Spring Boot 启动流程深度解析:从源码到实践
Spring Boot 启动流程深度解析:从源码到实践
Spring Boot 作为 Java 开发的主流框架,其 “约定大于配置” 的理念极大提升了开发效率。本文将从源码层面深入解析 Spring Boot 的启动流程,并通过代码示例展示其工作机制。
一、Spring Boot 启动的入口点
Spring Boot 应用的启动通常从一个包含main方法的类开始:
@SpringBootApplication
public class MyApplication {public static void main(String[] args) {SpringApplication.run(MyApplication.class, args);}
}
@SpringBootApplication是一个组合注解,包含:
@SpringBootConfiguration:声明这是一个配置类@EnableAutoConfiguration:启用自动装配机制@ComponentScan:启用组件扫描
SpringApplication.run()是启动的核心方法,下面我们深入分析其执行流程。
二、SpringApplication 的初始化
当调用SpringApplication.run()时,首先会创建SpringApplication实例:
public static ConfigurableApplicationContext run(Class<?> primarySource, String... args) {return run(new Class<?>[] { primarySource }, args);
}public static ConfigurableApplicationContext run(Class<?>[] primarySources, String[] args) {return new SpringApplication(primarySources).run(args);
}
SpringApplication的构造函数会执行一系列初始化操作:
public SpringApplication(Class<?>... primarySources) {this(null, primarySources);
}@SuppressWarnings({ "unchecked", "rawtypes" })
public SpringApplication(ResourceLoader resourceLoader, Class<?>... primarySources) {this.resourceLoader = resourceLoader;Assert.notNull(primarySources, "PrimarySources must not be null");this.primarySources = new LinkedHashSet<>(Arrays.asList(primarySources));// 1. 判断应用类型(REACTIVE, SERVLET, NONE)this.webApplicationType = WebApplicationType.deduceFromClasspath();// 2. 设置ApplicationContextInitializersetInitializers((Collection) getSpringFactoriesInstances(ApplicationContextInitializer.class));// 3. 设置ApplicationListenersetListeners((Collection) getSpringFactoriesInstances(ApplicationListener.class));// 4. 推断主应用类(包含main方法的类)this.mainApplicationClass = deduceMainApplicationClass();
}
关键步骤解析:
- 应用类型推断:根据类路径中的类推断应用类型(WebFlux、Servlet 或普通应用)
- 初始化器加载:从
META-INF/spring.factories加载ApplicationContextInitializer - 监听器加载:从
META-INF/spring.factories加载ApplicationListener - 主应用类推断:通过栈轨迹找到包含 main 方法的类
三、SpringApplication.run () 方法解析
run()方法是 Spring Boot 启动的核心逻辑:
public ConfigurableApplicationContext run(String... args) {long startTime = System.nanoTime();DefaultBootstrapContext bootstrapContext = createBootstrapContext();ConfigurableApplicationContext context = null;configureHeadlessProperty();// 1. 获取并启动所有SpringApplicationRunListenerSpringApplicationRunListeners listeners = getRunListeners(args);listeners.starting(bootstrapContext, this.mainApplicationClass);try {ApplicationArguments applicationArguments = new DefaultApplicationArguments(args);// 2. 准备环境ConfigurableEnvironment environment = prepareEnvironment(listeners, bootstrapContext, applicationArguments);configureIgnoreBeanInfo(environment);// 3. 打印BannerBanner printedBanner = printBanner(environment);// 4. 创建ApplicationContextcontext = createApplicationContext();context.setApplicationStartup(this.applicationStartup);// 5. 准备上下文prepareContext(bootstrapContext, context, environment, listeners, applicationArguments, printedBanner);// 6. 刷新上下文refreshContext(context);// 7. 刷新后的处理afterRefresh(context, applicationArguments);// 8. 计时结束Duration timeTakenToStartup = Duration.ofNanos(System.nanoTime() - startTime);if (this.logStartupInfo) {new StartupInfoLogger(this.mainApplicationClass).logStarted(getApplicationLog(), timeTakenToStartup);}// 9. 发布应用启动完成事件listeners.started(context, timeTakenToStartup);// 10. 调用所有RunnerscallRunners(context, applicationArguments);}catch (Throwable ex) {handleRunFailure(context, ex, listeners);throw new IllegalStateException(ex);}try {// 11. 发布应用就绪事件Duration timeTakenToReady = Duration.ofNanos(System.nanoTime() - startTime);listeners.ready(context, timeTakenToReady);}catch (Throwable ex) {if (context != null) {context.close();throw new IllegalStateException("Error handling failed", ex);}throw new IllegalStateException(ex);}return context;
}
四、关键步骤详解
1. 启动监听器(SpringApplicationRunListeners)
Spring Boot 通过事件机制在启动的不同阶段发布事件,允许开发者介入:
private SpringApplicationRunListeners getRunListeners(String[] args) {Class<?>[] types = new Class<?>[] { SpringApplication.class, String[].class };return new SpringApplicationRunListeners(logger,getSpringFactoriesInstances(SpringApplicationRunListener.class, types, this, args),this.applicationStartup);
}
核心监听器包括EventPublishingRunListener,它会发布一系列事件:
ApplicationStartingEventApplicationEnvironmentPreparedEventApplicationContextInitializedEventApplicationPreparedEventApplicationStartedEventApplicationReadyEvent
2. 环境准备(prepareEnvironment)
环境准备包括创建并配置ConfigurableEnvironment,加载属性源和配置文件:
private ConfigurableEnvironment prepareEnvironment(SpringApplicationRunListeners listeners,DefaultBootstrapContext bootstrapContext,ApplicationArguments applicationArguments) {// 创建环境(Web或非Web)ConfigurableEnvironment environment = getOrCreateEnvironment();// 配置环境configureEnvironment(environment, applicationArguments.getSourceArgs());ConfigurationPropertySources.attach(environment);// 发布环境准备事件listeners.environmentPrepared(bootstrapContext, environment);bindToSpringApplication(environment);if (!this.isCustomEnvironment) {environment = new EnvironmentConverter(getClassLoader()).convertEnvironmentIfNecessary(environment,deduceEnvironmentClass());}ConfigurationPropertySources.attach(environment);return environment;
}
3. 创建应用上下文(createApplicationContext)
根据应用类型创建不同的ApplicationContext:
protected ConfigurableApplicationContext createApplicationContext() {Class<?> contextClass = this.applicationContextClass;if (contextClass == null) {try {// 根据应用类型选择上下文类switch (this.webApplicationType) {case SERVLET:contextClass = Class.forName(DEFAULT_SERVLET_WEB_CONTEXT_CLASS);break;case REACTIVE:contextClass = Class.forName(DEFAULT_REACTIVE_WEB_CONTEXT_CLASS);break;default:contextClass = Class.forName(DEFAULT_CONTEXT_CLASS);}}catch (ClassNotFoundException ex) {throw new IllegalStateException("Unable to create a default ApplicationContext, please specify an ApplicationContextClass", ex);}}return (ConfigurableApplicationContext) BeanUtils.instantiateClass(contextClass);
}
4. 准备应用上下文(prepareContext)
对创建好的上下文进行初始化,包括设置环境、加载源、应用初始化器等:
private void prepareContext(DefaultBootstrapContext bootstrapContext, ConfigurableApplicationContext context,ConfigurableEnvironment environment, SpringApplicationRunListeners listeners,ApplicationArguments applicationArguments, Banner printedBanner) {// 设置环境context.setEnvironment(environment);// 应用上下文后置处理器postProcessApplicationContext(context);// 应用初始化器applyInitializers(context);// 发布上下文初始化事件listeners.contextPrepared(context);if (this.logStartupInfo) {logStartupInfo(context.getParent() == null);logStartupProfileInfo(context);}// 添加资源加载器和主应用类ConfigurableListableBeanFactory beanFactory = context.getBeanFactory();beanFactory.registerSingleton("springApplicationArguments", applicationArguments);if (printedBanner != null) {beanFactory.registerSingleton("springBootBanner", printedBanner);}// 设置懒加载if (beanFactory instanceof DefaultListableBeanFactory) {((DefaultListableBeanFactory) beanFactory).setAllowBeanDefinitionOverriding(this.allowBeanDefinitionOverriding);}// 加载源(主配置类)Set<Object> sources = getAllSources();Assert.notEmpty(sources, "Sources must not be empty");load(context, sources.toArray(new Object[0]));// 发布上下文加载完成事件listeners.contextLoaded(context);
}
5. 刷新应用上下文(refreshContext)
调用AbstractApplicationContext.refresh()方法,这是 Spring 框架的核心逻辑,包括:
- BeanFactory 的创建与初始化
- BeanDefinition 的加载
- Bean 的创建与依赖注入
- 自动装配的处理
- 事件发布器的初始化
- 嵌入式 Servlet 容器的启动(如果是 Web 应用)
private void refreshContext(ConfigurableApplicationContext context) {if (this.registerShutdownHook) {try {context.registerShutdownHook();}catch (AccessControlException ex) {// Not allowed in some environments.}}refresh(context);
}protected void refresh(ConfigurableApplicationContext context) {context.refresh();
}
6. 调用应用 Runner(callRunners)
启动完成后,调用所有实现了ApplicationRunner或CommandLineRunner的 Bean:
private void callRunners(ApplicationContext context, ApplicationArguments args) {List<Object> runners = new ArrayList<>();// 添加所有ApplicationRunnerrunners.addAll(context.getBeansOfType(ApplicationRunner.class).values());// 添加所有CommandLineRunnerrunners.addAll(context.getBeansOfType(CommandLineRunner.class).values());// 排序AnnotationAwareOrderComparator.sort(runners);// 调用for (Object runner : new LinkedHashSet<>(runners)) {if (runner instanceof ApplicationRunner) {callRunner((ApplicationRunner) runner, args);}if (runner instanceof CommandLineRunner) {callRunner((CommandLineRunner) runner, args);}}
}
五、自定义启动流程
开发者可以通过以下方式自定义启动流程:
1. 添加 ApplicationContextInitializer
public class CustomApplicationContextInitializer implements ApplicationContextInitializer<ConfigurableApplicationContext> {@Overridepublic void initialize(ConfigurableApplicationContext applicationContext) {// 在上下文刷新前执行自定义逻辑System.out.println("Custom initializer called");}
}
注册方式:
@SpringBootApplication
public class MyApplication {public static void main(String[] args) {SpringApplication app = new SpringApplication(MyApplication.class);app.addInitializers(new CustomApplicationContextInitializer());app.run(args);}
}
2. 添加 ApplicationListener
public class CustomApplicationListener implements ApplicationListener<ApplicationStartedEvent> {@Overridepublic void onApplicationEvent(ApplicationStartedEvent event) {// 应用启动后执行System.out.println("Application started!");}
}
注册方式:
@SpringBootApplication
public class MyApplication {public static void main(String[] args) {SpringApplication app = new SpringApplication(MyApplication.class);app.addListeners(new CustomApplicationListener());app.run(args);}
}
3. 实现 CommandLineRunner 或 ApplicationRunner
@Component
public class CustomCommandLineRunner implements CommandLineRunner {@Overridepublic void run(String... args) throws Exception {System.out.println("CommandLineRunner executed with args: " + Arrays.toString(args));}
}
六、启动流程总结
Spring Boot 的启动流程可以概括为以下关键步骤:
- 初始化 SpringApplication:
- 推断应用类型
- 加载初始化器和监听器
- 确定主应用类
- 执行 run () 方法:
- 发布启动事件
- 准备环境(加载配置属性)
- 创建应用上下文
- 准备上下文(设置环境、加载源)
- 刷新上下文(核心 Spring 容器初始化)
- 调用应用 Runner
- 发布就绪事件
- 核心机制:
- 事件机制:通过
ApplicationEvent和ApplicationListener实现 - 自动装配:在上下文刷新阶段通过
@EnableAutoConfiguration触发 - 条件注解:控制配置类的加载条件
- 事件机制:通过
理解 Spring Boot 的启动流程有助于开发者更好地调试应用、自定义启动行为,以及解决启动过程中遇到的问题。通过扩展点(Initializers、Listeners、Runners),开发者可以在不修改核心代码的情况下介入启动流程,实现各种定制需求。
相关文章:

Spring Boot 启动流程深度解析:从源码到实践
Spring Boot 启动流程深度解析:从源码到实践 Spring Boot 作为 Java 开发的主流框架,其 “约定大于配置” 的理念极大提升了开发效率。本文将从源码层面深入解析 Spring Boot 的启动流程,并通过代码示例展示其工作机制。 一、Spring Boot 启…...
深度学习|pytorch基本运算-乘除法和幂运算
【1】引言 前序学习进程中,已经对pytorch张量数据的生成和广播做了详细探究,文章链接为: 深度学习|pytorch基本运算-CSDN博客 深度学习|pytorch基本运算-广播失效-CSDN博客 上述探索的内容还止步于张量的加减法,在此基础上&am…...

嵌入式通用集成电路卡市场潜力报告:物联网浪潮下的机遇与挑战剖析
一、嵌入式通用集成电路卡概述 嵌入式通用集成电路卡(Embedded Universal Integrated Circuit Card,简称 eUICC),是一种将传统 SIM 卡功能直接嵌入到设备主板上的芯片解决方案 。与传统可插拔式 SIM 卡不同,eUICC 采…...

4.2.4 Spark SQL 数据写入模式
在本节实战中,我们详细探讨了Spark SQL中数据写入的四种模式:ErrorIfExists、Append、Overwrite和Ignore。通过具体案例,我们演示了如何使用mode()方法结合SaveMode枚举类来控制数据写入行为。我们首先读取了一个JSON文件生成DataFrame&#…...
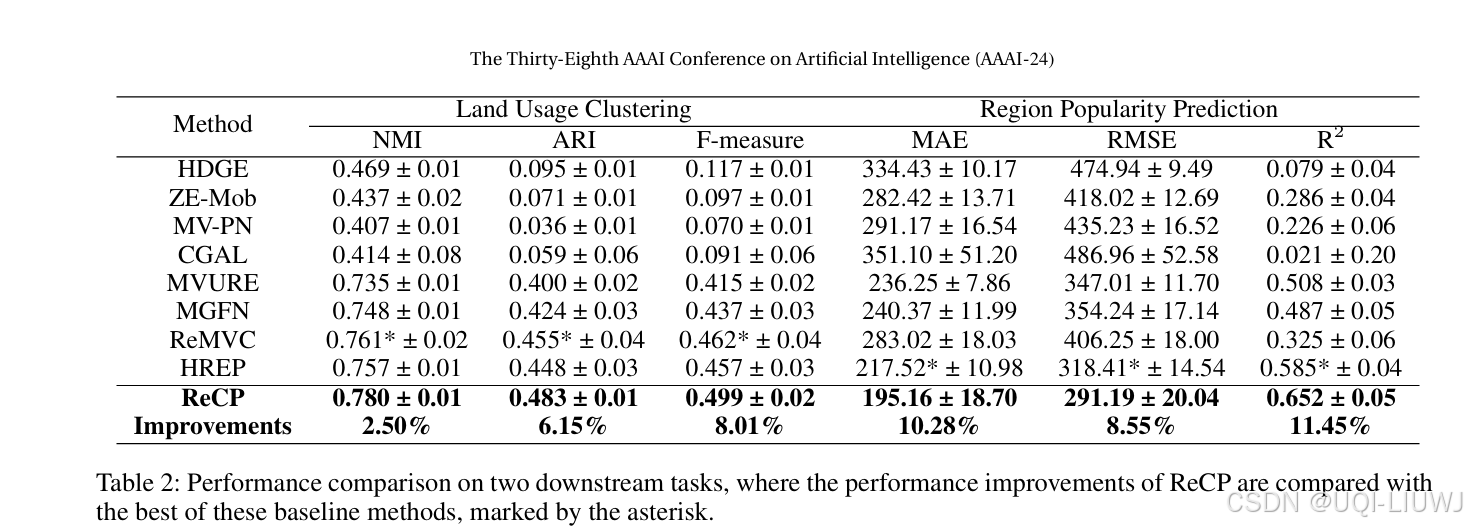
论文笔记: Urban Region Embedding via Multi-View Contrastive Prediction
AAAI 2024 1 INTRO 之前基于多视图的region embedding工作大多遵循相同的模式 单独的单视图表示多视图融合 但这种方法存在明显的局限性:忽略了不同视图之间的信息一致性 一个区域的多个视图所携带的信息是高度相关的,因此它们的表示应该是一致的如果能…...
)
Android 缓存应用冻结器(Cached Apps Freezer)
一、核心功能与原理 1. 功能概述 目标:通过冻结后台缓存应用的进程,减少其对 CPU、内存等系统资源的消耗,优化设备性能与续航。适用场景:针对行为不当的后台应用(如后台偷偷运行代码、占用 CPU)ÿ…...

初学者如何微调大模型?从0到1详解
本文将手把手带你从0到1,详细解析初学者如何微调大模型,让你也能驾驭这些强大的AI工具。 1. 什么是大模型微调? 想象一下,预训练大模型就像一位博览群书但缺乏专业知识的通才。它掌握了海量的通用知识,但可能无法完美…...

西瓜书第十一章——降维与度量学习
文章目录 降维与度量学习k近邻学习原理头歌实战-numpy实现KNNsklearn实现KNN 降维——多维缩放(Multidimensional Scaling, MDS,MDS)提出背景与原理重述1.**提出背景**2.**数学建模与原理推导**3.**关键推导步骤** Principal Component Analy…...
Portainer安装指南:多节点监控的docker管理面板-家庭云计算专家
背景 Portainer 是一个轻量级且功能强大的容器管理面板,专为 Docker 和 Kubernetes 环境设计。它通过直观的 Web 界面简化了容器的部署、管理和监控,即使是非技术用户也能轻松上手。Portainer 支持多节点管理,允许用户从一个中央控制台管理多…...

NanoGPT的BenchMarking.py
1.Benchmarking是一种评估和比较性能的过程。在深度学习领域,它通常涉及对模型的训练速度、推理速度、内存占用等指标进行测量,以便评估不同模型、不同硬件配置或者不同软件版本之间的性能差异。 例如,当你尝试比较两个不同架构的模型&#x…...

测试用例及黑盒测试方法
一、测试用例 1.1 基本要素 测试用例(Test Case)是为了实施测试而向被测试的系统提供的一组集合,这组集合包含:测试环境、操作步骤、测试数据、预期结果等4个主要要素。 1.1.1 测试环境 定义:测试执行所需的软硬件…...

CentOS 7 环境下部署 LAMP
在 CentOS 7 环境下部署 LAMP(Linux Apache MySQL 5.7 PHP 7.4) 环境的详细步骤如下: 1. 系统准备 1.1 更新系统 sudo yum update -y 1.2 安装依赖 sudo yum install -y gcc pcre pcre-devel zlib zlib-devel openssl openssl-devel e…...
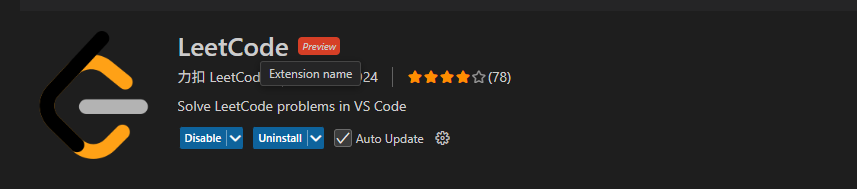
vscode实用配置
前端开发安装插件: 1.可以更好看的显示文件图标 2.用户快速打开文件 使用步骤:在html文件下右键点击 open with live server 即可 刷力扣: 安装这个插件 还需要安装node.js即可...

React 项目中封装 Excel 导入导出组件:技术分享与实践
文章目录 前言一、为什么需要封装 Excel 组件?二、技术选型三、核心实现1. 安装依赖2. 封装Excel导出3. 封装导入组件 (UploadExcel) 总结 前言 在 React 项目中,处理 Excel 文件的导入和导出是常见的业务需求。无论是导出报表数…...
)
【PhysUnits】15.1 引入P1后的加一特质(add1.rs)
一、源码 代码实现了类型系统中的"加一"操作(Add1 trait),用于在编译期进行数字的增量计算。 //! 加一操作特质实现 / Increment operation trait implementation //! //! 说明: //! 1. Z0、P1,、N1 1࿰…...

【2025CCF中国开源大会】RISC-V 开源生态的挑战与机遇分论坛重磅来袭!共探开源芯片未来
点击蓝字 关注我们 CCF Opensource Development Committee 开源浪潮正从软件席卷硬件领域,RISC-V作为全球瞩目的开源芯片架构,正在重塑计算生态的版图!相较于成熟的x86与ARM,RISC-V生态虽处爆发初期,却蕴藏着无限可能。…...
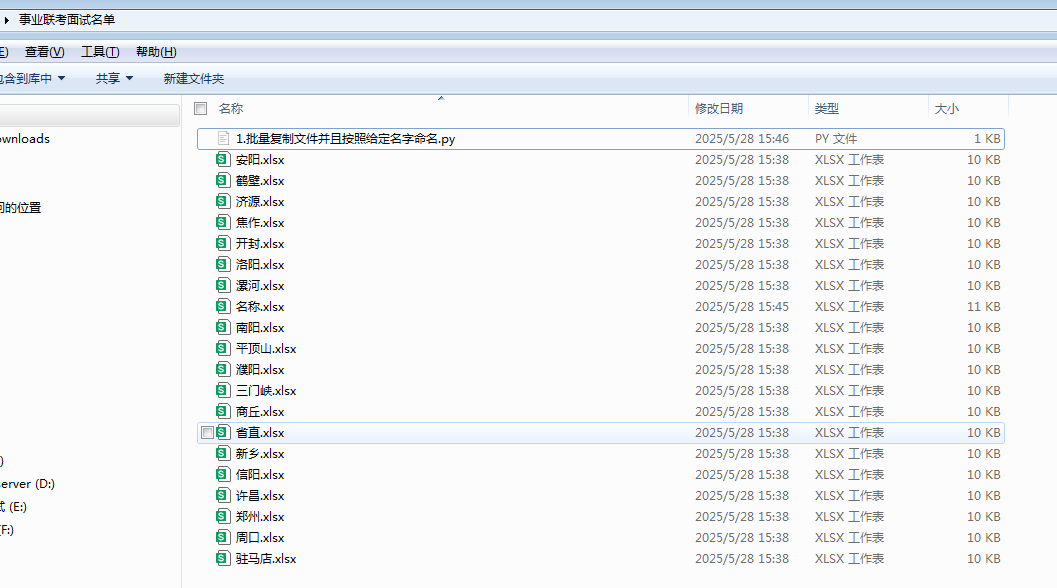
python完成批量复制Excel文件并根据另一个Excel文件中的名称重命名
import openpyxl import shutil import os # 原始文件路径 original_file "C:/Users/Administrator/Desktop/事业联考面试名单/郑州.xlsx" # 读取包含名称的Excel文件 # 修改为您的文件名 wb openpyxl.load_workbook( "C:/Users/Administrator/Desktop/事…...

Vue-2-前端框架Vue基础入门之二
文章目录 1 计算属性1.1 计算属性简介1.2 计算属性示例 2 侦听器2.1 简单的侦听器2.2 深度监听2.3 监听对象单个属性 3 vue-cli3.1 工程化的Vue项目3.2 Vue项目的运行流程 4 vue组件4.1 Vue组件的三个部分4.1.1 template4.1.2 script4.1.3 style 4.2 组件之间的关系4.2.1 使用组…...

CPT208 Human-Centric Computing 人机交互 Pt.7 交互和交互界面
文章目录 1. 界面隐喻(Interface metaphors)1.1 界面隐喻的应用方式1.2 界面隐喻的优缺点 2. 交互类型2.1 Instructing(指令式交互)2.2 Conversing(对话式交互)2.3 Manipulating(操作式交互&…...

ubuntu20.04.5-arm64版安装robotjs
ubuntu20.04.5arm上使用robotjs #ssh,可选 sudo apt update sudo apt install openssh-server sudo systemctl status ssh sudo systemctl enable ssh sudo systemctl enable --now ssh #防火墙相关,可选 sudo ufw allow ssh sudo ufw allow 2222/tc…...
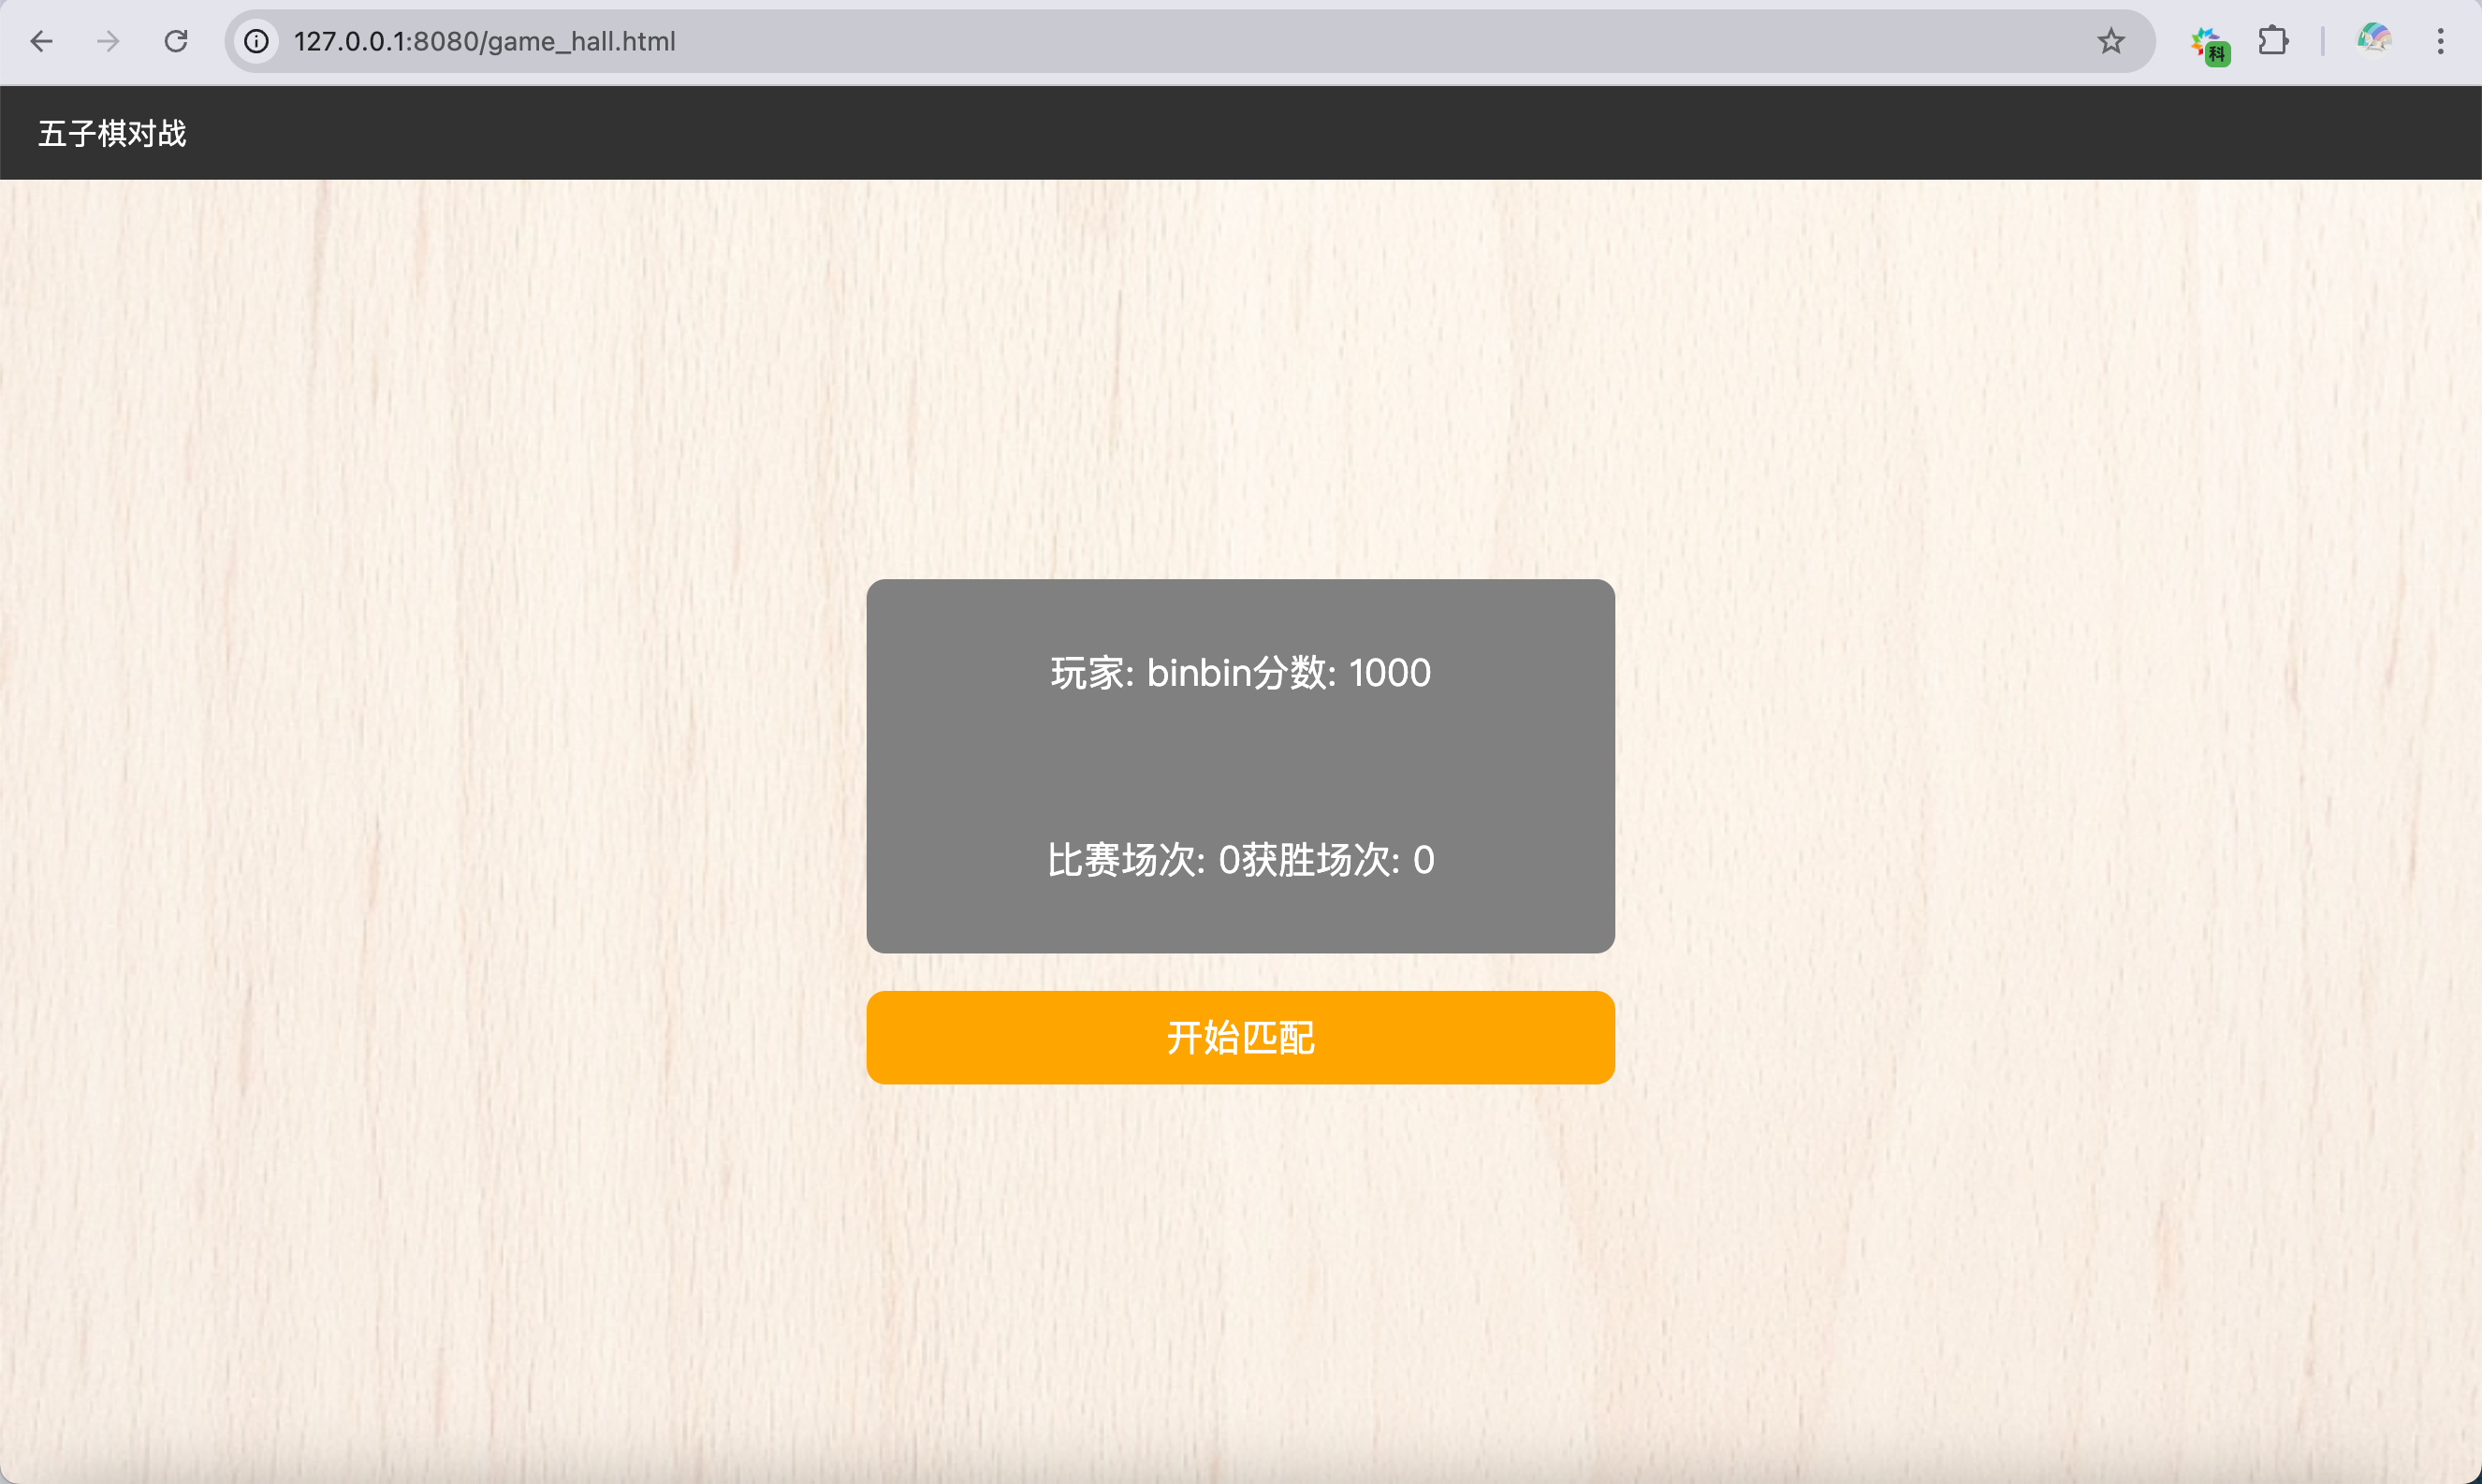
[网页五子棋][匹配模块]前后端交互接口(消息推送机制)、客户端开发(匹配页面、匹配功能)
让多个用户,在游戏大厅中能够进行匹配,系统会把实力相近的两个玩家凑成一桌,进行对战 约定前后端交互接口 消息推送机制 匹配这样的功能,也是依赖消息推送机制的 玩家 1 点击开始匹配按钮,就会告诉服务器࿱…...

【数据分析】Matplotlib+Pandas+Seaborn绘图
【数据分析】MatplotlibPandasSeaborn绘图 (一)Matplotlib绘图1.1 matplotlib绘图方式1: 状态接口1.2 matplotlib绘图方式2: 面向对象1.3 通过安斯科姆数据集, 说明可视化的重要性1.4 MatPlotlib绘图-单变量-直方图1.5 MatPlotlib绘图-双变量-散点图1.6 …...
NLP学习路线图(十五):TF-IDF(词频-逆文档频率)
在自然语言处理(NLP)的浩瀚宇宙中,TF-IDF(词频-逆文档频率) 犹如一颗恒星,虽古老却依然璀璨。当ChatGPT、BERT等大模型光芒四射时,TF-IDF作为传统方法的代表,其简洁性、高效性与可解…...
[Redis] Redis命令在Pycharm中的使用
初次学习,如有错误还请指正 目录 String命令 Hash命令 List命令 set命令 SortedSet命令 连接pycharm的过程见:[Redis] 在Linux中安装Redis并连接桌面客户端或Pycharm-CSDN博客 redis命令的使用见:[Redis] Redis命令(1…...

openpnp - 给M4x0.7mm的直油嘴加油的工具选择
文章目录 openpnp - 给M4x0.7mm的直油嘴加油的工具选择概述如果换上带卡口的M4x0.7直油嘴END openpnp - 给M4x0.7mm的直油嘴加油的工具选择 概述 X导轨用了一个HG15的滑块 滑块上的注油口的黄油嘴是M4x0.7mm的直油嘴。 外表面是6边形的柱子,没有可以卡住加油嘴工…...

Azure Devops 系列之三- vscode部署function app
Azure Function App 是 Microsoft Azure 提供的一项无服务器计算服务,它允许您运行事件驱动的应用程序,而无需管理底层基础架构。它使您能够执行代码来响应各种事件,例如 HTTP 请求、队列消息、计时器以及许多其他类型的触发器。 Azure Function App 的主要功能: 无服务器…...

EasyExcel复杂Excel导出
效果图展示 1、引入依赖 <!-- easyExcel --> <dependency><groupId>com.alibaba</groupId><artifactId>easyexcel</artifactId><version>4.0.2</version> </dependency>2、实体类 import com.alibaba.excel.annotatio…...
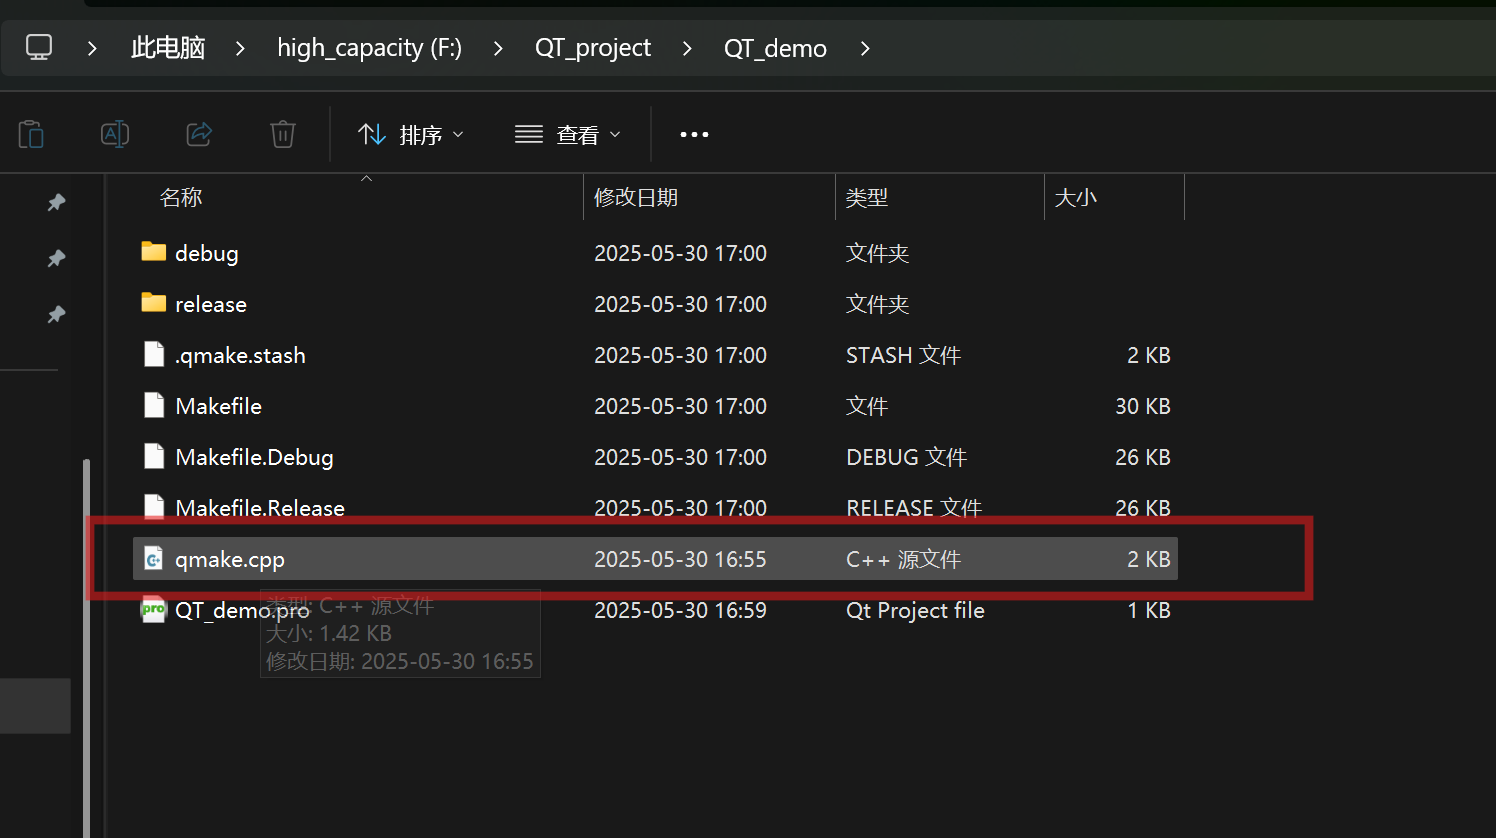
1,QT的编译教程
目录 整体流程: 1,新建project文件 2,编写源代码 3,打开QT的命令行窗口 4,生成工程文件(QT_demo.pro) 5,生成Make file 6,编译工程 7,运行编译好的可执行文件 整体流程: 1,新建project文件 新建文本文件,后缀改为.cpp 2,编写源代码...
)
C++基础算法————深度优先搜索(DFS)
一、DFS算法原理 (一)基本思想 深度优先搜索(Depth-First Search,DFS)是一种用于遍历或搜索树或图的算法。它从一个起始节点开始,沿着一个方向尽可能深入地探索,直到无法继续为止,然后回溯到上一个节点,继续探索其他方向。这一过程可以用递归或栈结构来实现。 (二…...

React 第五十节 Router 中useNavigationType的使用详细介绍
前言 useNavigationType 是 React Router v6 提供的一个钩子,用于确定用户如何导航到当前页面。 它提供了关于导航类型的洞察,有助于优化用户体验和实现特定导航行为。 一、useNavigationType 核心用途 1.1、检测导航方式: 判断用户是通过…...