鸿蒙网络数据传输案例实战
一、案例效果截图

二、案例运用到的知识点
- 核心知识点
- 网络连接管理:connection模块
- HTTP数据请求:http模块
- RPC数据请求:rcp模块
- 文件管理能力:fileIo模块、fileUri模块
- 其他知识点
- ArkTS 语言基础
- V2版状态管理:@ComponentV2/@Local
- 渲染控制:if/ForEach
- 自定义组件和组件生命周期
- 自定义构建函数@Builder
- @Extend:定义扩展样式
- Navigation:导航组件
- 内置组件:Stack/TabBar/Progress/Image/Column/Row/Text/TextInput/Button/Line/Blank/SymbolGlyph
- 常量与资源分类的访问
- MVVM模式
三、代码结构
├──entry/src/main/ets        // 代码区
│  ├──common
│  │  └──network
│  │     ├──ConnectionUtils.ets
│  │     ├──HttpUtils.ets
│  │     └──RCPUtils.ets
│  ├──entryability
│  │  └──EntryAbility.ets    // 程序入口类
│  ├──pages
│  │  ├──LoginPage.ets       // 登录页面
│  │  └──MainPage.ets        // 主页面
│  ├──view
│  │  ├──Home.ets            // 首页组件
│  │  └──Setting.ets         // 我的组件
│  └──viewmodel
│     ├──ResponseData
│     │  ├──ListInfo.ets     // 列表数据模型
│     │  ├──ResponseData.ets // 响应结果模型
│     │  └──Value.ets        // 响应数据模型
│     ├──ItemData.ets        // 页面数据模型
│     └──MainViewModel.ets   // 绑定数据到组件并提供接口
└──entry/src/main/resources  ├──base│  ├──element             // 尺寸、颜色、文字等资源文件存放位置│  ├──media               // 媒体资源存放位置│  └──profile             // 页面配置文件存放位置└──rawfile                // 本地html代码存放位置
四、公共文件与资源
本案例涉及到的资源文件如下:
- entry/src/main/resources/base/element/string.json
- entry/src/main/resources/base/element/float.json
- entry/src/main/resources/base/element/color.json
其他资源请到源码中获取。
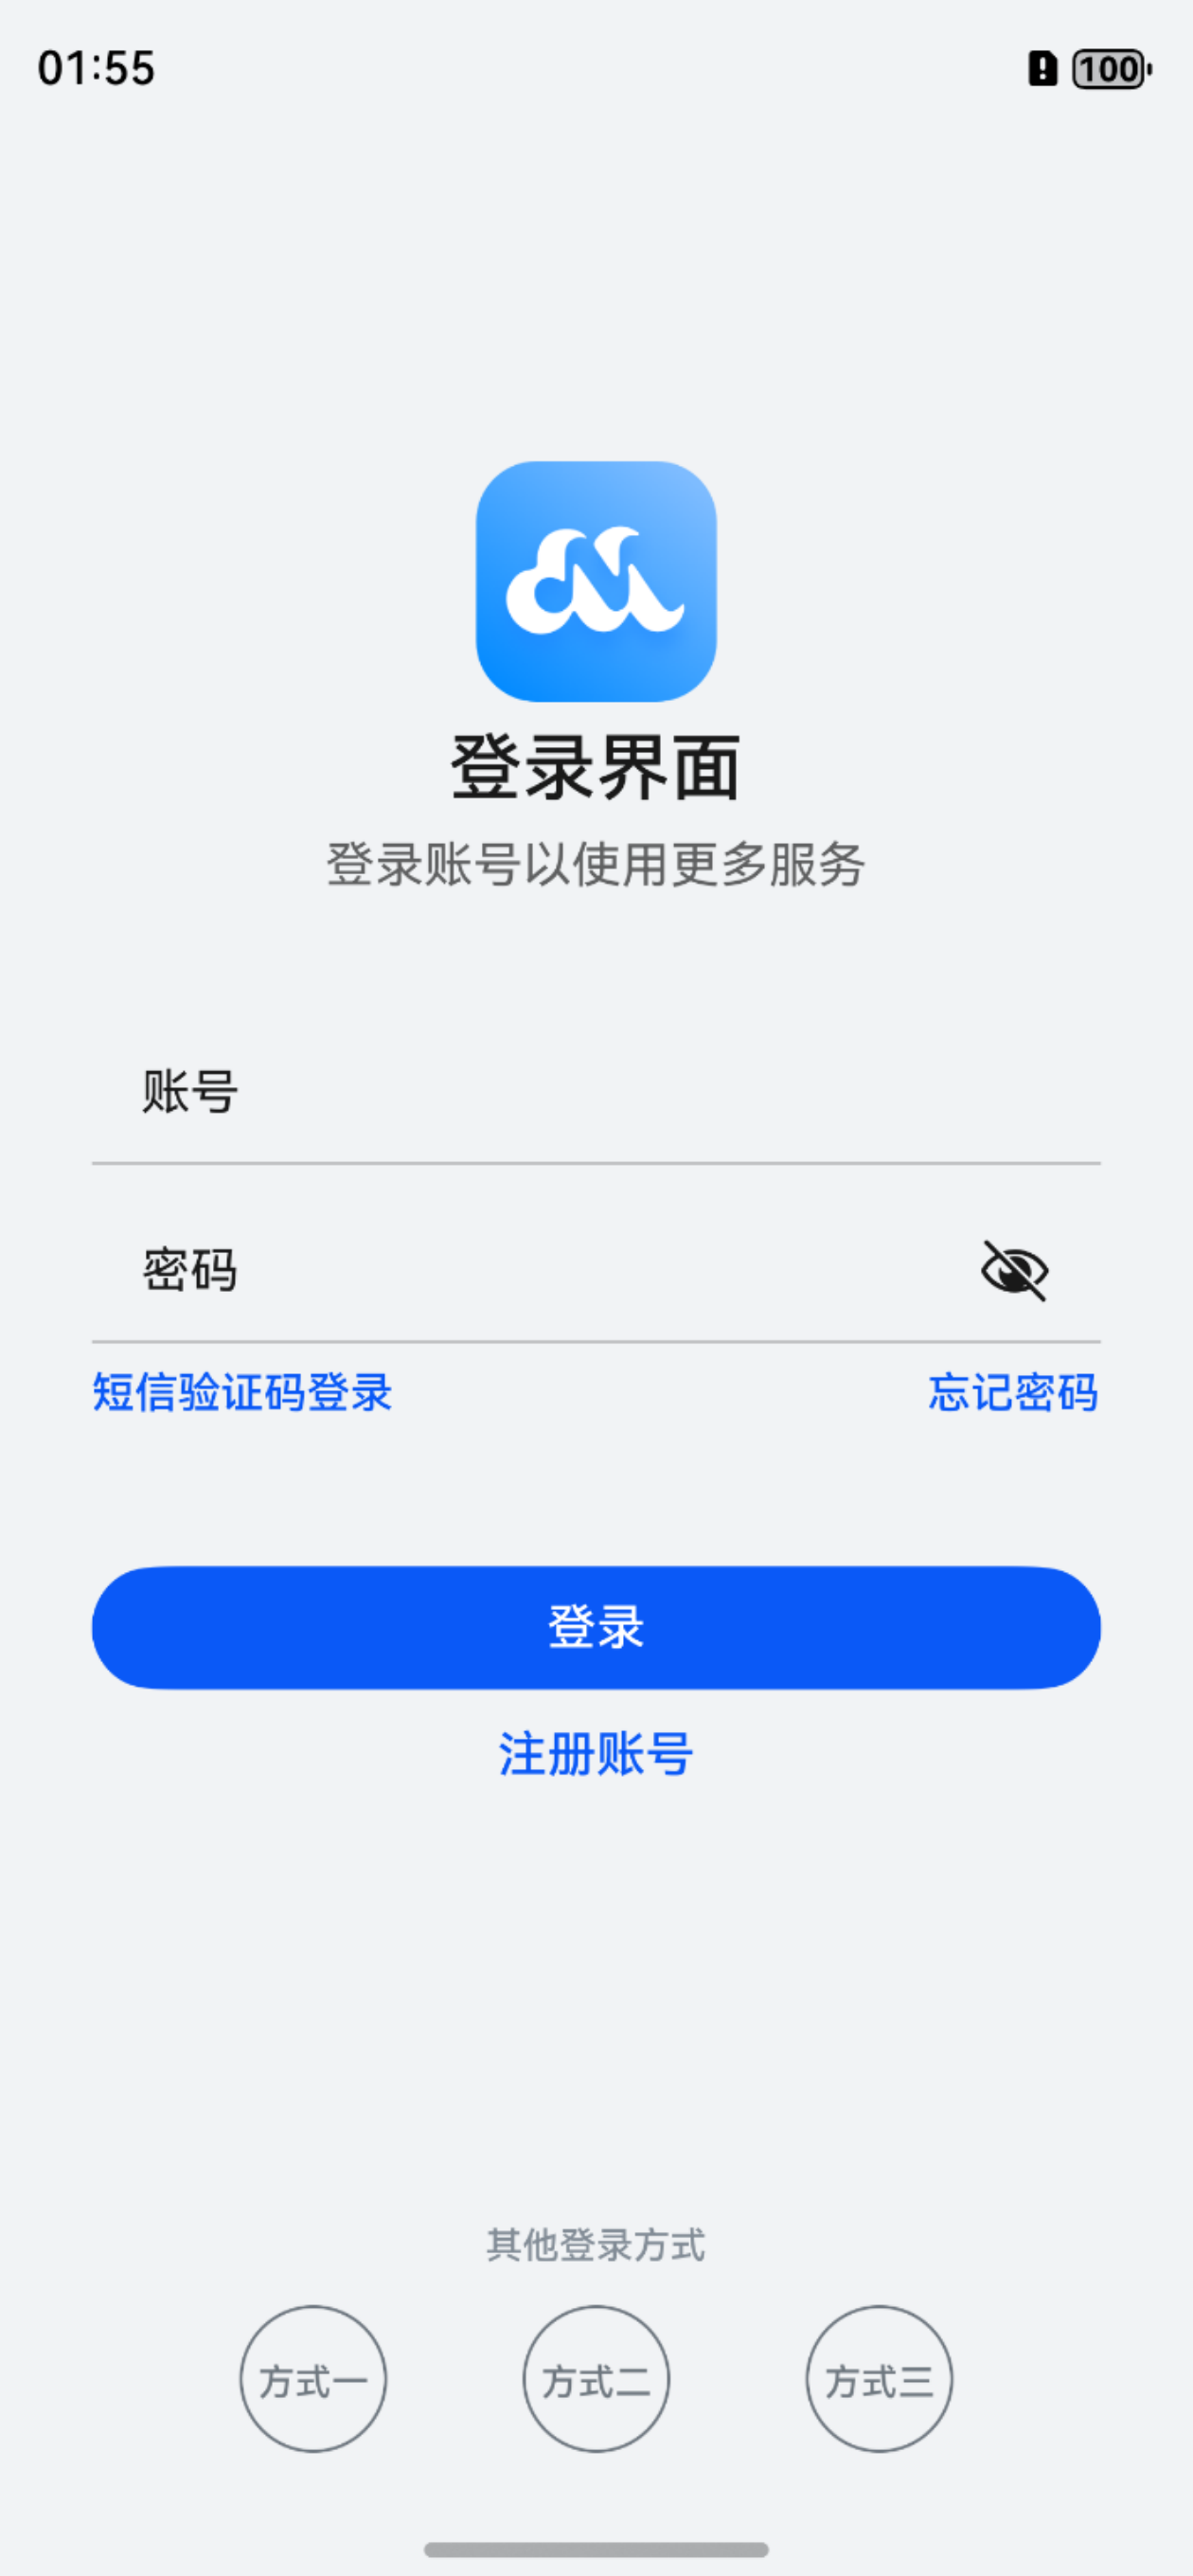
五、网络状态监听的实现
我们希望在首页登录时,不仅对账号和密码进行非空校验,还需要对网络状态进行检测。在没有网络的情况下,拒绝登录操作,并提示用户网络未连接。
- 网络连接工具类
首先,我们可以在ets目录下创建一个common文件夹,用于存放一些公共能力。
随后在common文件夹下创建network文件夹,并创建ConnectionUtils.ets文件(网络连接工具类),我们将在该文件实现网络状态监听的功能。
// entry/src/main/ets/common/network/ConnectionUtils.ets
import { connection } from '@kit.NetworkKit'
import { BusinessError } from '@kit.BasicServicesKit'
import { promptAction } from '@kit.ArkUI'
import { hilog } from '@kit.PerformanceAnalysisKit'const TAG: string = 'ConnectionUtils'/*** ConnectionUtils 提供网络监听功能。*/
export class ConnectionUtils {netConnection = connection.createNetConnection()/*** 检查网络是否连接的方法。*/async isNetworkConnected(): Promise<boolean> {let result: boolean = falseawait connection.getDefaultNet().then(async (data: connection.NetHandle) => {if (data.netId === 0) {hilog.info(0x0000, TAG, '网络错误')return}await connection.getNetCapabilities(data).then((data: connection.NetCapabilities) => {let bearerTypes: Set<number> = new Set(data.bearerTypes)let bearerTypesNum = Array.from(bearerTypes.values())for (let item of bearerTypesNum) {if (item === 0) {result = truehilog.info(0x0000, TAG, '蜂窝网络')} else if (item === 1) {result = truehilog.info(0x0000, TAG, 'WiFi')} else if (item === 3) {result = truehilog.info(0x0000, TAG, '以太网')} else {return}}})})return result}/*** 打开网络注册的方法。*/openRegister() {this.netConnection.register((error: BusinessError) => {hilog.info(0x0000, TAG, JSON.stringify(error))})}/*** 监听网络状态变化的方法。*/registerNetworkAvailableStatus() {this.netConnection.on('netAvailable', () => {promptAction.showToast({message: $r('app.string.Network_Available'),duration: 2000})})this.netConnection.on('netUnavailable', () => {promptAction.showToast({message: $r('app.string.Network_Unavailable'),duration: 2000})})this.netConnection.on('netLost', () => {promptAction.showToast({message: $r('app.string.Network_Lost'),duration: 2000})})}/*** 关闭网络注册的方法。*/closeRegister() {this.netConnection.unregister((error: BusinessError) => {hilog.info(0x0000, TAG, JSON.stringify(error))})}
}export default new ConnectionUtils()
关键代码说明:
- 实现是否有网络的校验,需要使用@kit.NetworkKit的connection模块,首先我们定义一个名为isNetworkConnected()的方法用于判断是否有网络连接,所以该函数应该返回一个布尔值。而具体的方法实现,需要使用connection模块提供的connection.getDefaultNet()方法,该方法可以获取到当前连接网络的信息,同时也可以判断是否有网络连接。connection模块还提供了connection.getNetCapabilities()方法,可以获取当前网络的具体信息,包括网络类型、网络具体能力等。
- 监听网络状态的registerNetworkAvailableStatus()方法中,我们主要通过模块提供的on('netAvailable')、on('netUnavailable')和on('netLost')三个方法,分别监听网络可用、网络不可用、网络丢失三种状态,并在监听到网络状态改变时,弹窗提醒用户。
- 添加访问权限
在实现网络连接工具类的封装前,首先需要申请权限,在entry/src/main目录下的module.json5中,添加网络访问权限和网络信息查看权限。
{"module": {// ..."requestPermissions": [{"name": "ohos.permission.INTERNET","reason": "$string:Internet","usedScene": {"abilities": ["EntryAbility"],"when": "inuse"}},{"name": "ohos.permission.GET_NETWORK_INFO","reason": "$string:network_info","usedScene": {"abilities": ["EntryAbility"],"when": "inuse"}}]}
}- 登录页面实现监听逻辑
// entry/src/main/ets/pages/LoginPage.ets
import { promptAction } from '@kit.ArkUI'
import ConnectionUtils from '../common/network/ConnectionUtils'@Extend(TextInput)
function inputStyle() {.placeholderColor($r('sys.color.font_primary')).height('45vp').fontSize('18fp').backgroundColor('#F1F3F5').width('328vp').margin({ top: 12 })
}@Extend(Line)
function lineStyle() {.width('328vp').height('1vp').backgroundColor($r('sys.color.font_fourth'))
}@Extend(Text)
function blueTextStyle() {.fontColor($r('sys.color.brand')).fontSize('14fp').fontWeight(FontWeight.Medium)
}@Entry
@Component
struct LoginPage {@State account: string = ''@State password: string = ''@State isShowProgress: boolean = falseprivate timeOutId: number = -1pathStack: NavPathStack = new NavPathStack()@BuilderimageButton(src: Resource) {Button({ type: ButtonType.Circle, stateEffect: true }) {Image(src)}.height('48vp').width('48vp').backgroundColor('#F1F3F5')}login(result: boolean): void {if (this.account === '' || this.password === '') {promptAction.showToast({message: $r('app.string.input_empty_tips')})} else {this.isShowProgress = trueif (this.timeOutId === -1) {this.timeOutId = setTimeout(async () => {this.isShowProgress = falsethis.timeOutId = -1if (result) {this.pathStack.pushPathByName('MainPage', null)} else {promptAction.showToast({message: $r('app.string.Network_Lost')})}}, 2000)}}}aboutToDisappear() {clearTimeout(this.timeOutId)this.timeOutId = -1}build() {Navigation(this.pathStack) {Column() {Image($r('app.media.logo')).width('78vp').height('78vp').margin({top: '150vp',bottom: '8vp'})Text($r('app.string.login_page')).fontSize('24fp').fontWeight(FontWeight.Medium).fontColor($r('sys.color.font_primary'))Text($r('app.string.login_more')).fontSize('16fp').fontColor($r('sys.color.font_secondary')).margin({bottom: '30vp',top: '8vp'})TextInput({ placeholder: $r('app.string.account') }).maxLength(11).type(InputType.Number).inputStyle().onChange((value: string) => {this.account = value})Line().lineStyle()TextInput({ placeholder: $r('app.string.password') }).maxLength(8).type(InputType.Password).inputStyle().onChange((value: string) => {this.password = value})Line().lineStyle()Row() {Text($r('app.string.message_login')).blueTextStyle()Text($r('app.string.forgot_password')).blueTextStyle()}.justifyContent(FlexAlign.SpaceBetween).width('328vp').margin({ top: '8vp' })Button($r('app.string.login'), { type: ButtonType.Capsule }).width('328vp').height('40vp').fontSize('16fp').fontWeight(FontWeight.Medium).backgroundColor($r('sys.color.brand')).margin({top: '48vp',bottom: '12vp'}).onClick(async () => {await ConnectionUtils.isNetworkConnected().then((value) => {this.login(value)})})Text($r('app.string.register_account')).fontColor($r('sys.color.brand')).fontSize('16fp').fontWeight(FontWeight.Medium)if (this.isShowProgress) {LoadingProgress().color($r('sys.color.font_primary')).width('30vp').height('30vp').margin({ top: '20vp' })}Blank()Text($r('app.string.other_login_method')).fontColor('#838D97').fontSize('12fp').fontWeight(FontWeight.Medium).margin({top: '50vp',bottom: '12vp'})Row({ space: 44 }) {this.imageButton($r('app.media.login_method1'))this.imageButton($r('app.media.login_method2'))this.imageButton($r('app.media.login_method3'))}.margin({ bottom: '16vp' })}.height('100%').width('100%').padding({left: '12vp',right: '12vp',bottom: '24vp'})}.backgroundColor('#F1F3F5').width('100%').height('100%').hideTitleBar(true).hideToolBar(true)}
}
关键代码说明:
- ConnectionUtils.isNetworkConnected(),检查网络连接情况。
- login(result: boolean): void {...},登录按钮点击的回调方法。
- if (result) { this.pathStack.pushPathByName('MainPage', null) },当网络连接正常(result值为true)时,跳转到MainPage页面。
六、使用HTTP请求网络数据
完成了网络状态的校验后,接下来需要进行网络请求了。我们可以通过@kit.NetworkKit中的http模块,完成网络请求的实现。
- 页面路由
本案例通过Navigation组件实现登录页到主要页的跳转,路由配置如下:
// entry/src/main/resources/base/profile/route_map.json
{"routerMap": [{"name": "MainPage","pageSourceFile": "src/main/ets/pages/MainPage.ets","buildFunction": "MainPageBuilder","data": {"description" : "this is mainPage"}}]
}
引用配置文件的设置:
// entry/src/main/module.json5
{"module": {//..."routerMap": "$profile:route_map"
}- MainPage首页
// entry/src/main/ets/pages/MainPage.ets
import Home from '../view/Home'
import Setting from '../view/Setting'@Builder
export function MainPageBuilder() {MainPage()
}@Component
export struct MainPage {@State currentIndex: number = 0private tabsController: TabsController = new TabsController()@BuildertabBuilder(title: Resource, index: number, selectedImg: Resource) {Column() {SymbolGlyph(selectedImg).fontSize('24fp').renderingStrategy(SymbolRenderingStrategy.MULTIPLE_OPACITY).symbolEffect(new BounceSymbolEffect(EffectScope.WHOLE, EffectDirection.UP),this.currentIndex === index ? true : false).fontColor(this.currentIndex === index ? ['#0a59f7'] : ['#66000000'])Text(title).margin({ top: '4vp' }).fontSize('10fp').fontWeight(500).fontColor(this.currentIndex === index ? '#0a59f7' : '#66000000')}.backgroundColor('#F1F3F5').justifyContent(FlexAlign.Center).height('56vp').width('100%').onClick(() => {this.currentIndex = indexthis.tabsController.changeIndex(this.currentIndex)})}build() {NavDestination() {Tabs({barPosition: BarPosition.End,controller: this.tabsController}) {TabContent() {Home()}.padding({left: '12vp',right: '12vp'}).backgroundColor('#F1F3F5').tabBar(this.tabBuilder($r('app.string.Tab_Bar_One'), 0, $r('sys.symbol.house_fill')))TabContent() {Setting()}.padding({left: '12vp',right: '12vp'}).backgroundColor('#F1F3F5').tabBar(this.tabBuilder($r('app.string.Tab_Bar_Two'), 1, $r('sys.symbol.person_crop_circle_fill_1')))}.margin({ bottom: '64vp' }).width('100%').height('100%').barHeight('80vp').barMode(BarMode.Fixed).onChange((index: number) => {this.currentIndex = index})}.height('100%').hideTitleBar(true).backgroundColor('#F1F3F5')}
}
关键代码说明:
- TabContent() { Home() },第一个tab页面内容为Home组件。
- TabContent() { Setting() },第二个tab页面内容为Setting组件。
- 实现HTTP工具类
首先,我们可以继续在network文件夹下,创建一个HttpUtils.ets文件(HTTP工具类),我们将在该文件中实现关于HTTP网络请求的主要功能。
简单分析一下该工具类需要完成的主要功能:
- 使用HTTP发起get请求,获取一张箭头图片并保存在沙箱路径中,并返回其沙箱路径对应的uri,以便使用箭头图片作为首页列表的布局元素。
- 使用HTTP发起post请求,获取官网中的图片与文本信息,并将其封装在实体类数组中,以便将这些信息作为首页列表的布局元素。
具体代码如下:
// entry/src/main/ets/common/network/HttpUtils.ets
import { http } from '@kit.NetworkKit'
import { fileIo, fileUri } from '@kit.CoreFileKit'
import { hilog } from '@kit.PerformanceAnalysisKit'
import ResponseData from '../../viewmodel/ResponseData/ResponseData'
import ListInfo from '../../viewmodel/ResponseData/ListInfo'const TAG: string = 'HttpUtils'
const IMAGE_URL: string = 'https://developer.huawei.com/system/modules/' +'org.opencms.portal.template.core/' +'resources/harmony/img/jiantou_right.svg'
const RESOURCE_URL: string = 'https://svc-drcn.developer.huawei.com/' +'community/servlet/consumer' +'/partnerActivityService/v1/developer/activity/terminalActivities/list'/*** 头部信息类。*/
class Header {contentType: stringconstructor(contentType: string) {this.contentType = contentType}
}/*** HttpUtils 提供通过 HTTP 访问网络的能力。*/
export class HttpUtils {httpRequest: http.HttpRequestconstructor() {this.httpRequest = http.createHttp()}/*** 通过 HTTP 发起 GET 请求的方法。*/async getHttpRequest(cacheDir: string): Promise<string> {let responsePictureUri: string = ''await this.httpRequest.request(IMAGE_URL, { method: http.RequestMethod.GET }).then((data: http.HttpResponse) => {let filePath = cacheDir + '/test.svg'let file = fileIo.openSync(filePath, fileIo.OpenMode.CREATE | fileIo.OpenMode.READ_WRITE)responsePictureUri = fileUri.getUriFromPath(filePath)fileIo.writeSync(file.fd, data.result as ArrayBuffer)fileIo.closeSync(file.fd)})return responsePictureUri}/*** 通过 HTTP 发起 POST 请求的方法。*/async postHttpRequest(): Promise<ListInfo[]> {let responseData: Array<ListInfo> = []await this.httpRequest.request(RESOURCE_URL,{method: http.RequestMethod.POST, extraData: {'status': '1','belong': '1','language': 'cn','needTop': 1,'displayChannel': [1, 3],'count': 4,'pagestart': 1,'type': '1,4,5,6'},header: new Header('application/jsoncharset=UTF-8')}).then((data: http.HttpResponse) => {let result: ResponseData = JSON.parse(data.result as string)responseData = result.value.list}).catch((err: Error) => {hilog.info(0x0000, TAG, JSON.stringify(err))})return responseData}/*** 销毁 httpRequest 的方法。*/destroyHttpRequest() {this.httpRequest.destroy()}
}
关键代码说明:
- 通过http模块提供的createHttp()方法获取一个HttpRequest对象,HttpRequest类是发起HTTP请求的关键,其中包括request()、requestInStream()、destroy()、on()和off()方法。所以我们封装一个名为HttpUtils的类,并为其添加一个对象httpRequest,并在构造方法中使用createHttp()方法为其赋值,以便后续封装的get请求和post请求能方便的使用到该对象。
- 成功获取到HttpRequest对象并通过构造方法为对象属性httpRequest赋值后,我们将基于该对象属性实现HTTP请求方法的封装,首先是get请求,主要通过request()方法实现,参数主要包括请求的url,发起请求可选参数HttpRequestOptions,以及一个回调函数。所以我们可以通过封装request()方法来实现通过get请求网络图片。
- 在成功使用request()方法发起get请求后,我们可以在回调函数中得到一个HttpResponse类型的对象data。为了将get请求得到的图片资源保存至沙箱路径,我们需要使用@kit.CoreFileKit提供的文件管理能力,创建一个test.svg并写入数据,并将其沙箱文件的uri返回以便后续使用。
- 与get请求一致,我们实现了一个名为postHttpRequest()的方法,其本质依旧是对request()方法的封装,传入网络请求地址url以及网络请求配置参数HttpRequestOptions,并在HttpRequestOptions中规定请求方法为post请求。
- 自定义Header类来为HttpRequestOptions补充响应头的参数,为其配置请求返回类型以及编码格式。
- 将request()方法的参数配置好后,我们可以通过回调函数中的HttpResponse类型的对象data获取返回值,由于响应头配置了返回类型为json格式,我们可以通过JSON.parse()将该json字符串转化为实体类,由于json字符串的结构较为复杂,所以我们需要自定义实体类用于承接,具体我们在viewmodel中创建了一个名为ResponseData的文件夹,并在其中封装了三个实体类,其中的属性名与json字符串中的命名保持一致。
- 在完成了实体类的封装之后,我们只需提取实体类对象中Value属性的list作为返回值。这样,我们就完成postHttpRequest()方法的实现。
- 在最后,我们使用完HttpRequest对象后,需要主动调用destroy()方法进行销毁,这里我们封装了一个destroyHttpRequest()方法来实现。
- 三个实体类
// entry/src/main/ets/viewmodel/ResponseData/ResponseData.ets
import Value from './Value'export default class ResponseData {public code: stringpublic value: Valueconstructor(code: string, value: Value) {this.code = codethis.value = value}
}
// entry/src/main/ets/viewmodel/ResponseData/Value.ets
import ListInfo from './ListInfo'export default class Value {public list: Array<ListInfo>constructor(list: Array<ListInfo>) {this.list = list}
}// entry/src/main/ets/viewmodel/ResponseData/ListInfo.ets
export default class ListInfo {public activityName: stringpublic theme: stringpublic indexNavPic: stringconstructor(activityName: string, theme: string, indexNavPic: string) {this.activityName = activityNamethis.theme = themethis.indexNavPic = indexNavPic}
}- Home组件
完成工具类的封装后,我们要通过使用工具类提供的方法来实现首页的列表部分。
// entry/src/main/ets/view/Home.ets
import { common } from '@kit.AbilityKit'
import mainViewModel from '../viewmodel/MainViewModel'
import ItemData from '../viewmodel/ItemData'
import ListInfo from '../viewmodel/ResponseData/ListInfo'
import { HttpUtils } from '../common/network/HttpUtils'/*** Home tab 内容*/
@Component
export default struct Home {@State httpGridItems: Array<ListInfo> = []@State pictureUri: string = ''private swiperController: SwiperController = new SwiperController()private context = getContext(this) as common.UIAbilityContextprivate applicationContext = this.context.getApplicationContext()private cacheDir = this.applicationContext.filesDirasync aboutToAppear(): Promise<void> {let httpUtil: HttpUtils = new HttpUtils()await httpUtil.postHttpRequest().then((value : Array<ListInfo>)=>{this.httpGridItems = value})await httpUtil.getHttpRequest(this.cacheDir).then((value: string) => {this.pictureUri = value})httpUtil.destroyHttpRequest()}build() {Column() {Text($r('app.string.mainPage_tabTitles_home')).width('100%').margin({top: '48vp',bottom: '12vp'}).fontWeight(700).fontSize('26fp')Scroll() {Column() {Swiper(this.swiperController) {ForEach(mainViewModel.getSwiperImages(), (img: Resource) => {Image(img).width('100%').borderRadius('16vp')}, (img: Resource) => JSON.stringify(img.id))}.autoPlay(true)Grid() {ForEach(mainViewModel.getFirstGridData(), (item: ItemData) => {GridItem() {Column() {Image(item.img).width('40vp').height('40vp')Text(item.title).fontSize('12fp').margin({ top: '4vp' })}}}, (item: ItemData) => JSON.stringify(item))}.backgroundImage($r('app.media.backgroundImage')).backgroundImageSize({width: '100%',height: '156vp'}).columnsTemplate('1fr 1fr 1fr 1fr').rowsTemplate('1fr 1fr').columnsGap('8vp').rowsGap('12vp').margin({ top: '12vp' }).padding({top: '12vp',bottom: '12vp'}).height('156vp').backgroundColor(Color.White).borderRadius('16vp')Text($r('app.string.home_list')).fontSize('18fp').fontWeight(700).width('100%').margin({top: '18vp',bottom: '8vp'})List() {ForEach(this.httpGridItems, (secondItem: ListInfo) => {ListItem() {Row() {Image(secondItem.indexNavPic).width('130vp').height('80vp').objectFit(ImageFit.TOP_START).borderRadius('8vp').margin({ right: '12vp' })Column() {Text(secondItem.activityName).width('190vp').textOverflow({ overflow: TextOverflow.Ellipsis }).maxLines(1).fontSize('16fp').fontWeight(FontWeight.Medium)Text(secondItem.theme).width('190vp').textOverflow({ overflow: TextOverflow.Ellipsis }).maxLines(2).margin({ top: '4vp' }).fontSize('12fp').fontColor('#99182431')Row() {Image(this.pictureUri).width('20vp').opacity(0.5)}.width('170vp').margin({ top: '10.5vp' }).justifyContent(FlexAlign.End).alignItems(VerticalAlign.Bottom)}.alignItems(HorizontalAlign.Start)}.width('100%').padding({left: '12vp',right: '12vp',top: '12vp',bottom: '12vp'}).justifyContent(FlexAlign.SpaceBetween)}.margin({ bottom: '8vp' }).borderRadius('16vp').backgroundColor('#ffffff').borderRadius($r('app.float.home_backgroundImage_borderRadius')).align(Alignment.TopStart).width('100%')}, (secondItem: ListInfo) => JSON.stringify(secondItem))}.scrollBar(BarState.Off).width('100%')}}.height('660vp').align(Alignment.TopStart).scrollBar(BarState.Off)}.justifyContent(FlexAlign.Start).alignItems(HorizontalAlign.Start).width('100%').height('100%')}
}
关键代码说明:
- 在Home组件的aboutToAppear生命周期中,通过postHttpRequest()和getHttpRequest()方法,分别获取到列表项中的文字以及图片数据源,和箭头图片的uri,并定义两个状态变量httpGridItems和pictureUri用来获取返回的结果。注意,使用完记得通过封装好的destroyHttpRequest()方法销毁HttpRequest对象。
- 获取到List所需资源并存储到状态变量后,我们通过List组件配合ForEach进行循环渲染,从而实现首页List的渲染。
七、使用RCP请求网络数据
我们不仅可以通过HTTP访问网络,还可以通过RCP发起网络请求实现相同的功能。
- 实现思路
同样的,我们可以在network目录下创建一个RCP工具类(RCPUtils.ets),在该文件下实现RCP请求网络数据的功能。
与HTTP工具类实现类似,我们也简单分析一下该工具类需要完成的主要功能:
- 使用RCP发起get请求,获取一张箭头图片并保存在沙箱路径中,并返回其沙箱路径对应的uri,以便使用箭头图片作为首页列表的布局元素。
- 使用RCP发起post请求,获取官网中的图片与文本信息,并将其封装在实体类数组中,以便将这些信息作为首页列表的布局元素。
- RCP工具类
// entry/src/main/ets/common/network/RCPUtils.ets
import { rcp } from '@kit.RemoteCommunicationKit'
import { fileIo, fileUri } from '@kit.CoreFileKit'
import { BusinessError } from '@kit.BasicServicesKit'
import { hilog } from '@kit.PerformanceAnalysisKit'
import ResponseData from '../../viewmodel/ResponseData/ResponseData'
import ListInfo from '../../viewmodel/ResponseData/ListInfo'const TAG: string = 'RCPUtils'
const list_source: string = 'https://svc-drcn.developer.huawei.com/' +'community/servlet/consumer/' +'partnerActivityService/v1/developer/activity/terminalActivities/list'/*** RCPUtils 提供通过 RCP 访问网络的能力*/
export class RCPUtils {rcpSession: rcp.Sessionconstructor() {this.rcpSession = rcp.createSession()}/*** 通过 RCP 发起 GET 请求的方法*/async getRCPRequest(cacheDir: string): Promise<string> {let responsePictureUri: string = ''await this.rcpSession.get('https://developer.huawei.com/system/' +'modules/org.opencms.portal.template.core/' +                       'resources/harmony/img/jiantou_right.svg').then((response) => {let filePath = cacheDir + '/test.svg'let file = fileIo.openSync(filePath, fileIo.OpenMode.CREATE | fileIo.OpenMode.READ_WRITE)responsePictureUri = fileUri.getUriFromPath(filePath)fileIo.writeSync(file.fd, response.body)fileIo.closeSync(file.fd)}).catch((err: BusinessError) => {hilog.error(0x0000, TAG, `错误: 错误代码 ${err.code}, 错误信息 ${JSON.stringify(err)}`)})return responsePictureUri}/*** 通过 RCP 发起 POST 请求的方法*/async postRCPRequest(): Promise<ListInfo[]> {let responseData: Array<ListInfo> = []let requestContent: rcp.RequestContent = {'status': '1','belong': '1','language': 'cn','needTop': 1,'displayChannel': [1, 3],'count': 4,'pagestart': 1,'type': '1,4,5,6'}await this.rcpSession.post(list_source, requestContent).then((response) => {let result: ResponseData = response.toJSON() as ResponseDataresponseData = result.value.list}).catch((err: BusinessError) => {hilog.error(0x0000, TAG, `错误: 错误代码 ${err.code}, 错误信息 ${JSON.stringify(err)}`)})return responseData}/*** 关闭 RCP 会话的方法*/destroySession() {this.rcpSession.close()}
}
关键代码说明:
- 通过@kit.RemoteCommunicationKit中的rcp模块来使用RCP能力。
- 在使用RCP发起网络请求前,首先需要获取一个Session类型的网络会话对象,在这里,我们将该类型的对象作为工具类的对象属性,并在构造方法中通过模块提供的rcp.createSession()方法为该对象属性赋值,以便后续方便的使用它。
- 完成了获取网络会话对象Session后,我们就可以进一步封装get请求和post请求获取网络信息的方法了。网络会话对象Session提供了get()方法与post()方法,可以用于实现发起get请求和post请求,具体实现与http模块类似。
- 最后,我们还需要像HTTP工具类一样,封装一个销毁会话对象的方法,需要使用会话对象的close()方法。
- 使用RCP工具类实现首页列表
完成RCP工具类的封装后,我们也可以通过RCP请求网络数据。
// entry/src/main/ets/view/Home.ets
import { rcp } from '@kit.RemoteCommunicationKit'
import { fileIo, fileUri } from '@kit.CoreFileKit'
import { BusinessError } from '@kit.BasicServicesKit'
import { hilog } from '@kit.PerformanceAnalysisKit'
import ResponseData from '../../viewmodel/ResponseData/ResponseData'
import ListInfo from '../../viewmodel/ResponseData/ListInfo'const TAG: string = 'RCPUtils'
const list_source: string = 'https://svc-drcn.developer.huawei.com/' +'community/servlet/consumer/' +'partnerActivityService/v1/developer/activity/terminalActivities/list'/*** RCPUtils 提供通过 RCP 访问网络的能力*/
export class RCPUtils {rcpSession: rcp.Sessionconstructor() {this.rcpSession = rcp.createSession()}/*** 通过 RCP 发起 GET 请求的方法*/async getRCPRequest(cacheDir: string): Promise<string> {let responsePictureUri: string = ''await this.rcpSession.get('https://developer.huawei.com/system/modules' +'/org.opencms.portal.template.core/' +'resources/harmony/img/jiantou_right.svg').then((response) => {let filePath = cacheDir + '/test.svg'let file = fileIo.openSync(filePath, fileIo.OpenMode.CREATE | fileIo.OpenMode.READ_WRITE)responsePictureUri = fileUri.getUriFromPath(filePath)fileIo.writeSync(file.fd, response.body)fileIo.closeSync(file.fd)}).catch((err: BusinessError) => {hilog.error(0x0000, TAG, `err: err code is ${err.code}, err message is ${JSON.stringify(err)}`)})return responsePictureUri}/*** 通过 RCP 发起 POST 请求的方法*/async postRCPRequest(): Promise<ListInfo[]> {let responseData: Array<ListInfo> = []let requestContent: rcp.RequestContent = {'status': '1','belong': '1','language': 'cn','needTop': 1,'displayChannel': [1, 3],'count': 4,'pagestart': 1,'type': '1,4,5,6'}await this.rcpSession.post(list_source, requestContent).then((response) => {let result: ResponseData = response.toJSON() as ResponseDataresponseData = result.value.list}).catch((err: BusinessError) => {hilog.error(0x0000, TAG, `err: err code is ${err.code}, err message is ${JSON.stringify(err)}`)})return responseData}/*** 关闭 RCP 会话的方法*/destroySession() {this.rcpSession.close()}
}
关键代码说明:
- 与HTTP实现渲染类似,只需要在生命周期aboutToAppear中,创建工具类对象,使用工具类封装好的方法发起请求并存储在在状态变量中,然后通过List渲染即可。
- 这里我们注释掉之前使用HTTP获取网络数据的部分,使用RCP实现相同的功能。
八、视频和代码资源
资源请访问:《HarmonyOS应用开发实战指南(进阶篇)》
相关文章:
鸿蒙网络数据传输案例实战
一、案例效果截图 二、案例运用到的知识点 核心知识点 网络连接管理:connection模块HTTP数据请求:http模块RPC数据请求:rcp模块文件管理能力:fileIo模块、fileUri模块 其他知识点 ArkTS 语言基础V2版状态管理:Comp…...
【JavaEE】-- 网络原理
文章目录 1. 网络发展史1.1 广域网1.2 局域网 2. 网络通信基础2.1 IP地址2.2 端口号2.3 认识协议2.4 五元组2.5 协议分层2.5.1 分层的作用2.5.2 OSI七层模型(教科书)2.5.3 TCP/IP五层(或四层)模型(工业中常用ÿ…...

1.RV1126-OPENCV 交叉编译
一.下载opencv-3.4.16.zip到自己想装的目录下 二.解压并且打开 opencv 目录 先用 unzip opencv-3.4.16.zip 来解压 opencv 的压缩包,并且进入 opencv 目录(cd opencv-3.4.16) 三. 修改 opencv 的 cmake 脚本的内容 先 cd platforms/linux 然后修改 arm-gnueabi.to…...
PySide6 GUI 学习笔记——常用类及控件使用方法(标签控件QLabel)
文章目录 标签控件QLabel及其应用举例标签控件QLabel的常用方法及信号应用举例Python 代码示例1Python 代码示例2 小结 标签控件QLabel及其应用举例 QLabel 是 PySide6.QtWidgets 模块中的一个控件,用于在界面上显示文本或图像。它常用于作为标签、提示信息或图片展…...

CSS (mask)实现服装动态换色:创意与技术的完美融合
在网页开发中,我们常常会遇到需要对图片元素进行个性化处理的需求,比如改变图片中特定部分的颜色。今天,我们就来探讨一种通过 CSS 和 JavaScript 结合,实现服装动态换色的有趣方法。 一、代码整体结构分析 上述代码构建了一个完…...

基于51单片机的音乐盒汽车喇叭调音量proteus仿真
地址: https://pan.baidu.com/s/1l3CSSMi4uMV5-XLefnKoSg 提取码:1234 仿真图: 芯片/模块的特点: AT89C52/AT89C51简介: AT89C51 是一款常用的 8 位单片机,由 Atmel 公司(现已被 Microchip 收…...

彻底理解Spring三级缓存机制
文章目录 前言一、Spring解决循环依赖时,为什么要使用三级缓存? 前言 Spring解决循环依赖的手段,是通过三级缓存: singletonObjects:存放所有生命周期完整的单例对象。(一级缓存)earlySingleto…...

MacOs 安装局域网 gitlab 记录
1、安装git brew install git > Downloading https://homebrew.bintray.com/bottles/git-2.7.0.el_capitan.bottle ######################################################################## 100.0% > Pouring git-2.7.0.el_capitan.bottle.tar.gz > Caveats The O…...
)
Flutter 与 Android 原生布局组件对照表(完整版)
本对照表用于帮助 Android 开发者快速理解 Flutter 中的布局组件与原生布局的关系。 📘 Flutter ↔ Android 布局组件对照表 Flutter WidgetAndroid View/Layout说明ContainerFrameLayout / View通用容器,可设置背景、边距、对齐等RowLinearLayout (hor…...
【产品经理从0到1】自媒体端产品设计
后台的定义 “后台” 与“前台”都是相对独立的平台,前台是服务于互联网用户的平台 ,后台主要是支撑前台页面内容、数据及对前台业务情况的统计分析的系统; 后台与前台的区别 第1:使用用户不同 前台用户:互联网用户…...

017搜索之深度优先DFS——算法备赛
深度优先搜索 如果说广度优先搜索是逐层扩散,那深度优先搜索就是一条道走到黑。 深度优先遍历是用递归实现的,预定一条顺序规则(如上下左右顺序) ,一直往第一个方向搜索直到走到尽头或不满足要求后返回上一个叉路口按…...

解决 maven编译项目-Fatal error compiling: 无效的目标发行版: 21 -> [Help 1]
目录 1. 问题描述 2. 排查思路 3. 设置-指定maven使用jdk21 4. 参考资料 1. 问题描述 在idea中使用maven编译时,在系统环境变量中已经设置了jdk为21,但是在执行mvn package时,确提示 Fatal error compiling: 无效的目标发行版: 21 -> [Help 1] [ERROR] Failed to e…...

Thinkphp6实现websocket
项目需要连接一台自动售货机,售货机要求两边用websocket连接,监听9997端口。本文实现了一个基于PHP的WebSocket服务器,用于连接自动售货机,支持start/stop/restart命令操作 1.新建文件 新建文件 /command/socket.php <?php namespace a…...
web-css
一.CSS选择器: 1.基础选择器 基本选择器: >.标签选择器 格式:标签名称{} >.类选择器(重) 格式:.class属性的值{} >.id选择器 格式:#id属性的值{} >.通配符(表示所有&am…...

关于 smali:2. 从 Java 到 Smali 的映射
一、对照 Java 代码与 Smali 代码差异 1.1 方法调用差异:Java vs Smali Java 方法分类: 方法类型Java 示例Smali 指令特点说明静态方法Utils.print("hi")invoke-static没有 this 指针实例方法obj.show()invoke-virtual有 this,虚…...
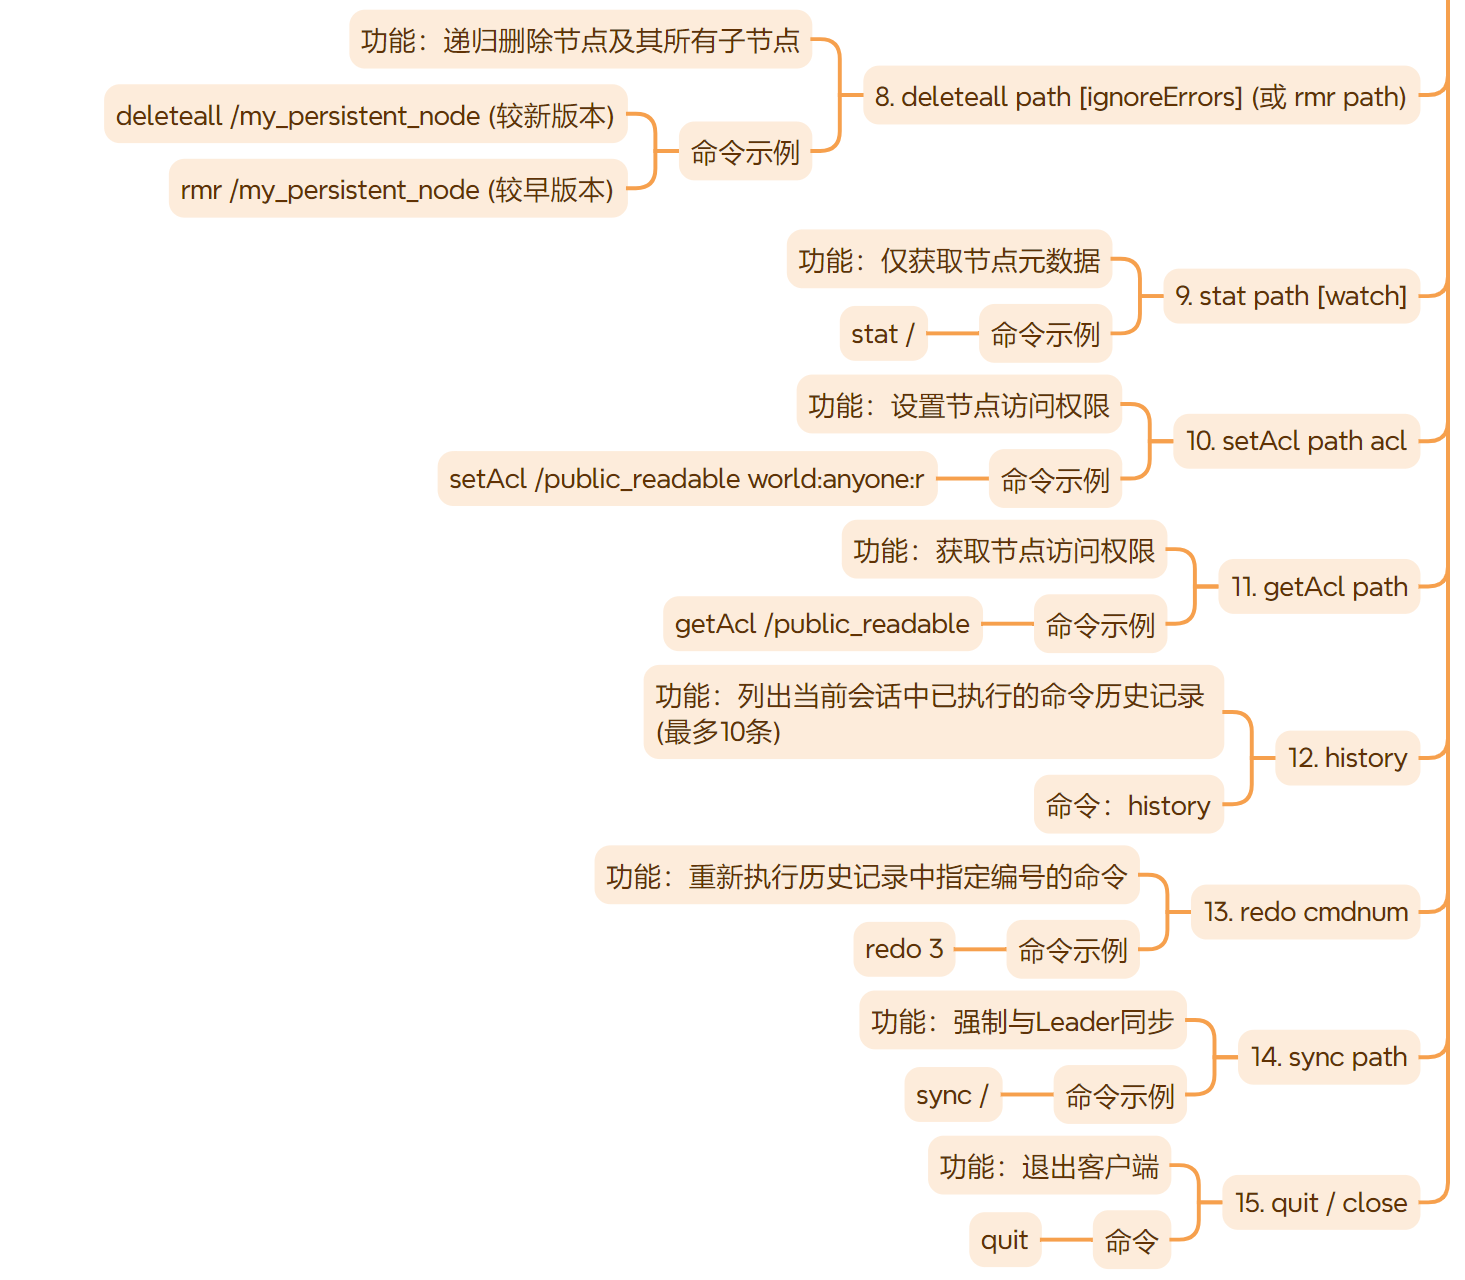
三、zookeeper 常用shell命令
作者:IvanCodes 日期:2025年5月28日 专栏:Zookeeper教程 ZooKeeper Shell (zkCli.sh) 是与ZooKeeper服务器交互的核心工具。本教程将详细介绍常用命令,并重点解析ZooKeeper数据节点 (ZNode) 的特性与分类。 思维导图 一、连接 Zo…...

分布式流处理与消息传递——Paxos Stream 算法详解
Java 实现 Paxos Stream 算法详解 一、Paxos Stream 核心设计 #mermaid-svg-cEJcmpaQwLXpEbx9 {font-family:"trebuchet ms",verdana,arial,sans-serif;font-size:16px;fill:#333;}#mermaid-svg-cEJcmpaQwLXpEbx9 .error-icon{fill:#552222;}#mermaid-svg-cEJcmpaQw…...

智变与重构:AI 赋能基础教育教学的范式转型研究报告
一、研究背景与核心价值 (一)技术驱动下的教育转型浪潮 在全球数字化转型加速的背景下,人工智能作为核心技术力量,正重塑基础教育生态。据《人工智能赋能未来教育研究报告》指出,我国教育数字化战略行动已推动超 70…...

平衡三进制
平衡三进制 - OI Wiki https://oi-wiki.org/math/balanced-ternary/ 上海市计算机学会竞赛平台 | YACS 方法一,先分离后进位 #include <iostream> using namespace std; int n, a[100], cnt; bool flag; int main() {cin >> n;if(n0){cout <<…...
、轻量级工具、在线开发平台、代码管理工具等))
针对Python开发的工具推荐及分析,涵盖集成开发环境(IDE)、轻量级工具、在线开发平台、代码管理工具等)
以下是针对Python开发的工具推荐及全面分析,涵盖集成开发环境(IDE)、轻量级工具、在线开发平台、代码管理工具等,结合不同场景和需求进行分类说明: 目录 一、集成开发环境(IDE) 1. PyCharm 2…...

960g轻薄本,把科技塞进巧克力盒子
朋友们,谁懂啊 最近本打工人被同事疯狂种草了一款 “巧克力盒子” 华硕灵耀 14 Air 骁龙版! 960g的重量比一瓶大可乐还轻 塞进通勤包毫无压力 连健身房的瑜伽垫都能多卷两圈 这台行走的生产力工具,到底有啥魔法? 今天就带…...
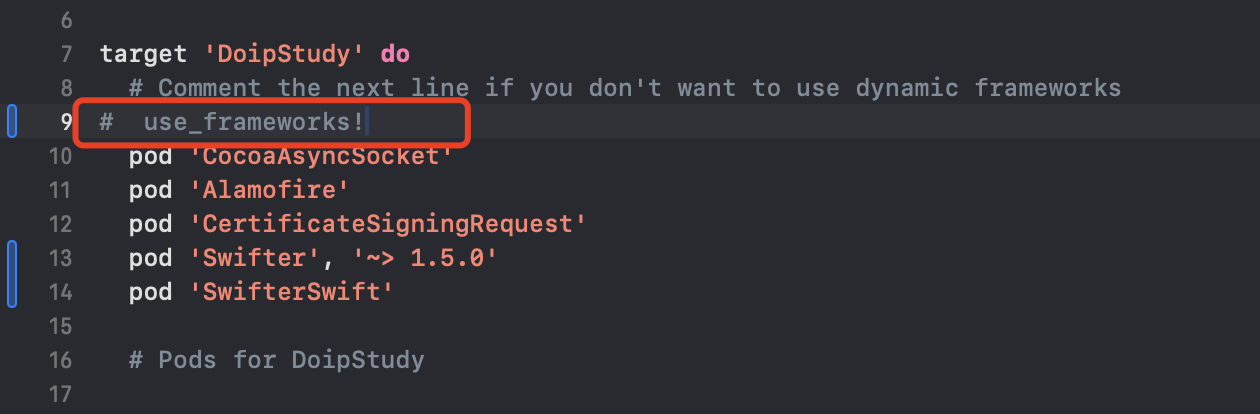
xcode 编译运行错误 Sandbox: rsync(29343) deny(1) file-write-create
解决方法 方法一:修改Targets -> Build Settings 中 ENABLE_USER_SCRIPT_SANDBOXING 设置 NO 方法二:项目使用cocoaPods进行三方管理 且 使用了 use_frameworks,把 use_frameworks 注释掉,然后重新自行pod install...

C# 基于 Windows 系统与 Visual Studio 2017 的 Messenger 消息传递机制详解:发布-订阅模式实现
🧑 博主简介:CSDN博客专家、CSDN平台优质创作者,高级开发工程师,数学专业,10年以上C/C, C#, Java等多种编程语言开发经验,拥有高级工程师证书;擅长C/C、C#等开发语言,熟悉Java常用开…...
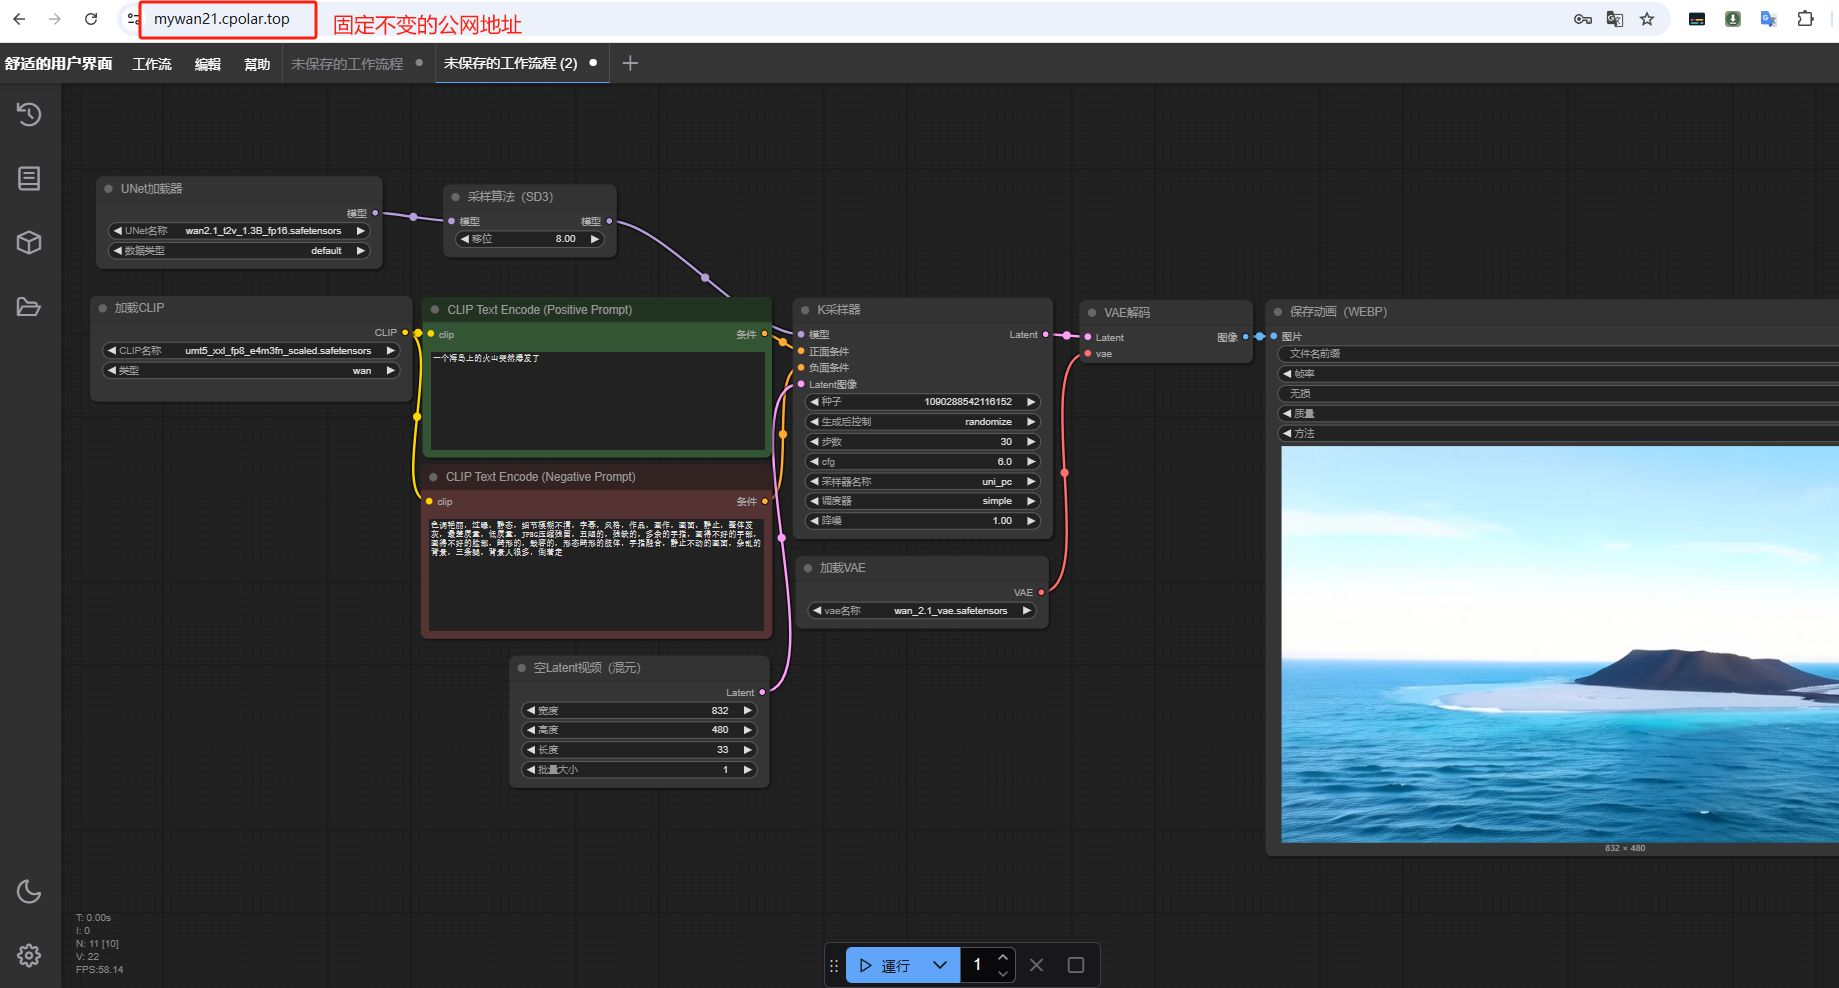
ComfyUI+阿里Wan2.1+内网穿透技术:本地AI视频生成系统搭建实战
文章目录 前言1.软件准备1.1 ComfyUI1.2 文本编码器1.3 VAE1.4 视频生成模型 2.整合配置3. 本地运行测试4. 公网使用Wan2.1模型生成视频4.1 创建远程连接公网地址 5. 固定远程访问公网地址总结 前言 各位技术爱好者,今天为您带来一组创新性的AI应用方案!…...

腾讯云开发者社区文章内容提取免费API接口教程
接口简介: 提取指定腾讯云开发者社区文章内容。本接口仅做内容提取,未经作者授权请勿转载。 请求地址: https://cn.apihz.cn/api/caiji/tencent.php 请求方式: POST或GET。 请求参数: 【名称】【参数】【必填】【说…...
利用海外代理IP,做Twitter2026年全球趋势数据分析
近年来,社交媒体趋势分析逐渐成为品牌监控、市场洞察和消费者研究的必备工具。而当谈到全球趋势数据分析,很多人都会立即想到 Twitter趋势(逼近连美丽国的总统都喜欢在上面发表自己的看法- -!!!)。Twitter趋势,即Twitt…...

OpenLayers 图形交互编辑
注:当前使用的是 ol 5.3.0 版本,天地图使用的key请到天地图官网申请,并替换为自己的key 图形要素包括属性信息和几何信息,在实际应用中,不仅需要修改样式信息,也需要修改图形几何信息。在OpenLayers中&…...
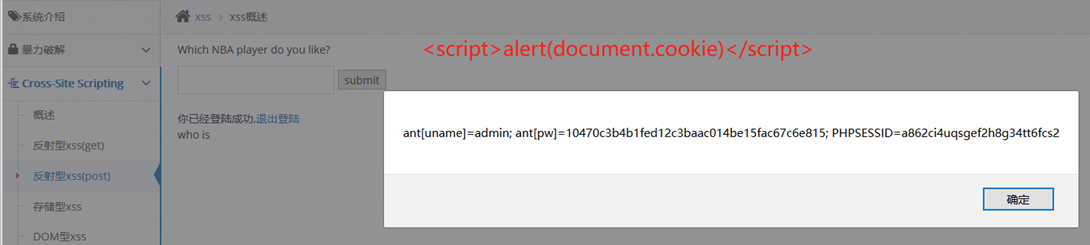
pikachu靶场通关笔记06 XSS关卡02-反射型POST
目录 一、XSS 二、反射型XSS 三、POST型报文 四、GET型与POST型区别 五、代码审计 五、渗透实战 1、渗透方法1 2、渗透方法2 本系列为通过《pikachu靶场通关笔记》的XSS关卡(共10关)渗透集合,通过对XSS关卡源码的代码审计找到XSS风险的真实原因&…...
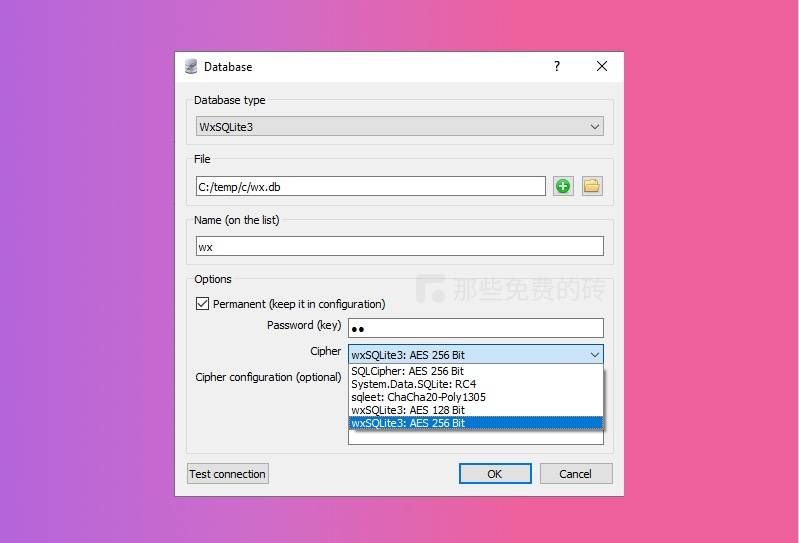
SQLiteStudio - 免费开源、轻量高效,跨平台的 SQLite 数据库管理工具,代替 Navicat for SQLite
管理 SQLite 数据库就用这款软件,真的早该摒弃破解和盗版的 Navicat 了。 SQLiteStudio 是一款专注于管理 SQLite 数据库 的桌面软件,用于浏览和编辑 SQLite 数据库文件。软件的作者是来自波兰的开发者 Paweł Salawa,他是一位拥有 20 年 Ja…...
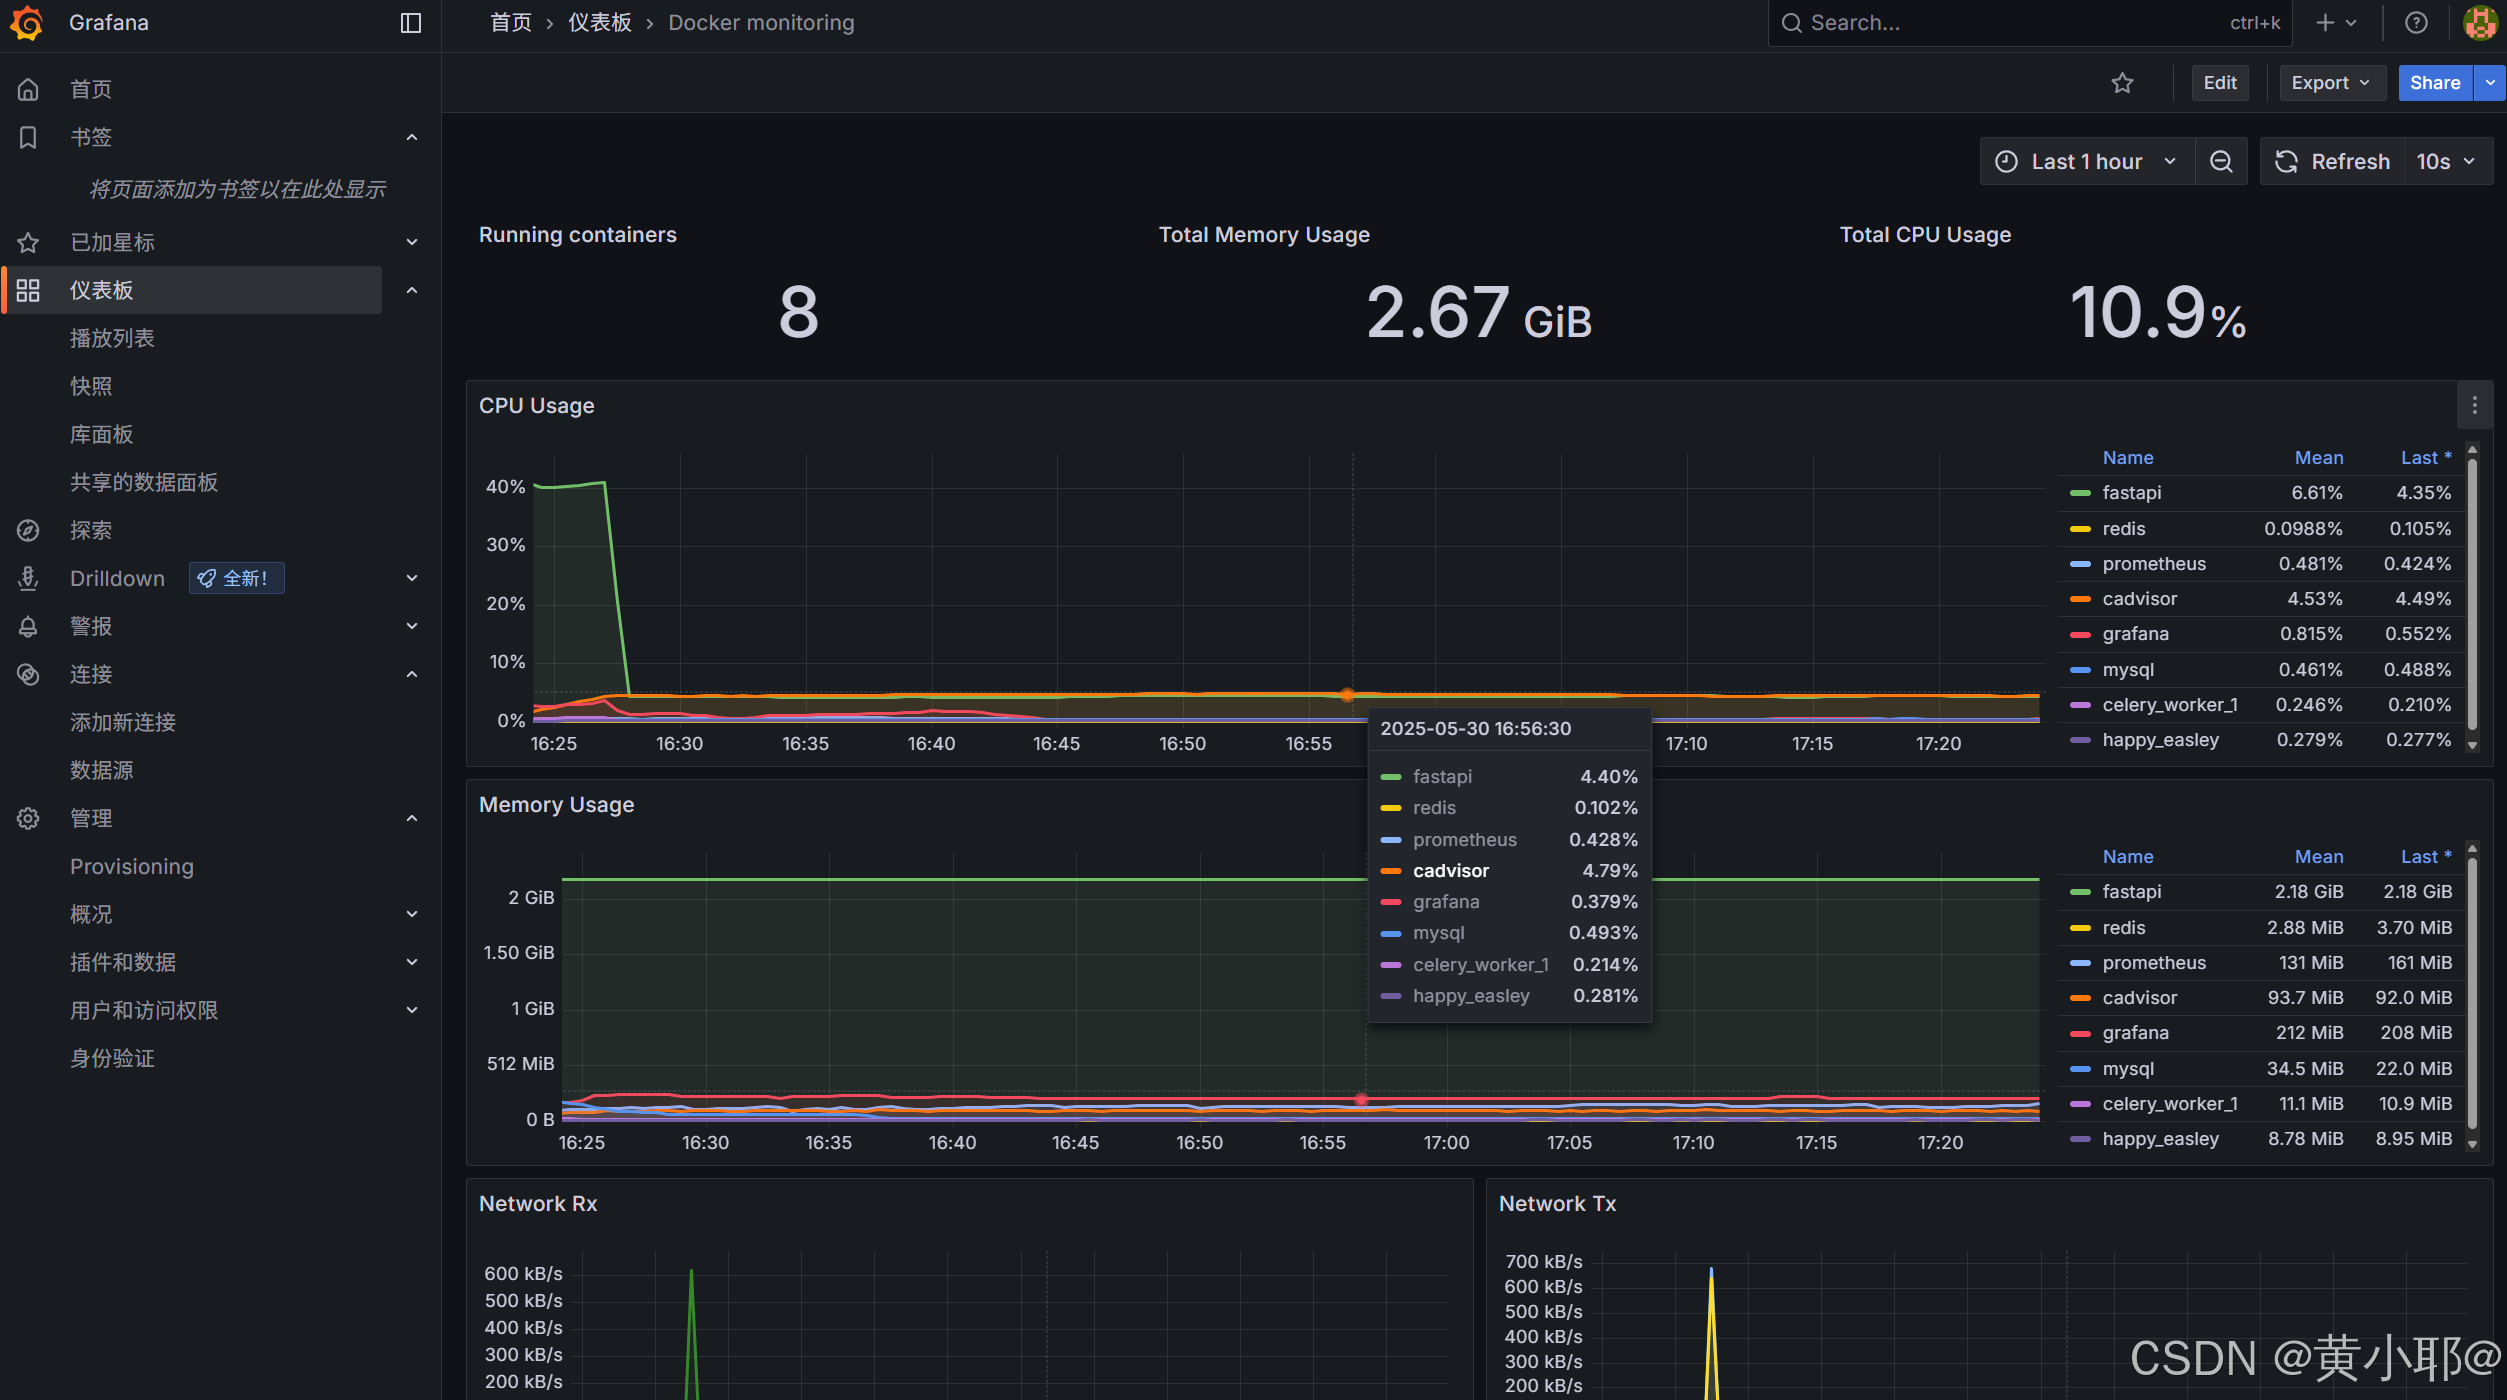
Prometheus + Grafana + Cadvisor:构建高效企业级服务监控体系
在现代软件开发和运维领域,容器化技术的应用越来越广泛,其中 Docker 作为最受欢迎的容器化解决方案之一,其容器的监控管理变得至关重要。本文将详细介绍如何使用 cadvisor、Prometheus 和 Grafana 来监控 Docker 容器的状态。 一、安装镜像 …...