【如何训练一个中英翻译模型】LSTM机器翻译模型部署之ncnn(python)(五)
系列文章
【如何训练一个中英翻译模型】LSTM机器翻译seq2seq字符编码(一)
【如何训练一个中英翻译模型】LSTM机器翻译模型训练与保存(二)
【如何训练一个中英翻译模型】LSTM机器翻译模型部署(三)
【如何训练一个中英翻译模型】LSTM机器翻译模型部署之onnx(python)(四)
目录
- 一、事情准备
- 二、模型转换
- 三、ncnn模型加载与推理(python版)
一、事情准备
这篇是在【如何训练一个中译英翻译器】LSTM机器翻译模型部署之onnx(python)(四)的基础上进行的,要用到文件为:
input_words.txt
target_words.txt
config.json
encoder_model-sim.onnx
decoder_model-sim.onnx
其中的onnx就是用来转为ncnn模型的,这里借助了onnx这个中间商,所以前面我们需要先通过onnxsim对模型进行simplify,要不然在模型转换时会出现op不支持的情况(模型转换不仅有中间商这个例子,目前还可以通过pnnx直接将pytorch模型转为ncnn,感兴趣的小伙伴可以去折腾下)
老规矩,先给出工具:
onnx2ncnn:https://github.com/Tencent/ncnn
netron:https://netron.app
二、模型转换
这里进行onnx转ncnn,通过命令进行转换
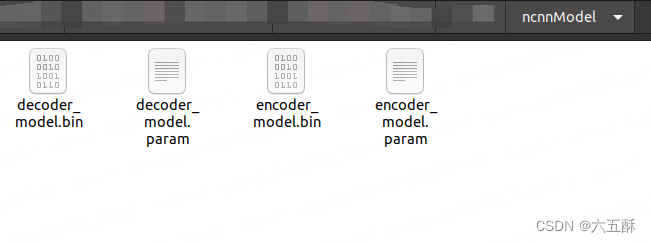
onnx2ncnn onnxModel/encoder_model-sim.onnx ncnnModel/encoder_model.param ncnnModel/encoder_model.bin
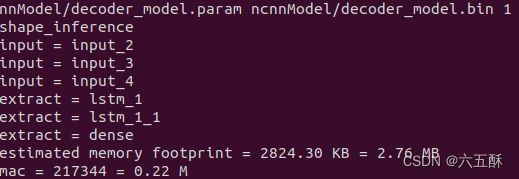
onnx2ncnn onnxModel/decoder_model-sim.onnx ncnnModel/decoder_model.param ncnnModel/decoder_model.bin
转换成功可以看到:
转换之后可以对模型进行优化,但是奇怪的是,这里优化了不起作用,去不了MemoryData这些没用的op
ncnnoptimize ncnnModel/encoder_model.param ncnnModel/encoder_model.bin ncnnModel/encoder_model.param ncnnModel/encoder_model.bin 1
ncnnoptimize ncnnModel/decoder_model.param ncnnModel/decoder_model.bin ncnnModel/decoder_model.param ncnnModel/decoder_model.bin 1
三、ncnn模型加载与推理(python版)
跟onnx的推理比较类似,就是函数的调用方法有点不同,这里先用python实现,验证下是否没问题,方面后面部署到其它端,比如android。
主要包括:模型加载、推理模型搭建跟模型推理,但要注意的是这里的输入输出名称需要在param这个文件里面获取。
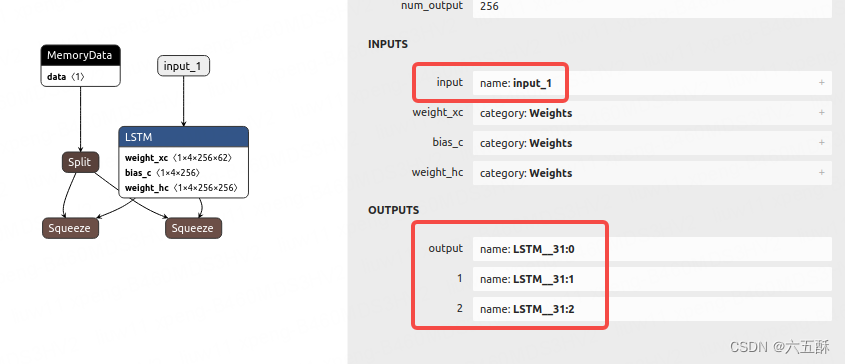
采用netron分别查看encoder与decoder的网络结构,获取输入输出名称:
encoder:
输入输出分别如图
decoder:
输入
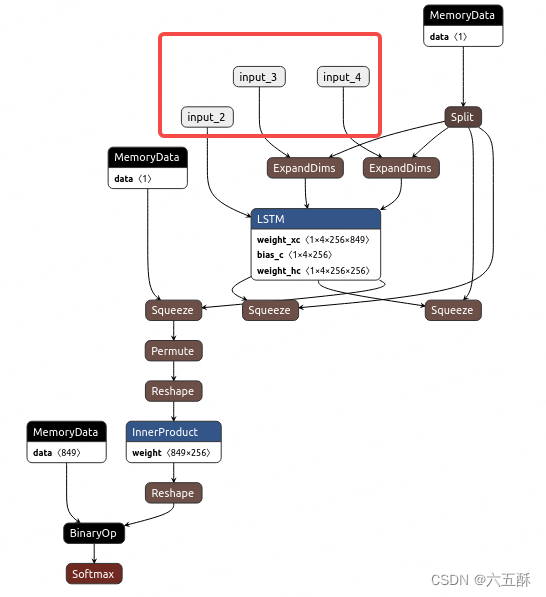
输出:
推理代码如下,推理过程感觉没问题,但是推理输出结果相差很大(对比过第一层ncnn与onnx的推理结果了),可能问题出在模型转换环节的精度损失上,而且第二层模型转换后网络输出结果不一致了,很迷,还没找出原因,但是以下的推理是能运行通过,只不过输出结果有问题
import numpy as np
import ncnn# 加载字符
# 从 input_words.txt 文件中读取字符串
with open('config/input_words.txt', 'r') as f:input_words = f.readlines()input_characters = [line.rstrip('\n') for line in input_words]# 从 target_words.txt 文件中读取字符串
with open('config/target_words.txt', 'r', newline='') as f:target_words = [line.strip() for line in f.readlines()]target_characters = [char.replace('\\t', '\t').replace('\\n', '\n') for char in target_words]#字符处理,以方便进行编码
input_token_index = dict([(char, i) for i, char in enumerate(input_characters)])
target_token_index = dict([(char, i) for i, char in enumerate(target_characters)])# something readable.
reverse_input_char_index = dict((i, char) for char, i in input_token_index.items())
reverse_target_char_index = dict((i, char) for char, i in target_token_index.items())
num_encoder_tokens = len(input_characters) # 英文字符数量
num_decoder_tokens = len(target_characters) # 中文文字数量import json
with open('config/config.json', 'r') as file:loaded_data = json.load(file)# 从加载的数据中获取max_encoder_seq_length和max_decoder_seq_length的值
max_encoder_seq_length = loaded_data["max_encoder_seq_length"]
max_decoder_seq_length = loaded_data["max_decoder_seq_length"]# Load the ncnn models for the encoder and decoder
encoderNet = ncnn.Net()
encoderNet.load_param("ncnnModel/encoder_model.param")
encoderNet.load_model("ncnnModel/encoder_model.bin")decoderNet = ncnn.Net()
decoderNet.load_param("ncnnModel/decoder_model.param")
decoderNet.load_model("ncnnModel/decoder_model.bin")def decode_sequence(input_seq):# Encode the input as state vectors.# print(input_seq)ex_encoder = encoderNet.create_extractor()ex_encoder.input("input_1", ncnn.Mat(input_seq))states_value = []_, LSTM_1 = ex_encoder.extract("lstm")_, LSTM_2 = ex_encoder.extract("lstm_1")states_value.append(LSTM_1)states_value.append(LSTM_2)# print(ncnn.Mat(input_seq))# print(vgdgd)# Generate empty target sequence of length 1.target_seq = np.zeros((1, 1, 849))# Populate the first character of target sequence with the start character.target_seq[0, 0, target_token_index['\t']] = 1.# this target_seq you can treat as initial state# Sampling loop for a batch of sequences# (to simplify, here we assume a batch of size 1).stop_condition = Falsedecoded_sentence = ''ex_decoder = decoderNet.create_extractor()while not stop_condition:#print(ncnn.Mat(target_seq))print("---------")ex_decoder.input("input_2", ncnn.Mat(target_seq))ex_decoder.input("input_3", states_value[0])ex_decoder.input("input_4", states_value[1])_, output_tokens = ex_decoder.extract("dense")_, h = ex_decoder.extract("lstm_1")_, c = ex_decoder.extract("lstm_1_1")print(output_tokens)tk = []for i in range(849):tk.append(output_tokens[849*i])tk = np.array(tk)output_tokens = tk.reshape(1,1,849)print(output_tokens)# print(fdgd)print(h)print(c)# output_tokens = np.array(output_tokens)# output_tokens = output_tokens.reshape(1, 1, -1)# # h = np.array(h)# # c = np.array(c)# print(output_tokens.shape)# print(h.shape)# print(c.shape)#output_tokens, h, c = decoder_model.predict([target_seq] + states_value)# Sample a token# argmax: Returns the indices of the maximum values along an axis# just like find the most possible charsampled_token_index = np.argmax(output_tokens[0, -1, :])# find char using indexsampled_char = reverse_target_char_index[sampled_token_index]# and append sentencedecoded_sentence += sampled_char# Exit condition: either hit max length# or find stop character.if (sampled_char == '\n' or len(decoded_sentence) > max_decoder_seq_length):stop_condition = True# Update the target sequence (of length 1).# append then ?# creating another new target_seq# and this time assume sampled_token_index to 1.0target_seq = np.zeros((1, 1, num_decoder_tokens))target_seq[0, 0, sampled_token_index] = 1.print(sampled_token_index)# Update states# update states, frome the front partsstates_value = [h, c]return decoded_sentenceimport numpy as npinput_text = "Call me."
encoder_input_data = np.zeros((1,max_encoder_seq_length, num_encoder_tokens),dtype='float32')
for t, char in enumerate(input_text):print(char)# 3D vector only z-index has char its value equals 1.0encoder_input_data[0,t, input_token_index[char]] = 1.input_seq = encoder_input_data
decoded_sentence = decode_sequence(input_seq)
print('-')
print('Input sentence:', input_text)
print('Decoded sentence:', decoded_sentence)
decoder的模型输出为849*849,感觉怪怪的,然后我们把模型的输入固定下来看看是不是模型的问题。
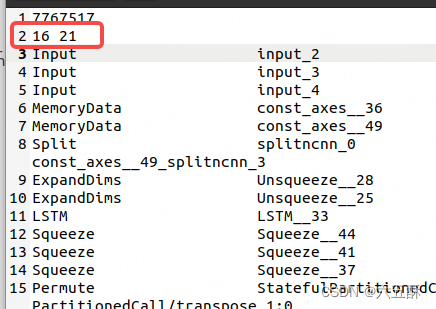
打开decoder_model.param,把输入层固定下来,0=w 1=h 2=c,那么:
input_2:0=849 1=1 2=1
input_3:0=256 1=1
input_4:0=256 1=1
运行以下命令进行优化
ncnnoptimize ncnnModel/decoder_model.param ncnnModel/decoder_model.bin ncnnModel/decoder_model.param ncnnModel/decoder_model.bin 1结果如下:
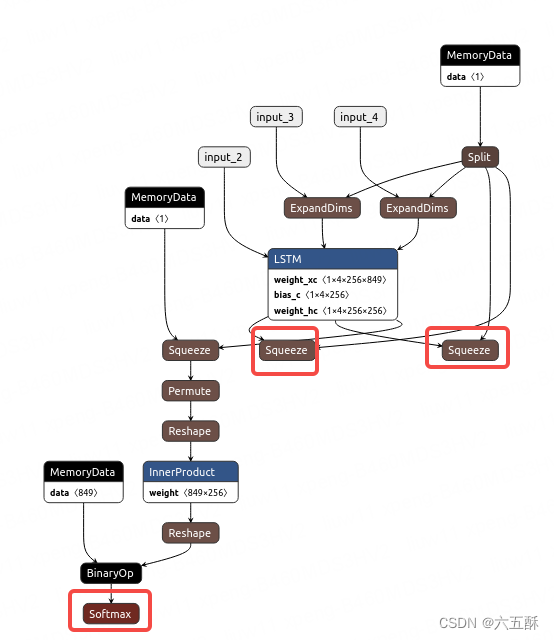
打开网络来看一下:
可以看到输出确实是849849(红色框),那就是模型转换有问题了
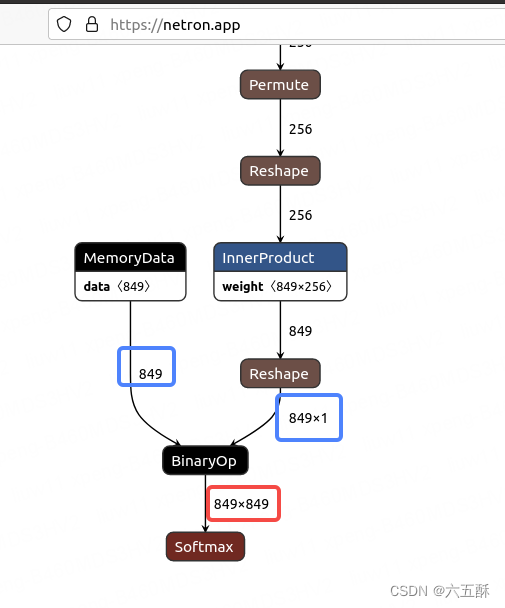
仔细看,能够看到有两个shape(蓝色框)分别为849跟8491,这两个不同维度的网络进行BinaryOP之后,就变成849849了,那么,我们把Reshape这个网络去掉试试(不把前面InnerProduct的输入维度有849reshape为8491),下面来看手术刀怎么操作。
我们需要在没经过固定维度并ncnnoptimize的模型上操作(也就是没经过上面0=w 1=h 2=c修改的模型上操作)
根据名字我们找到Reshape那一层:
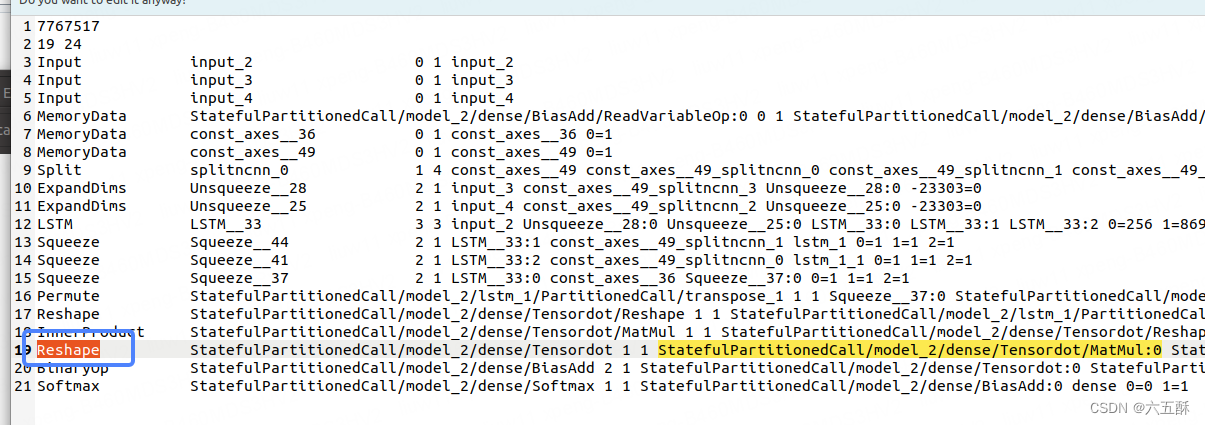
然后找到与reshape那一层相连接的上一层(红色框)与下一层(蓝色框)

通过红色框与蓝色框里面的名字我们找到了上层与下层分别为InnerProduct与BinaryOp

这时候,把InnerProduct与BinaryOp接上,把Reshape删掉

再改一下最上面的层数,把19改为18,因为我们删掉了一层
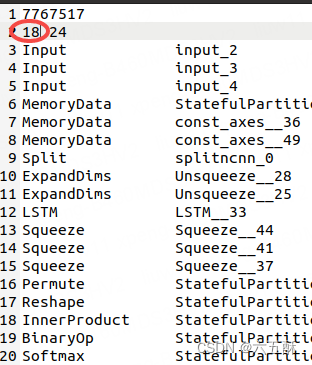 保存之后再次执行
ncnnoptimize ncnnModel/decoder_model.param ncnnModel/decoder_model.bin ncnnModel/decoder_model.param ncnnModel/decoder_model.bin 1
执行后可以看到网络层数跟blob数都更新了
这时候改一下固定一下输入层数,并运行ncnnoptimize,再打开netron看一下网络结构,可以看到输出维度正常了

但是通过推理结果还是不对,没找到原因,推理代码如下:
import numpy as np
import ncnn# 加载字符
# 从 input_words.txt 文件中读取字符串
with open('config/input_words.txt', 'r') as f:input_words = f.readlines()input_characters = [line.rstrip('\n') for line in input_words]# 从 target_words.txt 文件中读取字符串
with open('config/target_words.txt', 'r', newline='') as f:target_words = [line.strip() for line in f.readlines()]target_characters = [char.replace('\\t', '\t').replace('\\n', '\n') for char in target_words]#字符处理,以方便进行编码
input_token_index = dict([(char, i) for i, char in enumerate(input_characters)])
target_token_index = dict([(char, i) for i, char in enumerate(target_characters)])# something readable.
reverse_input_char_index = dict((i, char) for char, i in input_token_index.items())
reverse_target_char_index = dict((i, char) for char, i in target_token_index.items())
num_encoder_tokens = len(input_characters) # 英文字符数量
num_decoder_tokens = len(target_characters) # 中文文字数量import json
with open('config/config.json', 'r') as file:loaded_data = json.load(file)# 从加载的数据中获取max_encoder_seq_length和max_decoder_seq_length的值
max_encoder_seq_length = loaded_data["max_encoder_seq_length"]
max_decoder_seq_length = loaded_data["max_decoder_seq_length"]# Load the ncnn models for the encoder and decoder
encoderNet = ncnn.Net()
encoderNet.load_param("ncnnModel/encoder_model.param")
encoderNet.load_model("ncnnModel/encoder_model.bin")decoderNet = ncnn.Net()
decoderNet.load_param("ncnnModel/decoder_model.param")
decoderNet.load_model("ncnnModel/decoder_model.bin")def decode_sequence(input_seq):# Encode the input as state vectors.# print(input_seq)ex_encoder = encoderNet.create_extractor()ex_encoder.input("input_1", ncnn.Mat(input_seq))states_value = []_, LSTM_1 = ex_encoder.extract("lstm")_, LSTM_2 = ex_encoder.extract("lstm_1")states_value.append(LSTM_1)states_value.append(LSTM_2)# print(ncnn.Mat(input_seq))# print(vgdgd)# Generate empty target sequence of length 1.target_seq = np.zeros((1, 1, 849))# Populate the first character of target sequence with the start character.target_seq[0, 0, target_token_index['\t']] = 1.# this target_seq you can treat as initial state# Sampling loop for a batch of sequences# (to simplify, here we assume a batch of size 1).stop_condition = Falsedecoded_sentence = ''ex_decoder = decoderNet.create_extractor()while not stop_condition:#print(ncnn.Mat(target_seq))print("---------")ex_decoder.input("input_2", ncnn.Mat(target_seq))ex_decoder.input("input_3", states_value[0])ex_decoder.input("input_4", states_value[1])_, output_tokens = ex_decoder.extract("dense")_, h = ex_decoder.extract("lstm_1")_, c = ex_decoder.extract("lstm_1_1")print(output_tokens)# print(ghfhf)# tk = []# for i in range(849):#     tk.append(output_tokens[849*i])# tk = np.array(tk)# output_tokens = tk.reshape(1,1,849)# print(output_tokens)# print(fdgd)print(h)print(c)output_tokens = np.array(output_tokens)output_tokens = output_tokens.reshape(1, 1, -1)# # h = np.array(h)# # c = np.array(c)# print(output_tokens.shape)# print(h.shape)# print(c.shape)#output_tokens, h, c = decoder_model.predict([target_seq] + states_value)# Sample a token# argmax: Returns the indices of the maximum values along an axis# just like find the most possible charsampled_token_index = np.argmax(output_tokens[0, -1, :])# find char using indexsampled_char = reverse_target_char_index[sampled_token_index]# and append sentencedecoded_sentence += sampled_char# Exit condition: either hit max length# or find stop character.if (sampled_char == '\n' or len(decoded_sentence) > max_decoder_seq_length):stop_condition = True# Update the target sequence (of length 1).# append then ?# creating another new target_seq# and this time assume sampled_token_index to 1.0target_seq = np.zeros((1, 1, num_decoder_tokens))target_seq[0, 0, sampled_token_index] = 1.print(sampled_token_index)# Update states# update states, frome the front partsstates_value = [h, c]return decoded_sentenceimport numpy as npinput_text = "Call me."
encoder_input_data = np.zeros((1,max_encoder_seq_length, num_encoder_tokens),dtype='float32')
for t, char in enumerate(input_text):print(char)# 3D vector only z-index has char its value equals 1.0encoder_input_data[0,t, input_token_index[char]] = 1.input_seq = encoder_input_data
decoded_sentence = decode_sequence(input_seq)
print('-')
print('Input sentence:', input_text)
print('Decoded sentence:', decoded_sentence)
参考文献:https://github.com/Tencent/ncnn/issues/2586
相关文章:
【如何训练一个中英翻译模型】LSTM机器翻译模型部署之ncnn(python)(五)
系列文章 【如何训练一个中英翻译模型】LSTM机器翻译seq2seq字符编码(一) 【如何训练一个中英翻译模型】LSTM机器翻译模型训练与保存(二) 【如何训练一个中英翻译模型】LSTM机器翻译模型部署(三) 【如何训练…...

C++ 面向对象三大特征
文章目录 一、封装二、继承三、多态 一、封装 目的:隐藏实现细节;模块化 特性: 1) 访问权限: public 所有 protected 子类 private 自己(友元类也可以访问) 2)属性 3)方…...

【Github】自动监测 SSL 证书过期的轻量级监控方案 - Domain Admin
在现代的企业网络中,网站安全和可靠性是至关重要的。一个不注意的SSL证书过期可能导致网站出现问题,给公司业务带来严重的影响。针对这个问题,手动检测每个域名和机器的证书状态需要花费大量的时间和精力。为了解决这个问题,我想向…...
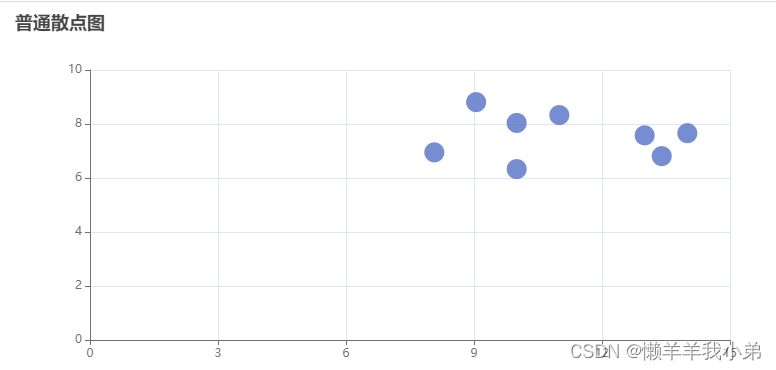
Echarts常见图表展示
一、折线图 1.1 堆叠折线图 const option {title: {text: 折线图,},tooltip: {trigger: axis},legend: {data: [张三, 李四, 王五],bottom: 10,},grid: {left: 3%,right: 4%,bottom: 10%,containLabel: true},xAxis: {type: category,boundaryGap: false,data: [Mon, Tue, We…...

PySpark机器学习实战案例
目录 PySpark机器学习库 分布式机器学习原理 PySpark架构设计 PySpark项目实战...

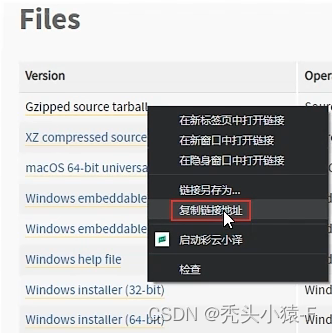
微软操作系统中,windows server 系列和windows 的区别
Windows Server和Windows Desktop(即我们常说的Windows系统)是Microsoft公司的两种操作系统产品,它们都基于Windows NT内核。两者在设计目标、功能和价格等方面存在显著的区别。 设计目标与功能 Windows Desktop系统主要针对个人用户和企业的…...
本地部署 Stable Diffusion XL 1.0 Gradio Demo WebUI
StableDiffusion XL 1.0 Gradio Demo WebUI 0. 先展示几张 StableDiffusion XL 生成的图片1. 什么是 Stable Diffusion XL Gradio Demo WebUI2. Github 地址3. 安装 Miniconda34. 创建虚拟环境5. 安装 Stable Diffusion XL Gradio Demo WebUI6. 启动 Stable Diffusion XL Gradi…...
模型法在初中物理中的实例与应用
摘要:模型法是初中物理解题的重要方法,它的优点有方便快捷,易于理解等。文章通过列举模型法在初中物理解题时应用的例子,与模型法在学习与生活中的实际应用,说明了模型法可用性高,易于理解,能让…...
el-table 设置行背景颜色 鼠标移入高亮问题处理
一、 设置行背景颜色 1. 需求描述 后端返回表格数据,有特定行数需要用颜色标识。类似于以下需求: 2. 解决方式 方式区别:row-class-name“tableRowClassName”已返回类名的形式设置样式,代码整洁,但是会鼠标高亮,…...

嵌入式面试常见题目收藏(超总结)
这篇文章来自很多博客主和其他网站的作者,如有侵权,联系必删 文章出处标注: https://blog.csdn.net/qq_44330858/article/details/128947083 ***如需PDF或者原稿可私信 *** ***如需PDF或者原稿可私信 *** ***如需PDF或者原稿可私信 *** 1.…...
: cannot open the connection)
error in file(out, “wt“): cannot open the connection
这个错误在提示我们: 文件无法打开链接,可能是以下原因之一: 文件不存在或者路径错误;文件正在被其他程序占用;没有足够的权限来访问该文件;硬盘内存不足; 可以尝试的方法: 可以检…...

Redis (一)消息订阅和发送测试
〇、redis 配置 1、概况 本文基于 Ubuntu20.04 云服务器配置Redis,且在本地进行 Redis 测试。 2、目录概况 一、配置文件 位于 /config/app.yml 中,目的用于 Redis 初始化: redis:addr: "39.104.**.28:6379"password: "p…...
区间预测 | MATLAB实现QRGRU门控循环单元分位数回归多输入单输出区间预测
区间预测 | MATLAB实现QRGRU门控循环单元分位数回归时间序列区间预测 目录 区间预测 | MATLAB实现QRGRU门控循环单元分位数回归时间序列区间预测效果一览基本介绍模型描述程序设计参考资料 效果一览 基本介绍 MATLAB实现QRGRU门控循环单元分位数回归分位数回归多输入单输出区间…...

Debian 12.1 “书虫 “发布,包含 89 个错误修复和 26 个安全更新
导读Debian 项目今天宣布,作为最新 Debian GNU/Linux 12 “书虫 “操作系统系列的首个 ISO 更新,Debian 12.1 正式发布并全面上市。 Debian 12.1 是在 Debian GNU/Linux 12 “书虫 “发布六周后推出的,目的是为那些希望在新硬件上部署操作系统…...
hadoop部署配置
端口名称 Hadoop2.x Hadoop3.x NameNode内部通信端口 8020 / 9000 8020 / 9000/9820 NameNode HTTP UI 50070 9870 MapReduce查看执行任务端口 8088 8088 历史服务器通信端口 19888 19888 端口名称Hadoop2.xHadoop3.xNameNode内部通信端口8020 / 90008020 / 9000/9820NameNode…...

文心一言 VS 讯飞星火 VS chatgpt (68)-- 算法导论6.5 7题
文心一言 VS 讯飞星火 VS chatgpt (68)-- 算法导论6.5 7题 七、试说明如何使用优先队列来实现一个先进先出队列,以及如何使用优先队列来实现栈(队列和栈的定义见 10.1 节。) 文心一言: 优先队列是一种数据结构,其中…...

uniapp:手写签名,多张图合成一张图
要实现的内容:手写签名,协议内容。点击提交后:生成1张图片,有协议内容和签署日期和签署人。 实现的效果图如下: 1、签名页面 <template><view class"index"><u-navbar title"电子协议…...

DevExpress WPF Tree List组件,让数据可视化程度更高!(一)
DevExpress WPF Tree List组件是一个功能齐全、数据感知的TreeView-ListView混合体,可以把数据信息显示为REE、GRID或两者的组合,在数据绑定或非绑定模式下,具有完整的数据编辑支持。 DevExpress WPF 拥有120个控件和库,将帮助您…...
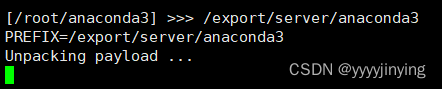
Linux操作系统下安装python环境
参考:Linux操作系统下安装python环境_linux如何下载python_秃头小猿-F的博客-CSDN博客 注意 切换用户 二、切换root用户 1.给root用户设置密码:命令:sudo passwd root输入密码,并确认密码。2.重新输入命令:su root …...

JavaScript的宏任务和微任务
宏任务和微任务 JS为微任务和宏任务简单介绍任务执行顺序例子任务执行顺序简单例子 关于new Promise实例化过程的例子 JS为微任务和宏任务简单介绍 js是单线程的,但是分同步异步微任务和宏任务皆为异步任务,它们都属于一个队列宏任务一般是:…...

如何完整破解Cursor Pro限制:终极免费激活方案全解析
如何完整破解Cursor Pro限制:终极免费激活方案全解析 【免费下载链接】cursor-free-vip [Support 0.45](Multi Language 多语言)自动注册 Cursor Ai ,自动重置机器ID , 免费升级使用Pro 功能: Youve reached your tria…...

内网规划练习
本文基于172.16.0.0/16 内网规划,实现双核心交换机互为备份,整合 VLAN、MSTP、VRRP、Eth-Trunk、DHCP 中继、NAT outbound 等技术,满足 PC 自动获取 IP、内网互通、访问公网及 ISP 环回的全业务需求。一、网络需求与规划内网地址:…...

Asimov支持的开发依赖类型详解:从Node.js到Python、Go、Rust全覆盖
Asimov支持的开发依赖类型详解:从Node.js到Python、Go、Rust全覆盖 【免费下载链接】asimov Automatically exclude development dependencies from Apple Time Machine backups 项目地址: https://gitcode.com/gh_mirrors/as/asimov Asimov是一款能够自动将…...

AgentCore Memory的记忆哲学:让Agent学会“忘记”
大多数关于AI记忆的讨论都在谈“如何记住更多”。但问题不是记住,而是记住什么、忘记什么、以及当新旧信息冲突时该相信谁。假设用户第1天说“预算500美元”,第30天说“预算改成800了”,第60天用三种不同措辞说了“我喜欢Python”。没有整合能…...

线上故障排查与应急响应实战:从零开始建立你的SRE体系
线上故障排查与应急响应实战:从零开始建立你的SRE体系 大家好,我是迪哥。2024 年我们的线上故障平均恢复时间(MTTR)是 45 分钟,2025 年降到了 10 分钟,怎么做到的?靠的是完善的应急响应机制和故…...

AI气象模型统一基准:可复现、多源真值、时空一致的评测标尺
1. 这不是又一个“天气数据集”,而是一把标尺:为什么AI气象建模急需统一基准“AI Weather Models”这个词组最近两年在气象学会议、AI顶会和工业界技术白皮书里出现的频率,已经快赶上“大模型”本身了。但我和团队在去年参与三个不同机构的AI…...

深入剖析Golang环境搭建:从基础配置到高效开发实践
1. 项目概述:为什么Golang环境搭建值得深究?如果你刚接触Go语言,可能会觉得“环境搭建”不就是下载、安装、配个变量吗?网上教程一搜一大把,五分钟搞定。但作为一名在多个生产环境中部署过Go服务的老兵,我必…...

Chrome无痕模式下Selenium BiDi协议断连原因与解决方案
1. 这个问题不是“能不能用”,而是“为什么一开无痕就断连”我第一次在CI流水线里跑通Chrome DevTools Protocol(CDP)自动化时,兴奋地加了--incognito参数想让测试更干净——结果WebDriver直接抛出org.openqa.selenium.devtools.D…...

京东自动抢购工具:5分钟快速上手指南,轻松抢购心仪商品
京东自动抢购工具:5分钟快速上手指南,轻松抢购心仪商品 【免费下载链接】autobuy-jd 使用python语言的京东平台抢购脚本 项目地址: https://gitcode.com/gh_mirrors/au/autobuy-jd 还在为心仪商品秒杀时手速不够快而烦恼吗?Autobuy-JD…...

Go语言整洁架构:分层设计
Go语言整洁架构:分层设计 1. 分层结构 internal/domain/ # 领域实体usecase/ # 用例adapter/ # 适配器handler/ # HTTP处理2. 总结 整洁架构强调业务逻辑的独立性和依赖方向的正确性。...