zygote forkSystemServer及systemServer启动
###zygote forkSystemServer方法
通过上一篇文章我们了解到zygote 在ZygoteInit.java类的main方法中调用forkSystemServer方法
@UnsupportedAppUsagepublic static void main(String[] argv) {ZygoteServer zygoteServer = null;....省略部分代码//根据环境变量(LocalServerSocket)获取zygote文件描述符并重新创建一个socket,可以从这里看到zygote其实就是一个//name为"zygote"的socket用来等待ActivityManagerService来请求zygote来fork出新的应用程序进程//所以ActivityManagerService 里启动应用程序(APP),都是由该zygote socket进行处理并fork出的子进程zygoteServer = new ZygoteServer(isPrimaryZygote);//默认为true,将启动systemServerif (startSystemServer) {//zygote就是一个孵化器,所以这里直接fork出systemServerRunnable r = forkSystemServer(abiList, zygoteSocketName, zygoteServer);// {@code r == null} in the parent (zygote) process, and {@code r != null} in the// child (system_server) process.//让SystemServer子进程运行起来if (r != null) {r.run();return;}}Log.i(TAG, "Accepting command socket connections");// The select loop returns early in the child process after a fork and// loops forever in the zygote.//让zygote socket(注意不是systemServer zygote)循环运行//等待client 进程来请求调用,请求创建子进程(fork 出子进程(例如等待AMS的请求))caller = zygoteServer.runSelectLoop(abiList);} catch (Throwable ex) {Log.e(TAG, "System zygote died with fatal exception", ex);throw ex;} finally {if (zygoteServer != null) {//停止关于systemServer的socket,保留和AMS通信的socket//在initNativeState阶段创建了一个和sysemServer通信的socket//接着拿到systemServer socket文件描述符重新创建了一个可以和AMS通信的socket(/dev/socket/zygote)zygoteServer.closeServerSocket();}}// We're in the child process and have exited the select loop. Proceed to execute the// command.if (caller != null) {caller.run();}}
根据代码我们要找到真正forkserver的地方,代码跟踪如下:
frameworks\base\core\java\com\android\internal\os/ZygoteInit.javaprivate static Runnable forkSystemServer(String abiList, String socketName,ZygoteServer zygoteServer) {int pid;/* Request to fork the system server process *///通过jni形式去调用init进程下的fork函数,派生出systemServer进程pid = Zygote.forkSystemServer(parsedArgs.mUid, parsedArgs.mGid,parsedArgs.mGids,parsedArgs.mRuntimeFlags,null,parsedArgs.mPermittedCapabilities,parsedArgs.mEffectiveCapabilities);} catch (IllegalArgumentException ex) {throw new RuntimeException(ex);}/* For child process *///pid==0代表已经运行在子进程(SystemServer)上了//代表SystemServer创建成功,创建成功后会关闭该socketif (pid == 0) {if (hasSecondZygote(abiList)) {waitForSecondaryZygote(socketName);}//销毁zygoteServer,保留和AMS通信的socket(runSelectLoop)//当SystemServer创建过后,zygoteServerSocket就没有用除了,进行关闭zygoteServer.closeServerSocket();//处理system server进程初始化工作并启动systemServer进程//并启动了一个binder线程池供system server进程和其他进程通信使用//最后调用RuntimeInit.applicationInit()执行进程启动自身初始化工作//applicationInit()最后是通过反射调用了SystemServer.java的main方法return handleSystemServerProcess(parsedArgs);}return null;}frameworks\base\core\java\com\android\internal\os/Zygote.javastatic int forkSystemServer(int uid, int gid, int[] gids, int runtimeFlags,int[][] rlimits, long permittedCapabilities, long effectiveCapabilities) {//停掉守护线程,停掉当前进程的所有的线程,zygote每次fork前调用ZygoteHooks.preFork();//通过jni去调用nativeForkSystemServer()函数int pid = nativeForkSystemServer(uid, gid, gids, runtimeFlags, rlimits,permittedCapabilities, effectiveCapabilities);// Set the Java Language thread priority to the default value for new apps.//设置当前线程优先级Thread.currentThread().setPriority(Thread.NORM_PRIORITY);//每次调用preFork()后,都会在子进程上调用postForkChild(),//并且都会在父进程和子进程上调用postForkCommon(),//子进程调用postForkCommon()在postForkCommon()之后ZygoteHooks.postForkCommon();return pid;}
通过AndroidRuntime.cpp类中注册jni可知 具体执行fork的代码在com_android_internal_os_Zygote.cpp文件中:
static const RegJNIRec gRegJNI[] = {...省略部分代码REG_JNI(register_com_android_internal_os_Zygote),REG_JNI(register_com_android_internal_os_ZygoteCommandBuffer),REG_JNI(register_com_android_internal_os_ZygoteInit),....省略部分代码
};frameworks/base/core/jni/com_android_internal_os_Zygote.cpp
static jint com_android_internal_os_Zygote_nativeForkSystemServer(JNIEnv* env, jclass, uid_t uid, gid_t gid, jintArray gids,jint runtime_flags, jobjectArray rlimits, jlong permitted_capabilities,jlong effective_capabilities) {//初始化usap相关的vectorstd::vector<int> fds_to_close(MakeUsapPipeReadFDVector()),fds_to_ignore(fds_to_close);fds_to_close.push_back(gUsapPoolSocketFD);if (gUsapPoolEventFD != -1) {fds_to_close.push_back(gUsapPoolEventFD);fds_to_ignore.push_back(gUsapPoolEventFD);}if (gSystemServerSocketFd != -1) {fds_to_close.push_back(gSystemServerSocketFd);fds_to_ignore.push_back(gSystemServerSocketFd);}pid_t pid = zygote::ForkCommon(env, true,fds_to_close,fds_to_ignore,true);if (pid == 0) {// System server prcoess does not need data isolation so no need to// know pkg_data_info_list.//在子进程中进行一些system_server相关配置SpecializeCommon(env, uid, gid, gids, runtime_flags, rlimits, permitted_capabilities,effective_capabilities, MOUNT_EXTERNAL_DEFAULT, nullptr, nullptr, true,false, nullptr, nullptr, /* is_top_app= */ false,/* pkg_data_info_list */ nullptr,/* allowlisted_data_info_list */ nullptr, false, false);} else if (pid > 0) {// The zygote process checks whether the child process has died or not.ALOGI("System server process %d has been created", pid);gSystemServerPid = pid;// There is a slight window that the system server process has crashed// but it went unnoticed because we haven't published its pid yet. So// we recheck here just to make sure that all is well.int status;//在父进程zygote中使用waitpid()函数以及WNOHANG这个选项,监控子进程的结束情况,//监控到system_server进程结束时,需要重启zygote。//waitpid()函数参考https://www.cnblogs.com/zhaihongliangblogger/p/6367041.htmif (waitpid(pid, &status, WNOHANG) == pid) {ALOGE("System server process %d has died. Restarting Zygote!", pid);RuntimeAbort(env, __LINE__, "System server process has died. Restarting Zygote!");}if (UsePerAppMemcg()) {//检测是否挂载了memcg// Assign system_server to the correct memory cgroup.// Not all devices mount memcg so check if it is mounted first// to avoid unnecessarily printing errors and denials in the logs.if (!SetTaskProfiles(pid, std::vector<std::string>{"SystemMemoryProcess"})) {ALOGE("couldn't add process %d into system memcg group", pid);}}}return pid;
}
继续跟踪代码在com_android_internal_os_Zygote.cpp的forkCommon方法里面
// Utility routine to fork a process from the zygote.
pid_t zygote::ForkCommon(JNIEnv* env, bool is_system_server,const std::vector<int>& fds_to_close,const std::vector<int>& fds_to_ignore,bool is_priority_fork,bool purge) {SetSignalHandlers();//为zygote管理子进程配置信号SIGCHLD/SIGHUP// Curry a failure function.auto fail_fn = std::bind(zygote::ZygoteFailure, env,is_system_server ? "system_server" : "zygote",nullptr, _1);// Temporarily block SIGCHLD during forks. The SIGCHLD handler might// log, which would result in the logging FDs we close being reopened.// This would cause failures because the FDs are not allowlisted.//// Note that the zygote process is single threaded at this point.
//在fork期间临时阻塞SIGCHLD。SIGCHLD处理程序可能会记录日志,BlockSignal(SIGCHLD, fail_fn);//这将导致我们关闭的日志fd被重新打开。会导致失败,因为不允许列出fd// Close any logging related FDs before we start evaluating the list of// file descriptors.__android_log_close();//在开始计算文件描述符列表之前,关闭所有与日志记录相关的fdAStatsSocket_close();// If this is the first fork for this zygote, create the open FD table,// verifying that files are of supported type and allowlisted.  Otherwise (not// the first fork), check that the open files have not changed.  Newly open// files are not expected, and will be disallowed in the future.  Currently// they are allowed if they pass the same checks as in the// FileDescriptorTable::Create() above.if (gOpenFdTable == nullptr) {//如果这是zygote的第一次fork,则创建一个打开的FD表,验证文件受支持的类型和允许列表gOpenFdTable = FileDescriptorTable::Create(fds_to_ignore, fail_fn);} else {//如果不是,则检查打开的文件是否没有更改,不希望并且未来会禁止打开新的文件gOpenFdTable->Restat(fds_to_ignore, fail_fn);//目标的做法是,如果通过了上面的create检测,则允许打开新的文件}android_fdsan_error_level fdsan_error_level = android_fdsan_get_error_level();if (purge) {//清除未是哦那个的本机内存,以减少与子进程的错误共享。通过减少与子进程共享的libc_malloc区域的大小// Purge unused native memory in an attempt to reduce the amount of false// sharing with the child process.  By reducing the size of the libc_malloc// region shared with the child process we reduce the number of pages that// transition to the private-dirty state when malloc adjusts the meta-data// on each of the pages it is managing after the fork.mallopt(M_PURGE, 0);//当malloc在fork之后调整它所管理的每个页面上的元数据时,可以减少转换到私有状态的页面数量}pid_t pid = fork();//核心的fork动作if (pid == 0) {//子进程if (is_priority_fork) {setpriority(PRIO_PROCESS, 0, PROCESS_PRIORITY_MAX);} else {setpriority(PRIO_PROCESS, 0, PROCESS_PRIORITY_MIN);}// The child process.PreApplicationInit();// Clean up any descriptors which must be closed immediatelyDetachDescriptors(env, fds_to_close, fail_fn);//通过dup3()函数清除那些需要立即关闭的文件描述符// Invalidate the entries in the USAP table.ClearUsapTable();//清除usap()进程表// Re-open all remaining open file descriptors so that they aren't shared// with the zygote across a fork.gOpenFdTable->ReopenOrDetach(fail_fn);//重新打开所有剩余的打开的文件描述符,这样它们就不会通过fork与zygote共享// Turn fdsan back on.android_fdsan_set_error_level(fdsan_error_level);// Reset the fd to the unsolicited zygote socketgSystemServerSocketFd = -1;} else {//父进程ALOGD("Forked child process %d", pid);}// We blocked SIGCHLD prior to a fork, we unblock it here.UnblockSignal(SIGCHLD, fail_fn);//fork 结束后打开阻塞,对应上面的BlockSignal()return pid;
}
###重点是fork
fork()采用copy on write技术,这是linux创建进程的标准方法,调用一次,返回了两次,返回值有3种类型
1、父进程中,fork返回新创建的子进程的pid
2、子进程中,fork返回0
3、当出现错误时,fork返回负数。(当进程数超过上限或者系统内存不足时会出错)
fork()的主要工作是寻找空闲的进程号pid,然后从父进程拷贝进程信息,例如数据段和代码段,fork()子进程要执行的代码等。Zygote进程是所有Android进程的母体,包括system_server和各个APP进程。zygote利用fork()方法生成新进程,对于新进程A复用Zygote进程本身的资源,再加上新进曾A相关的资源,构成新的应用进程

fork之后,操作系统会复制一个与父进程完全相同的子进程,虽说是父子关系,但是在操作系统看来,它们更像兄弟关系,这两个进程共享代码空间,但是数据空间是相互独立的,子进程数据空间中的内容是父进程的完整拷贝,指令指针也完全相同,子进程拥有父进程当前运行到的位置(两进程的程序计数器pc值相同,也就是说,子进程是从fork返回处开始执行的),但有一点不同,如果fork成功,子进程中fork的返回值是0,父进程中fork的返回值是子进程的进程号,如果fork不成功,父进程返回错误。可以这样想象,2个进程一直同时运行,而且步调一致,在fork之后,它们就开始分别做不同的工作。
到此system_server进程已完成创建的所有工作。
systemServer启动
private static Runnable forkSystemServer(String abiList, String socketName,ZygoteServer zygoteServer) {....省略代码/* For child process *///pid==0代表已经运行在子进程(SystemServer)上了//代表SystemServer创建成功,创建成功后会关闭该socketif (pid == 0) {if (hasSecondZygote(abiList)) {waitForSecondaryZygote(socketName);}//销毁zygoteServer,保留和AMS通信的socket(runSelectLoop)//当SystemServer创建过后,zygoteServerSocket就没有用除了,进行关闭zygoteServer.closeServerSocket();//处理system server进程初始化工作并启动systemServer进程//并启动了一个binder线程池供system server进程和其他进程通信使用//最后调用RuntimeInit.applicationInit()执行进程启动自身初始化工作//applicationInit()最后是通过反射调用了SystemServer.java的main方法return handleSystemServerProcess(parsedArgs);}return null;}```在ZygoteInit.java的forkSystemServer方法里面我们知道Zygote调用forkSystemServer方法返回pid,根据上文得知fork systemServer成功后pid的值为0。代码会执行handleSystemServerProcess方法```javaprivate static Runnable handleSystemServerProcess(ZygoteArguments parsedArgs) {// set umask to 0077 so new files and directories will default to owner-only permissions.Os.umask(S_IRWXG | S_IRWXO);if (parsedArgs.mNiceName != null) {Process.setArgV0(parsedArgs.mNiceName);//设置当前进程名称为"system_server"}final String systemServerClasspath = Os.getenv("SYSTEMSERVERCLASSPATH");if (systemServerClasspath != null) {//执行dex优化操作performSystemServerDexOpt(systemServerClasspath);// Capturing profiles is only supported for debug or eng builds since selinux normally// prevents it.if (shouldProfileSystemServer() && (Build.IS_USERDEBUG || Build.IS_ENG)) {try {Log.d(TAG, "Preparing system server profile");prepareSystemServerProfile(systemServerClasspath);} catch (Exception e) {Log.wtf(TAG, "Failed to set up system server profile", e);}}}if (parsedArgs.mInvokeWith != null) {String[] args = parsedArgs.mRemainingArgs;// If we have a non-null system server class path, we'll have to duplicate the// existing arguments and append the classpath to it. ART will handle the classpath// correctly when we exec a new process.if (systemServerClasspath != null) {String[] amendedArgs = new String[args.length + 2];amendedArgs[0] = "-cp";amendedArgs[1] = systemServerClasspath;System.arraycopy(args, 0, amendedArgs, 2, args.length);args = amendedArgs;}//启动应用进程WrapperInit.execApplication(parsedArgs.mInvokeWith,parsedArgs.mNiceName, parsedArgs.mTargetSdkVersion,VMRuntime.getCurrentInstructionSet(), null, args);throw new IllegalStateException("Unexpected return from WrapperInit.execApplication");} else {//创建类加载器,并赋予当前线程ClassLoader cl = getOrCreateSystemServerClassLoader();if (cl != null) {Thread.currentThread().setContextClassLoader(cl);}/** Pass the remaining arguments to SystemServer.*/return ZygoteInit.zygoteInit(parsedArgs.mTargetSdkVersion,parsedArgs.mDisabledCompatChanges,parsedArgs.mRemainingArgs, cl);}/* should never reach here */}
public static Runnable zygoteInit(int targetSdkVersion, long[] disabledCompatChanges,String[] argv, ClassLoader classLoader) {if (RuntimeInit.DEBUG) {Slog.d(RuntimeInit.TAG, "RuntimeInit: Starting application from zygote");}Trace.traceBegin(Trace.TRACE_TAG_ACTIVITY_MANAGER, "ZygoteInit");RuntimeInit.redirectLogStreams();//重定向log输出RuntimeInit.commonInit();//初始化运行环境,像日志,网络之类的ZygoteInit.nativeZygoteInit();//初始化binder//应用初始化return RuntimeInit.applicationInit(targetSdkVersion, disabledCompatChanges, argv,classLoader);}
在ZygoteInit.zygoteInit方法里面主要做了1、初始化运行环境2、初始化binder 3,初始化application三件事。
根据zygoteInit.zygoteInit方法持续跟踪到RuntimeInit.java类的findStaticMain方法里面
文件目录:frameworks\base\core\java\com\android\internal\os/RuntimeInit.java
protected static Runnable findStaticMain(String className, String[] argv,ClassLoader classLoader) {Class<?> cl;try {// 反射拿到SystemServer类,classname =com.android.server.SystemServercl = Class.forName(className, true, classLoader);} catch (ClassNotFoundException ex) {throw new RuntimeException("Missing class when invoking static main " + className,ex);}Method m;try {// 反射拿到SystemServer.java的main函数,并启动m = cl.getMethod("main", new Class[] { String[].class });} catch (NoSuchMethodException ex) {throw new RuntimeException("Missing static main on " + className, ex);} catch (SecurityException ex) {throw new RuntimeException("Problem getting static main on " + className, ex);}int modifiers = m.getModifiers();if (! (Modifier.isStatic(modifiers) && Modifier.isPublic(modifiers))) {throw new RuntimeException("Main method is not public and static on " + className);}/** This throw gets caught in ZygoteInit.main(), which responds* by invoking the exception's run() method. This arrangement* clears up all the stack frames that were required in setting* up the process.*/return new MethodAndArgsCaller(m, argv);}
根据代码可以看到,通过反射创建systemServer类,调用systemServer类里面的main方法
systemServer.java的具体目录是/frameworks/base/services/java/com/android/server/SystemServer.java代码如下:
public static void main(String[] args) {new SystemServer().run();}
在main方法里面会创建systemServer对象并调用run方法。
至此。SystemServer就创建和启动完毕了
总结
可以知道zygote是从rc中启动的,zygote本质上就是一个socket,不会关闭和销毁,而创建zygote时携带的startSystemServer参数会启动systemServer子进程,SystemServer也是通过fork出来的,而底层和上层的交互是通过jni实现的,SystemServer的启动是由zygoteInit通过反射的方式启动SystemServer的main方法。
zygote启动时创建了服务端socket,用于SystemServer的创建,当SystemServer创建完成后则会关闭连接,期间已经调用了runSelectLoop来循环等待AMS及其他进城来请求连接,从而fork出应用程序的socket。服务端socket会在SystemServer进程创建完毕后就关闭,已经没有用处了,等待AMS发来连接将采用runSelectLoop方法进行循环等待。
相关文章:

zygote forkSystemServer及systemServer启动
###zygote forkSystemServer方法 通过上一篇文章我们了解到zygote 在ZygoteInit.java类的main方法中调用forkSystemServer方法 UnsupportedAppUsagepublic static void main(String[] argv) {ZygoteServer zygoteServer null;....省略部分代码//根据环境变量(LocalServerSocke…...
享元模式-提供统一实现对象的复用
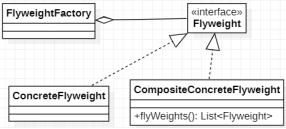
下围棋时,分为黑白棋子。棋子都一样,这是出现的位置不同而已。如果将每个棋子都作为一个独立的对象存储在内存中,将导致内存空间消耗较大。我们可以将其中不变的部分抽取出来,只存储它的位置信息来实现节约内存。 图 围棋 1 享元模…...

Jenkins工具系列 —— 在Ubuntu 18.04上安装各种版本OpenJDK
文章目录 安装java方式一、使用apt-get工具安装方式二、手动安装java 卸载java各种版本OpenJDK安装包下载 安装java 方式一、使用apt-get工具安装 1、安装各种JAVA版本 若要安装新版本的java11,安装命令: sudo apt install default-jre若选择安装jav…...
vue基础-虚拟dom
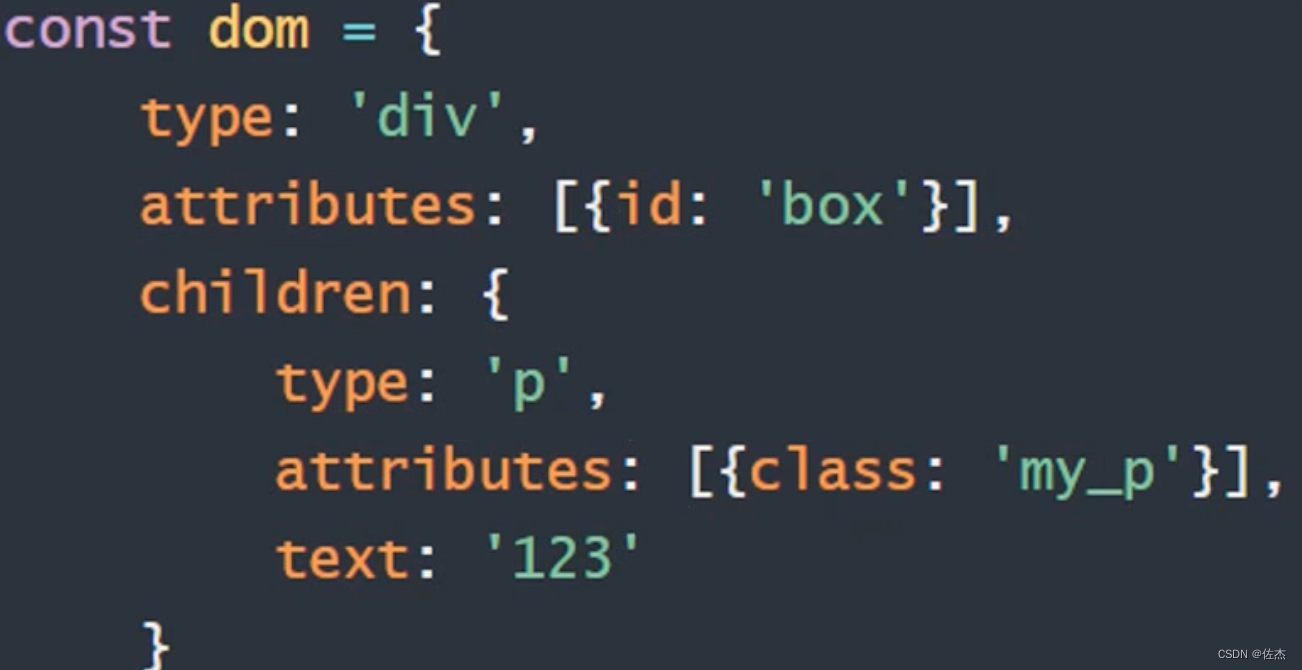
vue基础-虚拟dom 1、真实dom目标2、虚拟dom目标 1、真实dom目标 在真实的document对象上,渲染到浏览器上显示的标签。 2、虚拟dom目标 本质是保存节点信息、属性和内容的一个JS对象 更新会监听变化的部分 给真实的DOM打补丁...

C#时间轴曲线图形编辑器开发2-核心功能实现
目录 三、关键帧编辑 1、新建Winform工程 (1)界面布局 (2)全局变量 2、关键帧添加和删除 (1)鼠标在曲线上识别 (2)键盘按键按下捕捉 (3)关键帧添加、删…...
【Git】初始化仓库配置与本地仓库提交流程
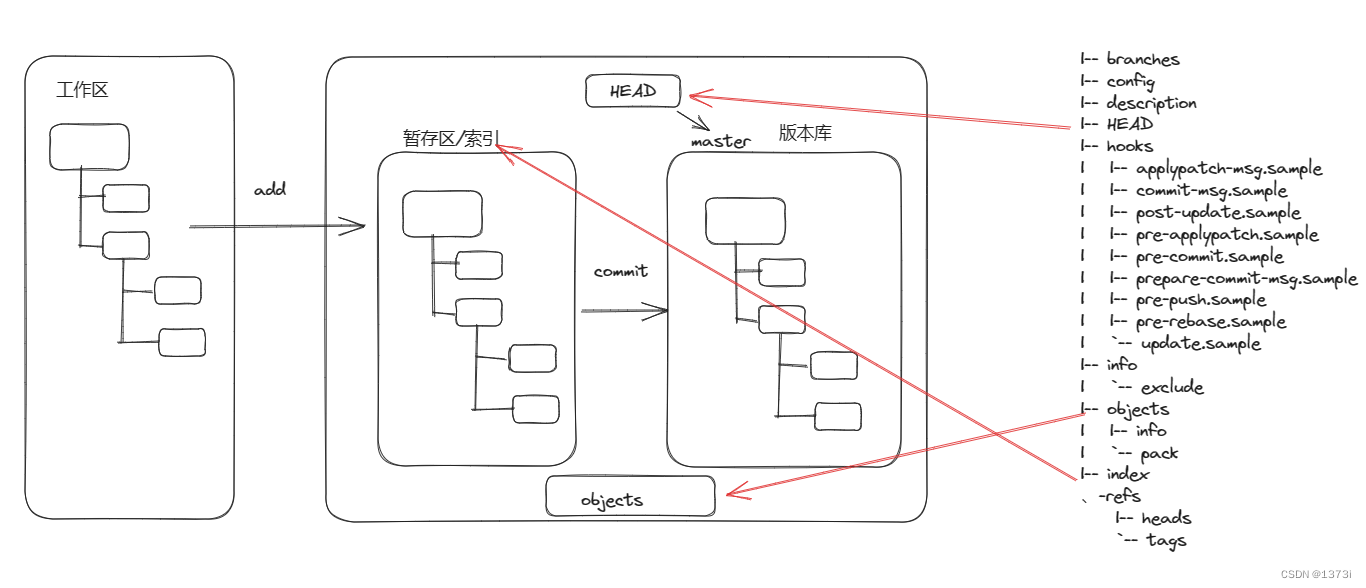
目录 一、仓库配置邮箱与用户名 二、本地仓库提交流程 一、仓库配置邮箱与用户名 【Git】Linux服务器Centos环境下安装Git与创建本地仓库_centos git仓库搭建_1373i的博客-CSDN博客https://blog.csdn.net/qq_61903414/article/details/131260033?spm1001.2014.3001.5501 在…...

学习day53
今天主要是做一个案例 TodoList 组件化编码流程: 1. 拆分静态组件:组件要按照功能点拆分,命名不要与html元素冲突 2.实现动态组件:考虑好数据的存放位置,数据是一个组件在用,还是一些组件在用:…...
【最短路算法】SPFA
引入 在计算机科学的世界里,算法就像是星空中的繁星,各自闪烁着智慧的光芒。它们沉默而坚定,像是一群不语的哲人,默默地解答着世界的问题。 算法的步骤,如同优美的诗行,让复杂的问题在流转的字符中得以释…...
牛客网Verilog刷题——VL48
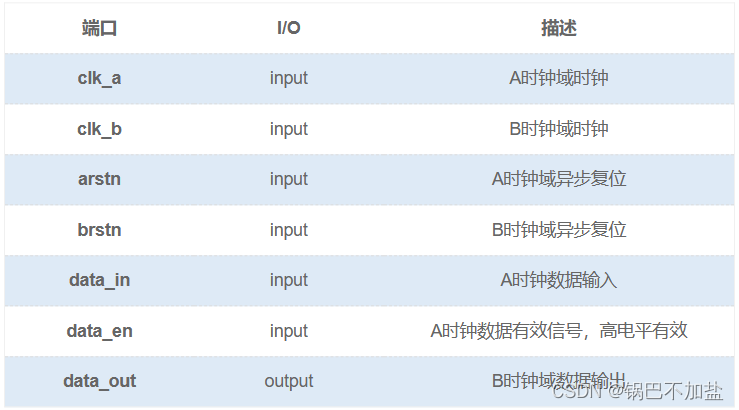
牛客网Verilog刷题——VL48 题目答案 题目 在data_en为高期间,data_in将保持不变,data_en为高至少保持3个B时钟周期。表明,当data_en为高时,可将数据进行同步。本题中data_in端数据变化频率很低,相邻两个数据间的变化&…...
组件的介绍及使用)
Unity UGUI的Shadow(阴影)组件的介绍及使用
Unity UGUI的Shadow(阴影)组件的介绍及使用 1. 什么是Shadow(阴影)组件? Shadow(阴影)组件是Unity UGUI中的一个特效组件,用于在UI元素上添加阴影效果。通过调整阴影的颜色、偏移、模糊等属性,可以使UI元素看起来更加立体和有层次感。 2. …...
Kubernetes系列
文章目录 1 详解docker,踏入容器大门1.1 引言1.2 初始docker1.3 docker安装1.4 docker 卸载1.5 docker 核心概念和底层原理1.5.1 核心概念1.5.2 docker底层原理 1.6 细说docker镜像1.6.1 镜像的常用命令 1.7 docker 容器1.8 docker 容器数据卷1.8.1 直接命令添加1.8.2 Dockerfi…...

同步锁: synchronized
synchronized 1. synchronized的特性2. synchronized的使用3. synchronized的锁机制 1. synchronized的特性 原子性: 所谓原子性就是指一个操作或者多个操作,要么全部执行并且执行的过程不会被任何因素打断,要么就都不执行。可见性: 可见性是指多个线程…...

【微服务】springboot 多模块打包使用详解
目录 一、前言 1.1 为什么需要掌握多模块打包 二、工程模块概述 2.1 前后端不分离...

嵌入式工程师面试经常遇到的30个经典问题
很多同学说很害怕面试,看见面试官会露怯,怕自己的知识体系不完整,怕面试官考的问题回答不上了,所以今天为大家准备了嵌入式工程师面试经常遇到的30个经典问题,希望可以帮助大家提前准备,不再惧怕面试。 1&a…...

ER系列路由器多网段划分设置指南
ER系列路由器多网段划分设置指南 - TP-LINK 服务支持 TP-LINK ER系列路由器支持划分多网段,可以针对不同的LAN接口划分网段,即每一个或多个LAN接口对应一个网段;也可以通过一个LAN接口与支持划分802.1Q VLAN的交换机进行对接,实现…...

3 PostGIS基础查询
PostGIS 基础查询 数据库维护 ps aux | grep postgrespsql 使用命令登录数据库psql -U postgres -d testdb -h localhost -p 5432postgres用户名,testdb数据库名称,localhost ip地址,可以省略,5432端口,可以省略。 …...

Shell错误:/bin/bash^M: bad interpreter: No such file or directory
目录 错误原因和现象 解决方案 错误原因和现象 在执行shell脚本的时候,报错:/bin/bash^M: bad interpreter: No such file or directory。 是由于该脚本文件是在Windows平台编写,然后在MacOS平台中执行。 在Windows平台上文件是dos格式&…...

Golang之路---01 Golang的安装与配置
Golang之路—01 Golang语言安装与配置 官网上下载Windows环境下的安装包 官网下载地址 双击下载后的文件进行安装,可根据需要自定义选择解压后的文件位置。 接着新创建一个文件夹,保存Golang语言项目。 在里面新建bin,pkg,src三个文件夹。 环境变量…...

Anolis OS 8.8服务器采用docker容器方式搭建gerrit3.8.1服务
采用docker容器方式搭建gerrit3.8.1服务 一、选择管理帐户密码的方式二、部署gerrit服务1. 采用docker compose部署单服务的方式部分gerrit(1) docker-compose.yaml文件内容(2) 在docker-compose.yaml文件所在目录调用下面命令先进行初始化操作 2. 在宿主机上部署httpd服务用于…...

PyTorch 中的多 GPU 训练和梯度累积作为替代方案
动动发财的小手,点个赞吧! 在本文[1]中,我们将首先了解数据并行(DP)和分布式数据并行(DDP)算法之间的差异,然后我们将解释什么是梯度累积(GA),最后…...
(十)学生端搭建
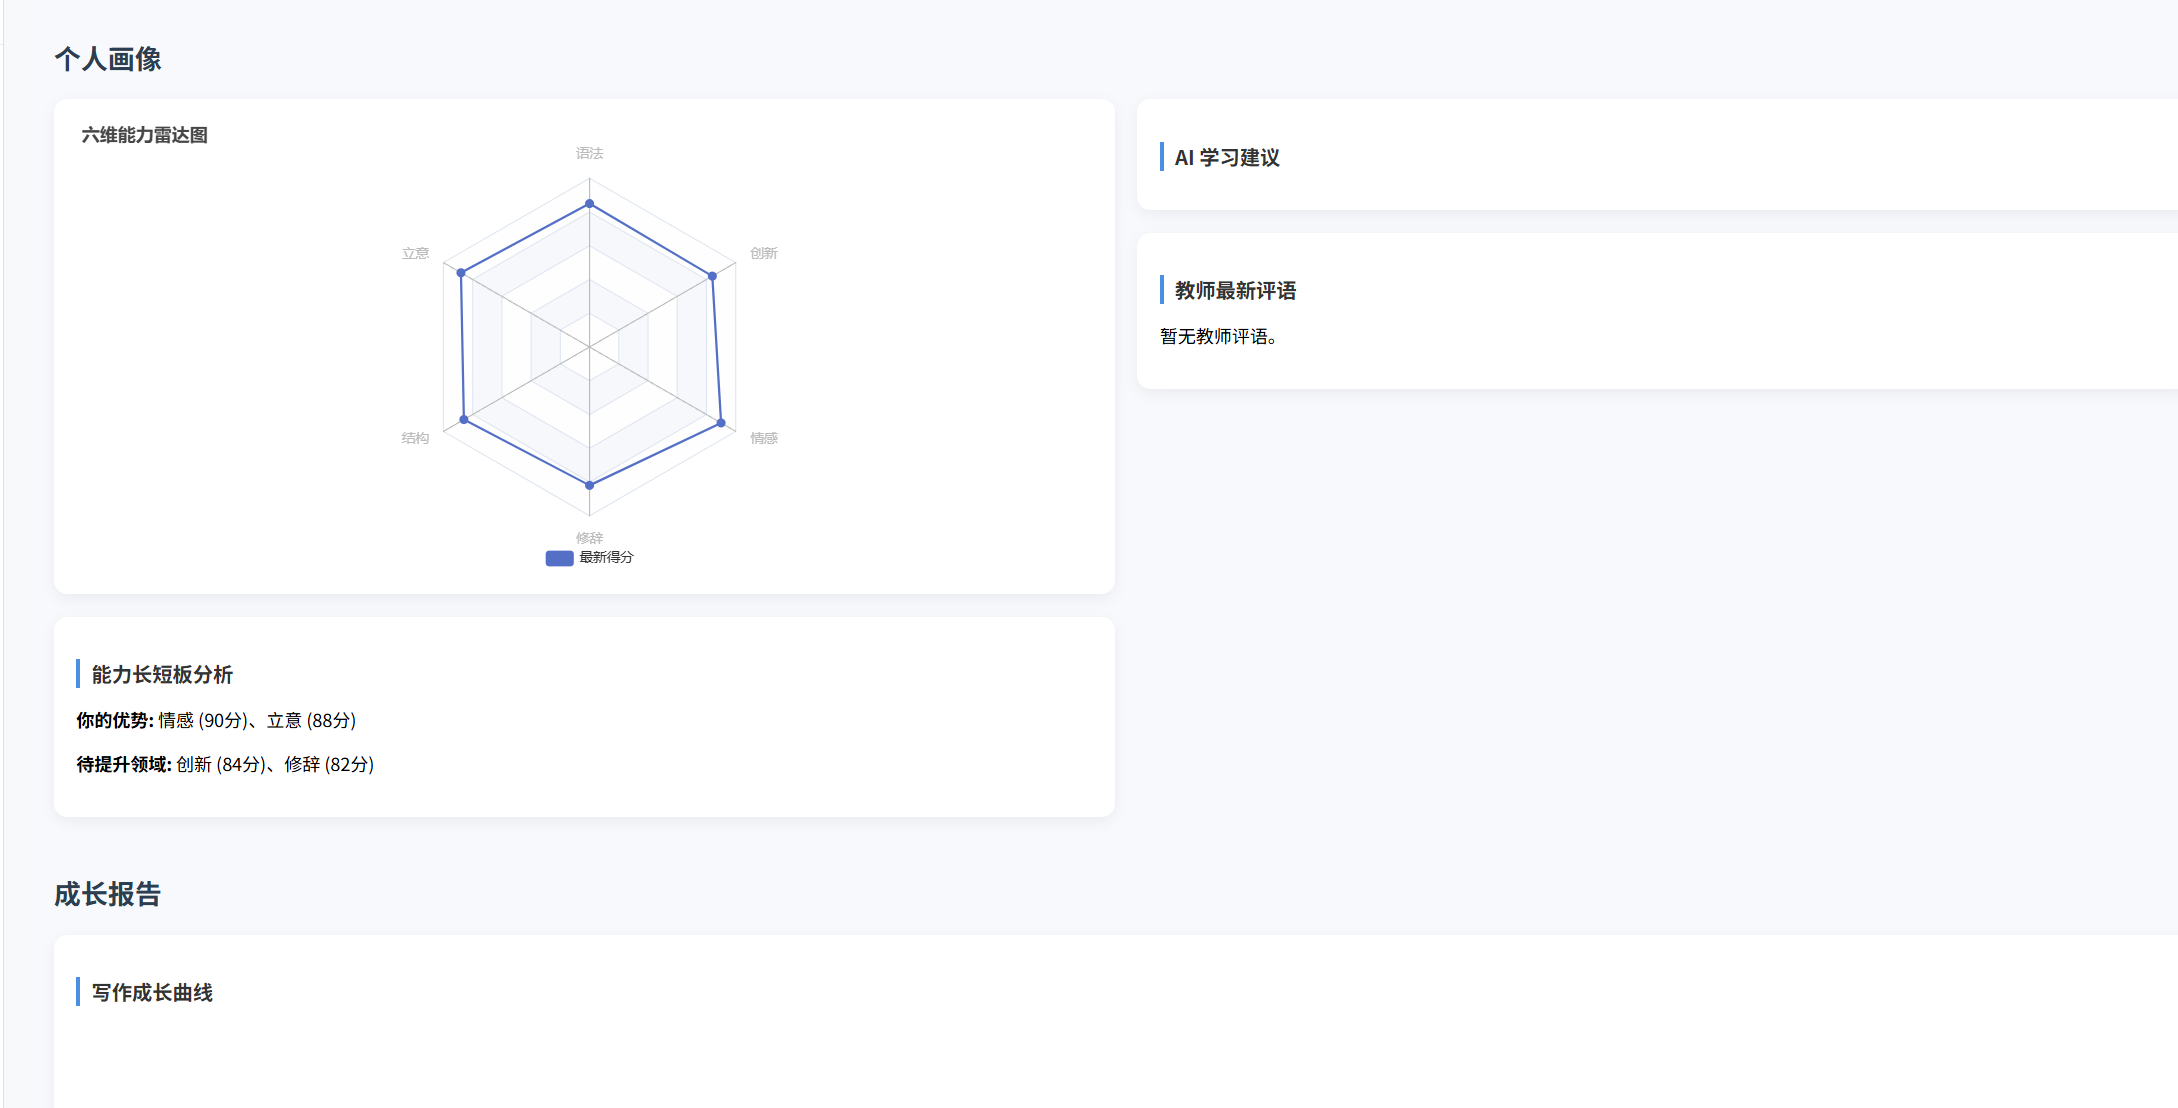
本次旨在将之前的已完成的部分功能进行拼装到学生端,同时完善学生端的构建。本次工作主要包括: 1.学生端整体界面布局 2.模拟考场与部分个人画像流程的串联 3.整体学生端逻辑 一、学生端 在主界面可以选择自己的用户角色 选择学生则进入学生登录界面…...
Redis相关知识总结(缓存雪崩,缓存穿透,缓存击穿,Redis实现分布式锁,如何保持数据库和缓存一致)
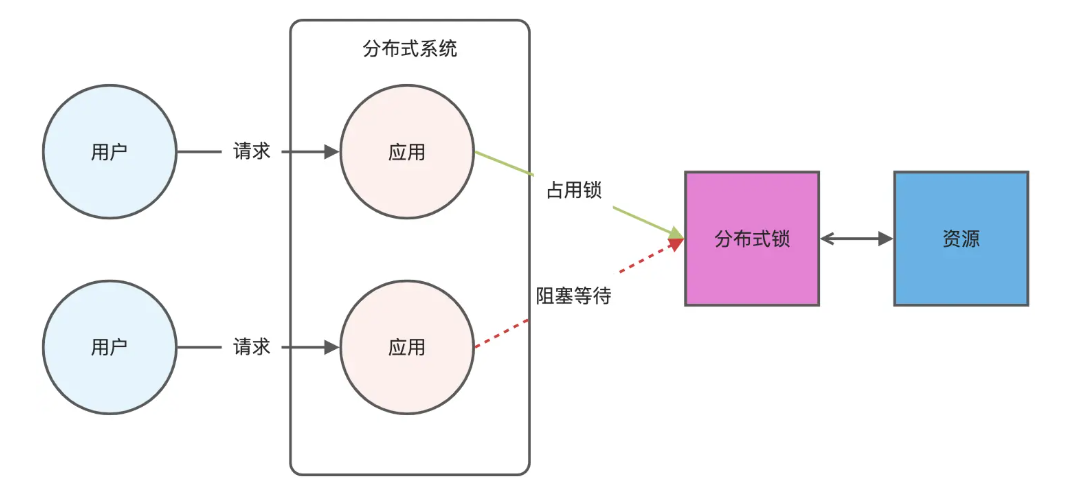
文章目录 1.什么是Redis?2.为什么要使用redis作为mysql的缓存?3.什么是缓存雪崩、缓存穿透、缓存击穿?3.1缓存雪崩3.1.1 大量缓存同时过期3.1.2 Redis宕机 3.2 缓存击穿3.3 缓存穿透3.4 总结 4. 数据库和缓存如何保持一致性5. Redis实现分布式…...

【入坑系列】TiDB 强制索引在不同库下不生效问题
文章目录 背景SQL 优化情况线上SQL运行情况分析怀疑1:执行计划绑定问题?尝试:SHOW WARNINGS 查看警告探索 TiDB 的 USE_INDEX 写法Hint 不生效问题排查解决参考背景 项目中使用 TiDB 数据库,并对 SQL 进行优化了,添加了强制索引。 UAT 环境已经生效,但 PROD 环境强制索…...
python/java环境配置
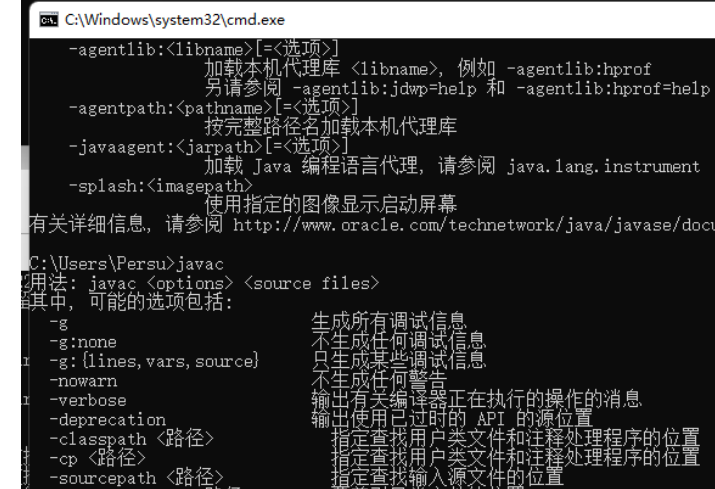
环境变量放一起 python: 1.首先下载Python Python下载地址:Download Python | Python.org downloads ---windows -- 64 2.安装Python 下面两个,然后自定义,全选 可以把前4个选上 3.环境配置 1)搜高级系统设置 2…...
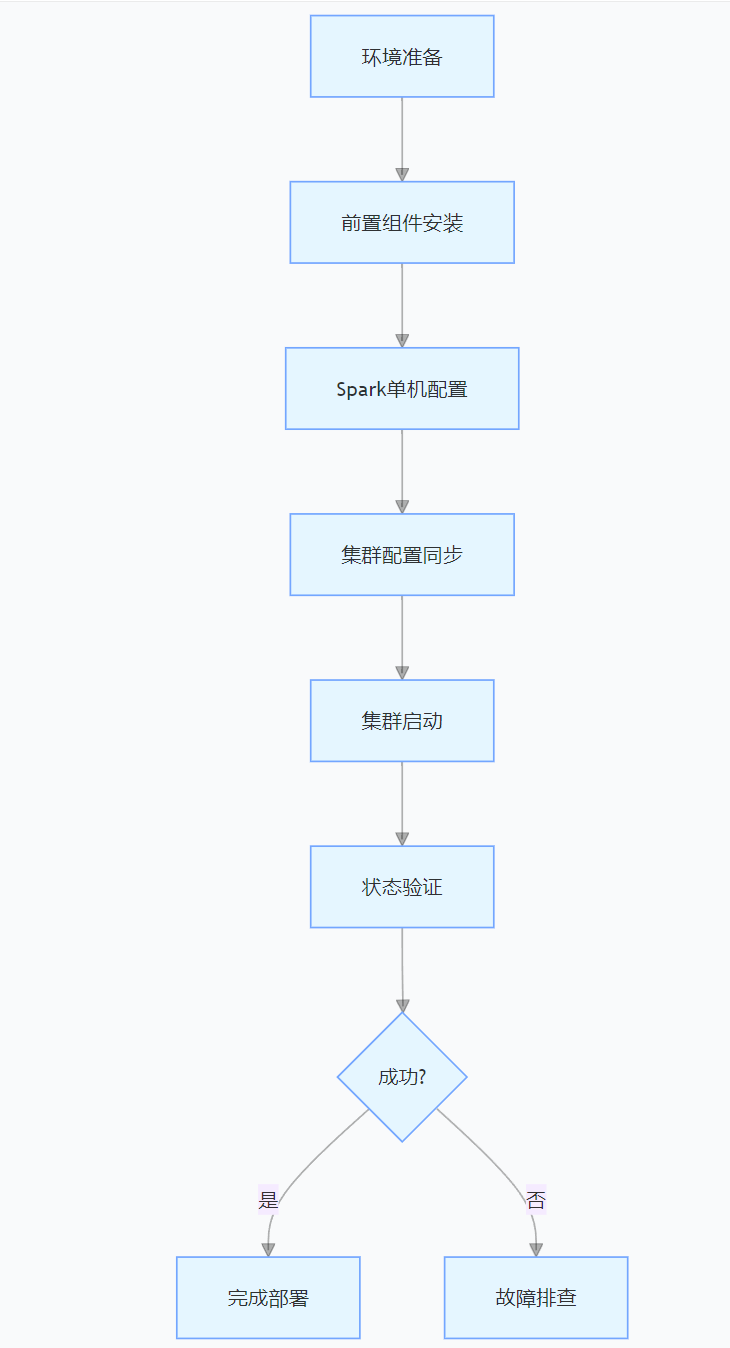
CentOS下的分布式内存计算Spark环境部署
一、Spark 核心架构与应用场景 1.1 分布式计算引擎的核心优势 Spark 是基于内存的分布式计算框架,相比 MapReduce 具有以下核心优势: 内存计算:数据可常驻内存,迭代计算性能提升 10-100 倍(文档段落:3-79…...

Cilium动手实验室: 精通之旅---20.Isovalent Enterprise for Cilium: Zero Trust Visibility
Cilium动手实验室: 精通之旅---20.Isovalent Enterprise for Cilium: Zero Trust Visibility 1. 实验室环境1.1 实验室环境1.2 小测试 2. The Endor System2.1 部署应用2.2 检查现有策略 3. Cilium 策略实体3.1 创建 allow-all 网络策略3.2 在 Hubble CLI 中验证网络策略源3.3 …...

《用户共鸣指数(E)驱动品牌大模型种草:如何抢占大模型搜索结果情感高地》
在注意力分散、内容高度同质化的时代,情感连接已成为品牌破圈的关键通道。我们在服务大量品牌客户的过程中发现,消费者对内容的“有感”程度,正日益成为影响品牌传播效率与转化率的核心变量。在生成式AI驱动的内容生成与推荐环境中࿰…...

安宝特方案丨船舶智造的“AR+AI+作业标准化管理解决方案”(装配)
船舶制造装配管理现状:装配工作依赖人工经验,装配工人凭借长期实践积累的操作技巧完成零部件组装。企业通常制定了装配作业指导书,但在实际执行中,工人对指导书的理解和遵循程度参差不齐。 船舶装配过程中的挑战与需求 挑战 (1…...

在QWebEngineView上实现鼠标、触摸等事件捕获的解决方案
这个问题我看其他博主也写了,要么要会员、要么写的乱七八糟。这里我整理一下,把问题说清楚并且给出代码,拿去用就行,照着葫芦画瓢。 问题 在继承QWebEngineView后,重写mousePressEvent或event函数无法捕获鼠标按下事…...
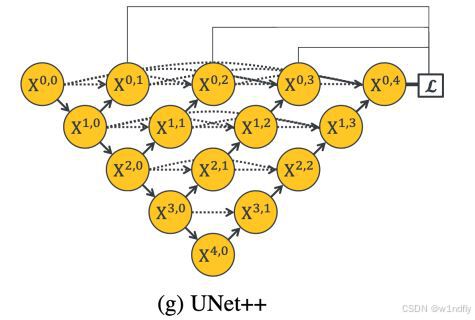
nnUNet V2修改网络——暴力替换网络为UNet++
更换前,要用nnUNet V2跑通所用数据集,证明nnUNet V2、数据集、运行环境等没有问题 阅读nnU-Net V2 的 U-Net结构,初步了解要修改的网络,知己知彼,修改起来才能游刃有余。 U-Net存在两个局限,一是网络的最佳深度因应用场景而异,这取决于任务的难度和可用于训练的标注数…...
