java(Collection类)
文章目录
- Collection接口继承树
- Collection接口及方法
- 判断
- 删除
- 其它
- Iterator(迭代器)接口
- 迭代器的执行原理
- foreach循环
- Collection子接口1:List
- List接口特点
- List接口方法
- List接口主要实现类:ArrayList
- List的实现类之二:LinkedList
- List的实现类之三:Vector(老了)
- Collection子接口2:Set
- Set接口概述
- Set主要实现类:HashSet
- **HashSet概述**
- HashSet中添加元素的过程:
- 重写 hashCode() 方法的基本原则
- 重写equals()方法的基本原则
- 练习
- Set实现类之二:LinkedHashSet
- Set实现类之三:TreeSet
- 1 TreeSet概述
Collection接口继承树
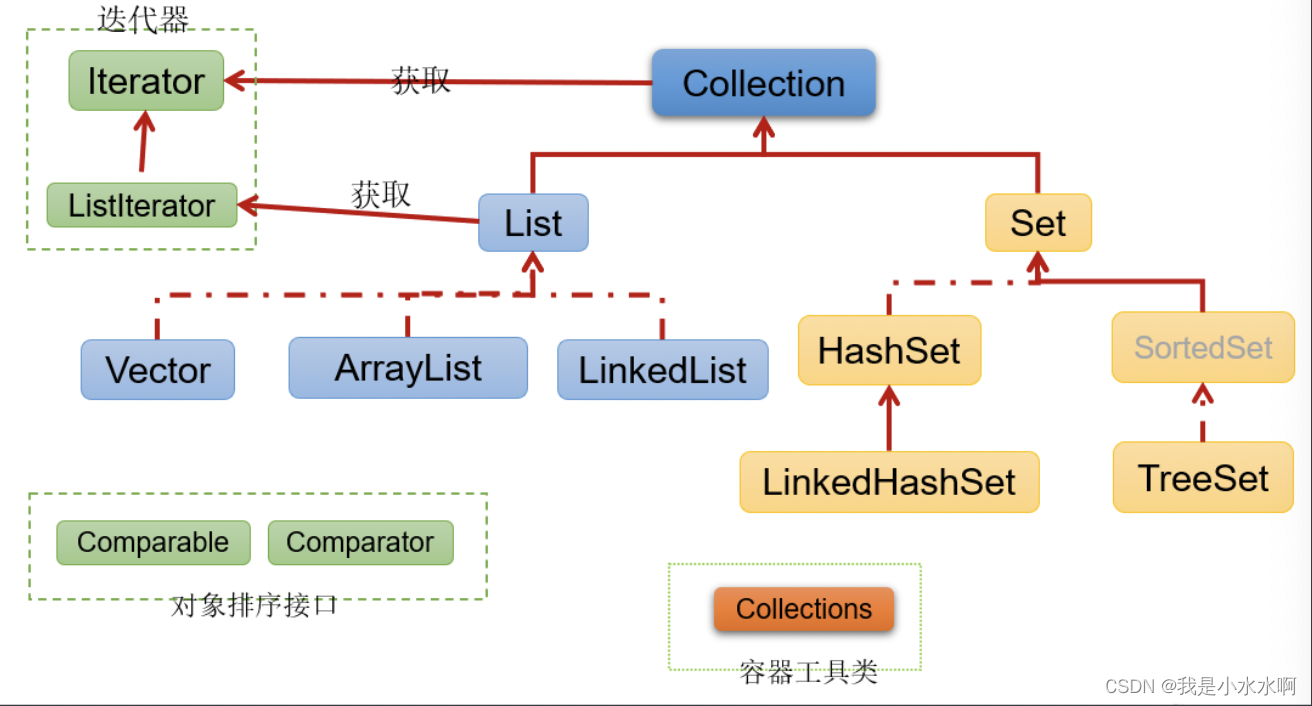
Collection接口及方法
- JDK不提供此接口的任何直接实现,而是提供更具体的子接口(如:Set和List)去实现。
- Collection 接口是 List和Set接口的父接口,该接口里定义的方法既可用于操作 Set 集合,也可用于操作 List 集合。方法如下:
- 添加:
(1)add(E obj):添加元素对象到当前集合中
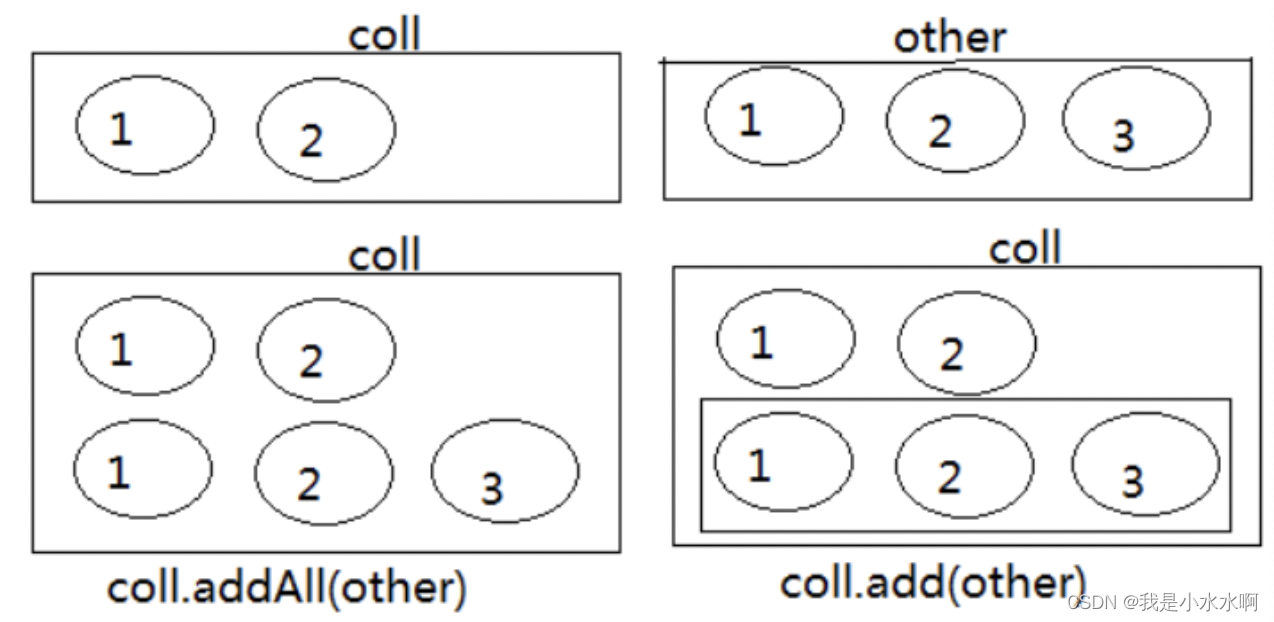
(2)addAll(Collection other):添加other集合中的所有元素对象到当前集合中,即this = this ∪ other
注意:add和addAll的区别
import org.junit.Test;import java.util.ArrayList;
import java.util.Collection;public class TestCollectionAdd {@Testpublic void testAdd(){//ArrayList是Collection的子接口List的实现类之一。Collection coll = new ArrayList();// 添加coll.add("小李广");coll.add("扫地僧");coll.add("石破天");System.out.println(coll);}@Testpublic void testAddAll(){Collection c1 = new ArrayList();c1.add(1);c1.add(2);System.out.println("c1集合元素的个数:" + c1.size());//2 元素的个数System.out.println("c1 = " + c1);Collection c2 = new ArrayList();c2.add(1);c2.add(2);System.out.println("c2集合元素的个数:" + c2.size());//2System.out.println("c2 = " + c2);Collection other = new ArrayList();other.add(1);other.add(2);other.add(3);System.out.println("other集合元素的个数:" + other.size());//3System.out.println("other = " + other);System.out.println();c1.addAll(other);System.out.println("c1集合元素的个数:" + c1.size());//5System.out.println("c1.addAll(other) = " + c1);c2.add(other);System.out.println("c2集合元素的个数:" + c2.size());//3System.out.println("c2.add(other) = " + c2);}
}
判断
(3)int size():获取当前集合中实际存储的元素个数
(4)boolean isEmpty():判断当前集合是否为空集合
(5)boolean contains(Object obj):判断当前集合中是否存在一个与obj对象equals返回true的元素
(6)boolean containsAll(Collection coll):判断coll集合中的元素是否在当前集合中都存在。即coll集合是否是当前集合的“子集”
(7)boolean equals(Object obj):判断当前集合与obj是否相等
import org.junit.Test;import java.util.ArrayList;
import java.util.Collection;public class TestCollectionContains {@Testpublic void test01() {Collection coll = new ArrayList();System.out.println("coll在添加元素之前,isEmpty = " + coll.isEmpty());coll.add("小李广");coll.add("扫地僧");coll.add("石破天");coll.add("佛地魔");System.out.println("coll的元素个数" + coll.size());System.out.println("coll在添加元素之后,isEmpty = " + coll.isEmpty());}@Testpublic void test02() {Collection coll = new ArrayList();coll.add("小李广");coll.add("扫地僧");coll.add("石破天");coll.add("佛地魔");System.out.println("coll = " + coll);System.out.println("coll是否包含“小李广” = " + coll.contains("小李广"));System.out.println("coll是否包含“小爬虫” = " + coll.contains("小爬虫"));Collection other = new ArrayList()other.add("小李广");other.add("扫地僧");other.add("小爬虫");System.out.println("other = " + other);System.out.println("coll.containsAll(other) = " + coll.containsAll(other));System.out.println(coll.contains(other));}@Testpublic void test03(){Collection c1 = new ArrayList();c1.add(1);c1.add(2);System.out.println("c1集合元素的个数:" + c1.size());//2System.out.println("c1 = " + c1);Collection c2 = new ArrayList();c2.add(1);c2.add(2);System.out.println("c2集合元素的个数:" + c2.size());//2System.out.println("c2 = " + c2);Collection other = new ArrayList();other.add(1);other.add(2);other.add(3);System.out.println("other集合元素的个数:" + other.size());//3System.out.println("other = " + other);System.out.println();c1.addAll(other);System.out.println("c1集合元素的个数:" + c1.size());//5System.out.println("c1.addAll(other) = " + c1);System.out.println("c1.contains(other) = " + c1.contains(other));System.out.println("c1.containsAll(other) = " + c1.containsAll(other));System.out.println();c2.add(other);System.out.println("c2集合元素的个数:" + c2.size());System.out.println("c2.add(other) = " + c2);System.out.println("c2.contains(other) = " + c2.contains(other));System.out.println("c2.containsAll(other) = " + c2.containsAll(other));}}
删除
(8)void clear():清空集合元素
(9) boolean remove(Object obj) :从当前集合中删除第一个找到的与obj对象equals返回true的元素。
(10)boolean removeAll(Collection coll):从当前集合中删除所有与coll集合中相同的元素。即this = this - this ∩ coll
(11)boolean retainAll(Collection coll):从当前集合中删除两个集合中不同的元素,使得当前集合仅保留与coll集合中的元素相同的元素,即当前集合中仅保留两个集合的交集,即this = this ∩ coll;
注意几种删除方法的区别
import org.junit.Test;import java.util.ArrayList;
import java.util.Collection;public class TestCollectionRemove {@Testpublic void test01(){Collection coll = new ArrayList();coll.add("小李广");coll.add("扫地僧");coll.add("石破天");coll.add("佛地魔");System.out.println("coll = " + coll); //coll = [小李广, 扫地僧, 石破天, 佛地魔]coll.remove("小李广");System.out.println("删除元素\"小李广\"之后coll = " + coll); //删除元素"小李广"之后coll = [扫地僧, 石破天, 佛地魔]coll.clear();System.out.println("coll清空之后,coll = " + coll);// coll清空之后,coll = []}@Testpublic void test02() {Collection coll = new ArrayList();coll.add("小李广");coll.add("扫地僧");coll.add("石破天");coll.add("佛地魔");System.out.println("coll = " + coll); // coll = [小李广, 扫地僧, 石破天, 佛地魔]Collection other = new ArrayList();other.add("小李广");other.add("扫地僧");other.add("小爬虫");System.out.println("other = " + other); // other = [小李广, 扫地僧, 小爬虫]coll.removeAll(other);System.out.println("coll.removeAll(other)之后,coll = " + coll); //coll.removeAll(other)之后,coll = [石破天, 佛地魔]System.out.println("coll.removeAll(other)之后,other = " + other); //coll.removeAll(other)之后,other = [小李广, 扫地僧, 小爬虫]}@Testpublic void test03() {Collection coll = new ArrayList();coll.add("小李广");coll.add("扫地僧");coll.add("石破天");coll.add("佛地魔");System.out.println("coll = " + coll); // coll = [小李广, 扫地僧, 石破天, 佛地魔]Collection other = new ArrayList(); other.add("小李广");other.add("扫地僧");other.add("小伙子");System.out.println("other = " + other); // other = [小李广, 扫地僧, 小伙子]coll.retainAll(other); // 取交集System.out.println("coll.retainAll(other)之后,coll = " + coll); // coll.retainAll(other)之后,coll = [小李广, 扫地僧]System.out.println("coll.retainAll(other)之后,other = " + other); //coll.retainAll(other)之后,other = [小李广, 扫地僧, 小伙子]}}
其它
(12)Object[] toArray():返回包含当前集合中所有元素的数组
(13)hashCode():获取集合对象的哈希值
(14)iterator():返回迭代器对象,用于集合遍历
import org.junit.Test;
import java.util.ArrayList;
import java.util.Arrays;
import java.util.Collection;public class TestCollectionContains {@Testpublic void test01() {Collection coll = new ArrayList();coll.add("小李广");coll.add("扫地僧");coll.add("石破天");coll.add("佛地魔");//集合转换为数组:集合的toArray()方法Object[] objects = coll.toArray();System.out.println("用数组返回coll中所有元素:" + Arrays.toString(objects)); // 用数组返回coll中所有元素:[小李广, 扫地僧, 石破天, 佛地魔]//对应的,数组转换为集合:调用Arrays的asList(Object ...objs)Object[] arr1 = new Object[]{123,"AA","CC"};Collection list = Arrays.asList(arr1);System.out.println(list); // [123, AA, CC]}
}
Iterator(迭代器)接口
-
在程序开发中,经常需要遍历集合中的所有元素。针对这种需求,JDK专门提供了一个接口
java.util.Iterator。Iterator接口也是Java集合中的一员,但它与Collection、Map接口有所不同。- Collection接口与Map接口主要用于
存储元素 Iterator,被称为迭代器接口,本身并不提供存储对象的能力,主要用于遍历Collection中的元素
- Collection接口与Map接口主要用于
-
Collection接口继承了java.lang.Iterable接口,该接口有一个iterator()方法,那么所有实现了Collection接口的集合类都有一个iterator()方法,用以返回一个实现了Iterator接口的对象。
public Iterator iterator(): 获取集合对应的迭代器,用来遍历集合中的元素的。- 集合对象每次调用iterator()方法都得到一个全新的迭代器对象,默认游标都在集合的第一个元素之前。
-
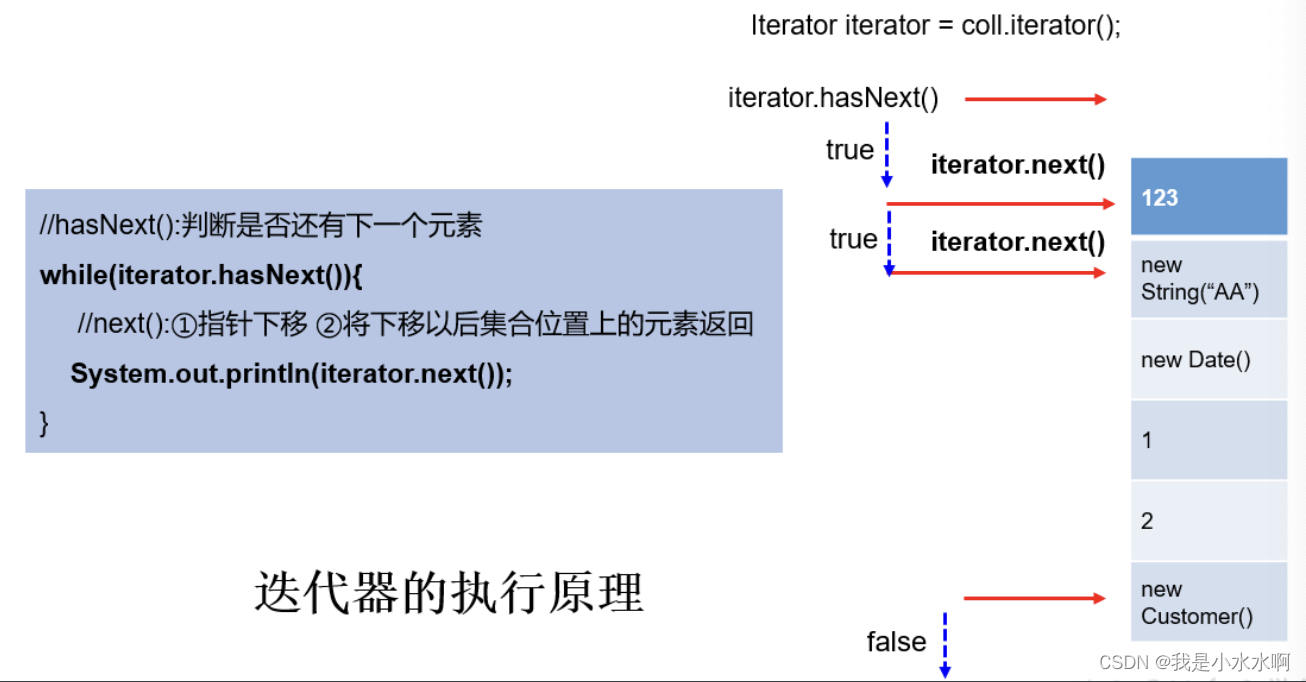
Iterator接口的常用方法如下:
public E next():返回迭代的下一个元素。public boolean hasNext():如果仍有元素可以迭代,则返回 true。
-
注意:在调用it.next()方法之前必须要调用it.hasNext()进行检测。若不调用,且下一条记录无效,直接调用it.next()会抛出
NoSuchElementException异常。
举例:
import org.junit.Test;
import java.util.ArrayList;
import java.util.Collection;
import java.util.Iterator;public class TestIterator {@Testpublic void test01(){Collection coll = new ArrayList();coll.add("小李广");coll.add("扫地僧");coll.add("石破天");Iterator iterator = coll.iterator();System.out.println(iterator.next()); // 小李广System.out.println(iterator.next()); // 扫地僧System.out.println(iterator.next()); // 石破天System.out.println(iterator.next()); //报NoSuchElementException异常}@Testpublic void test02(){Collection coll = new ArrayList();coll.add("小李广");coll.add("扫地僧");coll.add("石破天");Iterator iterator = coll.iterator();//获取迭代器对象while(iterator.hasNext()) {//判断是否还有元素可迭代System.out.println(iterator.next());//取出下一个元素}/* 输出结果:*   小李广扫地僧石破天* */}
}
迭代器的执行原理
Iterator迭代器对象在遍历集合时,内部采用指针的方式来跟踪集合中的元素,接下来通过在这里插入代码片一个图例来演示Iterator对象迭代元素的过程:
使用Iterator迭代器删除元素:java.util.Iterator迭代器中有一个方法:void remove() ;
Iterator iter = coll.iterator();//回到起点
while(iter.hasNext()){Object obj = iter.next();if(obj.equals("Tom")){iter.remove();}
}
注意:- Iterator可以删除集合的元素,但是遍历过程中通过迭代器对象的remove方法,不是集合对象的remove方法。
- 如果还未调用next()或在上一次调用 next() 方法之后已经调用了 remove() 方法,再调用remove()都会报IllegalStateException。- Collection已经有remove(xx)方法了,为什么Iterator迭代器还要提供删除方法呢?因为迭代器的remove()可以按指定的条件进行删除。
import org.junit.Test;import java.util.ArrayList;
import java.util.Collection;
import java.util.Iterator;public class TestIteratorRemove {@Testpublic void test01(){Collection coll = new ArrayList();coll.add(1);coll.add(2);coll.add(3);coll.add(4);coll.add(5);coll.add(6);Iterator iterator = coll.iterator();while(iterator.hasNext()){Integer element = (Integer) iterator.next();if(element % 2 == 0){iterator.remove();}}System.out.println(coll); // [1, 3, 5]}
}
foreach循环
-
foreach循环(也称增强for循环)是 JDK5.0 中定义的一个高级for循环,专门用来
遍历数组和集合的。 -
foreach循环的语法格式:
for(元素的数据类型 局部变量 : Collection集合或数组){ //操作局部变量的输出操作
}
//这里局部变量就是一个临时变量,自己命名就可以
- 举例
import org.junit.Test;import java.util.ArrayList;
import java.util.Collection;public class TestForeach {@Testpublic void test01(){Collection coll = new ArrayList();coll.add("小李广");coll.add("扫地僧");coll.add("石破天");//foreach循环其实就是使用Iterator迭代器来完成元素的遍历的。for (Object o : coll) {System.out.println(o); // 循环遍历之前的ArrayList}}@Testpublic void test02(){int[] nums = {1,2,3,4,5};for (int num : nums) {System.out.println(num);}System.out.println("-----------------");String[] names = {"张三","李四","王五"};for (String name : names) {System.out.println(name);}}
}
对于集合的遍历,增强for的内部原理其实是个Iterator迭代器。
它用于遍历Collection和数组。通常只进行遍历元素,不要在遍历的过程中对集合元素进行增删操作。
Collection子接口1:List
List接口特点
-
鉴于Java中数组用来存储数据的局限性,我们通常使用
java.util.List替代数组 -
List集合类中
元素有序、且可重复,集合中的每个元素都有其对应的顺序索引。- 举例:List集合存储数据,就像银行门口客服,给每一个来办理业务的客户分配序号:第一个来的是“张三”,客服给他分配的是0;第二个来的是“李四”,客服给他分配的1;以此类推,最后一个序号应该是“总人数-1”。
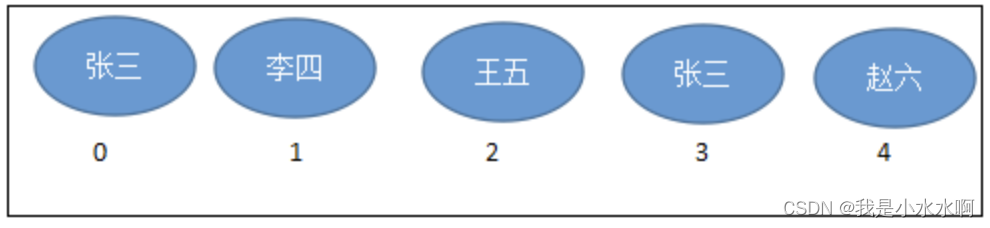
- 举例:List集合存储数据,就像银行门口客服,给每一个来办理业务的客户分配序号:第一个来的是“张三”,客服给他分配的是0;第二个来的是“李四”,客服给他分配的1;以此类推,最后一个序号应该是“总人数-1”。
List接口方法
List除了从Collection集合继承的方法外,List 集合里添加了一些根据索引来操作集合元素的方法。
- 插入元素
void add(int index, Object ele):在index位置插入ele元素- boolean addAll(int index, Collection eles):从index位置开始将eles中的所有元素添加进来
- 获取元素
Object get(int index):获取指定index位置的元素- List subList(int fromIndex, int toIndex):返回从fromIndex到toIndex位置的子集合
- 获取元素索引
- int indexOf(Object obj):返回obj在集合中首次出现的位置
- int lastIndexOf(Object obj):返回obj在当前集合中末次出现的位置
- 删除和替换元素
-
Object remove(int index):移除指定index位置的元素,并返回此元素 -
Object set(int index, Object ele):设置指定index位置的元素为ele
举例:
-
import java.util.ArrayList;
import java.util.List;public class TestListMethod {public static void main(String[] args) {// 创建List集合对象List<String> list = new ArrayList<String>();// 往 尾部添加 指定元素list.add("图图");list.add("小美");list.add("不高兴");System.out.println(list);// add(int index,String s) 往指定位置添加list.add(1,"没头脑");System.out.println(list);// String remove(int index) 删除指定位置元素  返回被删除元素// 删除索引位置为2的元素System.out.println("删除索引位置为2的元素");System.out.println(list.remove(2));System.out.println(list);// String set(int index,String s)// 在指定位置 进行 元素替代(改)// 修改指定位置元素list.set(0, "三毛");System.out.println(list);// String get(int index)  获取指定位置元素// 跟size() 方法一起用  来 遍历的for(int i = 0;i<list.size();i++){System.out.println(list.get(i));}//还可以使用增强forfor (String string : list) {System.out.println(string);}}
}
注意:在JavaSE中List名称的类型有两个,一个是java.util.List集合接口,一个是java.awt.List图形界面的组件,别导错包了。
List接口主要实现类:ArrayList
-
ArrayList 是 List 接口的
主要实现类 -
本质上,ArrayList是对象引用的一个”变长”数组
-
Arrays.asList(…) 方法返回的 List 集合,既不是 ArrayList 实例,也不是 Vector 实例。 Arrays.asList(…) 返回值是一个固定长度的 List 集合

List的实现类之二:LinkedList
对于频繁的插入或删除元素的操作,建议使用LinkedList类,效率较高。这是由底层采用链表(双向链表)结构存储数据决定的。
特有方法:
- void addFirst(Object obj)
- void addLast(Object obj)
- Object getFirst()
- Object getLast()
- Object removeFirst()
- Object removeLast()
List的实现类之三:Vector(老了)
- Vector 是一个
古老的集合,JDK1.0就有了。大多数操作与ArrayList相同,区别之处在于Vector是线程安全的。 - 在各种List中,最好把
ArrayList作为默认选择。当插入、删除频繁时,使用LinkedList;Vector总是比ArrayList慢,所以尽量避免使用。
特有方法:
- void addElement(Object obj)
- void insertElementAt(Object obj,int index)
- void setElementAt(Object obj,int index)
- void removeElement(Object obj)
- void removeAllElements()
@Test
public void testListRemove() {List list = new ArrayList();list.add(1);list.add(2);list.add(3);updateList(list);System.out.println(list);//[1,2]
}private static void updateList(List list) {list.remove(2);  // 移除下标
}
Collection子接口2:Set
Set接口概述
- Set接口是Collection的子接口,Set接口相较于Collection接口没有提供额外的方法
- Set 集合不允许包含相同的元素,如果试把两个相同的元素加入同一个 Set 集合中,则添加操作失败。
- Set集合支持的遍历方式和Collection集合一样:foreach和Iterator。
- Set的常用实现类有:HashSet、TreeSet、LinkedHashSet。
Set主要实现类:HashSet
HashSet概述
-
HashSet 是 Set 接口的主要实现类,大多数时候使用 Set 集合时都使用这个实现类。
-
HashSet 按 Hash 算法来存储集合中的元素,因此具有很好的存储、查找、删除性能。
-
HashSet 具有以下
特点:- 不能保证元素的排列顺序
- HashSet 不是线程安全的
- 集合元素可以是 null
-
HashSet 集合
判断两个元素相等的标准:两个对象通过hashCode()方法得到的哈希值相等,并且两个对象的equals()方法返回值为true。 -
对于存放在Set容器中的对象,对应的类一定要重写hashCode()和equals(Object obj)方法,以实现对象相等规则。即:“相等的对象必须具有相等的散列码”。
-
HashSet集合中元素的无序性,不等同于随机性。这里的无序性与元素的添加位置有关。具体来说:我们在添加每一个元素到数组中时,具体的存储位置是由元素的hashCode()调用后返回的hash值决定的。导致在数组中每个元素不是依次紧密存放的,表现出一定的无序性。
HashSet中添加元素的过程:
-
第1步:当向 HashSet 集合中存入一个元素时,HashSet 会调用该对象的 hashCode() 方法得到该对象的 hashCode值,然后根据 hashCode值,通过某个散列函数决定该对象在 HashSet 底层数组中的存储位置。
-
第2步:如果要在数组中存储的位置上没有元素,则直接添加成功。
-
第3步:如果要在数组中存储的位置上有元素,则继续比较:
- 如果两个元素的hashCode值不相等,则添加成功;
- 如果两个元素的hashCode()值相等,则会继续调用equals()方法:
- 如果equals()方法结果为false,则添加成功。
- 如果equals()方法结果为true,则添加失败。
第2步添加成功,元素会保存在底层数组中。
第3步两种添加成功的操作,由于该底层数组的位置已经有元素了,则会通过
链表的方式继续链接,存储。
举例:
import java.util.Objects;public class MyDate {private int year;private int month;private int day;public MyDate(int year, int month, int day) {this.year = year;this.month = month;this.day = day;}@Overridepublic boolean equals(Object o) {if (this == o) return true;if (o == null || getClass() != o.getClass()) return false;MyDate myDate = (MyDate) o;return year == myDate.year &&month == myDate.month &&day == myDate.day;}@Overridepublic int hashCode() {return Objects.hash(year, month, day);}@Overridepublic String toString() {return "MyDate{" +"year=" + year +", month=" + month +", day=" + day +'}';}
}
测试类
import org.junit.Test;import java.util.HashSet;public class TestHashSet {@Testpublic void test01(){HashSet set = new HashSet();set.add("张三");set.add("张三");set.add("李四");set.add("王五");set.add("王五");set.add("赵六");System.out.println("set = " + set);//不允许重复,无序}@Testpublic void test02(){HashSet set = new HashSet();set.add(new MyDate(2021,1,1));set.add(new MyDate(2021,1,1));set.add(new MyDate(2022,2,4));set.add(new MyDate(2022,2,4));System.out.println("set = " + set);//不允许重复,无序// set = [MyDate{year=2022, month=2, day=4}, MyDate{year=2021, month=1, day=1}]}
}
重写 hashCode() 方法的基本原则
- 在程序运行时,同一个对象多次调用 hashCode() 方法应该返回相同的值。
- 当两个对象的 equals() 方法比较返回 true 时,这两个对象的 hashCode() 方法的返回值也应相等。
- 对象中用作 equals() 方法比较的 Field,都应该用来计算 hashCode 值。
注意:如果两个元素的 equals() 方法返回 true,但它们的 hashCode() 返回值不相等,hashSet 将会把它们存储在不同的位置,但依然可以添加成功。
重写equals()方法的基本原则
-
重写equals方法的时候一般都需要同时复写hashCode方法。通常参与计算hashCode的对象的属性也应该参与到equals()中进行计算。
-
推荐:开发中直接调用Eclipse/IDEA里的快捷键自动重写equals()和hashCode()方法即可。
- 为什么用Eclipse/IDEA复写hashCode方法,有31这个数字?
首先,选择系数的时候要选择尽量大的系数。因为如果计算出来的hash地址越大,所谓的“冲突”就越少,查找起来效率也会提高。(减少冲突)其次,31只占用5bits,相乘造成数据溢出的概率较小。再次,31可以 由i*31== (i<<5)-1来表示,现在很多虚拟机里面都有做相关优化。(提高算法效率)最后,31是一个素数,素数作用就是如果我用一个数字来乘以这个素数,那么最终出来的结果只能被素数本身和被乘数还有1来整除!(减少冲突)
练习
**练习1:**在List内去除重复数字值,要求尽量简单
public static List duplicateList(List list) {HashSet set = new HashSet();set.addAll(list);return new ArrayList(set);
}
public static void main(String[] args) {List list = new ArrayList();list.add(new Integer(1));list.add(new Integer(2));list.add(new Integer(2));list.add(new Integer(4));list.add(new Integer(4));List list2 = duplicateList(list);for (Object integer : list2) {System.out.println(integer);}
}
**练习2:**获取随机数
编写一个程序,获取10个1至20的随机数,要求随机数不能重复。并把最终的随机数输出到控制台。
public class RandomValueTest {public static void main(String[] args) {HashSet hs = new HashSet(); // 创建集合对象Random r = new Random();while (hs.size() < 10) {int num = r.nextInt(20) + 1; // 生成1到20的随机数hs.add(num);}for (Integer integer : hs) { // 遍历集合System.out.println(integer); // 打印每一个元素}}
}
**练习3:**去重
public class DistinctTest {public static void main(String[] args) {Scanner sc = new Scanner(System.in); // 创建键盘录入对象System.out.println("请输入一行字符串:");String line = sc.nextLine(); // 将键盘录入的字符串存储在line中char[] arr = line.toCharArray(); // 将字符串转换成字符数组HashSet hs = new HashSet(); // 创建HashSet集合对象for (Object c : arr) { // 遍历字符数组hs.add(c); // 将字符数组中的字符添加到集合中}for (Object ch : hs) { // 遍历集合System.out.print(ch);}}
}
**练习4:**面试题
import java.util.HashSet;
import java.util.Objects;public class Person {private int num;private String name;@Overridepublic String toString() {return "Person{" +"num=" + num +", name='" + name + '\'' +'}';}@Overridepublic boolean equals(Object o) {System.out.println("进入了equals方法.....");if (this == o) return true;if (o == null || getClass() != o.getClass()) return false;Person person = (Person) o;return num == person.num && Objects.equals(name, person.name);}@Overridepublic int hashCode() {return Objects.hash(num, name);}public Person(int num, String name) {this.num = num;this.name = name;}public void setNum(int num) {this.num = num;}public void setName(String name) {this.name = name;}public int getNum() {return num;}public String getName() {return name;}public static void main(String[] args) {HashSet set = new HashSet();Person p1 = new Person(1001,"AA");Person p2 = new Person(1002,"BB");set.add(p1);set.add(p2);p1.name = "CC"; System.out.println("现在集合里的元素:"+set); // 现在集合里的元素:[Person{num=1002, name='BB'}, Person{num=1001, name='CC'}] --->修改成功System.out.println("现在的p1"+p1); // 现在的 p1 也修改成功/** 在equals 方法里面 打印了 东西 但是这里也没有显示equals方法的进入,* */set.remove(p1); // 移除p1  但是移除不了 p1的hashCode() 已经改变了 进不了equal方法了 如果是进入了哈希算法相同的位置 但是之前的哈希值值 1001 AA 之后的是1001CC 所以哈希值不同。System.out.println(set); // [Person{num=1002, name='BB'}, Person{num=1001, name='CC'}]}
}
类似:
import java.util.HashSet;
import java.util.Objects;public class Person {private int num;private String name;@Overridepublic String toString() {return "Person{" +"num=" + num +", name='" + name + '\'' +'}';}@Overridepublic boolean equals(Object o) {System.out.println("进入了equals方法.....");if (this == o) return true;if (o == null || getClass() != o.getClass()) return false;Person person = (Person) o;return num == person.num && Objects.equals(name, person.name);}@Overridepublic int hashCode() {return Objects.hash(num, name);}public Person(int num, String name) {this.num = num;this.name = name;}public void setNum(int num) {this.num = num;}public void setName(String name) {this.name = name;}public int getNum() {return num;}public String getName() {return name;}public static void main(String[] args) {HashSet set = new HashSet();Person p1 = new Person(1001,"AA");Person p2 = new Person(1002,"BB");set.add(p1);set.add(p2);p1.name = "CC";System.out.println("现在集合里的元素:"+set); // 现在集合里的元素:[Person{num=1002, name='BB'}, Person{num=1001, name='CC'}] --->修改成功System.out.println("现在的p1"+p1); // 现在的 p1 也修改成功/** 在equals 方法里面 打印了 东西 但是这里也没有显示equals方法的进入,* */set.remove(p1); // 移除p1 但是移除不了 p1的hashCode() 已经改变了 进不了equal方法了,就算是创建了一样的hashCode,进了equal方法也不相等了System.out.println(set); // [Person{num=1002, name='BB'}, Person{num=1001, name='CC'}]set.add(new Person(1001,"CC"));System.out.println(set); // [Person{num=1002, name='BB'}, Person{num=1001, name='CC'}, Person{num=1001, name='CC'}]
// 现在居然可以加入"相同"的对象set.add(new Person(1001,"AA"));System.out.println(set); // [Person{num=1002, name='BB'}, Person{num=1001, name='CC'}, Person{num=1001, name='CC'}, Person{num=1001, name='AA'}]//其中Person类中重写了hashCode()和equal()方法}
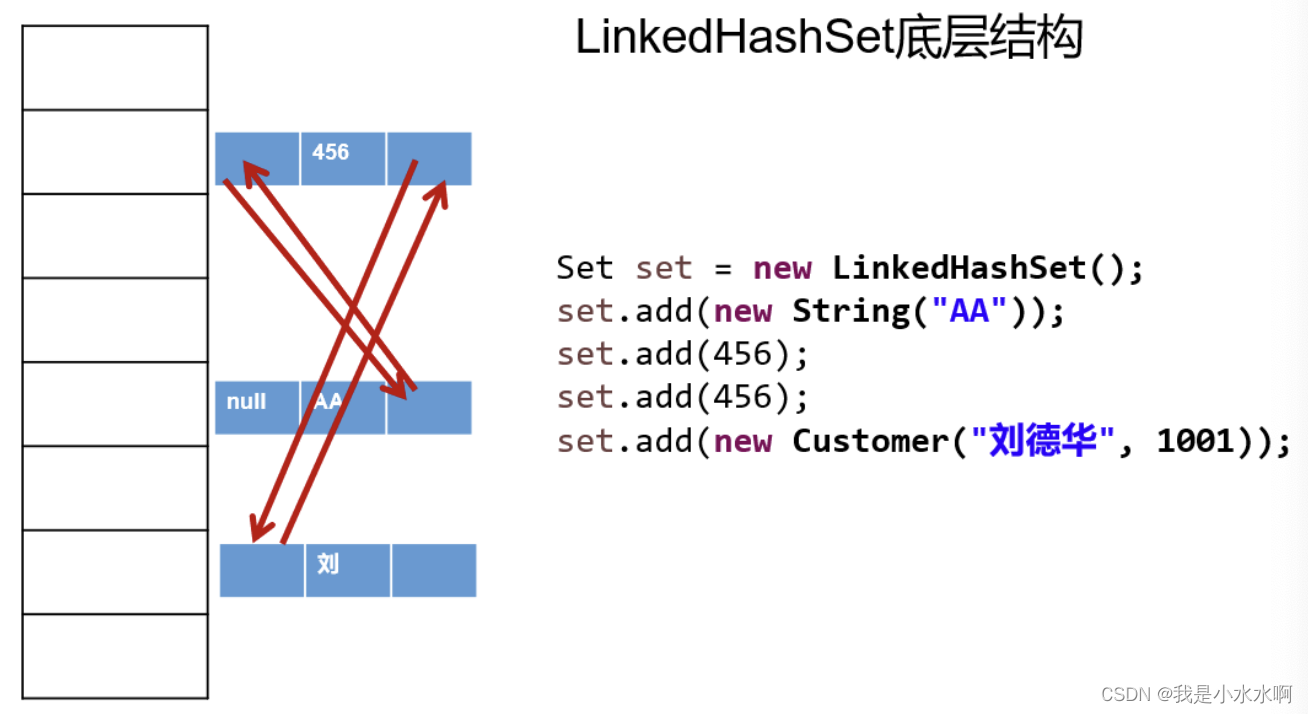
}Set实现类之二:LinkedHashSet
-
LinkedHashSet 是 HashSet 的子类,不允许集合元素重复。
-
LinkedHashSet 根据元素的 hashCode 值来决定元素的存储位置,但它同时使用
双向链表维护元素的次序,这使得元素看起来是以添加顺序保存的。 -
LinkedHashSet
插入性能略低于 HashSet,但在迭代访问Set 里的全部元素时有很好的性能。
朴素一点就是按顺序存储
import org.junit.Test;import java.util.LinkedHashSet;public class TestLinkedHashSet {@Testpublic void test01(){LinkedHashSet set = new LinkedHashSet();set.add("张三");set.add("张三");set.add("李四");set.add("王五");set.add("王五");set.add("赵六");System.out.println("set = " + set);//不允许重复,体现添加顺序}
}
Set实现类之三:TreeSet
1 TreeSet概述
- TreeSet 是 SortedSet 接口的实现类,TreeSet 可以按照添加的元素的指定的属性的大小顺序进行遍历。
- TreeSet底层使用
红黑树结构存储数据 - 新增的方法如下:
- Comparator comparator()
- Object first()
- Object last()
- Object lower(Object e)
- Object higher(Object e)
- SortedSet subSet(fromElement, toElement)
- SortedSet headSet(toElement)
- SortedSet tailSet(fromElement)
- TreeSet特点:不允许重复、实现排序(自然排序或定制排序)
- TreeSet 两种排序方法:
自然排序和定制排序。默认情况下,TreeSet 采用自然排序。自然排序:TreeSet 会调用集合元素的 compareTo(Object obj) 方法来比较元素之间的大小关系,然后将集合元素按升序(默认情况)排列。- 如果试图把一个对象添加到 TreeSet 时,则该对象的类必须实现 Comparable 接口。
- 实现 Comparable 的类必须实现 compareTo(Object obj) 方法,两个对象即通过 compareTo(Object obj) 方法的返回值来比较大小。
定制排序:如果元素所属的类没有实现Comparable接口,或不希望按照升序(默认情况)的方式排列元素或希望按照其它属性大小进行排序,则考虑使用定制排序。定制排序,通过Comparator接口来实现。需要重写compare(T o1,T o2)方法。- 利用int compare(T o1,T o2)方法,比较o1和o2的大小:如果方法返回正整数,则表示o1大于o2;如果返回0,表示相等;返回负整数,表示o1小于o2。
- 要实现定制排序,需要将实现Comparator接口的实例作为形参传递给TreeSet的构造器。
- 因为只有相同类的两个实例才会比较大小,所以向 TreeSet 中添加的应该是
同一个类的对象。 - 对于 TreeSet 集合而言,它判断
两个对象是否相等的唯一标准是:两个对象通过compareTo(Object obj) 或compare(Object o1,Object o2)方法比较返回值。返回值为0,则认为两个对象相等。
注意它的结构不一样,之前那种修改元素之后,在添加可能会添加出一样元素的值,这个结构不一样要特殊分析。
举例:
import org.junit.Test;
import java.util.Iterator;
import java.util.TreeSet;public class TreeSetTest {/** 自然排序:针对String类的对象* */@Testpublic void test1(){TreeSet set = new TreeSet();set.add("MM");set.add("CC");set.add("AA");set.add("DD");set.add("ZZ");//set.add(123);  //报ClassCastException的异常Iterator iterator = set.iterator();while(iterator.hasNext()){System.out.println(iterator.next());}}/** 自然排序:针对User类的对象* */@Testpublic void test2(){TreeSet set = new TreeSet();set.add(new User("Tom",12));set.add(new User("Rose",23));set.add(new User("Jerry",2));set.add(new User("Eric",18));set.add(new User("Tommy",44));set.add(new User("Jim",23));set.add(new User("Maria",18));//set.add("Tom");Iterator iterator = set.iterator();while(iterator.hasNext()){System.out.println(iterator.next());}System.out.println(set.contains(new User("Jack", 23))); //true}
}
其中,User类定义如下:
public class User implements Comparable{String name;int age;public User() {}public User(String name, int age) {this.name = name;this.age = age;}@Overridepublic String toString() {return "User{" +"name='" + name + '\'' +", age=" + age +'}';}/*举例:按照age从小到大的顺序排列,如果age相同,则按照name从大到小的顺序排列* */public int compareTo(Object o) {if(this == o){return 0;}if(o instanceof User){User user = (User)o;int value = this.age - user.age;if(value != 0){return value;}return -this.name.compareTo(user.name);}throw new RuntimeException("输入的类型不匹配");}
}
/** 定制排序* */
@Test
public void test3(){//按照User的姓名的从小到大的顺序排列Comparator comparator = new Comparator() {@Overridepublic int compare(Object o1, Object o2) {if(o1 instanceof User && o2 instanceof User){User u1 = (User)o1;User u2 = (User)o2;return u1.name.compareTo(u2.name);}throw new RuntimeException("输入的类型不匹配");}};TreeSet set = new TreeSet(comparator);set.add(new User("Tom",12));set.add(new User("Rose",23));set.add(new User("Jerry",2));set.add(new User("Eric",18));set.add(new User("Tommy",44));set.add(new User("Jim",23));set.add(new User("Maria",18));//set.add(new User("Maria",28));Iterator iterator = set.iterator();while(iterator.hasNext()){System.out.println(iterator.next());}
}
**练习1:**在一个List集合中存储了多个无大小顺序并且有重复的字符串,定义一个方法,让其有序(从小到大排序),并且不能去除重复元素。
public class SortTest {public static void main(String[] args) {ArrayList list = new ArrayList();list.add("ccc");list.add("ccc");list.add("aaa");list.add("aaa");list.add("bbb");list.add("ddd");list.add("ddd");sort(list);System.out.println(list);}/** 对集合中的元素排序,并保留重复*/public static void sort(List list) {TreeSet ts = new TreeSet(new Comparator() { @Overridepublic int compare(Object o1, Object o2) { // 重写compare方法String s1 = (String)o1;String s2 = (String)o2;int num = s1.compareTo(s2); // 比较内容return num == 0 ? 1 : num; // 如果内容一样返回一个不为0的数字即可}});ts.addAll(list); // 将list集合中的所有元素添加到ts中list.clear(); // 清空listlist.addAll(ts); // 将ts中排序并保留重复的结果在添加到list中}
}
**练习2:**TreeSet的自然排序和定制排序
-
定义一个Employee类。
该类包含:private成员变量name,age,birthday,其中 birthday 为 MyDate 类的对象;
并为每一个属性定义 getter, setter 方法;
并重写 toString 方法输出 name, age, birthday -
MyDate类包含:
private成员变量year,month,day;并为每一个属性定义 getter, setter 方法; -
创建该类的 5 个对象,并把这些对象放入 TreeSet 集合中(下一章:TreeSet 需使用泛型来定义)
-
分别按以下两种方式对集合中的元素进行排序,并遍历输出:
1). 使Employee 实现 Comparable 接口,并按 name 排序
2). 创建 TreeSet 时传入 Comparator对象,按生日日期的先后排序。
- 代码实现:
public class MyDate implements Comparable{private int year;private int month;private int day;public MyDate() {}public MyDate(int year, int month, int day) {this.year = year;this.month = month;this.day = day;}public int getYear() {return year;}public void setYear(int year) {this.year = year;}public int getMonth() {return month;}public void setMonth(int month) {this.month = month;}public int getDay() {return day;}public void setDay(int day) {this.day = day;}@Overridepublic String toString() {
//        return "MyDate{" +
//                "year=" + year +
//                ", month=" + month +
//                ", day=" + day +
//                '}';return year + "年" + month + "月" + day + "日";}@Overridepublic int compareTo(Object o) {if(this == o){return 0;}if(o instanceof MyDate){MyDate myDate = (MyDate) o;int yearDistance = this.getYear() - myDate.getYear();if(yearDistance != 0){return yearDistance;}int monthDistance = this.getMonth() - myDate.getMonth();if(monthDistance != 0){return monthDistance;}return this.getDay() - myDate.getDay();}throw new RuntimeException("输入的类型不匹配");}
}
public class Employee implements Comparable{private String name;private int age;private MyDate birthday;public Employee() {}public Employee(String name, int age, MyDate birthday) {this.name = name;this.age = age;this.birthday = birthday;}public String getName() {return name;}public void setName(String name) {this.name = name;}public int getAge() {return age;}public void setAge(int age) {this.age = age;}public MyDate getBirthday() {return birthday;}public void setBirthday(MyDate birthday) {this.birthday = birthday;}@Overridepublic String toString() {return "Employee{" +"name='" + name + '\'' +", age='" + age + '\'' +", birthday=" + birthday +'}';}@Overridepublic int compareTo(Object o) {if(o == this){return 0;}if(o instanceof Employee){Employee emp = (Employee) o;return this.name.compareTo(emp.name);}throw new RuntimeException("传入的类型不匹配");}
}
public class EmployeeTest {/*自然排序:创建该类的 5 个对象,并把这些对象放入 TreeSet 集合中* 需求1:使Employee 实现 Comparable 接口,并按 name 排序* */@Testpublic void test1(){TreeSet set = new TreeSet();Employee e1 = new Employee("Tom",23,new MyDate(1999,7,9));Employee e2 = new Employee("Rose",43,new MyDate(1999,7,19));Employee e3 = new Employee("Jack",54,new MyDate(1998,12,21));Employee e4 = new Employee("Jerry",12,new MyDate(2002,4,21));Employee e5 = new Employee("Tony",22,new MyDate(2001,9,12));set.add(e1);set.add(e2);set.add(e3);set.add(e4);set.add(e5);//遍历Iterator iterator = set.iterator();while(iterator.hasNext()){System.out.println(iterator.next());}}/** 定制排序:* 创建 TreeSet 时传入 Comparator对象,按生日日期的先后排序。* */@Testpublic void test2(){Comparator comparator = new Comparator() {@Overridepublic int compare(Object o1, Object o2) {if(o1 instanceof Employee && o2 instanceof Employee){Employee e1 = (Employee) o1;Employee e2 = (Employee) o2;//对比两个employee的生日的大小MyDate birth1 = e1.getBirthday();MyDate birth2 = e2.getBirthday();//方式1:
//                    int yearDistance = birth1.getYear() - birth2.getYear();
//                    if(yearDistance != 0){
//                        return yearDistance;
//                    }
//                    int monthDistance = birth1.getMonth() - birth2.getMonth();
//                    if(monthDistance != 0){
//                        return monthDistance;
//                    }
//
//                    return birth1.getDay() - birth2.getDay();//方式2:return birth1.compareTo(birth2);}throw new RuntimeException("输入的类型不匹配");}};TreeSet set = new TreeSet(comparator);Employee e1 = new Employee("Tom",23,new MyDate(1999,7,9));Employee e2 = new Employee("Rose",43,new MyDate(1999,7,19));Employee e3 = new Employee("Jack",54,new MyDate(1998,12,21));Employee e4 = new Employee("Jerry",12,new MyDate(2002,4,21));Employee e5 = new Employee("Tony",22,new MyDate(2001,9,12));set.add(e1);set.add(e2);set.add(e3);set.add(e4);set.add(e5);//遍历Iterator iterator = set.iterator();while(iterator.hasNext()){System.out.println(iterator.next());}}
}
相关文章:
java(Collection类)
文章目录 Collection接口继承树Collection接口及方法判断删除其它 Iterator(迭代器)接口迭代器的执行原理 foreach循环Collection子接口1:ListList接口特点List接口方法List接口主要实现类:ArrayListList的实现类之二:LinkedListList的实现类…...

VS2019编译安装OpenMesh8.0
文章目录 一、简介二、相关准备三、编译安装四、举个栗子参考资料一、简介 多边形网格一直以来就是交互式3D图形应用程序中最合适的几何表示,它们足够灵活,可以近似任意形状,并且可以通过当前的图形硬件有效地处理,即使在今天的低成本电脑上也是如此。OpenMesh便是其中一种…...

Python爬虫遇到URL错误解决办法大全
在进行Python爬虫任务时,遇到URL错误是常见的问题之一。一个错误的URL链接可能导致爬虫无法访问所需的网页或资源。为了帮助您解决这个问题,本文将提供一些实用的解决方法,并给出相关代码示例,希望对您的爬虫任务有所帮助。 一、…...

基于Vue+ElementUI+Echarts+G2Plot的大屏设计器,代码完全开源
简介 🔥DataRoom是一款基于SpringBoot、MyBatisPlus、ElementUI、G2Plot、Echarts等技术栈的大屏设计器,具备大屏设计、预览、资源管理、组件管理等能力,支持JSON、MySQL、Oracle、PostgreSQL、HTTP、JavaScript、Groovy等数据集接入&#x…...
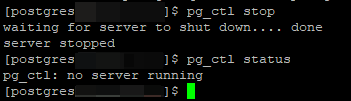
Linux - PostgreSQL 适用于9.x 以上的 tar.gz 源码安装与理解 - 报错集锦
这里写目录标题 序言主要内容bash 配置文件个人理解关于初始化 PostgreSQL 数据库的理解 启动方法检查服务器是否在PostgreSQL中运行关闭 postgresql 数据库方法参考链接 序言 PostgreSQL 9.x 以下版本笔者没用过,具体操作看参考链接,笔者就不记录重复操…...
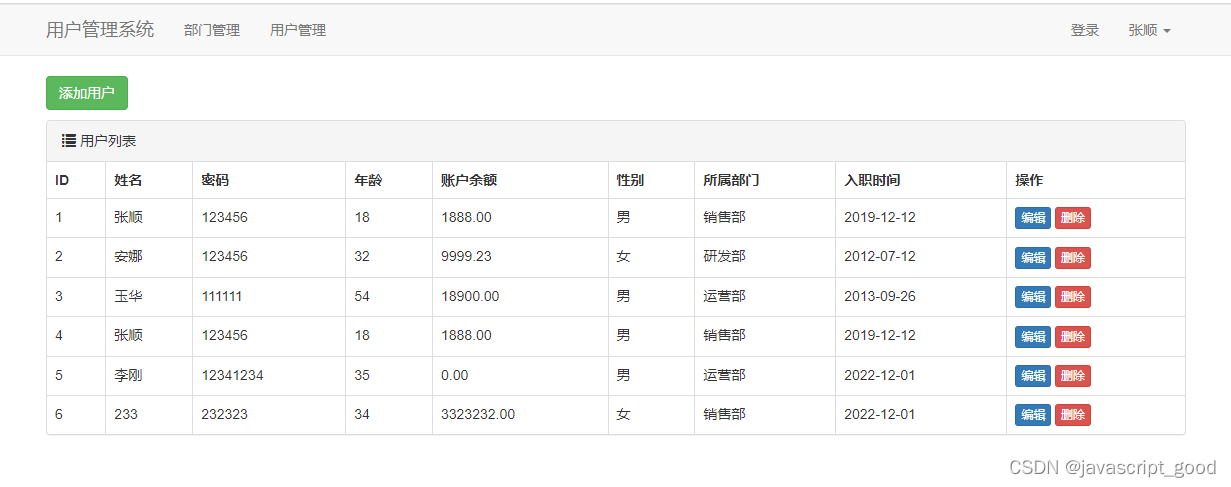
Django使用用户列表的展示和添加
接着上一篇:https://blog.csdn.net/javascript_good/article/details/132027702 来实现用户表的查询和添加 1、创建数据库表 在models.py 中,增加UserInfo类,包括字段姓名、密码、年龄、账号余额、入职时间、所属部门、性别 verbose_name 就…...

kubernetes错误汇总
title: “kubernetes错误汇总” categories: - “技术” tags: - “Kubernetes” - “错误汇总” toc: false original: true draft: false 1、增加 master etcd 报错 1.1、错误描述 由于创建的k8s集群,其中有一个master节点初始化失败,先删除了这个节…...
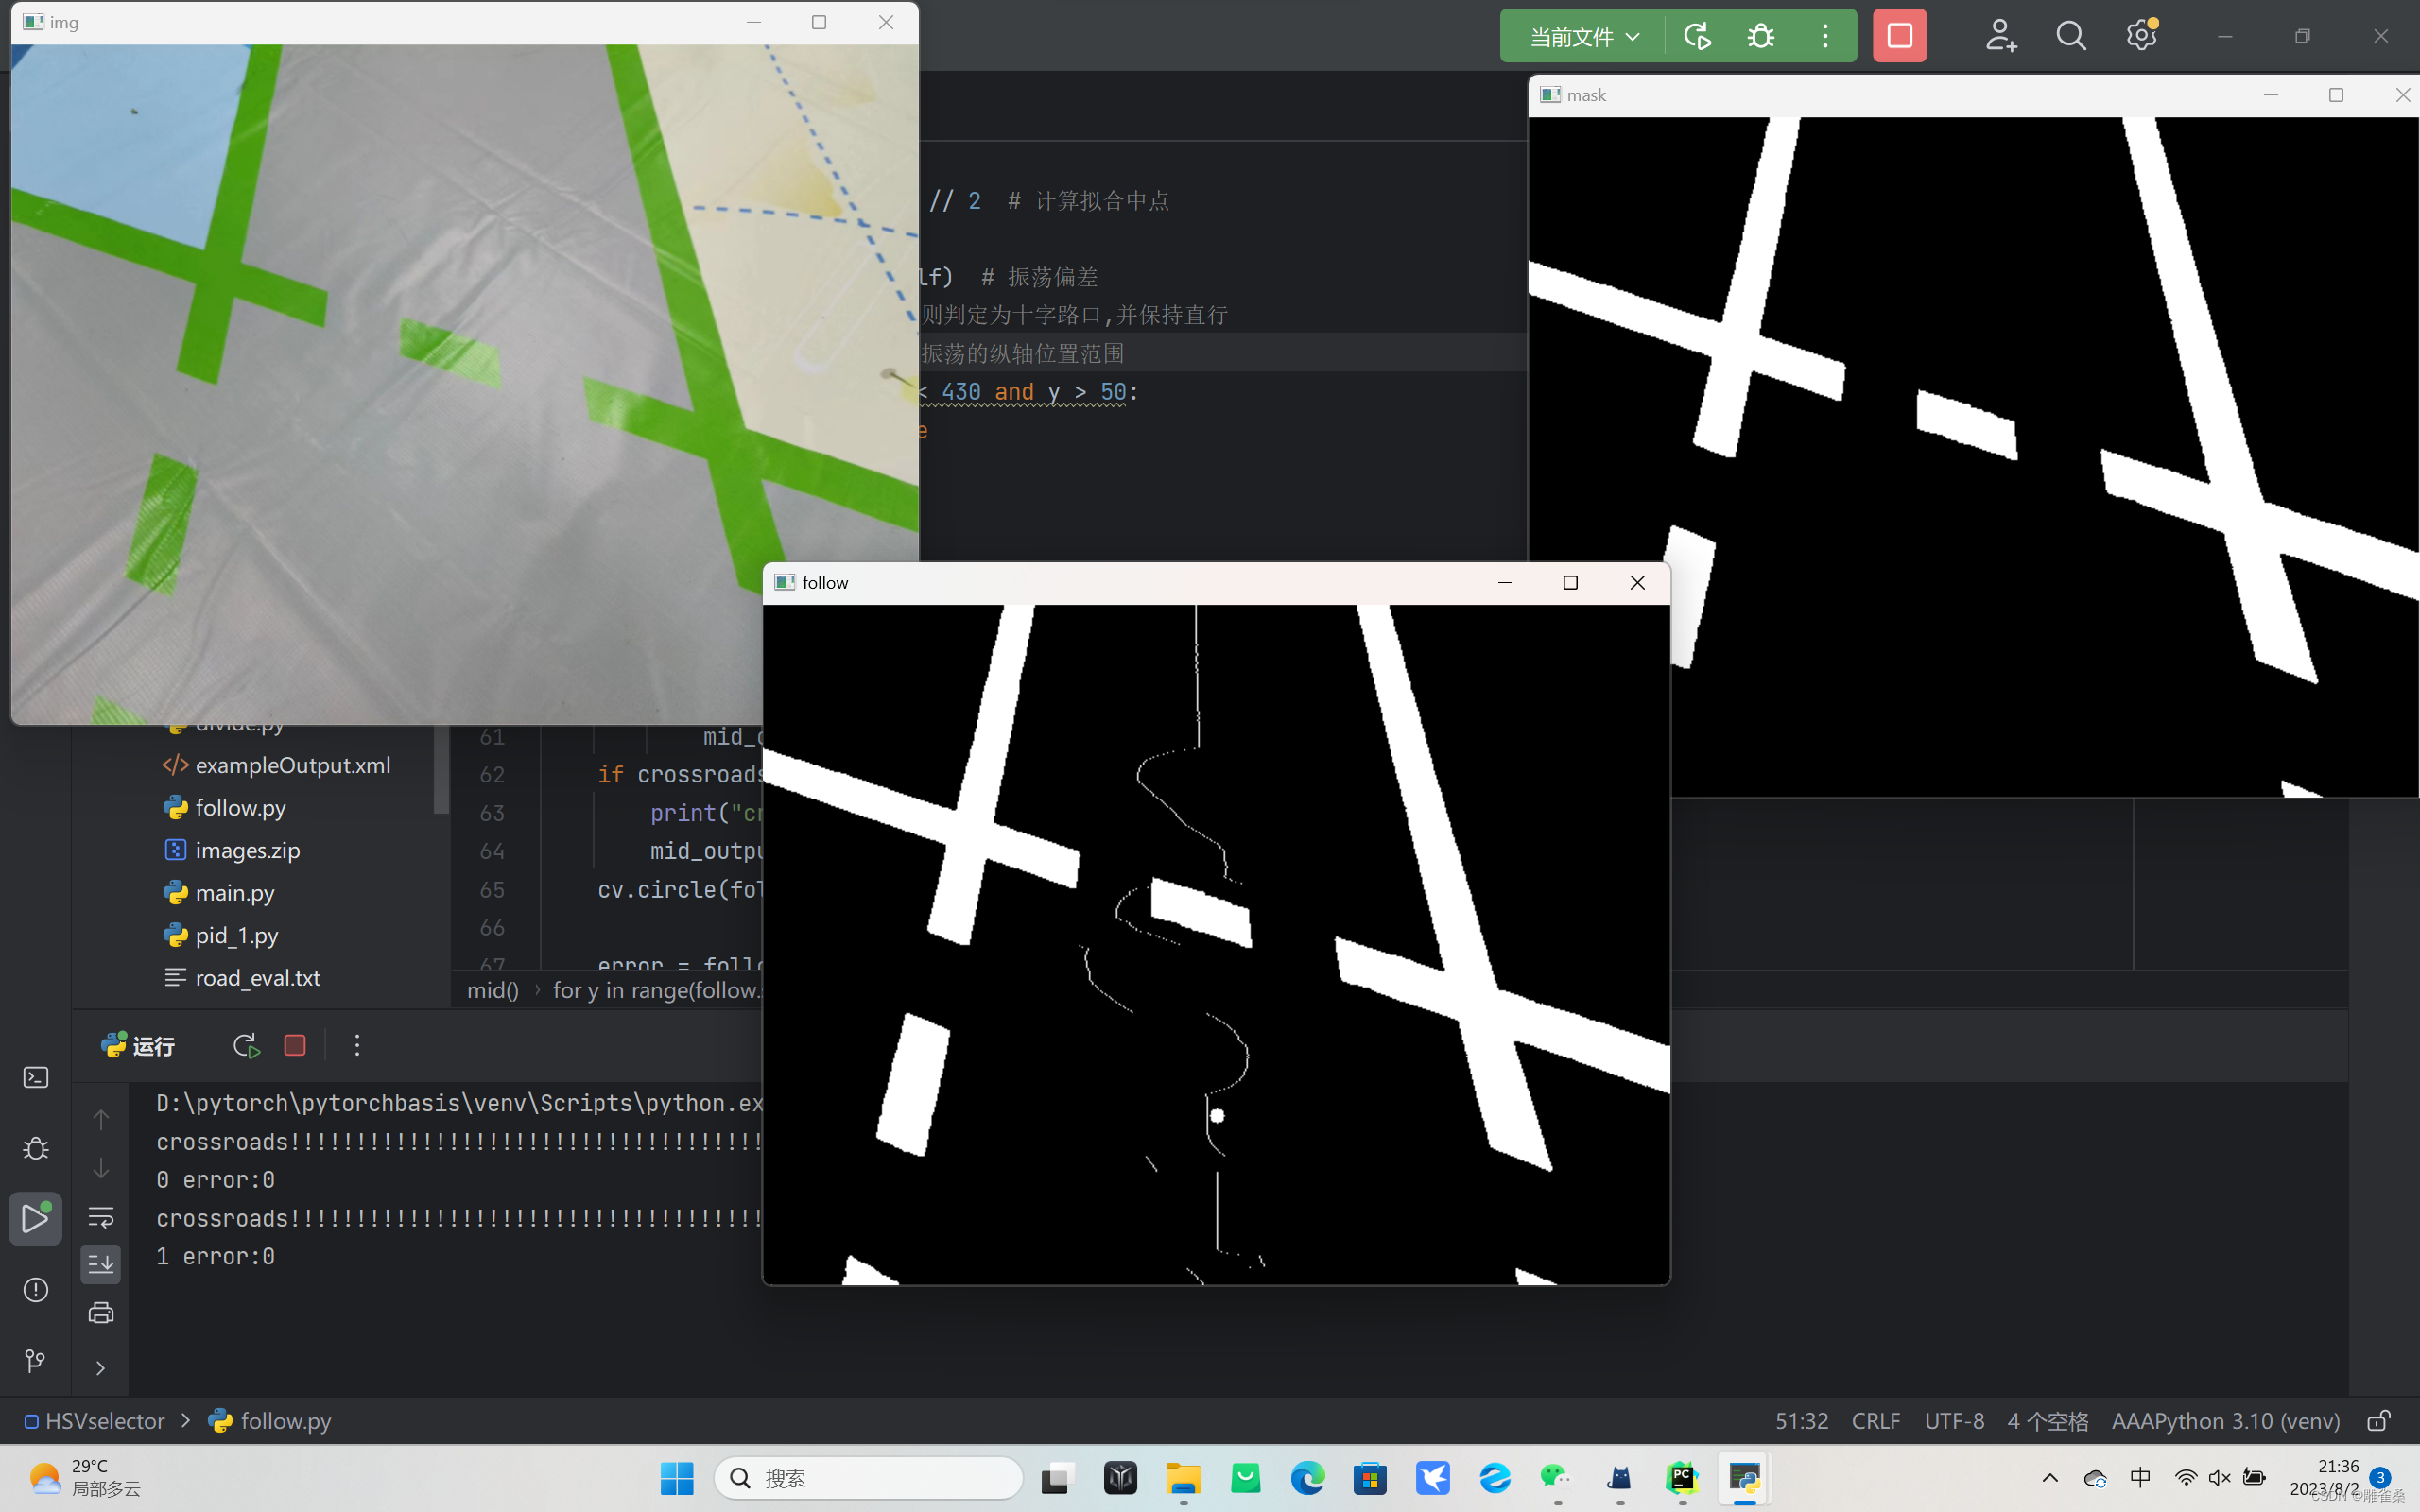
[openCV]基于拟合中线的智能车巡线方案V4
import cv2 as cv import os import numpy as np# 遍历文件夹函数 def getFileList(dir, Filelist, extNone):"""获取文件夹及其子文件夹中文件列表输入 dir:文件夹根目录输入 ext: 扩展名返回: 文件路径列表"""newDir d…...

【网络云盘客户端】——上传文件的功能的实现
目录 上传文件功能的实现 uploadtask的设计 设置上传的槽函数 uploadFileAction接口 uploadFile接口 定时上传文件 进度条的设计 上传文件功能的实现 上传文件功能实现 1.双击 ”上传文件 “的 QListWidgetItem 或者 点击 “上传” 菜单项 都会弹出一个文件对话框 2.在文…...
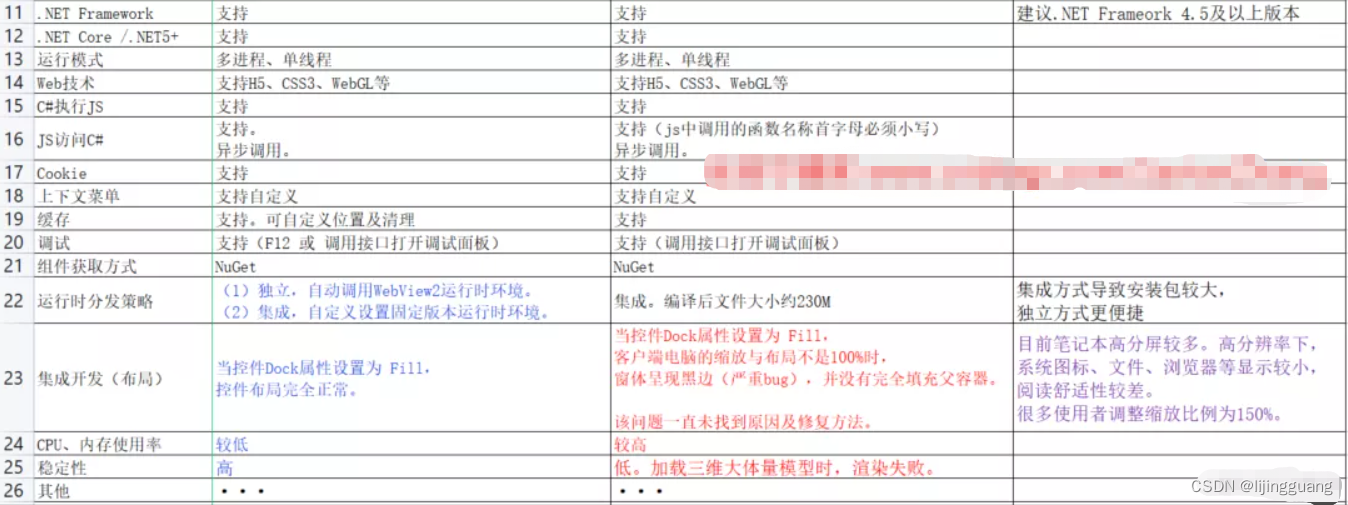
WebView2对比CefSharp的超强优势
第一次使用了CefSharp组件,集成开发结束后,测试及使用过程中遇到了一些无法处理的bug及严重的性能问题。然后又测试对比了其他多种组件,具体情况可以阅读我的博客 《.NET桌面程序集成Web网页开发的十种解决方案》。最终选用了微软新出…...

前端需要知道的计算机网络知识
1 Web 机制 无论通过有线方式 (通常是网线) 还是无线方式(比如 wifi 或蓝牙),通信需要进行连接,网络上的每台计算机需要链接到路由器(router)。 路由器确保从一台计算机上发出的一条信息可以到达正确的计算机。计算机…...
)
[2023杭电多校5 1005] Snake (生成函数)
题意 有 n n n 个标号为 1 , 2 , ⋯ , n 1,2,\cdots,n 1,2,⋯,n 的球,放到 m m m 个无标号盒子 (盒内顺序有标号),且每个盒子球数不超过 k k k,求方案数对 998 244 353 998\,244\,353 998244353 取模。 1 ≤ m , k ≤ n ≤ 1 0 6 1 \le…...
【MyBtis】各种查询功能
目录 【MyBtis】配置和映射 11.1 示例:实现表数据的增、删、改、查 1.创建工程mybatis_DML demo 2.创建数据库操作的工具类:DBOperatorMgr.java 3.创建映射接口 4.创建XML映射文件 5.测试 【MyBtis】配置和映射 MyBatis 的真正强大之外在于它的映射语句…...

H5打包封装小程序系统开发
H5打包封装小程序系统开发 H5打包封装小程序系统开发是指将H5页面打包封装成小程序的开发过程。下面是一个简单的步骤: 准备工作:首先,需要准备好H5页面的代码和资源文件。确保H5页面在浏览器中正常运行,并且没有依赖于浏览器特…...

SpringBoot集成jasypt,加密yml配置文件
SpringBoot集成jasypt,加密yml配置文件 一、pom配置二、生成密文代码三、配置3.1、yml加密配置3.2、密文配置3.3、启动配置3.4、部署配置 四、遇到的一些坑 最新项目安全检测,发现配置文件中数据库密码,redis密码仍处理明文状态 一、pom配置…...
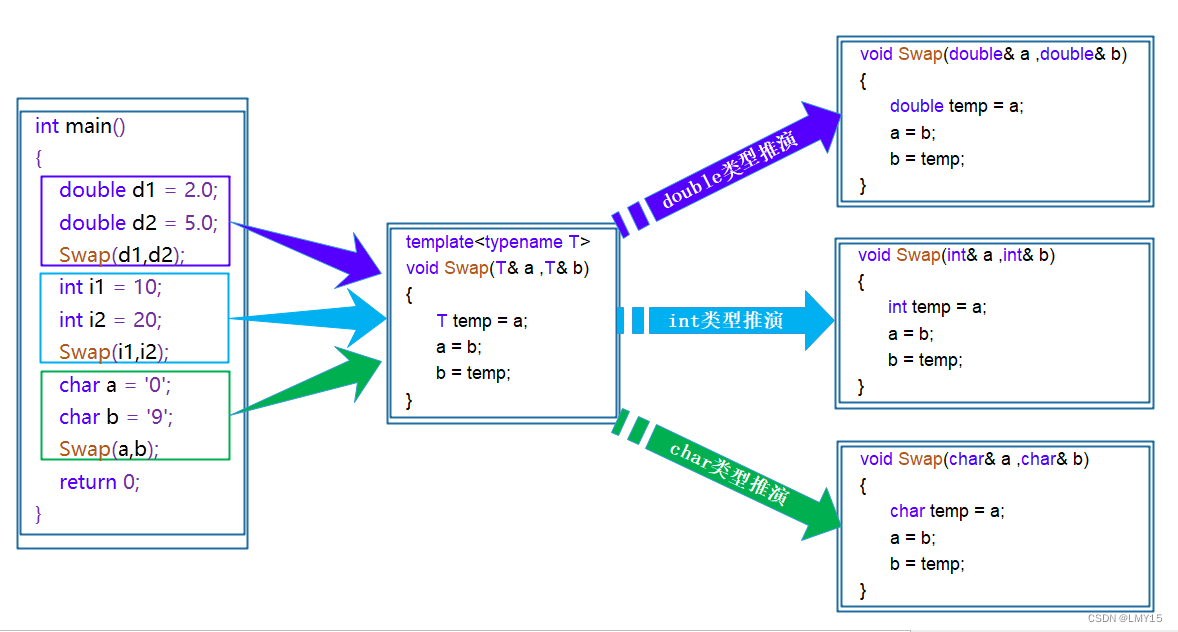
【C++】模板(初阶)
1、泛型编程 泛型编程:编写与类型无关的通用代码,是代码复用的一种手段。模板是泛型编程的基础 2、函数模板 函数模板代表了一个函数家族,该函数模板与类型无关,在使用时被参数化,根据实参类型产生函数的特定类型版本…...
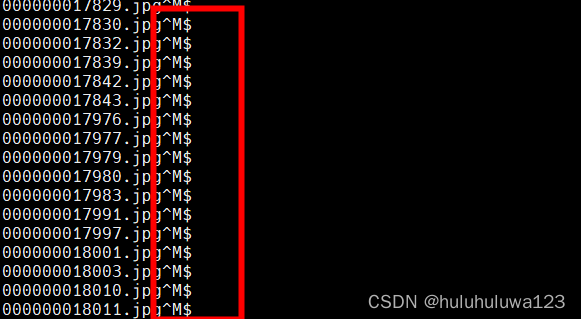
windows下的txt文档,传到ubuntu后,每行后面出现^M,怎么处理?
问题背景:windows下pycharm生成的txt文档,传到ubuntu后,每行后面出现^M 用vim打开显示 使用cat -A filename显示如下 参考https://www.lmlphp.com/user/16697/article/item/579325/给出的几种方法 方法一、dos2unix filename。服务器没装…...
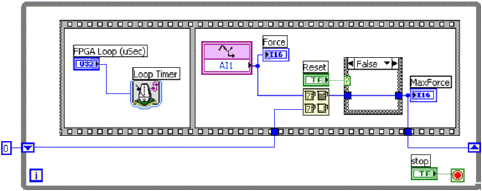
LabVIEW FPGA开发实时滑动摩擦系统
LabVIEW FPGA开发实时滑动摩擦系统 由于非线性摩擦效应的建模和补偿的固有困难,摩擦系统的运动控制已被广泛研究。最近,人们更加关注滑动动力学和滑动定位,作为传统机器人定位的低成本和更灵活的驱动替代方案。摩擦控制器设计和适当选择基础…...

Prometheus服务器、Prometheus被监控端、Grafana、Prometheus服务器、Prometheus被监控端、Grafana
day03 day03Prometheus概述部署Prometheus服务器环境说明:配置时间安装Prometheus服务器添加被监控端部署通用的监控exporterGrafana概述部署Grafana展示node1的监控信息监控MySQL数据库配置MySQL配置mysql exporter配置mysql exporter配置prometheus监控mysql自动…...
)
常见的锁策略(面试八股文)
1.乐观锁vs悲观锁 乐观锁:预测该场景中不太会出现锁冲突的情况。(后续做的工作会更少) 悲观锁:预测该场景非常容易出现锁冲突(后续做的工作会更多) 锁冲突:多个线程同时尝试去获得同一把锁&…...

AX-MES生产制造管理系统-总览
前言说起 MES 就不得不说 ERP,但是 ERP 大家基本上都知道,MES 就不一定了,常见的 ERP 系统包括 SAP、金蝶、用友等,ERP的流程相对来说也比较统一;MES就不同了,基本上熟悉业务流程的软件公司都可以开发并实施…...

基于XGBoost与SHAP的分子气味预测:从特征工程到可解释性分析
1. 项目概述与核心价值在香水设计、食品风味工业乃至环境监测领域,一个核心且持久的挑战是:如何从分子的化学结构出发,准确预测其气味?这不仅仅是化学家或调香师的直觉游戏,更是一个复杂的、高维度的模式识别问题。传统…...

如何用SMUDebugTool彻底掌控你的AMD Ryzen处理器性能调优
如何用SMUDebugTool彻底掌控你的AMD Ryzen处理器性能调优 【免费下载链接】SMUDebugTool A dedicated tool to help write/read various parameters of Ryzen-based systems, such as manual overclock, SMU, PCI, CPUID, MSR and Power Table. 项目地址: https://gitcode.co…...

智能检索新范式,让AIAgent自主决策,提升RAG效率100%!
市面上的 RAG 系统,不管叫什么名字,本质上只有两种做法: 第一种,一次性检索。把用户的 query 向量化,从语料库里捞出 Top-K 个文档片段,拼成一个大 prompt 塞给模型。GraphRAG、HippoRAG、LightRAG 都属于…...

HFSS仿真结果怎么看?以T型波导为例,读懂S参数与电场动态图
HFSS仿真结果深度解析:从S参数到电场动态图的实战指南当你第一次在HFSS中完成T型波导仿真后,面对满屏的曲线和彩色云图,是否感到既兴奋又困惑?那些起伏的S参数曲线究竟告诉你什么信息?电场图中跳跃的颜色又代表怎样的物…...

别再乱算相似度了!用Python实战二元变量聚类:从Jaccard系数到病人分组
医疗数据分析实战:用Python实现基于Jaccard系数的病人症状聚类在医疗数据分析领域,如何从海量病人症状数据中发现潜在规律一直是临床研究的难点。传统方法往往依赖医生经验或简单统计,而现代数据挖掘技术为我们提供了更科学的解决方案。本文将…...

为Alchitry Au FPGA开发板外接JTAG接口的完整指南
1. 项目概述与核心价值如果你正在使用基于Xilinx Artix-7 FPGA的Alchitry Au或Au开发板,并且已经厌倦了每次调试或烧录都要依赖板载的USB-JTAG桥接芯片,或者你的项目已经将板载USB接口挪作他用,那么为你的开发板外接一个独立的JTAG调试器&…...

【DeepSeek开源协议识别权威指南】:20年合规专家亲授3大协议陷阱与5步精准识别法
更多请点击: https://intelliparadigm.com 第一章:DeepSeek开源协议识别的底层逻辑与合规价值 DeepSeek系列模型(如DeepSeek-V2、DeepSeek-Coder)虽以“开源”名义发布,但其实际许可状态需通过结构化协议解析才能准确…...

配置OpenClaw Agent使用Taotoken作为后端模型提供商
🚀 告别海外账号与网络限制!稳定直连全球优质大模型,限时半价接入中。 👉 点击领取海量免费额度 配置OpenClaw Agent使用Taotoken作为后端模型提供商 基础教程类,指导希望使用OpenClaw等Agent工具的开发者,…...

基于Arduino与nRF24L01+的无线传感器平台设计与部署指南
1. 项目概述与设计思路如果你和我一样,喜欢在阳台或者小院子里种点蔬菜瓜果,那你肯定也遇到过这样的烦恼:出门几天,心里总惦记着家里的番茄苗是不是缺水了,小温室里的温度会不会太高。传统的温湿度计只能让你在现场读数…...