向 Maven 中央仓库上传一个修改过的基于jeecg的autoPOI的 jar包记录
1、注册https://issues.sonatype.org/账号
下面就代表注册好了,同时提交的工单也通过了
2、这里主要是goupId 需要进行认证,需要到域名注册商近一个txt的解析,以便确保这个是你的
通过下面来验证你的域名信息,这里主要是上面的工单号码要包括进去,我这里是一个链接地址作为text的返回

3、GPG签名
如果你没有设置过GPG签名,需要设置。
首先下载GPG工具
www.gnupg.org/download/
下载需要钱,没钱就付0元也可以下载,简单就下载win这个文件

下载运行后出现

遇到这种情况,就用命令行吧。
选择其中一个即可
执行一下脚本
gpg --generate-key
生成之后会填写一些个人信息
中间会填写一个passphrase,这个要记住。

通过下面的命令行,可以校验公钥的字符串发往与接收服务器是否成功。
发送
gpg --keyserver keyserver.ubuntu.com --send-keys FF490DBFEC050B856BB998716292A0B996ACB000
接收
gpg --keyserver keyserver.ubuntu.com --recv-keys FF490DBFEC050B856BB998716292A0B996ACB000

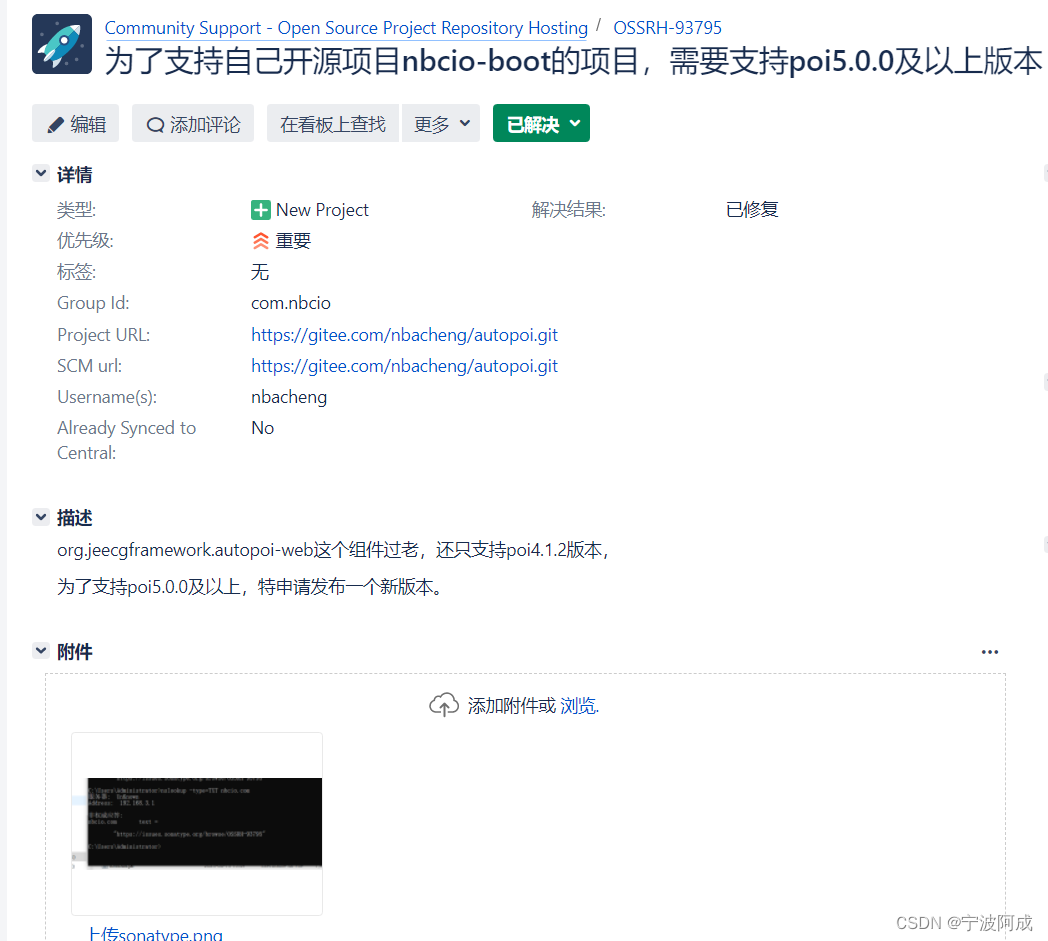
4、根据上面信息修改settings.xml和pom.xml文件,具体见附件
5、上传发布
mvn clean install deploy -P release 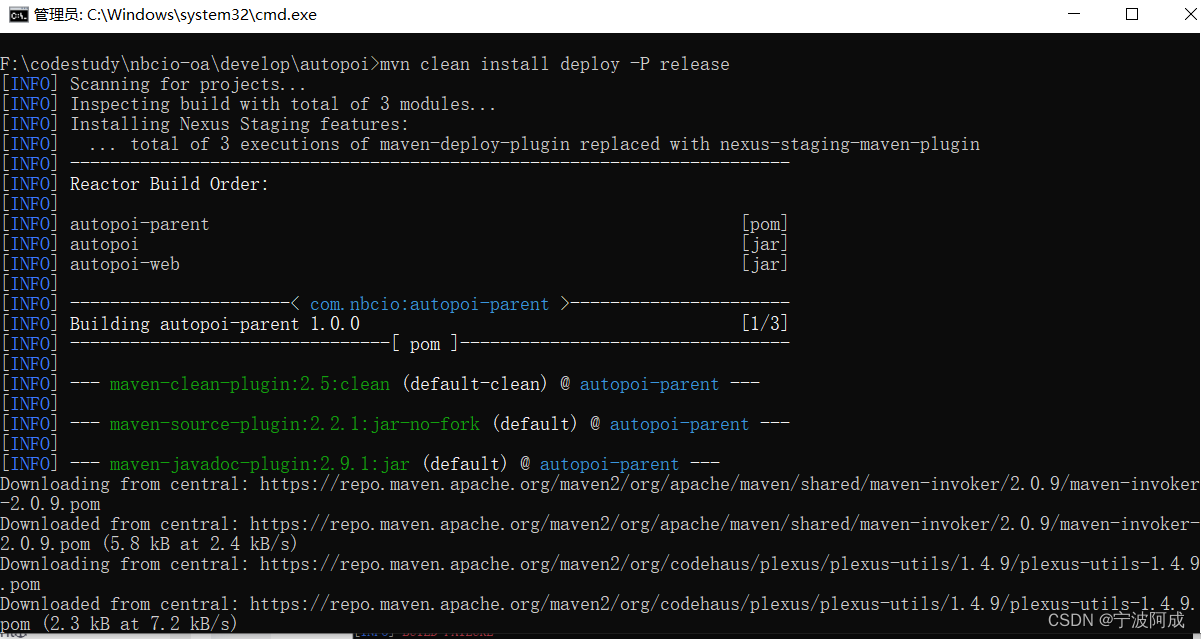
出现下面错误

原来是忘记mvn目录下的setting.xml忘记覆盖了,之后就出现下面发布正常了。

6、用之前的账号密码登录下面地址查看发布情况
Nexus Repository Manager
不过上面好像没有搜到
7、就可以到中央仓库中搜索到自己发布的构件了!
中央仓库搜索网站:http://search.maven.org/,可以收到了发的jar包了。
国内可以在下面阿里的仓库上搜索
仓库服务
附上:settings.xml文件
<servers> <server><id>ossrh</id><username>sonatype账号</username><password>sonatype密码</password></server></servers><profiles> <profile><id>ossrh</id><properties><gpg.executable>gpg</gpg.executable><gpg.passphrase>自己passphrase密码</gpg.passphrase></properties></profile></profiles> pom.xml文件
<project xmlns="http://maven.apache.org/POM/4.0.0"xmlns:xsi="http://www.w3.org/2001/XMLSchema-instance"xsi:schemaLocation="http://maven.apache.org/POM/4.0.0 http://maven.apache.org/xsd/maven-4.0.0.xsd"><modelVersion>4.0.0</modelVersion><groupId>com.nbcio</groupId><artifactId>autopoi-parent</artifactId><version>1.0.0</version><packaging>pom</packaging><name>autopoi-parent</name><url>http://www.nbcio.com</url><modules><module>autopoi</module><module>autopoi-web</module></modules><description> office 工具类 基于 poi</description><licenses><license><name>The Apache License, Version 2.0</name><url>http://www.apache.org/licenses/LICENSE-2.0.txt</url></license></licenses><scm><connection>scm:git:https://gitee.com/nbacheng/autopoi.git</connection><developerConnection>scm:git:https://gitee.com/nbacheng/autopoi.git</developerConnection><url>https://gitee.com/nbacheng/autopoi</url></scm><developers><developer><name>nbacheng</name><email>498871963@qq.com</email></developer></developers><properties><autopoi.version>1.0.0</autopoi.version><poi.version>5.0.0</poi.version><xerces.version>2.9.1</xerces.version><guava.version>29.0-jre</guava.version><commons-lang.version>3.10</commons-lang.version><slf4j.version>1.7.30</slf4j.version><spring.version>5.1.0.RELEASE</spring.version></properties><dependencyManagement><dependencies><!-- poi --><dependency><groupId>org.apache.poi</groupId><artifactId>poi</artifactId><version>${poi.version}</version></dependency><dependency><groupId>org.apache.poi</groupId><artifactId>poi-ooxml</artifactId><version>${poi.version}</version></dependency><dependency><groupId>org.apache.poi</groupId><artifactId>poi-ooxml-full</artifactId><version>${poi.version}</version></dependency><!-- sax 读取时候用到的 --><dependency><groupId>xerces</groupId><artifactId>xercesImpl</artifactId><version>${xerces.version}</version><optional>true</optional></dependency><dependency><groupId>org.apache.poi</groupId><artifactId>poi-scratchpad</artifactId><version>${poi.version}</version></dependency><!-- excel背景<dependency><groupId>org.apache.poi</groupId><artifactId>ooxml-schemas</artifactId><version>1.4</version></dependency>--><!-- google 工具类 --><dependency><groupId>com.google.guava</groupId><artifactId>guava</artifactId><version>${guava.version}</version></dependency><dependency><groupId>org.apache.commons</groupId><artifactId>commons-lang3</artifactId><version>${commons-lang.version}</version></dependency><!--日志 --><!-- slf4j --><dependency><groupId>org.slf4j</groupId><artifactId>slf4j-api</artifactId><version>${slf4j.version}</version></dependency><dependency><groupId>org.slf4j</groupId><artifactId>slf4j-log4j12</artifactId><version>${slf4j.version}</version><scope>provided</scope></dependency><!--spring-web --><dependency><groupId>org.springframework</groupId><artifactId>spring-webmvc</artifactId><version>${spring.version}</version><optional>true</optional></dependency><!--servlet --><dependency><groupId>javax.servlet</groupId><artifactId>servlet-api</artifactId><version>2.5</version><scope>provided</scope><optional>true</optional></dependency><!-- 模块版本 --><dependency><groupId>org.jeecgframework</groupId><artifactId>autopoi</artifactId><version>${autopoi.version}</version></dependency></dependencies></dependencyManagement><profiles><profile><id>release</id><build><plugins><plugin><artifactId>maven-compiler-plugin</artifactId><configuration><source>1.8</source><target>1.8</target><encoding>UTF-8</encoding></configuration></plugin><!-- Source --><plugin><groupId>org.apache.maven.plugins</groupId><artifactId>maven-source-plugin</artifactId><version>2.2.1</version><executions><execution><phase>package</phase><goals><goal>jar-no-fork</goal></goals></execution></executions></plugin><!-- Javadoc --><plugin><groupId>org.apache.maven.plugins</groupId><artifactId>maven-javadoc-plugin</artifactId><version>2.9.1</version><executions><execution><phase>package</phase><goals><goal>jar</goal></goals><configuration><encoding>UTF-8</encoding><additionalparam>-Xdoclint:none</additionalparam></configuration></execution></executions></plugin><!--Maven GPG插件用于使用以下配置对组件进行签名--><plugin><groupId>org.apache.maven.plugins</groupId><artifactId>maven-gpg-plugin</artifactId><version>1.6</version><executions><execution><id>sign-artifacts</id><phase>verify</phase><goals><goal>sign</goal></goals></execution></executions></plugin><!--Nexus Staging Maven插件是将组件部署到OSS并将其发布到Central Repository的推荐方法--><plugin><groupId>org.sonatype.plugins</groupId><artifactId>nexus-staging-maven-plugin</artifactId><version>1.6.7</version><extensions>true</extensions><configuration><serverId>ossrh</serverId><nexusUrl>https://s01.oss.sonatype.org/</nexusUrl><autoReleaseAfterClose>true</autoReleaseAfterClose></configuration></plugin></plugins></build></profile></profiles><distributionManagement><snapshotRepository><id>ossrh</id><url>https://s01.oss.sonatype.org/content/repositories/snapshots/</url></snapshotRepository><repository><id>ossrh</id><url>https://s01.oss.sonatype.org/service/local/staging/deploy/maven2/</url></repository></distributionManagement><build><plugins><plugin><artifactId>maven-compiler-plugin</artifactId><version>3.8.1</version><configuration><source>1.8</source><target>1.8</target><encoding>UTF-8</encoding></configuration></plugin><plugin><groupId>org.apache.maven.plugins</groupId><artifactId>maven-surefire-plugin</artifactId><version>3.0.0-M5</version><configuration><skipTests>true</skipTests></configuration></plugin></plugins></build></project>下面是官方提供的帮助资料
Distribution Management and Authentication⚓︎
In order to configure Maven to deploy to the OSSRH Nexus Repository Manager with the Nexus Staging Maven plugin you have to configure it like this
Note: As of February 2021, all new projects began being provisioned on Nexus Repository Manager. If your project is not provisioned on Nexus Repository Manager, you will want to login to the legacy host Nexus Repository Manager.
<distributionManagement><snapshotRepository><id>ossrh</id><url>https://s01.oss.sonatype.org/content/repositories/snapshots</url></snapshotRepository>
</distributionManagement>
<build><plugins><plugin><groupId>org.sonatype.plugins</groupId><artifactId>nexus-staging-maven-plugin</artifactId><version>1.6.7</version><extensions>true</extensions><configuration><serverId>ossrh</serverId><nexusUrl>https://s01.oss.sonatype.org/</nexusUrl><autoReleaseAfterClose>true</autoReleaseAfterClose></configuration></plugin>...</plugins>
</build>
Since OSSRH is always running the latest available version of Sonatype Nexus Repository Manager, it is best to use the latest version of the Nexus Staging Maven plugin.
Alternatively if you are using the Maven deploy plugin, which is the default behavior, you need to add a full distributionManagement section.
<distributionManagement><snapshotRepository><id>ossrh</id><url>https://s01.oss.sonatype.org/content/repositories/snapshots</url></snapshotRepository><repository><id>ossrh</id><url>https://s01.oss.sonatype.org/service/local/staging/deploy/maven2/</url></repository>
</distributionManagement>
The above configurations will get the user account details to deploy to OSSRH from your Maven settings.xml file, usually placed in ~/.m2. A minimal settings with the authentication is:
<settings><servers><server><id>ossrh</id><username>your-jira-id</username><password>your-jira-pwd</password></server></servers>
</settings>
Note how the id element in the server element in settings.xml is identical to the id elements in the snapshotRepository and repository element as well as the serverId configuration of the Nexus Staging Maven plugin
Javadoc and Sources Attachments⚓︎
To get Javadoc and Source jar files generated, you have to configure the Javadoc and source Maven plugins.
<build><plugins><plugin><groupId>org.apache.maven.plugins</groupId><artifactId>maven-source-plugin</artifactId><version>2.2.1</version><executions><execution><id>attach-sources</id><goals><goal>jar-no-fork</goal></goals></execution></executions></plugin><plugin><groupId>org.apache.maven.plugins</groupId><artifactId>maven-javadoc-plugin</artifactId><version>2.9.1</version><executions><execution><id>attach-javadocs</id><goals><goal>jar</goal></goals></execution></executions></plugin></plugins>
</build>
GPG Signed Components⚓︎
The Maven GPG plugin is used to sign the components with the following configuration.
<build><plugins><plugin><groupId>org.apache.maven.plugins</groupId><artifactId>maven-gpg-plugin</artifactId><version>1.5</version><executions><execution><id>sign-artifacts</id><phase>verify</phase><goals><goal>sign</goal></goals></execution></executions></plugin></plugins>
</build>
It relies on the gpg command being installed and the GPG credentials being available e.g. from settings.xml. In addition you can configure the gpg command in case it is different from gpg. This is a common scenario on some operating systems.
<settings><profiles><profile><id>ossrh</id><activation><activeByDefault>true</activeByDefault></activation><properties><gpg.executable>gpg2</gpg.executable><gpg.passphrase>the_pass_phrase</gpg.passphrase></properties></profile></profiles>
</settings>
In case you have multiple keys, the local gpg will use the first listed signature key (gpg --list-signatures), if you need to use a specific key you could add the details of the gpg key inside a <configuration> section and use local settings.xml to discover the passphrase via the signature keyname.
<build><plugins><plugin><groupId>org.apache.maven.plugins</groupId><artifactId>maven-gpg-plugin</artifactId><version>1.5</version><executions><execution><id>sign-artifacts</id><phase>verify</phase><goals><goal>sign</goal></goals><configuration><keyname>${gpg.keyname}</keyname><passphraseServerId>${gpg.keyname}</passphraseServerId></configuration></execution></executions></plugin></plugins>
</build>
Are you being prompted for a passphrase or getting a gpg: signing failed: No such file or directory error?
This may be happening to you because you are using gpg version 2.1 or later. If running gpg --version shows that you are running version 2.1 or later, you must modify the configuration of the Maven GPG plugin to add additional gpgArguments. Building on the example above:
<configuration><keyname>${gpg.keyname}</keyname><passphraseServerId>${gpg.keyname}</passphraseServerId><gpgArguments><arg>--pinentry-mode</arg><arg>loopback</arg></gpgArguments>
</configuration>
Hint
In the example below you may need to use the last 8 characters of the signature keyid in hexadecimal format, you can find them using this command gpg --list-signatures --keyid-format 0xshort:
$ gpg --list-signatures --keyid-format 0xshort
/home/mylocaluser/.gnupg/pubring.kbx
---------------------------------
pub   rsa3072/0x3ABDEC12 2021-01-27 [SC] [expires: 2023-01-27]74524542545300A398653AB5242798823ABDEC12
uid           [ultimate] Other Name <otheremail@example.com>
sig 3        0x3ABDEC12 2021-01-27  Other Name <alarconj@gmail.com>
sub   rsa3072 2021-01-27 [E] [expires: 2023-01-27]
sig          0x3ABDEC12 2021-01-27  Julian Alarcon <alarconj@gmail.com>pub   rsa3072/0x0ABA0F98 2021-06-23 [SC] [expires: 2022-03-21]CA925CD6C9E8D064FF05B4728190C4130ABA0F98
uid           [ultimate] Central Repo Test <central@example.com>
sig 3        0x0ABA0F98 2021-06-24  Central Repo Test <central@example.com>
sub   rsa3072/0x7C17C93B 2021-06-23 [E] [expires: 2023-06-23]
sig          0x0ABA0F98 2021-06-23  Central Repo Test <central@example.com>
You will find in the line that starts with sig 3 that 0x3ABDEC12 is the signature short keyid in hexadecimal format that you will need to pass as ${gpg.keyname}.
If you need more help setting up and configuring GPG, please read our detailed instructions.
Nexus Staging Maven Plugin for Deployment and Release⚓︎
The Nexus Staging Maven Plugin is the recommended way to deploy your components to OSSRH and release them to the Central Repository. To configure it simply add the plugin to your Maven pom.xml.
<build>
<plugins>
...
<plugin><groupId>org.sonatype.plugins</groupId><artifactId>nexus-staging-maven-plugin</artifactId><version>1.6.7</version><extensions>true</extensions><configuration><serverId>ossrh</serverId><nexusUrl>https://s01.oss.sonatype.org/</nexusUrl><autoReleaseAfterClose>true</autoReleaseAfterClose></configuration>
</plugin>
If your version is a release version (does not end in -SNAPSHOT) and with this setup in place, you can run a deployment to OSSRH and an automated release to the Central Repository with the usual:
mvn clean deploy
With the property autoReleaseAfterClose set to false you can manually inspect the staging repository in the Nexus Repository Manager and trigger a release of the staging repository later with
mvn nexus-staging:release
If you find something went wrong you can drop the staging repository with
mvn nexus-staging:drop
Please read Staging Releases in the Repository Manager 2 documentation for more information about the Nexus Staging Maven Plugin.
Deprecated oss-parent⚓︎
In the past all the plugin configuration and other setup was managed by a Maven parent POM with the latest coordinates of org.sonatype.oss:oss-parent:9. This project leaked SCM, URL and other details and its usage is discouraged. Maintenance of the project has stopped and it no longer works with latest tooling such as Maven versions or Java versions. If desired, please manage your own organization-level POM in a similar manner.
Using a Profile⚓︎
Since the generation of the javadoc and source jars as well as signing components with GPG is a fairly time consuming process, these executions are typically isolated from the normal build configuration and moved into a profile. This profile is then in turn used when a deployment is performed by activating the profile.
<profiles><profile><id>release</id><build>...javadoc, source and gpg plugin from above...</build></profile>
</profiles>
Performing a Snapshot Deployment⚓︎
Snapshot deployment are performed when your version ends in -SNAPSHOT . You do not need to fulfill the requirements when performing snapshot deployments and can simply run
mvn clean deploy
on your project.
SNAPSHOT versions are not synchronized to the Central Repository. If you wish your users to consume your SNAPSHOT versions, they would need to add the snapshot repository to their Nexus Repository Manager, settings.xml, or pom.xml. Successfully deployed SNAPSHOT versions will be found in Index of /repositories/snapshots
Performing a Release Deployment⚓︎
In order to perform a release deployment you have to edit your version in all your POM files to use release versions. This means that they can not end in -SNAPSHOT In addition plugin and dependency declarations can also not use snapshot versions. This ensures that you only depend on other released components. Ideally they are all available in the Central Repository. This ensures that your users can retrieve your components as well as your transitive dependencies from the Central Repository.
The change of the versions for your project, and the parent references in a multi module setup, can be performed manually or with the help of the Maven versions plugin.
mvn versions:set -DnewVersion=1.2.3
Once you have updated all the versions and ensured that your build passes without deployment you can perform the deployment with the usage of the release profile with
mvn clean deploy -P release
This process is completely independent from your workflow with your SCM system. If you want to ensure that a specific version in the Central Repository corresponds to a specific revisions in your SCM system, which is a good practice, you can either perform the commits manually in a flow similar to
- Develop, develop, develop
- Commit any outstanding changes
- Verify build passes
- Update versions to release version
- Commit release version
- Run deployment
- Update versions to next snapshot version
- Commit new snapshot version
- Develop, develop, develop and rinse and repeat
or you can automate it with a script of your choice including a configuration running on a CI server or you can use the Maven release plugin, documented in the following.
Performing a Release Deployment with the Maven Release Plugin⚓︎
The Maven Release Plugin can be used to automate the changes to the Maven POM files, sanity checks, the SCM operations required and the actual deployment execution.
The configuration for the Maven release plugin should include disabling the release profile that is part of the Maven Super POM, since we are using our own profile, and specify the deploy goal together with the activation of our release profile
<plugin><groupId>org.apache.maven.plugins</groupId><artifactId>maven-release-plugin</artifactId><version>2.5.3</version><configuration><autoVersionSubmodules>true</autoVersionSubmodules><useReleaseProfile>false</useReleaseProfile><releaseProfiles>release</releaseProfiles><goals>deploy</goals></configuration>
</plugin>
With the SCM connection configured correctly you can perform a release deployment to OSSRH with
mvn release:clean release:prepare
by answering the prompts for versions and tags, followed by
mvn release:perform
This execution will deploy to OSSRH and release to the Central Repository in one go, thanks to the usage of the Nexus Staging Maven Plugin with autoReleaseAfterClose set to true.
Manually Releasing the Deployment to the Central Repository⚓︎
If you are using autoReleaseAfterClose set to false you or you are using the default Maven deploy plugin, you can inspect and potentially release the deployed artifacts manually
Alternatively if you have deployed with the Nexus Staging Maven Plugin, and the deployment succeeded, you can release the repository directly on the command line. Immediately after the deployment a properties file in the target directory contains all the information required and you can simply release the staging repository with
mvn nexus-staging:release
If you have been running the deployment as part of a release done with the Maven release plugin, the deployment was done from the tag in your version control system checked out into target/checkout so you have to run the Nexus Staging plugin from there:
mvn release:perform
...
cd target/checkout
mvn nexus-staging:release
You can configure this goal to be run automatically as part of your release deployment with the release plugin by adding it as a goal execution after deploy.
<plugin><groupId>org.apache.maven.plugins</groupId><artifactId>maven-release-plugin</artifactId><configuration><goals>deploy nexus-staging:release</goals>...相关文章:
向 Maven 中央仓库上传一个修改过的基于jeecg的autoPOI的 jar包记录
1、注册https://issues.sonatype.org/账号 下面就代表注册好了,同时提交的工单也通过了 2、这里主要是goupId 需要进行认证,需要到域名注册商近一个txt的解析,以便确保这个是你的 通过下面来验证你的域名信息,这里主要是上面的工…...
【HDFS】Block、BlockInfo、BlockInfoContiguous、BlockInfoStriped的分析记录
本文主要介绍如下内容: 关于几个Block类之间的继承、实现关系;针对文章标题中的每个类,细化到每个成员去注释分析列出、并详细分析BlockInfo抽象类提供的抽象方法、非抽象方法的功能针对几个跟块组织结构的方法再进行分析。moveBlockToHead、listInsert、listRemove等。一、…...
STM32 LoRa(学习二)
LoRa关键参数说明 LoRa数据包由三个部分组成:前导码、可选报头、数据有效负载。 前导码:用于保持接收机与输入的数据流同步。默认情况下,数据包含有12个符号长度的前导码。前导码是一个可以通过编程来设置的变量,所以前导码的长度…...
ASP.NET Core学习路线图
说明 1. 先决条件 - [C#](https://www.pluralsight.com/paths/csharp) - [Entity Framework](https://www.pluralsight.com/search?qentity%20framework%20core) - [ASP.NET Core](https://www.pluralsight.com/search?qasp.net%20core) - SQL基础知识 2. 通用开发技能 -…...

无涯教程-Lua - for语句函数
for 循环是一种重复控制结构,可让您有效地编写需要执行特定次数的循环。 for loop - 语法 Lua编程语言中 for 循环的语法如下- for init,max/min value, increment dostatement(s) end 这是 for 循环中的控制流程- 首先执行 init 步骤,并且仅执行一…...
二叉树的相关题目
目录 1、根据二叉树创建字符串 2、二叉树的层序遍历 3、二叉树的最近公共祖先 4、搜索二叉树与双向链表 5、从前序与中序遍历序列构造二叉树 6、 从中序与后序遍历序列构造二叉树 7、二叉树的前序遍历(非递归实现) 8、二叉树的中序遍历(…...
【antd之tabs踩坑篇】Tabs有items时切换不起作用
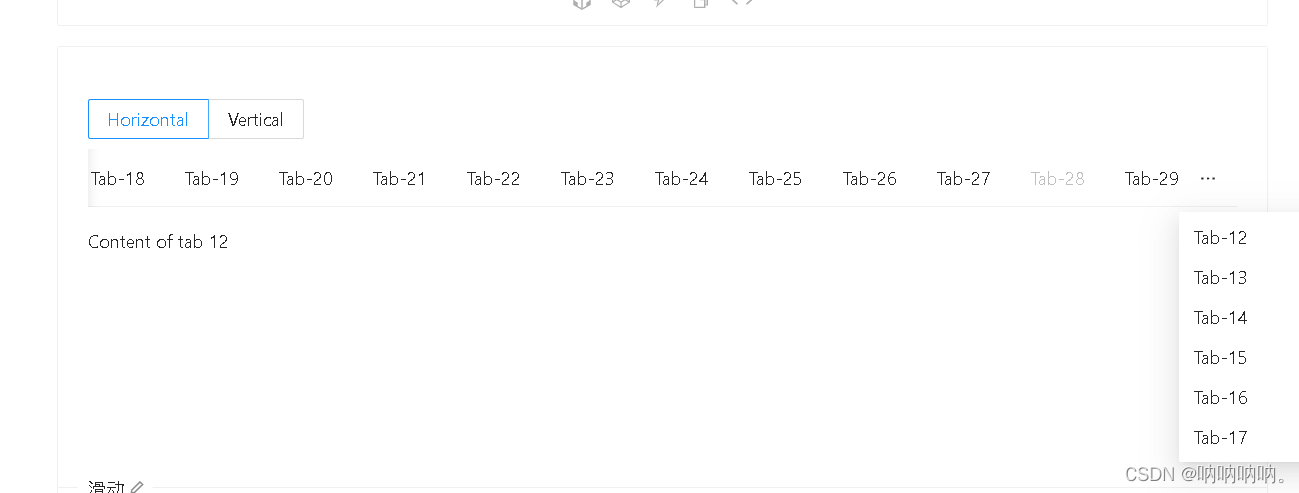
<TabsdefaultActiveKey"1"tabPosition{mode}style{{ height: 220 }}items{new Array(30).fill(null).map((_, i) > {const id String(i);return {label: Tab-${id},key: id,disabled: i 28,children: Content of tab ${id},};})}/>官网上如果tabs有很多it…...

简单模拟livedata数据倒灌
简单模拟livedata数据倒灌 数据倒灌,就是将旧的或只展示一次的数据再次展现出来。 livedata内部通过版本号更新可见视图数据,而在view在活跃与不活跃之间反复横跳时,livedata也会通知数据。 class MainActivity : AppCompatActivity() {pri…...
python爬虫-加速乐cookie混淆解析实例小记
注意!!!!某XX网站逆向实例仅作为学习案例,禁止其他个人以及团体做谋利用途!!! 第一步:抓包工具第一次请求页面,得到响应。本次我使用的fiddle进行抓包&#…...

TensorFlow 中前缀 prefix
前缀 prefix 主要用于命名 TensorFlow 中的变量,以避免变量名冲突。在 TensorFlow 中,每个变量都有一个唯一的名称,由变量的作用域和变量的名称组成。作用域可以通过 tf.variable_scope() 函数来创建,而变量的名称通常是由用户指定…...
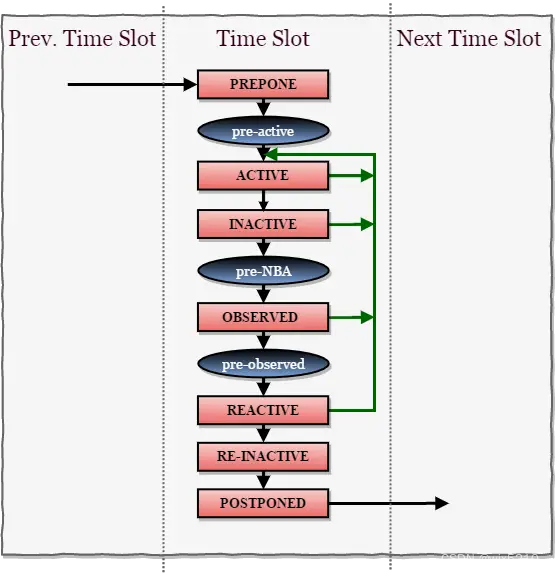
SystemVerilog scheduler
文章目录 简介调度器simulation regionPreponed regionActive regionInactive regionNBA(Non-blocking Assignment Events region)Observed regionReactive regionRe-Inactive Events regionRe-NBA RegionPostponed Region PLI region:Pre-active regionPre-NBA regionPost-NBA…...
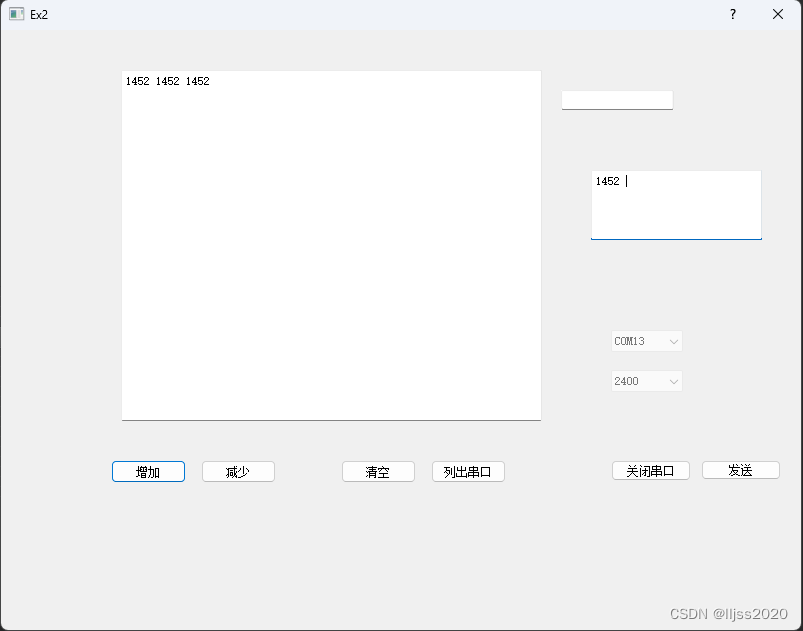
Qt 5. QSerialPort串口收发
1. 代码 //ex2.cpp #include "ex2.h" #include "ui_ex2.h" #include <QtSerialPort/QSerialPort> #include <QtSerialPort/QSerialPortInfo>int static cnt 0;Ex2::Ex2(QWidget *parent): QDialog(parent), ui(new Ui::Ex2) {ui->setupUi…...
?)
什么是Java中的JVMTI(JVM Tool Interface)?
Java中的JNI(Java Native Interface)和JVMTI(JVM Tool Interface)都是与Java运行时环境(JVM)交互的工具,但它们有不同的目的和使用场景。下面我从新手的角度来幽默地解释一下它们的区别和用途。…...

WAF独木难支 RASP与ADR将成应用安全防护2.0时代新宠
曾几何时,黑客攻击大多通过网络层进行,但随着基于网络层的基础安全防护措施趋于严密,防火墙、入侵防御、防病毒等安全软硬件构建起了相对完善的防护体系,想再从网络层钻空子的难度增大。如今,黑客攻击从网络层转入Web为…...
四、Unity中颜色空间
Unity中的设置 通过点击菜单Edit->Project Settings->Player页签->Other Settings下的Rendering部分进行修改,参数Color Space可以选择Gamma或Linear。 当选择Gamma Space时,Unity不会做任何处理。当选择Linear Space时,引擎的渲染…...

Java程序员面试题
Java程序员面试题目 1.Java基础1.1 Java有list,list有很多种,你平时开发喜欢用哪个list?(容易)1.2 Java的map,你知道有哪几种map,你平时喜欢用哪个?(容易) 2.…...
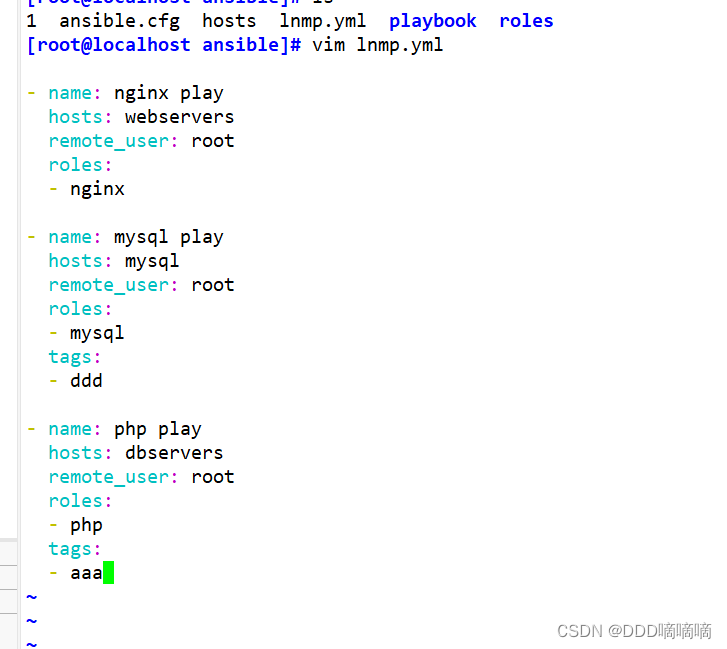
【自动化剧本】Role角色
目录 一、Roles模块1.1roles的目录结构1.2roles 内各目录含义解释1.3在一个 playbook 中使用 roles 的步骤 二、使用Role编写LNMP剧本2.1 搭建Nginx角色2.2搭建Mysql角色2.3搭建php角色2.4lnmp剧本 一、Roles模块 roles用于层次性、结构化地组织playbook。roles能够根据层次型结…...

安全文件传输:如何避免数据泄露和黑客攻击
网络安全问题日益严重,导致许多数据被泄露和黑客袭击的事件频发。为了保证文件传输的安全,需要实施一系列安全文件传输策略来防止数据被泄露和黑客袭击。 第一、选择适合的加密方法是非常关键的 加密是一种将明文转换成密文的过程,这样只有授…...

web基础与http
一,dns与域名 网络基于tcp/ip协议进行通信和连接的,其中主机以ip地址做固定的地址标识,用以区分用户和计算机。ip地址是由32位二进制数组成,不方便记忆。为了方便记忆,采用了域名。但是网络通信的唯一标识是ip地址&…...
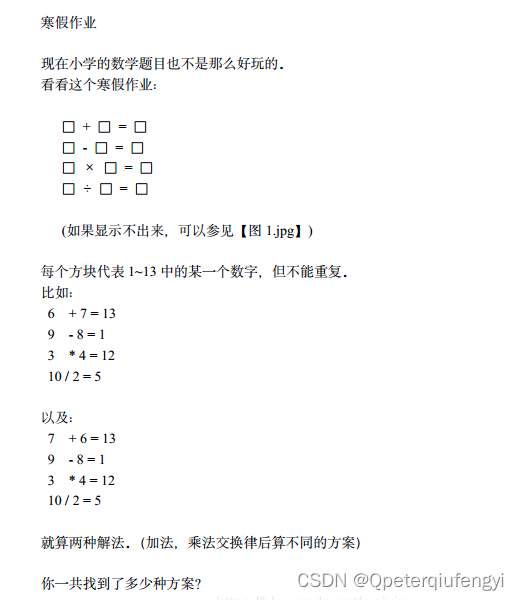
寒假作业(蓝桥杯2016年省赛C++A组第6题 )
题目: 注:蓝桥杯2016年省赛CA组第6题 请填写表示方案数目的整数。 题解: 由题可知这是一道全排列问题,因此我们可以使用c的next_permutation函数对于1-13的数字进行全排列即可,并每次排列判断是否满足题意。 注意…...

2026年,别让AIGC检测绊住你毕业!百考通AI查重降重全攻略
高效、安全、省心,你的论文通关搭档 又到一年毕业季,当你在图书馆熬了无数个夜,终于为论文画上最后一个句号时,真正的挑战可能才刚刚开始。 “重复率明明改下来了,导师却说AI痕迹太重,打回重写!…...

联想 / 拯救者 /moto 手机全机型通用|官方操作指导视频合集,新手老手都适用
不管是刚入手联想、拯救者、moto 系列手机的新用户,还是使用已久想解锁更多功能的老用户,在日常使用中总会遇到功能不会用、设置找不到、问题不会修的情况。网上教程零散、版本不匹配、步骤不清晰,不仅浪费时间,还容易因操作不当影…...

【HALCON 实战入门】2. HALCON 快速入门
欢迎订阅【HALCON 实战入门】专栏: 1. HALCON 简介与安装 2. HALCON 快速入门 3. 图像读取、显示与保存 4. 图像采集 5. 交互式与 ROI 2. HALCON 快速入门第 1 章:安装 HALCON第 2 章:HALCON 架构2.1 算子2.1.1 参数与数据结构2.2 扩展包2.3 …...

OV5640摄像头模组研究
OV5640是一款由OmniVision(豪威科技)公司生产的高性能500万像素CMOS图像传感器,凭借其卓越的成像质量、灵活的接口配置和丰富的功能特性,已成为嵌入式视觉系统、智能监控设备和机器人技术等领域的热门选择。作为一款1/4英寸光学格式的传感器,OV5640支持多种分辨率(最高25…...

Windows下3DGS环境搭建保姆级教程:用最小化environment.yml和手动安装搞定CUDA 12.8
Windows下3DGS环境搭建:最小化配置与CUDA 12.8兼容性实战指南 当你在Windows系统上尝试复现3D Gaussian Splatting(3DGS)项目时,可能会遇到各种依赖冲突和环境配置问题,尤其是使用较新的CUDA 12.8版本和50系列显卡时。…...

AcousticSense AI从零开始:搭建视觉化音频分析工作站完整指南
AcousticSense AI从零开始:搭建视觉化音频分析工作站完整指南 1. 项目介绍与核心价值 AcousticSense AI是一个创新的音频分析解决方案,它将音频处理与计算机视觉技术巧妙结合,让计算机能够"看见"音乐的本质。这个项目的核心思路很…...

【实战解析】C# NPOI实现Excel图片插入与智能列宽调整的进阶技巧
1. 电商后台数据导出的痛点与NPOI解决方案 做过电商后台开发的朋友应该都遇到过这样的需求:需要将商品列表导出为Excel报表,并且要在报表中插入商品图片。这个需求看似简单,实际操作中却会遇到不少坑。比如图片插入后单元格大小不合适导致图片…...

PyStand:Python独立部署环境的终极解决方案,5分钟完成Windows应用打包
PyStand:Python独立部署环境的终极解决方案,5分钟完成Windows应用打包 【免费下载链接】PyStand :rocket: Python Standalone Deploy Environment !! 项目地址: https://gitcode.com/gh_mirrors/py/PyStand 还在为Python程序分发烦恼吗࿱…...
)
告别CAN总线?手把手教你用ISO 13400和DoIP实现车载远程诊断(附Python示例)
从CAN到以太网:基于ISO 13400的DoIP诊断实战指南 当传统CAN总线在带宽和远程诊断需求面前逐渐力不从心,车载以太网正以百兆甚至千兆的传输速率重塑车辆电子架构。作为诊断协议的新载体,DoIP(Diagnostic over Internet Protocol&am…...

Python 测试驱动开发:从单元测试到集成测试 实践指南
Python 测试驱动开发:从单元测试到集成测试 实践指南 核心结论 测试驱动开发 (TDD):先写测试,再实现功能,提高代码质量和可维护性单元测试:测试代码的最小单元,确保每个组件正常工作集成测试:测…...