MFC第三十天 通过CToolBar类开发文字工具栏和工具箱、GDI+边框填充以及基本图形的绘制方法、图形绘制过程的反色线模型和实色模型
文章目录
- CControlBar
- 通过CToolBar类开发文字工具栏和工具箱
- CMainFrame.h
- CApp
- CMainFrm.cpp
- CMainView.h
- CMainView.cpp
- CEllipse.h
- CEllipse.cpp
- CLine.h
- CLine.cpp
- CRRect .h
- CRRect .cpp
CControlBar
class AFX_NOVTABLE CControlBar : public CWnd{DECLARE_DYNAMIC(CControlBar)protected: // ConstructionCControlBar();public: // Attributesint GetCount() const;CWnd *m_pInPlaceOwner;void SetInPlaceOwner(CWnd *pWnd);// for styles specific to CControlBarDWORD GetBarStyle();void SetBarStyle(DWORD dwStyle);
BOOL m_bAutoDelete;// getting and setting border spacevoid SetBorders(LPCRECT lpRect);void SetBorders(int cxLeft = 0, int cyTop = 0, int cxRight = 0, int cyBottom = 0);CRect GetBorders() const;CFrameWnd* GetDockingFrame() const;BOOL IsFloating() const;virtual CSize CalcFixedLayout(BOOL bStretch, BOOL bHorz);virtual CSize CalcDynamicLayout(int nLength, DWORD nMode);// Operationsvoid EnableDocking(DWORD dwDockStyle);
CBRS_控制条属性
// ControlBar styles(理论上包括状态栏、工具栏等)
#define CBRS_ALIGN_LEFT     0x1000L
#define CBRS_ALIGN_TOP      0x2000L
#define CBRS_ALIGN_RIGHT    0x4000L
#define CBRS_ALIGN_BOTTOM   0x8000L
#define CBRS_ALIGN_ANY      0xF000L#define CBRS_BORDER_LEFT    0x0100L
#define CBRS_BORDER_TOP     0x0200L
#define CBRS_BORDER_RIGHT   0x0400L
#define CBRS_BORDER_BOTTOM  0x0800L
#define CBRS_BORDER_ANY     0x0F00L
#define CBRS_TOOLTIPS       0x0010L 小字条提示(\n后半)
#define CBRS_FLYBY          0x0020L  状态栏提示的另一半文字
#define CBRS_FLOAT_MULTI    0x0040L
#define CBRS_BORDER_3D      0x0080L
#define CBRS_HIDE_INPLACE   0x0008L
#define CBRS_SIZE_DYNAMIC   0x0004L 可以拉扯工具栏变形
#define CBRS_SIZE_FIXED     0x0002L 固定形状(不可拉扯)
#define CBRS_FLOATING       0x0001L  #define CBRS_GRIPPER        0x00400000L 掐子(去掉之后就是锁定工具栏的属性)
#define CBRS_ORIENT_HORZ    (CBRS_ALIGN_TOP|CBRS_ALIGN_BOTTOM)
#define CBRS_ORIENT_VERT    (CBRS_ALIGN_LEFT|CBRS_ALIGN_RIGHT)
#define CBRS_ORIENT_ANY     (CBRS_ORIENT_HORZ|CBRS_ORIENT_VERT)
#define CBRS_ALL            0x0040FFFFL// the CBRS_ style is made up of an alignment style and a draw border style
//  the alignment styles are mutually exclusive
//  the draw border styles may be combined
#define CBRS_NOALIGN        0x00000000L
#define CBRS_LEFT           (CBRS_ALIGN_LEFT|CBRS_BORDER_RIGHT)
#define CBRS_TOP            (CBRS_ALIGN_TOP|CBRS_BORDER_BOTTOM)
#define CBRS_RIGHT          (CBRS_ALIGN_RIGHT|CBRS_BORDER_LEFT)
#define CBRS_BOTTOM         (CBRS_ALIGN_BOTTOM|CBRS_BORDER_TOP)
通过CToolBar类开发文字工具栏和工具箱
高级工具栏的开发
a)文字工具栏开发:调用CToolBar::SetButtonText和CBoolBar::SetSizes方法;
b)工具箱创建时要指定:CBRS_SIZE_FIXED
调用CToolBar::SetButtonStyle方法,为n个按钮一行做分行属性。
#ifndef PCH_H
#define PCH_H
#include "framework.h"
#include <gdiplus.h>
//图形软件开发的关键架构  公共的基类  虚函数架构  没有实际意义 自己也不能画 也不可以自己建立对象(抽象类)无法实例化 只能由派生类来构造 也必须实现所有的抽象接口
struct SLayer {  enum STAT {ST_DRAW = 0, //绘制状态ST_NORMAL, //正常状态ST_SELECT,	//选中状态	};STAT m_stat{ ST_DRAW };static CPoint m_last;virtual	void OnLButtonDown(UINT nFlags, CPoint point)=0; //形成多态virtual	void OnLButtonUp(UINT nFlags, CPoint point)=0;virtual	void OnMouseMove(UINT nFlags, CPoint point,CDC * pDC=NULL)=0;virtual	void OnDraw(CDC* pDC)=0;  // 重写以绘制该视图
};
#endif //PCH_H
CMainFrame.h
class CMainFrame : public CMDIFrameWnd{DECLARE_DYNAMIC(CMainFrame)void InitTools();
public:		CMainFrame() noexcept;
public:		virtual BOOL PreCreateWindow(CREATESTRUCT& cs); //重写
public:		virtual ~CMainFrame();//实现
protected:  		// 控件条嵌入成员CToolBar	m_toolBox;CToolBar    m_wndToolBar;CStatusBar  m_wndStatusBar;protected:			// 生成的消息映射函数afx_msg int OnCreate(LPCREATESTRUCT lpCreateStruct);DECLARE_MESSAGE_MAP()
};
// pch.cpp: 与预编译标头对应的源文件
#include "pch.h"
CPoint SLayer::m_last{ MAXWORD,MAXWORD };  //鼠标移动最终的点 MAXWORD 65535超大值
CApp
在CApp初始化要对GDI+进行初始化 加载 头文件 命名空间
EnableTaskbarInteraction(FALSE);GdiplusStartupInput gdiplusStartupInput;ULONG_PTR gdiplusToken;GdiplusStartup(&gdiplusToken, &gdiplusStartupInput, NULL);
CMainFrm.cpp
#include "pch.h"
#include "framework.h"
#include "DrawLx.h"
#include "MainFrm.h"#ifdef _DEBUG
#define new DEBUG_NEW
#endif
IMPLEMENT_DYNAMIC(CMainFrame, CMDIFrameWnd)
BEGIN_MESSAGE_MAP(CMainFrame, CMDIFrameWnd)ON_WM_CREATE()
END_MESSAGE_MAP()
static UINT indicators[] =
{ID_SEPARATOR,           // 状态行指示器ID_INDICATOR_CAPS,ID_INDICATOR_NUM,ID_INDICATOR_SCRL,
};// CMainFrame 构造/析构
CMainFrame::CMainFrame() noexcept
{
}
CMainFrame::~CMainFrame()
{
}
void CMainFrame::InitTools(){int i = -1,nCount = m_wndToolBar.GetCount();LPCTSTR ts[] ={_T("新建"),_T("打开"),_T("保存"),_T(""),_T("剪切"),_T("拷贝"),_T("粘贴"),_T(""),_T("打印"),_T("帮助") };while(++i<nCount)m_wndToolBar.SetButtonText(i,ts[i]);CRect rect;m_wndToolBar.GetItemRect(0,rect);m_wndToolBar.SetSizes(rect.Size(), { 16,15 });GetWindowRect(rect);//auto b = m_toolBox.IsFloating(); //b = m_toolBox.IsFloating();m_toolBox.SetButtonStyle(1, TBBS_BUTTON | TBBS_WRAPPED);m_toolBox.SetButtonStyle(3, TBBS_BUTTON | TBBS_WRAPPED);m_toolBox.SetButtonStyle(5, TBBS_BUTTON | TBBS_WRAPPED);FloatControlBar(&m_toolBox, { rect.right - 60,rect.top + 100 }); }
int CMainFrame::OnCreate(LPCREATESTRUCT lpCreateStruct){if (CMDIFrameWnd::OnCreate(lpCreateStruct) == -1)return -1;if (!m_wndToolBar.CreateEx(this, TBSTYLE_FLAT, WS_CHILD | WS_VISIBLE | CBRS_TOP | CBRS_GRIPPER | CBRS_TOOLTIPS | CBRS_FLYBY | CBRS_SIZE_DYNAMIC) ||!m_wndToolBar.LoadToolBar(IDR_MAINFRAME)) {TRACE0("未能创建工具栏\n");return -1; // 未能创建}if (!m_toolBox.CreateEx(this, TBSTYLE_FLAT, WS_CHILD | WS_VISIBLE | CBRS_TOP | CBRS_GRIPPER| CBRS_TOOLTIPS | CBRS_FLYBY | CBRS_SIZE_FIXED) ||!m_toolBox.LoadToolBar(IDR_TOOLBOX)){TRACE0("未能创建工具栏\n");return -1; // 未能创建}
	if (!m_wndStatusBar.Create(this))	{TRACE0("未能创建状态栏\n");return -1;      // 未能创建}m_wndStatusBar.SetIndicators(indicators, sizeof(indicators)/sizeof(UINT));//int nCount = m_wndStatusBar.GetCount();m_wndToolBar.EnableDocking(CBRS_ALIGN_ANY);    // 如果不需要可停靠工具栏,则删除这三行m_toolBox.EnableDocking(CBRS_ALIGN_ANY);EnableDocking(CBRS_ALIGN_ANY);DockControlBar(&m_wndToolBar);m_toolBox.SetWindowTextW(_T("工具箱"));m_wndToolBar.SetWindowText(_T("标准"));InitTools();return 0;
}
BOOL CMainFrame::PreCreateWindow(CREATESTRUCT& cs)
{if( !CMDIFrameWnd::PreCreateWindow(cs) )return FALSE;// TODO: 在此处通过修改//  CREATESTRUCT cs 来修改窗口类或样式return TRUE;
}
CMainView.h
class CMainView : public CScrollView{int m_nIndex{ID_DRAW_DRAG}; //工具编号CArray<SLayer*>m_ls;  //类似于蝴蝶的架构
protected: // 仅从序列化创建CMainView() noexcept;DECLARE_DYNCREATE(CMainView)// 特性
public:CMainDoc* GetDocument() const;// 重写
public:virtual void OnDraw(CDC* pDC);  // 重写以绘制该视图virtual BOOL PreCreateWindow(CREATESTRUCT& cs);
protected:virtual void OnInitialUpdate(); // 构造后第一次调用virtual BOOL OnPreparePrinting(CPrintInfo* pInfo);virtual void OnBeginPrinting(CDC* pDC, CPrintInfo* pInfo);virtual void OnEndPrinting(CDC* pDC, CPrintInfo* pInfo);
protected:DECLARE_MESSAGE_MAP()
public:afx_msg void OnDrawTools(UINT);afx_msg void OnUpdateDrawTools(CCmdUI* pCmdUI);afx_msg void OnLButtonDown(UINT nFlags, CPoint point);afx_msg void OnLButtonUp(UINT nFlags, CPoint point);afx_msg void OnMouseMove(UINT nFlags, CPoint point);
};
CMainView.cpp
#include "pch.h"
#include "framework.h"
#include "CLine.h"
#include "CPencil.h"
#include "CRecta.h"
#include "CEllipse.h"
#include "CRRect.h"
#include "DrawXq.h"
#endif
#include "CMainDoc.h"
#include "CMainView.h"
CMainView::CMainView() noexcept{     // CMainView 构造/析构
}
CMainView::~CMainView(){
}
BOOL CMainView::PreCreateWindow(CREATESTRUCT& cs)
{//  CREATESTRUCT cs 来修改窗口类或样式return CScrollView::PreCreateWindow(cs);
}
// CMainView 绘图
void CMainView::OnDraw(CDC* pDC) //传来paintDc 因为基类中已经做了这个,你再做是无效的
{auto nCount = m_ls.GetCount();int i = -1;while (++i<nCount){m_ls[i]->OnDraw(pDC);}
}
void CMainView::OnInitialUpdate()
{CScrollView::OnInitialUpdate();CSize sizeTotal;// TODO: 计算此视图的合计大小sizeTotal.cx = sizeTotal.cy = 100;SetScrollSizes(MM_TEXT, sizeTotal);
}
 void CMainView::OnDrawTools(UINT nID)
{m_nIndex = nID;
}void CMainView::OnUpdateDrawTools(CCmdUI* pCmdUI){//pCmdUI->SetCheck(); //这个TRUE的话7个都会亮起来pCmdUI->SetCheck(pCmdUI->m_nID == m_nIndex);}
void CMainView::OnLButtonDown(UINT nFlags, CPoint point){SLayer* pLayer = nullptr;switch (m_nIndex){case ID_DRAW_LINE:pLayer = new CLine;break;case ID_DRAW_RECT:pLayer = new CRecta;break;case ID_DRAW_PENCIL:pLayer = new CPencil;break;
	case ID_DRAW_ELLIPSE:pLayer = new CEllipse;break;case ID_DRAW_RRECT:pLayer = new CRRect;break;}if (pLayer){pLayer->OnLButtonDown(nFlags, point);m_ls.Add(pLayer);}CScrollView::OnLButtonDown(nFlags, point);
}
void CMainView::OnLButtonUp(UINT nFlags, CPoint point)
{CScrollView::OnLButtonUp(nFlags, point);SLayer::m_last ={ MAXWORD,MAXWORD }; //恢复到未开始的状态auto nCount = m_ls.GetCount();if (nCount < 1)return;m_ls[nCount - 1]->OnLButtonUp(nFlags, point);Invalidate();
}
void CMainView::OnMouseMove(UINT nFlags, CPoint point)
{CScrollView::OnMouseMove(nFlags, point);auto nCount = m_ls.GetCount();if (nCount < 1)return;CClientDC dc(this);// this是窗口类  做的是反差色dc.SetROP2(R2_NOT);m_ls[nCount - 1]->OnMouseMove(nFlags, point, &dc);
}
CEllipse.h
#pragma once
#include "pch.h"
class CEllipse : public SLayer
{CRect m_rect;void OnLButtonDown(UINT nFlags, CPoint point); //形成多态void OnLButtonUp(UINT nFlags, CPoint point);void OnMouseMove(UINT nFlags, CPoint point, CDC* pDC);void OnDraw(CDC* pDC);  // 重写以绘制该视图
};
CEllipse.cpp
#include "pch.h"
#include "CEllipse.h"
using namespace Gdiplus;
void CEllipse::OnLButtonDown(UINT nFlags, CPoint point) {m_rect.TopLeft() = point;
}
void CEllipse::OnLButtonUp(UINT nFlags, CPoint point)
{m_rect.BottomRight() = point;m_rect.NormalizeRect();
}
void CEllipse::OnMouseMove(UINT nFlags, CPoint point, CDC* pDC)
{
}
#include<gdiplusbrush.h>
void CEllipse::OnDraw(CDC* pDC) {Graphics g(pDC->GetSafeHdc());Pen pen({ 0xff,0,0,255 }, 3.0); //0xff,0,0,255第一个参数为透明度 第二三四为RGB ,3.0为粗度Point startPoint(m_rect.left, m_rect.top);Point endPoint(m_rect.right, m_rect.bottom);LinearGradientBrush brush(startPoint, endPoint, Color(0x80, 255, 0, 0), Color(0x80, 0, 0, 255));g.FillEllipse(&brush, m_rect.left, m_rect.top, m_rect.Width(), m_rect.Height());g.DrawEllipse(&pen, m_rect.left, m_rect.top, m_rect.Width(), m_rect.Height());
}
/*Pen p2({ 0xff,0,0xff,0 }, 3.0f);g.DrawLine(&p2, m_rect.left, m_rect.top, m_rect.right, m_rect.bottom);g.DrawEllipse(&pen, m_rect.left, m_rect.top, m_rect.Width(), m_rect.Height());pDC->Ellipse(m_rect);*/
CLine.h
#pragma once
#include "pch.h"
class CLine : public SLayer
{CPoint m_ps,m_pe; //statr-end; void OnLButtonDown(UINT nFlags, CPoint point); //形成多态void OnLButtonUp(UINT nFlags, CPoint point);void OnMouseMove(UINT nFlags, CPoint point, CDC* pDC);void OnDraw(CDC* pDC);  // 重写以绘制该视图
};
CLine.cpp
#include "pch.h"
#include "CLine.h"
void CLine::OnLButtonDown(UINT nFlags, CPoint point)
{m_ps = point;
}void CLine::OnLButtonUp(UINT nFlags, CPoint point)
{	if (ST_DRAW == m_stat){	m_pe = point;m_stat = ST_NORMAL;}
}
void CLine::OnMouseMove(UINT nFlags, CPoint point, CDC* pDC){if (ST_DRAW ==m_stat &&nFlags &MK_LBUTTON)	{if (m_last.x!=MAXWORD)	{pDC->MoveTo(m_ps);pDC->LineTo(m_last);}pDC->MoveTo(m_ps);pDC->LineTo(point);m_last = point;}
}
void CLine::OnDraw(CDC* pDC){pDC->MoveTo(m_ps);pDC->LineTo(m_pe);
}
CRRect .h
#pragma once
#include "pch.h"
class CRRect : public SLayer
{CRect m_rect;void OnLButtonDown(UINT nFlags, CPoint point); //形成多态void OnLButtonUp(UINT nFlags, CPoint point);void OnMouseMove(UINT nFlags, CPoint point, CDC* pDC);void OnDraw(CDC* pDC);  // 重写以绘制该视图
};
CRRect .cpp
#include "pch.h"
#include "CRRect.h"
void CRRect::OnLButtonDown(UINT nFlags, CPoint point)
{m_rect.TopLeft() = point;
}void CRRect::OnLButtonUp(UINT nFlags, CPoint point)
{m_rect.BottomRight() = point;m_rect.NormalizeRect();
}
void CRRect::OnMouseMove(UINT nFlags, CPoint point, CDC* pDC)
{
}void CRRect::OnDraw(CDC* pDC)
{int nWidth = m_rect.Width();int nHeight = m_rect.Height();pDC->RoundRect(m_rect, {nWidth/5,nHeight/5});
}

相关文章:
MFC第三十天 通过CToolBar类开发文字工具栏和工具箱、GDI+边框填充以及基本图形的绘制方法、图形绘制过程的反色线模型和实色模型
文章目录 CControlBar通过CToolBar类开发文字工具栏和工具箱CMainFrame.hCAppCMainFrm.cppCMainView.hCMainView.cppCEllipse.hCEllipse.cppCLine.hCLine.cppCRRect .hCRRect .cpp CControlBar class AFX_NOVTABLE CControlBar : public CWnd{DECLARE_DYNAMIC(CControlBar)pro…...
Android Https
本质:在客户端和服务端使用非对称加密协商出一套对称密钥,每次发送数据前加密,收到后解密,达到加密传输 http ssl 在http之下增加了安全层,用于保障http的加密传输 HTTPS连接 TLS连接步骤 1.客户端发送 client h…...
Games101学习笔记2
参考博客:GAMES101 梳理 / 个人向图形学笔记_games101笔记_river_of_sebajun的博客-CSDN博客 lecture 05 Rasterization 1(Triangles) 光栅化 把东西画在屏幕上的过程就是光栅化的过程 视口变换 为什么模型用三角形? 最基本的几何平面;保…...

java字符串String类的常用方法
java字符串String类的常用方法 字符串的创建: (1)定义字符串直接赋值,在字符串池中开辟空间() String str1“Hello”;//在字符串池中写入字符串"hello" String str2“Hello”;//直接引用字符串池中的"Hello" System.out.println(s…...

自动化测试如何解决chrome自动更新问题
问题 调试好的自动化测试脚本,有时候总是在第一天或过几天就不好使了。产品并未进行功能逻辑,ui修改,一切还和调试自动化脚本的时候保持一致。运行自动化测试脚本时,控制台总是会在driver webdriver.Chrome()这一行报错。 问题…...

闲鱼卖货:新手容易踩坑的7个地方。赶紧看看有没有中招?
科思创业汇 大家好,这里是科思创业汇,一个轻资产创业孵化平台。赚钱的方式有很多种,我希望在科思创业汇能够给你带来最快乐的那一种! 这是我以前的一个学生收到的第一个非法通知。他告诉我,他当时很害怕,…...

PowerShell 获取某目录下所有的文件、文件夹,同时对获取到的文件路径字符串进行替换处理
PowerShell 获取某目录下所有的文件、文件夹,同时对获取到的文件路径字符串进行替换处理 前言: 为了将Windows系统下的Java编译文件与linux服务器上的文件进行比较,故进行此文件路径的获取及路径处理。 在只有文件路径 而没有实际文件的情况下…...
JUC并发编程之线程锁(一)
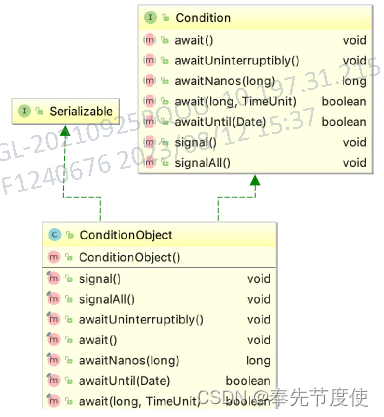
目录 1.ReentrantLock(互斥锁) 2.ReentRantReaderWriterLock(互斥读写锁) 3.StampedLock(无障碍锁) 4.Condition(自定义锁) 5.LockSupport 问题引出: 由于传统的线程控制需要用到同步机制Sy…...

Android AlertDialog标题居中
网上很多做法都是使用setCustomTitle方法实现的,我偏不,因为我已经找到了标题的textView了: 在show了之后可以拿到标题(注意一定是show之后才能拿得到,create之后拿也是空的): TextView title…...

k8s界面化平台dashboard、kubesphere、Rancher对比
k8s集群管理dashboard有很多,比如kuboard、官方发dashboard、kubesphere、Rancher等等。 Dashboard、KubeSphere 和 Rancher 都是流行的 Kubernetes 管理和操作界面。它们都提供了图形化的用户界面,以简化对 Kubernetes 集群的管理和监控。每个工具都有其…...

【字符串左旋】
字符串左旋 1.题目要求 实现一个函数,可以左旋字符串中的k个字符。 例如: ABCD左旋一个字符得到BCDA ABCD左旋两个字符得到CDAB 2.解法: 设计循环使其可以旋1次,然后让他执行n次是一个最简单的思路: 函数实现…...
漏洞复现与分析容器逃逸)
Docker Dirtypipe(CVE-2022-0847)漏洞复现与分析容器逃逸
安装环境 ./metarget cnv install cve-2022-0847 --verbose 原理 同脏牛,通过写只读内存,对映射的内存做篡改 EXP docker run --rm -it -v $(pwd):/exp --cap-addCAP_DAC_READ_SEARCH ubuntu如果提示 Unknown capability to add: "CAP_CAP_DAC_RE…...
python接口自动化测试框架2.0,让你像Postman一样编写测试用例,支持多环境切换、多业务依赖、数据库断言等
项目介绍 接口自动化测试项目2.0 软件架构 本框架主要是基于 Python unittest ddt HTMLTestRunner log excel mysql 企业微信通知 Jenkins 实现的接口自动化框架。 前言 公司突然要求你做自动化,但是没有代码基础不知道怎么做?或者有自动化…...

Vue.js2+Cesium1.103.0 九、淹没分析效果
Vue.js2Cesium1.103.0 九、淹没分析效果 Demo <template><divid"cesium-container"style"width: 100%; height: 100%;"><spanid"button"style"position: absolute; right: 50px; top: 50px; z-index: 999; font-size: 24px…...
SpringBoot案例-部门管理-新增
根据页面原型,明确需求 页面原型 需求 阅读接口文档 接口文档链接如下: 【腾讯文档】SpringBoot案例所需文档 https://docs.qq.com/doc/DUkRiTWVaUmFVck9N 思路分析 前端在输入要新增的部门名称后,会以JSON格式将数据传入至后端…...

微信小程序中背景图片如何占满整个屏幕,拉伸
不变形 1. 在页面的wxss文件中,设置背景图片的样式: page{background-image: url(图片路径);background-size: 100% 100%;background-repeat: no-repeat; }2. 在页面的json文件中,设置背景图片的样式: {"backgroundTextStyl…...
Java并发编程(四)线程同步 中 [AQS/Lock]
概述 Java中可以通过加锁,来保证多个线程访问某一个公共资源时,资源的访问安全性。Java提出了两种方式来加锁 第一种是我们上文提到的通过关键字synchronized加锁,synchronized底层托管给JVM执行的,并且在java 1.6 以后做了很多…...
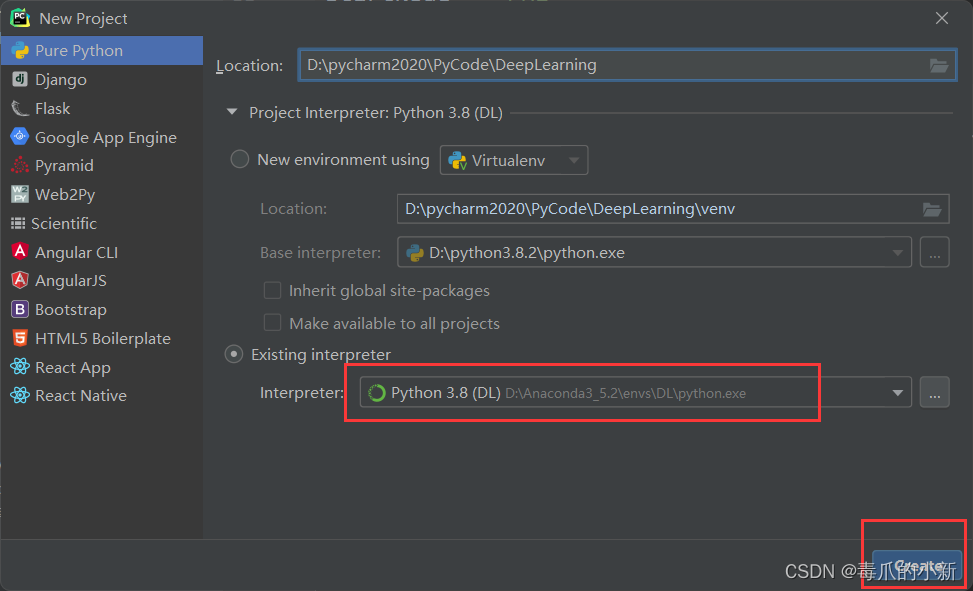
PyTorch深度学习环境安装(Anaconda、CUDA、cuDNN)及关联PyCharm
1. 关系讲解 Tytorch:Python机器学习库,基于Torch,用于自然语言处理等应用程序 Anaconda:是默认的python包和环境管理工具,安装了anaconda,就默认安装了conda CUDA:CUDA是一种由显卡厂商NVIDI…...

Active Directory安全和风险状况管理
风险评估和管理 风险评估和管理是主动安全性和合规性管理不可或缺的一部分。 发现关键基础设施组件中的风险行为和配置对于阻止网络入侵和预防网络攻击至关重要。帐户泄露和配置错误漏洞是用于破坏网络的常见技术。当评估、监控和降低 Active Directory 基础架构的风险时&…...
学术论文GPT源码解读:从chatpaper、chatwithpaper到gpt_academic
前言 之前7月中旬,我曾在微博上说准备做“20个LLM大型项目的源码解读” 针对这个事,目前的最新情况是 已经做了的:LLaMA、Alpaca、ChatGLM-6B、deepspeedchat、transformer、langchain、langchain-chatglm知识库准备做的:chatpa…...
Transformer跳跃连接原理与工程实践详解
1. 跳跃连接在Transformer模型中的核心价值我第一次在Vision Transformer中尝试引入跳跃连接时,准确率直接提升了7个百分点——这个结果让我意识到,这个看似简单的结构远比想象中重要。跳跃连接(Skip Connection)本质上是将神经网…...

real-anime-z多场景落地:儿童绘本插画、教育课件配图、科普信息图风格生成
real-anime-z多场景落地:儿童绘本插画、教育课件配图、科普信息图风格生成 1. 模型介绍与部署 real-anime-z是基于Z-Image的LoRA版本模型,专注于生成真实风格的动画图片。该模型特别适合需要高质量动漫风格图像的各类应用场景。 使用Xinference部署re…...
:支持ISO通信与多种CAN卡,S-rec...)
基于UDS的BootLoader上位机源代码(C#):支持ISO通信与多种CAN卡,S-rec...
基于UDS的BootLoader上位机源代码(C#) 基于UDS的BootLoader上位机源代码,支持ISO15765通信,支持PeakCAN , ZJG CAN等CAN卡, 支持S-record格式的二进制文件解析; 可二次开发或扩展应用。一、概述 本文档详细解读基于UDS…...
)
从‘Hello World’到‘Hello AI’:用ESP32和TensorFlow Lite做个会呼吸的灯(附完整代码)
从‘Hello World’到‘Hello AI’:用ESP32和TensorFlow Lite打造智能呼吸灯实战指南 1. 为什么嵌入式开发者需要尝试TinyML? 记得第一次点亮LED时的兴奋吗?那种"Hello World"级别的成就感,正是推动我们不断探索技术的原…...
到底怎么设才不掉数据?)
ESP-IDF串口调试踩坑记:ESP32-S3的uart_set_rx_full_threshold()到底怎么设才不掉数据?
ESP32-S3串口数据丢失难题:深度解析uart_set_rx_full_threshold()的黄金法则 当你在凌晨三点调试ESP32-S3的串口通信,却发现每20个字节就神秘消失1个——这不是什么灵异事件,而是FIFO阈值在作祟。作为经历过数十个物联网项目的老兵࿰…...

3分钟完成B站缓存转换:m4s无损转MP4的完整解决方案
3分钟完成B站缓存转换:m4s无损转MP4的完整解决方案 【免费下载链接】m4s-converter 一个跨平台小工具,将bilibili缓存的m4s格式音视频文件合并成mp4 项目地址: https://gitcode.com/gh_mirrors/m4/m4s-converter 你是否曾经遇到过这样的困境&…...

题解:洛谷 P3958 [NOIP 2017 提高组] 奶酪
本文分享的必刷题目是从蓝桥云课、洛谷、AcWing等知名刷题平台精心挑选而来,并结合各平台提供的算法标签和难度等级进行了系统分类。题目涵盖了从基础到进阶的多种算法和数据结构,旨在为不同阶段的编程学习者提供一条清晰、平稳的学习提升路径。 欢迎大…...

别再为IRF堆叠脑裂发愁了!手把手教你用LACP MAD给H3C交换机上个双保险
H3C IRF堆叠架构下LACP MAD高可用方案实战解析 在企业级网络架构中,核心交换机的可靠性直接决定了整个业务系统的稳定性。当采用H3C IRF(Intelligent Resilient Framework)堆叠技术将多台物理交换机虚拟化为单一逻辑设备时,虽然提…...

别再只会用INNER JOIN了!Hive SQL里CROSS JOIN的这两个实战场景,帮你搞定复杂统计和ID续接
Hive SQL高阶实战:CROSS JOIN在复杂统计与ID续接中的妙用 笛卡尔积在SQL中常被视为性能杀手,但在特定场景下却能化身为解决问题的利器。今天我们就来探讨Hive中CROSS JOIN的两个高阶应用场景,这些技巧来自真实的数据仓库项目经验,…...
)
从“点赞”到“私信”:手把手设计一个高可用的站内信系统(含数据库表结构)
从“点赞”到“私信”:手把手设计一个高可用的站内信系统 当用户在你的平台上点赞了一篇帖子,或是收到一条私信时,如何确保通知能实时、可靠地送达?站内信系统作为用户互动的核心枢纽,直接影响着产品的用户体验和留存…...