Node + Express 后台开发 —— 起步
Node + Express 后台开发 —— 起步
前面陆续学习了一下 node、npm、模块,也稍尝试 Express,感觉得换一个思路加快进行。
比如笔者对前端的开发已较熟悉,如果领导给一个内部小网站的需求,难道说你得给我配置一个后端?
又不是做一个复杂的后端,只是简单的数据存储(增删改查)、上传文件、下载csv或excel,无需考虑性能、稳定性、负载均衡等等,怎么就不能做
目标
实现简单后台的开发和部署
Express 项目生成器
生成项目
可通过应用生成器工具 express-generator 可以快速创建一个应用的骨架
创建项目文件夹 spug-back-end,进入项目后执行 npx express-generator:
Administrator@ /e/spug-back-end
$ npx express-generator
npm WARN exec The following package was not found and will be installed: express-generator@4.16.1
npm WARN deprecated mkdirp@0.5.1: Legacy versions of mkdirp are no longer supported. Please update to mkdirp 1.x. (Note that the API surface has changed to use Promises in 1.x.)warning: the default view engine will not be jade in future releaseswarning: use `--view=jade' or `--help' for additional optionscreate : public\create : public\javascripts\create : public\images\create : public\stylesheets\create : public\stylesheets\style.csscreate : routes\create : routes\index.jscreate : routes\users.jscreate : views\create : views\error.jadecreate : views\index.jadecreate : views\layout.jadecreate : app.jscreate : package.jsoncreate : bin\create : bin\wwwinstall dependencies:$ npm installrun the app:$ DEBUG=spug-back-end:* npm start
生成如下内容:
Administrator@ /e/spug-back-end
$ ll
total 5
-rw-r--r-- 1 Administrator 197121 1075 Apr 14 15:06 app.js
drwxr-xr-x 1 Administrator 197121    0 Apr 14 15:06 bin/
-rw-r--r-- 1 Administrator 197121  301 Apr 14 15:06 package.json
drwxr-xr-x 1 Administrator 197121    0 Apr 14 15:06 public/
drwxr-xr-x 1 Administrator 197121    0 Apr 14 15:06 routes/
drwxr-xr-x 1 Administrator 197121    0 Apr 14 15:06 views/
Tip: 对于较老的 Node 版本(8.2.0 以下),请通过 npm 将 Express 应用程序生成器安装到全局环境中并使用
$ npm install -g express-generator
$ express
根据上文提示安装依赖 npm install:
Administrator@ /e/spug-back-end
$ npm install
npm WARN deprecated constantinople@3.0.2: Please update to at least constantinople 3.1.1
npm WARN deprecated transformers@2.1.0: Deprecated, use jstransformer
npm WARN deprecated jade@1.11.0: Jade has been renamed to pug, please install the latest version of pug instead of jadeadded 99 packages, and audited 100 packages in 22s1 package is looking for fundingrun `npm fund` for details8 vulnerabilities (1 low, 4 high, 3 critical)To address all issues (including breaking changes), run:npm audit fix --forceRun `npm audit` for details.
全局安装 nodemon(在Node.js应用程序开发过程中使用的简单监视器脚本),编码过程中无需重启 node 服务即可生效:
PS E:\spug-back-end> npm i -g nodemonchanged 32 packages, and audited 33 packages in 1s3 packages are looking for fundingrun `npm fund` for detailsfound 0 vulnerabilities
修改启动脚本:
   "version": "0.0.0","private": true,"scripts": {
-    "start": "node ./bin/www"
+    "start": "nodemon ./bin/www"
通过 npm run start 本地启动服务:
PS E:\spug-back-end> npm run start> spug-back-end@0.0.0 start
> nodemon ./bin/www[nodemon] 2.0.22
[nodemon] to restart at any time, enter `rs`
[nodemon] watching path(s): *.*
[nodemon] watching extensions: js,mjs,json
[nodemon] starting `node ./bin/www`
入口文件 /bin/www.js 默认使用的是 3000 端口(var port = normalizePort(process.env.PORT || '3000');)
浏览器访问 http://localhost:3000/,页面显示:
Express
Welcome to Express
项目解读
模板
views 目录中存放的是 jade 模板文件:
Administrator@ /e/spug-back-end/views (master)
$ ls
error.jade  index.jade  layout.jade
首页对应的模板是 index.jade:
Administrator@ /e/spug-back-end/views (master)
$ cat index.jade
extends layoutblock contenth1= titlep Welcome to #{title}
Express 生成器默认使用 jade 模板,对前端不是很友好,笔者通过 npx express-generator --view=ejs 选用 ejs模板(对前端更友好)重新创建。
首页对应模板 index.ejs:
<!DOCTYPE html>
<html><head><title><%= title %></title><link rel='stylesheet' href='/stylesheets/style.css' /></head><body><h1><%= title %></h1><p>Welcome to <%= title %></p></body>
</html>
入口文件
bin/www.js 是应用的入口文件。
核心代码如下:
// 加载 app.js
var app = require('../app');
var http = require('http');var port = normalizePort(process.env.PORT || '3000');
app.set('port', port);// 创建 http server
var server = http.createServer(app);
server.listen(port);
完整代码如下:
#!/usr/bin/env node/*** Module dependencies.*/var app = require('../app');
var debug = require('debug')('spug-back-end:server');
var http = require('http');/*** Get port from environment and store in Express.*/var port = normalizePort(process.env.PORT || '3000');
app.set('port', port);/*** Create HTTP server.*/var server = http.createServer(app);/*** Listen on provided port, on all network interfaces.*/server.listen(port);
server.on('error', onError);
server.on('listening', onListening);/*** Normalize a port into a number, string, or false.*/function normalizePort(val) {var port = parseInt(val, 10);if (isNaN(port)) {// named pipereturn val;}if (port >= 0) {// port numberreturn port;}return false;
}/*** Event listener for HTTP server "error" event.*/function onError(error) {if (error.syscall !== 'listen') {throw error;}var bind = typeof port === 'string'? 'Pipe ' + port: 'Port ' + port;// handle specific listen errors with friendly messagesswitch (error.code) {case 'EACCES':console.error(bind + ' requires elevated privileges');process.exit(1);break;case 'EADDRINUSE':console.error(bind + ' is already in use');process.exit(1);break;default:throw error;}
}/*** Event listener for HTTP server "listening" event.*/function onListening() {var addr = server.address();var bind = typeof addr === 'string'? 'pipe ' + addr: 'port ' + addr.port;debug('Listening on ' + bind);
}
Tip: 和我们之前创建的最简单的服务器类似
app.js
入口文件中引入 app.js,完整代码如下:
var createError = require('http-errors');
var express = require('express');
var path = require('path');
var cookieParser = require('cookie-parser');
var logger = require('morgan');var indexRouter = require('./routes/index');
var usersRouter = require('./routes/users');
// Creates an Express application
var app = express();// view engine setup
// 模板引擎相关代码
app.set('views', path.join(__dirname, 'views'));
app.set('view engine', 'ejs');app.use(logger('dev'));
// for parsing application/json
app.use(express.json());
// for parsing application/x-www-form-urlencoded
app.use(express.urlencoded({ extended: false }));
app.use(cookieParser());
// 放开静态资源
app.use(express.static(path.join(__dirname, 'public')));// 定义两个路由。一个返回页面一个返回后端数据
// app.use([path,] callback [, callback...]) - 在指定路径挂载指定的一个或多个中间件函数:当请求路径的基匹配路径时,执行中间件函数。
app.use('/', indexRouter);
app.use('/users', usersRouter);// catch 404 and forward to error handler
app.use(function(req, res, next) {next(createError(404));
});// error handler
app.use(function(err, req, res, next) {// set locals, only providing error in developmentres.locals.message = err.message;res.locals.error = req.app.get('env') === 'development' ? err : {};// render the error pageres.status(err.status || 500);res.render('error');
});module.exports = app;
和我们之前用 Express 实现的报名系统 非常类似。这里创建了一个 Express 应用,并定义了两个示例路由:
var indexRouter = require('./routes/index');
var usersRouter = require('./routes/users');// 返回页面
app.use('/', indexRouter);
// 返回后端数据
app.use('/users', usersRouter);
路由
app.js 使用了两个路由。内容如下:
// routes/index.js
var express = require('express');
var router = express.Router();/* GET home page. */
router.get('/', function(req, res, next) {res.render('index', { title: 'Express' });
});module.exports = router;
// routes/users.js
var express = require('express');
var router = express.Router();/* GET users listing. */
router.get('/', function(req, res, next) {res.send('respond with a resource');
});module.exports = router;
浏览器访问 http://localhost:3000/users,页面显示 respond with a resource。
mongodb
数据库通常会安装到 linux 中,这里以 ubuntu 为例,通过 apt-get install mongodb 即可安装,非常方便:
// 笔者刚已执行
root@linux:/home/pjl# apt-get install mongodb
Reading package lists... Done
Building dependency tree
Reading state information... Done
mongodb is already the newest version (1:3.6.9+really3.6.8+90~g8e540c0b6d-0ubuntu5.3).
0 upgraded, 0 newly installed, 0 to remove and 150 not upgraded.
数据库现在已经启动,我们通过mongo -version验证安装成功:
root@linux:/home/pjl# mongo -version
MongoDB shell version v3.6.8
git version: 8e540c0b6db93ce994cc548f000900bdc740f80a
OpenSSL version: OpenSSL 1.1.1f  31 Mar 2020
allocator: tcmalloc
modules: none
build environment:distarch: x86_64target_arch: x86_64
mongodb 配置文件是 /etc/mongodb.conf。请注意下面两项配置:
// 远程连接
#bind_ip = 127.0.0.1
bind_ip = 0.0.0.0// 开机自启动
#auth = true
auth = true
MongoDB shell
输入 mongo 即可进入 MongoDB shell(操作mongo):
root@linux:/home/pjl# mongo
MongoDB shell version v3.6.8
connecting to: mongodb://127.0.0.1:27017
Implicit session: session { "id" : UUID("aedc6541-4a67-4e60-8eb4-d1325c82d061") }
MongoDB server version: 3.6.8
Welcome to the MongoDB shell.
For interactive help, type "help".
For more comprehensive documentation, seehttp://docs.mongodb.org/
Questions? Try the support grouphttp://groups.google.com/group/mongodb-user
Server has startup warnings:
2023-04-15T14:34:32.327+0800 I STORAGE  [initandlisten]
2023-04-15T14:34:32.327+0800 I STORAGE  [initandlisten] ** WARNING: Using the XFS filesystem is strongly recommended with the WiredTiger storage engine
2023-04-15T14:34:32.327+0800 I STORAGE  [initandlisten] **          See http://dochub.mongodb.org/core/prodnotes-filesystem
2023-04-15T14:34:34.861+0800 I CONTROL  [initandlisten]
2023-04-15T14:34:34.861+0800 I CONTROL  [initandlisten] ** WARNING: Access control is not enabled for the database.
2023-04-15T14:34:34.861+0800 I CONTROL  [initandlisten] **          Read and write access to data and configuration is unrestricted.
2023-04-15T14:34:34.861+0800 I CONTROL  [initandlisten]
> helpdb.help()                    help on db methodsdb.mycoll.help()             help on collection methodssh.help()                    sharding helpersrs.help()                    replica set helpershelp admin                   administrative helphelp connect                 connecting to a db helphelp keys                    key shortcutshelp misc                    misc things to knowhelp mr                      mapreduceshow dbs                     show database namesshow collections             show collections in current databaseshow users                   show users in current databaseshow profile                 show most recent system.profile entries with time >= 1msshow logs                    show the accessible logger namesshow log [name]              prints out the last segment of log in memory, 'global' is defaultuse <db_name>                set current databasedb.foo.find()                list objects in collection foodb.foo.find( { a : 1 } )     list objects in foo where a == 1it                           result of the last line evaluated; use to further iterateDBQuery.shellBatchSize = x   set default number of items to display on shellexit                         quit the mongo shell
> show dbs
admin   0.000GB
config  0.000GB
local   0.000GB
通过 help 可以查看帮助,通过show dbs 发现现在有三个数据库。
新建数据库
通过 use 可以创建或切换数据库。比如:
// use - 创建数据库 pjl_db。如果存在则直接切换
> use pjl_db
switched to db pjl_db
// db - 目前操作的是 pjl_db 数据库
> db
pjl_db
由于新建的数据库 pjl_db 什么都没有,所以通过 show dbs 显示不出来,可通过 createCollection 创建表,再次查询即可显示该数据库。比如
// 新建数据库未能展示
> show dbs
admin   0.000GB
config  0.000GB
local   0.000GB
// 通过 tab 建有提示
> db.create
db.createCollection(  db.createRole(        db.createUser(        db.createView(
// 创建表 users。这里叫集合
> db.createCollection("users")
{ "ok" : 1 }
// 再次查询则可显示新建数据库 pjl_db
> show dbs
admin   0.000GB
config  0.000GB
local   0.000GB
pjl_db  0.000GB
Tip:db.createCollection("pjl_db", {size: 1024*1024, capped: true, max: 1000}) - 创建 pjl_db 数据库,同时这个数据库最多 1M,记录数只能有1000条,在多一条则把第一条给替代。db.createCollection("users") 则不作限制。
删除数据库
通过 db.dropDatabase() 即可删除数据库。比如:
> db.dropDatabase()
{ "dropped" : "pjl_db", "ok" : 1 }
> show dbs
admin   0.000GB
config  0.000GB
local   0.000GB
新增、查看和删除表
通过 db.createCollection("users") 新建 users 表。比如:
// 创建表 users。这里叫集合
> db.createCollection("users")
{ "ok" : 1 }
// 再次查询则可显示新建数据库 pjl_db
> show dbs
admin   0.000GB
config  0.000GB
local   0.000GB
pjl_db  0.000GB
- db.getCollectionNames - 查看有哪些表
- db.tableName.drop - 删除某张表
示例:
// 新建两张表: table-b、table-c
> db.createCollection("table-b")
{ "ok" : 1 }
> db.createCollection("table-c")
{ "ok" : 1 }
// tab 提示
> db.getCollection
db.getCollection(       db.getCollectionInfos(  db.getCollectionNames(
// 有哪些表
> db.getCollectionNames()
[ "table-b", "table-c", "users" ]
// 删除table-b表失败
> db.table-b.drop()
2023-04-15T15:17:10.232+0800 E QUERY    [thread1] ReferenceError: b is not defined :
@(shell):1:1
// 删除table-b表成功
> db["table-b"].drop()
true
> db.getCollectionNames()
[ "table-c", "users" ]
表格-新增数据
通过 db.users.save 可以向 users 表中单条、批量插入数据。甚至字段名不同,字段数量不同也能插入。请看示例:
// 给 users 表插入一条数据 {"name": 'pjl', age: 18}
> db.users.save({"name": 'pjl', age: 18})
WriteResult({ "nInserted" : 1 })
// 查询users表
> db.users.find()
{ "_id" : ObjectId("643a513d73f16a13ae248f42"), "name" : "pjl", "age" : 18 }
// 批量插入数据
> db.users.save([{"name": 'pjl2', age: 19}, {"name": 'pjl3', age: 20}])
BulkWriteResult({"writeErrors" : [ ],"writeConcernErrors" : [ ],"nInserted" : 2,"nUpserted" : 0,"nMatched" : 0,"nModified" : 0,"nRemoved" : 0,"upserted" : [ ]
})
// 批量插入成功
> db.users.find()
{ "_id" : ObjectId("643a513d73f16a13ae248f42"), "name" : "pjl", "age" : 18 }
{ "_id" : ObjectId("643a51db73f16a13ae248f44"), "name" : "pjl2", "age" : 19 }
{ "_id" : ObjectId("643a51db73f16a13ae248f45"), "name" : "pjl3", "age" : 20 }
// 换字段名和字段长度,也能插入成功
> db.users.save({"name2": 'pjl', age2: 18, tel: 131111111})
WriteResult({ "nInserted" : 1 })
> db.users.find()
{ "_id" : ObjectId("643a513d73f16a13ae248f42"), "name" : "pjl", "age" : 18 }
{ "_id" : ObjectId("643a51db73f16a13ae248f44"), "name" : "pjl2", "age" : 19 }
{ "_id" : ObjectId("643a51db73f16a13ae248f45"), "name" : "pjl3", "age" : 20 }
{ "_id" : ObjectId("643a529a73f16a13ae248f46"), "name2" : "pjl", "age2" : 18, "tel" : 131111111 }
Tip:向 mongo 表中插入数据非常自由,什么字段、什么类型都可以。
表格-删除数据
通过 db.users.remove({age2:18}) 可以删除 age2=18 的数据,通过 db.users.remove({}) 删除 users 表中所有数据。请看示例:
// 目前有4条数据
> db.users.find()
{ "_id" : ObjectId("643a513d73f16a13ae248f42"), "name" : "pjl", "age" : 18 }
{ "_id" : ObjectId("643a51db73f16a13ae248f44"), "name" : "pjl2", "age" : 19 }
{ "_id" : ObjectId("643a51db73f16a13ae248f45"), "name" : "pjl3", "age" : 20 }
{ "_id" : ObjectId("643a529a73f16a13ae248f46"), "name2" : "pjl", "age2" : 18, "tel" : 131111111 }// 可以删除 age2=18 的数据
> db.users.remove({age2:18})
WriteResult({ "nRemoved" : 1 })
> db.users.find()
{ "_id" : ObjectId("643a513d73f16a13ae248f42"), "name" : "pjl", "age" : 18 }
{ "_id" : ObjectId("643a51db73f16a13ae248f44"), "name" : "pjl2", "age" : 19 }
{ "_id" : ObjectId("643a51db73f16a13ae248f45"), "name" : "pjl3", "age" : 20 }// 删除 users 表中所有数据是 `db.users.remove({})`。`db.users.remove()` 会报错
> db.users.remove()
2023-04-16T09:10:55.859+0800 E QUERY    [thread1] Error: remove needs a query :
DBCollection.prototype._parseRemove@src/mongo/shell/collection.js:357:1
DBCollection.prototype.remove@src/mongo/shell/collection.js:382:18
@(shell):1:1
// 删除 users 表中所有数据
> db.users.remove({})
WriteResult({ "nRemoved" : 3 })
> db.users.find()
>
表格-修改数据
通过 db.users.update({name:'pjl2'}, {$set: {age: 20}}) 修改 name=pjl2 的数据,将 age 改为 20。
Tip:直接 db.users.update({name:'pjl'}, {age: 19}) 会替换整条数据。
\$inc 指增加,如果需要减去,则将数字改成负数。
示例如下:
> db.users.find()
{ "_id" : ObjectId("643b4d0cd21fdd4d6f0b0484"), "name" : "pjl", "age" : 18 }
{ "_id" : ObjectId("643b4d17d21fdd4d6f0b0486"), "name" : "pjl2", "age" : 19 }
{ "_id" : ObjectId("643b4d17d21fdd4d6f0b0487"), "name" : "pjl3", "age" : 20 }
{ "_id" : ObjectId("643b4d1fd21fdd4d6f0b0488"), "name2" : "pjl", "age2" : 18, "tel" : 131111111 }
// 修改 name=pjl 的数据,将 age改为19
> db.users.update({name:'pjl'}, {age: 19})
WriteResult({ "nMatched" : 1, "nUpserted" : 0, "nModified" : 1 })
// 替换了条数据
> db.users.find()
{ "_id" : ObjectId("643b4d0cd21fdd4d6f0b0484"), "age" : 19 }
{ "_id" : ObjectId("643b4d17d21fdd4d6f0b0486"), "name" : "pjl2", "age" : 19 }
{ "_id" : ObjectId("643b4d17d21fdd4d6f0b0487"), "name" : "pjl3", "age" : 20 }
{ "_id" : ObjectId("643b4d1fd21fdd4d6f0b0488"), "name2" : "pjl", "age2" : 18, "tel" : 131111111 }
// 通过 $set 成功更改 age 而不影响其他字段
> db.users.update({name:'pjl2'}, {$set: {age: 20}})
WriteResult({ "nMatched" : 1, "nUpserted" : 0, "nModified" : 1 })
> db.users.find()
{ "_id" : ObjectId("643b4d0cd21fdd4d6f0b0484"), "age" : 19 }
{ "_id" : ObjectId("643b4d17d21fdd4d6f0b0486"), "name" : "pjl2", "age" : 20 }
{ "_id" : ObjectId("643b4d17d21fdd4d6f0b0487"), "name" : "pjl3", "age" : 20 }
{ "_id" : ObjectId("643b4d1fd21fdd4d6f0b0488"), "name2" : "pjl", "age2" : 18, "tel" : 131111111 }
// 给 age 增加1
> db.users.update({name:'pjl2'}, {$inc: {age: 1}})
WriteResult({ "nMatched" : 1, "nUpserted" : 0, "nModified" : 1 })
> db.users.find()
{ "_id" : ObjectId("643b4d0cd21fdd4d6f0b0484"), "age" : 19 }
{ "_id" : ObjectId("643b4d17d21fdd4d6f0b0486"), "name" : "pjl2", "age" : 21 }
{ "_id" : ObjectId("643b4d17d21fdd4d6f0b0487"), "name" : "pjl3", "age" : 20 }
{ "_id" : ObjectId("643b4d1fd21fdd4d6f0b0488"), "name2" : "pjl", "age2" : 18, "tel" : 131111111 }
// 给 age 减去1
> db.users.update({name:'pjl2'}, {$inc: {age: -1}})
WriteResult({ "nMatched" : 1, "nUpserted" : 0, "nModified" : 1 })
> db.users.find()
{ "_id" : ObjectId("643b4d0cd21fdd4d6f0b0484"), "age" : 19 }
{ "_id" : ObjectId("643b4d17d21fdd4d6f0b0486"), "name" : "pjl2", "age" : 20 }
{ "_id" : ObjectId("643b4d17d21fdd4d6f0b0487"), "name" : "pjl3", "age" : 20 }
{ "_id" : ObjectId("643b4d1fd21fdd4d6f0b0488"), "name2" : "pjl", "age2" : 18, "tel" : 131111111 }
表格-查询数据
首先清空 users 表,并插入6条数据。
find
通过 db.users.find() 查询所有数据:
> db.users.find()
{ "_id" : ObjectId("643bb3dfd21fdd4d6f0b048a"), "name" : "peng", "age" : 19, "tel" : "0730-1231" }
{ "_id" : ObjectId("643bb3dfd21fdd4d6f0b048b"), "name" : "jia", "age" : 29, "tel" : "0730-1232" }
{ "_id" : ObjectId("643bb3dfd21fdd4d6f0b048c"), "name" : "li", "age" : 39, "tel" : "0730-1233" }
{ "_id" : ObjectId("643bb3dfd21fdd4d6f0b048d"), "name" : "pengjia", "age" : 49, "tel" : "0730-1234" }
{ "_id" : ObjectId("643bb3dfd21fdd4d6f0b048e"), "name" : "pengjiali", "age" : 59, "tel" : "0730-1235" }
{ "_id" : ObjectId("643bb3dfd21fdd4d6f0b048f"), "name" : "jiali", "age" : 69, "tel" : "0730-1236" }
>
大于小于
- $gt - 大于
- $gte - 大于等于
- $lt - 小于
- $lte - 小于等于
// 查询 age 大于 50 的数据
> db.users.find({age:{$gt: 50}})
{ "_id" : ObjectId("643bb3dfd21fdd4d6f0b048e"), "name" : "pengjiali", "age" : 59, "tel" : "0730-1235" }
{ "_id" : ObjectId("643bb3dfd21fdd4d6f0b048f"), "name" : "jiali", "age" : 69, "tel" : "0730-1236" }
// 查询 age 大于 69 的数据
> db.users.find({age:{$gt: 69}})
// 查询 age 大于等于 69 的数据
> db.users.find({age:{$gte: 69}})
{ "_id" : ObjectId("643bb3dfd21fdd4d6f0b048f"), "name" : "jiali", "age" : 69, "tel" : "0730-1236" }
// age 小于 20
> db.users.find({age:{$lt: 20}})
{ "_id" : ObjectId("643bb3dfd21fdd4d6f0b048a"), "name" : "peng", "age" : 19, "tel" : "0730-1231" }
// 查询 age 大于 10,小于 40 的数据
> db.users.find({age:{$gt:10, $lt:40}})
{ "_id" : ObjectId("643bb3dfd21fdd4d6f0b048a"), "name" : "peng", "age" : 19, "tel" : "0730-1231" }
{ "_id" : ObjectId("643bb3dfd21fdd4d6f0b048b"), "name" : "jia", "age" : 29, "tel" : "0730-1232" }
{ "_id" : ObjectId("643bb3dfd21fdd4d6f0b048c"), "name" : "li", "age" : 39, "tel" : "0730-1233" }
>
单条件
db.users.find({name: "jia"})- 查询 name等于jia 的数据db.users.find({name: /jia/})- 查询 name 中包含jia 的数据db.users.find({name: /jia$/})- 查询 name 中以 jia结尾的数据
// 查询 name 等于 jia 的数据
> db.users.find({name: "jia"})
{ "_id" : ObjectId("643bb3dfd21fdd4d6f0b048b"), "name" : "jia", "age" : 29, "tel" : "0730-1232" }
// 查询 name 中包含 jia 的数据
> db.users.find({name: /jia/})
{ "_id" : ObjectId("643bb3dfd21fdd4d6f0b048b"), "name" : "jia", "age" : 29, "tel" : "0730-1232" }
{ "_id" : ObjectId("643bb3dfd21fdd4d6f0b048d"), "name" : "pengjia", "age" : 49, "tel" : "0730-1234" }
{ "_id" : ObjectId("643bb3dfd21fdd4d6f0b048e"), "name" : "pengjiali", "age" : 59, "tel" : "0730-1235" }
{ "_id" : ObjectId("643bb3dfd21fdd4d6f0b048f"), "name" : "jiali", "age" : 69, "tel" : "0730-1236" }
// 查询 name 中以 jia 结尾的数据
> db.users.find({name: /jia$/})
{ "_id" : ObjectId("643bb3dfd21fdd4d6f0b048b"), "name" : "jia", "age" : 29, "tel" : "0730-1232" }
{ "_id" : ObjectId("643bb3dfd21fdd4d6f0b048d"), "name" : "pengjia", "age" : 49, "tel" : "0730-1234" }
多条件
db.users.find({$or: [{age: 19}, {name: 'jia'}]}) 查询 age=19 或 name=jia
// 查询 age=19 或 name=jia
> db.users.find({$or: [{age: 19}, {name: 'jia'}]})
{ "_id" : ObjectId("643bb3dfd21fdd4d6f0b048a"), "name" : "peng", "age" : 19, "tel" : "0730-1231" }
{ "_id" : ObjectId("643bb3dfd21fdd4d6f0b048b"), "name" : "jia", "age" : 29, "tel" : "0730-1232" }
列过滤
db.users.find({}, {name: 1})- 只显示 name 这个字段。默认主键回返回。1 是显示,0指不显示db.users.find({}, {name: 1, age: 1, _id: 0})- 只要 name 和 age 字段,主键不要
// 只显示 name 这个字段。默认主键回返回
> db.users.find({}, {name: 1})
{ "_id" : ObjectId("643bb3dfd21fdd4d6f0b048a"), "name" : "peng" }
{ "_id" : ObjectId("643bb3dfd21fdd4d6f0b048b"), "name" : "jia" }
{ "_id" : ObjectId("643bb3dfd21fdd4d6f0b048c"), "name" : "li" }
{ "_id" : ObjectId("643bb3dfd21fdd4d6f0b048d"), "name" : "pengjia" }
{ "_id" : ObjectId("643bb3dfd21fdd4d6f0b048e"), "name" : "pengjiali" }
{ "_id" : ObjectId("643bb3dfd21fdd4d6f0b048f"), "name" : "jiali" }
// 只显示 name 这个字段,主键也不要
> db.users.find({}, {name: 1, _id: 0})
{ "name" : "peng" }
{ "name" : "jia" }
{ "name" : "li" }
{ "name" : "pengjia" }
{ "name" : "pengjiali" }
{ "name" : "jiali" }
// 只要 name 和 age 字段,主键不要
> db.users.find({}, {name: 1, age: 1, _id: 0})
{ "name" : "peng", "age" : 19 }
{ "name" : "jia", "age" : 29 }
{ "name" : "li", "age" : 39 }
{ "name" : "pengjia", "age" : 49 }
{ "name" : "pengjiali", "age" : 59 }
{ "name" : "jiali", "age" : 69 }
排序
通过 db.users.find().sort({age: -1}) 执行 age 逆序,正序则为1。
// age 逆序
> db.users.find({}, {age:1}).sort({age: -1})
{ "_id" : ObjectId("643bb3dfd21fdd4d6f0b048f"), "age" : 69 }
{ "_id" : ObjectId("643bb3dfd21fdd4d6f0b048e"), "age" : 59 }
{ "_id" : ObjectId("643bb3dfd21fdd4d6f0b048d"), "age" : 49 }
{ "_id" : ObjectId("643bb3dfd21fdd4d6f0b048c"), "age" : 39 }
{ "_id" : ObjectId("643bb3dfd21fdd4d6f0b048b"), "age" : 29 }
{ "_id" : ObjectId("643bb3dfd21fdd4d6f0b048a"), "age" : 19 }
// age 正序
> db.users.find({}, {age:1}).sort({age: 1})
{ "_id" : ObjectId("643bb3dfd21fdd4d6f0b048a"), "age" : 19 }
{ "_id" : ObjectId("643bb3dfd21fdd4d6f0b048b"), "age" : 29 }
{ "_id" : ObjectId("643bb3dfd21fdd4d6f0b048c"), "age" : 39 }
{ "_id" : ObjectId("643bb3dfd21fdd4d6f0b048d"), "age" : 49 }
{ "_id" : ObjectId("643bb3dfd21fdd4d6f0b048e"), "age" : 59 }
{ "_id" : ObjectId("643bb3dfd21fdd4d6f0b048f"), "age" : 69 }
分页
分页可以通过 skip 和 limit实现。例如 db.users.find().skip(2).limit(2) 查询第二页。跳过2条,查询2条。
> db.users.find()
{ "_id" : ObjectId("643bb3dfd21fdd4d6f0b048a"), "name" : "peng", "age" : 19, "tel" : "0730-1231" }
{ "_id" : ObjectId("643bb3dfd21fdd4d6f0b048b"), "name" : "jia", "age" : 29, "tel" : "0730-1232" }
{ "_id" : ObjectId("643bb3dfd21fdd4d6f0b048c"), "name" : "li", "age" : 39, "tel" : "0730-1233" }
{ "_id" : ObjectId("643bb3dfd21fdd4d6f0b048d"), "name" : "pengjia", "age" : 49, "tel" : "0730-1234" }
{ "_id" : ObjectId("643bb3dfd21fdd4d6f0b048e"), "name" : "pengjiali", "age" : 59, "tel" : "0730-1235" }
{ "_id" : ObjectId("643bb3dfd21fdd4d6f0b048f"), "name" : "jiali", "age" : 69, "tel" : "0730-1236" }
// 查询前3条
> db.users.find().limit(3)
{ "_id" : ObjectId("643bb3dfd21fdd4d6f0b048a"), "name" : "peng", "age" : 19, "tel" : "0730-1231" }
{ "_id" : ObjectId("643bb3dfd21fdd4d6f0b048b"), "name" : "jia", "age" : 29, "tel" : "0730-1232" }
{ "_id" : ObjectId("643bb3dfd21fdd4d6f0b048c"), "name" : "li", "age" : 39, "tel" : "0730-1233" }
// 第一页。跳过0条,查询2条
> db.users.find().skip(0).limit(2)
{ "_id" : ObjectId("643bb3dfd21fdd4d6f0b048a"), "name" : "peng", "age" : 19, "tel" : "0730-1231" }
{ "_id" : ObjectId("643bb3dfd21fdd4d6f0b048b"), "name" : "jia", "age" : 29, "tel" : "0730-1232" }
// 第二页。跳过2条,查询2条
> db.users.find().skip(2).limit(2)
{ "_id" : ObjectId("643bb3dfd21fdd4d6f0b048c"), "name" : "li", "age" : 39, "tel" : "0730-1233" }
{ "_id" : ObjectId("643bb3dfd21fdd4d6f0b048d"), "name" : "pengjia", "age" : 49, "tel" : "0730-1234" }
// 第三页。跳过4条,查询2条
> db.users.find().skip(4).limit(2)
{ "_id" : ObjectId("643bb3dfd21fdd4d6f0b048e"), "name" : "pengjiali", "age" : 59, "tel" : "0730-1235" }
{ "_id" : ObjectId("643bb3dfd21fdd4d6f0b048f"), "name" : "jiali", "age" : 69, "tel" : "0730-1236" }
// 先 age 逆序,在取2条
> db.users.find().sort({age: -1}).skip(0).limit(2)
{ "_id" : ObjectId("643bb3dfd21fdd4d6f0b048f"), "name" : "jiali", "age" : 69, "tel" : "0730-1236" }
{ "_id" : ObjectId("643bb3dfd21fdd4d6f0b048e"), "name" : "pengjiali", "age" : 59, "tel" : "0730-1235" }
通过 count() 查询记录数,例如 db.users.find({name: 'jia'}).count()
// 总共 6 条
> db.users.find().count()
6
// 符合条件的共 1 条
> db.users.find({name: 'jia'}).count()
1
> db.users.find({name: /jia/}).count()
4
db.users.findOne() - 查询第一条
// 查询第一条
> db.users.findOne()
{"_id" : ObjectId("643bb3dfd21fdd4d6f0b048a"),"name" : "peng","age" : 19,"tel" : "0730-1231"
}
项目目录划分
程序那么复杂,不可能全写在一起,笔者做如下分层:
路由层- 匹配路由,调用控制层控制层- 取得前端请求数据,加工处理,比如调用数据库(services层),在返回数据给前端服务层- 引用创建的数据库模型,对数据进行增删改查模型层- 创建数据库模型(这里是创建表)
以用户模块为例,在这4层中分别创建如下 js:
- services            // 服务层- UserService.js    // User 模块的服务层
- routes              // 路由- UserRouter.js     // User 模块的路由。比如登录、登录
- models              // 模型层- UserModel.js      // User Model
- controllers         // 控制层- UserController.js
连接数据库
前面我们操作数据库是直接进入 mongo shell 操作:
// 创建并切换到数据库 pjl_db
use pjl_db// 创建 users 表(这里叫集合)
db.createCollection("users")
现在我们需要通过 node 来操作数据库。
启动mongo服务
通过 mongod --dbpath=/var/lib/mongodb --bind_ip=0.0.0.0 --port=27017 启动mongo服务(未设置数据库密码)。其中 0.0.0.0 用户远程连接,端口是 27017。
如果需要后台启动(关闭终端服务也不会停止),需要指定日志路径,就像这样:
root@linux:/home/pjl# mongod --dbpath=/var/lib/mongodb --fork --logpath=/var/log/mongodb/mongodb.log --bind_ip=0.0.0.0 --port=27017
about to fork child process, waiting until server is ready for connections.
forked process: 133354
child process started successfully, parent exiting
查看 mongod 进程:
root@linux:/home/pjl# ps aux |grep mongod
root      133354  7.5  1.5 976348 62496 ?        Sl   09:46   0:00 mongod --dbpath=/var/lib/mongodb --fork --logpath=/var/log/mongodb/mongodb.log --bind_ip=0.0.0.0 --port=27017
root      133383  0.0  0.0  12120   716 pts/0    S+   09:47   0:00 grep --color=auto mongod
root@linux:/home/pjl#
Tip:还可以通过指定配置文件启动:
root@linux:/home/pjl# mongod -f /etc/mongodb.conf
// 没反应,通过 `tail -10 日志` 能看到输出
另起窗口进入 mongo shell,运行 show dbs 报错如下:
// 笔者将配置文件中端口改为 27027
root@linux:/var/log/mongodb# mongo --port=27027
MongoDB shell version v3.6.8
connecting to: mongodb://127.0.0.1:27027/
Implicit session: session { "id" : UUID("dc184887-824d-474a-a942-3d42ff1a21bf") }
MongoDB server version: 3.6.8
> show dbs
2023-04-21T09:52:04.824+0800 E QUERY    [thread1] Error: listDatabases failed:{"ok" : 0,"errmsg" : "there are no users authenticated","code" : 13,"codeName" : "Unauthorized"
} :
_getErrorWithCode@src/mongo/shell/utils.js:25:13
Mongo.prototype.getDBs@src/mongo/shell/mongo.js:67:1
shellHelper.show@src/mongo/shell/utils.js:860:19
shellHelper@src/mongo/shell/utils.js:750:15
@(shellhelp2):1:1
>
网友说是 安装mongo数据库时,配置文件中加了安全权限的设置,解决请看这里
安装 mongoose
通过 npm i mongoose -D 安装 mongoose —— Mongoose is a MongoDB object modeling tool)。
通过 mongoose 操作数据库非常方便
连接数据库
连接数据库很简单,只需要先启动数据库服务,然后在启动应用前连接数据库即可。代码如下:
// bin/www.jsvar http = require('http');
+ // 引入数据库
+ require('../config/db.config')
var port = normalizePort(process.env.PORT || '3000');
// config/db.config.jsconst mongoose = require("mongoose")
// mongo服务 ip
mongoose.connect("mongodb://192.168.1.223:27017/pjl_db")
mongoose.connection.once("open", () => {console.log('数据库连接成功')
})
通过 mongo shell 查到目前只有3个数据库:
> show dbs
admin   0.000GB
config  0.000GB
local   0.000GB
启动应用,控制台输出 数据库连接成功:
PS E:\spug-back-end> npm run start> spug-back-end@0.0.0 start
> nodemon ./bin/www[nodemon] 2.0.22
[nodemon] to restart at any time, enter `rs`
[nodemon] watching path(s): *.*
[nodemon] watching extensions: js,mjs,json
[nodemon] starting `node ./bin/www`
数据库连接成功
发现 pjl_db 数据库自动被创建。
> show dbs
admin   0.000GB
config  0.000GB
local   0.000GB
pjl_db  0.000GB
Tip:有了数据库,还得需要表才能对数据进行增、删、改、查。在 mongoose 中,需要创建一个 model(模型),可以把他当做一张表(或一条记录),比如下文登录模块的 UserModel.js 就是一个 model,向 model 插入一条数据时,mongoose 会自动创建一张名为 users 的表(或集合)。
登录
这里我们完成系统登录模块的开发。
app.js
app.js 引入用户路由。
// app.js
var indexRouter = require('./routes/index');
var usersRouter = require('./routes/users');
+ const UserRouter = require('./routes/UserRouter')app.use('/users', usersRouter);
+ app.use(UserRouter);
UserRouter.js
定义登录路由(/user/login),路由匹配成功,进入控制层处理。
// routes/UserRouter.js// 用户路由
var express = require('express');
var router = express.Router();
const UserController = require('../controllers/UserController.js')
/* POST users listing. */
router.post('/user/login', UserController.login);module.exports = router;
UserController.js
控制层调用服务层,如果数据库能通过用户名和密码查询到该用户则表明登录成功,否则返回用户名密码不匹配。
// controllers/UserController.jsconst UserService = require('../services/UserService')const UserModel = require('../models/UserModel')
const UserController = {login: async (req, res) => {// req.body - 例如 {"username":"pjl","password":"123456"}console.log('res.body', JSON.stringify(res.body))var result = await UserService.login(req.body)if(result.length === 0){res.send({code: '-1',error: '用户名密码不匹配'})}else{res.send({code: '0',error: ''})}}
}module.exports = UserController
UserService.js
模型层通过 model 查找数据库
// services/UserService.jsconst UserModel = require('../models/UserModel.js')
const UserService = {login: async ({username, password}) => {return UserModel.find({username,password})}
}module.exports = UserService
UserModel.js
mongoose 通过 model 创建表。
// models/UserModel.js// model 与表一一对应
const mongoose = require('mongoose')
const Schema = mongoose.Schema
// 通过 schema 限制一下集合(表),否则什么都能传入,太自由了不好
const Usertype = {username: String,password: String,// 性别gender: Number,// 头像avatar: String,// 角色role: Number, // 管理员1,编辑2
}const UserModel = mongoose.model("user", new Schema(Usertype))
module.exports = UserModel
测试
这里笔者在 git bash 中使用 curl(客户端的url) 模拟登录(post 用户名+密码):
Administrator@ ~/Desktop
$ curl -X POST -d 'username=pjl' -d 'password=123456' http://localhost:3000/user/login% Total    % Received % Xferd  Average Speed   Time    Time     Time  CurrentDload  Upload   Total   Spent    Left  Speed
100    76  100    48  100    28   1425    831 --:--:-- --:--:-- --:--:--  2533{"code":"-1","error":"用户名密码不匹配"}
由于 users 表中没有数据,当然也就查询不到(返回 {"code":"-1","error":"用户名密码不匹配"})。
笔者手动插入该条用户信息:
> use pjl_db
switched to db pjl_db
> db.users.save({username: 'pjl', password: '123456'})
WriteResult({ "nInserted" : 1 })
再次登录就能查询到 {"code":"0","error":""}:
Administrator@ ~/Desktop
$ curl -X POST -d 'username=pjl' -d 'password=123456' http://localhost:3000/user/login% Total    % Received % Xferd  Average Speed   Time    Time     Time  CurrentDload  Upload   Total   Spent    Left  Speed
100    51  100    23  100    28   1730   2106 --:--:-- --:--:-- --:--:--  5100{"code":"0","error":""}
相关文章:

Node + Express 后台开发 —— 起步
Node Express 后台开发 —— 起步 前面陆续学习了一下 node、npm、模块,也稍尝试 Express,感觉得换一个思路加快进行。 比如笔者对前端的开发已较熟悉,如果领导给一个内部小网站的需求,难道说你得给我配置一个后端?…...
Python学习笔记第五十七天(Pandas 数据清洗)
Python学习笔记第五十七天 Pandas 数据清洗Pandas 清洗空值isnull() Pandas替换单元格mean()median()mode() Pandas 清洗格式错误数据Pandas 清洗错误数据Pandas 清洗重复数据duplicated()drop_duplicates() 后记 Pandas 数据清洗 数据清洗是对一些没有用的数据进行处理的过程…...
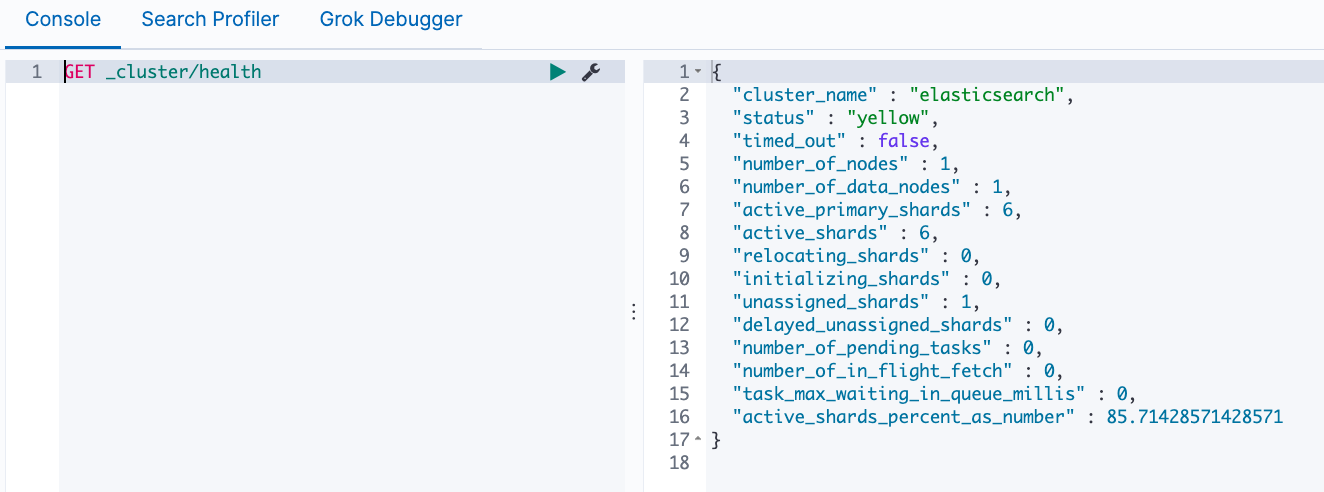
Elasticsearch的一些基本概念
文章目录 基本概念:文档和索引JSON文档元数据索引REST API 节点和集群节点Master eligible节点和Master节点Data Node 和 Coordinating Node其它节点 分片(Primary Shard & Replica Shard)分片的设定操作命令 基本概念:文档和索引 Elasticsearch是面…...
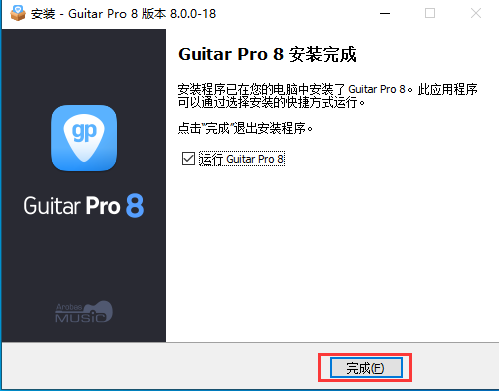
Guitar Pro8专业版吉他学习、绘谱、创作软件
Guitar Pro 8 专业版更强大!更优雅!更完美!Guitar Pro 8.0 五年磨一剑!多达30项功能优化!Guitar Pro8 版本一共更新近30项功能,令吉他打谱更出色!Guitar Pro8 是自2017年4月发布7.0之后发布的最…...
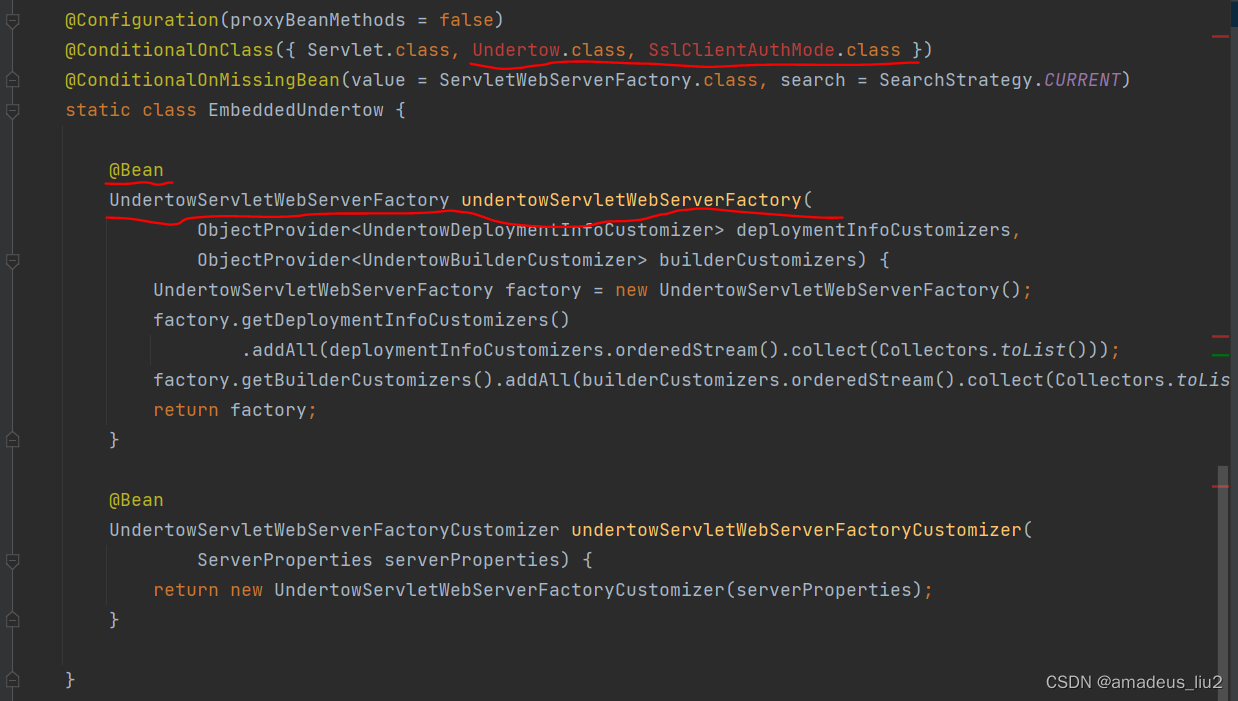
SpringBoot复习(39)Servlet容器的自动配置原理
Servlet容器自动配置类为ServletWebServerFactoryAutoConfiguration 可以看到通过Import注解导入了三个配置类: 通过这个这三个配置类可以看出,它们都使用了ConditionalOnClass注解,当类路径存在tomcat相关的类时,会配置一个T…...

【前端 | CSS】盒模型clientWidth、clientHeight、offsetWidht、offsetHeight
图 先看一个例子 html <div class"container"><div class"item">内容内容内容内容内容内容内容内容内容内容内容内容内容内容内容内容内容内容内容内容内容内容内容内容内容内容内容内容内容内容内容内容内容内容内容内容</div> </…...

Django 高级指南:深入理解和使用类视图和中间件
Django 是一款强大的 Python Web 框架,它提供了一套完整的解决方案,让我们能够用 Python 语言快速开发和部署复杂的 Web 应用。在本文中,我们将会深入研究 Django 中的两个高级特性:类视图(Class-Based Viewsÿ…...

《C语言深度解剖》.pdf
🐇 🔥博客主页: 云曦 📋系列专栏:深入理解C语言 💨吾生也有涯,而知也无涯 💛 感谢大家👍点赞 😋关注📝评论 C语言深度解剖.pdf 提取码:yunx...
【小梦C嘎嘎——启航篇】string介绍以及日常使用的接口演示
【小梦C嘎嘎——启航篇】string 使用😎 前言🙌C语言中的字符串标准库中的string类string 比较常使用的接口对上述函数和其他函数的测试代码演示: 总结撒花💞 😎博客昵称:博客小梦 😊最喜欢的座右…...

多个 Github 账户访问 Github
文章目录 多个 Github 账户访问 Github背景步骤 参考 多个 Github 账户访问 Github 背景 如果我想在这台电脑上同时使用两个 Github 账号怎么办呢? 你主机上的 SSH 公钥只能标识出一个账号。如果需要使用另外一个git账号,访问仓库,你需要创…...

c#实现命令模式
下面是一个使用C#实现命令模式的示例代码: using System; using System.Collections.Generic;// 命令接口 public interface ICommand {void Execute();void Undo(); }// 具体命令:打开文件 public class OpenFileCommand : ICommand {private FileMana…...

Kubernetes的默认调度和自定义调度详解
默认调度和自定义调度详解 默认调度 默认调度是 Kubernetes 中的内置机制,它使用调度器组件来管理分配容器的节点。调度器依据以下原则选择合适的节点: 资源需求 :调度器会为每个 Pod 根据其 CPU 和内存需求选择一个具有足够资源的节点。亲…...

使用Spring-Security后,浏览器不能缓存的问题
Spring-Security在默认情况下是不允许客户端进行缓存的,在使用时可以通过禁用Spring-Security中的cacheControl配置项允许缓存。 protected void configure(HttpSecurity http) throws Exception {// 允许缓存配置http.headers().cacheControl().disable(); }...

中睿天下入选河南省网信系统2023年度网络安全技术支撑单位
近日,河南省委网信办发布了“河南省网信系统2023年度网络安全技术支撑单位名单”,中睿天下凭借出色的网络安全技术能力和优势成功入选。 本次遴选由河南省委网信办会同国家计算机网络与信息安全管理中心河南分中心(以下简称安全中心河南分中心…...

代码随想录day44 45 46
这部分的题目主要介绍了完全背包的内容; 主要考虑了两种情况,求组合数还是排列数 先遍历背包,再遍历物品,得到的就是组合数,也就是有顺序 for (int j 0; j < amount; j) { // 遍历背包容量for (int i 0; i <…...

一探Linux下的七大进程状态
文章目录 一、前言二、操作系统学科下的进程状态1、运行状态2、阻塞状态3、挂起状态 三、Linux下的7种进程状态1、运行状态R2、浅度睡眠状态S3、深度睡眠状态D一场有趣的官司 4、停止状态T5、进程跟踪状态t6、死亡状态X7、僵死状态Z —— 两个特殊进程① 僵尸进程② 孤儿进程 四…...

香港站群服务器为什么适合seo优化?
香港站群为什么适合seo优化?本文主要从以下四点出发进行原因阐述。 1.香港站群服务器的优势 2.香港站群服务器与国内服务器的对比 3.多IP站群服务器的优势 4.香港站群服务器在SEO优化中的注意事项 1.香港站群服务器的优势 香港站群服务器是为了满足企业SEO优化需求而提供…...

虚拟机内搭建CTFd平台搭建及CTF题库部署,局域网内机器可以访问
一、虚拟机环境搭建 1、安装docker、git、docker-compose ubuntu: sudo apt-get update #更新系统 sudo apt-get -y install docker.io #安装docker sudo apt-get -y install git #安装git sudo apt-get -y install python3-pip #安装pip3 sudo pip install dock…...
qq录屏怎么弄?手把手教会你!
“有没有人知道qq怎么录屏呀,听说qq可以录屏,刚好最近需要录制屏幕,就想用qq去录,但是找了很久,都没找到,有人知道吗,谢谢了。” 在如今数字化时代,屏幕录制已成为广泛使用的工具。…...

一文读懂c++语言
一文读懂C语言 C的发展C的设计目标C的特性C的挑战 C的发展 C是一种通用的、高级的编程语言,它是C语言的扩展。C由Bjarne Stroustrup于1983年首次引入,并在之后的几十年中不断发展壮大。C被广泛应用于各种领域,包括系统开发、游戏开发、嵌入式…...

Agent开发面试通关攻略:吃透稳拿offer
阅读前置:2026年当下最卷也最缺人的AI岗位,一定是AI Agent开发。最近刷遍CSDN、牛客、力扣最新面经,发现一个非常明显的招聘趋势:普通大模型微调岗位饱和内卷,而AI Agent开发岗位人才严重缺口,薪资更高、竞…...

微信小程序3D开发框架技术对比:XR-Frame与threejs-miniprogram
随着微信小程序逐步支持3D渲染与AR能力,开发者面临两个主要官方方案:自研的XR-Frame和适配Three.js的threejs-miniprogram。本文将从架构设计、渲染机制、功能集成、开发模式及适用场景等维度进行技术分析,为技术选型提供参考。一、XR-Frame&…...

Graphin高级应用:结合GISDK构建配置化图分析模块的完整指南
Graphin高级应用:结合GISDK构建配置化图分析模块的完整指南 【免费下载链接】Graphin 🌌 A React toolkit for graph visualization based on G6. 项目地址: https://gitcode.com/gh_mirrors/gr/Graphin 在当今数据驱动的时代,图可视化…...

ModernWMS核心功能详解:从ASN入库到Dispatch出库的完整工作流
ModernWMS核心功能详解:从ASN入库到Dispatch出库的完整工作流 【免费下载链接】ModernWMS The open source simple and complete warehouse management system is derived from our many years of experience in implementing erp projects. We stripped the origin…...

Noto字体终极指南:告别“豆腐块“,让全球文字清晰显示
Noto字体终极指南:告别"豆腐块",让全球文字清晰显示 【免费下载链接】noto-fonts Noto fonts, except for CJK and emoji 项目地址: https://gitcode.com/gh_mirrors/no/noto-fonts 在数字世界中,你是否经常看到那些令人困…...

利用 Taotoken 多模型能力为智能客服场景提供备份路由
🚀 告别海外账号与网络限制!稳定直连全球优质大模型,限时半价接入中。 👉 点击领取海量免费额度 利用 Taotoken 多模型能力为智能客服场景提供备份路由 智能客服系统是许多企业与用户交互的关键入口,其响应能力和服务…...

WarcraftHelper:让经典魔兽争霸3完美适配现代电脑的终极解决方案
WarcraftHelper:让经典魔兽争霸3完美适配现代电脑的终极解决方案 【免费下载链接】WarcraftHelper Warcraft III Helper , support 1.20e, 1.24e, 1.26a, 1.27a, 1.27b 项目地址: https://gitcode.com/gh_mirrors/wa/WarcraftHelper 还在为魔兽争霸3在现代操…...

ncmdumpGUI终极指南:深度解析网易云音乐NCM加密文件转换技术
ncmdumpGUI终极指南:深度解析网易云音乐NCM加密文件转换技术 【免费下载链接】ncmdumpGUI C#版本网易云音乐ncm文件格式转换,Windows图形界面版本 项目地址: https://gitcode.com/gh_mirrors/nc/ncmdumpGUI ncmdumpGUI是一款专为Windows平台设计…...

OpenCore Legacy Patcher完整指南:让老旧Mac焕发新生,运行最新macOS
OpenCore Legacy Patcher完整指南:让老旧Mac焕发新生,运行最新macOS 【免费下载链接】OpenCore-Legacy-Patcher Experience macOS just like before 项目地址: https://gitcode.com/GitHub_Trending/op/OpenCore-Legacy-Patcher 你是否有一台被苹…...

每日一书㉗ | 刻意练习:为什么有些人努力一辈子还是平庸?
“本文来自「乐想屋」公众号,系列更新[每日一书],每次5分钟,帮你把书读薄,把知识用活”先问你一个问题。你身边有没有这样的人:入行时间比你短,但能力已经甩你好几条街。他们好像没有特别刻苦,但…...