opencv实战项目 手势识别-实现尺寸缩放效果
手势识别系列文章目录
手势识别是一种人机交互技术,通过识别人的手势动作,从而实现对计算机、智能手机、智能电视等设备的操作和控制。
1. opencv实现手部追踪(定位手部关键点)
2.opencv实战项目 实现手势跟踪并返回位置信息(封装调用)
3.手势识别-手势音量控制(opencv)
4.opencv实战项目 手势识别-手势控制鼠标
5.opencv实战项目 手势识别-手部距离测量
6.opencv实战项目 手势识别-实现尺寸缩放效果
未完待续
目录
手势识别系列文章目录
1.HandTraqckModule模块
2、主模块
本项目是使用了谷歌开源的框架mediapipe,里面有非常多的模型提供给我们使用,例如面部检测,身体检测,手部检测等
代码需要用到opencv HandTraqckModule模块 mediapipe模块
1.HandTraqckModule模块
如下:
定义 HandDetector 类,用于检测手势并提取相关信息:
class HandDetector:def __init__(self, mode=False, maxHands=2, detectionCon=0.5, minTrackCon=0.5):# 初始化函数,设置参数self.mode = modeself.maxHands = maxHandsself.detectionCon = detectionConself.minTrackCon = minTrackCon# 初始化 Mediapipe 模块和相关对象self.mpHands = mp.solutions.handsself.hands = self.mpHands.Hands(static_image_mode=self.mode, max_num_hands=self.maxHands,min_detection_confidence=self.detectionCon, min_tracking_confidence=self.minTrackCon)self.mpDraw = mp.solutions.drawing_utilsself.tipIds = [4, 8, 12, 16, 20]self.fingers = []self.lmList = []
findHands 函数:在图像中找到手部,并返回手部信息以及绘制的图像。
def findHands(self, img, draw=True, flipType=True):# 找到手部,并绘制相关信息imgRGB = cv2.cvtColor(img, cv2.COLOR_BGR2RGB)self.results = self.hands.process(imgRGB)allHands = []# 处理每个检测到的手if self.results.multi_hand_landmarks:for handType, handLms in zip(self.results.multi_handedness, self.results.multi_hand_landmarks):# 提取手部关键点和边界框信息myHand = {}mylmList = []xList = []yList = []for id, lm in enumerate(handLms.landmark):px, py = int(lm.x * w), int(lm.y * h)mylmList.append([px, py])xList.append(px)yList.append(py)# 计算边界框信息xmin, xmax = min(xList), max(xList)ymin, ymax = min(yList), max(yList)boxW, boxH = xmax - xmin, ymax - yminbbox = xmin, ymin, boxW, boxHcx, cy = bbox[0] + (bbox[2] // 2), bbox[1] + (bbox[3] // 2)myHand["lmList"] = mylmListmyHand["bbox"] = bboxmyHand["center"] = (cx, cy)# 根据手的方向进行翻转if flipType:if handType.classification[0].label == "Right":myHand["type"] = "Left"else:myHand["type"] = "Right"else:myHand["type"] = handType.classification[0].labelallHands.append(myHand)# 绘制手部信息if draw:self.mpDraw.draw_landmarks(img, handLms, self.mpHands.HAND_CONNECTIONS)cv2.rectangle(img, (bbox[0] - 20, bbox[1] - 20), (bbox[0] + bbox[2] + 20, bbox[1] + bbox[3] + 20),(255, 0, 255), 2)cv2.putText(img, myHand["type"], (bbox[0] - 30, bbox[1] - 30), cv2.FONT_HERSHEY_PLAIN,2, (255, 0, 255), 2)if draw:return allHands, imgelse:return allHands
fingersUp 函数:检测手指的状态,返回一个列表表示手指是否抬起。
def fingersUp(self, myHand):# 检测手指状态,返回列表表示手指是否抬起myHandType = myHand["type"]myLmList = myHand["lmList"]if self.results.multi_hand_landmarks:fingers = []# 大拇指if myHandType == "Right":if myLmList[self.tipIds[0]][0] > myLmList[self.tipIds[0] - 1][0]:fingers.append(1)else:fingers.append(0)else:if myLmList[self.tipIds[0]][0] < myLmList[self.tipIds[0] - 1][0]:fingers.append(1)else:fingers.append(0)# 其他四指for id in range(1, 5):if myLmList[self.tipIds[id]][1] < myLmList[self.tipIds[id] - 2][1]:fingers.append(1)else:fingers.append(0)return fingers
findDistance 函数:计算两点间的距离,可选是否在图像上绘制。
def findDistance(self, p1, p2, img=None):# 计算两点间的距离,可绘制在图像上x1, y1 = p1x2, y2 = p2cx, cy = (x1 + x2) // 2, (y1 + y2) // 2length = math.hypot(x2 - x1, y2 - y1)info = (x1, y1, x2, y2, cx, cy)if img is not None:cv2.circle(img, (x1, y1), 15, (255, 0, 255), cv2.FILLED)cv2.circle(img, (x2, y2), 15, (255, 0, 255), cv2.FILLED)cv2.line(img, (x1, y1), (x2, y2), (255, 0, 255), 3)cv2.circle(img, (cx, cy), 15, (255, 0, 255), cv2.FILLED)return length, info, imgelse:return length, info
HandTraqckModule模块整体代码
"""
Hand Tracking Module
"""import cv2
import mediapipe as mp
import mathclass HandDetector:"""Finds Hands using the mediapipe library. Exports the landmarksin pixel format. Adds extra functionalities like finding howmany fingers are up or the distance between two fingers. Alsoprovides bounding box info of the hand found."""def __init__(self, mode=False, maxHands=2, detectionCon=0.5, minTrackCon=0.5):""":param mode: In static mode, detection is done on each image: slower:param maxHands: Maximum number of hands to detect:param detectionCon: Minimum Detection Confidence Threshold:param minTrackCon: Minimum Tracking Confidence Threshold"""self.mode = modeself.maxHands = maxHandsself.detectionCon = detectionConself.minTrackCon = minTrackConself.mpHands = mp.solutions.handsself.hands = self.mpHands.Hands(static_image_mode=self.mode, max_num_hands=self.maxHands,min_detection_confidence=self.detectionCon, min_tracking_confidence = self.minTrackCon)self.mpDraw = mp.solutions.drawing_utilsself.tipIds = [4, 8, 12, 16, 20]self.fingers = []self.lmList = []def findHands(self, img, draw=True, flipType=True):"""Finds hands in a BGR image.:param img: Image to find the hands in.:param draw: Flag to draw the output on the image.:return: Image with or without drawings"""imgRGB = cv2.cvtColor(img, cv2.COLOR_BGR2RGB)self.results = self.hands.process(imgRGB)allHands = []h, w, c = img.shapeif  self.results.multi_hand_landmarks:for handType,handLms in zip(self.results.multi_handedness,self.results.multi_hand_landmarks):myHand={}## lmListmylmList = []xList = []yList = []for id, lm in enumerate(handLms.landmark):px, py = int(lm.x * w), int(lm.y * h)mylmList.append([px, py])xList.append(px)yList.append(py)## bboxxmin, xmax = min(xList), max(xList)ymin, ymax = min(yList), max(yList)boxW, boxH = xmax - xmin, ymax - yminbbox = xmin, ymin, boxW, boxHcx, cy = bbox[0] + (bbox[2] // 2), \bbox[1] + (bbox[3] // 2)myHand["lmList"] = mylmListmyHand["bbox"] = bboxmyHand["center"] =  (cx, cy)if flipType:if handType.classification[0].label =="Right":myHand["type"] = "Left"else:myHand["type"] = "Right"else:myHand["type"] = handType.classification[0].labelallHands.append(myHand)## drawif draw:self.mpDraw.draw_landmarks(img, handLms,self.mpHands.HAND_CONNECTIONS)cv2.rectangle(img, (bbox[0] - 20, bbox[1] - 20),(bbox[0] + bbox[2] + 20, bbox[1] + bbox[3] + 20),(255, 0, 255), 2)cv2.putText(img,myHand["type"],(bbox[0] - 30, bbox[1] - 30),cv2.FONT_HERSHEY_PLAIN,2,(255, 0, 255),2)if draw:return allHands,imgelse:return allHandsdef findPosition(self, img, handNo=0, draw=True):"""Finds landmarks of a single hand and puts them in a listin pixel format. Also finds the bounding box around the hand.:param img: main image to find hand in:param handNo: hand id if more than one hand detected:param draw: Flag to draw the output on the image.:return: list of landmarks in pixel format; bounding box"""xList = []yList = []bbox = []bboxInfo = []self.lmList = []if self.results.multi_hand_landmarks:myHand = self.results.multi_hand_landmarks[handNo]for id, lm in enumerate(myHand.landmark):h, w, c = img.shapepx, py = int(lm.x * w), int(lm.y * h)xList.append(px)yList.append(py)self.lmList.append([px, py])if draw:cv2.circle(img, (px, py), 5, (255, 0, 255), cv2.FILLED)xmin, xmax = min(xList), max(xList)ymin, ymax = min(yList), max(yList)boxW, boxH = xmax - xmin, ymax - yminbbox = xmin, ymin, boxW, boxHcx, cy = bbox[0] + (bbox[2] // 2), \bbox[1] + (bbox[3] // 2)bboxInfo = {"id": id, "bbox": bbox, "center": (cx, cy)}if draw:cv2.rectangle(img, (bbox[0] - 20, bbox[1] - 20),(bbox[0] + bbox[2] + 20, bbox[1] + bbox[3] + 20),(0, 255, 0), 2)return self.lmList, bboxInfodef fingersUp(self,myHand):"""Finds how many fingers are open and returns in a list.Considers left and right hands separately:return: List of which fingers are up"""myHandType =myHand["type"]myLmList = myHand["lmList"]if self.results.multi_hand_landmarks:fingers = []# Thumbif myHandType == "Right":if myLmList[self.tipIds[0]][0] > myLmList[self.tipIds[0] - 1][0]:fingers.append(1)else:fingers.append(0)else:if myLmList[self.tipIds[0]][0] < myLmList[self.tipIds[0] - 1][0]:fingers.append(1)else:fingers.append(0)# 4 Fingersfor id in range(1, 5):if myLmList[self.tipIds[id]][1] < myLmList[self.tipIds[id] - 2][1]:fingers.append(1)else:fingers.append(0)return fingersdef findDistance(self,p1, p2, img=None):"""Find the distance between two landmarks based on theirindex numbers.:param p1: Point1:param p2: Point2:param img: Image to draw on.:param draw: Flag to draw the output on the image.:return: Distance between the pointsImage with output drawnLine information"""x1, y1 = p1x2, y2 = p2cx, cy = (x1 + x2) // 2, (y1 + y2) // 2length = math.hypot(x2 - x1, y2 - y1)info = (x1, y1, x2, y2, cx, cy)if img is not None:cv2.circle(img, (x1, y1), 15, (255, 0, 255), cv2.FILLED)cv2.circle(img, (x2, y2), 15, (255, 0, 255), cv2.FILLED)cv2.line(img, (x1, y1), (x2, y2), (255, 0, 255), 3)cv2.circle(img, (cx, cy), 15, (255, 0, 255), cv2.FILLED)return length,info, imgelse:return length, infodef main():cap = cv2.VideoCapture(0)detector = HandDetector(detectionCon=0.8, maxHands=2)while True:# Get image framesuccess, img = cap.read()# Find the hand and its landmarkshands, img = detector.findHands(img)  # with draw# hands = detector.findHands(img, draw=False)  # without drawif hands:# Hand 1hand1 = hands[0]lmList1 = hand1["lmList"]  # List of 21 Landmark pointsbbox1 = hand1["bbox"]  # Bounding box info x,y,w,hcenterPoint1 = hand1['center']  # center of the hand cx,cyhandType1 = hand1["type"]  # Handtype Left or Rightfingers1 = detector.fingersUp(hand1)if len(hands) == 2:# Hand 2hand2 = hands[1]lmList2 = hand2["lmList"]  # List of 21 Landmark pointsbbox2 = hand2["bbox"]  # Bounding box info x,y,w,hcenterPoint2 = hand2['center']  # center of the hand cx,cyhandType2 = hand2["type"]  # Hand Type "Left" or "Right"fingers2 = detector.fingersUp(hand2)# Find Distance between two Landmarks. Could be same hand or different handslength, info, img = detector.findDistance(lmList1[8], lmList2[8], img)  # with draw# length, info = detector.findDistance(lmList1[8], lmList2[8])  # with draw# Displaycv2.imshow("Image", img)cv2.waitKey(1)if __name__ == "__main__":main()
2、主模块
原理:
-
当检测到两只手时,并且两只手的拇指和食指都抬起时,通过计算拇指指尖之间的距离来获取初始距离
startDist。 -
当两只手的拇指和食指都抬起时,计算当前拇指指尖之间的距离,并根据距离变化来调整缩放因子
scale。这个变化可以通过当前距离减去初始距离得到。 -
根据计算得到的
scale值,调整图像的尺寸,将另一张图像按照scale进行缩放。
这样,当你用两只手的拇指和食指模拟捏取的动作时,可以实现图像的放大和缩小效果。两只手之间的距离越大,图像缩小得越多;两只手之间的距离越小,图像放大得越多。
这个应用可以在许多场景中使用,比如在展示图像、视频播放或地图应用中,通过手势来实现图像的交互式缩放效果。这个示例,展示了手势识别在图像处理和交互中的潜在应用。
导入所需的库:
import cv2
from HandTrackingModule import *
配置摄像头,创建手势检测器对象:
cap = cv2.VideoCapture(0)
cap.set(3, 1280)  # 设置摄像头的宽度
cap.set(4, 720)   # 设置摄像头的高度detector = HandDetector(detectionCon=0.8)  # 创建手势检测器对象,设置检测置信度阈值
定义变量用于手势缩放操作:
startDist = None  # 用于存储初始距离
scale = 0  # 缩放值
cx, cy = 500, 500  # 缩放中心的坐标
进入主循环,读取视频帧并执行手势识别和图像操作:
while True:success, img = cap.read() # 读取视频帧hands, img = detector.findHands(img) # 手势检测# 读取一张图像用于操作img1 = cv2.imread("cvarduino.jpg")if len(hands) == 2:# 如果检测到两只手if detector.fingersUp(hands[0]) == [1, 1, 0, 0, 0] and \detector.fingersUp(hands[1]) == [1, 1, 0, 0, 0]:lmList1 = hands[0]["lmList"] # 第一只手的关键点列表lmList2 = hands[1]["lmList"] # 第二只手的关键点列表# 计算两个手指尖之间的距离作为缩放参考if startDist is None:length, info, img = detector.findDistance(lmList1[8], lmList2[8], img)startDist = lengthlength, info, img = detector.findDistance(lmList1[8], lmList2[8], img)scale = int((length - startDist) // 2) # 计算缩放值cx, cy = info[4:] # 获取缩放中心的坐标print(scale) # 打印缩放值else:startDist = Nonetry:h1, w1, _ = img1.shapenewH, newW = ((h1 + scale) // 2) * 2, ((w1 + scale) // 2) * 2img1 = cv2.resize(img1, (newW, newH))# 在指定位置绘制缩放后的图像img[cy - newH // 2:cy + newH // 2, cx - newW // 2:cx + newW // 2] = img1except:passcv2.imshow("Image", img) # 显示处理后的图像cv2.waitKey(1) # 等待按键
主模块
全部代码:
import cv2
# from cvzone.HandTrackingModule import HandDetector
from HandTrackingModule import *
cap = cv2.VideoCapture(0)
cap.set(3, 1280)
cap.set(4, 720)detector = HandDetector(detectionCon=0.8)
startDist = None
scale = 0
cx, cy = 500,500
while True:success, img = cap.read()hands, img = detector.findHands(img)img1 = cv2.imread("cvarduino.jpg")if len(hands) == 2:# print('Zoom Gesture')# print(detector.fingersUp(hands[0]),detector.fingersUp(hands[1]))if detector.fingersUp(hands[0]) == [1, 1, 0, 0, 0] and \detector.fingersUp(hands[1]) == [1, 1, 0, 0, 0]:# print('zhenque ')lmList1 = hands[0]["lmList"]lmList2 = hands[1]["lmList"]# point 8 is the tip of the index fingerif startDist is None:length, info, img = detector.findDistance(lmList1[8], lmList2[8], img)# print(length)startDist = lengthlength, info, img = detector.findDistance(lmList1[8], lmList2[8], img)scale = int((length - startDist) // 2)cx, cy = info[4:]print(scale)else:startDist = Nonetry:h1, w1, _= img1.shapenewH, newW = ((h1+scale)//2)*2, ((w1+scale)//2)*2img1 = cv2.resize(img1, (newW,newH))img[cy-newH//2:cy+ newH//2, cx-newW//2:cx+ newW//2] = img1except:passcv2.imshow("Image", img)cv2.waitKey(1)

有遇到的问题欢迎评论区留言!
相关文章:
opencv实战项目 手势识别-实现尺寸缩放效果
手势识别系列文章目录 手势识别是一种人机交互技术,通过识别人的手势动作,从而实现对计算机、智能手机、智能电视等设备的操作和控制。 1. opencv实现手部追踪(定位手部关键点) 2.opencv实战项目 实现手势跟踪并返回位置信息&…...

Netty对HPACK头部压缩的支持
前言 HTTP2终于支持对头部进行压缩传输了,Netty很早就支持HTTP2了,看下Netty对HPACK的实现源码,可以对HPACK理解的更深一下。 HpackDecoder Netty内置的编解码器Http2FrameCodec专门用来对HTTP2的各种Frame进行编解码,其中就包…...

C++:替换string中的字符
1.按照位置进行替换 string的成员函数replace可以满足这种需求,其变体有很多种,请参考官方文档,以下列举常用的两种: #include <iostream> #include <string> using namespace std;int main() {string s = "hello world";s.replace(s.begin(), s.b…...
【ChatGPT】自我救赎
ChatGPT辅助学习C之【在C中如果大数据类型转小数据类型会发生什么呢?】,今天问ChatGPT一个问题,让它解析下面这个C程序: #include <iostream> #include <cstdio> using namespace std; int main() {int a;long long b532165478…...
微信小程序(由浅到深)
文章目录 一. 项目基本配置1. 项目组成2. 常见的配置文件解析3. app.json全局的五大配置4.单个页面中的page配置5. App函数6.tabBar配置 二. 基本语法,事件,单位1. 语法2. 事件3. 单位 三. 数据响应式修改四 . 内置组件1. button2. image3. input4. 组件…...
冒泡排序 简单选择排序 插入排序 快速排序
bubblesort 两个for循环,从最右端开始一个一个逐渐有序 #include <stdio.h> #include <string.h> #include <stdlib.h>void bubble(int *arr, int len); int main(int argc, char *argv[]) {int arr[] {1, 2, 3, 4, 5, 6, 7};int len sizeof(…...
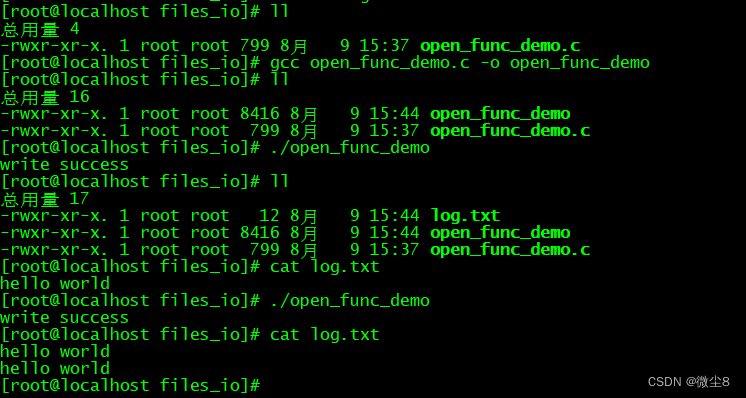
linux文件I/O之 open() 函数用法
#include <sys/types.h> #include <sys/stat.h> #include <fcntl.h> typedef unsigned int mode_t ; int open(const char *pathname, int flags); int open(const char *pathname, int flags, mode_t mode); 函数功能 打开或创建一个文件 返回值 成功…...

用Java操作MySQL数据库
新建Maven项目 创建Maven项目 添加依赖 在pom.xml的标签里加上下面的内容 如果是MySQL 5.8那么的版本号是5.x.x, 例如5.1.49 如果是MySQL 8.0那么的版本号是8.x.x, 例如 8.0.28 <dependencies><!-- https://mvnrepository.com/artifact/mysql/mysql-connector-java …...
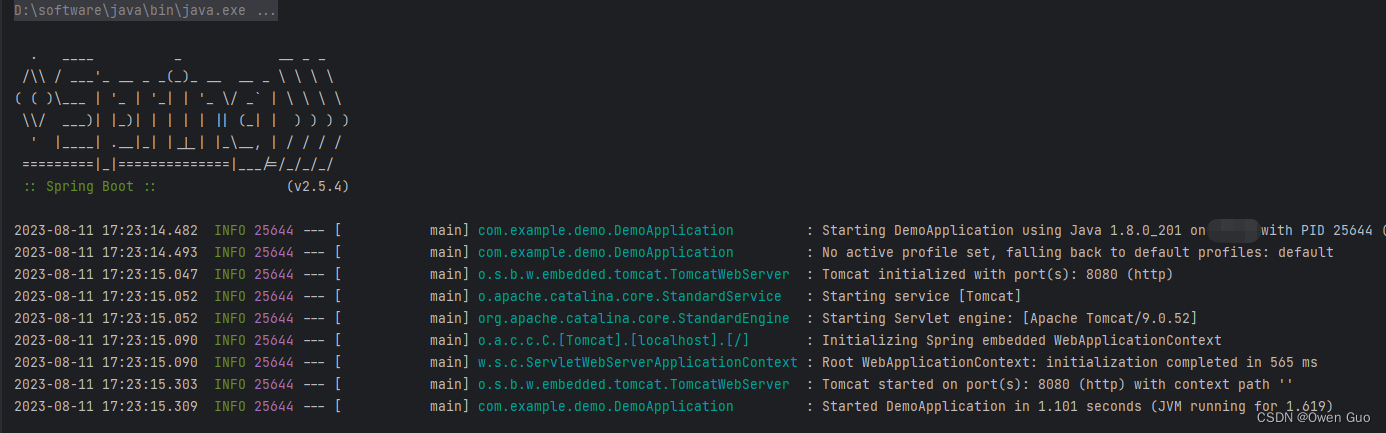
SpringBoot启动报错:java: 无法访问org.springframework.boot.SpringApplication
报错原因:jdk 1.8版本与SpringBoot 3.1.2版本不匹配 解决方案:将SpringBoot版本降到2系列版本(例如2.5.4)。如下图: 修改版本后切记刷新Meavn依赖 然后重新启动即可成功。如下图:...

Vue3 setup语法糖 解决富文本编辑器上传图片64位码过长问题 quill-image-extend-module
引言: 富文本编辑器传图片会解码成64位,非常长导致数据库会报错第一种方法:将数据库类型改成 mediumtext第二种办法:本文中的方法 说明,本周文所用语法糖为Vue3 setup语法,即<script setup> 思路 拦…...
、国测局坐标(火星坐标,GCJ02)、和WGS84坐标系之间的转换)
百度坐标(BD09)、国测局坐标(火星坐标,GCJ02)、和WGS84坐标系之间的转换
<!DOCTYPE html> <html><head><meta charset="UTF-8"><title></title></head><body><script>/*** * 百度坐标(BD09)、国测局坐标(火星坐标,GCJ02)、和WGS84坐标系之间的转换*///定义一些常量var x_PI = …...

论文浅尝 | CI4MRC:基于因果推断去除机器阅读理解中的名字偏差
笔记整理:朱珈徵,天津大学硕士,研究方向:问答 链接:https://aclanthology.org/2023.findings-acl.812/ 动机 机器阅读理解(Machine Reading Comprehension,MRC)是根据给定的文章回答…...

【校招VIP】测试计划之黑盒测试白盒测试
考点介绍: 黑盒测试&白盒测试是大厂和三四线公司校招的必考点。黑盒是以结果说话,白盒往往需要理解实现逻辑。现在商业项目的接口测试往往以白盒为主,也就是需要测试同学自己观察和修改数据库的值进行用例的测试。 但是无论采用哪种测试方…...
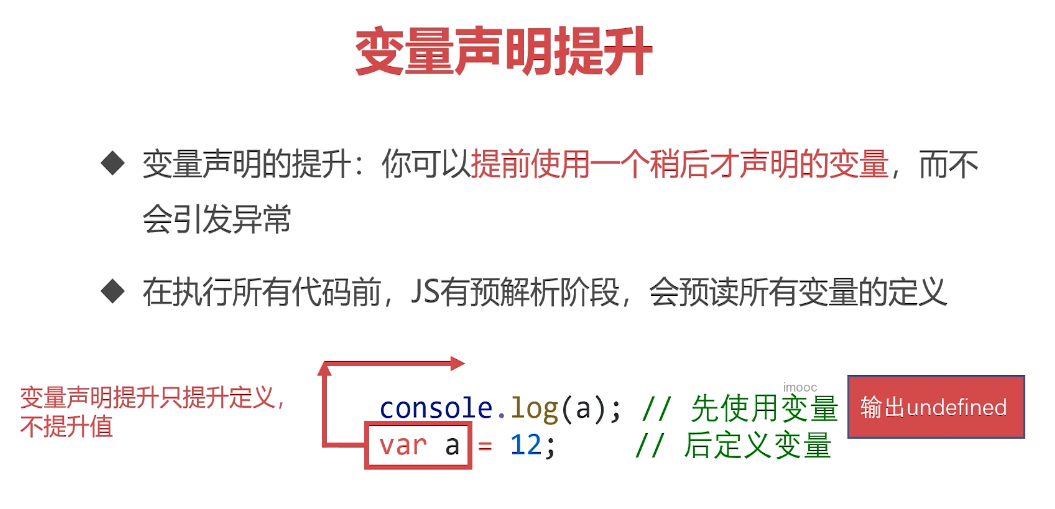
学习笔记整理-JS-01-语法与变量
文章目录 一、语法与变量1. 初识JavaScript2. JavaScript的历史3. JavaScript与ECMAScript的关系4. JavaScript的体系5. JavaScript的语言风格和特性 二、语法1. JavaScript的书写位置2. 认识输出语句3. REPL环境,交互式解析器4. 变量是什么5. 重点内容 一、语法与变…...

PHP之PHPExcel
include PHPExcel.php; include PHPExcel/Writer/Excel2007.php; //或者include PHPExcel/Writer/Excel5.php; 用于输出.xls的 //创建一个excel $objPHPExcel new PHPExcel(); // 输出Excel表格到浏览器下载 header(Content-Type: application/vnd.ms-excel); header(Content-…...
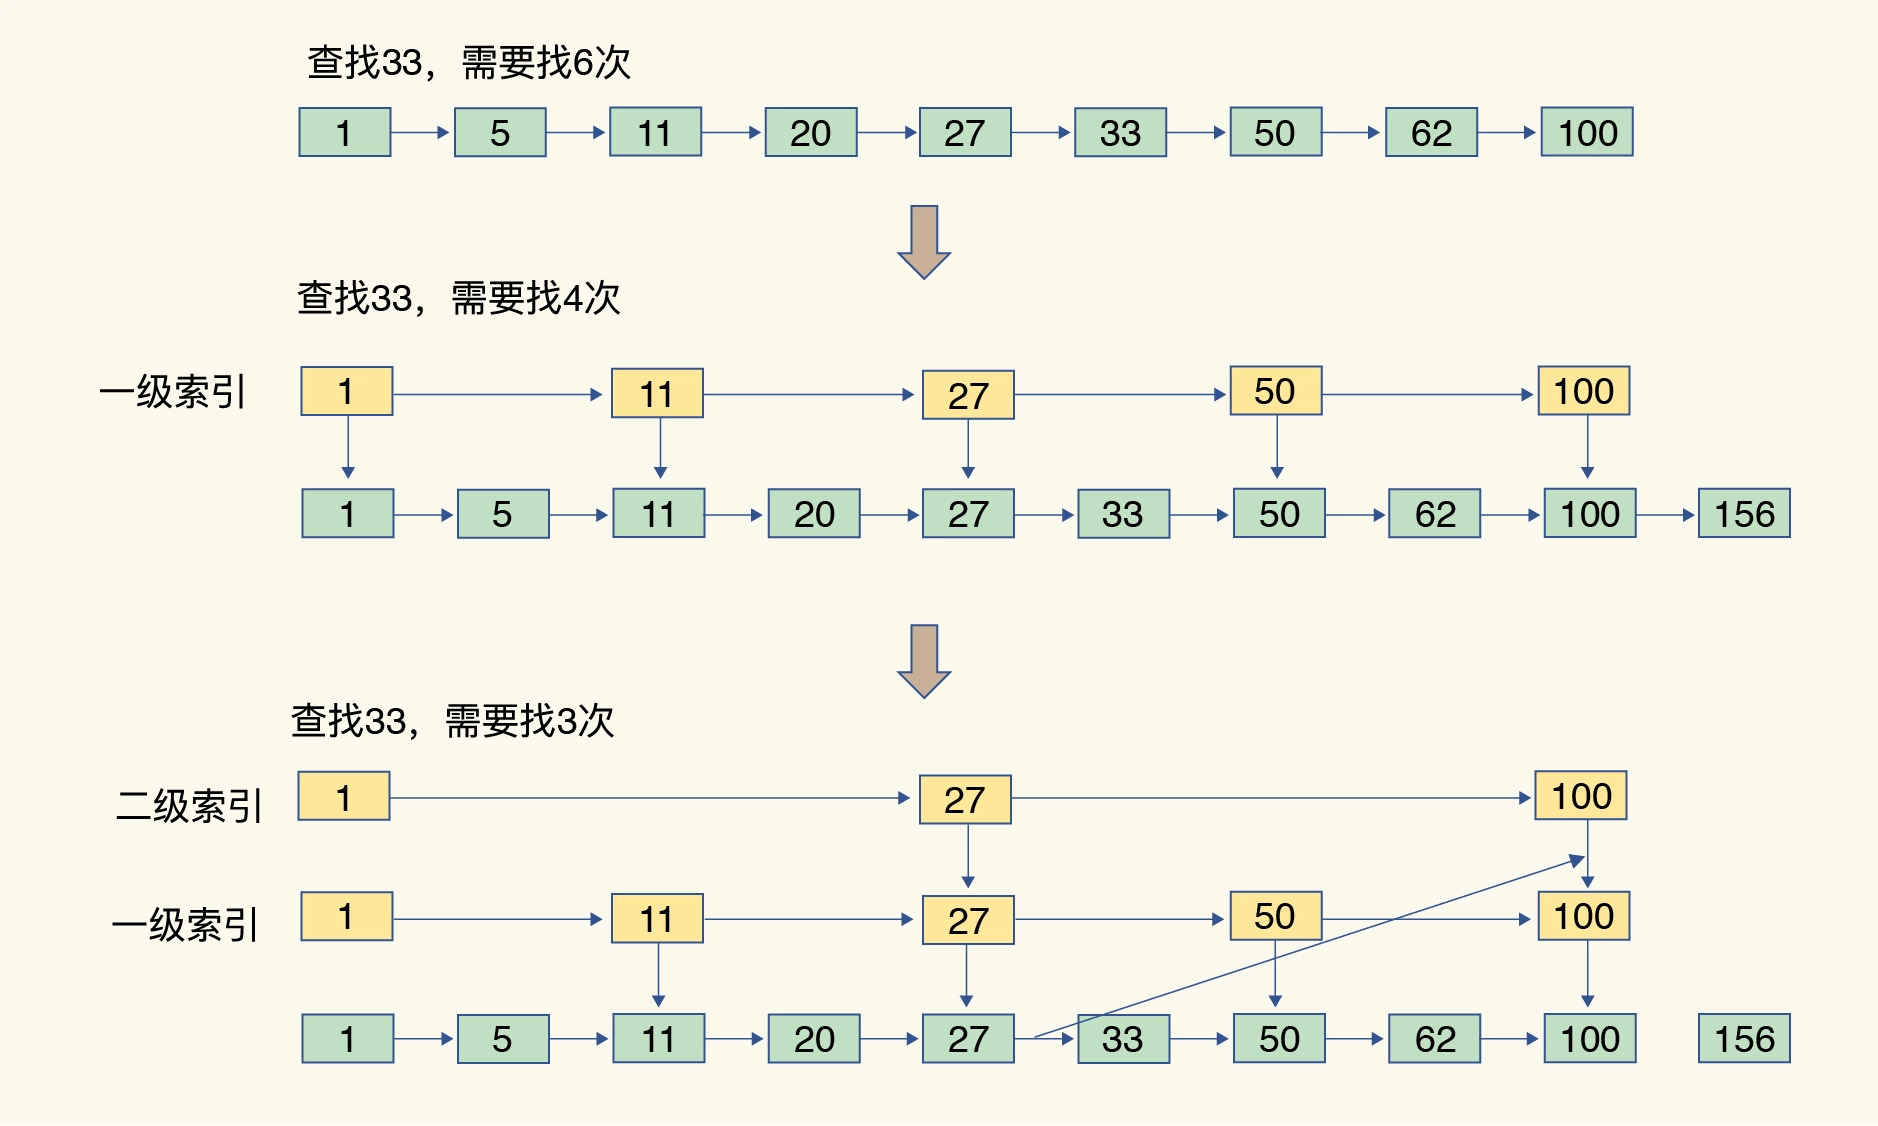
Redis系列(一):深入了解Redis数据类型和底层数据结构
Redis有以下几种常用的数据类型: redis数据是如何组织的 为了实现从键到值的快速访问,Redis 使用了一个哈希表来保存所有键值对。 Redis全局哈希表(Global Hash Table)是指在Redis数据库内部用于存储所有键值对的主要数据结构。…...

javaScript:如何获取html中的元素对象
目录 前言: 方法 1.通过id获取元素 2.通过标签名获取元素 3.通过类名class获取元素 获取body的方法 1.document.getElementsByTagName(body)[0] 2.document.body 相关代码 前言: 通过获取HTML中的元素对象,JavaScript可以对网页进行动…...
面试总结-webpack/git
说说你对webpack的理解 webpack 是一个静态模块打包器,整个打包过程就像是一条生产线,把资源从入口放进去,经过一系列的加工(loader),最终转换成我们想要的结果,整个加工过程还会有监控&#x…...

深入解析美颜SDK:算法、效果与实现
在当今数字化社会中,图像处理和美化技术已经成为了许多应用领域的重要组成部分,尤其在视频直播领域,美颜技术更是无处不在。直播美颜SDK作为一种集成的软件工具包,为开发者和应用提供了强大的美颜功能。 一、算法原理 磨皮算法…...

ChatGPT Plus和ChatGPT对比
模型规模更大,参数数量超过6万亿,比ChatGPT大很多训练数据更丰富,包括不同语言、领域和类型的数据语言理解和生成能力更强,能够更准确地理解和生成文本可解释性和可控性更好,支持更多的调参和控制参数,生成…...

从Gamma函数到泊松分布:一个概率论中的含参量积分实用案例解析
Gamma函数与泊松分布:概率论中的数学之美 在数据科学和机器学习的实践中,概率分布构成了建模的基石。当我们深入探究这些分布背后的数学原理时,Gamma函数以其优雅的性质和广泛的应用脱颖而出。它不仅连接了离散与连续概率世界,更在…...

BLE四大广播模式详解:可连接/不可连接/定向/周期广播
一、前言在低功耗蓝牙(BLE)开发中,广播(Advertising)是设备发现、连接建立、数据广播、设备重连的核心基石,所有BLE交互流程均始于广播报文的收发。不同于传统经典蓝牙,BLE所有广播行为标准化、…...

如何快速掌握开源UE资产编辑器:UAssetGUI完整配置与实战指南
如何快速掌握开源UE资产编辑器:UAssetGUI完整配置与实战指南 【免费下载链接】UAssetGUI A tool designed for low-level examination and modification of Unreal Engine game assets by hand. 项目地址: https://gitcode.com/gh_mirrors/ua/UAssetGUI UAss…...
)
Sora 2原生接入Unity 6.0:5步完成神经渲染管线嵌入,实测帧率提升47%(附GitHub认证插件)
更多请点击: https://kaifayun.com 第一章:Sora 2与Unity整合 Sora 2作为新一代AI视频生成引擎,其开放API设计天然支持与实时3D引擎的深度协同。Unity 2023.2版本通过URP(Universal Render Pipeline)与C# Job System提…...

2026 文章代码高亮方案选型
将基于 Prism.js 或 Highlight.js 的传统高亮方案与基于 Shiki 的现代化高亮方案进行对比,其核心区别在于底层解析原理的不同(正则表达式 vs. TextMate 语法树)。 以下是两种方案的底层原理、各自优缺点、核心对比矩阵以及适用场景的详细分析…...

Gazebo Sim多旋翼控制:四轴飞行器动力学建模与PID调参
Gazebo Sim多旋翼控制:四轴飞行器动力学建模与PID调参 【免费下载链接】gz-sim Open source robotics simulator. The latest version of Gazebo. 项目地址: https://gitcode.com/gh_mirrors/gz/gz-sim Gazebo Sim是一款功能强大的开源机器人模拟器ÿ…...

php有什么版本,php语言有几个版本
php有什么版本,php语言有几个版本PHP的大版本主要分四支:PHP4/PHP5/PHP6/PHP7 其中,PHP4由于太古老、对OO支持不力已基本被淘汰,请无视PHP4。 PHP6由于基本没有生产线上的应用,还基本只是一款概念产品,很多功能已在PHP…...

Go开发者必备:circuitbreaker API全解析与最佳实践指南 [特殊字符]
Go开发者必备:circuitbreaker API全解析与最佳实践指南 🚀 【免费下载链接】circuitbreaker Circuit Breakers in Go 项目地址: https://gitcode.com/gh_mirrors/circ/circuitbreaker 作为一名Go开发者,你是否经常遇到远程服务调用失败…...

模拟电路实现自主循线机器人:无MCU的硬件逻辑设计
1. 项目概述:用最纯粹的模拟电路,造一台会“思考”的机器人每次看到那些在赛道上灵巧穿梭的循线小车,你是不是也手痒,想自己动手做一个?但一听到“单片机”、“编程”、“Arduino”这些词,又觉得门槛太高&a…...

BurpSuite+SqlMap深度集成:构建高可信SQL注入检测流水线
1. 这不是“点几下就出结果”的玩具,而是你真正能放进渗透流程里的SQL注入检测流水线很多人第一次看到“BurpSuiteSqlMap插件5分钟搞定SQL注入检测”这个标题,第一反应是:又一个标题党?点开全是截图堆砌、参数照抄、报错就卡住的半…...