探索自动化网页交互的魔力:学习 Selenium 之旅【超详细】
"在当今数字化的世界中,网页自动化已经成为了不可或缺的技能。想象一下,您可以通过编写代码,让浏览器自动执行各种操作,从点击按钮到填写表单,从网页抓取数据到进行自动化测试。学习 Selenium,这一功能强大的自动化工具,将为您打开无尽的可能性。在本博客中,您将深入探索 Selenium 的精髓,学习如何构建稳定、高效的自动化脚本,以及如何应用这些技能来提升工作效率、加速开发流程和实现可靠的网页交互。无论您是一名开发人员、自动化工程师还是对网页技术感兴趣的爱好者,本博客将带您踏上一段令人激动的学习之旅,释放出无限的可能性。准备好挑战传统、超越自我,掌握 Selenium,引领网页自动化的未来吗?让我们一起探索吧!"
Selenium
简介
简介
Selenium是一个Web的自动化测试工具,最初是为网站自动化测试而开发的,类型像我们玩游戏用的按键精灵,
可以按指定的命令自动操作,不同是Selenium 可以直接运行在浏览器上,它支持所有主流的浏览器(包括PhantomJS这些无界面的浏览器)。
Selenium 可以根据我们的指令,让浏览器自动加载页面,获取需要的数据,甚至页面截屏,或者判断网站上某些动作是否发生。
官网
selenium官网
https://selenium-python.readthedocs.io/index.html
注意
Selenium 自己不带浏览器,不支持浏览器的功能,它需要与第三方浏览器结合在一起才能使用
但是我们有时候需要让它内嵌在代码中运行,所以我们可以用一个叫 PhantomJS 的工具代替真实的浏览器
安装
安装selenium
pip install selenium
安装ChromeDriver
国内源
https://registry.npmmirror.com/binary.html?path=chromedriver/
ChromeDriver
版本号要对应/帮助-关于Google Chrome——>找到对应版本下载——>下载的文件解压到python_version\Scripts
安装Firefox geckodriver
国内源
https://download-installer.cdn.mozilla.net/pub/firefox/releases/
Firefox geckodriver
安装firefox最新版本,添加Firefox可执行程序到系统环境变量。记得关闭firefox的自动更新
将下载的geckodriver.exe 放到path路径下 D:\Python\python_version\
基础知识
基础操作
创建浏览器对象
from selenium import webdriver
from selenium.webdriver.chrome.service import Service
service = Service('./chromedriver.exe')
chrome = webdriver.Chrome(service=service)
打开页面
chrome.get('http://www.baidu.com')
打开本地页面
import os
file_path='file:///'+os.path.abspath('./1.下拉菜单.html')
chrome.get(file_path)
获取页面html源码【换行】
page = chrome.page_source
休眠
from time import sleep
sleep(8)
关闭浏览器
chrome.quit()操作浏览器
窗口大小
chrome.maximize_window() #窗口最大化
chrome.set_window_size(600, 800) #设置窗口大小
前进和后退
chrome.forward()
chrome.back()
基础定位
定位元素
from selenium.webdriver.common.by import By
chrome.find_element(By.ID,'su')
chrome.find_element(By.XPATH, "//option[@value='10.69']").click()
find_element(type,value) 一个元素
find_elements(type,value) 多个元素
By中参数选择
XPATH【xpath选择器】
ID【id属性】
NAME【name属性 】
CLASS_NAME 【class属性】
LINK_TEXT 【超链接的文本】
PARTIAL_LINK_TEXT = "partial link text"
TAG_NAME = "tag name"
CSS_SELECTOR = "css selector"
操作元素
click 点击对象
send_keys 在对象上模拟按键输入
clear 清除对象的内容,如果可以的话
基础示例
from selenium import webdriver
from selenium.webdriver.chrome.service import Service
from time import sleep
from selenium.webdriver.common.by import Byservice = Service('./chromedriver.exe')
chrome = webdriver.Chrome(service=service)
chrome.get('http://www.baidu.com')
sleep(3)
chrome.find_element(By.ID, 'kw').send_keys('CSDN')
sleep(3)
chrome.find_element(By.ID, 'su').click()
sleep(3)
常用操作
定位下拉菜单
注意
在定位下拉菜单时,要先定位到父级元素,然后再做一个模拟光标移动,再点击所选项
页面代码
<html><head><meta http-equiv="content-type" content="text/html;charset=utf-8" /><title>Level Locate</title> <script type="text/javascript" src="https://cdn.jsdelivr.net/npm/jquery@1.12.4/dist/jquery.min.js"></script><link href="https://cdn.jsdelivr.net/npm/@bootcss/v3.bootcss.com@1.0.9/dist/css/bootstrap.min.css" rel="stylesheet" /> </head><body><h3>Level locate</h3><div class="span3 col-md-3"> <div class="well"><div class="dropdown"><a class="dropdown-toggle" data-toggle="dropdown" href="#">Link1</a><ul class="dropdown-menu" role="menu" aria-labelledby="dLabel" id="dropdown1" ><li><a tabindex="-1" href="http://www.bjsxt.com">Action</a></li><li><a tabindex="-1" href="#">Another action</a></li><li><a tabindex="-1" href="#">Something else here</a></li><li class="divider"></li><li><a tabindex="-1" href="#">Separated link</a></li></ul></div> </div> </div><div class="span3 col-md-3"> <div class="well"><div class="dropdown"><a class="dropdown-toggle" data-toggle="dropdown" href="#">Link2</a><ul class="dropdown-menu" role="menu" aria-labelledby="dLabel" ><li><a tabindex="-1" href="#">Action</a></li><li><a tabindex="-1" href="#">Another action</a></li><li><a tabindex="-1" href="#">Something else here</a></li><li class="divider"></li><li><a tabindex="-1" href="#">Separated link</a></li></ul></div> </div> </div></body><script src="https://cdn.jsdelivr.net/npm/@bootcss/v3.bootcss.com@1.0.9/dist/js/bootstrap.min.js"></script></html>
核心代码
# 定位父级元素
chrome.find_element(By.LINK_TEXT, 'Link1').click()
sleep(4)
# 做一个移动光标的动作【模拟人工,非必要】
menu = chrome.find_element(By.LINK_TEXT, 'Action')
webdriver.ActionChains(chrome).move_to_element(menu).perform()
# 定位子集元素
menu.click()
示例代码
from selenium import webdriver
from selenium.webdriver.chrome.service import Service
from time import sleep
from selenium.webdriver.common.by import By
import osservice = Service('./chromedriver.exe')
chrome = webdriver.Chrome(service=service)
file_path = 'file:///' + os.path.abspath('./1.下拉菜单.html')
chrome.get(file_path)
sleep(3)
# 定位父级元素
chrome.find_element(By.LINK_TEXT, 'Link1').click()
sleep(4)
# 做一个移动光标的动作【模拟人工,非必要】
menu = chrome.find_element(By.LINK_TEXT, 'Action')
webdriver.ActionChains(chrome).move_to_element(menu).perform()
# 定位子集元素
menu.click()
sleep(4)
定位下拉框
简介
相比定位下拉菜单,下拉框可以直接定位到元素
页面代码
<html>
<body>
<select id="ShippingMethod" onchange="updateShipping(options[selectedIndex]);" name="ShippingMethod"><option value="12.51">UPS Next Day Air ==> $12.51</option><option value="11.61">UPS Next Day Air Saver ==> $11.61</option><option value="10.69">UPS 3 Day Select ==> $10.69</option><option value="9.03">UPS 2nd Day Air ==> $9.03</option><option value="8.34">UPS Ground ==> $8.34</option><option value="9.25">USPS Priority Mail Insured ==> $9.25</option><option value="7.45">USPS Priority Mail ==> $7.45</option><option value="3.20" selected="">USPS First Class ==> $3.20</option>
</select>
</body>
</html>
核心代码
# 定位到选择框,并利用xpath进行选取
m = chrome.find_element(By.ID, "ShippingMethod")
m.find_element(By.XPATH, "//option[@value='10.69']").click()
示例代码
from selenium import webdriver
from selenium.webdriver.chrome.service import Service
from time import sleep
from selenium.webdriver.common.by import By
import osservice = Service('./chromedriver.exe')
chrome = webdriver.Chrome(service=service)
file_path = 'file:///' + os.path.abspath('./3.drop_down.html')
chrome.get(file_path)
sleep(3)
# 定位到选择框,并利用xpath进行选取
m = chrome.find_element(By.ID, "ShippingMethod")
m.find_element(By.XPATH, "//option[@value='10.69']").click()
sleep(3)
chrome.quit()
定位层级内元素
简介
有时候我们定位一个元素,定位器没有问题,但一直定位不了,这时候就要检查这个元素是否在一个frame中
页面代码
<html>
<head><meta http-equiv="content-type" content="text/html;charset=utf-8"/><title>inner</title>
</head>
<body>
<div class="row-fluid"><div class="span6 well"><h3>inner</h3><iframe id="f2" src="https://cn.bing.com/" width="700" height="500"></iframe></div>
</div>
</body>
</html>
<html>
<head><meta http-equiv="content-type" content="text/html;charset=utf-8"/><title>frame</title><script type="text/javascript" src="https://cdn.jsdelivr.net/npm/jquery@1.12.4/dist/jquery.min.js"></script><link href="http://netdna.bootstrapcdn.com/twitter-bootstrap/2.3.2/css/bootstrap-combined.min.css"rel="stylesheet"/>
</head><body>
<div class="row-fluid"><div class="span10 well"><h3>frame</h3><iframe id="f1" src="2.inner.html" width="800" , height="600"></iframe></div>
</div>
</body>
<script src="https://cdn.jsdelivr.net/npm/@bootcss/v3.bootcss.com@1.0.8/dist/js/bootstrap.min.js"></script>
</html>
</html>
核心代码
可以利用以下方法进入到内层元素【参数时id属性】
chrome.switch_to.frame('f1')
示例代码
from selenium import webdriver
from selenium.webdriver.chrome.service import Service
from time import sleep
from selenium.webdriver.common.by import By
import os# 定位层级内元素【三层】
service = Service('./chromedriver.exe')
chrome = webdriver.Chrome(service=service)
file_path = 'file:///' + os.path.abspath('./2.outer.html')
chrome.get(file_path)
sleep(3)
# 切换到frame里【根据id】
chrome.switch_to.frame('f1')
chrome.switch_to.frame('f2')
# 定位三层里的元素【www.baidu.com】
chrome.find_element(By.ID, 'sb_form_q').send_keys('CSDN')
chrome.find_element(By.ID, 'search_icon').click()
sleep(3)
处理弹窗
页面代码
<!DOCTYPE html>
<html lang="en">
<head><meta charset="UTF-8"><title>This is a page</title>
</head>
<body>
<div id="container"><div style="font: size 30px;">Hello,Python Spider</div>
</div>
</body>
<script>alert('这个是测试弹窗')</script>
</html>
核心代码
# 定位弹出窗口,并点击
chrome.switch_to.alert.accept()
示例代码
from selenium import webdriver
from selenium.webdriver.chrome.service import Service
from time import sleep
from selenium.webdriver.common.by import By
import osservice = Service('./chromedriver.exe')
chrome = webdriver.Chrome(service=service)
file_path = 'file:///' + os.path.abspath('./4.弹出框.html')
chrome.get(file_path)
sleep(3)
# 定位弹出窗口,并点击
chrome.switch_to.alert.accept()
sleep(4)
chrome.quit()
拖拽元素
简介
拖拽元素:如拖拽div标签【块级】
页面代码
<!doctype html>
<html lang="en">
<head><meta charset="utf-8"><meta name="viewport" content="width=device-width, initial-scale=1"><title>jQuery UI Draggable - Auto-scroll</title><link rel="stylesheet" href="http://code.jquery.com/ui/1.12.1/themes/base/jquery-ui.css"><style>#draggable, #draggable2, #draggable3 { width: 100px; height: 100px; padding: 0.5em; float: left; margin: 0 10px 10px 0; }body {font-family: Arial, Helvetica, sans-serif;}table {font-size: 1em;}.ui-draggable, .ui-droppable {background-position: top;}</style><script src="https://code.jquery.com/jquery-1.12.4.js"></script><script src="https://code.jquery.com/ui/1.12.1/jquery-ui.js"></script><script>$( function() {$( "#draggable" ).draggable({ scroll: true });$( "#draggable2" ).draggable({ scroll: true, scrollSensitivity: 100 });$( "#draggable3" ).draggable({ scroll: true, scrollSpeed: 100 });} );</script>
</head>
<body>
<div id="draggable" class="ui-widget-content"><p>Scroll set to true, default settings</p>
</div><div id="draggable2" class="ui-widget-content"><p>scrollSensitivity set to 100</p>
</div><div id="draggable3" class="ui-widget-content"><p>scrollSpeed set to 100</p>
</div>
<div style="height: 5000px; width: 1px;"></div>
</body>
</html>
核心代码
# 定位要拖拽的元素
div1 = chrome.find_element(By.ID, 'draggable')
div2 = chrome.find_element(By.ID, 'draggable2')
div3 = chrome.find_element(By.ID, 'draggable3')
sleep(3)
# 拖拽【把div1拖拽到div2处】
ActionChains(chrome).drag_and_drop(div1, div2).perform()
sleep(3)
# 拖拽【把div3向左/下各拖拽10px】
ActionChains(chrome).drag_and_drop_by_offset(div3, 10, 10).perform()
sleep(3)
示例代码
from selenium import webdriver
from selenium.webdriver import ActionChains
from selenium.webdriver.chrome.service import Service
from time import sleep
from selenium.webdriver.common.by import By
import os# 定位弹出框
service = Service('./chromedriver.exe')
chrome = webdriver.Chrome(service=service)
file_path = 'file:///' + os.path.abspath('./5.拖拽元素.html')
chrome.get(file_path)
sleep(3)
# 定位要拖拽的元素
div1 = chrome.find_element(By.ID, 'draggable')
div2 = chrome.find_element(By.ID, 'draggable2')
div3 = chrome.find_element(By.ID, 'draggable3')
sleep(3)
# 拖拽【把div1拖拽到div2处】
ActionChains(chrome).drag_and_drop(div1, div2).perform()
sleep(3)
# 拖拽【把div3向左/下各拖拽10px】
ActionChains(chrome).drag_and_drop_by_offset(div3, 10, 10).perform()
sleep(3)
chrome.quit()
调用JS方法
简介
有时候我们需要控制页面滚动条上的滚动条,但滚动条并非页面上的元素,这个时候就需要借助js是来进行操作
注意
js都可以直接打开浏览器开发者工具去测试
控制台————输入js即可
核心代码
js = "window.scrollTo(100,400)"# 拉动滚动条
driver.execute_script(js)
示例代码
from selenium.webdriver.chrome.service import Service
from selenium import webdriver
from time import sleepservice = Service('./chromedriver.exe')
chrome = webdriver.Chrome(service=service)
chrome.get('https://www.jd.com/')
# 拉动滚动条
js = "window.scrollTo(100,400)"
chrome.execute_script(js)
sleep(3)
功能
等待元素
强制等待
作用:当代码运行到强制等待这一行的时候,无论出于什么原因,都强制等待指定的时间,需要通过time模块实现
优点:简单
缺点:无法做有效的判断,会浪费时间
from time import sleep
sleep(3)
隐式等待
作用:到了一定的时间发现元素还没有加载,则继续等待我们指定的时间,
如果超过了我们指定的时间还没有加载就会抛出异常,如果没有需要等待的时候就已经加载完毕就会立即执行
优点: 设置一次即可,所有操作都会等待
缺点:必须等待加载完成才能到后续的操作,或者等待超时才能进入后续的操作
from selenium import webdriver
chrome.implicitly_wait(10)
显示等待
作用:指定一个等待条件,并且指定一个最长等待时间,会在这个时间内进行判断是否满足等待条件,如果成立就会立即返回,
如果不成立,就会一直等待,直到等待你指定的最长等待时间,如果还是不满足,就会抛出异常,如果满足了就会正常返回
优点:专门用于对指定一个元素等待,加载完即可运行后续代码
缺点:多个元素都需要要单独设置等待
from selenium.webdriver.support.wait import WebDriverWait
# 0.5:指定检查条件的频率,单位为秒。也就是每隔0.5秒检查一次条件是否满足
wait = WebDriverWait(driver,10,0.5)
wait.until(EC.presence_of_element_located((By.CLASS_NAME, 'next')))
隐藏浏览器
实现
# 设置参数,将浏览器隐藏起来(无头浏览器)
options = ChromeOptions()
options.add_argument('--headless')
# 创建Chrome浏览器时加入参数
service = Service('./chromedriver')
driver = Chrome(service=service,options=options)
代理模式
实现1
# 设置参数,给浏览器设置代理
options = ChromeOptions()
# options.add_argument('--proxy-server=http://ip:port')
options.add_argument('--proxy-server=http://221.199.36.122:35414')
# 设置驱动
service = Service('./chromedriver')
# 启动Chrome浏览器
driver = Chrome(service=service,options=options)
实现2
from selenium.webdriver.common.proxy import ProxyType,Proxy
# 设置参数,给浏览器设置代理
ip = 'http://113.76.133.238:35680'
proxy = Proxy()
proxy.proxy_type = ProxyType.MANUAL
proxy.http_proxy = ip
proxy.ssl_proxy = ip
# 关联浏览器
capabilities = DesiredCapabilities.CHROME
proxy.add_to_capabilities(capabilities)# 设置驱动
service = Service('./chromedriver')
# 启动Chrome浏览器
driver = Chrome(service=service,desired_capabilities=capabilities)
防检测设置
实现
from selenium.webdriver import Chrome
from selenium.webdriver import ChromeOptionsoptions = ChromeOptions()
options.add_experimental_option('excludeSwitches', ['enable-automation'])
options.add_experimental_option('useAutomationExtension', False)chrome = Chrome(chrome_options=options)
chrome.execute_cdp_cmd("Page.addScriptToEvaluateOnNewDocument", {
"source": """
Object.defineProperty(navigator, 'webdriver', {
get: () => false
})
"""
})chrome.get('http://httpbin.org/get')
info = chrome.page_sourceprint(info)
sleep(20)
实战
虎牙
爬取英雄联盟全部分页的主播和对应的人气
from selenium import webdriver
from selenium.webdriver.chrome.service import Service
from lxml import etree
from selenium.webdriver.common.by import Byservice = Service('../0.工具/chromedriver.exe')
chrome = webdriver.Chrome(service=service)
# 设置隐式等待
chrome.implicitly_wait(5)
# 爬取英雄联盟页面的数据
chrome.get('https://www.huya.com/g/lol')
# 做一个循环,退出条件是下一页没有数据
while True:# 分析数据e = etree.HTML(chrome.page_source)names = e.xpath('//i[@class="nick"]/@title')  # 获取主播昵称person_nums = e.xpath('//i[@class="js-num"]/text()')  # 获取主播人气# 提取数据for n, p in zip(names, person_nums):print(f'{n}————————————{p}')try:# 找到下一页的按钮next_btn = chrome.find_element(By.XPATH, '//a[@class="laypage_next"]')# 点击下一页next_btn.click()except Exception as e:break# if chrome.page_source.find('laypage_next') == -1:#     break# # 找到下一页的按钮# next_btn = chrome.find_element(By.XPATH, '//a[@class="laypage_next"]')# # 点击下一页# next_btn.click()
chrome.quit()
相关文章:
探索自动化网页交互的魔力:学习 Selenium 之旅【超详细】
"在当今数字化的世界中,网页自动化已经成为了不可或缺的技能。想象一下,您可以通过编写代码,让浏览器自动执行各种操作,从点击按钮到填写表单,从网页抓取数据到进行自动化测试。学习 Selenium,这一功能…...

css常用样式和不常用样式
文章目录 1、hover鼠标变小手2、ul去除点3、文字溢出显示省略号(1)一行文字溢出显示省略号(2)多行文字溢出显示省略号 4、文字单词超出(1)文字单词超出换行(word-wrap)(2…...
【小练习】交互式网格自定义增删改错误记录及解决(进行中)
经过之前的学习,已经能创建简单的交互式网格并设置自定义增删改按钮,但是实现上还是存在一些问题,来完善优化一下。 首先是修改,正常修改都会弹出修改框,里面是之前存储的信息,根据实际需要对其进行修改&a…...

云渲染效果不对?云渲染前的四个细节表明你的问题出在这里!
云渲染针对3D渲染行业,帮助本地电脑解决渲染慢的问题,大幅提高设计师的工作效率。但小编发现,有不少小伙伴在使用云渲染时,出现了渲染效果不对或丢失的问题,根据小伙伴们的问题和我们创意云云渲染平台给出的解决方案&a…...
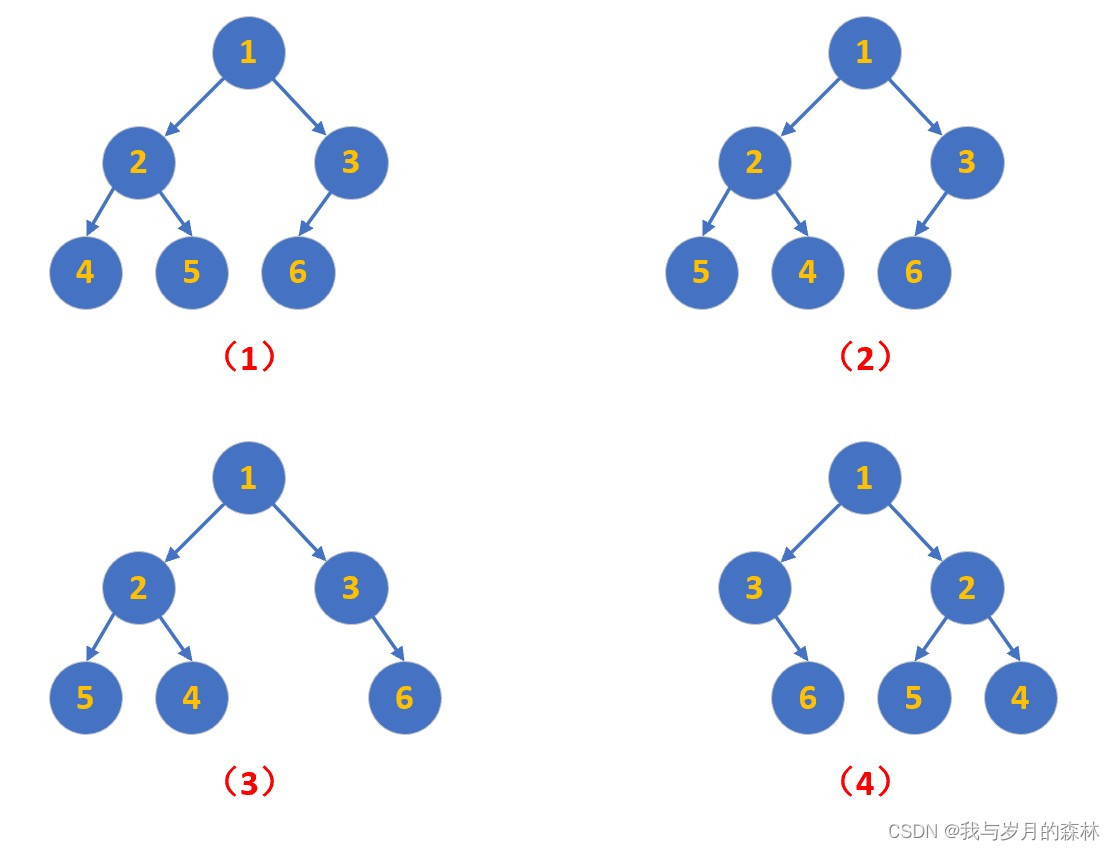
翻转二叉树
声明 该系列文章仅仅展示个人的解题思路和分析过程,并非一定是优质题解,重要的是通过分析和解决问题能让我们逐渐熟练和成长,从新手到大佬离不开一个磨练的过程,加油! 原题链接 翻转二叉树备战技术面试?…...
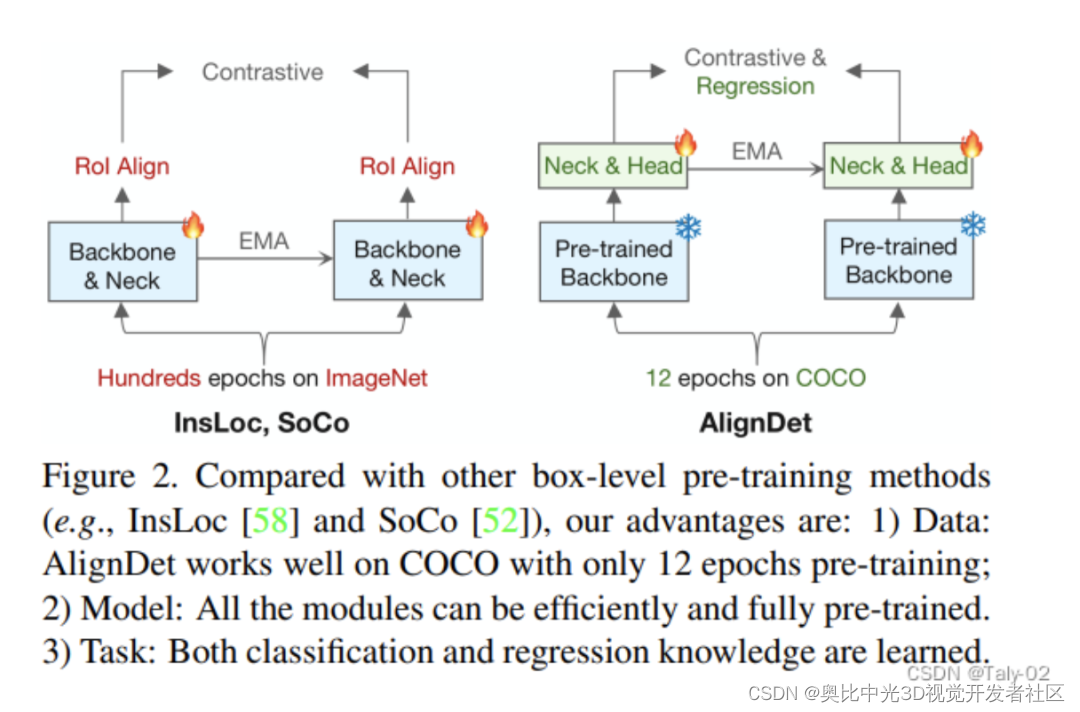
检测新突破 | AlignDet:支持各类检测器自监督新框架(ICCV2023)
引言 论文链接:https://arxiv.org/abs/2307.11077 项目地址:https://github.com/liming-ai/AlignDet 这篇论文主要研究目标检测领域的自监督预训练方法。作者首先指出,当前主流的预训练-微调框架在预训练和微调阶段存在数据、模型和任务上的…...
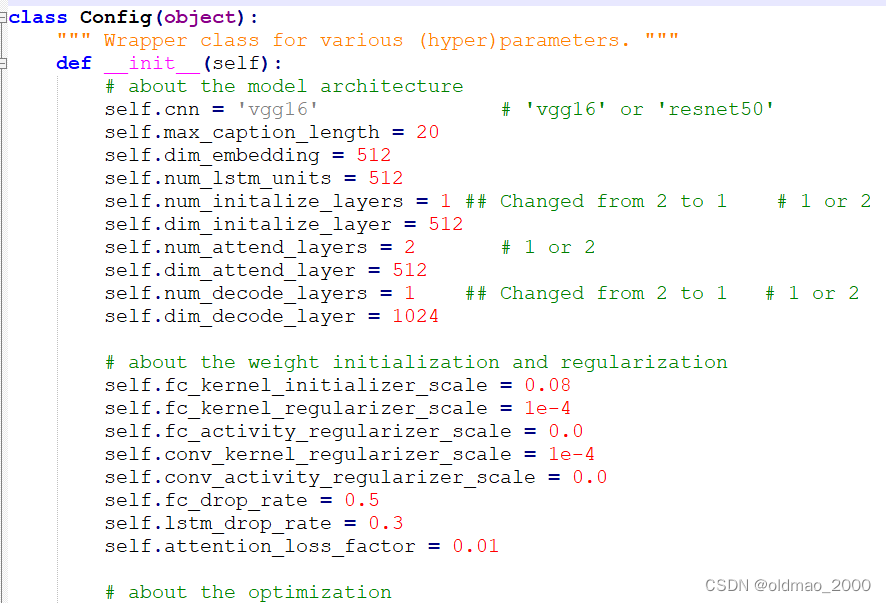
03.Show and Tell
目录 前言泛读摘要IntroductionRelated Work小结 精读模型基于LSTM的句子生成器TrainingInference 实验评价标准数据集训练细节分数结果生成结果多样性讨论排名结果人工评价结果表征分析 结论 代码 前言 本课程来自深度之眼《多模态》训练营,部分截图来自课程视频。…...

QStackedWidget 的使用
QStackedWidget QStackedWidget 提供一些层叠的 Widget,同一时间只有一个Widget处于可视状态,就像书本一样。 什么时候使用 QStackedWidget 强烈建议 如果需要点击一个按钮显示一些界面再点击按钮隐藏当前界面而去显示另外的界面时。都使用 QStackedW…...
大数据--难点--地图的制作
地图一直是亮点也是难点,刚刚进公司的时候也很难懂~~做出来的也很难看 纯CSS3使用vw和vh视口单位实现h5页面自适应,gulp自动监听sass改动并保存到css中 当修改了sass里面的代码后,gulp会自动监听修改内容并同名保存到css文件夹中࿰…...

【AI作画】使用Stable Diffusion的艺术二维码完全生成攻略
文章目录 前言Stable Diffusion 简介 什么是云端平台?优势灵活性和可扩展性成本效益高可用性和容错性管理简便性 选择适合的云端平台 平台优势平台操作购买算力并创建工作空间启动工作空间应用市场一键安装 使用Stable-Diffusion作图使用控制网络将文本转图像二维码…...

SQLAlchemy------更多查询
1 查询: filer:写条件 filter_by:等于的值 res session.query(User).all() # 是个普通列表 print(type(res)) print(len(res)) all()的结果就是列表,列表里面是对象 2 只查询某几个字段 # select name as xx,email from user; res…...

13-数据结构-串以及KMP算法,next数组
串 目录 串 一、串: 二、串的存储结构: 三、模式匹配 1.简单模式匹配(BF算法) 2.KMP算法 2.1-next(j)数组手工求解 2.2-nextval(j)数组手工求解 一、串: 内容受…...

Stable Diffusion - 俯视 (from below) 拍摄的人物图像 LoRA 与配置
欢迎关注我的CSDN:https://spike.blog.csdn.net/ 本文地址:https://spike.blog.csdn.net/article/details/132192139 图像来自 哥特风格 LoRA 俯视 LoRA,提升视觉冲击力,核心配置 <lora:view_from_below:0.6>,(from below,…...
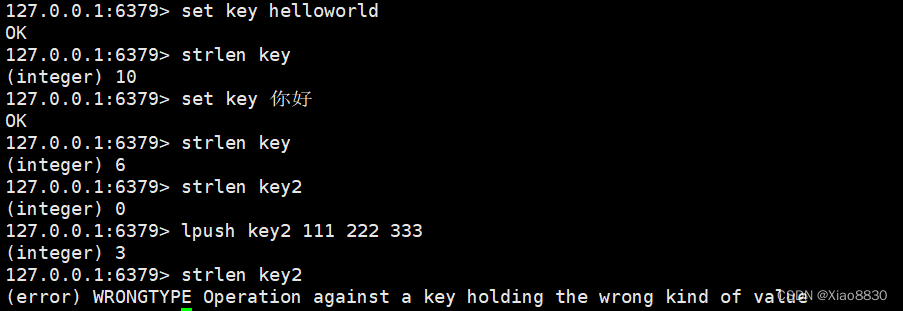
Redis——String类型详解
概述 Redis中的字符串直接按照二进制的数据存储,不会有任何的编码转换,因此存放什么样,取出来的时候就什么样。而MySQL默认的字符集是拉丁文,如果插入中文就会失败 Redis中的字符串类型不仅可以存放文本数据,还可以存…...
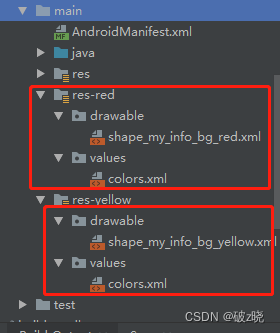
Android:换肤框架Android-Skin-Support
gihub地址:https://github.com/ximsfei/Android-skin-support 样例: 默认: 更换后: 一、引入依赖: // -- 换肤依赖implementation skin.support:skin-support:4.0.5// skin-supportimplementation skin.support:ski…...

软件测试面试心得:四种公司、四种问题…
以下是我个人总结的一些经验: 传统开发模式:V模式,瀑布模式。传统开发模式往往循规蹈矩,从需求,概要设计,详细设计,开发,单元测试,集成测试,系统测…...
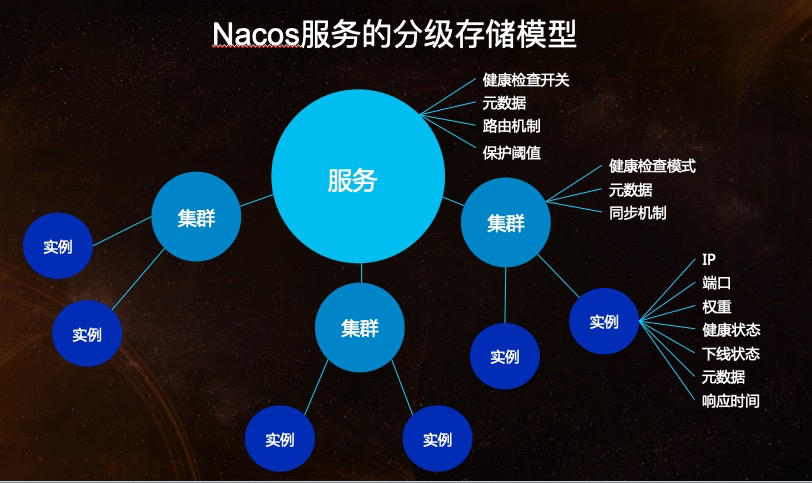
【探索SpringCloud】服务发现-Nacos使用
前言 在聊服务注册中心时,便提到了Nacos。这次便来认识一下。当然,这自然没有官方介绍那般详尽,权当是学习了解Nacos原理的一个过程吧。 Nacos简介 Nacos,全名:dynamic Naming And Configuration Service. 而这个名…...

soap通信2
首先,定义一个XSD(XML Schema Definition)来描述你的数据结构。在你的Maven项目的src/main/resources目录下,创建一个名为schemas的文件夹,并在其中创建一个名为scriptService.xsd的文件,内容如下ÿ…...

【MySQL】MySQL不走索引的情况分析
未建立索引 当数据表没有设计相关索引时,查询会扫描全表。 create table test_temp (test_id int auto_incrementprimary key,field_1 varchar(20) null,field_2 varchar(20) null,field_3 bigint null,create_date date null );expl…...
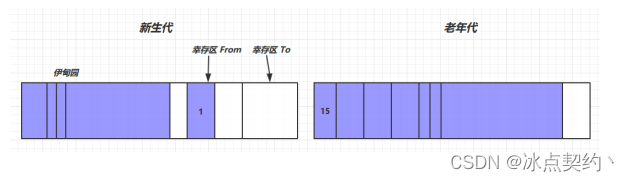
JVM垃圾回收篇-垃圾回收算法
JVM垃圾回收篇-垃圾回收算法 标记清除(Mark Sweep) 概念 collector指的就是垃圾收集器。 mutator是指除了垃圾收集器之外的部分,比如说我们的应用程序本身。 mutator的职责一般是NEW(分配内存)、READ(从内存中读取内容)、WRITE(将内容写入内…...

C++中显示与隐式加载dll的使用与区别
一、什么是 DLL?DLL(Dynamic Link Library) 是 Windows 下的动态链接库,包含可被多个程序共享的函数、资源或类。使用 DLL 可以实现代码复用、模块化设计和插件机制。在 C 中,调用 DLL 中的函数有两种主要方式…...
—东方仙盟)
酒店门锁V10SDK接口说明-幽冥大陆(一百23)—东方仙盟
相关文件系统环境C# :NET.20,NET3.5,NET4,NET4.5,NET 5.0C:VS2005,VS2012,VS2015操作系统:未来之窗VOSWEB:CHROME43核心代码完整代码using System; using System.Collections.Generic; using System.Text; using System.Collections.Specialized;using System.Windo…...

从理论推导到代码实现:手把手教你用Python/Numpy写出守恒形式的NS方程求解器
从理论推导到代码实现:手把手教你用Python/Numpy写出守恒形式的NS方程求解器计算流体力学(CFD)的魅力在于它将抽象的数学方程转化为可执行的代码,让流体运动的奥秘在计算机中重现。对于已经掌握流体力学理论的中高级学习者来说&am…...

除了排错,你可能不知道OPC Expert v8.1还能做这些:数据归档、计算与冗余实战
解锁OPC Expert v8.1的隐藏潜力:数据归档、实时计算与冗余架构实战指南在工业自动化领域,OPC Expert常被视为故障排查的"急救箱",但它的能力远不止于此。当大多数工程师还在用它解决DCOM配置问题时,少数先行者已经用它重…...

配置OpenClaw Agent使用Taotoken作为后端模型提供商
🚀 告别海外账号与网络限制!稳定直连全球优质大模型,限时半价接入中。 👉 点击领取海量免费额度 配置OpenClaw Agent使用Taotoken作为后端模型提供商 基础教程类,指导希望使用OpenClaw等Agent工具的开发者,…...

人类防伪指南:为什么你越写错字,HR越信你是真人?
前言各位码农、算法侠、CtrlC/V十级学者请注意:你有没有过这样的经历?辛辛苦苦肝了一晚上文档,逻辑严密、语法丝滑、连Markdown都对齐得像军训方阵,结果老板幽幽来一句:“这真是你自己写的?”那一刻&#x…...

Office RibbonX Editor:简单三步打造你的专属Office界面
Office RibbonX Editor:简单三步打造你的专属Office界面 【免费下载链接】office-ribbonx-editor An overhauled fork of the original Custom UI Editor for Microsoft Office, built with WPF 项目地址: https://gitcode.com/gh_mirrors/of/office-ribbonx-edit…...

yuzu模拟器完整指南:在电脑上畅玩Switch游戏的终极解决方案
yuzu模拟器完整指南:在电脑上畅玩Switch游戏的终极解决方案 【免费下载链接】yuzu 任天堂 Switch 模拟器 项目地址: https://gitcode.com/GitHub_Trending/yu/yuzu 想在电脑上体验任天堂Switch游戏的魅力吗?yuzu模拟器正是你寻找的完美答案。作为…...

LeaguePrank:5分钟打造个性化英雄联盟客户端,段位头像随心换!
LeaguePrank:5分钟打造个性化英雄联盟客户端,段位头像随心换! 【免费下载链接】LeaguePrank 项目地址: https://gitcode.com/gh_mirrors/le/LeaguePrank 厌倦了千篇一律的英雄联盟客户端界面?想向好友展示王者段位却还在白…...

正视孩童情绪波动,耐心陪伴平稳疏导
孩子的情绪就像夏天的天气,前一秒还晴空万里,后一秒可能就乌云密布。面对突如其来的哭闹、发脾气或者闷闷不乐,很多家长会急着“灭火”——要么讲道理,要么直接制止。但其实,情绪波动本身不是问题,它是孩子…...