ansible入门
一.ansible 背景介绍
- Ansible 是一个广受欢迎的 IT 自动化系统。可以用来处理配置管理、应用自动化部署、云资源配给、网络
自动化和多借点部署等任务。其也可以使得复杂的变更如带负载均衡的零停机滚动更新更加容易。Ansible.com
1.1 自动化运维概念
1.1.1 运维自动化的内容
- 运维自动化是指将 IT 运维中的大量手工的日常任务(日常检查、配置变更、软件安装等)转为自动化完成。
高度的自动化是 IT 运维追求的目标,是未来 IT 运维发展的趋势。简单的说,IT 自动化就是基于事先建立的
框架和流程,将某些不可预测的事件与 IT 流程关联起来,一旦某个系统一有风吹草动,就会被相应的监控
系统检测到,并根据相关的预定义的流程执行相应的补救措施,这些自动补救的措施都是在无人干涉的情
况下自动完成的。从而大幅减少系统不可用时间。
1.1.2 运维工程师核心职能
-
平台架构组件
负责参与并审核架构设计的合理性和可运维性,搭建运维平台技术架构,通过开源解决方案,以确保在
产品发布之后能高效稳定的运行,保障并不断提升服务的可用性,确保用户数据安全,提升用户体验。 -
日常运营保障
负责用运维技术或者运维平台确保产品可以高效的发布上线,负责保障产品 7*24H 稳定运行,在此期间
对出现的各种问题可以快速定位并解决;在日常工作中不断优化系统架构和部署的合理性,以提升系统服务
的稳定性。 -
性能、效率优化
用自动化的工具/平台提升软件在研发生命周期中的工程效率。不断优化系统架构、提升部署效率、优化
资源利用率支持产品的不断迭代,需要不断的进行架构优化调整。以确保整个产品能够在功能不断丰富和
复杂的条件下,同时保持高可用性。
运维开发工程师的职能和使用的工具 -
对于运维工程师来说,掌握这些自动化运维工具并能够相应的扩展功能是必备的技能。
1.2 常见自动化运维工具介绍
- 常见自动化运维工具在 Github 的受欢迎程度–统计于 2019.12.8
| 自动化运维工具 | Github Watch | Star | Fork | Contributors | Used by | Build language |
|---|---|---|---|---|---|---|
| Ansible | 2000 | 40800 | 17700 | 4800 | 9400 | Python |
| Saltstack | 596 | 10500 | 4700 | 2163 | not included | Python |
| Puppet | 489 | 5600 | 2100 | 528 | 7300 | Ruby |
| Chef | 420 | 6000 | 2400 | 581 | 5800 | Ruby |
| Fabric | 519 | 11900 | 1800 | 9 | not include | Python |
-
能看出 ansible 和 saltstack 是比较受欢迎的工具。
-
各工具的源码托管地址:
Github-Ansible
Github-Saltstack
Github-Puppet
Github-Chef
Github-Fabric
1.3 ansible 背景
-
Ansible 由 Michael DeHaan(Cobbler 与 Func 作者)使用 Python 在 2012 年开发,ansible 的名称来自
《安德的游戏》中跨越时空的即时通信工具。 于 2012-03-09,发布 0.0.1 版。在 2015-10-17,Red Hat
宣布 1.5 亿美元收购 Ansible。新版本的 RedHt 系统集成 Ansible。可以工作在 Linu、BSD、Mac OS 等
平台,目前是三大自动化运维工具(Ansible,Saltstack,Puppet)中最受欢迎的工具。 -
Andible 官网和官方文档
官网
官方文档
Ansible 中文文档 -
Michael DeHaan 信息和博客
Linkedin-MichaelDehaan
Medium
ansible.com
二.ansible 特性介绍
- ansible 特性
- 模块化:调用特定的模块,完成特定任务
- Paramiko(python 对 ssh 的实现),PyYAML,Jinja2(模板语言)三个关键模块
- 支持自定义模块,可使用任何编程语言写模块
- 基于 Python 语言实现
- 部署简单,基于 python 和 SSH(默认已安装),agentless,无需代理不依赖 PKI(无需 ssl),
去中心化部署 - 安全,基于 OpenSSH
- 幂等性:一个任务执行 1 遍和执行 n 遍效果一样,不因重复执行带来意外情况
- 支持 playbook 编排任务,YAML 格式,编排任务,支持丰富的数据结构
- 较强大的多层解决方案 role
三.ansible 架构介绍
3.1 Ansible 整体架构

3.2 Ansible 的核心模块
-
ansible 核心模块包括:
INVENTRY:ansible 控制和管理的主机清单默认使用的文件为/etc/ansible/hosts
API: 供第三方程序调用的应用程序编程接口
MODULES:ansible 执行命令的功能模块,多数为内置核心,也可以自定义(基于 Python)
PLUGINS:模块功能的补充,如连接类的插件、循环插件、过滤插件等。 -
ANSIBLE 命令执行来源
USER:普通用户,即 SYSTEM ADMINISTRATOR
PLAYBOOKS:任务剧本(任务集),编排定义 Ansible 任务集的配置文件,由 Ansible 顺序依次
执行,通常是 JSON 格式的 YML 文件
CMDB(配置管理数据库): API 调用
PUBLIC/PRIVATE CLOUD: API 调用
USER-> Ansible Playbook -> Ansibile -
Tips
执行 ansible 的主机一般称为主控端,中控,master 或堡垒机
主控端 Python 版本需要 2.6 或以上
被控端 Python 版本小于 2.4 需要安装 python-simplejson
被控端如开启 SELinux 需要安装 libselinux-python
windows 不能做为主控端
四.Ansible 安装和入门
4.1 Ansible 安装
-
RedHat 系列系统配置各版本的 epel 源直接 yum 安装
yum install ansible -
编译安装
$yum -y install python-jinja2 PyYAML python-paramiko python-babel python-crypto
$tar xf ansible-1.5.4.tar.gz
$cd ansible-1.5.4
$python setup.py build
$python setup.py install
$mkdir /etc/ansible
$cp -r examples/* /etc/ansible
- Git 安装
$git clone git://github.com/ansible/ansible.git --recursive
$cd ./ansible
$source ./hacking/env-setup
- 使用 Python 包管理器 pip 安装
yum install python-pip python-devel
yum install gcc glibc-devel zibl-devel  rpm-bulid openssl-devel
pip install  --upgrade pip
pip install ansible --upgrade
4.2 Ansible 配置
- 相关配置文件
/etc/ansible/ansible.cfg 主配置文件,配置 ansible 工作特性
/etc/ansible/hosts       默认的Inventory主机清单
/etc/ansible/roles/      存放角色的目录
- Ansible 主配置文件
/etc/ansible/ansible.cfg
# config file for ansible -- https://ansible.com/
# ===============================================# nearly all parameters can be overridden in ansible-playbook
# or with command line flags. ansible will read ANSIBLE_CONFIG,
# ansible.cfg in the current working directory, .ansible.cfg in
# the home directory or /etc/ansible/ansible.cfg, whichever it
# finds first[defaults]# some basic default values...#inventory      = /etc/ansible/hosts
#library        = /usr/share/my_modules/
#module_utils   = /usr/share/my_module_utils/
#remote_tmp     = ~/.ansible/tmp
#local_tmp      = ~/.ansible/tmp
#plugin_filters_cfg = /etc/ansible/plugin_filters.yml
#forks          = 5
#poll_interval  = 15
#sudo_user      = root
#ask_sudo_pass = True
#ask_pass      = True
#transport      = smart
#remote_port    = 22
#module_lang    = C
#module_set_locale = False# implicit - gather by default, turn off with gather_facts: False
# explicit - do not gather by default, must say gather_facts: True
#gathering = implicit | explicit
#gather_subset = all | network | hardware | virtual | facter | ohai
# gather_timeout = 10
# inject_facts_as_vars = True
#roles_path    = /etc/ansible/roles
#host_key_checking = False
host_key_checking = False
#stdout_callback = skippy
#callback_whitelist = timer, mail
#task_includes_static = False
#handler_includes_static = False
#error_on_missing_handler = True
#sudo_exe = sudo
#sudo_flags = -H -S -n# SSH timeout
#timeout = 10# default user to use for playbooks if user is not specified
# (/usr/bin/ansible will use current user as default)
#remote_user = root# logging is off by default unless this path is defined
# if so defined, consider logrotate
log_path = /var/log/ansible.log# default module name for /usr/bin/ansible
module_name = shell# use this shell for commands executed under sudo
# you may need to change this to bin/bash in rare instances
# if sudo is constrained
#executable = /bin/sh# if inventory variables overlap, does the higher precedence one win
# or are hash values merged together?  The default is 'replace' but
# this can also be set to 'merge'.
#hash_behaviour = replace# by default, variables from roles will be visible in the global variable
# scope. To prevent this, the following option can be enabled, and only
# tasks and handlers within the role will see the variables there
#private_role_vars = yes# list any Jinja2 extensions to enable here:
#jinja2_extensions = jinja2.ext.do,jinja2.ext.i18n# if set, always use this private key file for authentication, same as
# if passing --private-key to ansible or ansible-playbook
#private_key_file = /path/to/file# If set, configures the path to the Vault password file as an alternative to
# specifying --vault-password-file on the command line.
#vault_password_file = /path/to/vault_password_file# format of string {{ ansible_managed }} available within Jinja2
# templates indicates to users editing templates files will be replaced.
# replacing {file}, {host} and {uid} and strftime codes with proper values.
#ansible_managed = Ansible managed: {file} modified on %Y-%m-%d %H:%M:%S by {uid} on {host}
# {file}, {host}, {uid}, and the timestamp can all interfere with idempotence
# in some situations so the default is a static string:
#ansible_managed = Ansible managed#display_skipped_hosts = True
#display_args_to_stdout = False
#error_on_undefined_vars = False
#system_warnings = True
#deprecation_warnings = True
# command_warnings = False# set plugin path directories here, separate with colons
#action_plugins     = /usr/share/ansible/plugins/action
#cache_plugins      = /usr/share/ansible/plugins/cache
#callback_plugins   = /usr/share/ansible/plugins/callback
#connection_plugins = /usr/share/ansible/plugins/connection
#lookup_plugins     = /usr/share/ansible/plugins/lookup
#inventory_plugins  = /usr/share/ansible/plugins/inventory
#vars_plugins       = /usr/share/ansible/plugins/vars
#filter_plugins     = /usr/share/ansible/plugins/filter
#test_plugins       = /usr/share/ansible/plugins/test
#terminal_plugins   = /usr/share/ansible/plugins/terminal
#strategy_plugins   = /usr/share/ansible/plugins/strategy#strategy = free
#bin_ansible_callbacks = False
#nocows = 1
#cow_selection = default
#cow_selection = random
#cow_whitelist=bud-frogs,bunny,cheese,daemon,default,dragon,elephant-in-snake,elephant,eyes,\
#              hellokitty,kitty,luke-koala,meow,milk,moofasa,moose,ren,sheep,small,stegosaurus,\
#              stimpy,supermilker,three-eyes,turkey,turtle,tux,udder,vader-koala,vader,www
#nocolor = 1
#fact_caching = memory
#For the redis plugin, the value is a host:port:database triplet: fact_caching_connection = localhost:6379:0
#fact_caching_connection=/tmp
#retry_files_enabled = False
#retry_files_save_path = ~/.ansible-retry
#squash_actions = apk,apt,dnf,homebrew,pacman,pkgng,yum,zypper# prevents logging of task data, off by default
#no_log = False# prevents logging of tasks, but only on the targets, data is still logged on the master/controller
#no_target_syslog = False# controls whether Ansible will raise an error or warning if a task has no
# choice but to create world readable temporary files to execute a module on
# the remote machine.  This option is False by default for security.  Users may
# turn this on to have behaviour more like Ansible prior to 2.1.x.  See
# https://docs.ansible.com/ansible/become.html#becoming-an-unprivileged-user
# for more secure ways to fix this than enabling this option.
#allow_world_readable_tmpfiles = False# controls the compression level of variables sent to
# worker processes. At the default of 0, no compression
# is used. This value must be an integer from 0 to 9.
#var_compression_level = 9# controls what compression method is used for new-style ansible modules when
# they are sent to the remote system.  The compression types depend on having
# support compiled into both the controller's python and the client's python.
# The names should match with the python Zipfile compression types:
# * ZIP_STORED (no compression. available everywhere)
# * ZIP_DEFLATED (uses zlib, the default)
# These values may be set per host via the ansible_module_compression inventory
# variable
#module_compression = 'ZIP_DEFLATED'# This controls the cutoff point (in bytes) on --diff for files
# set to 0 for unlimited (RAM may suffer!).
#max_diff_size = 1048576# This controls how ansible handles multiple --tags and --skip-tags arguments
# on the CLI.  If this is True then multiple arguments are merged together.  If
# it is False, then the last specified argument is used and the others are ignored.
# This option will be removed in 2.8.
#merge_multiple_cli_flags = True# Controls showing custom stats at the end, off by default
#show_custom_stats = True# Controls which files to ignore when using a directory as inventory with
# possibly multiple sources (both static and dynamic)
#inventory_ignore_extensions = ~, .orig, .bak, .ini, .cfg, .retry, .pyc, .pyo# This family of modules use an alternative execution path optimized for network appliances
# only update this setting if you know how this works, otherwise it can break module execution
#network_group_modules=eos, nxos, ios, iosxr, junos, vyos# When enabled, this option allows lookups (via variables like {{lookup('foo')}} or when used as
# a loop with `with_foo`) to return data that is not marked "unsafe". This means the data may contain
# jinja2 templating language which will be run through the templating engine.
# ENABLING THIS COULD BE A SECURITY RISK
#allow_unsafe_lookups = False# set default errors for all plays
#any_errors_fatal = False[inventory]
# enable inventory plugins, default: 'host_list', 'script', 'yaml', 'ini', 'auto'
#enable_plugins = host_list, virtualbox, yaml, constructed# ignore these extensions when parsing a directory as inventory source
#ignore_extensions = .pyc, .pyo, .swp, .bak, ~, .rpm, .md, .txt, ~, .orig, .ini, .cfg, .retry# ignore files matching these patterns when parsing a directory as inventory source
#ignore_patterns=# If 'true' unparsed inventory sources become fatal errors, they are warnings otherwise.
#unparsed_is_failed=False[privilege_escalation]
#become=True
#become_method=sudo
#become_user=root
#become_ask_pass=False[paramiko_connection]# uncomment this line to cause the paramiko connection plugin to not record new host
# keys encountered.  Increases performance on new host additions.  Setting works independently of the
# host key checking setting above.
#record_host_keys=False# by default, Ansible requests a pseudo-terminal for commands executed under sudo. Uncomment this
# line to disable this behaviour.
#pty=False# paramiko will default to looking for SSH keys initially when trying to
# authenticate to remote devices.  This is a problem for some network devices
# that close the connection after a key failure.  Uncomment this line to
# disable the Paramiko look for keys function
#look_for_keys = False# When using persistent connections with Paramiko, the connection runs in a
# background process.  If the host doesn't already have a valid SSH key, by
# default Ansible will prompt to add the host key.  This will cause connections
# running in background processes to fail.  Uncomment this line to have
# Paramiko automatically add host keys.
#host_key_auto_add = True[ssh_connection]# ssh arguments to use
# Leaving off ControlPersist will result in poor performance, so use
# paramiko on older platforms rather than removing it, -C controls compression use
#ssh_args = -C -o ControlMaster=auto -o ControlPersist=60s# The base directory for the ControlPath sockets.
# This is the "%(directory)s" in the control_path option
#
# Example:
# control_path_dir = /tmp/.ansible/cp
#control_path_dir = ~/.ansible/cp# The path to use for the ControlPath sockets. This defaults to a hashed string of the hostname,
# port and username (empty string in the config). The hash mitigates a common problem users
# found with long hostames and the conventional %(directory)s/ansible-ssh-%%h-%%p-%%r format.
# In those cases, a "too long for Unix domain socket" ssh error would occur.
#
# Example:
# control_path = %(directory)s/%%h-%%r
#control_path =# Enabling pipelining reduces the number of SSH operations required to
# execute a module on the remote server. This can result in a significant
# performance improvement when enabled, however when using "sudo:" you must
# first disable 'requiretty' in /etc/sudoers
#
# By default, this option is disabled to preserve compatibility with
# sudoers configurations that have requiretty (the default on many distros).
#
#pipelining = False# Control the mechanism for transferring files (old)
#   * smart = try sftp and then try scp [default]
#   * True = use scp only
#   * False = use sftp only
#scp_if_ssh = smart# Control the mechanism for transferring files (new)
# If set, this will override the scp_if_ssh option
#   * sftp  = use sftp to transfer files
#   * scp   = use scp to transfer files
#   * piped = use 'dd' over SSH to transfer files
#   * smart = try sftp, scp, and piped, in that order [default]
#transfer_method = smart# if False, sftp will not use batch mode to transfer files. This may cause some
# types of file transfer failures impossible to catch however, and should
# only be disabled if your sftp version has problems with batch mode
#sftp_batch_mode = False# The -tt argument is passed to ssh when pipelining is not enabled because sudo
# requires a tty by default.
#use_tty = True# Number of times to retry an SSH connection to a host, in case of UNREACHABLE.
# For each retry attempt, there is an exponential backoff,
# so after the first attempt there is 1s wait, then 2s, 4s etc. up to 30s (max).
#retries = 3[persistent_connection]# Configures the persistent connection timeout value in seconds.  This value is
# how long the persistent connection will remain idle before it is destroyed.
# If the connection doesn't receive a request before the timeout value
# expires, the connection is shutdown. The default value is 30 seconds.
#connect_timeout = 30# Configures the persistent connection retry timeout.  This value configures the
# the retry timeout that ansible-connection will wait to connect
# to the local domain socket. This value must be larger than the
# ssh timeout (timeout) and less than persistent connection idle timeout (connect_timeout).
# The default value is 15 seconds.
#connect_retry_timeout = 15# The command timeout value defines the amount of time to wait for a command
# or RPC call before timing out. The value for the command timeout must
# be less than the value of the persistent connection idle timeout (connect_timeout)
# The default value is 10 second.
#command_timeout = 10[accelerate]
#accelerate_port = 5099
#accelerate_timeout = 30
#accelerate_connect_timeout = 5.0# The daemon timeout is measured in minutes. This time is measured
# from the last activity to the accelerate daemon.
#accelerate_daemon_timeout = 30# If set to yes, accelerate_multi_key will allow multiple
# private keys to be uploaded to it, though each user must
# have access to the system via SSH to add a new key. The default
# is "no".
#accelerate_multi_key = yes[selinux]
# file systems that require special treatment when dealing with security context
# the default behaviour that copies the existing context or uses the user default
# needs to be changed to use the file system dependent context.
#special_context_filesystems=nfs,vboxsf,fuse,ramfs,9p# Set this to yes to allow libvirt_lxc connections to work without SELinux.
#libvirt_lxc_noseclabel = yes[colors]
#highlight = white
#verbose = blue
#warn = bright purple
#error = red
#debug = dark gray
#deprecate = purple
#skip = cyan
#unreachable = red
#ok = green
#changed = yellow
#diff_add = green
#diff_remove = red
#diff_lines = cyan[diff]
# Always print diff when running ( same as always running with -D/--diff )
# always = no# Set how many context lines to show in diff
# context = 3- Ansible 默认被控主机清单
/etc/ansible/hosts - ansible 的主要功用在于批量主机操作,为了便捷地使用其中的部分主机,可以在 inventory file 中将其
分组命名。默认的 inventory file 为/etc/ansible/hosts,inventory file 可以有多个,且也可以通过
Dynamic Inventory 来动态生成 - 主机清单文件格式
inventory 文件遵循 INI 文件风格,中括号中的字符为组名。可以将同一个主机同时归并到多个不同的组中。
此外, 当如若目标主机使用了非默认的 SSH 端口,还可以在主机名称之后使用冒号加端口号来标明如果
主机名称遵循相似的命名模式,还可以使用列表的方式标识各主机。如下面的例子:
# websrvs 组的主机清单
[websrvs]
172.20.1.67
172.20.1.68
172.20.1.69# websrvs 组的主机变量
[websrvs:vars]
web67=172.20.1.67
web68=172.20.1.68
web69=172.20.1.69# appsrvs 组的主机清单
[appsrvs]
172.20.1.84
172.20.1.86
172.20.1.87# appsrvs 组的主机变量
[appsrvs:vars]
app84=172.20.1.84
app86=172.20.1.86
app87=172.20.1.87# dnssrvs 组的主机清单
[dnssrvs]
172.20.1.79
172.20.1.88
172.20.1.89# dnssrvs 组的主机别名(变量)
[dnssrvs:vars]
dns79=172.20.1.79
dns88=172.20.1.88
dns89=172.20.1.89
4.3 Ansible 附带的工具
- 安装 Ansible 时会附带一些必要的工具
- 加粗的工具经常使用,其它不常使用
| /usr/bin/ansible | 主程序,临时命令执行工具 |
| /usr/bin/ansible-doc | 查看配置文档,模块功能查看工具 |
| /usr/bin/ansible-galaxy | 下载/上传优秀代码或 Roles 模块的官网平台 |
| /usr/bin/ansible-playbook | 定制自动化任务,编排剧本工具 |
| /usr/bin/ansible-pull | 远程执行命令的工具 |
| /usr/bin/ansible-vault | 文件加密工具 |
| /usr/bin/ansible-console | 基于 Console 界面与用户交互的执行工具 |
- ansible-doc 命令,用来显示个模块的帮助,一般直接跟模块名即可
ansible-doc [options] [module...]
-l, --list          #列出可用模块
-s, --snippet       #显示指定模块的playbook片段
#列出所有模块
ansible-doc -l
#查看指定模块帮助用法
ansible-doc ping
#查看指定模块帮助用法
ansible-doc -s  pineg:
root@ubuntu1904:~#ansible-doc ping -s
- name: Try to connect to host, verify a usable python and return `pong' on successping:data:                  # Data to return for the `ping' return value. If this parameter is set to `crash', the module will cause an exception.
4.4 ansible 命令
- ansible 命令通过 ssh 协议,实现对远程主机的配置管理、应用部署、任务执行等功能,使用-k 选项来输入
远程主机的密码。由于每台主机的密码可能不一样。建议:使用此工具前,先配置 ansible 主控端能基于
密钥认证的方式联系各个被管理节点。如下面的脚本可以实现 ansible 主控机与被控主机基于 Key 验证
范例:利用 sshpass 批量实现基于 key 验证
#!/bin/bash
#
#*******************************************************************************
#Author:            steveli
#QQ:                1049103823
#Data:              2019-12-08
#FileName:          key_cert.sh
#URL:               https://blog.csdn.net/YouOops
#Description:       Test scrpting.
#Copyright (C):     2019 All rights reserved
#*******************************************************************************
ssh-keygen -f /root/.ssh/id_rsa  -P ''
NET=172.20.1
export SSHPASS=stevenux
for IP in {80..99}; dosshpass -e ssh-copy-id  ${NET}.${IP}
done
- ansible 命令用法
ansible <host-pattern> [ options [-m module_name] [-a args] ]
- options
--version           #显示版本
-m module           #指定模块,默认为command
-v                  #详细过程 –vv  -vvv更详细
--list-hosts        #显示主机列表,可简写 --list
-k, --ask-pass      #提示输入ssh连接密码,默认Key验证
-C, --check         #检查,并不执行
-T, --timeout=TIMEOUT #执行命令的超时时间,默认10s
-u, --user=REMOTE_USER #执行远程执行的用户
-b, --become        #代替旧版的sudo 切换
--become-user=USERNAME  #指定sudo的runas用户,默认为root
-K, --ask-become-pass #提示输入sudo时的口令- <host-pattern> 用于匹配控制的主机列表,筛选出特定的主机来执行特定任务
| 模式 | 意义 | 例子 |
|---|---|---|
| all | 所有 Inventory 中定义的主机 | ansible all –m ping |
| * | 通配符 | ansible “*” -m ping |
| ansible 192.168.1.* -m ping | ||
| ansible “websrvss” -m ping | ||
| : | 逻辑或关系 | ansible “webwebsrvss:appwebsrvss” -m ping |
| ansible “192.168.1.10:192.168.1.20” -m ping | ||
| :& | 逻辑与关系 | ansible “webwebsrvss:&dbwebsrvss” –m ping #在 webwebsrvss 组并且在 dbwebsrvss 组中的主机 |
| :! | 逻辑非关系 | ansible ‘webwebsrvss:!dbwebsrvss’ –m ping #在 webwebsrvss 组,但不在 dbwebsrvss 组中的主机。 注意:此处为单引号 |
| 正则表达式 | ansible “webwebsrvss:&dbwebsrvss” –m ping | |
| 正则表达式 | ansible “~(web | db).*.magedu.com” –m ping |
- Ansible 实际管理的主要方式有两种
1.Ad-Hoc 方式,即是利用 ansible 命令临时管理的方式
2.Ansible-playbook 命令,用于长期规划好的大型项目使用,需要编写相应的 playbook
- ansible 命令执行过程
- 加载自己的配置文件 默认/etc/ansible/ansible.cfg
- 加载自己对应的模块文件,如:command
- 通过 ansible 将模块或命令生成对应的临时 py 文件,并将该文件传输至远程服务器的对应执行用户
$HOME/.ansible/tmp/ansible-tmp-数字/XXX.PY 文件 - 给文件加执行权限执行
- 执行并返回结果
- 删除临时 py 文件,退出
- ansible 执行后返回状态可以在配置文件自定义
/ect/ansible/ansible.cfg
green:绿色表示执行成功且不需要做改变
yellow:执行成功并且对被控主机有改动
red:执行失败
root@ubuntu1904:~#grep -A 15 '\[colors\]' /etc/ansible/ansible.cfg
[colors]
#highlight = white
#verbose = blue
#warn = bright purple
#error = red
#debug = dark gray
#deprecate = purple
#skip = cyan
#unreachable = red
#ok = green
#changed = yellow
#diff_add = green
#diff_remove = red
#diff_lines = cyan
- ansible 使用范例
#以stevenux用户执行ping存活检测
ansible all -m ping -u stevenux  -k
#以stevenux sudo至root执行ping存活检测
ansible all -m ping -u stevenux -k -b
#以stevenux sudo至mage用户执行ping存活检测
ansible all -m ping -u stevenux -k -b --become-user=mage
#以stevenux sudo至root用户执行ls
ansible all -m command  -u stevenux -a 'ls /root' -b --become-user=root -k -K
- ansible-galaxy 此工具用来下载网上的 roles
此工具连接到:galaxy.ansibl.com下载 roles
下载的 roles 默认放到~/.ansible/roles
#列出所有已安装的galaxy
ansible-galaxy list#安装galaxy
ansible-galaxy install geerlingguy.redisroot@ubuntu1904:~/.ansible#tree roles/
roles/
└── geerlingguy.redis├── defaults│   └── main.yml├── handlers│   └── main.yml├── LICENSE├── meta│   └── main.yml├── README.md├── tasks│   ├── main.yml│   ├── setup-Archlinux.yml│   ├── setup-Debian.yml│   └── setup-RedHat.yml├── templates│   └── redis.conf.j2├── tests│   ├── README.md│   └── test.yml└── vars├── Archlinux.yml├── Debian.yml└── RedHat.yml#删除galaxy
ansible-galaxy remove geerlingguy.redis
-
ansible-pull
此工具会推送 ansible 的命令至远程,效率无限提升,对运维要求较高 -
ansible-playbook
此工具用于执行编写好的 playbook 任务 -
Playbook 例子
root@ubuntu1904:~#cat .ansible/roles/geerlingguy.redis/tasks/main.yml
---
# Variable setup.
- name: Include OS-specific variables.include_vars: "{{ ansible_os_family }}.yml"- name: Define redis_package.set_fact:redis_package: "{{ __redis_package }}"when: redis_package is not defined# Setup/install tasks.
- include_tasks: setup-RedHat.ymlwhen: ansible_os_family == 'RedHat'- include_tasks: setup-Debian.ymlwhen: ansible_os_family == 'Debian'- include_tasks: setup-Archlinux.ymlwhen: ansible_os_family == 'Archlinux'- name: Ensure Redis is configured.template:src: redis.conf.j2dest: "{{ redis_conf_path }}"mode: 0644notify: restart redis- name: Ensure Redis is running and enabled on boot.service: "name={{ redis_daemon }} state=started enabled=yes"
- ansible-vault
此工具可以用于加和密解密 yml 文件
ansible-vault [create|decrypt|edit|encrypt|rekey|view]
例子:
ansible-vault encrypt hello.yml     #加密
ansible-vault decrypt hello.yml     #解密
ansible-vault view hello.yml        #查看
ansible-vault edit  hello.yml       #编辑加密文件
ansible-vault rekey  hello.yml      #修改口令
ansible-vault create new.yml        #创建新文件
- ansible-console
- 此工具可交互执行命令,支持 tab,ansible 2.0+新增的功能
- 进入交互界面后的提示符格式:
执行用户@当前操作的主机组 (当前组的主机数量)[f:并发数]$ - 常用子命令
设置并发数: forks n 例如: forks 10
切换组: cd 主机组 例如: cd web
列出当前组主机列表: list
列出所有的内置命令: ?或 help
root@ubuntu1904:~#ansible-console
Welcome to the ansible console.
Type help or ? to list commands.root@all (9)[f:5]$ ls
172.20.1.68 | CHANGED | rc=0 >>
anaconda-ks.cfg
auto_install_mysql_v03.sh
hello.txt
......
oot@all (9)[f:5]$ pwd
172.20.1.67 | CHANGED | rc=0 >>
/root
172.20.1.68 | CHANGED | rc=0 >>
/root
172.20.1.69 | CHANGED | rc=0 >>
/root
......
root@all (9)[f:5]$ list
172.20.1.67
172.20.1.68
172.20.1.69
172.20.1.79
172.20.1.88
172.20.1.89
172.20.1.84
172.20.1.86
172.20.1.87
4.5 Ansible 常用模块使用
常用模块参考
4.5.1 Command 模块
-
功能: 在远程主机执行命令,此为默认模块,可忽略-m 选项
-
注意点: 此命令不支持 $VARNAME < > | ; & 等符号和相应功能,用 shell 模块实现
-
例子:
root@ubuntu1904:~#ansible all -m command -a "echo 'Hello ansibleansible'"
172.20.1.79 | CHANGED | rc=0 >>
Hello ansibleansible172.20.1.67 | CHANGED | rc=0 >>
Hello ansibleansible172.20.1.68 | CHANGED | rc=0 >>
Hello ansibleansible
4.5.2 Shell 模块
- 功能: 和 command 功能类似,使用 shell 来在被控主机执行命令
- 注意点: 调用 bash 执行命令 类似 cat /tmp/test.md | awk -F‘|’ ‘{print $1,$2}’ &> /tmp/example.txt
这些复杂命令,即使使用 shell 也可能会失败。解决办法:写到脚本–>copy 到远程主机–>执行;再把
需要的结果 fetch 回来主控机器。 - 例子:
root@ubuntu1904:~#ansible all -m shell -a 'ip addr | sed -nr "s#.*(1
72.20.1...).*#\1#p"'
172.20.1.67 | CHANGED | rc=0 >>
172.20.1.67172.20.1.68 | CHANGED | rc=0 >>
172.20.1.68172.20.1.84 | CHANGED | rc=0 >>
172.20.1.84
4.5.3 Script 模块
- 功能: 在本地指定脚本,自动传输到远程执行并返回结果
- 注意点:
- 例子:
root@ubuntu1904:~#cat script.sh
#!/bin/bash
echo `ip a | sed -nr 's/inet (172.20.*\/..) .*/\1/p'`root@ubuntu1904:~#ansible webwebsrvss -m script -a './script.sh'
172.20.1.67 | CHANGED => {"changed": true,"rc": 0,"stderr": "Shared connection to 172.20.1.67 closed.\r\n","stderr_lines": ["Shared connection to 172.20.1.67 closed."],"stdout": "172.20.1.67/16\r\n","stdout_lines": ["172.20.1.67/16"   # 返回ip地址]
}
172.20.1.68 | CHANGED => {"changed": true,"rc": 0,"stderr": "Shared connection to 172.20.1.68 closed.\r\n","stderr_lines": ["Shared connection to 172.20.1.68 closed."],"stdout": "172.20.1.68/16\r\n","stdout_lines": ["172.20.1.68/16"]
}
172.20.1.69 | CHANGED => {"changed": true,"rc": 0,"stderr": "Shared connection to 172.20.1.69 closed.\r\n","stderr_lines": ["Shared connection to 172.20.1.69 closed."],"stdout": "172.20.1.69/16\r\n","stdout_lines": ["172.20.1.69/16"]
}
4.5.4 Copy 模块
- 功能: 从 ansible 主控端复制文件到远程被控主机
- 注意点: 文件源在 ansible 主控机,目标是远程被控机
- 例子:
root@ubuntu1904:~#ansible all -m copy -a 'src=~/script.sh dest=/data/'
172.20.1.67 | CHANGED => {"changed": true,"checksum": "c3e89fbe08ae1d3edfa22b1c9968abd470ba8e81","dest": "/data/script.sh","gid": 0,"group": "root","md5sum": "6a33896eae3ee660a6b0c0bb60a5b326","mode": "0644","owner": "root","size": 67,"src": "/root/.ansible/tmp/ansible-tmp-1575851039.0323763-219776225171533/source","state": "file","uid": 0
}
......# 将文本内容直接在被控机生成文件
root@ubuntu1904:~#ansible all -m copy -a 'content="Hello asible" dest=/data/hello.txt'
172.20.1.87 | CHANGED => {"changed": true,"checksum": "8754e6aac9f6b9b741c3bdf974e6a33bbc72b321","dest": "/data/hello.txt","gid": 0,"group": "root","md5sum": "a131edb4211ac4a39aac74d8a04126f6","mode": "0644","owner": "root","size": 12,"src": "/root/.ansible/tmp/ansible-tmp-1575851292.1085637-80128185007427/source","state": "file","uid": 0
}root@ubuntu1904:~#ansible all -a  'cat /data/hello.txt'
172.20.1.89 | CHANGED | rc=0 >>
Hello asible172.20.1.67 | CHANGED | rc=0 >>
Hello asible172.20.1.68 | CHANGED | rc=0 >>
Hello asible# 拷贝/etc/sysconfig/文件夹下的文件,不包括文件夹本身
root@ubuntu1904:~#ansible all -m copy -a 'src=/etc/sysconfig/ dest=/backup'
4.5.5 Fetch 模块
- 功能: 从远程被控主机拷贝文件到主控端,与 copy 模块方向相反
- 注意点: 不支持将远程被控机的问价夹拷贝到主控机
- 例子:
root@ubuntu1904:~#ansible all -m fetch -a  'src=/data/hello.txt dest=/data/'
172.20.1.87 | CHANGED => {"changed": true,"checksum": "8754e6aac9f6b9b741c3bdf974e6a33bbc72b321","dest": "/data/172.20.1.87/data/hello.txt","md5sum": "a131edb4211ac4a39aac74d8a04126f6","remote_checksum": "8754e6aac9f6b9b741c3bdf974e6a33bbc72b321","remote_md5sum": null
}
root@ubuntu1904:~#cat /data/172.20.1.67/data/hello.txt
Hello asible
4.5.6 File 模块
- 功能: 设置远程被控主机的文件、符号链接、文件夹的属性;也可以删除其
- 注意点: 创建软连接时,目标文件或文件夹是在远程被控主机上,软连接也是位于远程主机
- 例子:
# 创建文件
root@ubuntu1904:~#ansible all -m file -a 'path=/data/hello.txt state=touch'
# 删除文件
root@ubuntu1904:~#ansible all -m file -a 'path=/data/hello.txt state=absent'
# 修改文件属主和权限
root@ubuntu1904:~#ansible all -m file -a 'path=/data/hello.txt owner=steve mode=0700'
# 创建文件夹
root@ubuntu1904:~#ansible all -m file -a 'path=/data/dir state=directory mode=0700'
# 为远程主机某个文件创建文件夹
root@ubuntu1904:~#ansible all -m file -a 'src=/data/hello.txt dest=/data/hello-link state=link'
4.5.7 unarchive 模块
- 功能: 将打包压缩的文件解压缩
- 注意点: 参数 copy=yes 表示将 ansible 主控机的打包压缩文件传输到远程被控机再解压缩;copy=no 表示
直接将远程主机某个压缩包解压缩。 - 常用参数:
- copy:默认为 yes,当 copy=yes,拷贝的文件是从 ansible 主机复制到远程主机上,如果设置为
copy=no,会在远程主机上寻找 src 源文件 - remote_src:和 copy 功能一样且互斥,yes 表示在远程主机,不在 ansible 主机,no 表示文件在
ansible 主机上;官方更推荐使用 remote_src 参数代替 copy 参数 - src:源路径,可以是 ansible 主机上的路径,也可以是远程主机上的路径,如果是远程主机上的路
径,则需要设置 copy=no - dest:远程主机上的目标路径
- mode:设置解压缩后的文件权限
- copy:默认为 yes,当 copy=yes,拷贝的文件是从 ansible 主机复制到远程主机上,如果设置为
- 例子:
root@ubuntu1904:~#ansible all -m unarchive -a 'src=/data/bar.tar.gz dest=/var/lib/bar'
root@ubuntu1904:~#ansible all -m unarchive -a 'src=/data/bar.zip dest=/data copy=no mode=0700'
root@ubuntu1904:~#ansible all -m unarchive -a 'src=https://suosuoli.cn/god-of-editor.pdf.zip dest=/data'
4.5.8 Archive 模块
- 功能: 打包压缩,和 unarchive 方向相反。默认,该模块认为压缩的源文件在远程被控主机。
压缩后指定remove=True可以删除源文件。 - 注意点:
- 例子:
root@ubuntu1904:~#ansible all -m archive  -a 'path=/data/ dest=/data/dir.tar.bz2 format=bz2 mode=0700'
172.20.1.87 | CHANGED => {"archived": [],"arcroot": "/data/","changed": true,"dest": "/data/dir.tar.bz2","expanded_exclude_paths": [],"expanded_paths": ["/data/"],"gid": 0,"group": "root","missing": [],"mode": "0700","owner": "root","size": 115,"state": "file","uid": 0
}
......
root@ubuntu1904:~#ansible all -m fetch -a 'src=/data/dir.tar.bz2 dest=/data'
172.20.1.87 | CHANGED => {"changed": true,"checksum": "e74d1ab8aad31d62cacad3a65a2a0ccc5623871c","dest": "/data/172.20.1.87/data/dir.tar.bz2","md5sum": "706f8ee46597a3c62e6c4597f37739a5","remote_checksum": "e74d1ab8aad31d62cacad3a65a2a0ccc5623871c","remote_md5sum": null
}
......
oot@ubuntu1904:~#ll /data/172.20.1.87/data/
total 8
-rwx------ 1 root root 116 Dec  9 09:04 dir.tar.bz2
-rw-r--r-- 1 root root  12 Dec  9 08:35 hello.txt
4.5.9 Hostname 模块
- 功能: hostname 模块用来管理主机名
- 注意点:
- 例子:
root@ubuntu1904:~#ansible webwebsrvss -m hostname -a 'name=webhost'
172.20.1.69 | CHANGED => {"ansible_facts": {"ansible_domain": "","ansible_fqdn": "webhost","ansible_hostname": "webhost","ansible_nodename": "webhost"},"changed": true,"name": "webhost"
}
172.20.1.67 | CHANGED => {"ansible_facts": {"ansible_domain": "","ansible_fqdn": "webhost","ansible_hostname": "webhost","ansible_nodename": "webhost"},"changed": true,"name": "webhost"
}
172.20.1.68 | CHANGED => {"ansible_facts": {"ansible_domain": "","ansible_fqdn": "webhost","ansible_hostname": "webhost","ansible_nodename": "webhost"},"changed": true,"name": "webhost"
}
root@ubuntu1904:~#ansible webwebsrvss  -a 'hostname'
172.20.1.68 | CHANGED | rc=0 >>
webhost172.20.1.69 | CHANGED | rc=0 >>
webhost172.20.1.67 | CHANGED | rc=0 >>
webhost
4.5.10 Cron 模块
- 功能: 管理和删除计划任务
- 注意点:
- 例子:
#备份数据库脚本
[root@centos8 ~]#cat mysql_backup.sh
mysqldump -A -F --single-transaction --master-data=2 -q -uroot |gzip >
/data/mysql_`date +%F_%T`.sql.gz
#创建任务
ansible 192.168.39.28 -m cron -a 'hour=2 minute=30 weekday=1-5 name="backup
mysql" job=/root/mysql_backup.sh'
ansible websrvs   -m cron -a "minute=*/5 job='/usr/sbin/ntpdate 172.20.0.1
&>/dev/null' name=Synctime"
#禁用计划任务
ansible websrvs   -m cron -a "minute=*/5 job='/usr/sbin/ntpdate 172.20.0.1
&>/dev/null' name=Synctime disabled=yes"
#启用计划任务
ansible websrvs   -m cron -a "minute=*/5 job='/usr/sbin/ntpdate 172.20.0.1
&>/dev/null' name=Synctime disabled=no"
#删除任务
ansible websrvs -m cron -a "name='backup mysql' state=absent"
ansible websrvs -m cron -a ‘state=absent name=Synctime’
4.5.11 Yum 模块
- 功能: 使用 yum 安装、升级、降级、删除和列出软件包。
- 注意点: 该软件包只适用于 python2,如果需要 python3 的支持,使用 dnf 模块
- 例子:
# 安装
root@ubuntu1904:~#ansible webwebsrvss -m yum -a 'name=nginx state=present'
# 删除
root@ubuntu1904:~#ansible webwebsrvss -m yum -a 'name=nginx state=absent'
4.5.12 Service 模块
- 功能: 控制远程被控机的服务。支持 init 启动服务的系统(包括 BSD init,OpenRC,SysV,
Solaris SMF,systemd,upstart)。 - 注意点:
- 例子:
root@ubuntu1904:~#ansible webwebsrvss -m service -a 'name=httpd state=started enabled=yes'
root@ubuntu1904:~#ansible webwebsrvss -m service -a 'name=httpd state=stopped'
root@ubuntu1904:~#ansible webwebsrvss -m service -a 'name=httpd state=reloaded'
root@ubuntu1904:~#ansible webwebsrvss -m service -a 'name=httpd state=restarted'
4.5.13 User 模块
- 功能: 管理用户账号和属性
- 注意点:
- 例子:
# 创建系统用户nginx
root@ubuntu1904:~#ansible webwebsrvss -m user -a 'name=nginx  groups="root,daemon" system=yes shell=/sbin/nologin createhome=no home=/data/nginx non_unique=yes'
172.20.1.67 | CHANGED => {"changed": true,"comment": "","create_home": false,"group": 995,"groups": "root,daemon","home": "/data/nginx","name": "nginx","shell": "/sbin/nologin","state": "present","system": true,"uid": 995
}
172.20.1.69 | CHANGED => {"changed": true,"comment": "","create_home": false,"group": 992,"groups": "root,daemon","home": "/data/nginx","name": "nginx","shell": "/sbin/nologin","state": "present","system": true,"uid": 994
}
172.20.1.68 | CHANGED => {"changed": true,"comment": "","create_home": false,"group": 995,"groups": "root,daemon","home": "/data/nginx","name": "nginx","shell": "/sbin/nologin","state": "present","system": true,"uid": 995
}
# 删除用户
root@ubuntu1904:~#ansible webwebsrvss -m user -a 'name=nginx state=absent remove=yes'
172.20.1.69 | CHANGED => {"changed": true,"force": false,"name": "nginx","remove": true,"state": "absent","stderr": "userdel: nginx mail spool (/var/spool/mail/nginx) not found\nuserdel: nginx home directory (/data/nginx) not found\n","stderr_lines": ["userdel: nginx mail spool (/var/spool/mail/nginx) not found","userdel: nginx home directory (/data/nginx) not found"]
}
......
4.5.14 Group 模块
- 功能: 管理用户组
- 注意点:
- 例子:
# 创建组
root@ubuntu1904:~#ansible webwebsrvss -m group -a 'name=nginx gid=123 state=present system=yes'
172.20.1.69 | CHANGED => {"changed": true,"gid": 123,"name": "nginx","state": "present","system": true
}
172.20.1.67 | CHANGED => {"changed": true,"gid": 123,"name": "nginx","state": "present","system": true
}
172.20.1.68 | CHANGED => {"changed": true,"gid": 123,"name": "nginx","state": "present","system": true
}
root@ubuntu1904:~#ansible webwebsrvss -a 'getent group nginx'
172.20.1.69 | CHANGED | rc=0 >>
nginx:x:123:172.20.1.68 | CHANGED | rc=0 >>
nginx:x:123:172.20.1.67 | CHANGED | rc=0 >>
nginx:x:123:# 删除组
root@ubuntu1904:~#ansible webwebsrvss -m group -a 'name=nginx state=absent'
4.5.15 Setup 模块
- 功能: setup 模块会手机远程被控主机的详细信息,其自带的记录远程主机的变量可以用于 playbook
- 注意点:
- 例子:
root@ubuntu1904:~#ansible webwebsrvss -m setup
172.20.1.67 | SUCCESS => {"ansible_facts": {"ansible_all_ipv4_addresses": ["172.20.1.67"],"ansible_all_ipv6_addresses": ["fe80::4d59:6b61:25f9:d67d"],"ansible_apparmor": {"status": "disabled"},
......
root@ubuntu1904:~#ansible websrvs -m setup -a "filter=ansible_nodename"
root@ubuntu1904:~#ansible websrvs -m setup -a "filter=ansible_hostname"
root@ubuntu1904:~#ansible websrvs -m setup -a "filter=ansible_domain"
root@ubuntu1904:~#ansible websrvs -m setup -a "filter=ansible_memtotal_mb"
root@ubuntu1904:~#ansible websrvs -m setup -a "filter=ansible_memory_mb"
root@ubuntu1904:~#ansible websrvs -m setup -a "filter=ansible_memfree_mb"
root@ubuntu1904:~#ansible websrvs -m setup -a "filter=ansible_os_family"
root@ubuntu1904:~#ansible websrvs -m setup -a "filter=ansible_distribution_major_version"
root@ubuntu1904:~#ansible websrvs -m setup -a "filter=ansible_distribution_version"
root@ubuntu1904:~#ansible websrvs -m setup -a "filter=ansible_processor_vcpus"
root@ubuntu1904:~#ansible websrvs -m setup -a "filter=ansible_all_ipv4_addresses"
root@ubuntu1904:~#ansible websrvs -m setup -a "filter=ansible_architecture"# 一些比较有用的参数
{{ ansible_default_ipv4.address }}
{{ansible_distribution}}
{{ansible_distribution_major_version}}
{{ansible_fqdn}}
{{ansible_hostname}}
{{ansible_machine}}
{{ansible_memtotal_mb}}
{{ansible_memory_mb.nocache.free}}
{{ansible_memory_mb.nocache.used}}
{{ansible_memory_mb.real.total}}
{{ansible_memory_mb.real.free}}
{{ansible_memory_mb.real.used}}
{{ansible_service_mgr}}
{{ansible_processor_cores}}
{{ansible_processor_count}}
{{ansible_processor_threads_per_core}}
{{ansible_pkg_mgr}}
相关文章:
ansible入门
ansible入门 一.ansible 背景介绍 Ansible 是一个广受欢迎的 IT 自动化系统。可以用来处理配置管理、应用自动化部署、云资源配给、网络 自动化和多借点部署等任务。其也可以使得复杂的变更如带负载均衡的零停机滚动更新更加容易。Ansible.com 1.1 自动化运维概念 1.1.1 运维…...

用Node.js吭哧吭哧撸一个运动主页
简单唠唠 某乎问题:人这一生,应该养成哪些好习惯? 问题链接:https://www.zhihu.com/question/460674063 如果我来回答肯定会有定期运动的字眼。 平日里也有煅练的习惯,时间久了后一直想把运动数据公开,…...

【C++】STL---vector
STL---vector 一、vector 的介绍二、vector 的模拟实现1. 容量相关的接口(1)size(2)capacity(3)reserve(4)resize(5)empty 2. [] 重载3. 迭代器4. 修改数据相…...

机器学习:基本介绍
机器学习介绍 Hnad-crafted rules Hand-crafted rules,叫做人设定的规则。那假设今天要设计一个机器人,可以帮忙打开或关掉音乐,那做法可能是这样: 设立一条规则,就是写一段程序。如果输入的句子里面看到**“turn of…...

基于长短期神经网络LSTM的碳排量预测,基于LSTM的碳排放量预测
目录 背影 摘要 LSTM的基本定义 LSTM实现的步骤 基于长短期神经网络LSTM的碳排放量预测 完整代码: 基于长短期神经网络LSTM的碳排放量预测,基于LSTM的碳排放量预测资源-CSDN文库 https://download.csdn.net/download/abc991835105/88184632 效果图 结果分析 展望 参考论文 背…...
日常BUG——SpringBoot关于父子工程依赖问题
😜作 者:是江迪呀✒️本文关键词:日常BUG、BUG、问题分析☀️每日 一言 :存在错误说明你在进步! 一、问题描述 在父子工程A和B中。A依赖于B,但是A中却无法引入B中的依赖,具体出现的…...
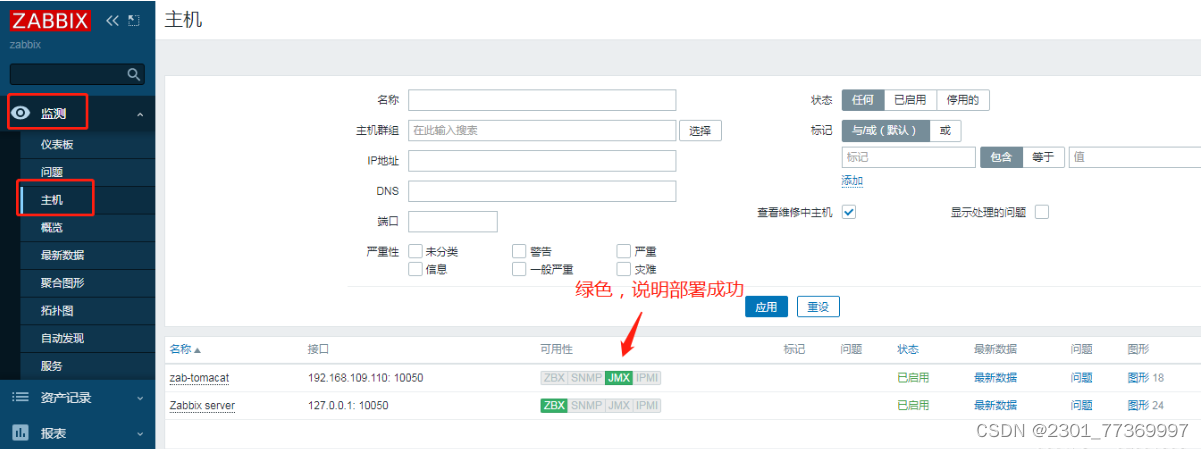
Zabbix监控tomcat
文章目录 一、安装部署TomcatTomcat二、安装Tomcat1.安装zabbix-agent收集监控数据(192.168.40.104)2.安装部署Zabbix-server(192.168.40.105)3.配置数据库 三、Zabbix监控Tomcat页面设置 实验环境 主机用途Centos7:192.168.40.105zabbix-server,zabbix-java-gatew…...
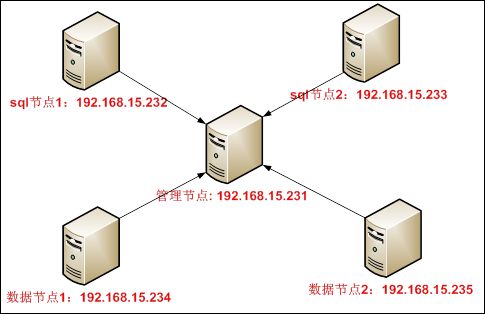
CentOS-6.3安装MySQL集群
安装要求 安装环境:CentOS-6.3 安装方式:源码编译安装 软件名称:mysql-cluster-gpl-7.2.6-linux2.6-x86_64.tar.gz 下载地址:http://mysql.mirror.kangaroot.net/Downloads/ 软件安装位置:/usr/local/mysql 数据存放位…...

项目管理的艺术:掌握成本效益分析
引言 在项目管理中,我们经常面临着如何有效地使用有限的资源来实现项目目标的挑战。为了解决这个问题,我们需要使用一种强大的工具——成本效益分析。通过成本效益分析,我们可以评估和比较不同的项目选项,选择最具成本效益的项目…...

护眼灯值不值得买?什么护眼灯对眼睛好
想要选好护眼台灯首先我们要知道什么是护眼台灯,大的方向来看,护眼台灯就是可以保护视力的台灯,深入些讲就是具备让灯发出接近自然光特性的光线,同时光线不会伤害人眼而出现造成眼部不适甚至是视力降低的照明设备。 从细节上看就…...

【设备树笔记整理4】内核对设备树的处理
1 从源头分析_内核head.S对dtb的简单处理 1.1 bootloader向内核传递的参数 (1)bootloader启动内核时,会设置r0,r1,r2三个寄存器: r0一般设置为0;r1一般设置为machine_id (在使用设备树时该参数没有被使用…...

算法通关村第七关——递归和迭代实现二叉树前中后序遍历
1.递归 1.1 熟悉递归 所有的递归有两个基本特征: 执行时范围不断缩小,这样才能触底反弹。终止判断在调用递归的前面。 写递归的步骤: 从小到大递推。分情况讨论,明确结束条件。组合出完整方法。想验证就从大到小画图推演。 …...
Datawhale Django后端开发入门Task01 Vscode配置环境
首先呢放一张运行成功的截图纪念一下,感谢众多小伙伴的帮助呀,之前没有配置这方面的经验 ,但还是一步一步配置成功了,所以在此以一个纯小白的经验分享如何配置成功。 1.选择要建立项目的文件夹,打开文件找到目标文件夹…...

django部署到centos服务器上
具体的操作步骤 步骤一 更新系统和安装依赖, sudo yum update sudo yum install python3 python3-pip python3-devel git步骤二:创建并激活虚拟环境 在终端中执行以下命令: python3 -m venv myenv source myenv/bin/activate可以不创建虚拟…...
IOS开发-XCode14介绍与入门
IOS开发-XCode14介绍与入门 1. XCODE14的小吐槽2. XCODE的功能bar一览3. XCODE项目配置一览4. XCODE更改DEBUG/RELEASE模式5. XCODE单元测试 1. XCODE14的小吐槽 iOS开发工具一直有个毛病,就是新版本的开发工具的总会有一些奇奇怪怪的bug。比如在我的Mac-Pro&#…...
)
Interactive Marker Publish Pose All the Time (Interactive Marker通过topic一直发送其状态)
以下代码实现了:Interactive Marker通过topic一直发送其状态,而不只是交互时才发送。 几个要点: 通过定时器rospy.Timer实现PublishInteractiveMarkerServer feedback.pose的类型是geometry_msgs/Pose,而不是geometry_msgs/PoseS…...

前后端分离------后端创建笔记(04)前后端对接
本文章转载于【SpringBootVue】全网最简单但实用的前后端分离项目实战笔记 - 前端_大菜007的博客-CSDN博客 仅用于学习和讨论,如有侵权请联系 源码:https://gitee.com/green_vegetables/x-admin-project.git 素材:https://pan.baidu.com/s/…...

一站式自动化测试平台-Autotestplat
3.1 自动化平台开发方案 3.1.1 功能需求 3.1.3 开发时间计划 如果是刚入门、但有一点代码基础的测试人员,大概 3 个月能做出演示版(Demo)进行自动化测试,6 个月内胜任开展工作中项目的自动化测试。 如果是有自动化测试基础的测试人员,大概 …...

Ansible Service模块,使用 Ansible Service模块进行服务管理
Ansible 是一种自动化工具,它可以简化配置管理、应用程序部署和任务自动化等操作。Ansible 的 Service 模块是其中一个重要的模块,它提供了管理服务的功能,使得在远程主机上启动、停止、重启和重新加载服务变得简单和可靠。本文将介绍 Ansibl…...

共识算法初探
共识机制的背景 加密货币都是去中心化的,去中心化的基础就是P2P节点众多,那么如何吸引用户加入网络成为节点,有那些激励机制?同时,开发的重点是让多个节点维护一个数据库,那么如何决定哪个节点写入&#x…...

用PyTorch复现FactorVAE:一个能同时预测收益和风险的量化模型实战教程
用PyTorch实战FactorVAE:构建收益与风险双预测的量化模型 在量化投资领域,传统线性因子模型正逐渐被非线性机器学习方法所取代。然而金融数据特有的低信噪比特性,使得直接从市场数据中提取有效因子成为一项艰巨挑战。本文将深入探讨如何利用P…...

AB包相关知识
Lua与AB包/Addressables以及YooAsset 摘自千问: Lua 是菜谱(逻辑):决定了菜怎么做,味道如何。因为你需要随时换菜谱(热更新),所以菜谱不能死板地印在墙上(编译进主包&a…...

基于EMA与轻量级机器学习的Wi-Fi链路质量预测实战
1. 项目概述与核心价值在工业自动化、仓储物流和智能制造等场景里,无线网络的稳定性正变得前所未有的重要。想象一下,一个自动导引运输车(AGV)正在执行物料搬运任务,或者一个机械臂正在与中央控制系统进行实时数据同步…...

Claude Code + LM Studio + CC-Switch 本地自动化编程部署指南
Claude Code LM Studio CC-Switch 本地自动化编程部署指南 本指南汇总了在 Windows 本地环境下,使用 Claude Code 配合 LM Studio 本地模型、CC-Switch 代理进行自动化编程开发的完整配置方案。 目录 硬件与模型选型LM Studio 本地模型部署CC-Switch 代理配置Cla…...

AI 应用原型开发阶段利用 Taotoken 快速进行多模型效果对比
🚀 告别海外账号与网络限制!稳定直连全球优质大模型,限时半价接入中。 👉 点击领取海量免费额度 AI 应用原型开发阶段利用 Taotoken 快速进行多模型效果对比 在构建一个 AI 应用的原型时,开发者常常面临一个核心问题&…...

鼎讯AM-601光纤熔接机:交通通信建设与维护的可靠伙伴
在铁路、高速公路等交通基础设施的智能化建设中,稳定高效的光纤网络是指挥调度、安全监控等核心系统运行的生命线。鼎讯AM-601光纤熔接机,作为一款专为严苛环境设计的六马达便携式熔接设备,正成为保障这些关键通信链路畅通无阻的可靠选择。无…...

保姆级教程:Multisim 14.0 从下载到汉化,手把手教你避开安装过程中的那些坑
Multisim 14.0 终极安装指南:从零开始到完美汉化的全流程解析 对于电子工程和自动化领域的学习者与从业者而言,Multisim 14.0 无疑是一款不可或缺的电路设计与仿真工具。然而,许多用户在初次安装过程中常常遇到各种棘手问题,导致软…...

OpenCore Legacy Patcher终极教程:如何让老旧Mac重获新生,运行最新macOS
OpenCore Legacy Patcher终极教程:如何让老旧Mac重获新生,运行最新macOS 【免费下载链接】OpenCore-Legacy-Patcher Experience macOS just like before 项目地址: https://gitcode.com/GitHub_Trending/op/OpenCore-Legacy-Patcher 还在为老旧Ma…...

Frida-Agent-Example实战指南:Native层动态插桩核心原理与工程落地
1. 这不是“又一个 Frida 教程”,而是一份能直接进项目、改代码、抓数据的实战手记你有没有遇到过这样的场景:App 里某个关键接口返回的数据结构藏在层层混淆的 Java/Kotlin 方法里,反编译出来的 smali 逻辑像天书;或者某个加密参…...

大语言模型在嵌入式系统开发中的应用与挑战
1. 嵌入式系统开发与大语言模型的碰撞 在智能家居、工业自动化和物联网设备蓬勃发展的今天,嵌入式系统作为连接数字世界与物理世界的桥梁,其开发复杂度正呈指数级增长。传统嵌入式开发要求工程师同时具备三大核心能力:理解电子元件特性与电路…...