Android 基础知识4-2.8 TableLayout(表格布局)详解
一、TableLayout的概述
表格布局是以行数和列数来确定位置进行排列。就像一间教室,确定好行数与列数就能让同学有序入座。
注意:我们需要先添加<TableRow容器,每添加一个就会多一行,然后再往<TableRow容器中添加其它组件。
二、TableLayout的属性
2.1 、TableLayout(表格布局)的样式,就像是一张表格。每个TableLayout,都由多个TableRow组成,每个TableRow就是一行,有几个TableRow就有几行。TableLayout不会显示行号和列号,也没有分割线,其行数和列数都可以进行操作。
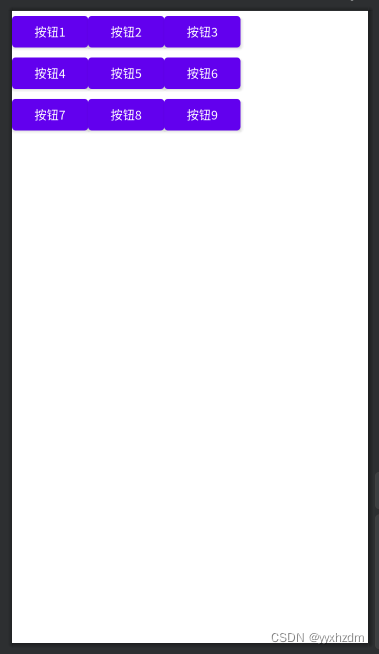
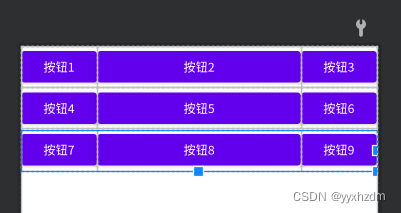
下面是 3 (行) x 3(列) 的TableLayout基本使用,其xml布局文件table_layout.xml如下:
<?xml version="1.0" encoding="utf-8"?>
<TableLayout xmlns:android="http://schemas.android.com/apk/res/android"android:layout_width="match_parent"android:layout_height="match_parent"><TableRow><Buttonandroid:id="@+id/button01"android:layout_width="wrap_content"android:layout_height="wrap_content"android:text="按钮1" /><Buttonandroid:id="@+id/button02"android:layout_width="wrap_content"android:layout_height="wrap_content"android:text="按钮2" /><Buttonandroid:id="@+id/button03"android:layout_width="wrap_content"android:layout_height="wrap_content"android:text="按钮3" /></TableRow><TableRow><Buttonandroid:id="@+id/button04"android:layout_width="wrap_content"android:layout_height="wrap_content"android:text="按钮4" /><Buttonandroid:id="@+id/button05"android:layout_width="wrap_content"android:layout_height="wrap_content"android:text="按钮5" /><Buttonandroid:id="@+id/button06"android:layout_width="wrap_content"android:layout_height="wrap_content"android:text="按钮6" /></TableRow><TableRow><Buttonandroid:id="@+id/button07"android:layout_width="wrap_content"android:layout_height="wrap_content"android:text="按钮7" /><Buttonandroid:id="@+id/button08"android:layout_width="wrap_content"android:layout_height="wrap_content"android:text="按钮8" /><Buttonandroid:id="@+id/button09"android:layout_width="wrap_content"android:layout_height="wrap_content"android:text="按钮9" /></TableRow>
</TableLayout>
效果图:
2.2 、TableLayout的android:shrinkColumns属性,当TableRow里边的空间布满布局的时候,指定列自动延伸以填充可用部分。当TableRow里边的控件还没有布满布局时,android:shrinkColumns不起作用。
下面的布局文件table_layout2.xml,演示了android:shrinkColumns属性的使用:
<?xml version="1.0" encoding="utf-8"?>
<TableLayout xmlns:android="http://schemas.android.com/apk/res/android"android:layout_width="match_parent"android:layout_height="match_parent"android:shrinkColumns="2"><TableRow><Buttonandroid:id="@+id/button01"android:layout_width="wrap_content"android:layout_height="wrap_content"android:text="按钮1" /><!-- android:text="按钮1AAAAAAAAAAAAAAA" --><Buttonandroid:id="@+id/button02"android:layout_width="wrap_content"android:layout_height="wrap_content"android:text="按钮2" /><!-- android:text="按钮2AAAAAAAAAAAAAAA" --><Buttonandroid:id="@+id/button03"android:layout_width="wrap_content"android:layout_height="wrap_content"android:text="按钮3AAAAAAAAAAAAAAA" /></TableRow><TableRow><Buttonandroid:id="@+id/button04"android:layout_width="wrap_content"android:layout_height="wrap_content"android:text="按钮4" /><Buttonandroid:id="@+id/button05"android:layout_width="wrap_content"android:layout_height="wrap_content"android:text="按钮5" /><Buttonandroid:id="@+id/button06"android:layout_width="wrap_content"android:layout_height="wrap_content"android:text="按钮6" /></TableRow><TableRow><Buttonandroid:id="@+id/button07"android:layout_width="wrap_content"android:layout_height="wrap_content"android:text="按钮7" /><Buttonandroid:id="@+id/button08"android:layout_width="wrap_content"android:layout_height="wrap_content"android:text="按钮8" /><Buttonandroid:id="@+id/button09"android:layout_width="wrap_content"android:layout_height="wrap_content"android:text="按钮9" /></TableRow>
</TableLayout>
效果图:
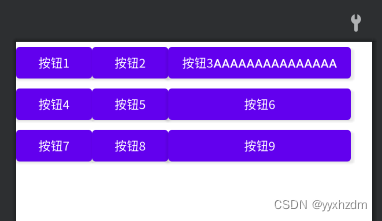
 从上面的实际效果图片可以看到,当TableLayout设置了android:shrinkColumns属性,则在TableRow中的控件如果超长的话,设置指定的列为可收缩的列。当可收缩的列太宽(内容过多)不会被挤出屏幕。当需要设置多列为可收缩时,将列序号用逗号隔开。
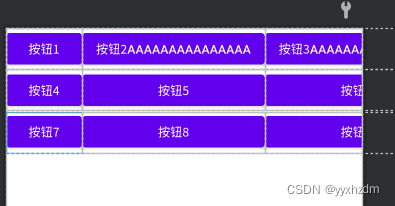
2.3 、下面的布局文件table_layout3.xml,演示了没有设置android:shrinkColumns属性,则在TableRow中的控件超长,也不会自动延伸以填充可用部分。
<?xml version="1.0" encoding="utf-8"?>
<TableLayout xmlns:android="http://schemas.android.com/apk/res/android"android:layout_width="match_parent"android:layout_height="match_parent"><TableRow><Buttonandroid:id="@+id/button01"android:layout_width="wrap_content"android:layout_height="wrap_content"android:text="按钮1" /><!-- android:text="按钮1AAAAAAAAAAAAAAA" --><Buttonandroid:id="@+id/button02"android:layout_width="wrap_content"android:layout_height="wrap_content"android:text="按钮2AAAAAAAAAAAAAAA" /><!-- android:text="按钮2" --><Buttonandroid:id="@+id/button03"android:layout_width="wrap_content"android:layout_height="wrap_content"android:text="按钮3AAAAAAAAAAAAAAA" /></TableRow><TableRow><Buttonandroid:id="@+id/button04"android:layout_width="wrap_content"android:layout_height="wrap_content"android:text="按钮4" /><Buttonandroid:id="@+id/button05"android:layout_width="wrap_content"android:layout_height="wrap_content"android:text="按钮5" /><Buttonandroid:id="@+id/button06"android:layout_width="wrap_content"android:layout_height="wrap_content"android:text="按钮6" /></TableRow><TableRow><Buttonandroid:id="@+id/button07"android:layout_width="wrap_content"android:layout_height="wrap_content"android:text="按钮7" /><Buttonandroid:id="@+id/button08"android:layout_width="wrap_content"android:layout_height="wrap_content"android:text="按钮8" /><Buttonandroid:id="@+id/button09"android:layout_width="wrap_content"android:layout_height="wrap_content"android:text="按钮9" /></TableRow>
</TableLayout>
效果图:
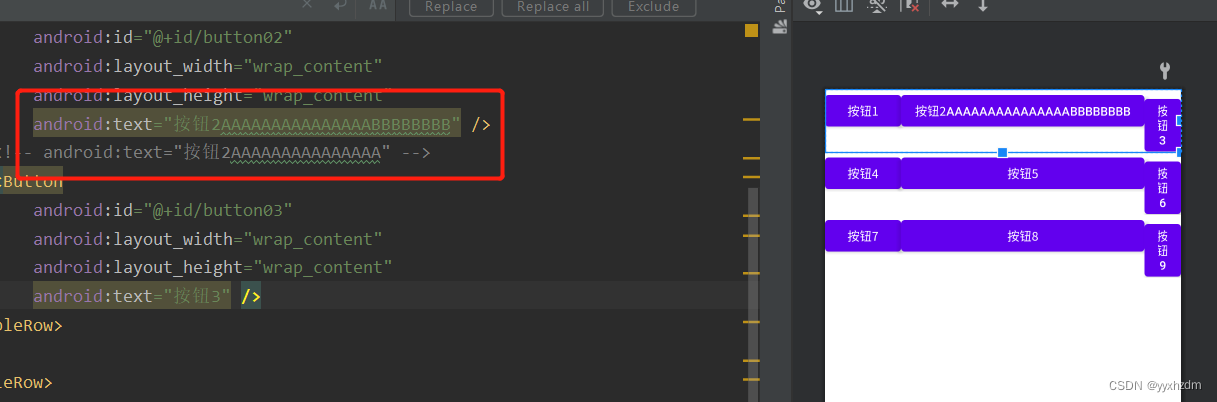
2.4、TableLayout的android:stretchColumns属性,用于指定列对空白部分进行填充。
下面的布局文件table_layout4.xml,演示了android:stretchColumns属性的使用:
<?xml version="1.0" encoding="utf-8"?>
<TableLayout xmlns:android="http://schemas.android.com/apk/res/android"android:layout_width="match_parent"android:layout_height="match_parent"android:stretchColumns="1"><TableRow><Buttonandroid:id="@+id/button01"android:layout_width="wrap_content"android:layout_height="wrap_content"android:text="按钮1"/><Buttonandroid:id="@+id/button02"android:layout_width="wrap_content"android:layout_height="wrap_content"android:text="按钮2"/><!-- android:text="按钮2" --><Buttonandroid:id="@+id/button03"android:layout_width="wrap_content"android:layout_height="wrap_content"android:text="按钮3"/></TableRow><TableRow><Buttonandroid:id="@+id/button04"android:layout_width="wrap_content"android:layout_height="wrap_content"android:text="按钮4"/><Buttonandroid:id="@+id/button05"android:layout_width="wrap_content"android:layout_height="wrap_content"android:text="按钮5"/><Buttonandroid:id="@+id/button06"android:layout_width="wrap_content"android:layout_height="wrap_content"android:text="按钮6"/></TableRow><TableRow><Buttonandroid:id="@+id/button07"android:layout_width="wrap_content"android:layout_height="wrap_content"android:text="按钮7"/><Buttonandroid:id="@+id/button08"android:layout_width="wrap_content"android:layout_height="wrap_content"android:text="按钮8"/><Buttonandroid:id="@+id/button09"android:layout_width="wrap_content"android:layout_height="wrap_content"android:text="按钮9"/></TableRow>
</TableLayout>
效果图:
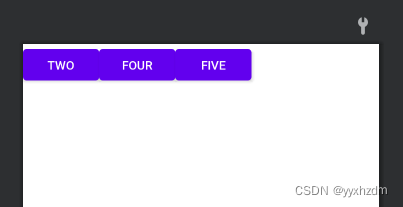
2.5、collapseColumns(隐藏列)
流程:在TableRow中定义5个按钮后,接着在最外层的TableLayout中添加以下属性:
android:collapseColumns = “0,2”,就是隐藏第一与第三列,代码如下:
<?xml version="1.0" encoding="utf-8"?>
<TableLayout xmlns:android="http://schemas.android.com/apk/res/android"android:layout_width="match_parent"android:layout_height="match_parent"android:stretchColumns="1"><TableLayoutandroid:id="@+id/TableLayout2"android:layout_width="fill_parent"android:layout_height="wrap_content"android:collapseColumns="0,2"><TableRow><Buttonandroid:layout_width="wrap_content"android:layout_height="wrap_content"android:text="one" /><Buttonandroid:layout_width="wrap_content"android:layout_height="wrap_content"android:text="two" /><Buttonandroid:layout_width="wrap_content"android:layout_height="wrap_content"android:text="three" /><Buttonandroid:layout_width="wrap_content"android:layout_height="wrap_content"android:text="four" /><Buttonandroid:layout_width="wrap_content"android:layout_height="wrap_content"android:text="five" /></TableRow></TableLayout>
</TableLayout>
效果图:
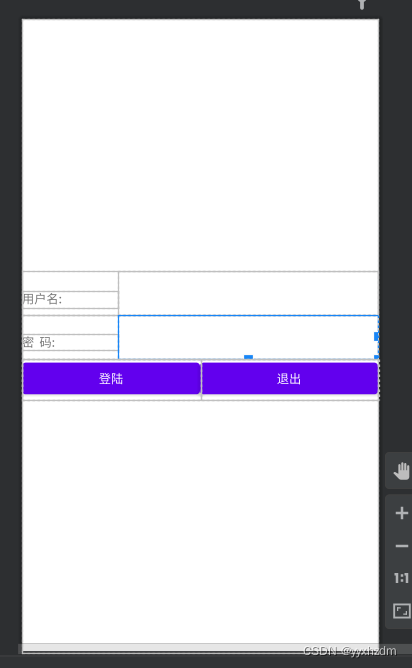
三、使用实例
使用TableLayout来完成简单的登录界面,运行效果图如下:
流程解析:
(1).调用gravity属性,设置为center_vertical,让布局里面的组件在竖直方向上居中
(2).将TableLayout中的第一和第四列设置为可拉伸
(3).在每个TableRow中添加两个TextView,用于拉伸填满该行,这样可以让表格水平居中
android:stretchColumns=”0,3” 设置为0.3,是为了让两边都充满,那么中间部分就可以居中了
<TableLayout xmlns:android="http://schemas.android.com/apk/res/android"android:id="@+id/TableLayout1"android:layout_width="match_parent"android:layout_height="match_parent"android:background="#FFFFFF"android:gravity="center_vertical"android:stretchColumns="0,3"><TableRow><TextViewandroid:layout_width="wrap_content"android:layout_height="wrap_content"android:text="用户名:" /><EditTextandroid:layout_width="wrap_content"android:layout_height="wrap_content"android:minWidth="300dp" /></TableRow><TableRow><TextViewandroid:layout_width="wrap_content"android:layout_height="wrap_content"android:text="密 码:" /><EditTextandroid:layout_width="wrap_content"android:layout_height="wrap_content"android:minWidth="300dp" /></TableRow><TableRow><Buttonandroid:layout_width="0dp"android:layout_height="wrap_content"android:layout_weight="1"android:text="登陆" /><Buttonandroid:layout_width="0dp"android:layout_height="wrap_content"android:layout_weight="1"android:text="退出" /></TableRow></TableLayout>
效果图:
相关文章:
Android 基础知识4-2.8 TableLayout(表格布局)详解
一、TableLayout的概述 表格布局是以行数和列数来确定位置进行排列。就像一间教室,确定好行数与列数就能让同学有序入座。 注意:我们需要先添加<TableRow容器,每添加一个就会多一行,然后再往<TableRow容器中添加其它组件。…...

SQL代码编码原则和规范
目录1、先了解MySQL的执行过程2、数据库常见规范3、所有表必须使用Innodb存储引擎4、每个Innodb表必须有个主键5、数据库和表的字符集统一使用UTF86、查询SQL尽量不要使用select *,而是具体字段7、避免在where子句中使用 or 来连接条件8、尽量使用数值替代字符串类型…...

【博客627】gobgp服务无损变更:graceful restart特性
gobgp服务无损变更:graceful restart特性 场景 当我们的bgp网关在对外宣告bgp路由的时候,如果我们网关有新的特性要发布,那么此时如果把网关停止再启动新版本,此时bgp路由会有短暂撤回再播出的过程,会有网络抖动 期待…...

一起学 pixijs(1):常见图形的绘制
大家好,我是前端西瓜哥。 pixijs 是一个强大的 Web Canvas 2D 库,以其强大性能而著称。其底层使用了 WebGL 实现了硬件加速,当然如果不支持的话,也能回退为 Canvas。 本文使用的 pixijs 版本为 7.1.2。 Application Applicati…...
2023年PMP考试教材有哪些?(含pmp资料)
PMP考试教材是《PMBOK指南》,但这次的考试因为大纲的更新,而需要另外的敏捷书籍来备考。且官方发了通知,3、5月还是第六版指南,8月及8月之后,使用第七版教材。 新版考纲将专注于以下三个新领域: 人 – 强调与有效领导项…...

centos7防火墙工具firewall-cmd使用
centos7防火墙工具firewall-cmd使用防火墙概述centos7防火墙工具firewall-cmd使用介绍firewalld的基本使用服务管理工具相关指令配置firewalld-cmd防火墙概述 防火墙是可以帮助计算机在内部网络和外部网络之间构建一道相对隔绝的保护屏障,从而保护数据信息的一种技…...

js html过滤所有标签格式并清除所有nbsp;
var odiv document.getElementsByTagName("*"); for(var i 0; i<odiv.length; i){ if(odiv[i].className newDetail){ let obj odiv[i].childNodes[3]; let oldHtml odiv[i].childNodes[3].innerText;//获取html中不带标签内容 //console.log(odiv[i].childN…...
「技术选型」深度学习软件如何选择?
深度学习(DL, Deep Learning)是机器学习(ML, Machine Learning)领域中一个新的研究方向,它被引入机器学习使其更接近于最初的目标——人工智能(AI, Artificial Intelligence)。 深度学习是学习样本数据的内在规律和表示层次,这些学习过程中获得的信息对…...
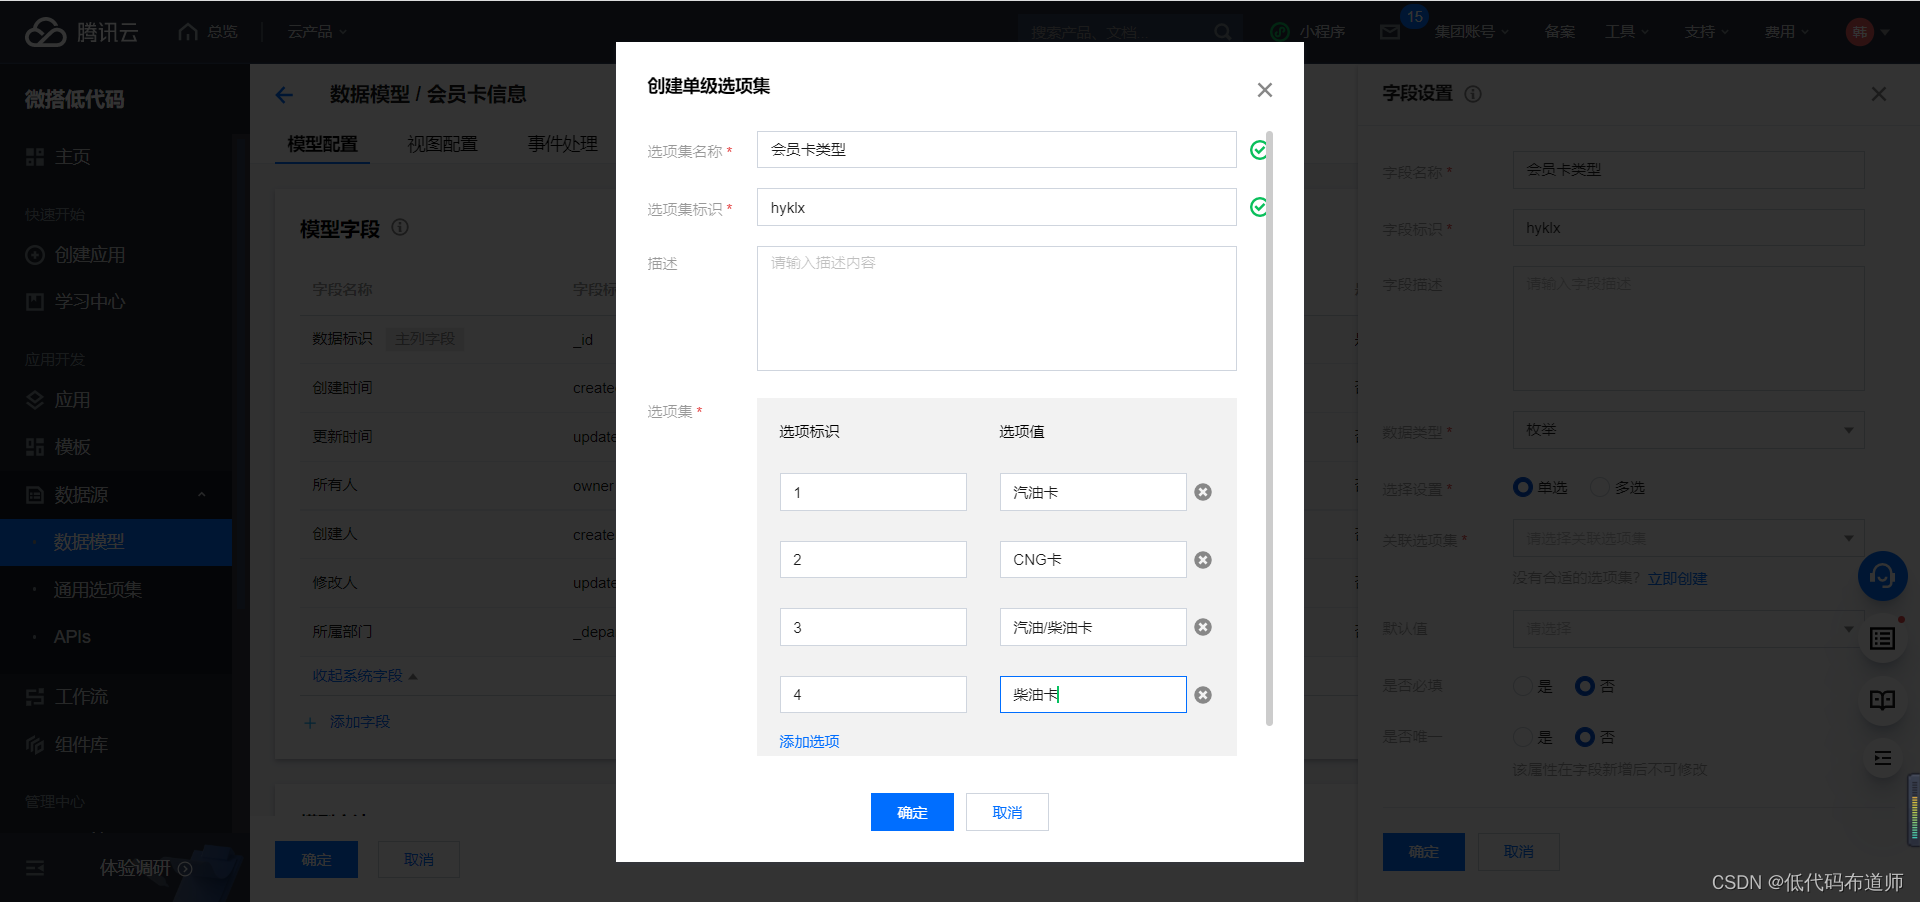
加油站会员管理小程序实战开发教程13
我们上一篇讲解了会员注册的功能,本篇我们介绍一下会员开卡的功能。 会员注册之后,可以进行开卡的动作。一个会员可以有多张会员卡,在微搭中用来描述这种一对多的关系的,我们用关联关系来表达。 登录微搭的控制台,点击数据模型,点击新建数据模型 输入数据源的名称会员卡…...
Go语言Web入门之浅谈Gin框架
Gin框架Gin简介第一个Gin示例HelloworldRESTful APIGin返回数据的几种格式Gin 获取参数HTTP重定向Gin路由&路由组Gin框架当中的中间件Gin简介 Gin 是一个用 Go (Golang) 编写的 web 框架。它是一个类似于 martini 但拥有更好性能的 API 框架,由于 httprouter&a…...
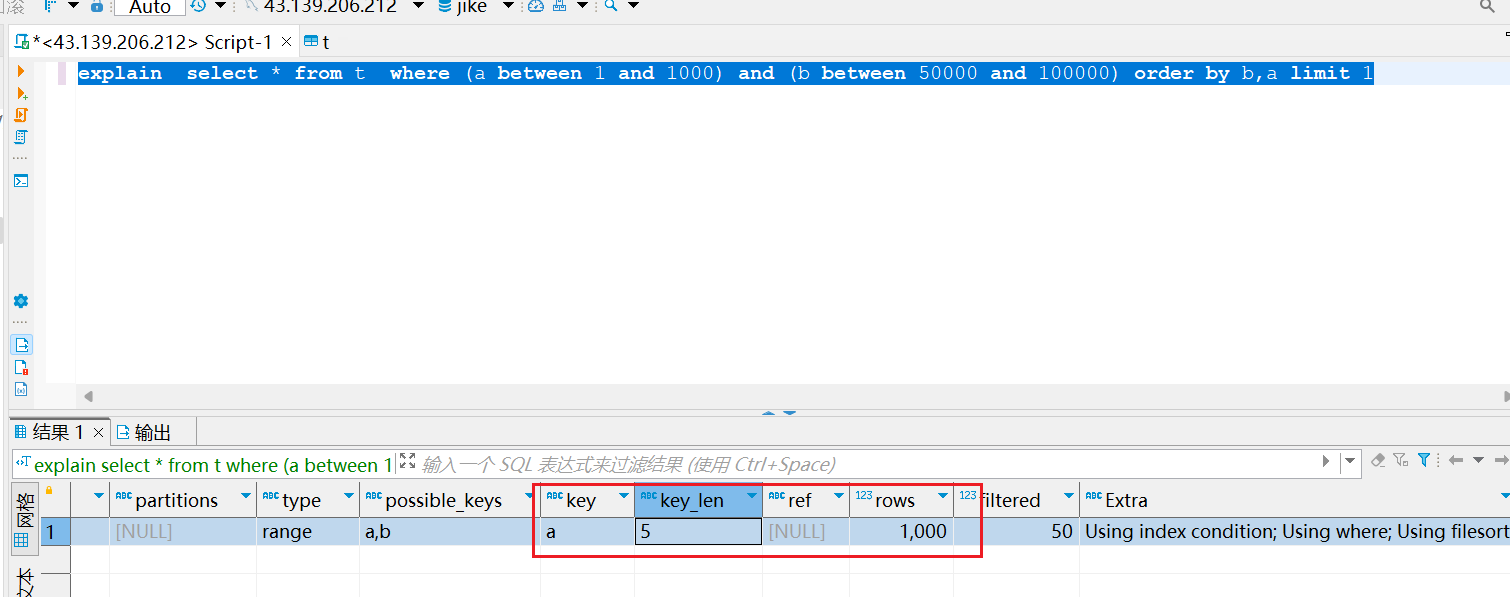
《MySQL学习》 MySQL优化器选择如何选择索引
一.优化器的选择逻辑 建表语句 CREATE TABLE t (id int(11) NOT NULL AUTO_INCREMENT,a int(11) DEFAULT NULL,b int(11) DEFAULT NULL,PRIMARY KEY (id),KEY a (a),KEY b (b) ) ENGINEInnoDB;往表中插入10W条数据 delimiter ;; create procedure idata() begindeclare i in…...
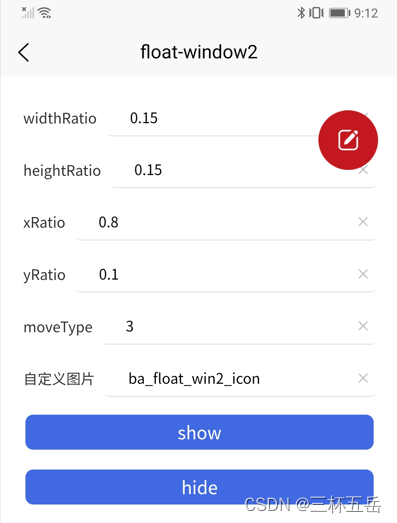
uniapp 悬浮窗(应用内、无需授权) Ba-FloatWindow2
简介(下载地址) Ba-FloatWindow2 是一款应用内并且无需授权的悬浮窗插件。支持多种拖动;自定义位置、大小;支持动态修改。 支持自动定义起始位置支持自定义悬浮窗大小支持贴边显示支持多种拖动方效果:不可拖动、任意…...
MMKV与mmap:全方位解析
概述 MMKV 是基于 mmap 内存映射的移动端通用 key-value 组件,底层序列化/反序列化使用 protobuf 实现,性能高,稳定性强。从 2015 年中至今,在 iOS 微信上使用已有近 3 年,其性能和稳定性经过了时间的验证。近期已移植…...
)
【信息系统项目管理师】项目管理十大知识领域记忆敲出(整体范围进度)
【信息系统项目管理师】项目管理十大知识领域记忆敲出(整体范围进度) 【信息系统项目管理师】项目管理十大知识领域记忆敲出(整体范围进度)【信息系统项目管理师】项目管理十大知识领域记忆敲出(整体范围进度ÿ…...

一起学 pixijs(3):Sprite
大家好,我是前端西瓜哥。今天来学习 pixijs 的 Sprite。 Sprite pixijs 的 Sprite 类用于将一些纹理(Texture)渲染到屏幕上。 Sprite 直译为 “精灵”,是游戏开发中常见的术语,就是将一个角色的多个动作放到一个图片…...

深入讲解Kubernetes架构-垃圾收集
垃圾收集(Garbage Collection)是 Kubernetes 用于清理集群资源的各种机制的统称。 垃圾收集允许系统清理如下资源:终止的 Pod已完成的 Job不再存在属主引用的对象未使用的容器和容器镜像动态制备的、StorageClass 回收策略为 Delete 的 PV 卷…...
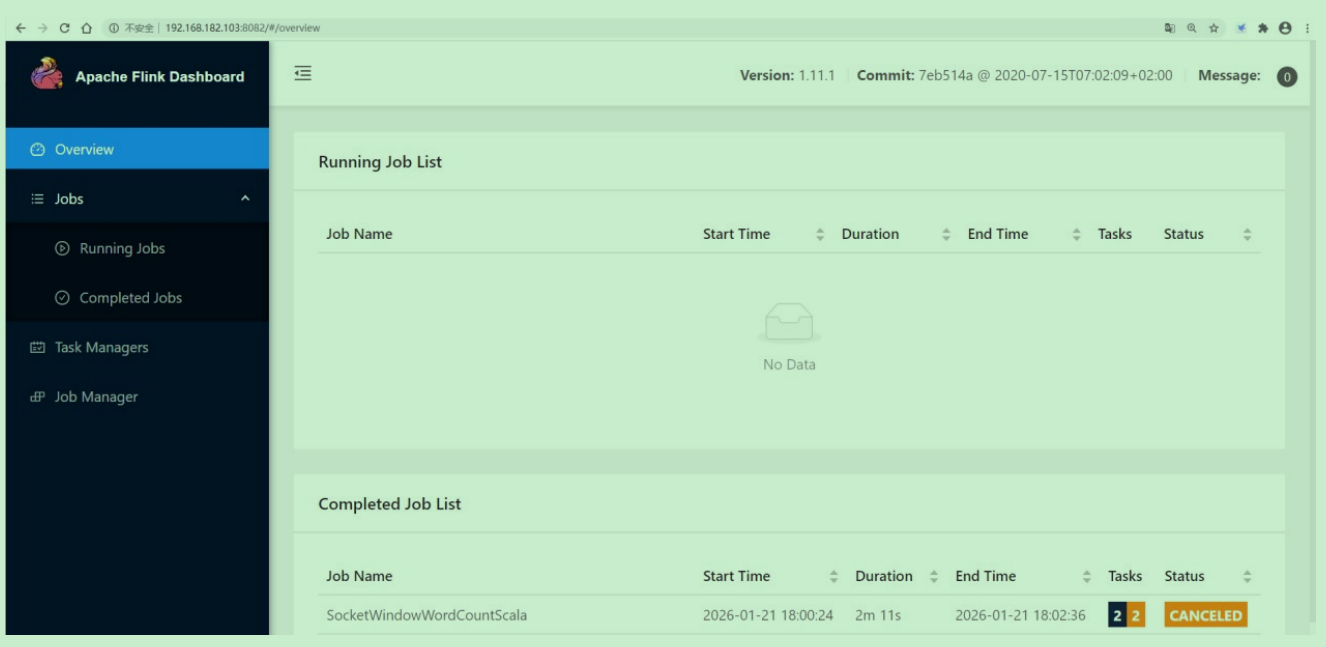
Flink03: 集群安装部署
Flink支持多种安装部署方式 StandaloneON YARNMesos、Kubernetes、AWS… 这些安装方式我们主要讲一下standalone和on yarn。 如果是一个独立环境的话,可能会用到standalone集群模式。 在生产环境下一般还是用on yarn 这种模式比较多,因为这样可以综合利…...
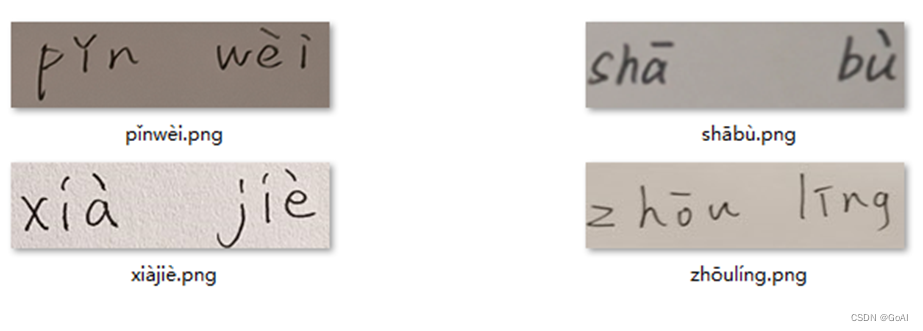
OCR项目实战(一):手写汉语拼音识别(Pytorch版)
✨写在前面:强烈推荐给大家一个优秀的人工智能学习网站,内容包括人工智能基础、机器学习、深度学习神经网络等,详细介绍各部分概念及实战教程,非常适合人工智能领域初学者及研究者学习。➡️点击跳转到网站。 📝OCR专栏…...
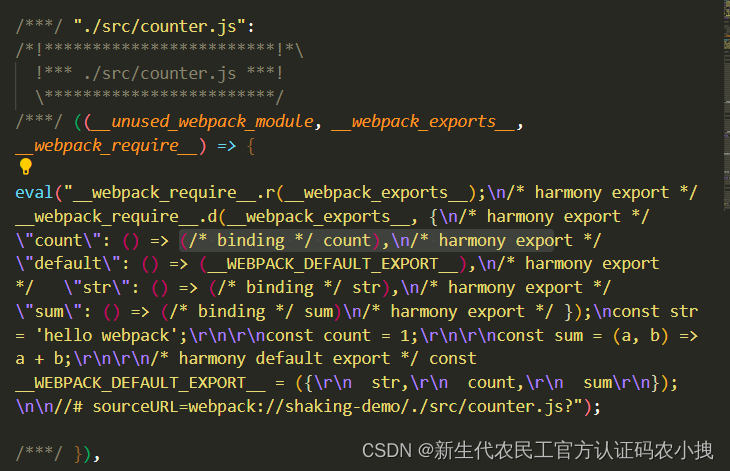
【js】export default也在影响项目性能呢
这里写目录标题介绍先说结论分析解决介绍 无意间看到一个关于export与exprot default对比的话题, 于是对二者关于性能方面,有了想法,二者的区别,仅仅是在于写法吗? 于是,有了下面的测试。 先说结论 太长…...

《软件安全》 彭国军 阅读总结
对于本书,小编本意是对其讲述的内容,分点进行笔记的整理,后来学习以后,发现,这本书应该不算是一本技术提升类的书籍,更像是一本领域拓展和知识科普类书籍,所讲知识广泛,但是较少实践…...

帆软报表FineReport连接Elasticsearch避坑指南:从插件安装到SQL编写的完整流程
帆软报表FineReport连接Elasticsearch全流程实战指南 在企业级数据分析领域,帆软报表FineReport与Elasticsearch的集成能够显著提升海量数据的可视化分析能力。本文将基于实际项目经验,系统梳理从环境准备到生产部署的完整链路,特别针对配置过…...

如何用Python快速接入Taotoken平台调用多模型API
🚀 告别海外账号与网络限制!稳定直连全球优质大模型,限时半价接入中。 👉 点击领取海量免费额度 如何用Python快速接入Taotoken平台调用多模型API 对于希望快速体验不同大模型能力的开发者而言,逐一对接各家厂商的API…...

基于API网关与Go的物联网设备管理平台架构设计与实践
1. 项目概述:一个为冲浪模拟器设计的API网关最近在折腾一个很有意思的项目,叫WindsurfPoolAPI。乍一看这个名字,你可能会联想到风帆冲浪或者游泳池,但实际上,它是一个为“冲浪模拟器”这类设备或应用场景设计的后端API…...

从零构建开源ADAS原型:车道检测、目标识别与PID控制实践
1. 项目概述:从零到一,构建一个开源的ADAS原型系统 最近几年,汽车行业最火的话题之一就是“智能驾驶”。无论是传统车企还是新势力,都在宣传自家的辅助驾驶功能,什么自适应巡航、车道保持、自动紧急制动,听…...

植物大战僵尸杂交版手机版最新版v3.16.1安卓2026最新下载分享
作为长期沉迷植物大战僵尸改版的老玩家,我近期完整体验了杂交版全新V3.16版本,从植物、关卡到平台适配,逐一实测验证。 整体来说,这是一次诚意满满的更新——既有新鲜玩法创新,又兼顾不同玩家需求。 下载链接&#x…...

2026届最火的AI科研神器横评
Ai论文网站排名(开题报告、文献综述、降aigc率、降重综合对比) TOP1. 千笔AI TOP2. aipasspaper TOP3. 清北论文 TOP4. 豆包 TOP5. kimi TOP6. deepseek 人工智能生成内容,也就是AIGC,它的广泛运用带来了效率的提升&#x…...

利用Taotoken多模型能力为AIGC应用构建智能降级链路
🚀 告别海外账号与网络限制!稳定直连全球优质大模型,限时半价接入中。 👉 点击领取海量免费额度 利用Taotoken多模型能力为AIGC应用构建智能降级链路 在构建面向真实用户的AIGC应用时,服务的稳定性直接影响用户体验。…...

NoFences:如何用开源方案解决Windows桌面管理难题
NoFences:如何用开源方案解决Windows桌面管理难题 【免费下载链接】NoFences 🚧 Open Source Stardock Fences alternative 项目地址: https://gitcode.com/gh_mirrors/no/NoFences Windows桌面图标管理长期困扰着用户,NoFences作为开…...

2026年南京本地实测整理,值得入手的高性价比全屋定制品牌推荐
讲真,南京准备装房子、换柜子的姊妹们、老少爷们,谁没为全屋定制头大过?刚收了江北核心区的新房,还是鼓楼老破小准备翻新,跑了三五家门店就会发现:水太深了!低价套餐勾你进去,签约后…...

AI LED调光控制器智能功率 MOSFET 完整选型方案
2026年随着 AI 技术在智能照明与调光控制中的深度渗透(如自适应色温、场景联动、人因节律照明),调光控制器对功率 MOSFET 提出更高要求:高精度PWM响应、超低导通损耗、高散热密度。微碧半导体(VBsemi)基于S…...