【C++ 学习 ⑬】- 详解 list 容器
目录
一、list 容器的基本介绍
二、list 容器的成员函数
2.1 - 迭代器
2.2 - 修改操作
三、list 的模拟实现
3.1 - list.h
3.2 - 详解 list 容器的迭代器
3.2 - test.cpp
一、list 容器的基本介绍
list 容器以类模板 list<T>(T 为存储元素的类型)的形式定义在 <list> 头文件中,并位于 std 命名空间中。
template < class T, class Alloc = allocator<T> > class list; list 是序列容器,允许在序列内的任意位置高效地插入和删除元素(时间复杂度是 O(1) 常数阶),其迭代器类型为双向迭代器(bidirectional iterator)。
list 容器的底层是以双向链表的形式实现的。
list 容器与 forward_list 容器非常相似,最主要的区别在于 forward_list 容器的底层是以单链表的形式实现的,其迭代器类型为前向迭代器(forward iterator)。
与其他标准序列容器(array、vector 和 deque)相比,list 容器在序列内已经获得迭代器的任意位置进行插入、删除元素时通常表现得更好。
与其他序列容器相比,list 容器和 forward_list 容器的最大缺点是不支持任意位置的随机访问,例如:要访问 list 中的第 6 个元素,必须从已知位置(比如头部或尾部)迭代到该位置,这需要线性阶的时间复杂度的开销。
二、list 容器的成员函数
2.1 - 迭代器
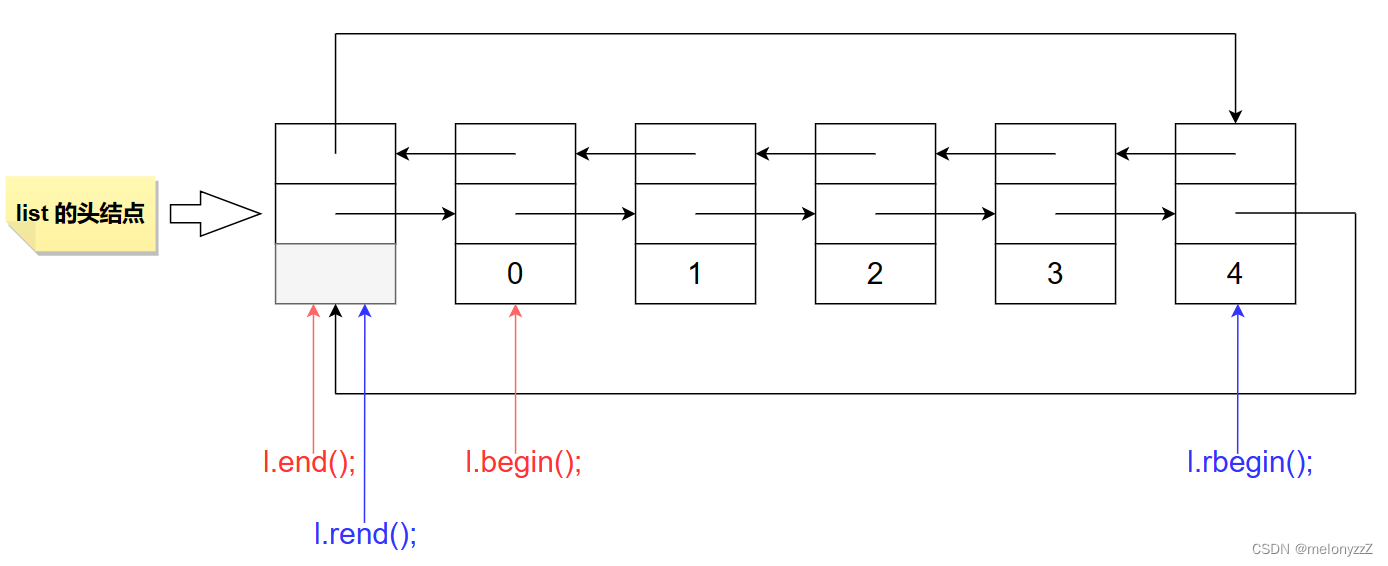
begin:
      iterator begin();
const_iterator begin() const;
end:
      iterator end();
const_iterator end() const;
rbegin:
      reverse_iterator rbegin();
const_reverse_iterator rbegin() const;
rend:
      reverse_iterator rend();
const_reverse_iterator rend() const;示例:
#include <iostream>
#include <list>
using namespace std;
int main()
{list<int> l;l.push_back(0);l.push_back(1);l.push_back(2);l.push_back(3);l.push_back(4);
for (list<int>::iterator it = l.begin(); it != l.end(); ++it){cout << *it << " ";}// 0 1 2 3 4cout << endl;
for (list<int>::reverse_iterator rit = l.rbegin(); rit != l.rend(); ++rit){cout << *rit << " ";}// 4 3 2 1 0cout << endl;return 0;
}
2.2 - 修改操作
push_front:
void push_front(const value_type& val);注意:value_type 等价于 T。
pop_front:
void pop_front();push_back:
void push_back(const value_type& val);pop_back:
void pop_back();insert:
// C++ 98
single element (1) iterator insert(iterator position, const value_type& val);fill (2)     void insert(iterator position, size_type n, const value_type& val);range (3) template <class InputIterator>void insert(iterator position, InputIterator first, InputIterator last);
相较于 vector,执行 list 的 insert 操作不会产生迭代器失效的问题。
示例一:
#include <iostream>
#include <list>
using namespace std;
int main()
{list<int> l;l.push_back(0);l.push_back(1);l.push_back(2);l.push_back(3);l.push_back(4);
// 要求:在第三个元素前面插入元素 100// l.insert(l.begin() + 2, 100); // error// 因为 list 对应的迭代器类型为双向迭代器,所以不支持加法操作,即没有重载该运算符
// 解决方案:list<int>::iterator it = l.begin();for (size_t i = 0; i < 2; ++i){++it;}l.insert(it, 100);
for (auto e : l){cout << e << " ";}// 0 1 100 2 3 4cout << endl;return 0;
}erase:
iterator erase(iterator position);
iterator erase(iterator first, iterator last);
因为节点被删除后,空间释放了,所以执行完 list 的 erase 操作,迭代器就失效了,而解决方案依然是通过返回值对迭代器进行重新赋值。
示例二:
#include <iostream>
#include <list>
using namespace std;
int main()
{list<int> l;l.push_back(0);l.push_back(1);l.push_back(2);l.push_back(3);l.push_back(4);
// 删除 list 中所有值为偶数的元素list<int>::iterator it = l.begin();while (it != l.end()){if (*it % 2 == 0)it = l.erase(it); // 直接写 l.erase(it); 会报错else++it;}
for (auto e : l){cout << e << " ";}// 1 3cout << endl;return 0;
}三、list 的模拟实现
3.1 - list.h
#pragma once
#include <iostream>
#include <assert.h>
namespace yzz
{template<class T>struct __list_node{__list_node<T>* _prev;__list_node<T>* _next;T _data;
__list_node(const T& val = T()): _prev(0), _next(0), _data(val){ }};
template<class T, class Ref, class Ptr>struct __list_iterator{typedef __list_iterator<T, Ref, Ptr> self;typedef __list_node<T> list_node;list_node* _pnode; // 节点指针
__list_iterator(list_node* p = 0): _pnode(p){ }
self& operator++(){_pnode = _pnode->_next;return *this;}
self operator++(int){self tmp(*this);_pnode = _pnode->_next;return tmp;}
self& operator--(){_pnode = _pnode->_prev;return *this;}
self operator--(int){self tmp(*this);_pnode = _pnode->_prev;return tmp;}
Ref operator*() const{return _pnode->_data;}
Ptr operator->() const{return &_pnode->_data;}
bool operator!=(const self& it) const{return _pnode != it._pnode;}
bool operator==(const self& it) const{return _pnode == it._pnode;}};
template<class T>class list{private:typedef __list_node<T> list_node;
void empty_initialize(){_phead = new list_node;_phead->_prev = _phead;_phead->_next = _phead;}
public:/*-------- 构造函数和析构函数 --------*/list(){empty_initialize();}
list(const list<T>& l) // 实现深拷贝{empty_initialize();for (auto& e : l){push_back(e);}}
~list(){clear();delete _phead;_phead = 0;}
/*-------- 赋值运算符重载 --------*/// 利用上面写好的拷贝构造函数实现深拷贝void swap(list<T>& l){std::swap(_phead, l._phead);}
list<T>& operator=(list<T> tmp){swap(tmp);return *this;}
/*-------- 迭代器 --------*/typedef __list_iterator<T, T&, T*> iterator;typedef __list_iterator<T, const T&, const T*> const_iterator;iterator begin(){return _phead->_next;// 等价于:return iterator(_phead);// 返回的过程中发生了隐式类型转换}
iterator end(){return _phead;}
const_iterator begin() const{return _phead->_next;// 等价于:return const_iterator(_phead->_next);}
const_iterator end() const{return _phead;}
/*-------- 容量操作 --------*/size_t size() const{size_t sz = 0;list_node* cur = _phead->_next;while (cur != _phead){++sz;cur = cur->_next;}return sz;}
bool empty() const{return _phead->_next == _phead;}
/*-------- 修改操作 --------*/iterator insert(iterator pos, const T& val){list_node* newnode = new list_node(val);newnode->_prev = pos._pnode->_prev;newnode->_next = pos._pnode;
pos._pnode->_prev->_next = newnode;pos._pnode->_prev = newnode;return newnode;}
void push_back(const T& val){// 方法一:/*list_node* newnode = new list_node(val);newnode->_prev = _phead->_prev;newnode->_next = _phead;
_phead->_prev->_next = newnode;_phead->_prev = newnode;*/
// 方法二(直接复用):insert(end(), val);}
void push_front(const T& val){// 方法一:/*list_node* newnode = new list_node(val);newnode->_prev = _phead;newnode->_next = _phead->_next;
_phead->_next->_prev = newnode;_phead->_next = newnode;*/
// 方法二(直接复用):insert(begin(), val);}
iterator erase(iterator pos){assert(pos != end()); // 前提是 list 非空list_node* prev_pnode = pos._pnode->_prev;list_node* next_pnode = pos._pnode->_next;prev_pnode->_next = next_pnode;next_pnode->_prev = prev_pnode;delete pos._pnode;return iterator(next_pnode);}
void pop_back(){erase(--end());}
void pop_front(){erase(begin());}
void clear(){list_node* cur = _phead->_next;while (cur != _phead){list_node* tmp = cur;cur = cur->_next;delete tmp;}_phead->_prev = _phead->_next = _phead;}
private:list_node* _phead; // 头指针};
}3.2 - 详解 list 容器的迭代器
我们可以通过循序渐进的方式来了解 list 容器的迭代器:
-
首先,不能使用原生态指针直接作为 list 容器的正向迭代器,即:
typedef list_node* iterator;否则当正向迭代器进行
++/--操作时,无法让它指向下一个或上一个节点,并且进行解引用*操作时,无法直接获得节点的值,所以需要对原生态指针进行封装,然后对这些操作符进行重载,即:typedef __list_iterator<T> iterator; -
其次,不能按以下方式直接定义 list 容器的常量正向迭代器,即:
typedef const __list_iterator<T> const_iterator;否则常量正向迭代器就无法进行
++/--操作,因为 const 类对象只能去调用 const 成员函数,并且 operator* 的返回值类型为 T&,即仍然可以在外部修改 list 容器。可以重新定义一个常量正向迭代器
__list_const_iterator,但需要修改的地方仅仅是 operatr* 的返回值,即将其修改为 const T&,显然这样的解决方案会造成代码的冗余,所以在__list_iterator类模板中增加一个类型参数 Ref,将 operator* 的返回值修改为 Ref,即:typedef __list_iterator<T, T&> iterator; typedef __list_iterator<T, const T&> const_iterator; -
最后,在重载
->操作符时,对于正向迭代器,返回值类型应该是 T*,对于常量正向迭代器,返回值类型应该是 const T*,所以再增加一个类型参数 Ptr,将 operator-> 的返回值类型修改为 Ptr,即:typedef __list_iterator<T, T&, T*> iterator; typedef __list_iterator<T, const T&, const T*> const_iterator;
3.2 - test.cpp
#include "list.h"
#include <iostream>
using namespace std;
void Print1(const yzz::list<int>& l)
{yzz::list<int>::const_iterator cit = l.begin();while (cit != l.end()){cout << *cit << " ";++cit;}cout << endl;
}
void test_list1()
{yzz::list<int> l1;l1.push_back(1);l1.push_back(2);l1.push_back(3);l1.push_back(4);cout << l1.size() << endl; // 4yzz::list<int> l2(l1);for (yzz::list<int>::iterator it = l2.begin(); it != l2.end(); ++it){cout << *it << " ";}// 1 2 3 4cout << endl;
l1.push_front(10);l1.push_front(20);l1.push_front(30);l1.push_front(40);cout << l1.size() << endl; // 8yzz::list<int> l3;l3 = l1;for (auto& e : l3){cout << e << " ";}// 40 30 20 10 1 2 3 4cout << endl;
l1.pop_back();l1.pop_back();l1.pop_front();l1.pop_front();cout << l1.size() << endl; // 4Print1(l1);// 20 10 1 2
l1.clear();cout << l1.size() << endl; // 0cout << l1.empty() << endl; // 1
}
struct Point
{int _x;int _y;
Point(int x = 0, int y = 0): _x(x), _y(y){ }
};
void Print2(const yzz::list<Point>& l)
{yzz::list<Point>::const_iterator cit = l.begin();while (cit != l.end()){// 方法一:// cout << "(" << (*cit)._x << ", " << (*cit)._y << ")" << " ";// 方法二:cout << "(" << cit->_x << ", " << cit->_y << ")" << " ";// 注意:operator-> 是单参数,所以本应该是 cit->->_i 和 cit->->_j,// 但为了可读性,编译器做了优化,即省去一个 ->++cit;}cout << endl;
}
void test_list2()
{yzz::list<Point> l;l.push_back(Point(1, 1));l.push_back(Point(2, 2));l.push_back(Point(3, 3));l.push_back(Point(4, 4));Print2(l);// (1, 1) (2, 2) (3, 3) (4, 4)
}
int main()
{// test_list1();test_list2();return 0;
}相关文章:
【C++ 学习 ⑬】- 详解 list 容器
目录 一、list 容器的基本介绍 二、list 容器的成员函数 2.1 - 迭代器 2.2 - 修改操作 三、list 的模拟实现 3.1 - list.h 3.2 - 详解 list 容器的迭代器 3.2 - test.cpp 一、list 容器的基本介绍 list 容器以类模板 list<T>(T 为存储元素的类型&…...
)
设计模式十五:命令模式(Command Pattern)
命令模式(Command Pattern)是一种行为型设计模式,它旨在将请求或操作封装成一个对象,从而允许你将不同的请求参数化,并且能够在不同的时间点执行或者队列化这些请求。这种模式使得请求发送者与接收者之间解耦ÿ…...
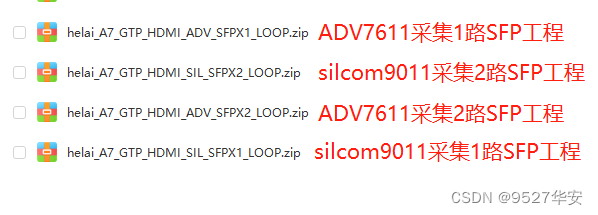
FPGA GTP全网最细讲解,aurora 8b/10b协议,HDMI视频传输,提供4套工程源码和技术支持
目录 1、前言免责声明 2、我这里已有的 GT 高速接口解决方案3、GTP 全网最细解读GTP 基本结构GTP 发送和接收处理流程GTP 的参考时钟GTP 发送接口GTP 接收接口GTP IP核调用和使用 4、设计思路框架HDMI输入视频配置及采集视频数据组包GTP aurora 8b/10b数据对齐视频数据解包图像…...

用dcker极简打包java.jar镜像并启动
用dcker极简打包java.jar镜像并启动 一、本地打包好jar包 二、新建文件夹,将步骤1中的jar包拷贝到文件夹下 三、同目录下新建Dockerfile ## 基础镜像,这里用的是openjdk:8 FROM openjdk:8## 将步骤一打包好的jar包 拷贝到镜像的 跟目录下[目录可以自定义…...

设计模式——创建型
1.单例模式 单例模式主要用于某个类有且只能用一个对象的场景,单例模式下不能外部实例化对象,由类内部自行私有化实例对象并提供一个可以获得该对象的方法。单例模式主要有饿汉模式(安全,但在编译时就会自动创建对象,…...
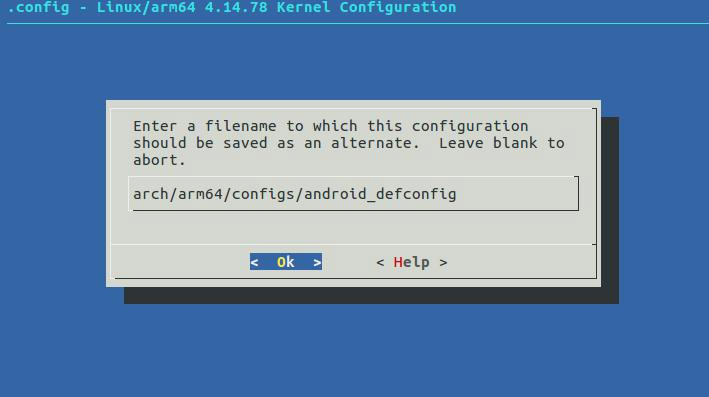
iTOP-i.MX8M开发板添加USB网络设备驱动
选中支持 USB 网络设备驱动,如下图所示: [*] Device Drivers→ *- Network device support → USB Network Adapters→ {*} Multi-purpose USB Networking Framework 将光标移动到 save 保存,如下图所示: 保存到 arch/arm64/c…...
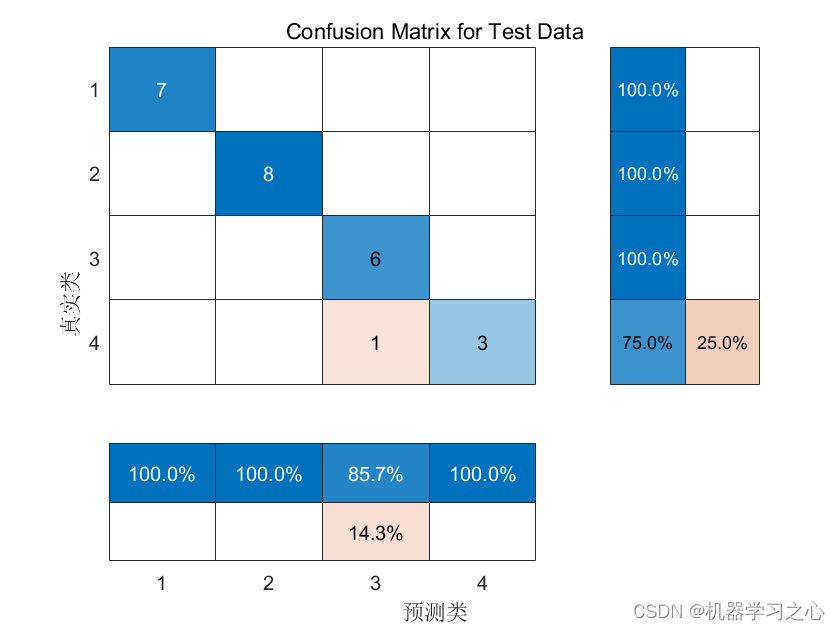
分类预测 | MATLAB实现GAPSO-LSSVM多输入分类预测
分类预测 | MATLAB实现GAPSO-LSSVM多输入分类预测 目录 分类预测 | MATLAB实现GAPSO-LSSVM多输入分类预测预测效果基本介绍程序设计参考资料 预测效果 基本介绍 1.分类预测 | MATLAB实现GAPSO-LSSVM多输入分类预测 2.代码说明:要求于Matlab 2021版及以上版本。 程序…...
JMeter 的并发设置教程
JMeter 是一个功能强大的性能测试工具,可以模拟许多用户同时访问应用程序的情况。在使用 JMeter 进行性能测试时,设置并发是非常重要的。本文将介绍如何在 JMeter 中设置并发和查看报告。 设置并发 并发是在线程组下的线程属性中设置的。 线程数&#…...

数据治理有哪些产品
数据治理是现代企业管理中至关重要的一个环节。随着企业的数据量不断增长,如何有效地管理和利用数据成为了一个亟待解决的问题。幸运的是,市场上已经涌现出了许多优秀的数据治理产品,下面就来介绍一些常见的数据治理产品。 首先,我…...
windows安装go,以及配置工作区,配置vscode开发环境
下载安装go 我安装在D:\go路径下配置环境变量 添加GOROOT value为D:\go修改path 添加%GOROOT%\bin添加GOPATH value为%USERPROFILE%\go 其中GOPATH 是我们自己开发的工作区,其中包含三个folder bin,pkg,以及src,其中src为我们编写代码的位置 配置vscod…...

第五章nginx负载均衡
负载均衡:反向代理来实现 nginx的七层代理: 七层是最常用的反向代理方式,只能配置在nginx配置文件的hppt模块中。而且配置方法名称:upstream模块,不能写在server中,也不能在location中,在http…...
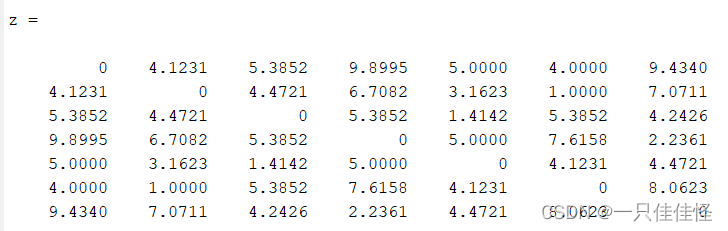
MATLAB计算一组坐标点的相互距离(pdist、squareform、pdist2函数)
如果有一组坐标P(X,Y),包含多个点的X和Y坐标,计算其坐标点之间的相互距离 一、坐标点 P[1 1;5 2;3 6;8 8;4 5;5 1; 6 9];二、pdist函数 输出的结果是一维数组,获得任意两个坐标之间的距离,但没有对应关系 Dpdist(P)三、square…...

我国农机自动驾驶系统需求日益增长,北斗系统赋能精准农业
中国现代农业的发展,离不开智能化、自动化设备,迫切需要自动驾驶系统与农用机械的密切结合。自动驾驶农机不仅能够缓解劳动力短缺问题,提升劳作生产效率,同时还能对农业进行智慧化升级,成为解决当下农业痛点的有效手段…...
防雷检测行业应用完整解决方案
防雷检测是指对雷电防护装置的性能、质量和安全进行检测的活动,是保障人民生命财产和公共安全的重要措施。防雷检测的作用和意义主要有以下几点: 防止或减少雷电灾害事故的发生。雷电是一种自然现象,具有不可预测、不可控制和高能量等特点&a…...
16.4 【Linux】特殊文件与程序
16.4.1 具有 SUID/SGID 权限的指令执行状态 SUID 的权限其实与程序的相关性非常的大!为什么呢?先来看看 SUID 的程序是如何被一般使用者执行,且具有什么特色呢? SUID 权限仅对二进制程序(binary program)…...

qrcode.react生成二维码
qrcode.react 是一个**用于生成二维码(QR 码)的 React 组件库。**它提供了一个 React 组件,可以轻松地在 React 应用程序中生成和显示 QR 码。 使用 qrcode.react,可以以声明式的方式在 React 组件中定义 QR 码的内容、尺寸、颜色…...

ETF套利及交易者如何进行套利的
ETF套利 什么是ETF套利为什么同一ETF在不同交易所上的价格会出现差异?如何操作ETF套利交易所如何解决ETF套利问题的? 什么是ETF套利 ETF(Exchange-Traded Fund)套利是一种通过利用市场中不同交易所交易价格之间的差异来获得利润的…...

了解异或的好处和用途
1.什么是异或? 异或:对于二进制,相同为0 不同为11 ⊕ 1 00 ⊕ 0 01 ⊕ 0 10 ⊕ 1 1 2.异或的好处? 异或的好处?1.快速比较两个值 2.xor a a例如 a 3 011xor 0110003.可以使用 异或 来使某些特定的位翻转【原因…...

vue函数式组件
<template>改为<template functional> 即可然后模板里使用到父组件参数的话,需在变量前面加上 props,如 <div>{{count}}</div> 改为 <div>{{props.count}}</div>如果组件比较简单,只是展示数据的话&…...
Idea Live Template 功能总结
文章目录 Java自带的template属性模板psf——public static finalpsfi——public static final intpsfi——public static final StringSt——String 方法模板psvm——main方法sout——打印语句iter——for迭代循环fori——for循环 代码块模板if-e —— if elseelse-if 自定义自…...

Google I/O 2026最魔幻的一幕:发新模型的同时,Google砍了自己的CLI
5月19号凌晨,我刚躺下准备刷会儿手机睡觉,结果被朋友圈刷屏了。 Google I/O 2026,总共两个小时的 keynote,愣是让我看到凌晨两点。不是因为我有多敬业,而是信息量实在太大——大到我觉得不记下来,明天就忘了…...

在OpenClaw项目中集成Taotoken实现Agent工作流
🚀 告别海外账号与网络限制!稳定直连全球优质大模型,限时半价接入中。 👉 点击领取海量免费额度 在OpenClaw项目中集成Taotoken实现Agent工作流 对于使用OpenClaw框架构建AI Agent的开发者而言,一个稳定、便捷的模型服…...

开源数据库 TimescaleDB 2.27.1 发布:性能改进与多项错误修复,官方建议尽快升级
开源数据库 TimescaleDB 2.27.1 版本正式发布,较 2.27.0 版本有性能改进和错误修复,官方建议用户尽快升级。 TimescaleDB 简介 TimescaleDB 是基于 PostgreSQL 构建的开源数据库,打包为 PostgreSQL 扩展程序,可让 SQL 扩展到时间序…...

BMS工程师必看:用南京集澈DVC1006做外部被动均衡,这几点时序和奇偶机制千万别搞错
BMS工程师实战指南:DVC1006被动均衡设计的五大关键陷阱与解决方案 在新能源汽车和储能系统井喷式发展的今天,电池管理系统(BMS)的可靠性直接决定了整个电池包的安全边界。作为国内AFE芯片的标杆产品,南京集澈DVC1006凭借其高集成度与稳定性&…...
)
告别低速串口:用STM32的FSMC总线驱动FPGA,实现高速数据交换的完整流程(基于STM32F407)
STM32与FPGA的高速数据通道:基于FSMC总线的实战设计指南 在嵌入式系统开发中,数据吞吐量常常成为制约系统性能的关键瓶颈。当STM32微控制器需要与FPGA进行大数据量交互时——无论是实时图像处理、高速数据采集还是复杂算法加速——传统的串行通信接口如…...

UV-UI终极指南:如何在30分钟内构建跨平台应用
UV-UI终极指南:如何在30分钟内构建跨平台应用 【免费下载链接】uv-ui uv-ui 破釜沉舟之兼容vue32、app、h5、小程序等多端基于uni-app和uView2.x的生态框架,支持单独导入,开箱即用,利剑出击。 项目地址: https://gitcode.com/gh…...

Navicat Mac终极重置指南:3种简单方法快速恢复试用期
Navicat Mac终极重置指南:3种简单方法快速恢复试用期 【免费下载链接】navicat_reset_mac navicat mac版无限重置试用期脚本 Navicat Mac Version Unlimited Trial Reset Script 项目地址: https://gitcode.com/gh_mirrors/na/navicat_reset_mac 你是否正在使…...

SPSS虚拟变量避坑指南:创建后如何正确用于回归分析?别让编码错误毁了你的模型
SPSS虚拟变量实战避坑:从编码到回归分析的完整解决方案 在数据分析领域,虚拟变量(Dummy Variable)是将分类变量转换为可用于回归分析形式的桥梁。许多研究者虽然掌握了SPSS生成虚拟变量的基础操作,却在后续分析中频频…...

3种简单方法解决Navicat Premium Mac试用期重置难题
3种简单方法解决Navicat Premium Mac试用期重置难题 【免费下载链接】navicat_reset_mac navicat mac版无限重置试用期脚本 Navicat Mac Version Unlimited Trial Reset Script 项目地址: https://gitcode.com/gh_mirrors/na/navicat_reset_mac 你是否正在为Navicat Pre…...

抖音批量下载器终极指南:免费高效的视频采集解决方案
抖音批量下载器终极指南:免费高效的视频采集解决方案 【免费下载链接】douyin-downloader A practical Douyin downloader for both single-item and profile batch downloads, with progress display, retries, SQLite deduplication, and browser fallback suppor…...