VGG分类实战:猫狗分类
关于数据集
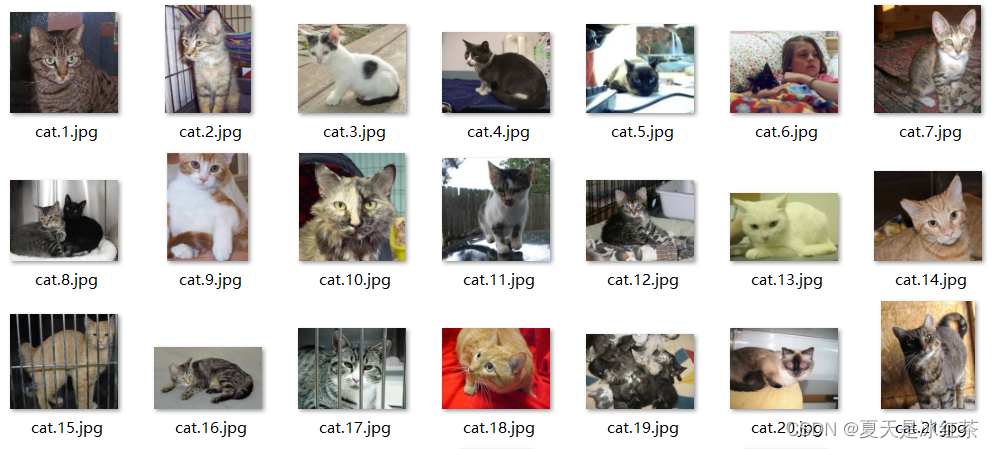
数据集选择的是Kaggle上的Cat and Dog,猫狗图片数量上达到了上万张。你可以通过这里进入Kaggle下载数据集Cat and Dog | Kaggle。
在我的Github仓库当中也放了猫狗图片各666张。
VGG网络
VGG的主要特点是使用了一系列具有相同尺寸 3x3 大小的卷积核进行多次卷积操作。这种结构的一个优势是可以堆叠更多的卷积层,使得网络能够学习到更复杂的特征。
详情请看此篇VGG16模型详解_夏天是冰红茶的博客-CSDN博客。
今天让我们来探究一下在2014年的ImageNet图像分类竞赛中取得显著成绩的VGG模型效果如何。
# net.pyimport torch
import torchvision
import torch.nn as nn
import torchsummaryfrom torch.hub import load_state_dict_from_url
# model = torchvision.models.vgg16()model_urls = {"vgg16": "https://download.pytorch.org/models/vgg16-397923af.pth","vgg19": "https://download.pytorch.org/models/vgg19-dcbb9e9d.pth"
}
cfgs = {"vgg16": [64, 64, "M", 128, 128, "M", 256, 256, 256, "M", 512, 512, 512, "M", 512, 512, 512, "M"],"vgg19": [64, 64, "M", 128, 128, "M", 256, 256, 256, 256, "M", 512, 512, 512, 512, "M", 512, 512, 512, 512, "M"],
}class VGG(nn.Module):def __init__(self, features, num_classes = 1000, init_weights= True, dropout = 0.5):super(VGG,self).__init__()self.features = featuresself.avgpool = nn.AdaptiveAvgPool2d((7, 7))self.classifier = nn.Sequential(nn.Linear(512 * 7 * 7, 4096),nn.ReLU(True),nn.Dropout(p=dropout),nn.Linear(4096, 4096),nn.ReLU(True),nn.Dropout(p=dropout),nn.Linear(4096, num_classes),)if init_weights:for m in self.modules():if isinstance(m, nn.Conv2d):nn.init.kaiming_normal_(m.weight, mode="fan_out", nonlinearity="relu")if m.bias is not None:nn.init.constant_(m.bias, 0)elif isinstance(m, nn.BatchNorm2d):nn.init.constant_(m.weight, 1)nn.init.constant_(m.bias, 0)elif isinstance(m, nn.Linear):nn.init.normal_(m.weight, 0, 0.01)nn.init.constant_(m.bias, 0)def forward(self, x):x = self.features(x)x = self.avgpool(x)x = torch.flatten(x, 1)x = self.classifier(x)return xdef make_layers_with_vgg(cfg, batch_norm = False):layers = []in_channels = 3for v in cfg:if v == "M":layers += [nn.MaxPool2d(kernel_size=2, stride=2)]else:conv2d = nn.Conv2d(in_channels, v, kernel_size=(3,3), padding=1)if batch_norm:layers += [conv2d, nn.BatchNorm2d(v), nn.ReLU(inplace=True)]else:layers += [conv2d, nn.ReLU(inplace=True)]in_channels = vreturn nn.Sequential(*layers)def vgg(mode='vgg16',pretrained=False, progress=True, num_classes=2):model = VGG(make_layers_with_vgg(cfgs[mode]))if pretrained:state_dict = load_state_dict_from_url(model_urls[mode], model_dir='./model', progress=progress)#预训练模型地址model.load_state_dict(state_dict)if num_classes != 1000:model.classifier = nn.Sequential(nn.Linear(512 * 7 * 7, 4096),nn.ReLU(True),nn.Dropout(p=0.5),nn.Linear(4096, 4096),nn.ReLU(True),nn.Dropout(p=0.5),nn.Linear(4096, num_classes),)return modelif __name__=='__main__':in_data = torch.ones(2, 3, 224, 224)net = vgg(mode='vgg16', pretrained=False, progress=True, num_classes=2)  # 使用默认的 VGG-16 架构# net = vgg(mode='vgg19', pretrained=False, progress=True, num_classes=2)  # 使用 VGG-19 架构out = net(in_data)print(out)torchsummary.summary(net, input_size=(3, 224, 224))
与前面纯手打的VGG16网络不同,这里还添加了VGG19网络结构以及预训练权重。
import torchvisionmodel = torchvision.models.vgg16()你可以通过这里来查看VGG16的模型结构与预训练权重的url,上面也是从pytorch实现的网络中更改过的,所有你也可以去pytorch的官网查找。
创建分类数据列表
将指定路径中的图像文件的类别和类型信息写入到名为 class_data.txt 的文件中,以便后续用于分类任务或其他需要这些信息的应用。
清华源安装
pip install pyzjr==1.1.1 --user -i https://pypi.tuna.tsinghua.edu.cn/simple
猫狗分类任务的数据列表的脚本
# annotation_txt.pyimport os
import pyzjr as pzclasses = ['cat', 'dog']
path = 'train'if __name__ == '__main__':with open('class_data.txt', 'w') as txt_file:  # 打开文件,注意使用 'w' 模式file_list = [os.path.join(path, i) for i in os.listdir(path)]for data_path in file_list:types_name, _ = pz.getPhotopath(data_path, True)cls_id = classes.index(os.path.basename(data_path))for type_name in types_name:line = f"{str(cls_id)};{str(type_name)}"txt_file.write(line + '\n')  # 追加写入数据
txt文件大致内容如下:
0;D:/deeplearning/VGGnet/train/cat/cat000.jpg
0;D:/deeplearning/VGGnet/train/cat/cat001.jpg
0;D:/deeplearning/VGGnet/train/cat/cat002.jpg
......
1;D:/deeplearning/VGGnet/train/dog/dog198.jpg
1;D:/deeplearning/VGGnet/train/dog/dog199.jpg
1;D:/deeplearning/VGGnet/train/dog/dog200.jpg
由于我本人的笔记本类型不是很好,所以就仅仅各自取了200张进行一个测试。
文件批量重命名(可选)
才下载的数据,它是这样的:
import pyzjr as pz
import os
import shutil
# 原始图片所在路径、保存指定图片路径
image_folder_path = r"D:\pythonprojects\deeplabv3_pytorch\img"
save_image_folder_path = pz.CreateFolder(r"D:\pythonprojects\deeplabv3_pytorch\imgs")newbasename = 'Crack'if __name__=="__main__":imglist,allist=pz.getPhotopath(image_folder_path,debug=False)print(imglist)for i,file in enumerate(imglist):print(i,file)properties = pz.ImageAttribute(file)name, ext = os.path.splitext(properties['name'])# -----------------------------------------------# 格式可以在这里修改   i:03d ——> 001# 扩展名也可以自己定义,默认采用原本的ext(.png,.jpg这种)#newname = f"{newbasename}{i:03d}{ext}"## -----------------------------------------------new_path = os.path.join(save_image_folder_path, newname)shutil.copy(file, new_path)print("文件批量重命名和保存完成")
只需要修改newbasename以及具体的格式即可,而扩展名我是默认使用的原本的ext,但要记住的是,修改扩展名时候要把“ . ”加上。
你也可以调用pyzjr.RenameFile进行批量化的重命名。
数据预处理与损失历史记录
这两个功能均在dataoperation.py文件当中,为深度学习模型的训练提供了一些辅助功能。可以在深度学习模型的训练过程中使用,以便更好地监控训练的进展和效果。
# dataoperation.pyimport cv2
import numpy as np
import torch.utils.data as data
import matplotlib
import torch
matplotlib.use('Agg')
from matplotlib import pyplot as plt
import scipy.signal
from PIL import Image
from torch.utils.tensorboard import SummaryWriter
import osdef preprocess_input(x):x/=127.5x-=1.return x
def cvtColor(image):if len(np.shape(image))==3 and np.shape(image)[-2]==3:return imageelse:image=image.convert('RGB')return imageclass DataGenerator(data.Dataset):def __init__(self,annotation_lines,inpt_shape,random=True):self.annotation_lines=annotation_linesself.input_shape=inpt_shapeself.random=randomdef __len__(self):return len(self.annotation_lines)def __getitem__(self, index):annotation_path=self.annotation_lines[index].split(';')[1].split()[0]image=Image.open(annotation_path)image=self.get_random_data(image,self.input_shape,random=self.random)image=np.transpose(preprocess_input(np.array(image).astype(np.float32)),[2,0,1])y=int(self.annotation_lines[index].split(';')[0])return image,ydef rand(self,a=0.,b=1.):return np.random.rand()*(b-a)+adef get_random_data(self,image,inpt_shape,jitter=.3,hue=.1,sat=1.5,val=1.5,random=True):image=cvtColor(image)iw,ih=image.sizeh,w=inpt_shapeif not random:scale=min(w/iw,h/ih)nw=int(iw*scale)nh=int(ih*scale)dx=(w-nw)//2dy=(h-nh)//2image=image.resize((nw,nh),Image.BICUBIC)new_image=Image.new('RGB',(w,h),(128,128,128))new_image.paste(image,(dx,dy))image_data=np.array(new_image,np.float32)return image_datanew_ar=w/h*self.rand(1-jitter,1+jitter)/self.rand(1-jitter,1+jitter)scale=self.rand(.75,1.25)if new_ar<1:nh=int(scale*h)nw=int(nh*new_ar)else:nw=int(scale*w)nh=int(nw/new_ar)image=image.resize((nw,nh),Image.BICUBIC)dx=int(self.rand(0,w-nw))dy=int(self.rand(0,h-nh))new_image=Image.new('RGB',(w,h),(128,128,128))new_image.paste(image,(dx,dy))image=new_imageflip=self.rand()<.5if flip: image=image.transpose(Image.FLIP_LEFT_RIGHT)rotate=self.rand()<.5if rotate:angle=np.random.randint(-15,15)a,b=w/2,h/2M=cv2.getRotationMatrix2D((a,b),angle,1)image=cv2.warpAffine(np.array(image),M,(w,h),borderValue=[128,128,128])hue=self.rand(-hue,hue)sat=self.rand(1,sat) if self.rand()<.5 else 1/self.rand(1,sat)val=self.rand(1,val) if self.rand()<.5 else 1/self.rand(1,val)x=cv2.cvtColor(np.array(image,np.float32)/255,cv2.COLOR_RGB2HSV)#颜色空间转换x[..., 1] *= satx[..., 2] *= valx[x[:, :, 0] > 360, 0] = 360x[:, :, 1:][x[:, :, 1:] > 1] = 1x[x < 0] = 0image_data=cv2.cvtColor(x,cv2.COLOR_HSV2RGB)*255return image_dataclass LossHistory():def __init__(self, log_dir, model, input_shape):self.log_dir = log_dirself.losses = []self.val_loss = []os.makedirs(self.log_dir,True)self.writer = SummaryWriter(self.log_dir)try:dummy_input = torch.randn(2, 3, input_shape[0], input_shape[1])self.writer.add_graph(model, dummy_input)except:passdef append_loss(self, epoch, loss, val_loss):if not os.path.exists(self.log_dir):os.makedirs(self.log_dir)self.losses.append(loss)self.val_loss.append(val_loss)with open(os.path.join(self.log_dir, "epoch_loss.txt"), 'a') as f:f.write(str(loss))f.write("\n")with open(os.path.join(self.log_dir, "epoch_val_loss.txt"), 'a') as f:f.write(str(val_loss))f.write("\n")self.writer.add_scalar('loss', loss, epoch)self.writer.add_scalar('val_loss', val_loss, epoch)self.loss_plot()def loss_plot(self):iters = range(len(self.losses))plt.figure()# plt.plot(iters, self.losses, 'red', linewidth=2, label='train loss')# plt.plot(iters, self.val_loss, 'coral', linewidth=2, label='val loss')plt.plot(iters, [loss.item() for loss in self.losses], 'red', linewidth=2, label='train loss')plt.plot(iters, [loss.item() for loss in self.val_loss], 'coral', linewidth=2, label='val loss')try:if len(self.losses) < 25:num = 5else:num = 15plt.plot(iters, scipy.signal.savgol_filter(self.losses, num, 3), 'green', linestyle='--', linewidth=2,label='smooth train loss')plt.plot(iters, scipy.signal.savgol_filter(self.val_loss, num, 3), '#8B4513', linestyle='--', linewidth=2,label='smooth val loss')except:passplt.grid(True)plt.xlabel('Epoch')plt.ylabel('Loss')plt.legend(loc="upper right")plt.savefig(os.path.join(self.log_dir, "epoch_loss.png"))plt.cla()plt.close("all")
训练主文件
import torch.nn as nn
from net import vgg
from torch.utils.data import DataLoader
from tqdm import tqdm
import datetime
from dataoperation import *if __name__=="__main__":#---------------------------------## Cuda       是否使用Cuda#            没有GPU可以设置成False#---------------------------------#Cuda = False# ---------------------------------## 'vgg16' and  'vgg19'# ---------------------------------#Net = 'vgg16'# ---------------------------------## 先运行annotation_txt脚本# ---------------------------------#annotation_path='class_data.txt'# ---------------------------------## 输入图片尺寸# ---------------------------------#input_shape = [224, 224]# ---------------------------------##  分类个数,比如这里只要猫和狗两类# ---------------------------------#num_classes = 2# -------------------------------------------------------##   lr         模型的最大学习率#              当使用Adam优化器时建议设置  lr=5e-4#              当使用SGD优化器时建议设置   lr=7e-3# -------------------------------------------------------#lr = 0.0001# ---------------------------------## 优化器选择 SGD 与 Adam# ---------------------------------#optimizer_type = "Adam"# ---------------------------------## 验证集所占百分比# ---------------------------------#percentage = 0.2# ---------------------------------## 训练轮次# ---------------------------------#epochs = 80# ---------------------------------##   save_period 多少个epoch保存一次权值# ---------------------------------#save_period = 1# ------------------------------------------------------------------##   save_dir        权值与日志文件保存的文件夹# ------------------------------------------------------------------#save_dir = 'log'if not os.path.exists(save_dir):os.makedirs(save_dir)time_str = datetime.datetime.strftime(datetime.datetime.now(), '%Y_%m_%d_%H_%M_%S')log_dir = os.path.join(save_dir, "loss_" + str(time_str))loss_history = LossHistory(log_dir=log_dir, model=Net, input_shape=input_shape)with open(annotation_path,'r') as f:lines=f.readlines()np.random.seed(10101)np.random.shuffle(lines)np.random.seed(None)num_val=int(len(lines) * percentage)num_train=len(lines) - num_valtrain_data=DataGenerator(lines[:num_train],input_shape,True)val_data=DataGenerator(lines[num_train:],input_shape,False)val_len=len(val_data)print(val_len)gen_train=DataLoader(train_data,batch_size=4)gen_test=DataLoader(val_data,batch_size=4)device=torch.device('cuda'if torch.cuda.is_available() and Cuda else "cpu")net=vgg(mode=Net, pretrained=True, progress=True, num_classes=num_classes)net.to(device)if optimizer_type == 'Adam':optim = torch.optim.Adam(net.parameters(), lr=lr)elif optimizer_type == 'SGD':optim = torch.optim.SGD(net.parameters(), lr=lr, momentum=0.9)else:raise ValueError("Unsupported optimizer type: {}".format(optimizer_type))sculer=torch.optim.lr_scheduler.StepLR(optim,step_size=1)for epoch in range(epochs):total_train=0for data in tqdm(gen_train, desc=f"Epoch{epoch + 1}/Train"):img,label=datawith torch.no_grad():img =img.to(device)label=label.to(device)optim.zero_grad()output=net(img)train_loss=nn.CrossEntropyLoss()(output,label).to(device)train_loss.backward()optim.step()total_train+=train_losssculer.step()total_test=0total_accuracy=0for data in tqdm(gen_test, desc=f"Epoch{epoch + 1}/Test"):img,label =datawith torch.no_grad():img=img.to(device)label=label.to(device)optim.zero_grad()out=net(img)test_loss=nn.CrossEntropyLoss()(out,label).to(device)total_test+=test_lossaccuracy=((out.argmax(1)==label).sum()).clone().detach().cpu().numpy()total_accuracy += accuracyprint("训练集上的损失:{}".format(total_train))print("测试集上的损失:{}".format(total_test))print("测试集上的精度:{:.1%}".format(total_accuracy/val_len))loss_history.append_loss(epoch + 1, total_train, total_test)if (epoch+1) % save_period == 0:modepath = os.path.join(log_dir,"DogandCat{}.pth".format(epoch+1))torch.save(net.state_dict(),modepath)print("模型已保存")
设置相关参数:
Cuda: 是否使用GPU加速,默认为False。Net: 选择要使用的VGG网络版本,可以是'vgg16'或'vgg19'。annotation_path: 数据集的注释文件路径,这是一个包含图像路径和标签的文本文件。input_shape: 输入图像的尺寸。num_classes: 分类的类别数量。lr: 学习率。optimizer_type: 选择优化器,可以是'Adam'或'SGD'。percentage: 验证集所占百分比。epochs: 训练轮次。save_period: 多少个epoch保存一次模型权重。save_dir: 模型权重和日志文件保存的目录。
接下来是进行数据准备将数据随机打乱并划分为训练集和验证集,创建训练集和验证集的数据生成器,然后实例化VGG模型,并根据选择的网络版本加载预训练权重,根据选择的优化器类型创建优化器,并设置学习率调度器,最后,每个epoch中计算训练集和验证集上的损失和精度,并记录到损失历史记录器中。
由于比较的费时间,这里我仅仅就进行了猫狗图片各自200张进行训练,主要是看看VGG的一个分类效果,所以就尽可能的快点。
模型预测
# predict.pyfrom torchvision import transforms
from PIL import Image
import matplotlib.pyplot as plt
import torch
import torch.nn.functional as F
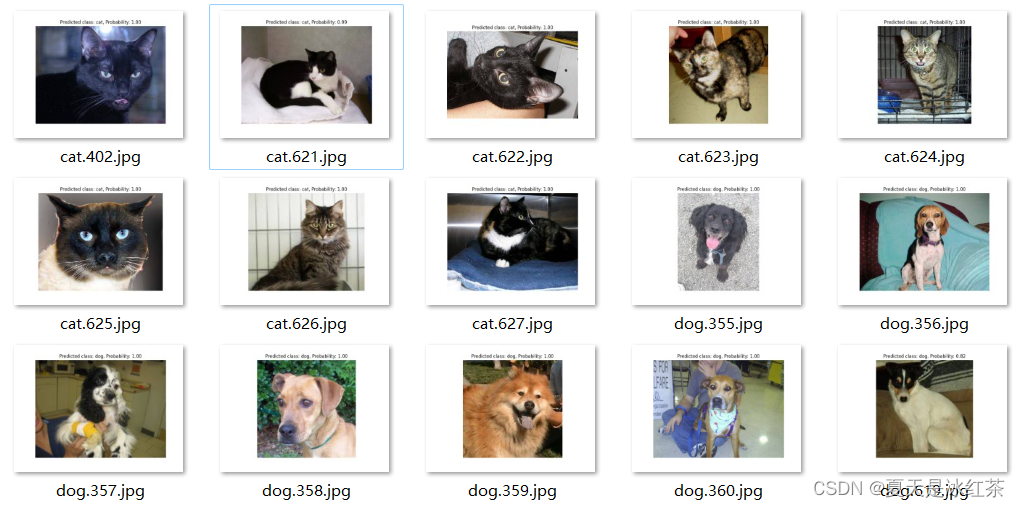
from VGGnet.net import vggif __name__=="__main__":# ---------------------------------## Cuda 是否使用Cuda# 没有GPU可以设置成False# ---------------------------------#Cuda = False# ---------------------------------## 分类类型# ---------------------------------#num_classes = ['cat', 'dog']# ---------------------------------## 'vgg16' and 'vgg19'# ---------------------------------#Netmode = 'vgg16'# ------------------------------------------------------------------------------## detection_mode用于指定测试的模式:## 'predict' 表示单张图片预测# 'dir_predict' 表示遍历文件夹进行检测并保存。默认遍历img文件夹,保存img_out文件夹# ------------------------------------------------------------------------------#detection_mode = "dir_predict"# -------------------------------------------------------## model_path指向log文件夹下的权值文件# 训练好后log文件夹下存在多个权值文件,选择验证集损失较低的即可。# -------------------------------------------------------#model_path = r"log\loss_2023_08_16_13_52_51\DogandCat30.pth"#-------------------------------------------------------------------------## dir_origin_path 指定了用于检测的图片的文件夹路径# dir_save_path 指定了检测完图片的保存路径## dir_origin_path和dir_save_path仅在 detection_mode='dir_predict'时有效#-------------------------------------------------------------------------#dir_origin_path = "img/"dir_save_path = "img_out/"device = torch.device("cuda" if torch.cuda.is_available() and Cuda else "cpu")model = vgg(mode=Netmode,num_classes=len(num_classes))model.load_state_dict(torch.load(model_path, map_location=device))model.to(device)model.eval()transform = transforms.Compose([transforms.Resize((224, 224)),transforms.ToTensor(),transforms.Normalize(mean=[0.485, 0.456, 0.406], std=[0.229, 0.224, 0.225]),])def predict_single_image(image_path):image = Image.open(image_path)image = transform(image).unsqueeze(0).to(device)with torch.no_grad():model.eval()output = model(image)probabilities = F.softmax(output, dim=1)predicted_class = torch.argmax(probabilities).item()predicted_label = num_classes[predicted_class]predicted_prob = probabilities[0][predicted_class].item()print("Output tensor:", output)print("Probabilities tensor:", probabilities)print(f"Predicted class: {predicted_label}, Probability: {predicted_prob:.2f}")plt.imshow(Image.open(image_path))plt.title(f"Predicted class: {predicted_label}, Probability: {predicted_prob:.2f}")plt.axis('off')plt.show()def predict_images_in_directory(origin_path, save_path):import osos.makedirs(save_path, exist_ok=True)image_files = [f for f in os.listdir(origin_path) if f.lower().endswith(('.jpg', '.jpeg', '.png', '.gif'))]for image_file in image_files:image_path = os.path.join(origin_path, image_file)result_image_path = os.path.join(save_path, image_file)image = Image.open(image_path)image = transform(image).unsqueeze(0).to(device)with torch.no_grad():model.eval()output = model(image)probabilities = F.softmax(output, dim=1)predicted_class = torch.argmax(probabilities).item()predicted_label = num_classes[predicted_class]predicted_prob = probabilities[0][predicted_class].item()print("Predicted class:", predicted_label)print("Predicted probability:", predicted_prob)plt.imshow(Image.open(image_path))plt.title(f"Predicted class: {predicted_label}, Probability: {predicted_prob:.2f}")plt.axis('off')plt.savefig(result_image_path)# plt.show()print("Prediction and saving complete.")if detection_mode == "predict":while True:image_path = input('Input image filename (or "exit" to quit): ')if image_path.lower() == "exit":breakpredict_single_image(image_path)elif detection_mode == "dir_predict":predict_images_in_directory(dir_origin_path, dir_save_path)else:raise ValueError("Invalid detection_mode")单张检测模式
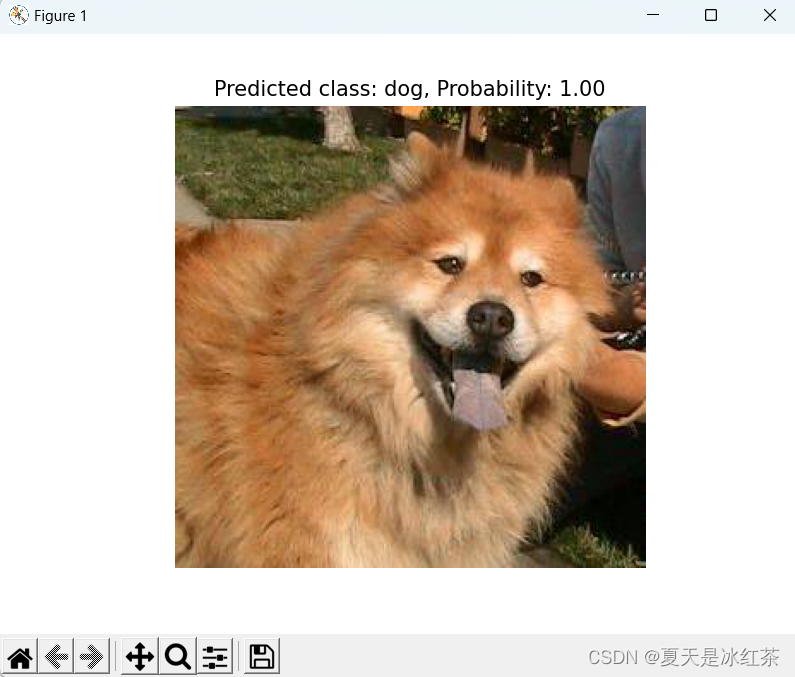

文件夹检测模式
资源链接
Auorui/VGG16-CatandDog: Explore the effectiveness of the VGG model, which achieved significant results in the ImageNet image classification competition in 2014, and use VGG for cat and dog classification (github.com)
相关文章:
VGG分类实战:猫狗分类
关于数据集 数据集选择的是Kaggle上的Cat and Dog,猫狗图片数量上达到了上万张。你可以通过这里进入Kaggle下载数据集Cat and Dog | Kaggle。 在我的Github仓库当中也放了猫狗图片各666张。 VGG网络 VGG的主要特点是使用了一系列具有相同尺寸 3x3 大小的卷积核进…...

C++11并发与多线程笔记(3)线程传参详解,detach()大坑,成员函数做线程函数
C11并发与多线程笔记(3)线程传参详解,detach 大坑,成员函数做线程函数 1、传递临时对象作为线程参数1.1 要避免的陷阱11.2 要避免的陷阱21.3 总结 2、临时对象作为线程参数2.1 线程id概念2.2 临时对象构造时机抓捕 3、传递类对象…...

说几个常见的语法糖
目录 面试回答 知识扩展 如何解语法糖? 糖块一、swith 支持 String 与枚举 糖块二、泛型 糖块三、自动装箱与拆箱 糖块四、枚举 糖块五、条件编译 糖块六、断言 糖块七、数值字面量 糖块八、for-each 糖块九、try-with-resource 可能遇到的坑 泛型 自…...

Python文件操作与输入输出:从基础到高级应用
文章目录 🍀引言🍀文件操作基础🍀上下文管理器与文件自动关闭🍀文件的迭代与逐行读取🍀文件的其他常见操作🍀输入输出基础🍀 文件输入输出🍀格式化输出🍀高级文件操作&am…...

leetcode算法题--找出最安全路径
原题链接:https://leetcode.cn/problems/find-the-safest-path-in-a-grid/description/ func maximumSafenessFactor(grid [][]int) int {n : len(grid)type pair struct {x inty int}p : make([]pair, 0)dis : make([][]int, n)for i : range dis {dis[i] make([…...

神经网络基础-神经网络补充概念-34-正则化
概念 正则化是一种用于控制模型复杂度并防止过拟合的技术,在机器学习和深度学习中广泛应用。它通过在损失函数中添加一项惩罚项来限制模型的参数,从而使模型更倾向于选择简单的参数配置。 理解 L1 正则化(L1 Regularization)&a…...
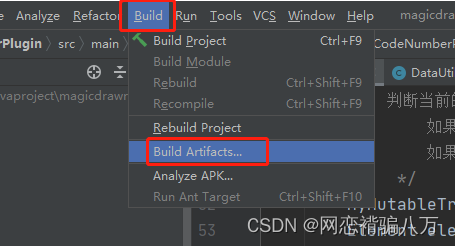
idea打jar包
目录 1、打包设置 2、打包介绍 3、开始打包 1、打包设置 先设置要打包的模块信息,即打包进去的内容。如下图所示:File --> Project Structure --> Artifacts,点击+号完成模块创建,其中有两种方式:…...
开展旅游景区度假区明察暗访复核检查服务)
民安汇智(第三方旅游服务暗访)开展旅游景区度假区明察暗访复核检查服务
近日,民安汇智受客户委托对该市某旅游景区度假区进行明察暗访复核检查工作。 民安汇智通过实地调研、体验式暗访等各种方式对该市范围内3A级以上旅游景区、旅游度假区及2022年新创建的3A级以上旅游景区、旅游度假区进行明察暗访复核检查,对照《旅游景区…...
单例模式 Singleton Pattern)
《游戏编程模式》学习笔记(六)单例模式 Singleton Pattern
单例模式的定义 保证一个类只有一个实例,并且提供了访问该实例的全局访问点。 定义这种东西一般都是不说人话的,要想要理解这句话的意思,我们得把它揉开了才能搞明白。 我们先看前半句 “保证一个类只有一个实例”,单例一般使用…...
)
《Go 语言第一课》课程学习笔记(二)
初窥门径:一个 Go 程序的结构是怎样的? 创建“hello,world”示例程序 在 Go 语言中编写一个可以打印出“hello,world”的示例程序,我们只需要简单两步,一是创建文件夹,二是开始编写和运行。通…...

神经网络基础-神经网络补充概念-26-前向和反向传播
简单比较 前向传播(Forward Propagation): 前向传播是神经网络中的正向计算过程,用于从输入数据开始,逐层计算每个神经元的输出值,直到得到最终的预测值。在前向传播过程中,我们按以下步骤进行…...

Gin路由组
Gin路由组 文章目录 Gin路由组接收任意请求的路由接收没有被定义的路由路由组完整代码 接收任意请求的路由 区别于以往的GET()函数只能处理一种请求,Any()函数可以处理各种函数 语法: func (group *RouterGroup) Any(relativePath string, handlers ...HandlerFunc){} 案例: …...
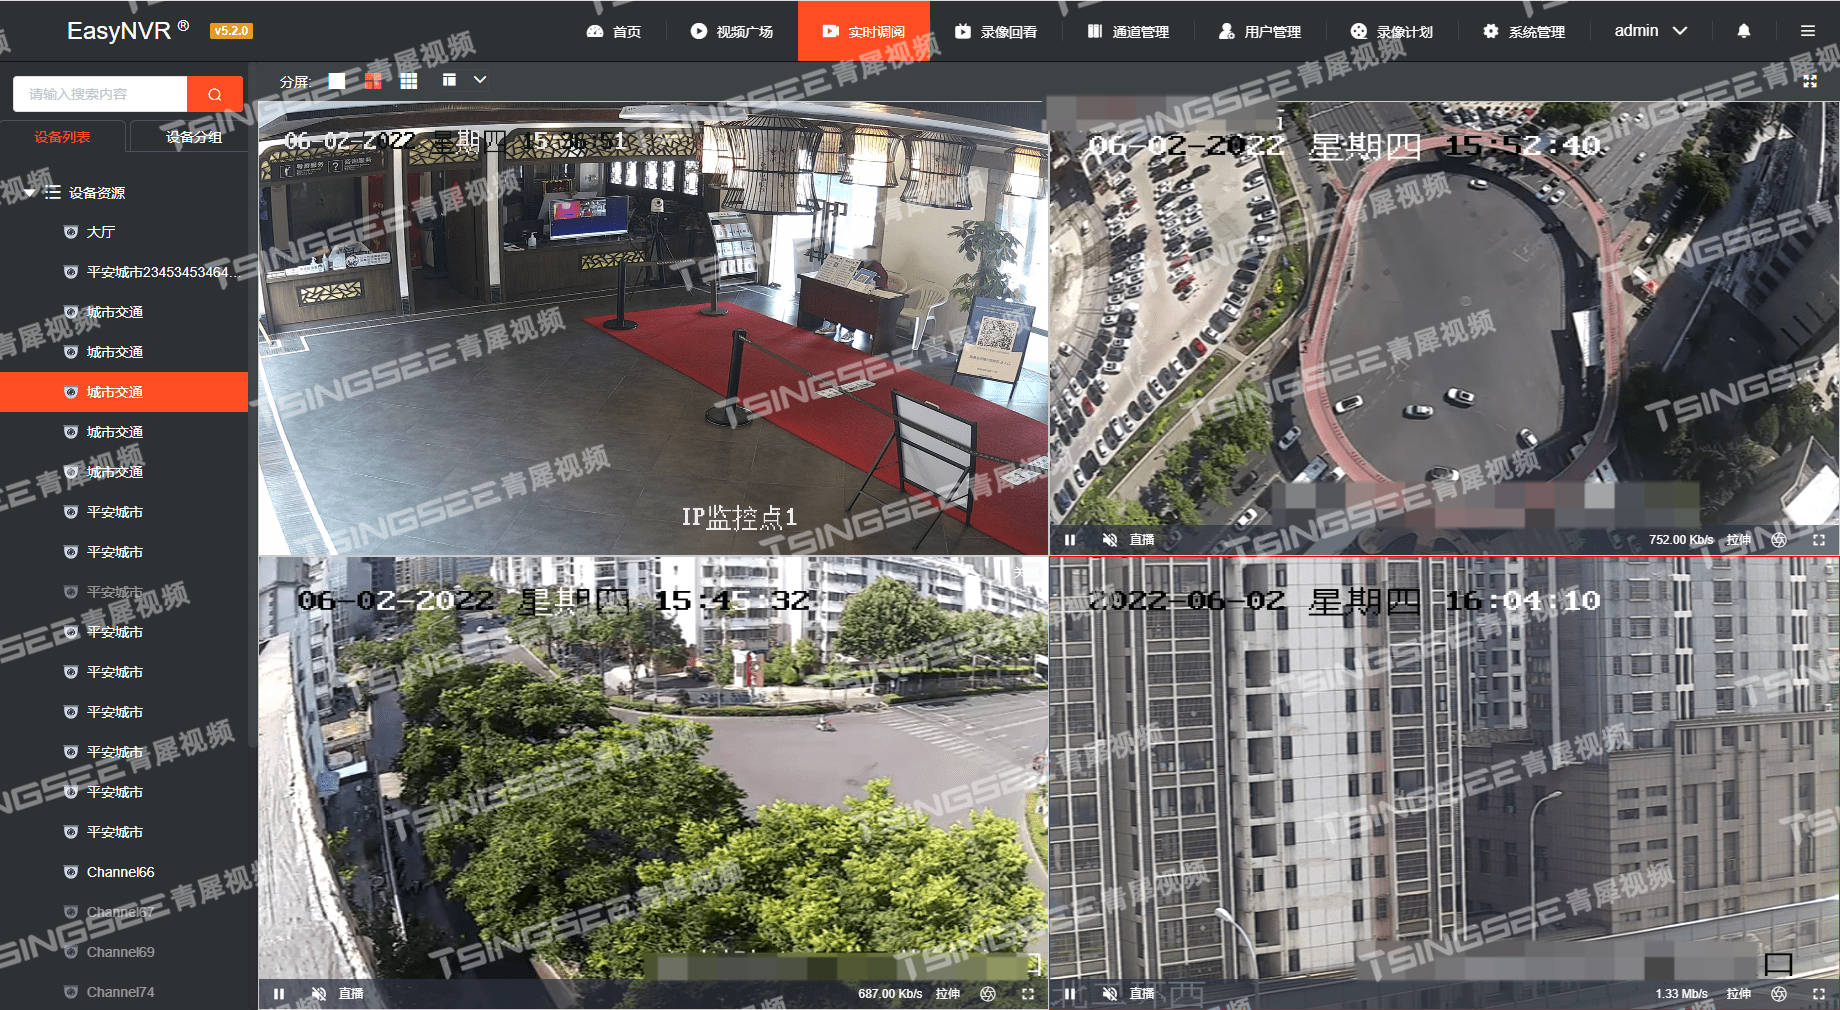
安防监控视频云存储平台EasyNVR通道频繁离线的原因排查与解决
安防视频监控汇聚EasyNVR视频集中存储平台,是基于RTSP/Onvif协议的安防视频平台,可支持将接入的视频流进行全平台、全终端分发,分发的视频流包括RTSP、RTMP、HTTP-FLV、WS-FLV、HLS、WebRTC等格式。为了满足用户的集成与二次开发需求…...

Redis-分布式锁!
分布式锁,顾名思义,分布式锁就是分布式场景下的锁,比如多台不同机器上的进程,去竞争同一项资源,就是分布式锁。 分布式锁特性 互斥性:锁的目的是获取资源的使用权,所以只让一个竞争者持有锁,这…...
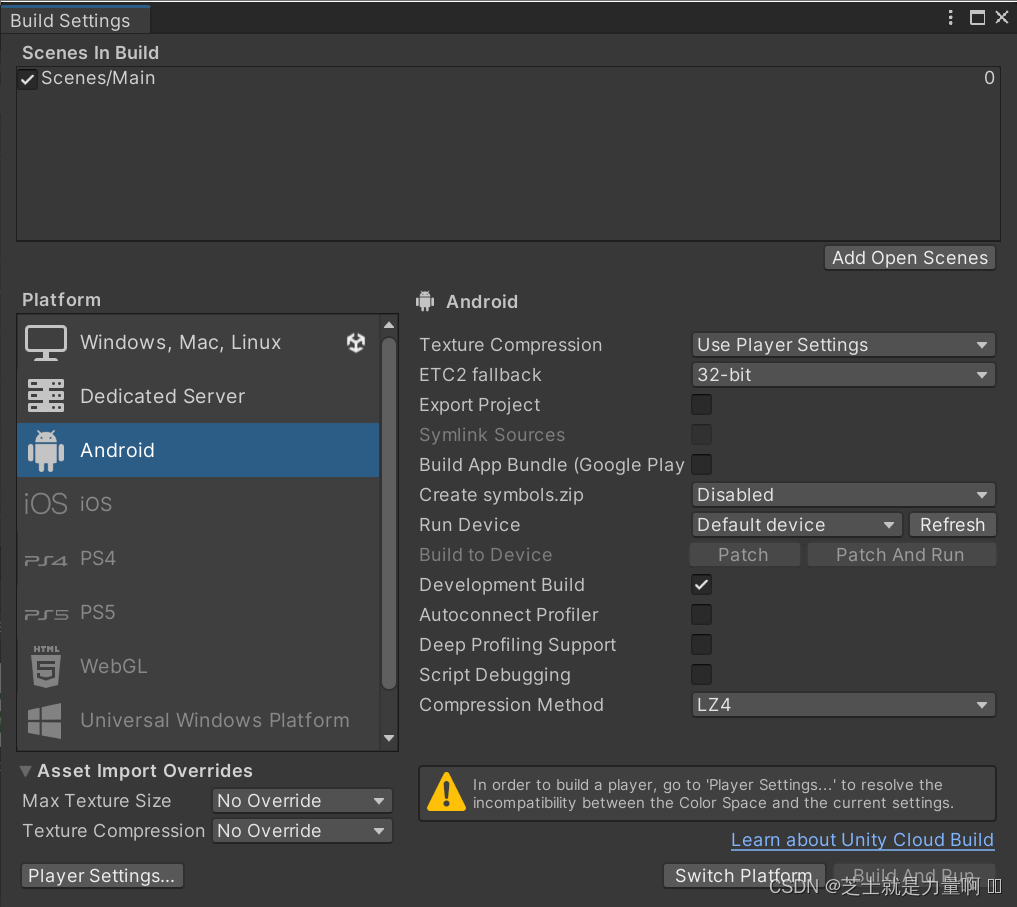
Unity如何把游戏导出成手机安装包
文章目录 前言使用环境步骤添加场景构建APK 前言 本文章主要演示了,如何将制作好的游戏,导出成APK,安装到手机上。 使用环境 Unity2022。 步骤 首先打开你的项目,然后选择菜单栏的“File” > “Build Settings…”…...

使用爱校对软件保证公文材料质量的关键步骤
在日常的公文处理中,保证材料质量是每个企业和机构都追求的目标。而要实现这个目标,使用正确的工具是关键。爱校对软件正是这样一款专业的校对工具,它可以帮助我们保证公文材料的质量。接下来,让我们一起来看看使用爱校对软件保证…...

Spring Data Elasticsearch 的简单使用
目录 一、简介 二、配置 三、映射 四、 常用方法 五、操作(重点) 1、对索引表的操作 2、对文档的操作(重点) (1)、添加文档 (2)、删除文档 (3)、查询…...
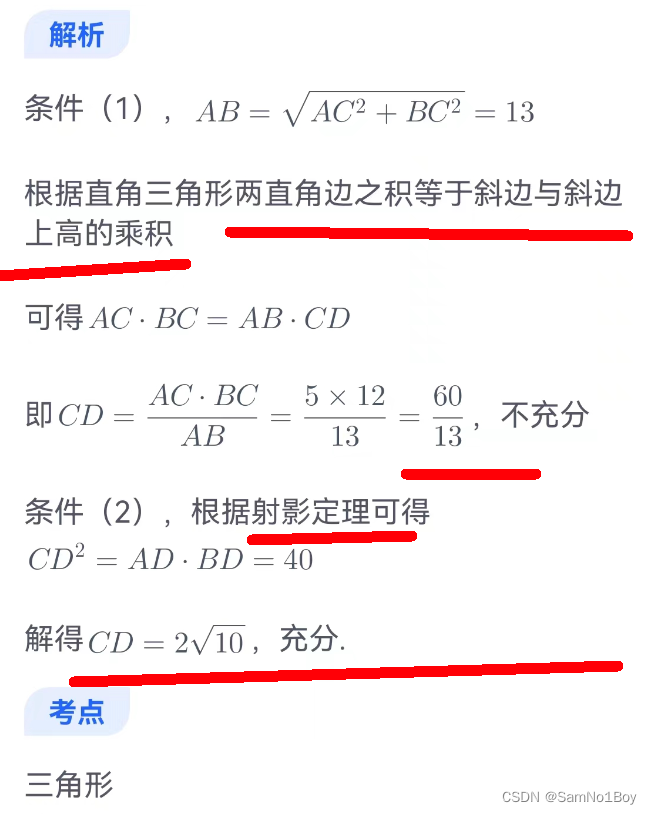
2024」预备研究生mem-角平分线定理中线定理垂线定理、射影定理
一、角平分线定理 二、中线定理 三、垂线定理、射影定理 垂线定理 射影定理: 四、课后题...
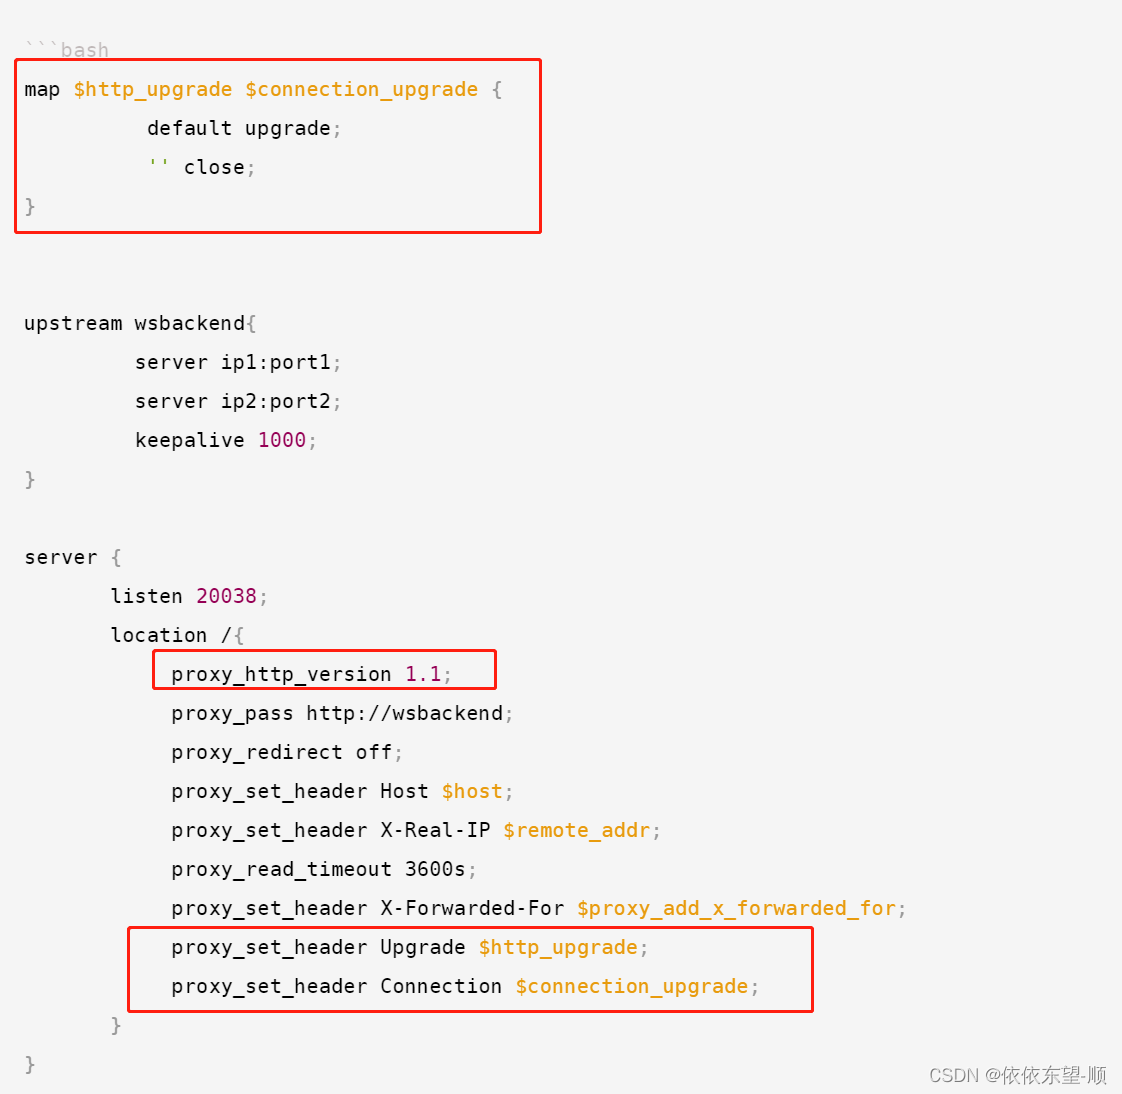
nginx部署时http接口正常,ws接口404
可以这么配置 map $http_upgrade $connection_upgrade {default upgrade; close; }upstream wsbackend{server ip1:port1;server ip2:port2;keepalive 1000; }server {listen 20038;location /{ proxy_http_version 1.1;proxy_pass http://wsbackend;proxy_redirect off;proxy…...
数学建模的概念和学习方法(什么是数学建模)
一、初步认识数学建模 数学建模是将数学方法和技巧应用于实际问题的过程。它涉及使用数学模型来描述和分析现实世界中的现象、系统或过程,并通过数学分析和计算来预测、优化或解决问题。数学建模可以应用于各种领域,包括自然科学、工程、经济学、环境科学…...
)
Linux 新手必会 30 个高频基础命令(零基础可直接上手)
前言对于Linux新手来说,无需死记硬背所有命令,重点掌握这30个高频基础命令,就能完成日常90%的操作(目录切换、文件管理、系统查看等)。本文按“使用场景分类”,每个命令标注【用法示例新手提示】࿰…...

2026年终极指南:JetBrains IDE试用期重置完整解决方案
2026年终极指南:JetBrains IDE试用期重置完整解决方案 【免费下载链接】ide-eval-resetter 项目地址: https://gitcode.com/gh_mirrors/id/ide-eval-resetter JetBrains IDE试用期重置是每个开发者都可能遇到的挑战,当IntelliJ IDEA、PyCharm、W…...

科研抢发期必看:Perplexity图书推荐查询速效组合技——3分钟生成带引用格式的跨学科书单
更多请点击: https://codechina.net 第一章:科研抢发期必看:Perplexity图书推荐查询速效组合技——3分钟生成带引用格式的跨学科书单 在论文投稿前的关键窗口期,快速定位权威参考文献是提升学术严谨性与跨学科说服力的核心能力。…...
)
别再死记公式了!用HFSS和Matlab FDTD两种方法,手把手教你仿真微带线阻抗(附工程文件)
微带线阻抗仿真实战:HFSS与Matlab FDTD双路径深度解析 微带线作为高频电路设计中最常见的传输线结构之一,其特性阻抗的准确计算直接关系到信号完整性和系统性能。许多工程师在学习初期都会遇到一个共同困惑:为什么教科书公式计算结果与仿真或…...

Agent+用药提醒:真正难的不是提醒,而是结合病情和依从性管理
用药提醒如果只做成定时推送,本质上接近一个带药品名称的闹钟。医疗健康应用里更棘手的问题是:用户是否按计划执行、漏服后如何记录、连续异常时是否需要升级提醒,以及这些规则如何被机构确认并可审计。本文只讨论技术架构和工程流程示例&…...

用Logisim从零搭建一个8位求补器:手把手教你理解补码的硬件实现
用Logisim从零搭建一个8位求补器:手把手教你理解补码的硬件实现 数字电路设计中最精妙的概念之一,莫过于补码表示法。它不仅解决了计算机中正负数的统一表示问题,还让加减法运算可以用同一套电路完成。但你是否好奇过,这个看似简单…...

Perplexity症状查询功能突然失效?排查清单来了:从OpenID Connect令牌过期、UMLS MetaMap服务中断到本地缓存污染的6层故障树分析
更多请点击: https://codechina.net 第一章:Perplexity症状查询功能突然失效?排查清单来了:从OpenID Connect令牌过期、UMLS MetaMap服务中断到本地缓存污染的6层故障树分析 当Perplexity的症状查询接口返回 401 Unauthorized 或…...

tinySPL 与 U-Boot 核心区别
tinySPL 与 U-Boot 核心区别 一、定位本质项目tinySPLU-Boot定位轻量极简二级引导,专为RTOS/裸机设计通用全能大型Bootloader,主打Linux系统体积极小,几十KB级别大,几百KB~数MB设计目标极速启动、轻量化、适配嵌入式轻系统功能最全…...

C#从零开始学习笔记---第七天
不是同样的时间,不是同样的笔记,但是同样的作者。新的一天,欢迎收看我的学习笔记吼吼~我们昨天最后留了两道题,不知道大家做的怎么样,我现在来公布一下答案,但因为1000个人心里有1000个哈姆雷特,…...

手把手教你用AsyncOpenAI库,为自部署的Llama 3模型打造一个高速问答接口
基于AsyncOpenAI与Llama 3构建高并发问答接口的工程实践 在当今AI应用开发领域,如何将开源大模型高效地集成到生产环境中,是许多开发者面临的挑战。特别是当我们需要处理大量并发请求时,传统的同步调用方式往往成为性能瓶颈。本文将深入探讨…...