19_微信小程序之优雅实现侧滑菜单
19_微信小程序之优雅实现侧滑菜单
一.先上效果图

要实现这样一个效果,布局其实很简单,整体布局是一个横向滚动的scroll-view,难点在于怎么控制侧滑菜单的回弹,以及寻找回弹的边界条件? 此篇文章主要是基于uni-app来实现的,以后也将继续使用uni-app,但是即使使用的是原生微信小程序框架也不影响,思路都是一样的,而且uni-app的api和原生微信小程序api是对标的。
二.整体布局实现
整体布局是一个横向滚动的scroll-view,scroll-view内部有两个标签,第一个标签是内容区域,宽度占满组件的宽度,高度自适应,第二个标签用于摆放侧滑按钮,宽度为每一个侧滑按钮的宽度之和,由于是自定义组件,所以预留了slot插槽。
<template><scroll-view class="swipe-cell__inner" enable-flex scroll-x><view class="swipe-cell__content"><slot></slot></view><view class="swipe-cell__right"><slot name="right"></slot></view></scroll-view>
</template><script>export default {name:"swipe-cell",data() {return {};}}
</script><style scoped>.swipe-cell__inner /deep/ ::-webkit-scrollbar {display: block;width: 0px !important;height: 0px !important;}.swipe-cell__inner {width: 100%;display: inline-flex;flex-direction: row;align-items: flex-start;white-space: nowrap;}.swipe-cell__content {display: inline-block;width: 100%;flex-shrink: 0;position: relative;white-space: normal;overflow: hidden;}.swipe-cell__right {align-self: stretch;display: inline-flex;flex-direction: row;align-items: stretch;position: relative;white-space: normal;}
</style>
三.在页面中使用该组件
我们先把组件引入使用,页面布局没问题之后,再来考虑侧滑面板的回弹效果。
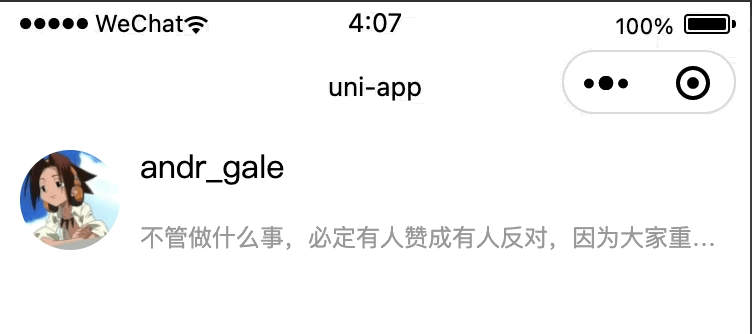
<template><scroll-view class="scroll-view" scroll-y><swipe-cell class="swipe-cell" v-for="(item, index) in 3"><view class="user-item"><image class="user-avatar" src="/static/avatar.png"/><view class="user-info-group"><view class="user-name">andr_gale</view><view class="user-desc clamp1">不管做什么事,必定有人赞成有人反对,因为大家重视的东西都有所不同。而且,不管什么事情,都可以随意给他加上好与不好的理由,所以,若果一定要分清争议与罪恶的行为,反而有问题。因此,重要的事情由心去决定就行了,不是凭感情,而是凭心</view></view></view><template #right><view class="user-button-group"><view class="user-button-follow">关注</view><view class="user-button-chat">私信</view></view></template></swipe-cell></scroll-view>
</template><script>export default {data() {return {}},onLoad() {},methods: {}}
</script><style>page {width: 100%;height: 100%;overflow: hidden;display: flex;flex-direction: column;align-items: stretch;}.clamp1 {display: -webkit-box;word-break: break-all;overflow: hidden;-webkit-box-orient: vertical;text-overflow: ellipsis;-webkit-line-clamp: 1;}.clamp2 {display: -webkit-box;word-break: break-all;overflow: hidden;-webkit-box-orient: vertical;text-overflow: ellipsis;-webkit-line-clamp: 2;}.clamp3 {display: -webkit-box;word-break: break-all;overflow: hidden;-webkit-box-orient: vertical;text-overflow: ellipsis;-webkit-line-clamp: 3;}.scroll-view {height: 100%;}.swipe-cell {display: block;border-bottom: thin solid #f2f2f2;}.swipe-cell:last-child {border-bottom: none;}.user-item {display: flex;flex-direction: row;align-items: stretch;padding: 20rpx;box-sizing: border-box;}.user-avatar {width: 100rpx;height: 100rpx;display: block;border-radius: 50rpx;box-sizing: border-box;overflow: hidden;}.user-info-group {flex: 1;overflow: hidden;margin-left: 20rpx;display: flex;flex-direction: column;align-items: stretch;justify-content: center;}.user-name {font-size: 32rpx;color: #000;line-height: 1;margin-bottom: auto;}.user-desc {font-size: 24rpx;color: #999;line-height: 1;margin-top: auto;}.user-button-group {display: flex;flex-direction: row;align-items: stretch;}.user-button-follow {width: 160rpx;background: orange;font-size: 28rpx;color: white;display: flex;flex-direction: row;align-items: center;justify-content: center;}.user-button-chat {width: 160rpx;background: #09BB07;font-size: 28rpx;color: white;display: flex;flex-direction: row;align-items: center;justify-content: center;}
</style>

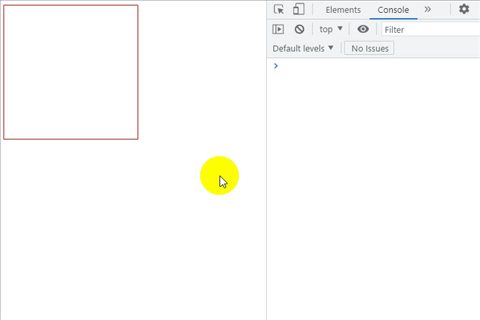
四.什么时候向左回弹打开? 什么时候向右回弹关闭

上图中,红色区域是一条辅助线,被固定在了组件的最由边的位置,为了好演示,我把宽度设置的比较宽,正常1px就够了,蓝色区域为侧滑面板的右半边。
当我们滑动完,放手后,红色区域与蓝色区域相交,这时应该向左回弹打开。
当我们滑动完,放手后,红色区域与蓝色区域不相交,这时应该向右回弹关闭。
<template><view class="swipe-cell__container"><scroll-view class="swipe-cell__inner" enable-flex scroll-x><view class="swipe-cell__content"><slot></slot></view><view class="swipe-cell__right"><view class="swipe-cell__right-half"></view><slot name="right"></slot></view></scroll-view><view class="swipe-cell__guide-line"></view></view>
</template><script>...
</script><style scoped>.swipe-cell__container {position: relative;width: 100%;}....swipe-cell__right-half {position: absolute;left: 50%;top: 0;width: 50%;height: 100%;background: blue;}.swipe-cell__guide-line {position: absolute;width: 6px;top: 0;bottom: 0;right: 0;background: red;}
</style>
问题转化为怎么判断红色区域与蓝色区域相交,我们的主角正式登场,使用IntersectionObserver可监听两个或多个组件节点在布局位置上的相交状态。
-
IntersectionObserver wx.createIntersectionObserver(Object component, Object options)
- 在页面中使用: IntersectionObserver wx.createIntersectionObserver(this, {observeAll: true}),observeAll为true可同时监听多个节点
- 在自定义组件中使用:IntersectionObserver this.createIntersectionObserver({observeAll: true})
-
IntersectionObserver IntersectionObserver.relativeTo(string selector, Object margins)
- 使用选择器指定一个节点,作为参照区域
-
IntersectionObserver.observe(string targetSelector, IntersectionObserver.observeCallback callback)
- 指定目标节点的选择器并监听由relativeTo指定的参照区域与目标节点是否相交,由于我们需要监听多个video节点,所以这里的目标节点选择器我们使用class选择器即可。
- 当目标节点与参照区域相交时,callback(res)返回的res中的intersectionRatio大于0
- 当目标节点与参照区域不相交时,callback(res)返回的res中的intersectionRatio等于0
-
IntersectionObserver.disconnect()
- 最后当页面或组件销毁的时候,需调用IntersectionObserver.disconnect()取消监听
<template><view class="swipe-cell__container"><scroll-view class="swipe-cell__inner" enable-flex scroll-x @touchend="onTouchEnd($event)"><view class="swipe-cell__content"><slot></slot></view><view class="swipe-cell__right"><view id="observable" class="swipe-cell__right-half"></view><slot name="right"></slot></view></scroll-view><view id="guide-line" class="swipe-cell__guide-line"></view></view>
</template><script>export default {name:"swipe-cell",data() {return {intersectionObserver: undefined,intersectionRatio: -1,};},mounted() {this.intersectionObserver = uni.createIntersectionObserver(this)this.intersectionObserver.relativeTo("#guide-line").observe("#observable", (res) => {let intersectionRatio = res.intersectionRatiothis.intersectionRatio = intersectionRatio})},unmounted() {this.intersectionObserver.disconnect()},methods: {onTouchEnd: function(event) {if(this.intersectionRatio > 0) {//红色区域与蓝色区域相交,向左回弹打开console.log("onTouchEnd", "向左回弹打开")} else {//红色区域与蓝色区域不相交,向右回弹关闭console.log("onTouchEnd", "向右回弹关闭")}}}}
</script><style scoped>...
</style>
五.怎么控制回弹?
通过设置scroll-view的scroll-into-view属性的值,滚动到指定元素来控制回弹,并设置scroll-with-animation为true来开启自动滚动动画效果,我们给内容区域的标签指定id为content,给侧滑面板的标签指定id为right,那么:
当红色区域与蓝色区域相交时,设置scroll-into-view属性的值为right,向左回弹打开
当红色区域与蓝色区域不相交,设置scroll-into-view属性的值为content,向左回弹关闭
<template><view class="swipe-cell__container"><scroll-view class="swipe-cell__inner" enable-flex scroll-x @touchend="onTouchEnd($event)" :scroll-into-view="scrollIntoView" scroll-with-animation><view id="content" class="swipe-cell__content"><slot></slot></view><view id="right" class="swipe-cell__right"><view id="observable" class="swipe-cell__right-half"></view><slot name="right"></slot></view></scroll-view><view id="guide-line" class="swipe-cell__guide-line"></view></view>
</template><script>export default {name:"swipe-cell",data() {return {intersectionObserver: undefined,intersectionRatio: -1,scrollIntoView: "content"};},...methods: {onTouchEnd: function(event) {if(this.intersectionRatio > 0) {//红色区域与蓝色区域相交,向左回弹打开console.log("onTouchEnd", "向左回弹打开")this.scrollIntoView = "right"} else {//红色区域与蓝色区域不相交,向右回弹关闭console.log("onTouchEnd", "向右回弹关闭")this.scrollIntoView = "content"}}}}
</script><style scoped>...
</style>

仔细观察上图,我们回发现有一个问题,当我们两次放手,两次的相交状态从不相交到相交或者从相交到不相交时,能正常回弹,
从相交到相交或者从不相交到不相交时,则不会回弹,这是因为:
从相交到相交的过程中,scroll-into-view始终为right不变
从不相交到不相交的过程中,scroll-into-view始终为content不变
要解决这个问题,我们需要在每一次放手的时候,产生一个唯一的随机数,给内容区域的标签指定id为content-随机数,给侧滑面板的标签指定id为right−{随机数},给侧滑面板的标签指定id为right-随机数,给侧滑面板的标签指定id为right−{随机数},最后,如果是回弹打开,设置scroll-into-view的值为right-随机数,如果是回弹关闭,设置scroll−into−view的值为content−{随机数},如果是回弹关闭,设置scroll-into-view的值为content-随机数,如果是回弹关闭,设置scroll−into−view的值为content−{随机数}。
这个随机数的生成规则,你可以自己写算法实现,这里我用了一种比较巧妙的办法,那就是在事件触发的回调中,系统会给我们一个event对象,我们通过这个event对象的timeStamp属性,可以获取到事件触发的时间戳,这个时间戳必然是唯一的,因此event.timesSamp就可以作为这个唯一的随机数来使用。
<template><view class="swipe-cell__container"><scroll-view class="swipe-cell__inner" enable-flex scroll-x @touchend="onTouchEnd($event)" :scroll-into-view="scrollIntoView" scroll-with-animation><view :id="'content-' + random" class="swipe-cell__content"><slot></slot></view><view :id="'right-' + random" class="swipe-cell__right"><view id="observable" class="swipe-cell__right-half"></view><slot name="right"></slot></view></scroll-view><view id="guide-line" class="swipe-cell__guide-line"></view></view>
</template><script>export default {name:"swipe-cell",data() {return {intersectionObserver: undefined,intersectionRatio: -1,scrollIntoView: "content-0",random: 0,};},...methods: {onTouchEnd: function(event) {this.random = event.timeStamp || 0if(this.intersectionRatio > 0) {//红色区域与蓝色区域相交,向左回弹打开console.log("onTouchEnd", "向左回弹打开")this.$nextTick(() => {this.scrollIntoView = "right-" + this.random})} else {//红色区域与蓝色区域不相交,向右回弹关闭console.log("onTouchEnd", "向右回弹关闭")this.$nextTick(() => {this.scrollIntoView = "content-" + this.random})}}}}
</script><style scoped>...
</style>

最后,我们把辅助色块去掉,就大功告成了。
<style scoped>....swipe-cell__right-half {position: absolute;left: 50%;top: 0;width: 50%;height: 100%;z-index: -1;}.swipe-cell__guide-line {position: absolute;width: 1px;top: 0;bottom: 0;right: 0;z-index: -1;}
</style>
六.完整代码
<template><view class="swipe-cell__container"><scroll-view class="swipe-cell__inner" enable-flex scroll-x @touchend="onTouchEnd($event)" :scroll-into-view="scrollIntoView" scroll-with-animation><view :id="'content-' + random" class="swipe-cell__content"><slot></slot></view><view :id="'right-' + random" class="swipe-cell__right"><view id="observable" class="swipe-cell__right-half"></view><slot name="right"></slot></view></scroll-view><view id="guide-line" class="swipe-cell__guide-line"></view></view>
</template><script>export default {name:"swipe-cell",data() {return {intersectionObserver: undefined,intersectionRatio: -1,scrollIntoView: "content-0",random: 0,};},mounted() {this.intersectionObserver = uni.createIntersectionObserver(this)this.intersectionObserver.relativeTo("#guide-line").observe("#observable", (res) => {let intersectionRatio = res.intersectionRatiothis.intersectionRatio = intersectionRatio})},unmounted() {this.intersectionObserver.disconnect()},methods: {onTouchEnd: function(event) {this.random = event.timeStamp || 0if(this.intersectionRatio > 0) {//红色区域与蓝色区域相交,向左回弹打开console.log("onTouchEnd", "向左回弹打开")this.$nextTick(() => {this.scrollIntoView = "right-" + this.random})} else {//红色区域与蓝色区域不相交,向右回弹关闭console.log("onTouchEnd", "向右回弹关闭")this.$nextTick(() => {this.scrollIntoView = "content-" + this.random})}}}}
</script><style scoped>.swipe-cell__container {position: relative;width: 100%;}.swipe-cell__inner /deep/ ::-webkit-scrollbar {display: block;width: 0px !important;height: 0px !important;}.swipe-cell__inner {width: 100%;display: inline-flex;flex-direction: row;align-items: flex-start;white-space: nowrap;}.swipe-cell__content {display: inline-block;width: 100%;flex-shrink: 0;position: relative;white-space: normal;overflow: hidden;}.swipe-cell__right {align-self: stretch;display: inline-flex;flex-direction: row;align-items: stretch;position: relative;white-space: normal;}.swipe-cell__right-half {position: absolute;left: 50%;top: 0;width: 50%;height: 100%;z-index: -1;}.swipe-cell__guide-line {position: absolute;width: 1px;top: 0;bottom: 0;right: 0;z-index: -1;}
</style>
相关文章:
19_微信小程序之优雅实现侧滑菜单
19_微信小程序之优雅实现侧滑菜单一.先上效果图 要实现这样一个效果,布局其实很简单,整体布局是一个横向滚动的scroll-view,难点在于怎么控制侧滑菜单的回弹,以及寻找回弹的边界条件? 此篇文章主要是基于uni-app来实现的…...

JSP中JDBC与javaBean学习笔记
本博文源于博主偷偷复习期末的java web,博文主要讲述JDBC API与JavaBean,涉及driver,driver Manager\connection、statement接口、PreparedStatement接口、ResultSet接口,JavaBean包含一些标记介绍。 1.JDBC API JDBC由一组接口和类组成&am…...

编译Android系统源码推荐的电脑配置
工欲善其事,必先利其器。 看到很多客户,搞Android产品开发,用的电脑配置是惨不忍睹。 这些老板脑子有坑吗... ------------ 编译Android9推荐电脑配置: 处理器:酷睿i7 5代系列 8线程以上 内存: 8GB以上…...

加油站会员管理小程序实战开发教程10
上一篇我们介绍了计算距离及到店导航的功能,本篇我们介绍一下今日油价的功能。 如果要按日显示最新的数据,那么我们首先需要有数据源来存放每日的油价数据。这里涉及数据源的时候要考虑你的数据是只录入一条,还是每日录入一条。 录入一条呢,比较简单,但有个问题是如果我…...

shell编程之条件判断和流程控制
typora-copy-images-to: pictures typora-root-url: …\pictures 文章目录typora-copy-images-to: pictures typora-root-url: ..\..\pictures本节课程目标一、条件判断语法结构2. 条件判断相关参数㈠ 判断文件类型㈡ 判断文件权限㈢ 判断文件新旧㈣ 判断整数㈤ 判断字符串㈥ 多…...

第一次接触jquery
文章目录一.关于jqurey二.什么是jqurey三.上课实例1.表格 2.鼠标移动效果 3隐藏和显示效果代码如下注意一.关于jqurey 简而言之:jQuery 是一个 JavaScript 库。 jQuery 极大地简化了 JavaScript 编程。 二.什么是jqurey jQuery 是一个 JavaScript 函数库。 jQu…...

Vue中 引入使用 babel-polyfill 兼容低版本浏览器
注意:本文主要介绍的 vue-cli 版本:3.x, 4.x; 最近在项目中使用 webpack 打包后升级,用户反馈使用浏览器(chrome 45)访问白屏。经过排查发现:由于 chrome 45 无法兼容 ES6 语法导致的…...
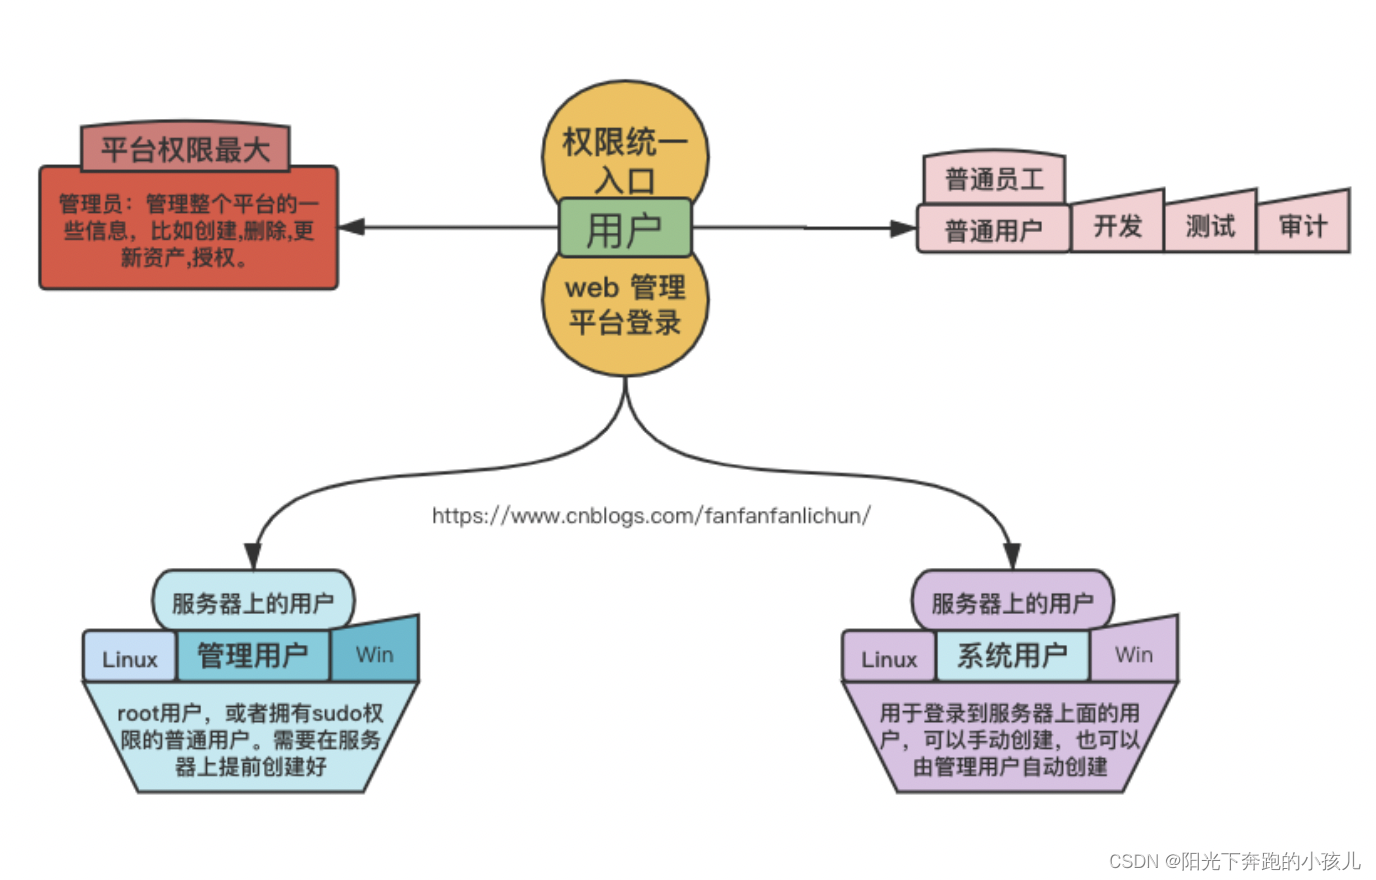
ArcGIS Enterprise on Kubernetes 11.0安装示例
博客主页:https://tomcat.blog.csdn.net 博主昵称:农民工老王 主要领域:Java、Linux、K8S 期待大家的关注💖点赞👍收藏⭐留言💬 目录安装前置条件基本安装解压文件生成秘钥执行安装脚本配置DNS方法一方法二…...
js 防抖函数 节流函数
某些事件中(如 onresize onscroll onkeydown onkeyup onmousemove …),会连续触发函数的执行,如果函数执行一些耗时的操作(如请求数据…),会影响性能,也有可能造成服务器压力。这时可以用 防抖函数 或 节流函数解决这种问题。 防…...

Yarn节点unhealthy解决办法
这几天用Spark计算任务时,发现yarn上有两个节点不参与计算,很是tm的离谱。使用下面的命令查看Yarn上的nodemanager节点状态yarn node -list -all发现两个节点处于unhealthy状态。经过Google查明原因:这种情况一般是因为那个节点上HDFS文件过多…...
【jumpServer 功能梳理】
用户管理 1.1 用户列表 创建jumpServe 账号 ;角色分为用户 管理员;更新账号信息;查看用户详情以及授权的资产; 1.2 用户组 用户组,这个组的意义在于用一个统称对接资源;用户组包含多个用户,可以操作增加删除…...
中国各省人力资本测算就业人员受教育程度构成(2000-2021年)
数据来源:自主整理 时间跨度:2000-2021年 区域范围:全国各省 指标说明: 人力资本测算公式:(小学*6初中*9高中*12大专及以上*16)/六岁及以上人口 参考文献: [1]罗仁福, 刘承芳,…...

java面试题-集合篇
Collection1.Collection有哪些类?Java集合框架中的Collection接口是所有集合类的基础接口,定义了一些基本的集合操作,如添加元素、删除元素、判断是否包含某个元素等。常见的集合类包括List、Set和Queue。ListList接口定义了按照索引访问和操…...
)
Python 异步: 同时运行多个协程(10)
asyncio 的一个好处是我们可以同时运行许多协程。这些协同程序可以在一个组中创建并存储,然后同时一起执行。这可以使用 asyncio.gather() 函数来实现。 让我们仔细看看。 1. 什么是 Asyncio gather() asyncio.gather() 模块函数允许调用者将多个可等待对象组合在一…...
SVN 获取多版本间的更新内容
文章目录背景介绍操作步骤 - 获取某段时间内的代码更新内容背景介绍 公司有个项目期初明确要做微信小程序,没有做其他端的意向,并且当时团队人数有限,没有项目实践过 uniapp,项目时间周期紧,就没有用 uniapp 去实现 然…...

c++ const使用说明
作⽤ 1. 修饰变量,说明该变量不可以被改变; 2. 修饰指针,分为指向常量的指针和指针常量; 3. 常量引⽤,经常⽤于形参类型,即避免了拷⻉,⼜避免了函数对值的修改; 4. 修饰成员函数…...

VSTO 开发 EXCEL 委托与多线程的极简示例
VSTO 开发 EXCEL 委托与多线程的极简示例问题解决步骤代码问题 这几天做 excel 加载项时遇到一个问题,对话框弹窗显示后,需要等待网络数据的返回来填充 ListBox 控件,由于网络延迟问题,整个窗体连带 Excel 一起白屏卡顿 5-10秒&a…...

spring之使用Spring的AOP
文章目录前言一、准备工作1、添加相应的依赖2、添加相应的命名空间3、创建目标类4、创建切面二、使用AOP1.在切面类中编写增强代码以及切点表达式2、开启aspectj的自动代理3、测试类4、测试结果前言 Spring对AOP的实现包括以下三种方式 1、Spring框架结合AspectJ框架实现的AOP…...

LeetCode LCP 66. 最小展台数量
力扣嘉年华将举办一系列展览活动,后勤部将负责为每场展览提供所需要的展台。 已知后勤部得到了一份需求清单,记录了近期展览所需要的展台类型, demand[i][j] 表示第 i 天展览时第 j 个展台的类型。 在满足每一天展台需求的基础上,…...

设计模式之模板方法模式
什么是模板方法模式 模板方法模式定义了一个操作中算法的框架,而将一些步骤延迟到子类中,使得子类可以不改变一个算法的结构就可以重定义该算法的某些特定步骤。 模板方法模式主要包含几下几个角色: AbstractClass(抽…...

2025.12晶晨S905L3S-L3SB安卓9通刷实战:当贝桌面加持,解锁多品牌盒子新玩法
1. 晶晨S905L3S-L3SB通刷包的前世今生 第一次听说晶晨S905L3S-L3SB芯片能通刷时,我正对着家里三台不同品牌的电视盒子发愁。这些盒子有的来自运营商赠送,有的是二手市场淘来的,虽然硬件配置相近,但系统体验天差地别。直到发现这个…...

League-Toolkit:重新定义英雄联盟游戏体验的智能助手
League-Toolkit:重新定义英雄联盟游戏体验的智能助手 【免费下载链接】League-Toolkit 兴趣使然的、简单易用的英雄联盟工具集。支持战绩查询、自动秒选等功能。基于 LCU API。 项目地址: https://gitcode.com/gh_mirrors/le/League-Toolkit League-Toolkit …...
)
Java结构化并发崩溃了?手把手教你用VirtualThread+StructuredTaskScope定位线程泄漏与作用域越界(附JDK21真机调试录屏)
第一章:Java结构化并发崩溃了?手把手教你用VirtualThreadStructuredTaskScope定位线程泄漏与作用域越界(附JDK21真机调试录屏)Java 21 正式引入结构化并发(Structured Concurrency),其核心组件 …...

Java 无人图书借阅系统设计与完整源码实现
以下是一个基于Java的无人图书借阅系统的设计与完整源码实现方案,涵盖系统架构、核心模块、数据库设计、关键代码实现及部署建议:一、系统架构设计1. 分层架构表现层:用户端:微信小程序(UniApp开发) H5页面…...

【ArkTS】基础语法
一、ArkTS 语言简介 ArkTS 是一种设计用于构建高性能应用的编程语言。它在继承 TypeScript 语法的基础上进行了优化,以提供更高的性能和开发效率。 许多编程语言在设计之初未考虑移动设备,导致应用运行缓慢、低效且功耗大。随着移动设备在日常生活中越来越普遍,针对移动环境…...
选型指南)
Web3D开发入门:5大引擎(Direct3D、OpenGL、UE、Unity、Three.js)选型指南
Web3D开发入门:5大引擎选型实战指南 当虚拟展厅、数字孪生和元宇宙应用席卷各行业时,选择合适的三维引擎成为开发者面临的首个关键决策。本文将带您深入剖析Direct3D、OpenGL、Unreal Engine、Unity和Three.js五大主流方案的技术特性与商业价值ÿ…...

RVC与FunASR联动:中文语音识别+AI翻唱端到端流水线
RVC与FunASR联动:中文语音识别AI翻唱端到端流水线 1. 引言:当AI翻唱遇见语音识别 想象一下这个场景:你有一段喜欢的歌曲音频,想用自己的声音翻唱它,但苦于记不住歌词,或者原唱语速太快跟不上。传统的做法…...

AI读脸术备份恢复指南:手把手教你搭建高可用人脸识别服务
AI读脸术备份恢复指南:手把手教你搭建高可用人脸识别服务 1. 项目背景与需求分析 人脸识别技术已经成为现代数字服务的重要组成部分,从电商个性化推荐到智能安防系统,都依赖这项技术的稳定运行。AI读脸术镜像基于OpenCV DNN深度神经网络构建…...

京东开放平台应用申请实战:从零到一,避开那些“看不见”的坑
1. 为什么你需要这份京东开放平台避坑指南? 第一次申请京东开放平台应用时,我踩遍了所有能踩的坑。记得当时为了赶项目进度,直接跳过了官方文档的"不重要章节",结果在云鼎环境配置环节卡了整整三天。后来才发现…...

USB251xB集线器I²C控制库:嵌入式USB设备扩展实战指南
1. 项目概述SparkFun USB Hub Qwiic USB251x 是一款面向嵌入式原型开发与量产过渡阶段的轻量级 USB 2.0 集线器控制库,专为 SparkFun 自研的 Qwiic 兼容 USB251xB 系列 Hub 模块(SPX-18014)设计。该库并非通用 USB 协议栈,而是聚焦…...