【jsthreeJS】入门three,并实现3D汽车展示厅,附带全码
首先放个最终效果图:
三维(3D)概念:
三维(3D)是一个描述物体在三个空间坐标轴上的位置和形态的概念。相比于二维(2D)只有长度和宽度的平面,三维增加了高度或深度这一维度
在三维空间中,我们使用三个独立的坐标轴来描述物体的位置。通常使用笛卡尔坐标系,即X、Y和Z轴。其中,X轴表示横向,Y轴表示纵向,Z轴表示纵深或垂直方向。通过在这些轴上的不同值组合,可以确定一个点或对象在三维空间中的位置
大家可以three编辑器中感受一下三维:three.js editor
ps:默认英文,可以切换中文语言
three前提概念
以舞台展示为例:
- 场景
Sence相当于一个舞台,在这里是布置场景物品和表演者表演的地方 - 相机
Carma相当于观众的眼睛去观看 - 几何体
Geometry相当于舞台的表演者 - 灯光
light相当于舞台灯光照射控制 Controls相当于这出舞台剧的总导演
创建场景与相机
<html><head><meta charset="utf-8"><title>My first three.js app</title>
</head><body><script src="https://code.jquery.com/jquery-3.6.0.min.js"></script><script type="importmap">{"imports": {"three": "./three.module.js"}}</script><script type="module">import { Scene, WebGLRenderer, PerspectiveCamera } from 'three'let scene,renderer,camera//创建场景const setScene = () => {scene = new Scene()renderer = new WebGLRenderer()//调用 setSize() 方法设置渲染器的大小为当前窗口的宽度和高度renderer.setSize(window.innerWidth, window.innerHeight)//将渲染器的 DOM 元素添加到页面的 <body> 元素中document.body.appendChild(renderer.domElement)}//相机的默认坐标const defaultMap = {x: 0,y: 10,z: 20,}//创建相机  const setCamera = () => {const { x, y, z } = defaultMap//创建一个 PerspectiveCamera 对象,并传入参数来设置透视相机的属性:视野角度为 45 度,宽高比为窗口的宽高比,近裁剪面为 1,远裁剪面为 1000camera = new PerspectiveCamera(45, window.innerWidth / window.innerHeight, 1, 1000)//用 position.set() 方法将相机的位置设置为之前从 defaultMap 中提取的坐标camera.position.set(x, y, z)}(function () {setScene()setCamera()})()</script>
</body></html>
PerspectiveCamera的详细说明:
new THREE.PerspectiveCamera构造函数用来创建透视投影相机,该构造函数总共有四个参数,分别是fov,aspect,near,far 。
fov表示摄像机视锥体垂直视野角度,最小值为0,最大值为180,默认值为50,实际项目中一般都定义45,因为45最接近人正常睁眼角度;aspect表示摄像机视锥体长宽比,默认长宽比为1,即表示看到的是正方形,实际项目中使用的是屏幕的宽高比;near表示摄像机视锥体近端面,这个值默认为0.1,实际项目中都会设置为1;far表示摄像机视锥体远端面,默认为2000,这个值可以是无限的,说的简单点就是我们视觉所能看到的最远距离。
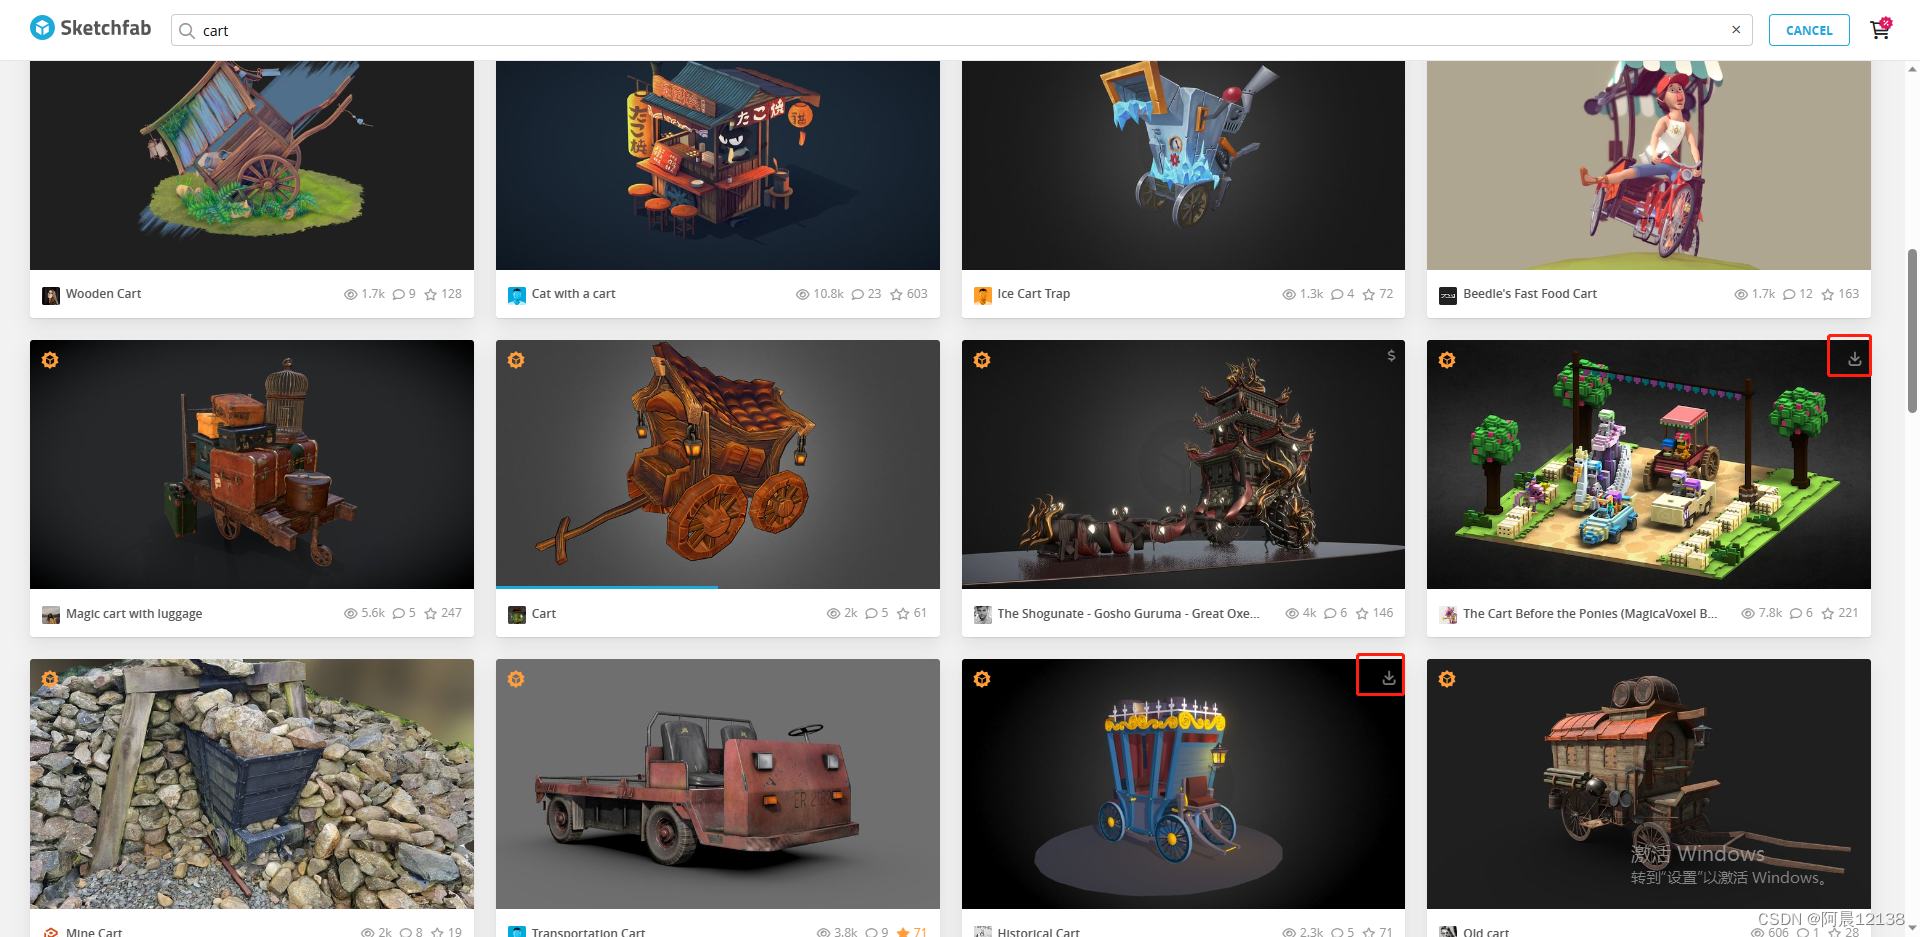
引入模型
国外一个3d模型下载网站,里面有很多免费的模型下载 点击红框处下载
Log in to your Sketchfab account - Sketchfab
<html><head><meta charset="utf-8"><title>My first three.js app</title>
</head><body><script src="https://code.jquery.com/jquery-3.6.0.min.js"></script><script type="importmap">{"imports": {"three": "./three.module.js"}}</script><script type="module">import { GLTFLoader } from 'three/examples/jsm/loaders/GLTFLoader'import { Scene, WebGLRenderer, PerspectiveCamera } from 'three'let scene, renderer, camera, directionalLight, dhelperlet isLoading = truelet loadingWidth = 0//创建场景const setScene = () => {scene = new Scene()renderer = new WebGLRenderer()renderer.setSize(window.innerWidth, window.innerHeight)document.body.appendChild(renderer.domElement)}//相机的默认坐标const defaultMap = {x: 0,y: 10,z: 20,}//创建相机  const setCamera = () => {const { x, y, z } = defaultMapcamera = new PerspectiveCamera(45, window.innerWidth / window.innerHeight, 1, 1000)camera.position.set(x, y, z)}//通过Promise处理一下loadfile函数const loader = new GLTFLoader() //引入模型的loader实例const loadFile = (url) => {return new Promise(((resolve, reject) => {loader.load(url,(gltf) => {resolve(gltf)}, ({ loaded, total }) => {let load = Math.abs(loaded / total * 100)loadingWidth = loadif (load >= 100) {setTimeout(() => {isLoading = false}, 1000)}console.log((loaded / total * 100) + '% loaded')},(err) => {reject(err)})}))}(async function () {const gltf = await loadFile('./assets/scene.gltf')setScene()setCamera()scene.add(gltf.scene)})()</script>
</body></html>
加载模型代码讲解:
loader.load 用来加载和解析 glTF 文件,接受四个参数:
- 第一个参数
url是要加载的 glTF 模型文件的路径。 - 第二个参数是一个回调函数,当模型加载成功时会被调用
- 第三个参数是一个回调函数,用于跟踪加载进度。回调函数的
{ loaded, total }参数表示已加载和总共需要加载的文件数量,通过计算百分比可以得到当前加载进度。 - 第四个参数是一个回调函数,当加载出错时会被调用。
创建灯光
<html><head><meta charset="utf-8"><title>My first three.js app</title>
</head><body><script src="https://code.jquery.com/jquery-3.6.0.min.js"></script><script type="importmap">{"imports": {"three": "./three.module.js"}}</script><script type="module">import { GLTFLoader } from 'three/examples/jsm/loaders/GLTFLoader'import { Scene, WebGLRenderer, PerspectiveCamera } from 'three'let scene, renderer, camera, directionalLight, dhelperlet isLoading = truelet loadingWidth = 0//创建场景const setScene = () => {scene = new Scene()renderer = new WebGLRenderer()renderer.setSize(window.innerWidth, window.innerHeight)document.body.appendChild(renderer.domElement)}//相机的默认坐标const defaultMap = {x: 0,y: 10,z: 20,}//创建相机  const setCamera = () => {const { x, y, z } = defaultMapcamera = new PerspectiveCamera(45, window.innerWidth / window.innerHeight, 1, 1000)camera.position.set(x, y, z)}// 设置灯光const setLight = () => {// 创建一个颜色为白色(0xffffff),强度为 0.5 的平行光对象directionalLight = new DirectionalLight(0xffffff, 0.5)//设置平行光的位置,这里将其放置在三维坐标 (-4, 8, 4) 的位置directionalLight.position.set(-4, 8, 4)//创建一个平行光辅助对象,用于可视化平行光的方向和强度dhelper = new DirectionalLightHelper(directionalLight, 5, 0xff0000)//创建一个颜色为白色(0xffffff),半球颜色为白色(0xffffff),强度为 0.4 的半球光对象hemisphereLight = new HemisphereLight(0xffffff, 0xffffff, 0.4)hemisphereLight.position.set(0, 8, 0)//创建一个半球光辅助对象,用于可视化半球光的方向和强度hHelper = new HemisphereLightHelper(hemisphereLight, 5)//添加到场景scene.add(directionalLight)//添加到场景scene.add(hemisphereLight)}//使场景、照相机、模型不停调用const loop = () => {//requestAnimationFrame(loop) 是浏览器提供的方法,用于在下一次重绘页面之前调用回调函数 loop。这样可以创建一个循环,使场景、相机和模型不断被渲染更新requestAnimationFrame(loop)//使用渲染器 renderer 渲染场景 scene 中的模型,使用相机 camera 进行投影renderer.render(scene, camera)}//通过Promise处理一下loadfile函数const loader = new GLTFLoader() //引入模型的loader实例const loadFile = (url) => {return new Promise(((resolve, reject) => {// loader.load 用来加载和解析 glTF 文件loader.load(url,(gltf) => {resolve(gltf)}, ({ loaded, total }) => {let load = Math.abs(loaded / total * 100)loadingWidth = loadif (load >= 100) {setTimeout(() => {isLoading = false}, 1000)}console.log((loaded / total * 100) + '% loaded')},(err) => {reject(err)})}))}(async function () {const gltf = await loadFile('./assets/scene.gltf')setScene()setCamera()setLight()scene.add(gltf.scene)loop()})()</script>
</body></html>
DirectionalLight 和 HemisphereLight 是 Three.js 中的两种灯光类型,分别表示平行光和半球光。它们用于模拟现实世界中的光照效果
此刻模型已经可以看见了,如何你只能看见黑黑的一片,无法看到模型,一般两个原因:
- 模型是否加载成功
try {gltf = await loadFile('./assets/scene.gltf');console.log('Model loading completed:', gltf);
} catch (error) {console.error('Error loading model:', error);
}- 相机位置偏差,调整下相机(defaultMap)的位置
控制模型
这一步完成之后,模型就可以通过鼠标移动,旋转了
<html><head><meta charset="utf-8"><title>My first three.js app</title>
</head><body><script src="https://code.jquery.com/jquery-3.6.0.min.js"></script><script type="importmap">{"imports": {"three": "./three.module.js"}}</script><script type="module">import { Scene, WebGLRenderer, PerspectiveCamera, DirectionalLight, HemisphereLight, DirectionalLightHelper, HemisphereLightHelper } from 'three'import { GLTFLoader } from './jsm/loaders/GLTFLoader.js'import { OrbitControls } from './jsm/controls/OrbitControls.js'let scene, renderer, camera, directionalLight, hemisphereLight, dhelper, hHelper, controlslet isLoading = truelet loadingWidth = 0//创建场景const setScene = () => {scene = new Scene()renderer = new WebGLRenderer()renderer.setSize(window.innerWidth, window.innerHeight)document.body.appendChild(renderer.domElement)}//相机的默认坐标const defaultMap = {x: 0,y: 10,z: 20,}//创建相机  const setCamera = () => {const { x, y, z } = defaultMapcamera = new PerspectiveCamera(45, window.innerWidth / window.innerHeight, 1, 1000)camera.position.set(x, y, z)}// 设置灯光const setLight = () => {directionalLight = new DirectionalLight(0xffffff, 0.5)directionalLight.position.set(-4, 8, 4)dhelper = new DirectionalLightHelper(directionalLight, 5, 0xff0000)hemisphereLight = new HemisphereLight(0xffffff, 0xffffff, 0.4)hemisphereLight.position.set(0, 8, 0)hHelper = new HemisphereLightHelper(hemisphereLight, 5)scene.add(directionalLight)scene.add(hemisphereLight)}//使场景、照相机、模型不停调用const loop = () => {requestAnimationFrame(loop)renderer.render(scene, camera)controls.update()}// 设置模型控制const setControls = () => {// 创建一个新的 OrbitControls 对象,并将它绑定到相机 camera 和渲染器的 DOM 元素 renderer.domElement 上controls = new OrbitControls(camera, renderer.domElement)// 设置相机的最大仰角(上下旋转角度),这里将其限制为 0.9 * π / 2controls.maxPolarAngle = 0.9 * Math.PI / 2//启用相机的缩放功能,允许用户通过鼠标滚轮或触摸手势进行缩放操作controls.enableZoom = true//监听控制器的变化事件,当用户操作控制器导致相机位置发生改变时,触发渲染函数 rendercontrols.addEventListener('change', render)}//在相机位置发生变化时,将新的相机位置保存到 defaultMap 对象中const render = () => {defaultMap.x = Number.parseInt(camera.position.x)defaultMap.y = Number.parseInt(camera.position.y)defaultMap.z = Number.parseInt(camera.position.z)}//通过Promise处理一下loadfile函数const loader = new GLTFLoader() //引入模型的loader实例const loadFile = (url) => {return new Promise(((resolve, reject) => {// loader.load 用来加载和解析 glTF 文件loader.load(url,(gltf) => {resolve(gltf)}, ({ loaded, total }) => {let load = Math.abs(loaded / total * 100)loadingWidth = loadif (load >= 100) {setTimeout(() => {isLoading = false}, 1000)}console.log((loaded / total * 100) + '% loaded')},(err) => {reject(err)})}))}(async function () {setScene()setCamera()setLight()setControls()const gltf = await loadFile('./assets/scene.gltf')scene.add(gltf.scene)loop()})()</script>
</body></html>
ps:这段代码没问题,可正常运行,前两三个可能会有些引入缺失或者声明变量的缺失,大家参考这个补齐,我就不去查漏补缺了
改变车身颜色
scene 有一个traverse函数,它回调了所有模型的子模型信息,只要我们找到对应name属性,就可以更改颜色,和增加贴图等等
//设置车身颜色const setCarColor = (index) => {//Color 是 Three.js 中的一个类,用于表示颜色。它的作用是创建和管理三维场景中物体的颜色const currentColor = new Color(colorAry[index])// 使用 Three.js 中的 traverse 方法遍历场景中的每个子对象scene.traverse(child => {if (child.isMesh) {console.log(child)if (child.name) {//将当前子对象的材质颜色设置为 currentColor,实现改变颜色的效果child.material.color.set(currentColor)}}})}整个的完整代码:
<html><head><meta charset="utf-8"><title>My first three.js app</title><style>body {margin: 0;}.maskLoading {background: #000;position: fixed;display: flex;justify-content: center;align-items: center;top: 0;left: 0;bottom: 0;right: 0;z-index: 1111111;color: #fff;}.maskLoading .loading {width: 400px;height: 20px;border: 1px solid #fff;background: #000;overflow: hidden;border-radius: 10px;}.maskLoading .loading div {background: #fff;height: 20px;width: 0;transition-duration: 500ms;transition-timing-function: ease-in;}canvas {width: 100%;height: 100%;margin: auto;}.mask {color: #fff;position: absolute;bottom: 0;left: 0;width: 100%;}.flex {display: flex;flex-wrap: wrap;padding: 20px;}.flex div {width: 10px;height: 10px;margin: 5px;cursor: pointer;}</style>
</head><body><div class="boxs"><div class="maskLoading"><div class="loading"><div class="oneDiv"></div></div><div style="padding-left: 10px;" class="twoDiv"></div></div><div class="mask"><p class="realTimeDate"></p><button class="rotatingCar">转动车</button><button class="stop">停止</button><div class="flex" id="colorContainer"></div></div></div><script src="https://code.jquery.com/jquery-3.6.0.min.js"></script><script type="importmap">{"imports": {"three": "./three.module.js"}}</script><script type="module">import {Color,DirectionalLight,DirectionalLightHelper,HemisphereLight,HemisphereLightHelper,PerspectiveCamera,Scene,WebGLRenderer} from 'three'import { GLTFLoader } from './jsm/loaders/GLTFLoader.js'import { OrbitControls } from './jsm/controls/OrbitControls.js'//车身颜色数组const colorAry = ["rgb(216, 27, 67)", "rgb(142, 36, 170)", "rgb(81, 45, 168)", "rgb(48, 63, 159)", "rgb(30, 136, 229)", "rgb(0, 137, 123)","rgb(67, 160, 71)", "rgb(251, 192, 45)", "rgb(245, 124, 0)", "rgb(230, 74, 25)", "rgb(233, 30, 78)", "rgb(156, 39, 176)","rgb(0, 0, 0)"]let scene, camera, renderer, controls, floor, dhelper, hHelper, directionalLight, hemisphereLightlet gltflet isLoading = truelet loadingWidth = 0//相机的默认坐标const defaultMap = {x: 0,y: 10,z: 20,}//遮罩层const maskLayer = () => {if (isLoading) {$('.maskLoading').hide();} else {$('.maskLoading').show()}}maskLayer()// 进度const schedule = () => {let timer = setInterval(function () {$('oneDiv').css('width', `${loadingWidth}%`);$('twoDiv').text(`${loadingWidth}%`);if (loadingWidth == 100) {clearInterval(timer);}}, 10);}schedule()//实时更新x,y,zconst realTime = () => {let timer = setInterval(function () {$('realTimeDate').text(`x:${defaultMap.x} y:${defaultMap.y} z:${defaultMap.z}`);}, 10);}// 生成颜色旋转块$.each(colorAry, function (index, item) {$('<div>').appendTo('#colorContainer') // 在 #colorContainer 中创建一个 <div> 元素.css('background-color', item) // 设置背景颜色.click(function () {setCarColor(index); // 调用 setCarColor 函数并传递索引参数});});//创建场景const setScene = () => {scene = new Scene()renderer = new WebGLRenderer()renderer.setSize(window.innerWidth, window.innerHeight)document.body.appendChild(renderer.domElement)}//创建相机  const setCamera = () => {const { x, y, z } = defaultMapcamera = new PerspectiveCamera(45, window.innerWidth / window.innerHeight, 1, 1000)camera.position.set(x, y, z)}//引入模型的loader实例const loader = new GLTFLoader()//通过Promise处理一下loadfile函数const loadFile = (url) => {return new Promise(((resolve, reject) => {loader.load(url,(gltf) => {resolve(gltf)}, ({ loaded, total }) => {let load = Math.abs(loaded / total * 100)loadingWidth = loadif (load >= 100) {setTimeout(() => {isLoading = false}, 1000)}console.log((loaded / total * 100) + '% loaded')},(err) => {reject(err)})}))}// 设置灯光const setLight = () => {directionalLight = new DirectionalLight(0xffffff, 0.8)directionalLight.position.set(-4, 8, 4)dhelper = new DirectionalLightHelper(directionalLight, 5, 0xff0000)hemisphereLight = new HemisphereLight(0xffffff, 0xffffff, 0.4)hemisphereLight.position.set(0, 8, 0)hHelper = new HemisphereLightHelper(hemisphereLight, 5)scene.add(directionalLight)scene.add(hemisphereLight)}// 设置模型控制const setControls = () => {controls = new OrbitControls(camera, renderer.domElement)controls.maxPolarAngle = 0.9 * Math.PI / 2controls.enableZoom = truecontrols.addEventListener('change', render)}//返回坐标信息const render = () => {defaultMap.x = Number.parseInt(camera.position.x)defaultMap.y = Number.parseInt(camera.position.y)defaultMap.z = Number.parseInt(camera.position.z)}(async function () {setScene()setCamera()setLight()setControls()try {gltf = await loadFile('./assets/scene.gltf');console.log('Model loading completed:', gltf);} catch (error) {console.error('Error loading model:', error);}scene.add(gltf.scene)loop()})()//使场景、照相机、模型不停调用const loop = () => {requestAnimationFrame(loop)renderer.render(scene, camera)controls.update()}//是否自动转动$('.rotatingCar').click(function () {console.log("旋转")controls.autoRotate = true})//停止转动$('.stop').click(function () {console.log("停止")controls.autoRotate = false})//设置车身颜色const setCarColor = (index) => {const currentColor = new Color(colorAry[index])scene.traverse(child => {if (child.isMesh) {console.log(child)if (child.name) {child.material.color.set(currentColor)}}})}</script>
</body></html>
完结撒花*★,°*:.☆( ̄▽ ̄)/$:*.°★* 。
相关文章:
【jsthreeJS】入门three,并实现3D汽车展示厅,附带全码
首先放个最终效果图: 三维(3D)概念: 三维(3D)是一个描述物体在三个空间坐标轴上的位置和形态的概念。相比于二维(2D)只有长度和宽度的平面,三维增加了高度或深度这一维度…...

unity将结构体/列表与json字符串相互转化
编写Unity程序时,面对大量需要传输或者保存的数据时,为了避免编写重复的代码,故采用NewtonJson插件来将定义好的结构体以及列表等转为json字符串来进行保存和传输。 具体代码如下: using System; using System.IO; using Newtons…...
【Vue】vue2项目使用swiper轮播图2023年8月21日实战保姆级教程
提示:文章写完后,目录可以自动生成,如何生成可参考右边的帮助文档 文章目录 前言一、npm 下载swiper二、使用步骤1.引入库声明变量2.编写页面3.执行js 总结 前言 swiper轮播图官网 参考文章,最好先看完他的介绍,再看…...
【算法日志】贪心算法刷题:单调递增数列,贪心算法总结(day32)
代码随想录刷题60Day 目录 前言 单调递增数列 贪心算法总结 前言 今天是贪心算法刷题的最后一天,今天本来是打算刷两道题,其中的一道hard题做了好久都没有做出来(主要思路错了)。然后再总结一下。 单调递增数列 int monotoneIncreasingDigits(int n…...

MATLAB算法实战应用案例精讲-【深度学习】模型压缩
目录 模型压缩概述 1. 为什么需要模型压缩 2. 模型压缩的基本方法 Patient-KD 1. Patient-KD 简介...
Matlab使用
Matlab使用 界面介绍 新建脚本:实际上就是新建一个新建后缀为.m的文件 新建编辑器:ctrlN 打开:打开最近文件,以找到最近写过的文件 点击路径,切换当前文件夹 预设:定制习惯用的界面 常见简单指令 ;…...
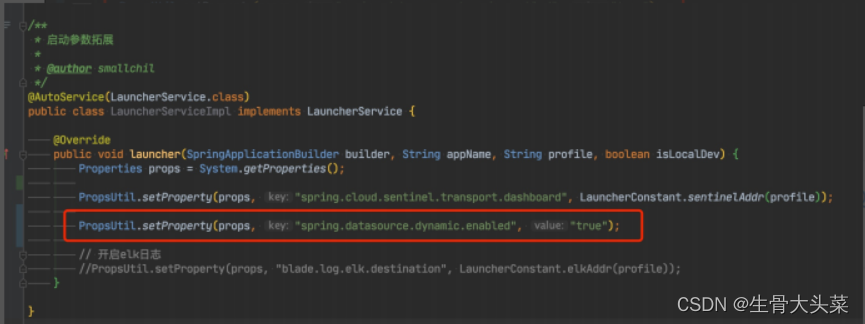
BladeX多数据源配置
启用多租户数据库隔离,会默认关闭mybatis-plus多数据源插件的启动,从而使用自定义的数据源识别 若不需要租户数据库隔离只需要字段隔离,而又需要用到多数据源的情况,需要前往LauncherService单独配置 数据源切换失败 详情请看说明…...

go里面关于超时的设计
设想一下你在接收源源不断的数据,如果有700ms没有收到,则认为是一个超时,需要做出处理。 逻辑上可以设计一个grouting,里面放一个通道,每收到一条数据进行相应处理。通道中夹杂一个timer定时器的处理,若通道在700ms内…...
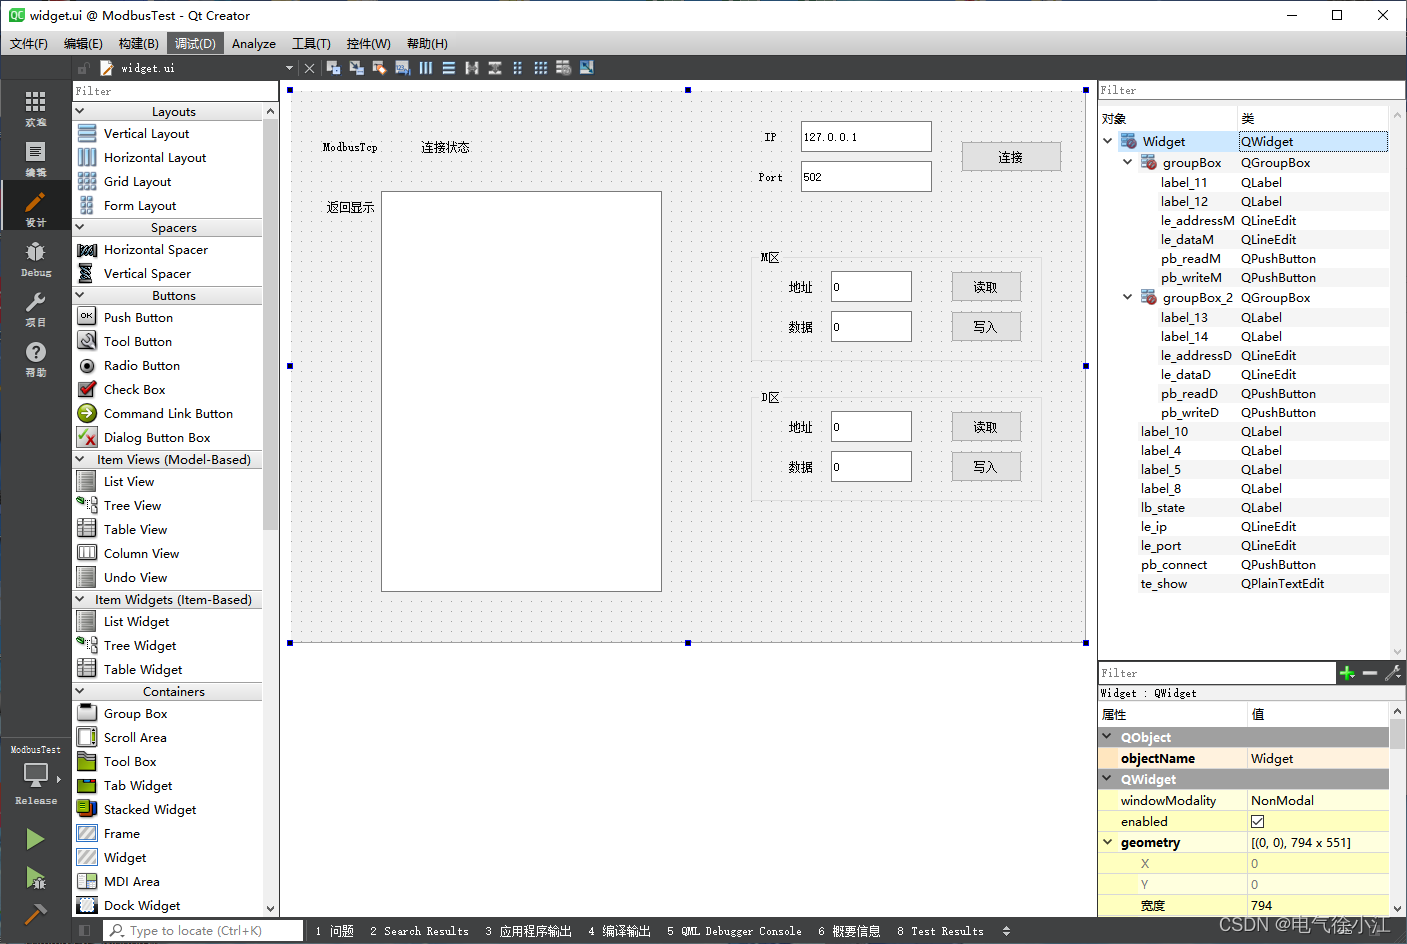
Qt下使用ModbusTcp通信协议进行PLC线圈/保持寄存器的读写(32位有符号数)
文章目录 前言一、引入Modbus模块二、Modbus设备的连接三、各寄存器数据的读取四、各寄存器数据的写入五、示例完整代码总结 前言 本文主要讲述了使用Qt的Modbus模块来进行ModbusTcp的通信,实现对PLC的线圈寄存器和保持寄存器的读写,基于TCP/IP的Modbus…...

ElasticSearch学习2
1、索引的操作 1、创建索引 对ES的操作其实就是发送一个restful请求,kibana中在DevTools中进行ES操作 创建索引时需要注意ES的版本,不同版本的ES创建索引的语句略有差别,会导致失败 如下创建一个名为people的索引,settings&…...

3D角色展示
先看效果: 再看代码: <!DOCTYPE html> <html lang"en"> <head><meta charset"UTF-8"><title>3D卡片悬停</title><style>font-face {font-family: "Exoct";src: url("htt…...

前端面试:【Angular】打造强大Web应用的全栈框架
嗨,亲爱的Angular探险家!在前端开发的旅程中,有一个全栈框架,那就是Angular。Angular提供了模块化、组件化、依赖注入、路由和RxJS等特性,助力你构建强大、可扩展的Web应用。 1. 什么是Angular? Angular是…...
数据结构:栈和队列
文章目录 一、栈1.栈的概念及结构1.栈的概念及结构2.栈的实现 2.栈的顺序表实现1.栈的结构体和实现的功能函数2.栈的初始化,入栈和出栈操作3.栈的其他操作 3.栈的链表实现1.栈的结构体和实现的功能函数2.栈功能函数的实现 二、队列1.队列的概念及结构1.队列的概念及…...

SpringCloud Gateway服务网关的介绍与使用
目录 1、网关介绍2、SpringCloudGateway工作原理3、三大组件3.1 、Route(路由)3.2、断言 Predicate3.3、过滤器 filter 4、Gateway整合nacos的使用4.1 、引入依赖4.2、 编写基础类和启动类4.3、 编写基础配置和路由规则4.4 、测试结果 1、网关介绍 客户…...

深入解析:如何打造高效的直播视频美颜SDK
在当今数字化时代,视频直播已经成为人们交流、娱乐和信息传递的重要方式。然而,许多人在直播时都希望能够呈现出最佳的外观,这就需要高效的直播视频美颜技术。本文将深入解析如何打造高效的直播视频美颜SDK,以实现令人满意的视觉效…...

每日一博 - MPP(Massively Parallel Processing,大规模并行处理)架构
文章目录 概述优点缺点小结 概述 MPP(Massively Parallel Processing,大规模并行处理)架构是一种常见的数据库系统架构,主要用于提高数据处理性能。它通过将多个单机数据库节点组成一个集群,实现数据的并行处理。 在 …...

ssh框架原理及流程
1.hibernate工作原理: 读取并解析配置文件读取并解析映射信息,创建sessionFactory打开session创建事务transaction持久化操作提交事务关闭session关闭sessionFactory 为什么使用: 对JDBC访问数据库的代码做了封装,大大简化了数据…...

eslint 配置和用法
在一个使用Webpack的项目中配置ESLint,你可以按照以下步骤操作: 首先,你需要在你的项目中安装ESLint和对应的Webpack loader。你可以使用npm或者yarn来安装。在你的项目根目录下打开终端,然后运行以下命令: 使用npm&…...
字符设备驱动实例(PWM和RTC)
目录 五、PWM 六、RTC 五、PWM PWM(Pulse Width Modulation,脉宽调制器),顾名思义就是一个输出脉冲宽度可以调整的硬件器件,其实它不仅脉冲宽度可调,频率也可以调整。它的核心部件是一个硬件定时器,其工作原理可以用…...

Ribbon 源码分析
Ribbon 源码分析 Ribbon Debug 分析 断点 LoadBalancerInterceptor LoadBalancerInterceptor 实现了 ClientHttpRequestInterceptor 接口,重写了其中的 intercept 方法,用来拦截请求; 获取原始的 uri 和 服务名,调用 LoadBalanc…...

开发者会话管理工具:提升多任务开发效率的利器
1. 项目概述:一个为开发者打造的会话管理利器在开发日常中,我们常常会同时打开多个终端窗口、IDE项目、数据库连接或者远程服务器会话。一天下来,桌面上可能散落着十几个终端标签页,每个都承载着不同的上下文:一个在跑…...

开源数字资产管理平台OpenClaw Studio:架构设计与工程实践
1. 项目概述:一个面向创意工作者的开源数字资产管理工具最近在和一些独立开发者、小型创意团队的朋友聊天时,大家普遍提到一个痛点:项目文件、素材、版本管理越来越乱。设计稿、代码、文档、参考图散落在电脑各个角落,团队协作时经…...

集成三相桥驱动的MCU:AiP8F7201电机控制方案解析
1. 项目概述:为什么我们需要“集成三相桥式驱动的微控制器”?在电机控制领域,尤其是消费电子、家电、工业自动化这些我们每天都会接触到的场景里,工程师们一直在和一堆“麻烦”作斗争。想象一下,你要设计一个驱动无刷直…...

如何3分钟精准定位Windows热键冲突:Hotkey Detective深度技术解析
如何3分钟精准定位Windows热键冲突:Hotkey Detective深度技术解析 【免费下载链接】hotkey-detective A small program for investigating stolen key combinations under Windows 7 and later. 项目地址: https://gitcode.com/gh_mirrors/ho/hotkey-detective …...

深圳市2026年打造人工智能先锋城市项目扶持计划申请指南
本项目扶持计划下设十个项目类别,均采用事后奖补类支持方式。1、申报单位需同时满足基础申报条件和专项申报条件。基础申报条件如下:(一)申报单位为在深圳市内(含深汕特别合作区)从事生产经营活动ÿ…...

AI赋能终端:基于LLM的智能命令行助手实现与实战
1. 项目概述:当终端遇见AI,一场效率革命如果你和我一样,每天有超过一半的工作时间是在终端(Terminal)里度过的,那你一定对那种在命令行历史里反复翻找、手动敲击冗长命令、或者为了一个复杂的管道组合而绞尽…...
实验总结 —— 让两根网线“抱团”干活)
端口聚合(Eth-Trunk)实验总结 —— 让两根网线“抱团”干活
企业场景:公司两栋楼之间只有两根网线相连,既要带宽加倍,又要一根线断了业务不中断。端口聚合就是让两根线“手拉手”变成一条逻辑链路,协同工作。📌 实验拓扑(两台交换机,两根网线互联…...

信号处理库mattbaconz/signal:实现优雅停机与进程通信的跨平台解决方案
1. 项目概述:一个信号处理与通信的瑞士军刀最近在GitHub上看到一个挺有意思的项目,mattbaconz/signal。光看名字,你可能会联想到那个知名的加密通讯应用,但点进去你会发现,这是一个完全不同的技术世界。这是一个由开发…...

n8n工作流模板大全:从入门到精通的自动化实战指南
1. 项目概述:一个为n8n用户准备的“万能工具箱” 如果你正在使用或者听说过n8n这个强大的工作流自动化工具,那你一定遇到过这样的时刻:面对一个空白的画布,知道n8n能帮你连接一切,但就是不知道从何下手,或…...

从方程到应用:激光雷达核心参数与激光器选型指南
1. 激光雷达方程:从数学公式到物理意义 第一次接触激光雷达方程时,我也被那一堆希腊字母和下标搞得头晕眼花。但后来发现,这个看似复杂的方程其实就像买菜算账一样简单直白。激光雷达方程本质上是个"能量收支平衡表",它…...