从零构建深度学习推理框架-9 再探Tensor类,算子输入输出的分配
再探Tensor类:
第二节中我们编写的Tensor类其实并不能满足我们的使用需要,我们将在这一节以代码阅读的方式来看看一个完全版本的Tensor应该具备怎样的要素,同时我们对Tensor类的分析来看看在C++中一个设计好的类应该是怎么样的。
Tensor<float>::Tensor(uint32_t channels, uint32_t rows, uint32_t cols) {data_ = arma::fcube(rows, cols, channels);if (channels == 1 && rows == 1) {this->raw_shapes_ = std::vector<uint32_t>{cols};} else if (channels == 1) {this->raw_shapes_ = std::vector<uint32_t>{rows, cols};} else {this->raw_shapes_ = std::vector<uint32_t>{channels, rows, cols};}
}
在这里,raw_shape记录的是另外一个方面的形状信息,主要用于review和flatten层中。
举一个简单的例子,当Tensor将一个大小为(2,16,1)的Tensor reshape到(32,1,1)的大小时,raw_shapes变量会被记录成(32). 将一个大小为(2,16, 2)的Tensor reshape到(2, 64)的大小时,raw_shapes会被记录成(2,64).
那这样做的目的是什么呢?原来的
Tensor不能在逻辑上区分当前的张量是三维的、二维的还是一维的,因为实际的数据存储类arma::fcube总是一个三维数据。所以我们要区分他的逻辑结构,就需要这么一个raw_shape
列优先的Reshape
void Tensor<float>::ReRawshape(const std::vector<uint32_t>& shapes) {CHECK(!this->data_.empty());CHECK(!shapes.empty());const uint32_t origin_size = this->size();uint32_t current_size = 1;for (uint32_t s : shapes) {current_size *= s;}CHECK(shapes.size() <= 3);CHECK(current_size == origin_size);if (shapes.size() == 3) {this->data_.reshape(shapes.at(1), shapes.at(2), shapes.at(0));this->raw_shapes_ = {shapes.at(0), shapes.at(1), shapes.at(2)};} else if (shapes.size() == 2) {this->data_.reshape(shapes.at(0), shapes.at(1), 1);this->raw_shapes_ = {shapes.at(0), shapes.at(1)};} else {this->data_.reshape(shapes.at(0), 1, 1);this->raw_shapes_ = {shapes.at(0)};}
}
我们再来分析一下这个函数,如果传入的shapes是1维的,就相当于将数据展开为(elem_size,1,1),并将逻辑维度赋值为1. 如果传入的shapes,相当于将数据展开为(shapes.at(0), shapes.at(1), 1). 我们来看看下面的这个图例:
如果把上面的(2,2,3)展平为一维的,那就应该是如下图所示:

而且这也是arma:cube的默认排序(列排序)
行优先的Reshape
那如果我们在某些情况下需要行优先的Reshape呢?
void Tensor<float>::ReView(const std::vector<uint32_t>& shapes) {CHECK(!this->data_.empty());const uint32_t target_channels = shapes.at(0);const uint32_t target_rows = shapes.at(1);const uint32_t target_cols = shapes.at(2);arma::fcube new_data(target_rows, target_cols, target_channels);const uint32_t plane_size = target_rows * target_cols;for (uint32_t c = 0; c < this->data_.n_slices; ++c) {const arma::fmat& channel = this->data_.slice(c);for (uint32_t c_ = 0; c_ < this->data_.n_cols; ++c_) {const float* colptr = channel.colptr(c_);for (uint32_t r = 0; r < this->data_.n_rows; ++r) {const uint32_t pos_index =c * data_.n_rows * data_.n_cols + r * data_.n_cols + c_;const uint32_t ch = pos_index / plane_size;const uint32_t row = (pos_index - ch * plane_size) / target_cols;const uint32_t col = (pos_index - ch * plane_size - row * target_cols);new_data.at(row, col, ch) = *(colptr + r);}}}this->data_ = new_data;
}
我们只能通过位置计算的方式来对逐个元素进行搬运,const uint32_t plane_size = target_rows * target_cols;来计算行数和列数相乘的积。
const uint32_t pos_index = c * data_.n_rows * data_.n_cols + r * data_.n_cols + c_; 得 到调整前的元素下标,随后我们计算调整后的通道下标位置:ch = pos_index / plane_size,plane_size就是和一面,一行乘一列。同理计算row,col等调整位置后的行、列坐标。
计算图关系
内容回顾
我们在回顾一下之前的内容,我们根据pnnx计算图得到了我们的计算图,我们的计算图由两部分组成,分别是kuiper_infer::RuntimeOperator和kuier_infer::RuntimeOperand.
但是作为一个计算图,计算节点之间往往是有连接的,包括从input operator到第一个计算节点再到第二个计算节点,直到最后的输出节点output operator,我们再来回顾一下这两个数据结构的具体定义:
struct RuntimeOperator {int32_t meet_num = 0; /// 计算节点被相连接节点访问到的次数~RuntimeOperator() {for (auto ¶m : this->params) {if (param.second != nullptr) {delete param.second;param.second = nullptr;}}}std::string name; /// 计算节点的名称std::string type; /// 计算节点的类型std::shared_ptr<Layer> layer; /// 节点对应的计算Layerstd::vector<std::string> output_names; /// 节点的输出节点名称std::shared_ptr<RuntimeOperand> output_operands; /// 节点的输出操作数std::map<std::string, std::shared_ptr<RuntimeOperand>> input_operands; /// 节点的输入操作数std::vector<std::shared_ptr<RuntimeOperand>> input_operands_seq; /// 节点的输入操作数,顺序排列std::map<std::string, std::shared_ptr<RuntimeOperator>> output_operators; /// 输出节点的名字和节点对应std::map<std::string, RuntimeParameter *> params; /// 算子的参数信息std::map<std::string, std::shared_ptr<RuntimeAttribute> > attribute; /// 算子的属性信息,内含权重信息
};
- std::map<:string std::shared_ptr>> output_operators; 我们重点来看这个定义,它是当前这个计算节点的下一个计算节点,当数据在当前
RuntimeOperator上计算完成之后,系统会读取output_operators中准备就绪的算子并开始执行。 - std::map<:string std::shared_ptr>> input_operands; 是当前计算节点所需要的输入,它往往来自于上一个
RuntimeOperator的输入。 - std::shared_ptr output_operands; 是当前节点计算得到的输出,它是通过当前的
op计算得到的。
具体的流程是这样的,假设我们在系统中有三个RuntimeOperators,分别为op1,op2和op3. 这三个算子的顺序是依次执行的,分别是op1-->op2-->op3.
- 当我们执行第一个算子
op1的时候,需要将来自于图像的输入填充到op1->input_operands中。 - 第一个算子
op1开始执行,执行的过程中读取op1->input_operands并计算得到相关的输出,放入到op1->output_operands中 - 从
op1的output_operators中读取到ready的op2 - 第二个算子
op2开始执行,执行的过程读取op1->output_operands并拷贝op2->input_operands中,随后op2算子开始执行并计算得到相关的输出,放入到op2->output_operands中。
所以我们可以看到者之间是有一个图关系的,那我们来看一下他是怎么构建这样一个图关系的
怎样构建图关系:
/ 构建图关系for (const auto ¤t_op : this->operators_) {const std::vector<std::string> &output_names = current_op->output_names;for (const auto &next_op : this->operators_) {if (next_op == current_op) {continue;}if (std::find(output_names.begin(), output_names.end(), next_op->name) !=output_names.end()) {current_op->output_operators.insert({next_op->name, next_op});}}}```- **const std::vector\<std::string> &output_names = current_op->output_names;** 存放的是当前`op`的`output_names`,`output_names`也就是当前算子的后一层算子的名字。对于`op1`,它的`output_names`就是`op2`的name.- **const auto &next_op : this->operators_** 我们遍历整个图中的`RuntimeOperators`,如果遇到`next_op`的name和当前`current_op->output_name`是一致的,那么我们就可以认为`next_op`是当前`op`的下一个节点之一。- **current_op->output_operators.insert({next_op->name, next_op});** 将`next_op`插入到`current_op`的下一个节点当中。- 这样一来,当`current_op`执行完成之后就取出`next_op`,并将当前`current_op`的输出`output_opends`(输出)拷贝到`next_op`的`input_operands`(输入)中。因为在初始化的时候就已经约定好了op1的输出是op2,所以只要在接下来的点中不停地寻找op2就好了,找到了之后就把它insert到output_operators里面.这个output_operators是一个map,就可以让输出节点的名字和节点对应。
这么一个计算图也得有输入输出节点吧
作者:傅大狗
链接:https://zhuanlan.zhihu.com/p/604613883
来源:知乎
著作权归作者所有。商业转载请联系作者获得授权,非商业转载请注明出处。
this->input_operators_maps_.clear();this->output_operators_maps_.clear();for (const auto &kOperator : this->operators_) {if (kOperator->type == "pnnx.Input") {this->input_operators_maps_.insert({kOperator->name, kOperator});} else if (kOperator->type == "pnnx.Output") {if (kOperator->name == output_name) {this->output_operators_maps_.insert({kOperator->name, kOperator});} else {LOG(FATAL) << "The graph has two output operator!";}} else {std::shared_ptr<Layer> layer = RuntimeGraph::CreateLayer(kOperator);CHECK(layer != nullptr) << "Layer create failed!";if (layer) {kOperator->layer = layer;}}}
- kOperator->type == "pnnx.Output" 找到
this->operators中的输出节点,但是目前Kuiperinfer只支持一个输出节点,其实也可以多输出,作为一个教学框架我实在不想支持这种corner case - 同理: kOperator->type == "pnnx.Input" 来找到图中,也就是op list中的输入节点
就是在op3结束之后,我们还要把op3的output_operand复制到输出节点的input_operand里面
初始化输入
struct RuntimeOperand {std::string name;                                     /// 操作数的名称std::vector<int32_t> shapes;                          /// 操作数的形状std::vector<std::shared_ptr<Tensor<float>>> datas;    /// 存储操作数 为什么是vector,因为是一个batch,如果batch是2的话,那就存储的是两个RuntimeDataType type = RuntimeDataType::kTypeUnknown; /// 操作数的类型,一般是float
};
可以看到这里的RuntimeOperand::datas就是存储具体数据的地方,我们初始化输入输出的空间也就是要在推理之前先根据shapes来初始化好这里datas的空间
代码位于runtime_ir.cpp的InitOperatorInputTensor中 RuntimeGraphShape::InitOperatorInputTensor(operators_) 这个函数的输入是operator list, 所以将在这个函数中对所有的op进行输入和输出空间的初始化。
- 得到一个
op的输入空间input_operands
const std::map<std::string, std::shared_ptr<RuntimeOperand>> &input_operands_map = op->input_operands;
- 如果初始的是空就continue
for (const auto &op : operators) {if (op->input_operands.empty()) {continue;} - 得到
input_operands中记录的数据应有大小input_operand_shape和存储数据的变量input_datas
auto &input_datas = input_operand->datas;CHECK(!input_operand_shape.empty());
const int32_t batch = input_operand_shape.at(0);
CHECK(batch >= 0) << "Dynamic batch size is not supported!";
CHECK(input_operand_shape.size() == 2 ||input_operand_shape.size() == 4 ||input_operand_shape.size() == 3)
- 我们需要根据
input_operand_shape中记录的大小去初始化input_datas. 而input_operand_shape可能是三维的,二维的以及一维的,如下方所示 - input_operand_shape : (batch, elemsize) 一维的
- input_operand_shape : (batch, rows,cols) 二维的
- input_operand_shape : (batch, rows,cols, channels) 三维的
如果当前input_operand_shape是二维的数据,也就是说输入维度是(batch,rows,cols)的. 我们首先对batch进行遍历,对一个batch的中的数据input_datas= op->input_operand(输入)进行初始化。
input_datas.resize(batch);
for (int32_t i = 0; i < batch; ++i) {
}
在for循环内,它会调用如下的方法去初始化一个二维的张量:
input_datas.at(i) = std::make_shared<Tensor<float>>(1, input_operand_shape.at(1), input_operand_shape.at(2));
这一块不太清楚,我们实际代码看一遍:
for (int32_t i = 0; i < batch; ++i) {if (input_operand_shape.size() == 4) {input_datas.at(i) = std::make_shared<Tensor<float>>(input_operand_shape.at(1), input_operand_shape.at(2),input_operand_shape.at(3));也就是如果是shape == 4 , 那就是三维的,那么1就是channel,2就是row,3就是col
那么如果输入的channel == 1,或者row == 1
Tensor<float>::Tensor(uint32_t channels, uint32_t rows, uint32_t cols) {data_ = arma::fcube(rows, cols, channels);if (channels == 1 && rows == 1) {this->raw_shapes_ = std::vector<uint32_t>{cols};} else if (channels == 1) {this->raw_shapes_ = std::vector<uint32_t>{rows, cols};} else {this->raw_shapes_ = std::vector<uint32_t>{channels, rows, cols};}
}
那就正好被初始化为了我们之前的raw_shape 这样的一个逻辑维度
这就和我们上面的课程内容对应上了,Tensor<float>原本是一个三维数据,我们怎么在逻辑上给他表现成一个二维的张量呢?这就要用到我们上面说到的raw_shapes了。
- 调用并初始化一维的数据也同理, 在初始化的过程中会调用(channels==1&&rows==1) 这个条件判断,并将
raw_shapes这个维度定义成一维。
input_datas.at(i) = std::make_shared<Tensor<float>>(1, input_operand_shape.at(1), 1)避免第二次初始化
那么在计算的过程中,我们只需要一次初始化就可以。
所以在第二次遇到她的时候,只需要去检查空间是否发生改变就可以啦
if (!input_datas.empty()) {CHECK(input_datas.size() == batch) << "Batch size is wrong!";for (int32_t i = 0; i < batch; ++i) {const std::vector<uint32_t> &input_data_shape =input_datas.at(i)->shapes();CHECK(input_data_shape.size() == 3)<< "THe origin shape size of operator input data do not equals ""to three";if (input_operand_shape.size() == 4) {CHECK(input_data_shape.at(0) == input_operand_shape.at(1) &&input_data_shape.at(1) == input_operand_shape.at(2) &&input_data_shape.at(2) == input_operand_shape.at(3));} else if (input_operand_shape.size() == 2) {CHECK(input_data_shape.at(1) == input_operand_shape.at(1) &&input_data_shape.at(0) == 1 && input_data_shape.at(2) == 1);} else {// current shape size = 3CHECK(input_data_shape.at(1) == input_operand_shape.at(1) &&input_data_shape.at(0) == 1 &&input_data_shape.at(2) == input_operand_shape.at(2));}}} CHECK(input_data_shape.at(0) == input_operand_shape.at(1) &&input_data_shape.at(1) == input_operand_shape.at(2) &&input_data_shape.at(2) == input_operand_shape.at(3));上面这一部分,左边是我们实际有的shape,也就是我们第一次初始化的shape,而右边的是我们再次遇到的时候应该具有的shape,所以这一次就是check这两个shape是否一致,如果check不通过,那就代表输入空间的大小被改变了。那这样的话就会报错,退出这个程序
示例:
这里的conv的输出分别是1和2
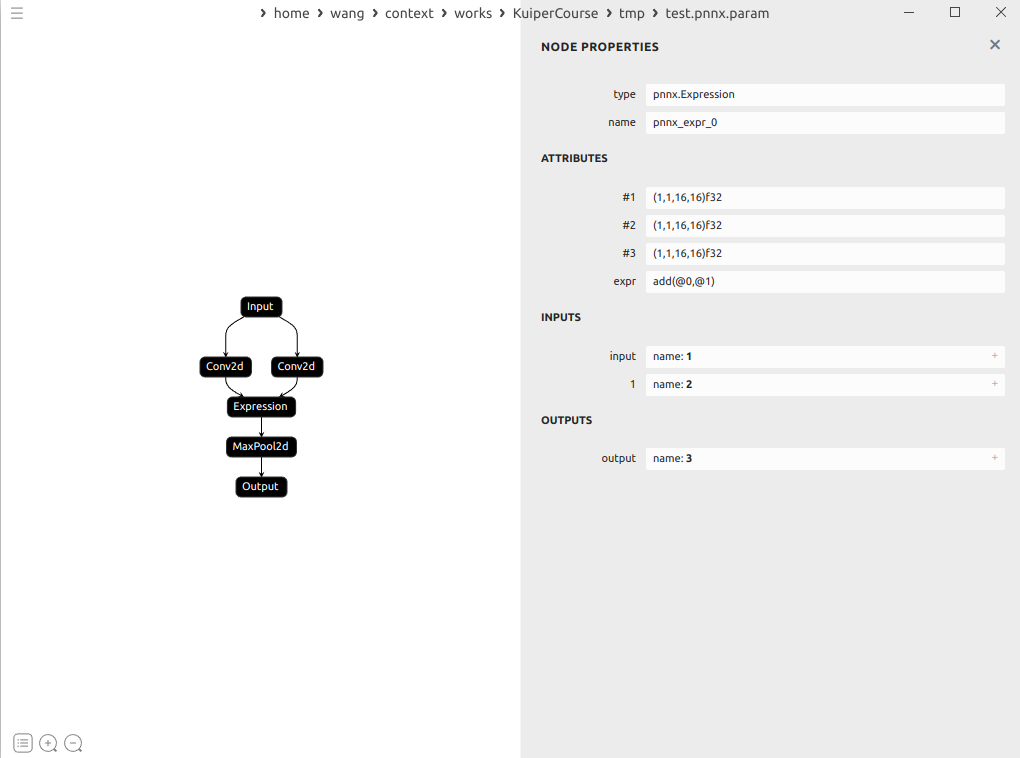
expression就接受了1和2为输入
最近在忙老师布置的任务,就耽误了这方面的进度,慢慢补把
相关文章:
从零构建深度学习推理框架-9 再探Tensor类,算子输入输出的分配
再探Tensor类: 第二节中我们编写的Tensor类其实并不能满足我们的使用需要,我们将在这一节以代码阅读的方式来看看一个完全版本的Tensor应该具备怎样的要素,同时我们对Tensor类的分析来看看在C中一个设计好的类应该是怎么样的。 Tensor<fl…...

Vue使用element-ui
main.js配置 //引入Vue import Vue from vue //引入App import App from ./App.vue//完整引入 //引入ElementUI组件库 // import ElementUI from element-ui; //引入ElementUI全部样式 // import element-ui/lib/theme-chalk/index.css;//按需引入 import { Button,Row,DatePi…...

使用ApplicationRunner简化Spring Boot应用程序的初始化和启动
ApplicationRunner这个接口,我们一起来了解这个组件,并简单使用它吧。🤭 引言 在开发Spring Boot应用程序时,应用程序的初始化和启动是一个重要的环节。ApplicationRunner是Spring Boot提供的一个有用的接口,可以帮助…...

Vue 2.x 项目升级到 Vue 3详细指南【修改清单】
文章目录 前言0.迁移过程1. 安装 Vue 32. 逐一处理迁移中的警告3. 迁移全局和内部 API4. 迁移 Vue Router 和 Vuex5. 处理其他的不兼容变更 1. Vue3特性1. Composition API2. 更好的性能3. 更好的 TypeScript 支持4. 多个根元素5. Suspense 组件6. Teleport 组件7. 全局 API 的…...
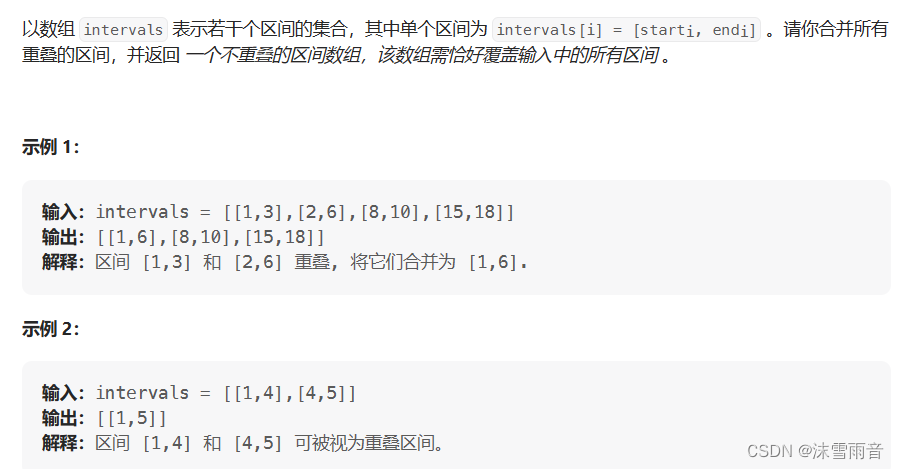
【算法日志】贪心算法刷题:重叠区问题(day31)
代码随想录刷题60Day 目录 前言 无重叠区间(筛选区间) 划分字母区间(切割区间) 合并区间 前言 今日的重点是掌握重叠区问题。 无重叠区间(筛选区间) int eraseOverlapIntervals(vector<vector<in…...
基于Jenkins构建生产CICD环境、jenkins安装
目录 Jenkins简介 安装配置Jenkins Jenkins简介 Jenkins是一个用Java编写的开源的持续集成工具。在与Oracle发生争执后,项目从Hudson项目独立。官方网站:https://jenkins.io/。 Jenkins提供了软件开发的持续集成服务。它运行在Servlet容器中ÿ…...
基于Java SpringBoot+vue+html 的地方美食系统(2.0版本)
博主介绍:✌程序员徐师兄、7年大厂程序员经历。全网粉丝30W,csdn、博客专家、掘金/华为云/阿里云/InfoQ等平台优质作者、专注于Java技术领域和毕业项目实战✌ 文章目录 1 简介2 技术栈3 系统流程的分析3.1 用户管理的流程3.2个人中心管理流程3.3登录流程 4系统设计…...
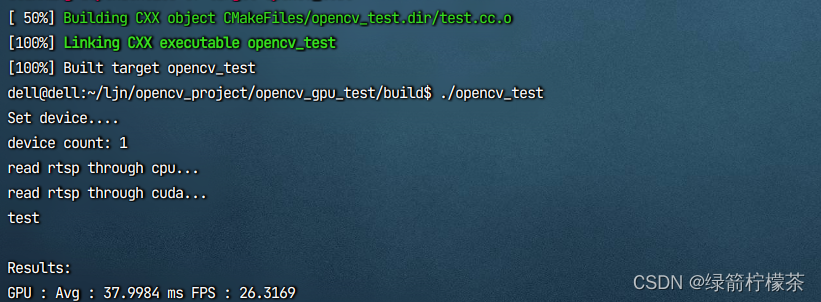
opencv-gpu版本编译(添加java支持,可选)实现硬解码
目录 opencv gpu版本编译,实现硬解码,加速rtsp视频流读取1、准备文件2、复制 NVCUVID 头文件到 cuda 安装目录 include3、安装相关依赖4、 执行cmake5、编译安装6、测试 opencv gpu版本编译,实现硬解码,加速rtsp视频流读取 前置条…...
数据分析问答总结
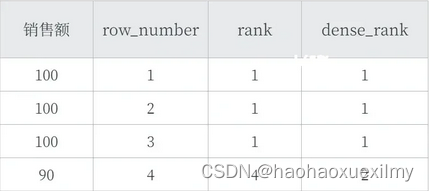
一、SQL窗口函数 1.是什么 OLAP(Online Anallytical Processing联机分析处理),对数据库数据进行实时分析处理。 2.基本语法: <窗口函数>OVER (PARTITION BY <用于分组的列名> ORDER BY <用于排序的…...
Python学习笔记_实战篇(二)_django多条件筛选搜索
多条件搜索在很多网站上都有用到,比如京东,淘宝,51cto,等等好多购物教育网站上都有,当然网上也有很多开源的比楼主写的好的多了去了,仅供参考,哈哈 先来一张效果图吧,不然幻想不出来…...

【生态经济学】利用R语言进行经济学研究技术——从数据的收集与清洗、综合建模评价、数据的分析与可视化、因果推断等方面入手
查看原文>>>如何快速掌握利用R语言进行经济学研究技术——从数据的收集与清洗、综合建模评价、数据的分析与可视化、因果推断等方面入手 近年来,人工智能领域已经取得突破性进展,对经济社会各个领域都产生了重大影响,结合了统计学、…...

xml中的vo是干什么用的
在Java中,VO(Value Object)是一种常见的设计模式,用于表示纯粹的数据对象。VO 通常用于在不同层或模块之间传递数据,并且它们的主要目的是封装和组织数据,而不包含业务逻辑。 VO 在Java中的具体作用有以下…...

现代企业数据泄露的原因分析与建议
近年来,随着信息技术的飞速发展,数据已经成为现代企业不可或缺的发展资源。然而,随之而来的数据泄露危机,给个人、企业甚至整个社会带来了巨大的风险与威胁。本文将综合探讨企业数据泄露的主要途径和原因,并提出防护建…...

飞天使-kubeadm安装一主一从集群
文章目录 安装前准备安装前准备配置yum源等安装前准备docker安装 安装kubeadm配置kubeadm验证集群 参考链接 安装前准备 cat >> /etc/hosts <<EOF 192.168.100.30 k8s-01 192.168.100.31 k8s-02 EOF hostnamectl set-hostname k8s-01 #所有机器按照要求修改 ho…...

string类写时拷贝
文章目录 1.string类拷贝构造函数的现代写法2.string类写时拷贝vs和g下string结构的不同vs下string的结构:g下string的结构 3.总结 1.string类拷贝构造函数的现代写法 string类拷贝构造函数的传统写法: string(const string& s){if (this ! &s)…...
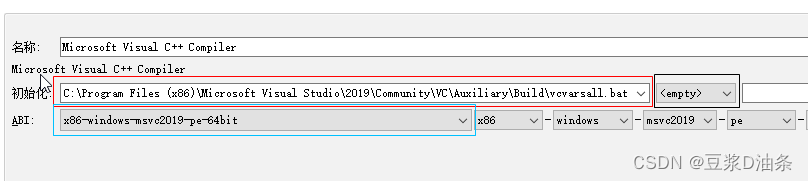
QT VS编译环境无法打开包括文件type_traits
这问题,别人给的处理方法都是: 添加环境变量执行vsvars32.bat/vcvarsall.bat/vsdevcmd.bat重新安装QT项目:执行qmake。。。。 个人不推荐配置环境编译,除非你非常熟,因为配置环境变量需要你知道有哪些路径需要添加&a…...
深入浅出 TCP/IP 协议栈
TCP/IP 协议栈是一系列网络协议的总和,是构成网络通信的核心骨架,它定义了电子设备如何连入因特网,以及数据如何在它们之间进行传输。TCP/IP 协议采用4层结构,分别是应用层、传输层、网络层和链路层,每一层都呼叫它的下…...

Servlet+JDBC实战开发书店项目讲解第13讲:库存管理功能
ServletJDBC实战开发书店项目讲解第13讲:库存管理功能 在第13讲中,我们将讲解如何实现书店项目中的库存管理功能。该功能包括图书的添加、编辑、删除和查询等核心功能。下面是实现该功能的主要思路: 显示库存列表: 创建一个管理页…...

Shepherd: A Critic for Language Model Generation
本文是LLM系列的相关文章,针对《Shepherd: A Critic for Language Model Generation》的翻译。 Shepherd:语言模型生成的评价 摘要1 引言2 数据收集3 Shepherd模型4 评估反馈5 结果6 相关工作7 结论不足 摘要 随着大型语言模型的改进,人们对…...
【Python爬虫案例】爬取大麦网任意城市的近期演出!
老规矩,先上结果: 含10个字段: 页码,演出标题,链接地址,演出时间,演出城市,演出地点,售价,演出类别,演出子类别,售票状态。 代码演示…...

用桌面CNC制作乐高兼容木制积木:从Fusion 360设计到精密加工全流程
1. 项目概述:当数字制造遇见经典玩具作为一名玩了十多年CNC的爱好者,我一直在寻找那些能将技术、创意和实用性完美结合的项目。最近,我成功地将工作室角落里的一块硬木废料,变成了一套可以严丝合缝地拼搭在标准乐高积木上的木制建…...

考公学习追踪器:用数据驱动备考,打造个人学习仪表盘
1. 项目概述:一个为“考公”学子量身定制的学习追踪器如果你正在准备公务员考试,或者身边有朋友在“考公”,那你一定对那种“学了忘,忘了学”的循环深有体会。行测的题海、申论的素材、时政的热点,每天的学习任务像一座…...

aelf区块链浏览器开发实战:从核心技能到定制化构建
1. 项目概述:一个区块链浏览器背后的技能集如果你在区块链领域,特别是公链开发或生态应用构建中工作过,那么“区块链浏览器”对你来说一定不陌生。它就像是区块链世界的“搜索引擎地图”,让我们能直观地查看链上发生的每一笔交易、…...

STM32F4用HAL库驱动MPU6050,从引脚重映射到数据读取的保姆级避坑指南
STM32F4 HAL库驱动MPU6050全流程实战:从引脚重映射到数据解析的深度避坑指南 第一次接触STM32F4和MPU6050的组合时,我花了整整三天时间才让传感器吐出第一个有效数据。不是I2C通信失败,就是数据全为零,最崩溃的是明明按照教程操作…...

LetsFG:基于Function与Group的去中心化协作平台设计与实战
1. 项目概述:一个面向未来的开源协作平台最近在开源社区里,一个名为“LetsFG/LetsFG”的项目引起了我的注意。乍一看这个标题,可能会觉得有些抽象,但当你深入其代码仓库和设计理念后,会发现它指向了一个非常具体且极具…...

在vscode中快速配置taotoken的claude code插件实现稳定编程助手
🚀 告别海外账号与网络限制!稳定直连全球优质大模型,限时半价接入中。 👉 点击领取海量免费额度 在VSCode中快速配置Taotoken的Claude Code插件实现稳定编程助手 对于使用VSCode的开发者而言,Claude Code插件是一个强…...

2026年十大最佳小程序制作平台:革新数字化运营体验
小程序制作已成为企业数字化运营的重要抓手,2026年市场涌现多个高效平台。本文聚焦十大主流工具,涵盖从开发效率到生态构建的核心维度。好赞科技凭借地域精准算法领跑,亿点通科技以低代码开发见长,启帆数字突出定制化能力。各平台…...

AI Coding如何落地APP开发——从个人玩具到公司级降本增效
一、AI 编程能力如何应用到APP开发团队 每天打开新闻都是各种: AI可以取代程序猿、AI可以独立写页面、AI可以独立完成APP,程序员马上要失业了,一个产品经理半天时间就能生成一个带完整页面的活动模块原型;一个运营人员一个小时就…...

C#中使用MiniExcel 快速入门:读写 .xlsx 文件
背景介绍 报表绕不开 Excel。传统方案用 Microsoft.Office.Interop,需要安装 Office,且进程管理复杂。MiniExcel 是一个轻量级库(< 1MB),通过直接操作 ZIP 压缩包(.xlsx 本质是 ZIP)实现读写…...

Adobe-GenP激活工具:5分钟解锁Adobe创意套件全功能
Adobe-GenP激活工具:5分钟解锁Adobe创意套件全功能 【免费下载链接】Adobe-GenP Adobe CC 2019/2020/2021/2022/2023 GenP Universal Patch 3.0 项目地址: https://gitcode.com/gh_mirrors/ad/Adobe-GenP Adobe-GenP是一款专为Adobe Creative Cloud用户设计的…...