Day8 智慧商城
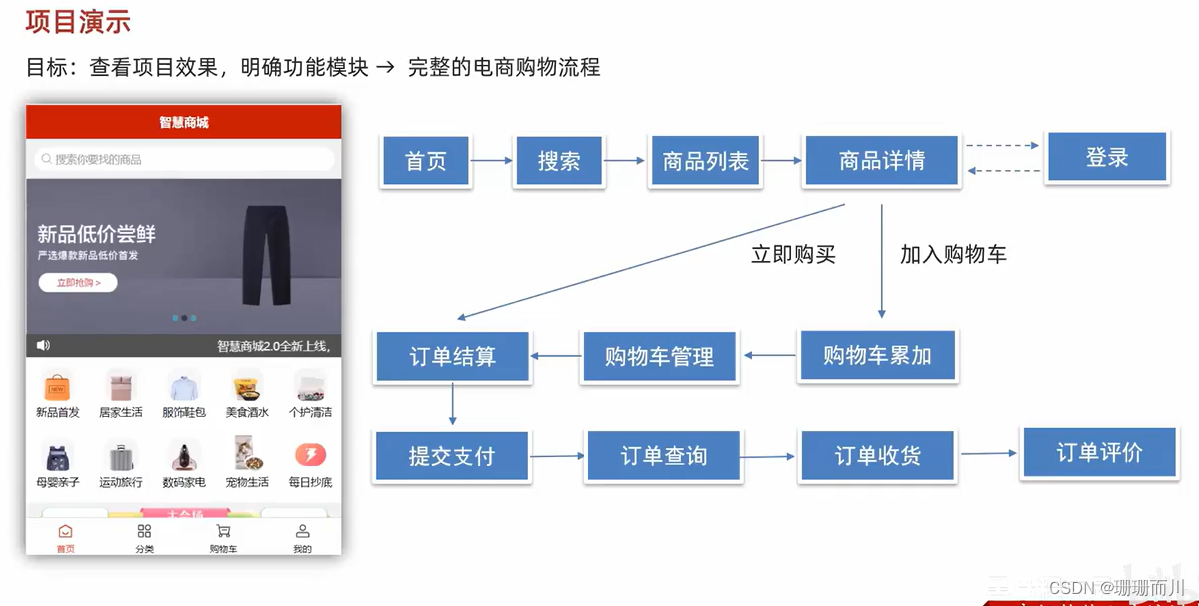
项目演示
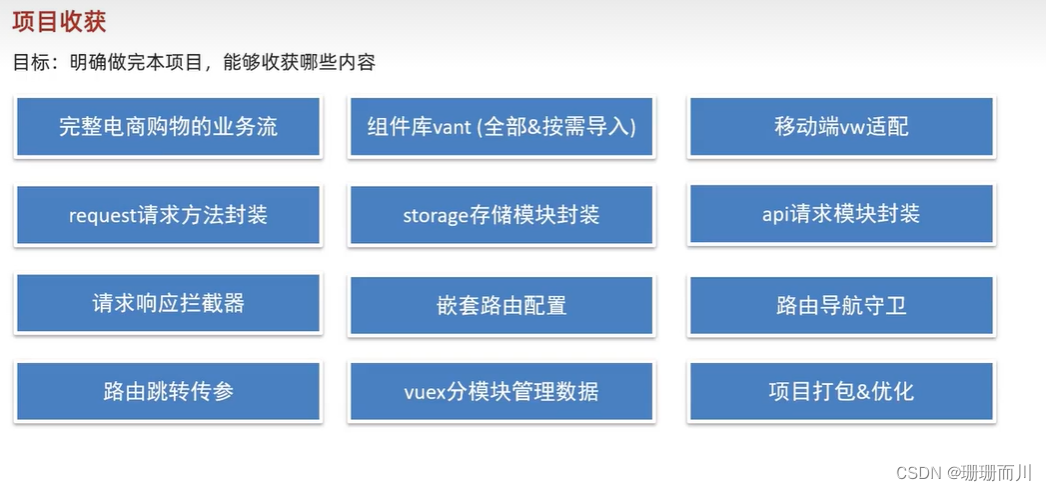
项目收获
创建项目

调整初始化目录
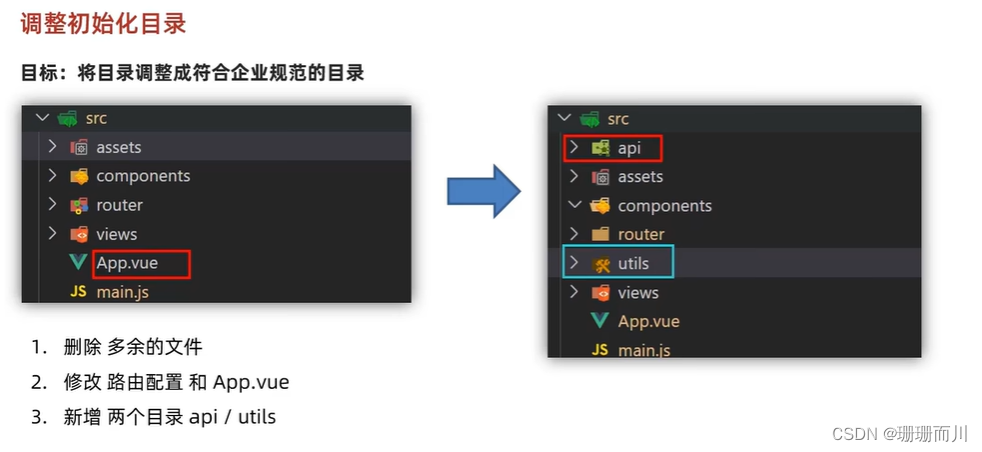

1.删components里的所有文件
2.删views里的所有文件
3.router/index.js 删路由 删规则
import Vue from 'vue'
import VueRouter from 'vue-router'Vue.use(VueRouter)const router = new VueRouter({routes: []
})export default router
4.App.vue 删css 内容,只留路由出口
<template><div id="app"><router-view/></div>
</template><style lang="less"></style>
学习vant组件库
基本介绍
 vant2 支持vue2
vant3和4 支持vue3
vant4官网
vant2官网

安装方式和基本使用姿势
# Vue 3 项目,安装最新版 Vant:
npm i vant -S# Vue 2 项目,安装 Vant 2:
npm i vant@latest-v2 -S
全部导入和按需引入
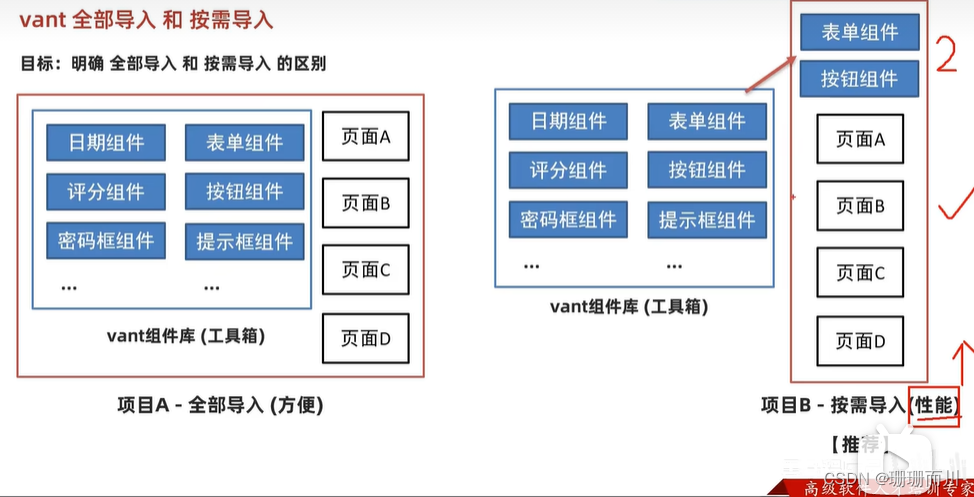
全部导入
 main.js
import Vue from 'vue'
import App from './App.vue'
import router from './router'
import store from './store'import Vant from 'vant'
import 'vant/lib/index.css'
Vue.use(Vant)Vue.config.productionTip = falsenew Vue({router,store,render: h => h(App)
}).$mount('#app')
App.vue
<template><div id="app"><van-button type="primary">主要按钮</van-button><van-button type="info">信息按钮</van-button><van-button type="default">默认按钮</van-button><router-view/></div>
</template><style lang="less"></style>
按需引入
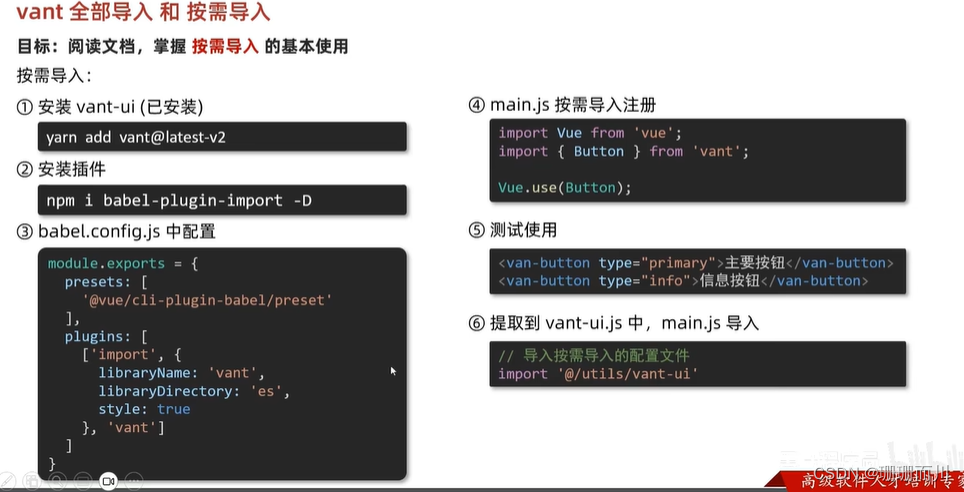 修改了babel.config.js要重启服务器,才能看到效果
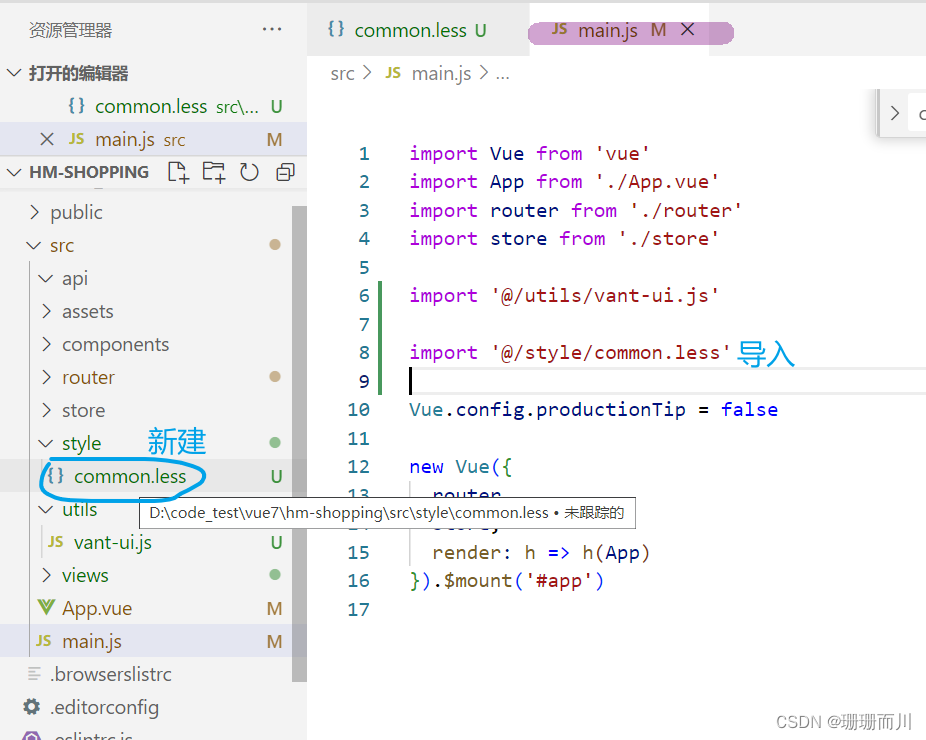
main.js
import Vue from 'vue'
import App from './App.vue'
import router from './router'
import store from './store'import '@/utils/vant-ui.js'Vue.config.productionTip = falsenew Vue({router,store,render: h => h(App)
}).$mount('#app')
utils/vant-ui.js
import Vue from 'vue'
import { Button } from 'vant'
Vue.use(Button)
babel.config.js
module.exports = {presets: ['@vue/cli-plugin-babel/preset']
}
module.exports = {plugins: [['import', {libraryName: 'vant',libraryDirectory: 'es',style: true}, 'vant']]
}
App.vue同上
# VM适配 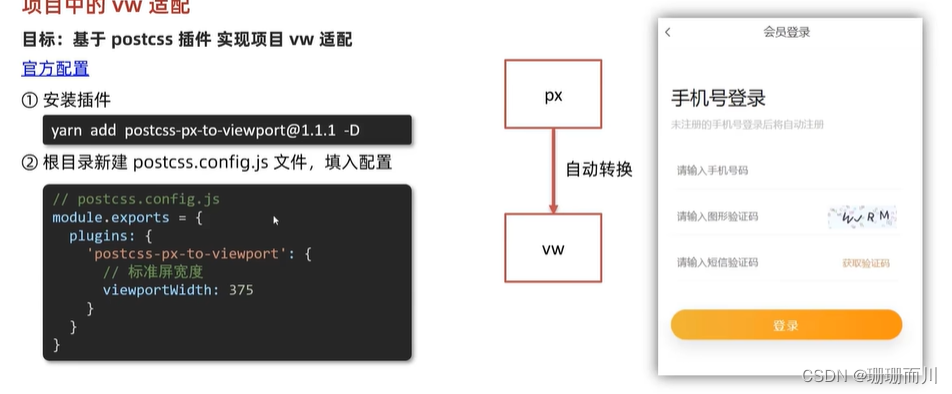vant官网中【进阶用法】中的浏览器适配 1.cnpm i postcss-px-to-viewport@1.1.1 -D 2.根目录创建postcss.config.js
// postcss.config.js
module.exports = {plugins: {'postcss-px-to-viewport': {// vw适配的标准屏宽度//  设计图750,调成一倍  适配375标准屏幕viewportWidth: 375}}
}
App.vue
<template><div id="app"><div class="box"></div><van-button type="primary">主要按钮</van-button><van-button type="info">信息按钮</van-button><van-button type="default">默认按钮</van-button><router-view/></div>
</template><style lang="less">
.box{width: 300px;height: 300px;background-color: #ed8a8a;
}
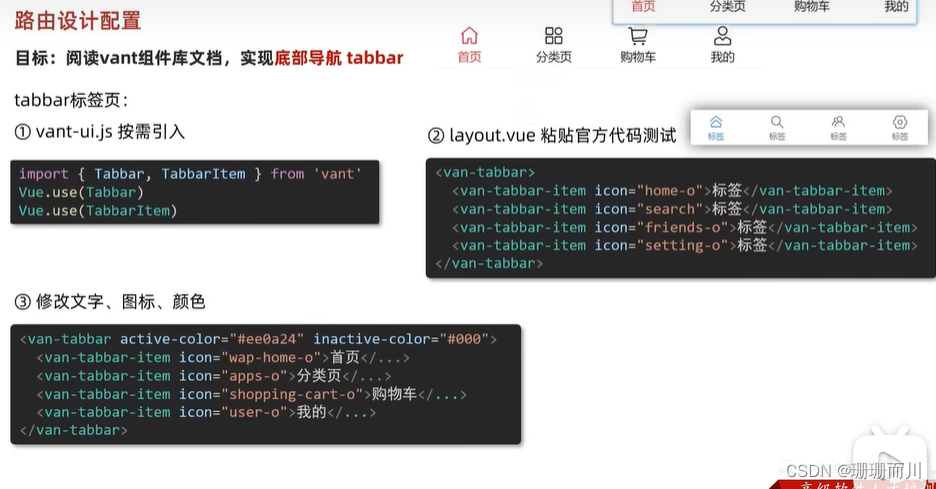
</style># 路由设计配置 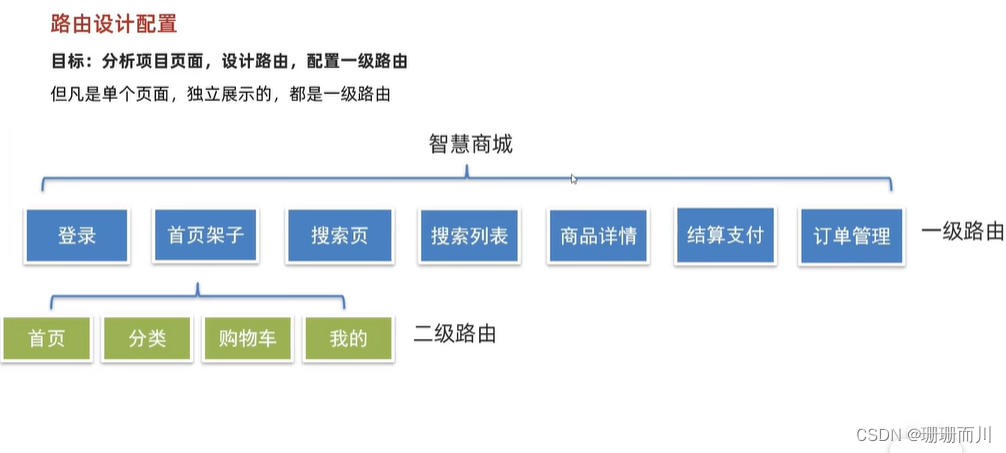
## 一级路由 这里和之前不同,是先在views建文件夹,再给每个建index.vue 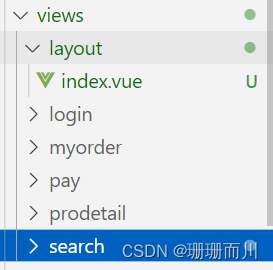例如:Layout/index.vue
<template><div>layout</div>
</template><script>
export default {name: 'LayoutIndex'
}
</script><style></style>
router/index.js
import Vue from 'vue'
import VueRouter from 'vue-router'import Login from '@/views/login'
import Layout from '@/views/layout'
import Myorder from '@/views/myorder'
import Pay from '@/views/pay'
import Prodetail from '@/views/prodetail'
import Search from '@/views/search'
import SearchList from '@/views/search/list.vue'Vue.use(VueRouter)const router = new VueRouter({routes: [{ path: '/login', component: Login },{ path: '/', component: Layout }, // 首页{ path: '/myorder', component: Myorder },{ path: '/pay', component: Pay },// 动态路由传参,路由参数携带id{ path: '/prodetail/:id', component: Prodetail },{ path: '/search', component: Search },{ path: '/searchlist', component: SearchList }]
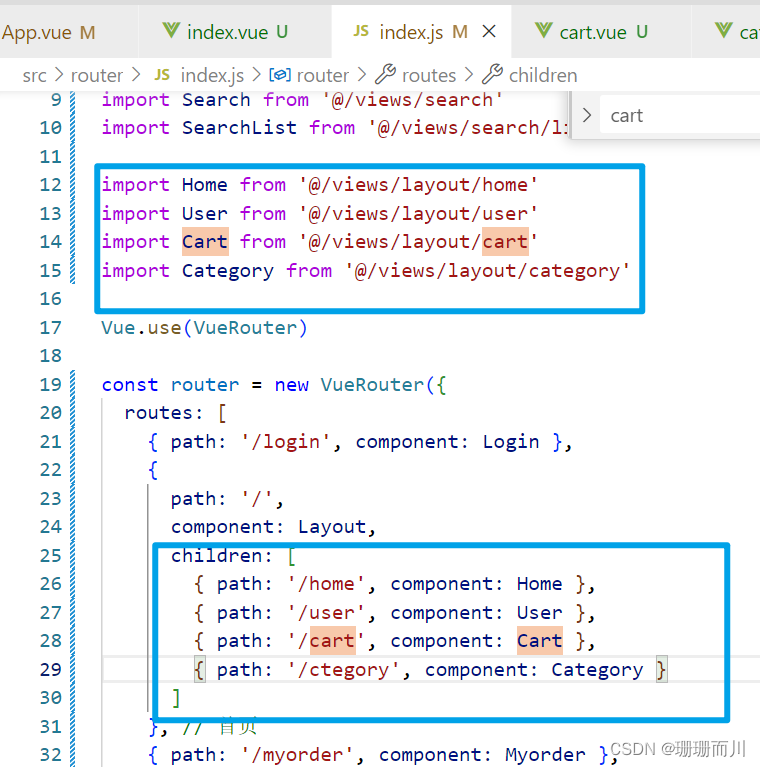
})export default router二级路由
layout/index.vue
<template><div><van-tabbar active-color="blue" inactive-color="#000"><!-- 改标签内容,小图标icon也是从vant里找,直接填名字即可实现改变 --><van-tabbar-item icon="wap-home-o">首页</van-tabbar-item><van-tabbar-item icon="apps-o">分类页</van-tabbar-item><van-tabbar-item icon="shopping-cart-o">购物车</van-tabbar-item><van-tabbar-item icon="user-o">我的</van-tabbar-item></van-tabbar>
</div>
</template><script>
export default {name: 'LayoutIndex'
}
</script><style></style>
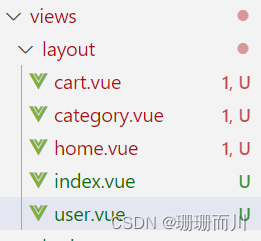
建文件
配置路由页面
layout/cart.vue
<template><div>cart</div>
</template><script>
export default {name: 'CartIndex'
}
</script><style></style>
配规则
router/index.js

layout/index.vue
<template><div><router-view></router-view><van-tabbar router active-color="blue" inactive-color="#000"><!-- 改标签内容,小图标icon也是从vant里找,直接填名字即可实现改变 --><van-tabbar-item to='/home' icon="wap-home-o">首页</van-tabbar-item><van-tabbar-item to='/category' icon="apps-o">分类页</van-tabbar-item><van-tabbar-item to='/cart' icon="shopping-cart-o">购物车</van-tabbar-item><van-tabbar-item to='/user' icon="user-o">我的</van-tabbar-item></van-tabbar>
</div>
</template>
登陆页面
登陆页静态布局
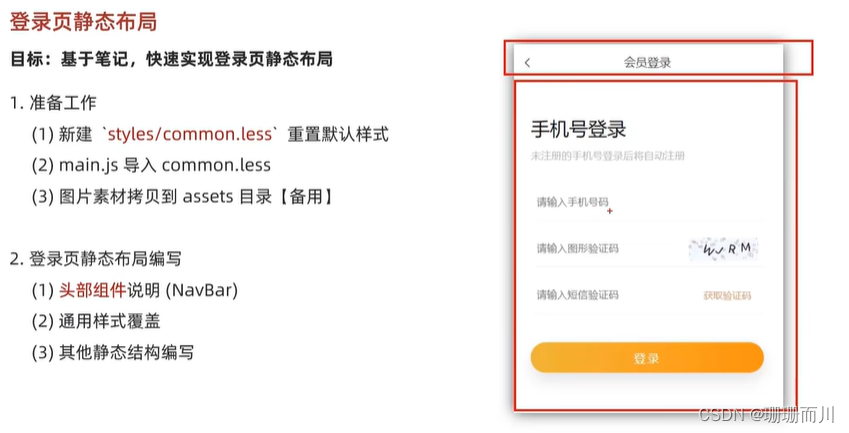
通用样式覆盖

login/index.vue
<template><div class="login"><van-nav-bar title="会员登录" left-arrow @click-left="$router.go(-1)" /><div class="container"><div class="title"><h3>手机号登录</h3><p>未注册的手机号登录后将自动注册</p></div><div class="form"><div class="form-item"><input class="inp" maxlength="11" placeholder="请输入手机号码" type="text"></div><div class="form-item"><input class="inp" maxlength="5" placeholder="请输入图形验证码" type="text"><img src="@/assets/code.png" alt=""></div><div class="form-item"><input class="inp" placeholder="请输入短信验证码" type="text"><button>获取验证码</button></div></div><div class="login-btn">登录</div></div></div>
</template><script>
export default {name: 'LoginPage'
}
</script><style lang="less" scoped>
.container {padding: 49px 29px;.title {margin-bottom: 20px;h3 {font-size: 26px;font-weight: normal;}p {line-height: 40px;font-size: 14px;color: #b8b8b8;}}.form-item {border-bottom: 1px solid #f3f1f2;padding: 8px;margin-bottom: 14px;display: flex;align-items: center;.inp {display: block;border: none;outline: none;height: 32px;font-size: 14px;flex: 1;}img {width: 94px;height: 31px;}button {height: 31px;border: none;font-size: 13px;color: #cea26a;background-color: transparent;padding-right: 9px;}}.login-btn {width: 100%;height: 42px;margin-top: 39px;background: linear-gradient(90deg,#ecb53c,#ff9211);color: #fff;border-radius: 39px;box-shadow: 0 10px 20px 0 rgba(0,0,0,.1);letter-spacing: 2px;display: flex;justify-content: center;align-items: center;}
}
</style>
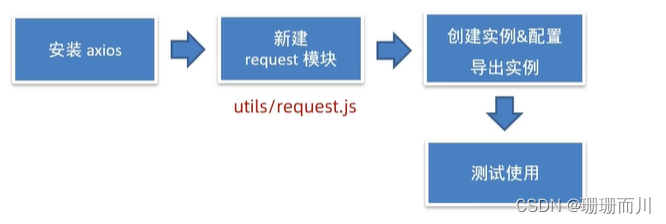
request模块 - axios封装
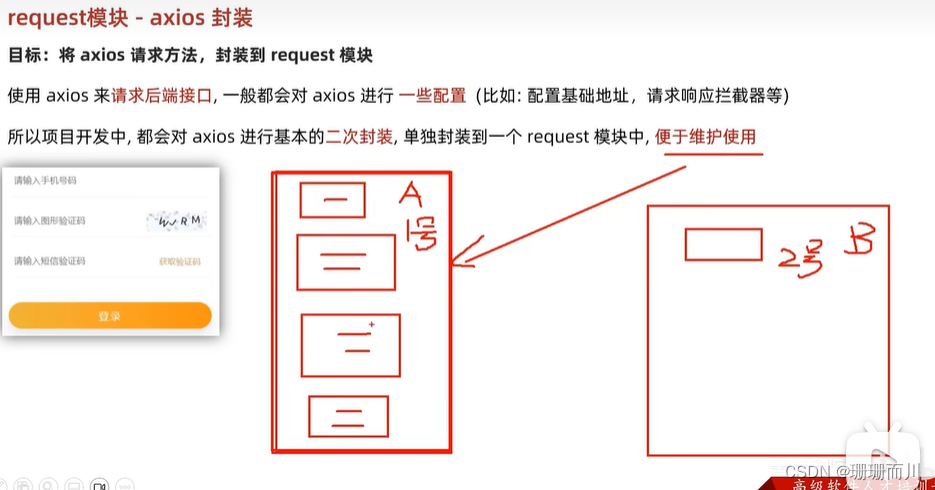
 axios官网文档
去里面直接复制就行
utils/requests.js
import axios from 'axios'
// 创建axios实例,将来对创建出来的实例,进行自定义配置
// 好处 不会污染原始的axios实例
const instance = axios.create({baseURL: 'http://cba.itlike.com/public/index.php?s=/api/',timeout: 5000})// 自定义配置 请求/相应 拦截器
// 添加请求拦截器
// axios.xxxx更改为 instance.xxxx
instance.interceptors.request.use(function (config) {// 在发送请求之前做些什么return config
}, function (error) {// 对请求错误做些什么return Promise.reject(error)
})// 添加响应拦截器
instance.interceptors.response.use(function (response) {// 2xx 范围内的状态码都会触发该函数。// 对响应数据做点什么(默认axios会多包装一层data,需要响应拦截器中处理一下)return response.data // 扒地一层
}, function (error) {// 超出 2xx 范围的状态码都会触发该函数。// 对响应错误做点什么return Promise.reject(error)
})// 导出配置好的实例
export default instance
测试使用
login/index.vue
import request from '@/utils/requests'
export default {name: 'LoginPage',async created () {// 就直接把request当做axios,就和之前一样地用const res = await request.get('/captcha/image')console.log(res)}
}
图形验证码功能

login/index.vue
  <div class="form-item"><input v-model="picCode"   class="inp" maxlength="5" placeholder="请输入图形验证码" type="text"><!-- v-if防止默认Url没有值显示空渲染   点击刷新 --><img v-if="picUrl"    :src="picUrl"  @click="getPicCode"          alt=""></div>import request from '@/utils/requests'
export default {name: 'LoginPage',data () {return {picCode: '', // 用户输入的图形验证码picKey: '', // 将来请求传递的图形验证码唯一标识picUrl: '' // 存储图片地址}},async created () {this.getPicCode()},methods: {async getPicCode () {const { data: { base64, key } } = await request.get('/captcha/image')this.picUrl = base64this.picKey = key}}
}
相关文章:
Day8 智慧商城
项目演示 项目收获 创建项目 调整初始化目录 1.删components里的所有文件 2.删views里的所有文件 3.router/index.js 删路由 删规则 import Vue from vue import VueRouter from vue-routerVue.use(VueRouter)const router new VueRouter({routes: [] })export default route…...
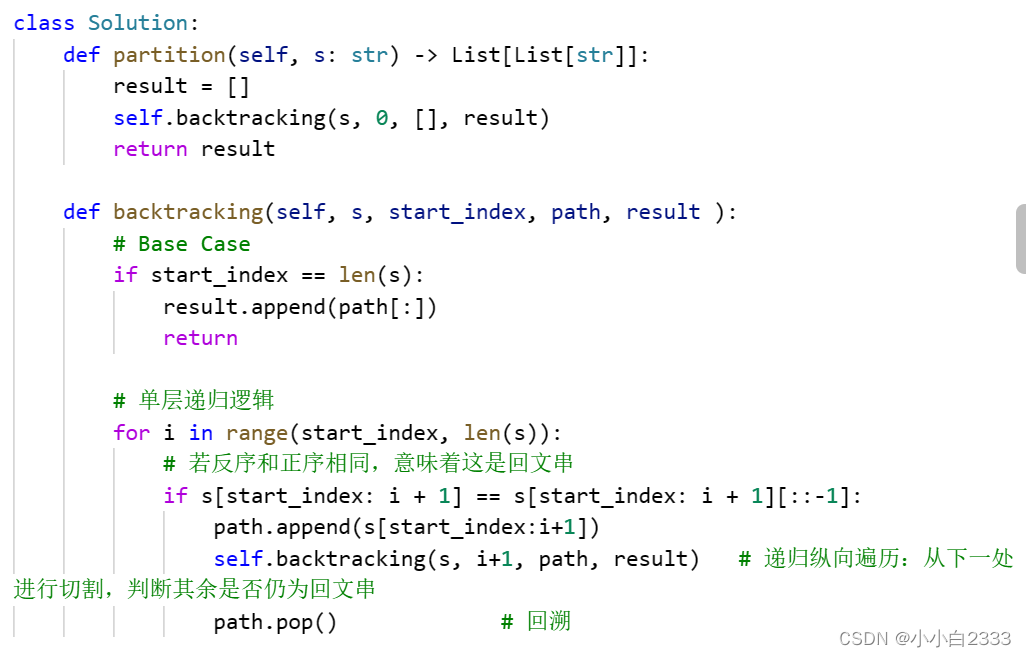
LeetCode:Hot100python版本之回溯
回溯算法其实是纯暴力搜索。for循环嵌套是写不出的 组合:没有顺序 排列:有顺序 回溯法可以抽象为树形结构。只有在回溯算法中递归才会有返回值。 46. 全排列 排列是有顺序的。 组合类问题用startindex,排序类问题用used,来标…...
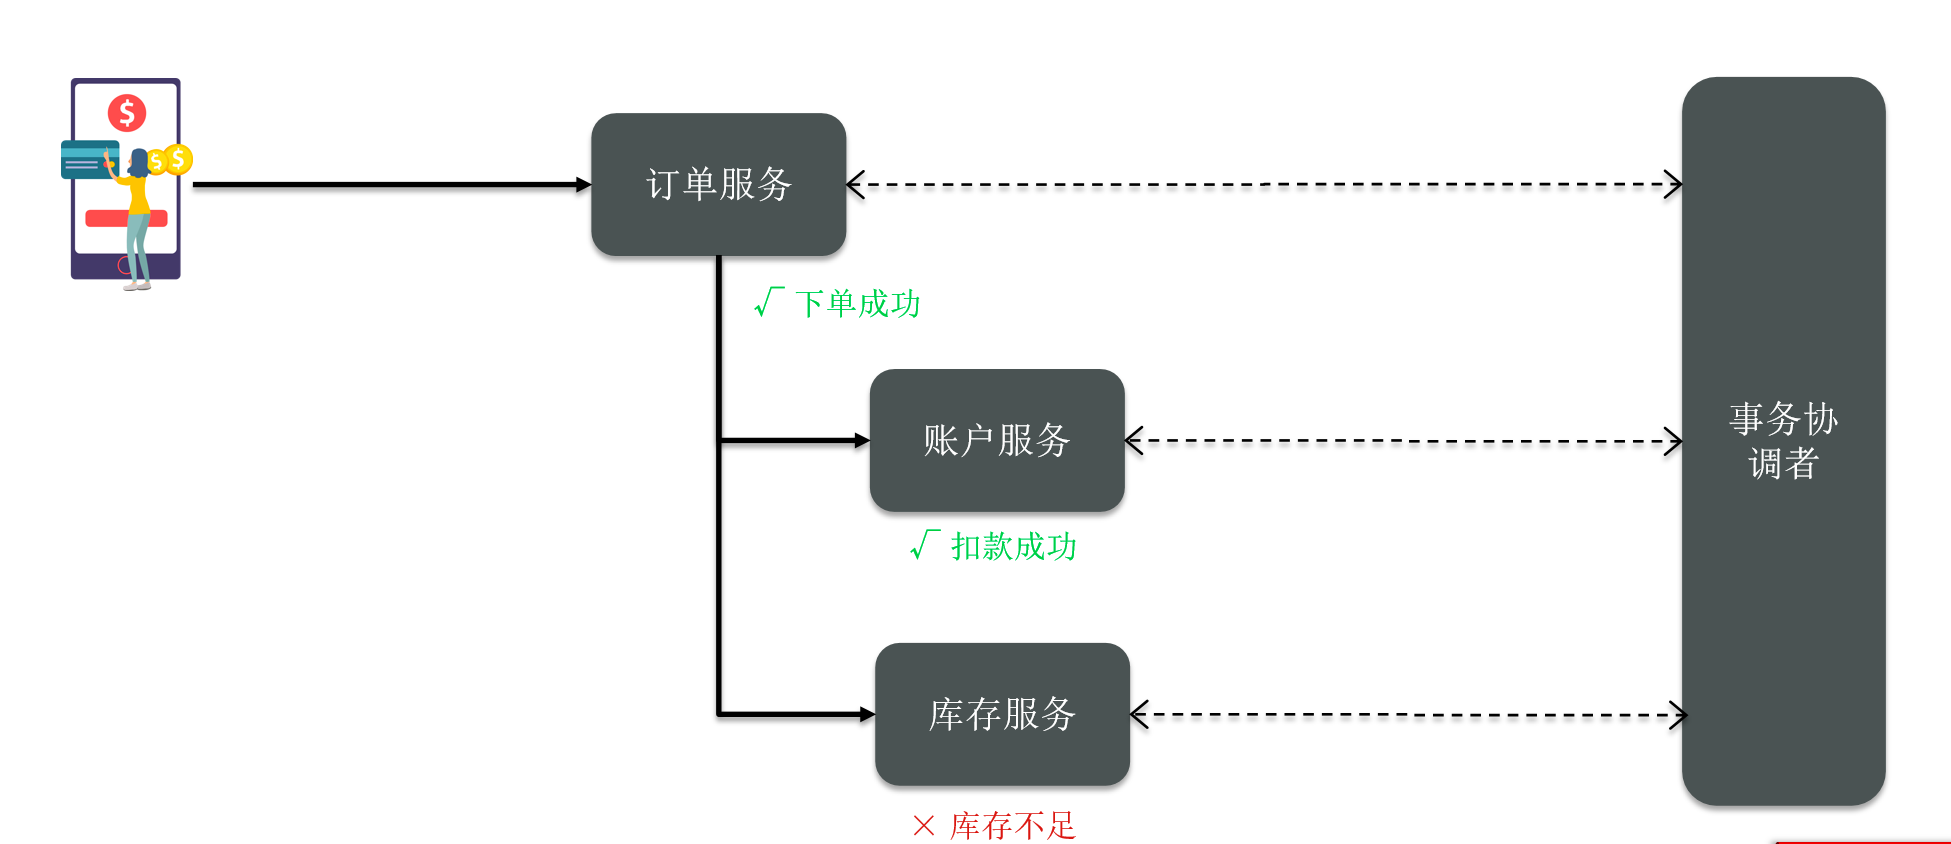
分布式事务理论基础
今天啊,本片博客我们一起来学习一下微服务中的一个重点和难点知识:分布式事务。 我们会基于Seata 这个框架来学习。 1、分布式事务问题 事务,我们应该比较了解,我们知道所有的事务,都必须要满足ACID的原则。也就是 …...

线性代数强化第三章
目录 一,关于A伴随,A逆与初等矩阵 二,分块矩阵 三,矩阵方程 一,关于A伴随,A逆与初等矩阵 如何证明行列式的值不能是0; 此秩为1. 法一: 法二: 不用看是列变换还是行变…...
---之配置)
搭建自己的私有 开源LoRaWAN 网络服务器(The ThingsStack)---之配置
介绍 这是使用 Docker 在您自己的硬件上安装 Things Stack Enterprise 或开源代码以运行您自己的私有 LoRaWAN 网络服务器的指南。 运行 The Things Stack 的方法有多种。 Things Stack 开源和企业发行版旨在在您自己的硬件上运行,本指南也对此进行了介绍。 对于具有高吞吐量的…...

多维时序 | MATLAB实现SCNGO-CNN-Attention多变量时间序列预测
多维时序 | MATLAB实现SCNGO-CNN-Attention多变量时间序列预测 目录 多维时序 | MATLAB实现SCNGO-CNN-Attention多变量时间序列预测预测效果基本介绍程序设计参考资料 预测效果 基本介绍 1.SCNGO-CNN-Attention超前24步多变量回归预测算法。 程序平台:无Attention适…...

clickhouse的删除和更新
clickhouse不擅长更新和删除操作,更新操作很重,更新是重新创建一个分区,更新完后,太混之前的 ClickHouse提供了DELETE和UPDATE的能力,这类操作被称为Mutation查询,它可以看作ALTER语句的变种。虽然Mutation…...

微前端 - qiankun
qiankun 是一个基于 single-spa 的微前端实现库,旨在帮助大家能更简单、无痛的构建一个生产可用微前端架构系统。 本文主要记录下如何接入 qiankun 微前端。主应用使用 vue2,子应用使用 vue3、react。 一、主应用 主应用不限技术栈,只需要提…...
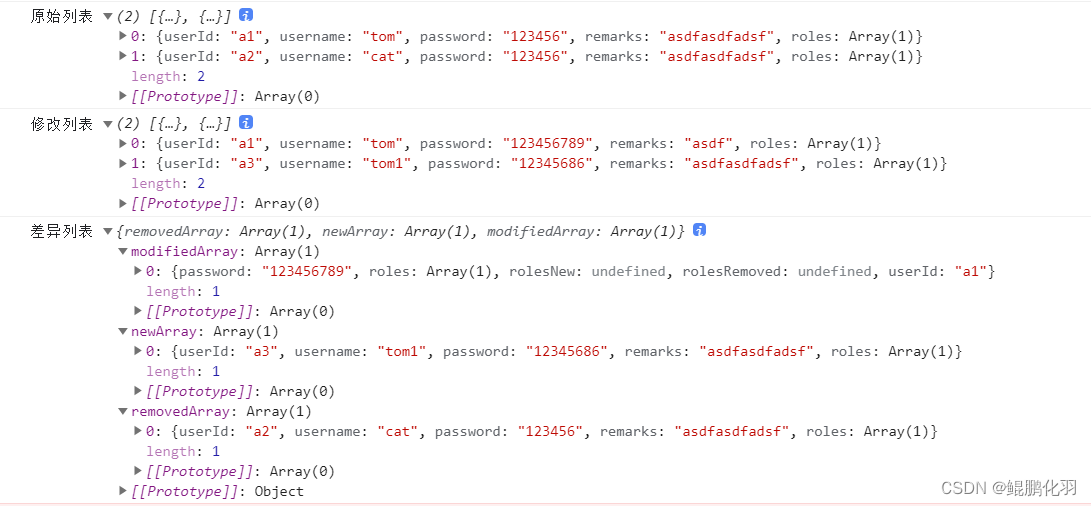
前端编辑页面修改后和原始数据比较差异
在软件研发过程中,会遇到很多编辑页面,有时编辑页面和新增页面长的基本上一样,甚至就是一套页面供新增和编辑共用。编辑页面的场景比较多,例如: 场景一、字段比较多,但实际只修改了几个字段,如…...

docker第一次作业
docker第一次作业 1.安装docker服务,配置镜像加速器 yum install -y yum-utils device-mapper-persistent-data lvm2 yum-config-manager --add-repo https://mirrors.aliyun.com/docker-ce/linux/centos/docker-ce.repo sed -i sdownload.docker.commirrors.aliy…...

Springboot3.0.0+集成SpringDoc并配置knife4j的UI
环境:JDK17,Springboot3,springdoc2,knife4j 4 Springdoc本身也是集成了Swagger3,而knife4j美化了Swagger3的UI Knife4j官网: 快速开始 | Knife4j Springdoc官网 OpenAPI 3 Library for spring-boot 1.pom配置 由于此knife4j内依赖了S…...
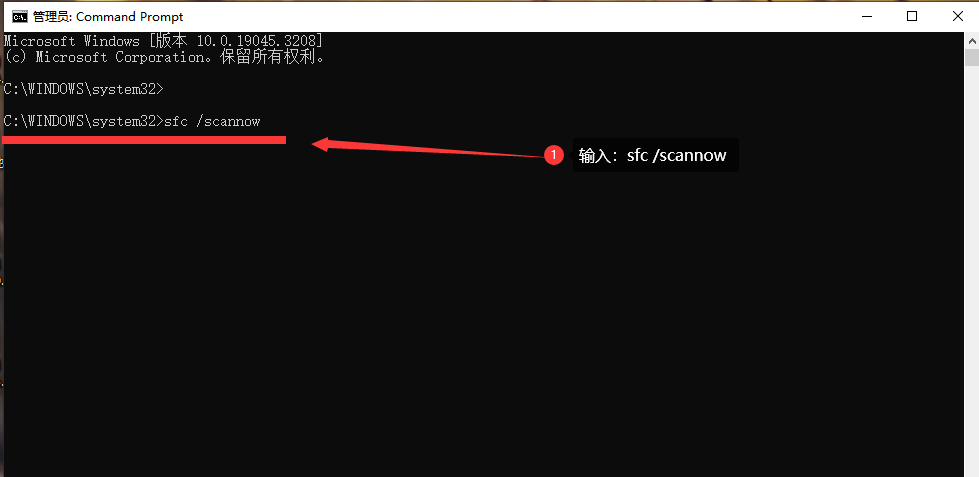
电脑运行缓慢?4个方法,加速电脑运行!
“我电脑才用了没多久哎!怎么突然就变得运行很缓慢了呢?有什么方法可以加速电脑运行速度吗?真的很需要,看看我吧!” 电脑的运行速度快会让用户在使用电脑时感觉愉悦,而电脑运行缓慢可能会影响我们的工作效率…...

3.Docker 搭建 MySQL8.0
1、docker仓库搜索mysql docker search mysql2、docker仓库拉取mysql8.0 docker pull mysql:8.0 备注: docker pull mysql //默认拉取最新版本3、查看本地仓库镜像是否下载成功 docker images mysql:8.04、安装运行mysql8.0容器 docker run -p 3306:3306 --name…...

Mybatis的SqlSource SqlNode BoundSql
学习链接 MyBatis SqlSource解析 【Mybatis】Mybatis源码之SqlSource#getBoundSql获取预编译SQL Mybatis中SqlSource解析流程详解 Mybatis TypeHandler解析 图解 Mybatis的SqlSource&SqlNode - processon DynamicSqlSource public class DynamicSqlSource implement…...

html动态爱心代码【二】(附源码)
目录 前言 效果演示 内容修改 完整代码 总结 前言 七夕马上就要到了,为了帮助大家高效表白,下面再给大家带来了实用的HTML浪漫表白代码(附源码)背景音乐,可用于520,情人节,生日,表白等场景,…...

【Rust】Rust学习 第十六章无畏并发
安全且高效的处理并发编程是 Rust 的另一个主要目标。并发编程(Concurrent programming),代表程序的不同部分相互独立的执行,而 并行编程(parallel programming)代表程序不同部分于同时执行,这两…...
系统报错mfc100u.dll丢失的解决方法(完美解决dll问题)
系统文件mfc100u.dll丢失和出错,极有可能是盗号木马、流氓软件等恶意程序所导致,其感染相关文件并加载起来,一旦杀毒软件删除被感染的文件,就会导致相关组件缺失,游戏等常用软件运行不起来,且提示“无法启动…...
docker compose的用法
目录 一、Docker-Compose介绍 1.1 Docker-Compose的概述 1.2 Docker-Compose 用来实现Docker容器快速编排 1.3 Docker-compose模板文件简介 二、YAML简介 2.1 YAML的概述 2.2 YAML的基本语法规则 2.3 YAML支持的数据架构 三、配置内部常用字段 四、Docker-compose 常…...

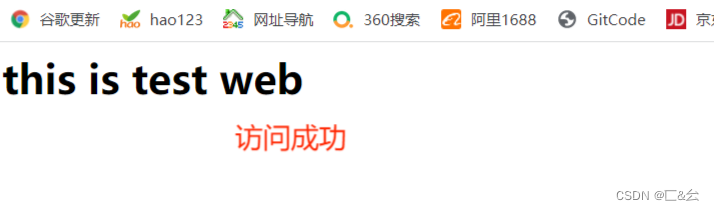
Linux: 使用 ssh 连接其他服务器
通过ifconfig 查看要连接的服务器地址: ubuntuubuntu1804-0172:/media/sangfor/vdc$ ssh ubuntu192.168.11.49 输入要连接的服务器密码: ubuntua192.168.1149 s password: 连接服务器成功:...
[.NET/WPF] CommunityToolkit.Mvvm 异步指令
我们在开发中, 经常会有这样的需求: 点击按钮后, 进行一些耗时的工作工作进行时, 按钮不可再次被点击工作进行时, 会显示进度条, 或者 “加载中” 的动画 RelayCommand CommunityToolkit.Mvvm 中的 RelayCommand 除了支持最简单的同步方法, 还支持以 Task 作为返回值的异步方…...

Cursor Pro破解工具:5步实现永久免费使用的完整指南
Cursor Pro破解工具:5步实现永久免费使用的完整指南 【免费下载链接】cursor-free-vip [Support 0.45](Multi Language 多语言)自动注册 Cursor Ai ,自动重置机器ID , 免费升级使用Pro 功能: Youve reached your trial…...

深度解析:libiec61850开源库如何解决电力系统通信的三大核心挑战
深度解析:libiec61850开源库如何解决电力系统通信的三大核心挑战 【免费下载链接】libiec61850 Official repository for libIEC61850, the open-source library for the IEC 61850 protocols 项目地址: https://gitcode.com/gh_mirrors/li/libiec61850 在电…...

RevokeMsgPatcher实战指南:Windows微信QQ防撤回的终极秘籍
RevokeMsgPatcher实战指南:Windows微信QQ防撤回的终极秘籍 【免费下载链接】RevokeMsgPatcher :trollface: A hex editor for WeChat/QQ/TIM - PC版微信/QQ/TIM防撤回补丁(我已经看到了,撤回也没用了) 项目地址: https://gitcod…...

静态前端项目实战:从营销页到现代化门户的架构与实现
1. 项目概述:一个纯粹的静态前端项目最近在GitHub上看到了一个名为“Vibe Code”的项目,它的README写得非常漂亮,充满了各种炫酷的特性介绍,比如支持Claude Code、OpenAI Codex等AI编程助手,还有深色/亮色主题切换、多…...

为个人AI助手项目集成多模型API实现成本与性能平衡
🚀 告别海外账号与网络限制!稳定直连全球优质大模型,限时半价接入中。 👉 点击领取海量免费额度 为个人AI助手项目集成多模型API实现成本与性能平衡 构建个人AI助手是许多独立开发者热衷的项目。在开发过程中,一个常见…...

多波束声呐接收机与信号处理算法【附程序】
✨ 长期致力于多通道声呐接收机、电路设计、FPGA、数字信号处理、波束形成研究工作,擅长数据搜集与处理、建模仿真、程序编写、仿真设计。 ✅ 专业定制毕设、代码 ✅ 如需沟通交流,点击《获取方式》 (1)小型化96通道接收机硬件电路…...

照片元数据管理终极指南:3步告别繁琐手动操作
照片元数据管理终极指南:3步告别繁琐手动操作 【免费下载链接】ExifToolGui A GUI for ExifTool 项目地址: https://gitcode.com/gh_mirrors/ex/ExifToolGui 你是否曾因数百张照片的拍摄时间错误而头痛不已?是否在为大量图片添加版权信息时感到力…...

opencv-第四章:图像轮廓检测
OpenCV-计算机视觉技术(林伟鹏版) 第四章:图像轮廓检测 文章目录OpenCV-计算机视觉技术(林伟鹏版)前言一、图像轮廓检测概念1.概念二、图像轮廓检测1.图像二值化转换2.图像轮廓匹配3.二值图轮换轮廓检测4.图像轮廓检测…...

将串口打印的日志,同时备份到sd卡里
将串口打印的日志,同时备份到sd卡里#include <stdio.h> #include <unistd.h> #include <pthread.h> #include <string.h> #include <stdlib.h> #include <errno.h>static int pipe_fd[2] {-1, -1};static int stdout_backup …...

从‘方波变形记’聊起:为什么你的高速信号需要Tx EQ?一个给嵌入式软件/FPGA工程师的通俗图解
从‘方波变形记’聊起:为什么你的高速信号需要Tx EQ? 想象一下,你正在观看一场高清直播,画面突然出现马赛克;或者传输重要数据时,系统频繁报错。这些问题的根源,可能就藏在信号传输的微观世界里…...