【目标检测】“复制-粘贴 copy-paste” 数据增强实现
文章目录
- 前言
- 1. 效果展示
- 代码说明
- 3. 参考文档
- 4. 不合适点
前言
本文来源论文《Simple Copy-Paste is a Strong Data Augmentation Method
for Instance Segmentation》(CVPR2020),对其数据增强方式进行实现。
论文地址:https://arxiv.org/abs/2012.07177
解读:https://mp.weixin.qq.com/s/nKC3bEe3m1eqPDI0LpVTIA
主要思想:

本文参考该数据增强的语义分割实现[1],相应修改为对应目标检测的实现,坐标变换的写法参考[2]。
其中,对应的标注信息为txt格式,如果自己的数据集是VOC或COCO格式,可自行修改,也可先转换成txt格式再使用下述代码。
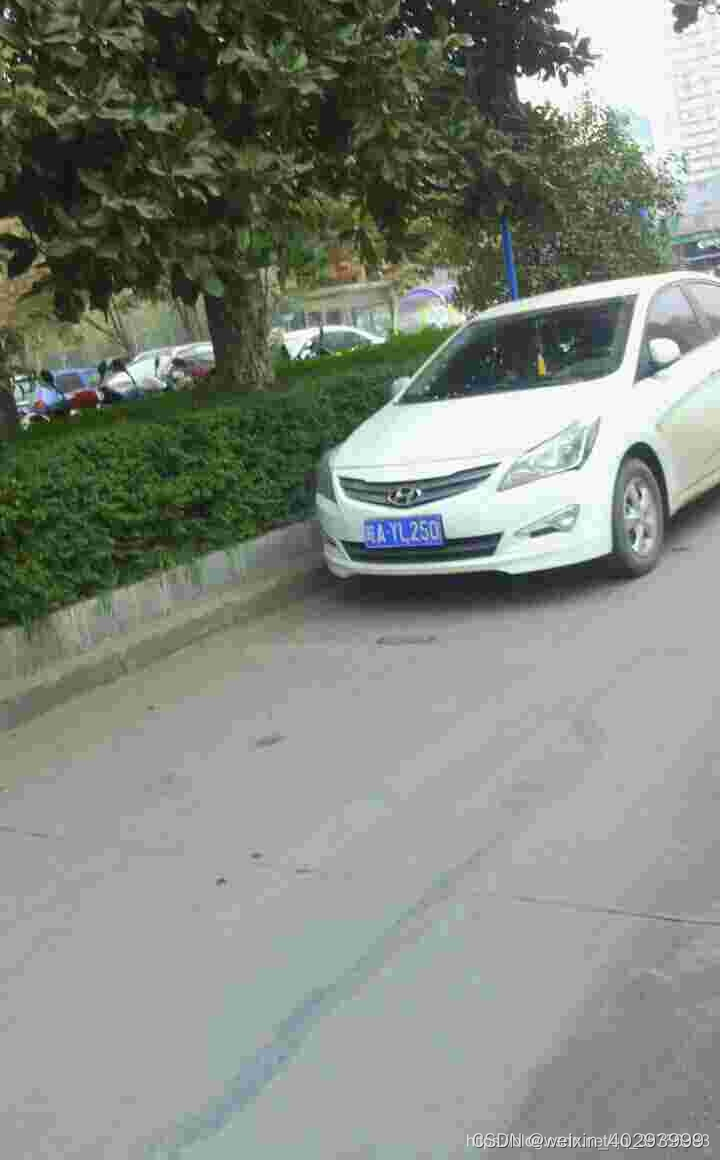
1. 效果展示
数据来源CCPD2019数据集,下图分别为img_main和img_src:
将img_src的车牌目标“复制-粘贴”到img_main的结果:
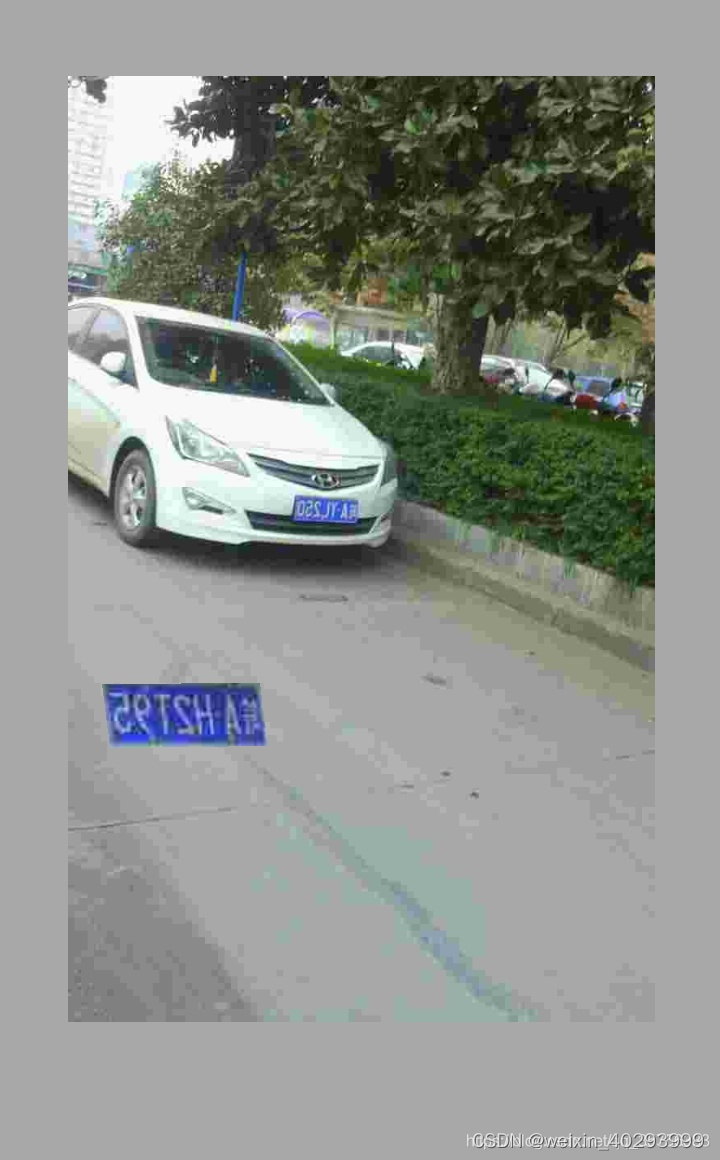
新生成的图片大小与img_main一致,空白的部分会补灰边。
代码说明
'''
Descripttion: Data Augment for Object Detection.
version: 1.0.0
Author: lakuite
Date: 2021-08-06 13:37:38
Copyright: Copyright(c) 2021 lakuite. All Rights Reserved
'''import numpy as np
import cv2
import os
import tqdm
import argparse
from skimage.draw import polygon
import randomdef random_flip_horizontal(img, box, p=0.5):'''对img和mask随机进行水平翻转。box为二维np.array。https://blog.csdn.net/weixin_41735859/article/details/106468551img[:,:,::-1] gbr-->bgr、img[:,::-1,:] 水平翻转、img[::-1,:,:] 上下翻转'''if np.random.random() < p:w = img.shape[1]img = img[:, ::-1, :]box[:, [0, 2, 4, 6]] = w - box[:, [2, 0, 6, 4]] # 仅针对4个点变换return img, boxdef Large_Scale_Jittering(img, box, min_scale=0.1, max_scale=2.0):'''对img和box进行0.1-2.0的大尺度抖动,并变回h*w的大小。'''rescale_ratio = np.random.uniform(min_scale, max_scale)h, w, _ = img.shape# rescaleh_new, w_new = int(h * rescale_ratio), int(w * rescale_ratio)img = cv2.resize(img, (w_new, h_new), interpolation=cv2.INTER_LINEAR)# crop or padding# x,y是随机选择左上角的一个点,让小图片在这个位置,或者让大图片从这个位置开始裁剪x, y = int(np.random.uniform(0, abs(w_new - w))), int(np.random.uniform(0, abs(h_new - h)))# 如果图像缩小了,那么其余部分要填充为像素168大小if rescale_ratio <= 1.0:  # paddingimg_pad = np.ones((h, w, 3), dtype=np.uint8) * 168img_pad[y:y + h_new, x:x + w_new, :] = imgbox[:, [0, 2, 4, 6]] = box[:, [0, 2, 4, 6]] * w_new/w + x # x坐标box[:, [1, 3, 5, 7]] = box[:, [1, 3, 5, 7]] * h_new/h + y # y坐标return img_pad, box# 如果图像放大了,那么要裁剪成h*w的大小else:  # cropimg_crop = img[y:y + h, x:x + w, :]box[:, [0, 2, 4, 6]] = box[:, [0, 2, 4, 6]] * w_new/w - xbox[:, [1, 3, 5, 7]] = box[:, [1, 3, 5, 7]] * h_new/h - yreturn img_crop, boxdef img_add(img_src, img_main, mask_src, box_src):'''将src加到main图像中,结果图还是main图像的大小。'''if len(img_main.shape) == 3:h, w, c = img_main.shapeelif len(img_main.shape) == 2:h, w = img_main.shapesrc_h, src_w = img_src.shape[0], img_src.shape[1]mask = np.asarray(mask_src, dtype=np.uint8)# mask是二值图片,对src进行局部遮挡,即只露出目标物体的像素。sub_img01 = cv2.add(img_src, np.zeros(np.shape(img_src), dtype=np.uint8), mask=mask) # 报错深度不一致mask_02 = cv2.resize(mask, (w, h), interpolation=cv2.INTER_NEAREST)mask_02 = np.asarray(mask_02, dtype=np.uint8)sub_img02 = cv2.add(img_main, np.zeros(np.shape(img_main), dtype=np.uint8),mask=mask_02) # 在main图像上对应位置挖了一块# main图像减去要粘贴的部分的图,然后加上复制过来的图img_main = img_main - sub_img02 + cv2.resize(sub_img01, (w, h),interpolation=cv2.INTER_NEAREST)box_src[:, [0, 2, 4, 6]] = box_src[:, [0, 2, 4, 6]] * w/src_wbox_src[:, [1, 3, 5, 7]] = box_src[:, [1, 3, 5, 7]] * h/src_hreturn img_main, box_srcdef normal_(jpg_path, txt_path="", box=None):"""根据txt获得box或者根据box获得mask。:param jpg_path: 图片路径:param txt_path: x1,y1,x2,y2 x3,y3,x4,y4...:param box: 如果有box,则为根据box生成mask:return: 图像,box 或 掩码"""if isinstance(jpg_path, str): # 如果是路径就读取图片jpg_path = cv2.imread(jpg_path)img = jpg_path.copy()if box is None: # 一定有txt_pathlines = open(txt_path).readlines()box = []for line in lines:ceils = line.strip().split(',')xy = []for ceil in ceils:xy.append(round(float(ceil)))box.append(np.array(xy))return np.array(img), np.array(box)else: # 获得maskh, w = img.shape[:2]mask = np.zeros((h, w), dtype=np.float32)for xy in box: # 对每个框xy = np.array(xy).reshape(-1, 2)cv2.fillPoly(mask, [xy.astype(np.int32)], 1)return np.array(mask)def is_coincide(polygon_1, polygon_2):'''判断2个四边形是否重合:param polygon_1: [x1, y1,...,x4, y4]:param polygon_2::return:  bool,1表示重合'''rr1, cc1 = polygon([polygon_1[i] for i in range(0, len(polygon_1), 2)],[polygon_1[i] for i in range(1, len(polygon_1), 2)])rr2, cc2 = polygon([polygon_2[i] for i in range(0, len(polygon_2), 2)],[polygon_2[i] for i in range(1, len(polygon_2), 2)])try: # 能包含2个四边形的最小矩形长宽r_max = max(rr1.max(), rr2.max()) + 1c_max = max(cc1.max(), cc2.max()) + 1except:return 0# 相当于canvas是包含了2个多边形的一个画布,有2个多边形的位置像素为1,重合位置像素为2canvas = np.zeros((r_max, c_max))canvas[rr1, cc1] += 1canvas[rr2, cc2] += 1intersection = np.sum(canvas == 2)return 1 if intersection!=0 else 0def copy_paste(img_main_path, img_src_path, txt_main_path, txt_src_path, coincide=False, muti_obj=True):'''整个复制粘贴操作,输入2张图的图片和坐标路径,返回其融合后的图像和坐标结果。1. 传入随机选择的main图像和src图像的img和txt路径;2. 对其进行随机水平翻转;3. 对其进行随机抖动;4. 获得src变换完后对应的mask;5. 将src的结果加到main中,返回对应main_new的img和src图的box.'''# 读取图像和坐标img_main, box_main = normal_(img_main_path, txt_main_path)img_src, box_src = normal_(img_src_path, txt_src_path)# 随机水平翻转img_main, box_main = random_flip_horizontal(img_main, box_main)img_src, box_src = random_flip_horizontal(img_src, box_src)# LSJ, Large_Scale_Jittering 大尺度抖动,并变回h*w大小img_main, box_main = Large_Scale_Jittering(img_main, box_main)img_src, box_src = Large_Scale_Jittering(img_src, box_src)if not muti_obj or box_src.ndim==1: # 只复制粘贴一个目标id = random.randint(0, len(box_src)-1)box_src = box_src[id]box_src = box_src[np.newaxis, :] # 增加一维# 获得一系列变换后的img_src的maskmask_src = normal_(img_src_path, box=box_src)# 将src结果加到main图像中,返回main图像的大小的叠加图img, box_src = img_add(img_src, img_main, mask_src, box_src)# 判断融合后的区域是否重合if not coincide:for point_main in box_main:for point_src in box_src:if is_coincide(point_main, point_src):return None, Nonebox = np.vstack((box_main, box_src))return img, boxdef save_res(img, img_path, box, txt_path):'''保存图片和txt坐标结果。'''cv2.imwrite(img_path, img)h, w = img.shape[:2]with open(txt_path, 'w+') as ftxt:for point in box: # [x1,y1,...x4,,y4]strxy = ""for i, p in enumerate(point):if i%2==0: # x坐标p = np.clip(p, 0, w-1)else: # y坐标p = np.clip(p, 0, h-1)strxy = strxy +  str(p) + ','strxy = strxy[:-1] # 去掉最后一个逗号ftxt.writelines(strxy + "\n")def main(args):# 图像和坐标txt文件输入路径JPEGs = os.path.join(args.input_dir, 'jpg')BOXes = os.path.join(args.input_dir, 'txt')# 输出路径os.makedirs(args.output_dir, exist_ok=True)os.makedirs(os.path.join(args.output_dir, 'cpAug_jpg'), exist_ok=True)os.makedirs(os.path.join(args.output_dir, 'cpAug_txt'), exist_ok=True)# 参与数据增强的图片名称,不含后缀imgs_list = open(args.aug_txt, 'r').read().splitlines()flag = '.jpg' # 图像的后缀名 .jpg ,pngtbar = tqdm.tqdm(imgs_list, ncols=100)  # 进度条显示for src_name in tbar:# src图像img_src_path = os.path.join(JPEGs, src_name+flag)txt_src_path = os.path.join(BOXes, src_name+'.txt')# 随机选择main图像main_name = np.random.choice(imgs_list)img_main_path = os.path.join(JPEGs, main_name+flag)txt_main_path = os.path.join(BOXes, main_name+'.txt')# 数据增强img, box = copy_paste(img_main_path, img_src_path, txt_main_path, txt_src_path,args.coincide, args.muti_obj)if img is None:continue# 保存结果img_name = "copy_" + src_name + "_paste_" + main_namesave_res(img, os.path.join(args.output_dir, 'cpAug_jpg', img_name+flag),box, os.path.join(args.output_dir, 'cpAug_txt', img_name+'.txt'))def get_args():parser = argparse.ArgumentParser()parser.add_argument("--input_dir", default="./input_dir", type=str,help="要进行数据增强的图像路径,路径结构下应有jpg和txt文件夹")parser.add_argument("--output_dir", default="./output_dir", type=str,help="保存数据增强结果的路径")parser.add_argument("--aug_txt", default="./input_dir/test.txt",type=str, help="要进行数据增强的图像的名字,不包含后缀")parser.add_argument("--coincide", default=False, type=bool,help="True表示允许数据增强后的图像目标出现重合,默认不允许重合")parser.add_argument("--muti_obj", default=False, type=bool,help="True表示将src图上的所有目标都复制粘贴,False表示只随机粘贴一个目标")return parser.parse_args()if __name__ == "__main__":args = get_args()main(args)
-
图像路径:
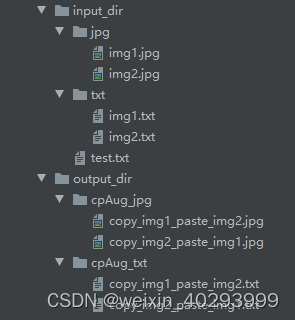
input_dir存放要数据增强的图片和其对应的txt,其中图片和txt名称应相同,图片后缀可修改 flag,默认为.jpg。output_dir输出数据增强后的图片,无需创建。 -
需进行增强的图片列表test.txt,不含后缀:
生成test.txt代码[3]:
# 获取验证集训练集划分的txt文件,划分仅保存名字,不包含后缀import os
import randomrandom.seed(0)xmlfilepath = './input_dir/txt' # 标签路径
saveBasePath = "./input_dir" # 保存的位置trainval_percent = 0.9 # 训练+验证集的比例,不为1说明有测试集
train_percent = 1 # 训练集在训练+验证集中占的比例,如果代码是从训练集分出的验证集,那就不用改temp_xml = os.listdir(xmlfilepath)
total_xml = []
for xml in temp_xml:if xml.endswith(".txt"):total_xml.append(xml)num = len(total_xml)
list = range(num)
tv = int(num * trainval_percent)
tr = int(tv * train_percent)
trainval = random.sample(list, tv)
train = random.sample(trainval, tr)print("train and val size", tv)
print("traub suze", tr)
ftrainval = open(os.path.join(saveBasePath, 'trainval.txt'), 'w')
ftest = open(os.path.join(saveBasePath, 'test.txt'), 'w')
ftrain = open(os.path.join(saveBasePath, 'train.txt'), 'w')
fval = open(os.path.join(saveBasePath, 'val.txt'), 'w')for i in list:name = total_xml[i][:-4] + '\n'if i in trainval:ftrainval.write(name)if i in train:ftrain.write(name)else:fval.write(name)else:ftest.write(name)ftrainval.close()
ftrain.close()
fval.close()
ftest.close()
运行后可在input_dir下生成4个.txt,其中test.txt仅包含10% input_dir中的图片。
3.标签txt格式:
3. 参考文档
参考文档
[1] 代码复现:Copy-Paste 数据增强for 语义分割 https://blog.csdn.net/oyezhou/article/details/111696577
[2] 目标检测中的数据增强方法(附详细代码讲解)https://www.cnblogs.com/xiamuzi/p/13471386.html
4. 不合适点
以上是人家的代码,但用在我这边不合适,是因为:它的车牌不会有交叉覆盖,我的是烟火识别,
烟和火是两个目标,有覆盖。 所以不合适。
import globimport cv2
import numpy as np
import randomdef crop_image(image, x, y, width, height):cropped_image = image[y:y + height, x:x + width]return cropped_imagedef convert_to_absolute(label, image_width, image_height):class_id, relative_x_center, relative_y_center, relative_width, relative_height = label# 计算边界框的绝对坐标absolute_x_center = relative_x_center * image_widthabsolute_y_center = relative_y_center * image_heightabsolute_width = relative_width * image_widthabsolute_height = relative_height * image_height# 计算边界框的左上角和右下角坐标left = absolute_x_center - absolute_width / 2top = absolute_y_center - absolute_height / 2right = absolute_x_center + absolute_width / 2bottom = absolute_y_center + absolute_height / 2# 返回绝对坐标形式的边界框return [class_id, left, top, right, bottom]def convert_to_yolo_format(class_id, left, top, right, bottom, image_width, image_height):# 计算目标框的中心点坐标和宽高x = (left + right) / 2y = (top + bottom) / 2width = right - leftheight = bottom - top# 将坐标和尺寸归一化到[0, 1]之间x /= image_widthy /= image_heightwidth /= image_widthheight /= image_height# 返回Yolo格式的标注return f"{class_id} {x} {y} {width} {height}"def get_src():img_list = glob.glob(r"E:\Dataset\zhongwaiyun\data_fire(1w)\data_fire(1w)\scr_copy_paste\images\*.jpg")random.shuffle(img_list)img_path = img_list[0]txt_path = img_list[0].replace("images", "txt").replace(".jpg", ".txt")return img_path, txt_pathimg_list = glob.glob(r"E:\Dataset\zhongwaiyun\zwy_make_background\*.jpg")
for img_b_path in img_list:img_a_path, img_a_txt = get_src()image_a = cv2.imread(img_a_path)image_height, image_width, _ = image_a.shapeimg_b_txt = img_b_path.replace(".jpg", ".txt").replace("zwy_make_background", "zwy_make_fire_and_smoke")img_b_path_new = img_b_path.replace("zwy_make_background", "zwy_make_fire_and_smoke")src_location_map = []with open(img_a_txt) as f:for line_str in f:line_info = line_str.strip().split(" ")label = [int(line_info[0]), float(line_info[1]), float(line_info[2]), float(line_info[3]),float(line_info[4])]class_id, left, top, right, bottom = convert_to_absolute(label, image_width, image_height)src_location_map.append([class_id, left, top, right, bottom])image_b = cv2.imread(img_b_path)res_list = []for row in src_location_map:class_id, left, top, right, bottom = rowif left or top or right or bottom:try:# 目标可以出现在空白图片的任何位置,只要没有超过限制即可x = int(left)  # 指定区域的起始横坐标y = int(top)  # 指定区域的起始纵坐标width = int(right - left)  # 指定区域的宽度height = int(bottom - top)  # 指定区域的高度cropped_image_a = crop_image(image_a, int(x), int(y), int(width), int(height))image_b_height, image_b_width, _ = image_b.shapeb_x = random.randint(0, int(image_b_width - width - 5))b_y = random.randint(0, int(image_b_height - height - 5))image_b[b_y:b_y + height, b_x:b_x + width] = cropped_image_ares = convert_to_yolo_format(class_id, b_x, b_y, b_x + width, b_y + height, image_b_width, image_b_height)print("--==", img_b_txt)with open(img_b_txt, "a") as f:f.write(res)cv2.imwrite(img_b_path_new, image_b)breakexcept:break
相关文章:
【目标检测】“复制-粘贴 copy-paste” 数据增强实现
文章目录 前言1. 效果展示代码说明3. 参考文档4. 不合适点 前言 本文来源论文《Simple Copy-Paste is a Strong Data Augmentation Method for Instance Segmentation》(CVPR2020),对其数据增强方式进行实现。 论文地址:https:/…...

深度学习知识总结2:主要涉及深度学习基础知识、卷积神经网络和循环神经网络
往期链接:Summer 1 : Summarize linear neural networks and multi-layer perceptron Summer 2: Summarize CNN and RNN 文章目录 Summer 2: Summarize CNN and RNNPart 1 Deep Learning> 层和块> 参数管理和延后初始化> 读写文件和GPU Part 2 CNN> 从…...
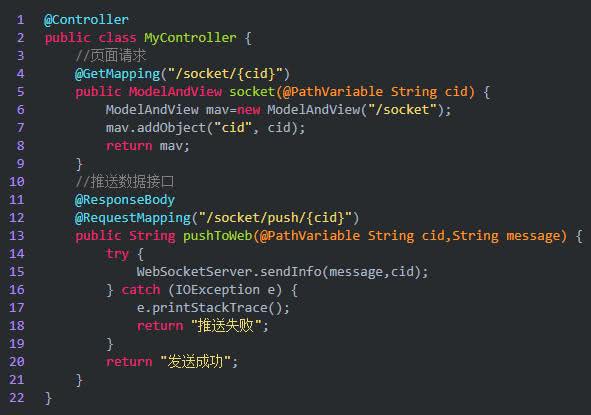
Spring Boot 集成 WebSocket 实现服务端推送消息到客户端
WebSocket 简介 WebSocket 协议是基于 TCP 的一种新的网络协议,它实现了浏览器与服务器全双工(full-duplex)通信—允许服务器主动发送信息给客户端,这样就可以实现从客户端发送消息到服务器,而服务器又可以转发消息到客…...
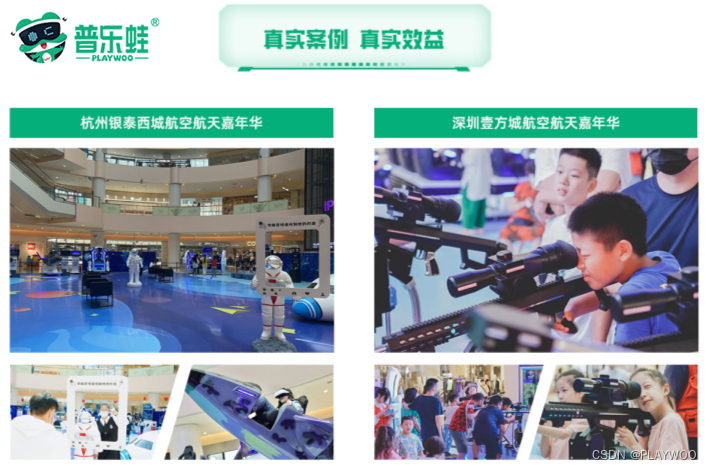
vr游乐场项目投资方案VR主题游乐馆互动体验
VR文旅景区沉浸互动体验项目是指利用虚拟现实技术在文旅景区中创建沉浸式的互动体验项目。通过虚拟现实技术,游客可以身临其境地体验景区的风景和文化,与虚拟场景中的元素进行互动。 普乐蛙VR设备 普乐蛙VR设备案例分享 这种项目可以为游客带来全新的旅游…...
)
chrom扩展开发配合百度图像文字识别实现自动登录(后端.net core web api)
好久没做浏览器插件开发了,因为公司堡垒机,每次登录都要输入账号密码和验证码。太浪费时间了,就想着做一个右键菜单形式的扩展。 实现思路也很简单,在这里做下记录,方便下次开发参考。 一,先来了解下chro…...
香港服务器怎么打开SSH
SSH是一种远程登录协议,可以通过加密方式在网络上安全地传输数据。它允许用户在远程服务器上执行命令,管理文件和目录,并进行其他系统管理任务。 如何打开SSH服务? 1.确认已安装OpenSSH服务器: 你可以通过命令sudoapt-geti…...
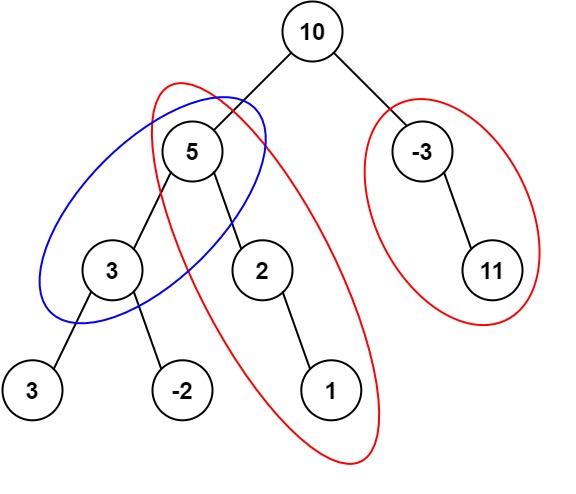
【LeetCode】437.路径总和Ⅲ
题目 给定一个二叉树的根节点 root ,和一个整数 targetSum ,求该二叉树里节点值之和等于 targetSum 的 路径 的数目。 路径 不需要从根节点开始,也不需要在叶子节点结束,但是路径方向必须是向下的(只能从父节点到子节…...

Mybatis-plus中操作JSON字段
1.实体类上要加上自动映射 TableName(value "school", autoResultMap true)2.json字段上加上json处理器 TableField(value "cover_url", typeHandler JacksonTypeHandler.class)private List<String> cover_url;参考博客 http://www.dedeyun.co…...
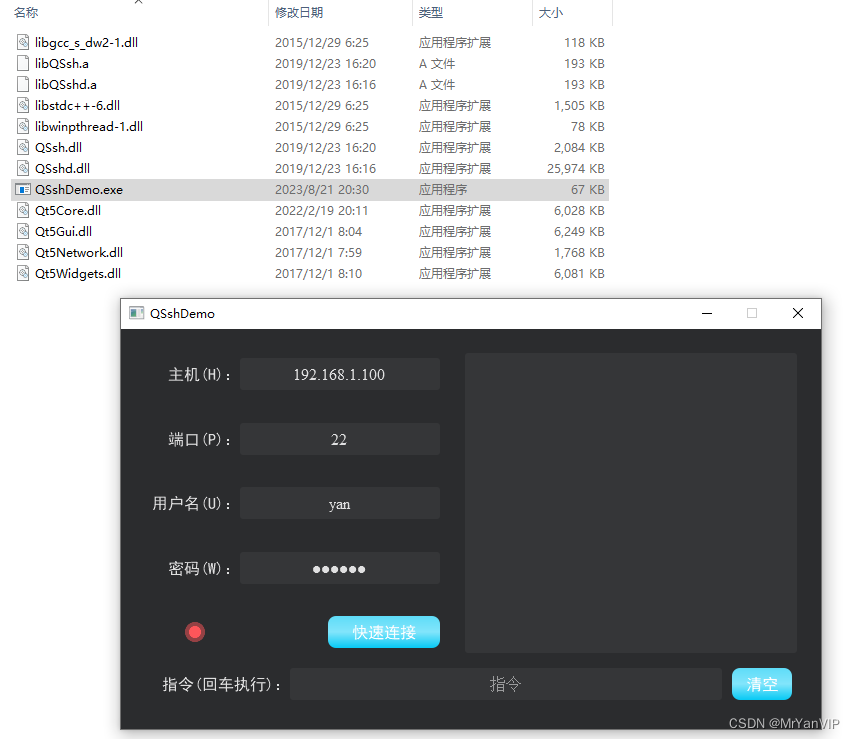
第十五课、Windows 下打包发布 Qt 应用程序
功能描述:讲解了 Windows 下打包发布 Qt 应用程序的三种方法,并对比优缺点 一、利用 windepolyqt 工具打包发布 Qt 提供了一个 windeployqt 工具来自动创建可部署的文件夹。 打包发布流程: 1. 新建一个文件夹,将编译后的可执行…...
【php】windows下php运行已有php web项目环境配置教程
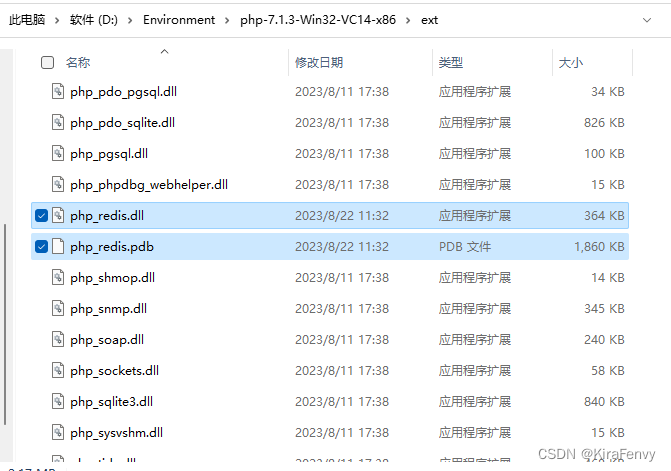
php环境配置教程 php安装composer安装扩展安装redis扩展安装 composer install 本文操作系统使用的是win11,软件PhpStorm 2023.1 php安装 要安装的php版本可以在composer.json看到,下载安装对应版本 windows下载地址https://windows.php.net/download …...

【mybatis】 mybatis在mysql 更新update 操作 更新时间字段按照年月日时分秒格式 更新为当前时间...
参考链接 【mybatis】 mybatis在mysql 更新update 操作 更新时间字段按照年月日时分秒格式 更新为当前时间…...

C++动态规划经典案例解析之合并石子
1. 前言 区间类型问题,指求一个数列中某一段区间的值,包括求和、最值等简单或复杂问题。此类问题也适用于动态规划思想。 如前缀和就是极简单的区间问题。如有如下数组: int nums[]{3,1,7,9,12,78,32,5,10,11,21,32,45,22}现给定区间信息[…...

go MongoDB
安装 go get go.mongodb.org/mongo-driver/mongo package mongodbexampleimport ("context""fmt""ginapi/structs""time""go.mongodb.org/mongo-driver/bson""go.mongodb.org/mongo-driver/bson/primitive""…...
--优先队列)
算法与数据结构(八)--优先队列
普通的队列是一种先进先出的数据结构,元素在队列尾追加,而从队列头删除,在某些情况下,我们可能需要找出队列中的最大值或者最小值。 例如使用一个队列保存计算机的任务,一般情况下计算机的任务都是有优先级的ÿ…...

React 全栈体系(三)
第二章 React面向组件编程 四、组件三大核心属性3: refs与事件处理 1. 效果 需求: 自定义组件, 功能说明如下: 点击按钮, 提示第一个输入框中的值当第2个输入框失去焦点时, 提示这个输入框中的值 2. 理解 组件内的标签可以定义ref属性来标识自己 3. 编码 3.1 字符串形式…...

腾讯云下一代CDN -- EdgeOne加速MinIO对象存储
省流 使用MinIO作为EdgeOne的源站。 背景介绍 项目中需要一个兼容S3协议的对象存储服务,腾讯云的COS虽然也兼容S3协议,但是也只是支持简单的上传下载,对于上传的时候同时打标签这种需求,就不兼容S3了。所以决定自建一个对象存储…...

GitLab-CI 指南
GitLab CI 指南 前置工作 部署GitLab 部署GitLab-Runner 注册Runner到GitLab docker exec -it gitlab-runner bash # 进入容器 gitlab-runner register #调用register命令开始注册 # 在Gitlab Setting中找到Runners,如下图所示Enter the GitLab instance URL (for example, …...
MyBatis的核心技术掌握,简单易懂(上)
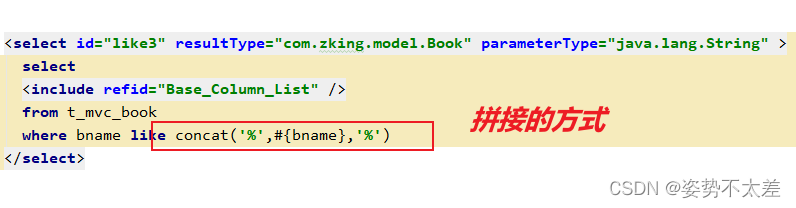
目录 一.MyBatis中的动态SQL 二.MyBatis中的模糊查询 1. # 符号 2. $ 符号 ---问题 ---所以大家知道 # 和 $ 在MyBatis中的模糊查询中的区别了嘛?? 三.MyBatis 中的结果映射 1. resultType: 2. resultMap: ---问题 ---…...

Redisson自定义序列化
Redisson自定义序列化_redisson 序列化_yzh_1346983557的博客-CSDN博客 redis存取的数据一定是可序列化的,而可序列化方式可以自定义。如果不同客户端设置的可序列化方式不一样,会导致读取不一致的问题。常见的序列化方式有几下几种...
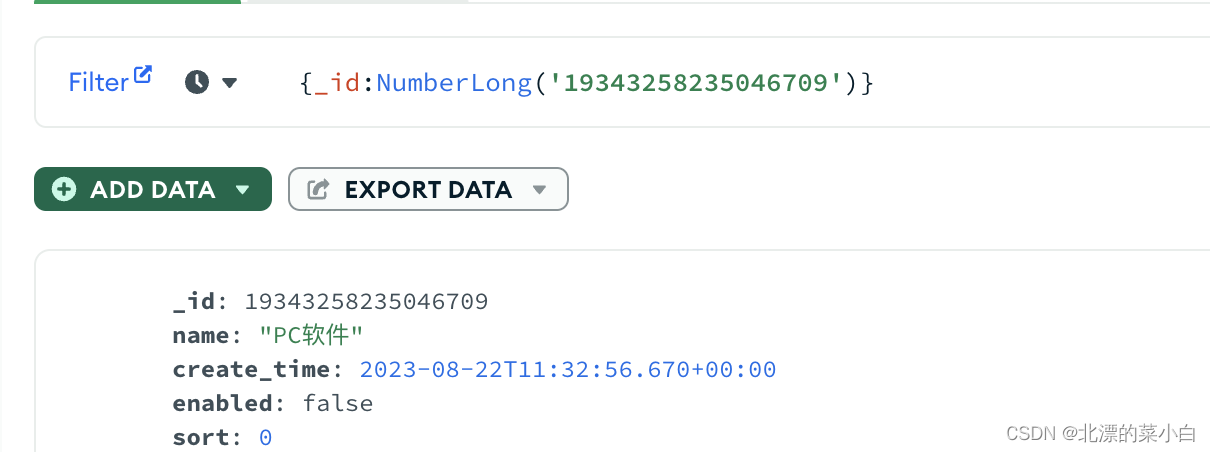
MongoDB Long 类型 shell 查询
场景 1、某数据ID为Long类型,JAVA 定义实体类 Id Long id 2、查询数据库,此数据存在 3、使用 shell 查询,查不到数据 4、JAVA代码查询Query.query 不受任何影响 分析 尝试解决(一) long 在 mongo中为 int64 类型…...

如何高效使用Avogadro 2:5个实用技巧带你掌握开源分子建模软件
如何高效使用Avogadro 2:5个实用技巧带你掌握开源分子建模软件 【免费下载链接】avogadroapp Avogadro is an advanced molecular editor designed for cross-platform use in computational chemistry, molecular modeling, bioinformatics, materials science, an…...

揭秘Delphi逆向分析:IDR工具让你的二进制代码开口说话
揭秘Delphi逆向分析:IDR工具让你的二进制代码开口说话 【免费下载链接】IDR Interactive Delphi Reconstructor 项目地址: https://gitcode.com/gh_mirrors/id/IDR 你是否曾面对一个Delphi编译的可执行文件,却无法理解其内部逻辑?或者…...

3分钟解决Cursor试用限制:设备标识重置完整指南
3分钟解决Cursor试用限制:设备标识重置完整指南 【免费下载链接】go-cursor-help 解决Cursor在免费订阅期间出现以下提示的问题: Your request has been blocked as our system has detected suspicious activity / Youve reached your trial request limit. / Too …...

ncmdump终极指南:5分钟解锁网易云音乐NCM加密文件
ncmdump终极指南:5分钟解锁网易云音乐NCM加密文件 【免费下载链接】ncmdump 项目地址: https://gitcode.com/gh_mirrors/ncmd/ncmdump 你是否曾在网易云音乐下载了心爱的歌曲,却发现只能在特定客户端播放?当你想在车载音响、智能音箱…...

PHP主流框架
PHP主流框架概述 PHP作为广泛使用的服务器端脚本语言,拥有多个成熟的开发框架,适用于不同规模和类型的项目。以下是当前主流的PHP框架及其特点: Laravel Laravel是目前最流行的PHP框架之一,以其优雅的语法和丰富的功能著称。它提供了强大的路由系统、ORM(Eloquent)、模…...

凡亿AD22--PCB全连接与十字花焊盘连接铺铜规则
核心重点:铺铜与焊盘/过孔的连接方式,核心分为「全连接」「十字连接」「不连接」三种,实际设计中仅常用前两种;连接方式的选择,核心取决于「焊接方式」「载流需求」,过孔连接需默认采用全连接,避…...

国产电池包传感监测芯片:从AFE设计到BMS系统实战解析
1. 项目概述:从“芯”守护,让每一度电都安全在电动汽车的心脏——动力电池包里,温度、电压、电流这些关键参数哪怕出现一丝一毫的异常,都可能从量变引发质变,最终导致热失控等严重安全事故。因此,对电池包内…...

风云三国2.4问鼎天下:不靠作弊代码,用TXT文件修改实现俘虏名将和强制投降
风云三国2.4问鼎天下:TXT文件修改实现俘虏名将与强制投降的硬核技巧 在《风云三国2.4问鼎天下》这款经典MOD中,许多玩家都渴望能够招降那些赫赫有名的武将,比如关羽、诸葛亮等,但游戏机制往往让这些名将难以归顺。传统的作弊代码虽…...

5分钟快速上手:FlicFlac音频格式转换工具完全指南 [特殊字符]
5分钟快速上手:FlicFlac音频格式转换工具完全指南 🎵 【免费下载链接】FlicFlac Tiny portable audio converter for Windows (WAV FLAC MP3 OGG APE M4A AAC) 项目地址: https://gitcode.com/gh_mirrors/fl/FlicFlac 还在为不同设备间的音频格式…...
)
基于 SOFAJRaft + Spring Boot 构建高可用 KV 存储集群(完整源码)
基于 SOFAJRaft + Spring Boot 构建高可用 KV 存储集群(完整源码) 引言 在分布式系统中,一致性 是核心难题。Raft 是比 Paxos 更易于理解的共识算法,而 SOFAJRaft 是蚂蚁集团开源的 Java 高性能 Raft 实现。 本文带你从零构建一个 3 节点高可用 KV 存储集群,包含完整源码、…...