Android 动画之插值器PathInterpolator
Android 的View动画、属性动画都可以设置动画插值器,以此来实现不同的动画效果。
这篇文章 Android View动画整理 有介绍各种插值器的效果,这一篇专访 PathInterpolator 。
参考官网 添加曲线动作 ,
PathInterpolator 基于 贝塞尔曲线 或 Path 对象。此插值器在一个 1x1 的正方形内指定一个动作曲线,定位点位于 (0,0) 和 (1,1),而控制点则使用构造函数参数指定。
简单来说就是,通过控制点来构造出 (0,0) 到 (1,1) 之间的任意曲线,让动画按照构造出的曲线来执行。
PathInterpolator 和其他动画插值器的使用是一样的,PathInterpolator 的优势是可以创建任意曲线来实现不同的动画效果,劣势是比较难绘制出满意的曲线,毕竟涉及了数学公式。
贝塞尔曲线
贝塞尔曲线的相关说明:
贝塞尔曲线_百度百科
从零开始学图形学:10分钟看懂贝塞尔曲线
曲线篇: 贝塞尔曲线
贝塞尔曲线在线测试网站:
Bezier Curve Demos
cubic-bezier
贝塞尔曲线在线绘制🚀
PathInterpolator 的构造函数,
PathInterpolator(Path path):利用 Path 对象创建插值器。PathInterpolator(float controlX, float controlY):传入一个控制点坐标(controlX,controlY),构造二维贝塞尔曲线插值器。PathInterpolator(float controlX1, float controlY1, float controlX2, float controlY2):传入两个控制点坐标 (controlX1,controlY1 )、(controlX2, controlY2),构造三维贝塞尔曲线插值器。PathInterpolator(Context context, AttributeSet attrs):通过 AttributeSet 加载插值器。
1. PathInterpolator(Path path)
先看通过 PathInterpolator(Path path) 构建。
1.1 Path
构造函数,直接 new Path 创建即可。
/*** Create an empty path*/public Path() {mNativePath = nInit();sRegistry.registerNativeAllocation(this, mNativePath);}
1.2 Path.moveTo
移动到指定坐标
/*** Set the beginning of the next contour to the point (x,y).** @param x The x-coordinate of the start of a new contour* @param y The y-coordinate of the start of a new contour*/public void moveTo(float x, float y) {nMoveTo(mNativePath, x, y);}
1.3 Path.lineTo(float x, float y)
从上一个点绘制一条线到给定的点 (x,y),显而易见,给的坐标决定了动画效果。
/*** Add a line from the last point to the specified point (x,y).* If no moveTo() call has been made for this contour, the first point is* automatically set to (0,0).** @param x The x-coordinate of the end of a line* @param y The y-coordinate of the end of a line*/public void lineTo(float x, float y) {isSimplePath = false;nLineTo(mNativePath, x, y);}
走直线
看如下代码,X 轴 、Y 轴 都移动一段距离,X 轴 、Y 轴 都用 LinearInterpolator ,
ObjectAnimator animationX = ObjectAnimator.ofFloat(imageViewIcon, "translationX",imageViewIcon.getWidth() * 5);
animationX.setInterpolator(new LinearInterpolator());ObjectAnimator animationY = ObjectAnimator.ofFloat(imageViewIcon, "translationY",imageViewIcon.getWidth() * 5);
animationY.setInterpolator(new LinearInterpolator());AnimatorSet set = new AnimatorSet();
set.playTogether(animationX, animationY);
set.setDuration(5000).start();
动画效果, imageViewIcon 按照对角线移动。

动画轨迹是起点、终点之间的直线,Path.lineTo 画线正合适, 用 PathInterpolator 来实现同样的效果, Go ~
Path path = new Path();path.moveTo(0f,0f);path.lineTo(0.25f,0.25f);path.lineTo(0.5f,0.5f);path.lineTo(0.75f,0.75f);path.lineTo(1f,1f);PathInterpolator pathInterpolator = new PathInterpolator(path);ObjectAnimator animationX = ObjectAnimator.ofFloat(imageViewIcon, "translationX",imageViewIcon.getWidth() * 5);animationX.setInterpolator(pathInterpolator);ObjectAnimator animationY = ObjectAnimator.ofFloat(imageViewIcon, "translationY",imageViewIcon.getWidth() * 5);animationY.setInterpolator(new LinearInterpolator());AnimatorSet set = new AnimatorSet();set.playTogether(animationX,animationY);set.setDuration(5000).start();
使用也简单,三大步:
- 创建 Path ,选取了 5 个点(可以更多)来绘制 (0f,0f) 到 (1f,1f) 的曲线(效果是直线,直线 ∈ 曲线)。
- 通过 Path 创建 PathInterpolator 。
- 动画指定用创建的 pathInterpolator 。控制变量法,X 轴用新创建的 pathInterpolator , Y 轴继续用 LinearInterpolator 。
效果,

肉眼看不出和 LinearInterpolator 的差别。
走折线
走折线就是走多条直接嘛,
例,
Path path = new Path();path.moveTo(0,0);path.lineTo(322,0);//path.lineTo(322,322);path.lineTo(-322,322);path.lineTo(-322,-322);path.lineTo(322,-322);path.lineTo(322,0);path.lineTo(0,0);ObjectAnimator animationX = ObjectAnimator.ofFloat(imageViewRed, "translationX","translationY", path);animationX.setDuration(8000).start();
图

1.4 Path.arcTo(float left, float top, float right, float bottom, float startAngle,float sweepAngle, boolean forceMoveTo)
画弧,
通过前4个参数确定矩形,从而得到椭圆圆心,
startAngle 是起始位置相对于圆心的角度,sweepAngle 是相对于圆心需要旋转的角度,两者可以确定起始角度,
有圆心,有角度,弧形不就出来了。
/*** Append the specified arc to the path as a new contour. If the start of* the path is different from the path's current last point, then an* automatic lineTo() is added to connect the current contour to the* start of the arc. However, if the path is empty, then we call moveTo()* with the first point of the arc.** @param startAngle Starting angle (in degrees) where the arc begins* @param sweepAngle Sweep angle (in degrees) measured clockwise, treated* mod 360.* @param forceMoveTo If true, always begin a new contour with the arc*/public void arcTo(float left, float top, float right, float bottom, float startAngle,float sweepAngle, boolean forceMoveTo) {isSimplePath = false;nArcTo(mNativePath, left, top, right, bottom, startAngle, sweepAngle, forceMoveTo);}
如下代码,走个半圆的动画,
(icon 宽度和黑色线的位置是计算好距离的)
Path path = new Path();
path.arcTo(-imageViewGreen.getWidth()*4, 0, imageViewGreen.getWidth()*4, imageViewGreen.getWidth()*8, 270f, 180f, true);
ObjectAnimator animator = ObjectAnimator.ofFloat(imageViewIcon, View.X, View.Y, path); // 注释1
animator.setDuration(5000);
animator.start();
看注释1 处,用的是 View.X, View.Y 参数,这个例子下和用 “translationX”, “translationY” 是一样的效果。
运行效果,

附图说明,

图解,
解释下 path.arcTo(-imageViewGreen.getWidth()*4, 0, imageViewGreen.getWidth()*4, imageViewGreen.getWidth()*8, 270f, 180f, true); 代码参数,
- 点 A :图片原始位置,也是动画开始位置。(注意:动画开始位置可以不是图片原始位置)
- 绿色箭头 j3 :动画轨迹,本例是半圆。
- 点 B :动画结束位置。
- 黄色框左上角 P1 :点 P1 由 点A 来确定,以动画开始位置为(0,0) ,它的坐标是 (-imageViewGreen.getWidth()*4, 0)。
- 黄色框右下角 P2 :点 P2 由 点A 来确定,以动画开始位置为(0,0) ,
它的坐标是 (imageViewGreen.getWidth()*4, imageViewGreen.getWidth()*8)。 - 蓝色线交汇点 O :黄色框左上角点 P1 和黄色框右下角点 P2 确定了矩形(本例是正方向,正方形 ∈ 矩形),得到了最大内切红色椭圆(本例是正圆,正圆 ∈ 椭圆),确定了圆心点 O 。这个圆心是弧形的圆心,也就是动画旋转的中心。
- 动画坐标系 :以点 O 为 圆心得到了动画坐标系,点O 的右方向是 0° ,下方向是 90° 。
按照 j1 旋转为正角度,顺时针旋转为正角度,逆时针旋转为负角度。
startAngle 是 A 点对于圆心O来说需要转 270° ,本例就是 270f 。
sweepAngle 是需要旋转的角度,按照 j1 旋转为正角度,本例是 180f ,即顺时针旋转 180° 。

很绕,捋一捋。如果错误,也请指正。
1.5 Path.arcTo(RectF oval, float startAngle, float sweepAngle)
arcTo 方法的重载,通过 android.graphics.RectF 画弧 。
RectF 的构造函数如下,也是通过给定的四个点来确定矩形,然后画弧。
/*** Create a new rectangle with the specified coordinates. Note: no range* checking is performed, so the caller must ensure that left <= right and* top <= bottom.** @param left The X coordinate of the left side of the rectangle* @param top The Y coordinate of the top of the rectangle* @param right The X coordinate of the right side of the rectangle* @param bottom The Y coordinate of the bottom of the rectangle*/public RectF(float left, float top, float right, float bottom) {this.left = left;this.top = top;this.right = right;this.bottom = bottom;}
示例,
Path path = new Path();
path.arcTo(new RectF(-imageViewGreen.getWidth() * 3,0,imageViewGreen.getWidth() * 3,imageViewGreen.getWidth() * 6),270,-359);
ObjectAnimator animator = ObjectAnimator.ofFloat(imageViewGreen, "translationX", "translationY", path);//注释 2
animator.setDuration(5000);
animator.start();
看注释2 处,用的是 “translationX”, “translationY” 参数,这个例子下和用 View.X, View.Y 是不一样的效果。
效果,绿球绕着红球逆时针旋转 359° ,

相关参数说明和 1.4 章节的一样。
最后一个参数 sweepAngle 有限制,
- 传 -360 无动画效果,传 -450 实际上是旋转 -90 的效果。
- 传 360 无动画效果,传 450 实际上是旋转 90 的效果。
就想要无限循环怎么办?na~ : animator.setRepeatCount(ValueAnimator.INFINITE);
1.5 Path.quadTo
Path.quadTo ,绘制二阶贝塞尔曲线。起点是 (0,0), 终点是(x2,y2),控制点是(x1,y1) ,
/*** Add a quadratic bezier from the last point, approaching control point* (x1,y1), and ending at (x2,y2). If no moveTo() call has been made for* this contour, the first point is automatically set to (0,0).** @param x1 The x-coordinate of the control point on a quadratic curve* @param y1 The y-coordinate of the control point on a quadratic curve* @param x2 The x-coordinate of the end point on a quadratic curve* @param y2 The y-coordinate of the end point on a quadratic curve*/public void quadTo(float x1, float y1, float x2, float y2) {isSimplePath = false;nQuadTo(mNativePath, x1, y1, x2, y2);}
例
Path path = new Path();path.moveTo(0,0);//二阶贝塞尔曲线path.quadTo(400,1300,imageViewGreen.getWidth()*5,imageViewGreen.getWidth()*5);ObjectAnimator animator = ObjectAnimator.ofFloat(imageViewIcon, View.X, View.Y, path);animator.setDuration(5000);animator.start();
图

1.6 Path.cubicTo
Path.cubicTo,绘制三阶阶贝塞尔曲线,起点是 (0,0), 终点是(x3,y3),控制点是(x1,y1) 和 (x2,y2) 。
/*** Add a cubic bezier from the last point, approaching control points* (x1,y1) and (x2,y2), and ending at (x3,y3). If no moveTo() call has been* made for this contour, the first point is automatically set to (0,0).** @param x1 The x-coordinate of the 1st control point on a cubic curve* @param y1 The y-coordinate of the 1st control point on a cubic curve* @param x2 The x-coordinate of the 2nd control point on a cubic curve* @param y2 The y-coordinate of the 2nd control point on a cubic curve* @param x3 The x-coordinate of the end point on a cubic curve* @param y3 The y-coordinate of the end point on a cubic curve*/public void cubicTo(float x1, float y1, float x2, float y2,float x3, float y3) {isSimplePath = false;nCubicTo(mNativePath, x1, y1, x2, y2, x3, y3);}
例
Path path = new Path();path.moveTo(0,0);path.rCubicTo(1500,100,700,1300,imageViewGreen.getWidth()*5,imageViewGreen.getWidth()*5);ObjectAnimator animator = ObjectAnimator.ofFloat(imageViewIcon, View.X, View.Y, path);animator.setDuration(5000);animator.start();
图

2. PathInterpolator(float controlX, float controlY)
绘制二阶贝塞尔曲线。起点是 (0,0), 终点是(1,1),控制点是(controlX, controlY) ,
/*** Create an interpolator for a quadratic Bezier curve. The end points* <code>(0, 0)</code> and <code>(1, 1)</code> are assumed.** @param controlX The x coordinate of the quadratic Bezier control point.* @param controlY The y coordinate of the quadratic Bezier control point.*/public PathInterpolator(float controlX, float controlY) {initQuad(controlX, controlY);}// ...private void initQuad(float controlX, float controlY) {Path path = new Path();path.moveTo(0, 0);path.quadTo(controlX, controlY, 1f, 1f);initPath(path);}
例,
PathInterpolator interpolator = new PathInterpolator(0.1f,0.9f);ObjectAnimator animationX = ObjectAnimator.ofFloat(imageViewIcon, "translationX",imageViewIcon.getWidth() * 5);animationX.setInterpolator(interpolator);ObjectAnimator animationY = ObjectAnimator.ofFloat(imageViewIcon, "translationY",imageViewIcon.getWidth() * 5);animationY.setInterpolator(new LinearInterpolator());AnimatorSet set = new AnimatorSet();set.playTogether(animationX,animationY);set.setDuration(5000).start();
图

3. PathInterpolator(float controlX1, float controlY1, float controlX2, float controlY2)
绘制三阶阶贝塞尔曲线,起点是 (0,0), 终点是(1, 1),控制点是(controlX1,controlY1) 和 (controlX2,controlY2) 。
/*** Create an interpolator for a cubic Bezier curve. The end points* <code>(0, 0)</code> and <code>(1, 1)</code> are assumed.** @param controlX1 The x coordinate of the first control point of the cubic Bezier.* @param controlY1 The y coordinate of the first control point of the cubic Bezier.* @param controlX2 The x coordinate of the second control point of the cubic Bezier.* @param controlY2 The y coordinate of the second control point of the cubic Bezier.*/public PathInterpolator(float controlX1, float controlY1, float controlX2, float controlY2) {initCubic(controlX1, controlY1, controlX2, controlY2);}// ...private void initCubic(float x1, float y1, float x2, float y2) {Path path = new Path();path.moveTo(0, 0);path.cubicTo(x1, y1, x2, y2, 1f, 1f);initPath(path);}
例,
PathInterpolator interpolator = new PathInterpolator(0, 1f ,1f,0);ObjectAnimator animationX = ObjectAnimator.ofFloat(imageViewIcon, "translationX",imageViewIcon.getWidth() * 5);animationX.setInterpolator(interpolator);ObjectAnimator animationY = ObjectAnimator.ofFloat(imageViewIcon, "translationY",imageViewIcon.getWidth() * 5);animationY.setInterpolator(new LinearInterpolator());AnimatorSet set = new AnimatorSet();set.playTogether(animationX,animationY);set.setDuration(5000).start();
图,

相关文章:
Android 动画之插值器PathInterpolator
Android 的View动画、属性动画都可以设置动画插值器,以此来实现不同的动画效果。 这篇文章 Android View动画整理 有介绍各种插值器的效果,这一篇专访 PathInterpolator 。 参考官网 添加曲线动作 , PathInterpolator 基于 贝塞尔曲线 或 …...

递归学习(转载)
转载至 https://www.cnblogs.com/king-lps/p/10748535.html 为避免原文丢失,因此原文转载作者【三年一梦】的帖子 前言 相信不少同学和我一样,在刚学完数据结构后开始刷算法题时,遇到递归的问题总是很头疼,而一看解答,…...

python接口自动化(二)--什么是接口测试、为什么要做接口测试(详解)
简介 上一篇和大家一起科普扫盲接口后,知道什么是接口,接口类型等,对其有了大致了解之后,我们就回到主题-接口测试。 什么是接口测试 接口测试是测试系统组件间接口的一种测试。接口测试主要用于检测外部系统与系统之间以及内部各…...
)
HashMap源码阅读(一)
HashMap继承抽象类AbstractMap,AbstractMap抽象类实现了Map接口 一、HashMap中的静态常量 //默认初始容量 static final int DEFAULT_INITIAL_CAPACITY 1 << 4; // aka 16 //最大长度 static final int MAXIMUM_CAPACITY 1 << 30; //负载因子&#…...

C语言:动态内存(一篇拿捏动态内存!)
目录 学习目标: 为什么存在动态内存分配 动态内存函数: 1. malloc 和 free 2. calloc 3. realloc 常见的动态内存错误: 1. 对NULL指针的解引用操作 2. 对动态开辟空间的越界访问 3. 对非动态开辟内存使用free释放 4. 使用free释…...

Lua - 替换字符串中的特殊字符
//替换指定串 s string.gsub("Lua is good", "good", "bad") print(s) --> Lua is bad//替换特殊字符 a "我们使用$"; b string.gsub(a, "%$", "RMB"); print(b) --> 我们使用RMB//替换反斜杠 path …...

按钮控件之3---QRadioButton 单选按钮/单选框控件
本文详细的介绍了QRadioButton控件的各种操作,例如:QRadioButton分组、默认选中、禁用启用、重置样式等操作。 一、QRadioButton部件提供了一个带有文本标签的单选框(单选按钮)。QRadioButton是一个可以切换选中(chec…...

基于STM32设计的游戏姿态数据手套
基于STM32设计的游戏姿态数据手套 一、项目背景 随着虚拟现实技术的发展,人机交互越来越朝着多通道、自然化的方向发展,由原来的以机器为中心向以人为中心发展。按照行业通用用途设计的高端数据手套,可以用于测量人手指动作,如搓捻、对掌等动作,广泛应用于人手的运动捕捉…...

react跳转页面redux数据被清除
关键代码如下,页面中有根据redux中state展示的数据,然后在组件卸载的时候会清空redux中存的数据,点击a标签可以打开新的标签页,如下代码会在打开新的标签页,组件卸载,清空redux数据,页面展示的也…...

Spring Cloud 微服务2
Eureka 注册中心,服务的自动注册、发现、状态监控 Ribbon 负载均衡,Eureka中已经集成了负载均衡组件 Hystrix 熔断器,用于隔离访问远程服务、第三方库,防止出现级联失败。 Feign 远程调用,将Rest的请求进行隐藏&a…...
(传统c++语法,类内容))
侯捷课程笔记(一)(传统c++语法,类内容)
侯捷课程笔记(一)(传统c语法,类内容) 2023-09-03更新: 本小节已经完结,只会进行小修改 埋下了一些坑,后面会单独讲或者起新章节讲 最近在学习侯捷的一些课程,虽然其中大部…...

自动化安装Nginx脚本:简化您的服务器配置
在如今的网络世界中,Nginx作为一款高性能的Web服务器和反向代理服务器,扮演着至关重要的角色。然而,手动安装和配置Nginx可能会耗费大量时间和精力,特别是对于那些对Linux系统不太熟悉的人来说。幸运的是,我们为您带来…...

通过es索引生命周期策略删除日志索引
通过es索引生命周期策略删除日志索引 在es 7.x版本之后,多了个索引生命周期的概念,可以一系列的设置,给新生成的索引绑定生命周期策略,到期后,索引自动删除。 也可以通过linux定时任务实现,请查看另一篇文章…...
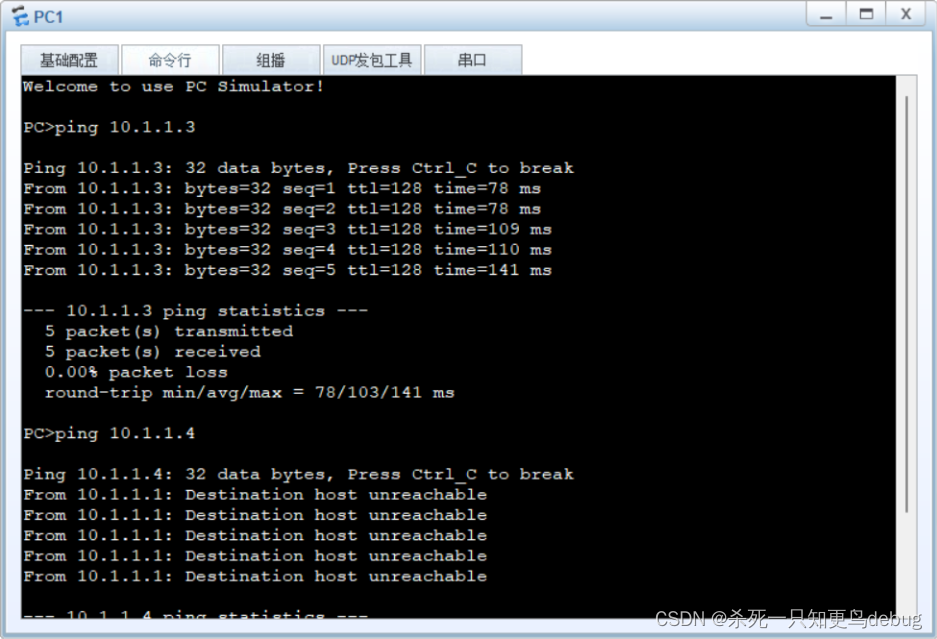
网络实验 VlAN 中 Trunk Access端口的说明及实验
网络实验 VlAN 中 Trunk Access端口的说明及实验 VlAN 虚拟局域网技术Access端口 工作原理Trunk端口 工作原理简单实验(一)划分不同Vlan,实现vlan内部通信拓朴图主机IP 配置划分Vlanping 测试 (二)跨交换机实现VLAN间通…...
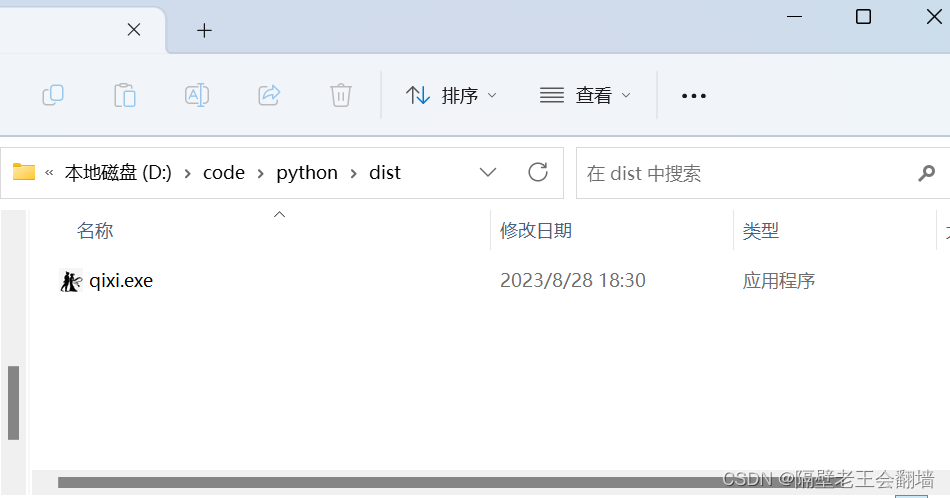
打包个七夕exe玩玩
前段时间七夕 当别的哥们都在酒店不要不要的时候 身为程序员的我 还在单位群收到收到 正好后来看到大佬些的这个 https://www.52pojie.cn/thread-1823963-1-1.html 这个贱 我必须要犯,可是我也不能直接给他装个python吧 多麻烦 就这几个弹窗 好low 加上bgm 再打包成…...

ReactNative 井字游戏 实战
效果展示 需要的插件准备 此实战项目需要用到两个插件。 react-native-snackbar 底部信息提示组件。 react-native-vector-icons 图标组件。 安装组件: npm i react-native-snackbar npm i react-native-vector-icons npm i types/react-native-vector-icons /…...

五-垃圾收集器G1ZGC详解
回顾CMS垃圾收集器 G1垃圾收集器 G1是一款面向服务器的垃圾收集器,主要针对配备多颗处理器及大容量处理的机器。以及高概率满足GC停顿时间要求的同时,还具备高吞吐量性能特征 物理上没有明显的物理概念,但是逻辑上还是有分代概念 物理上分…...
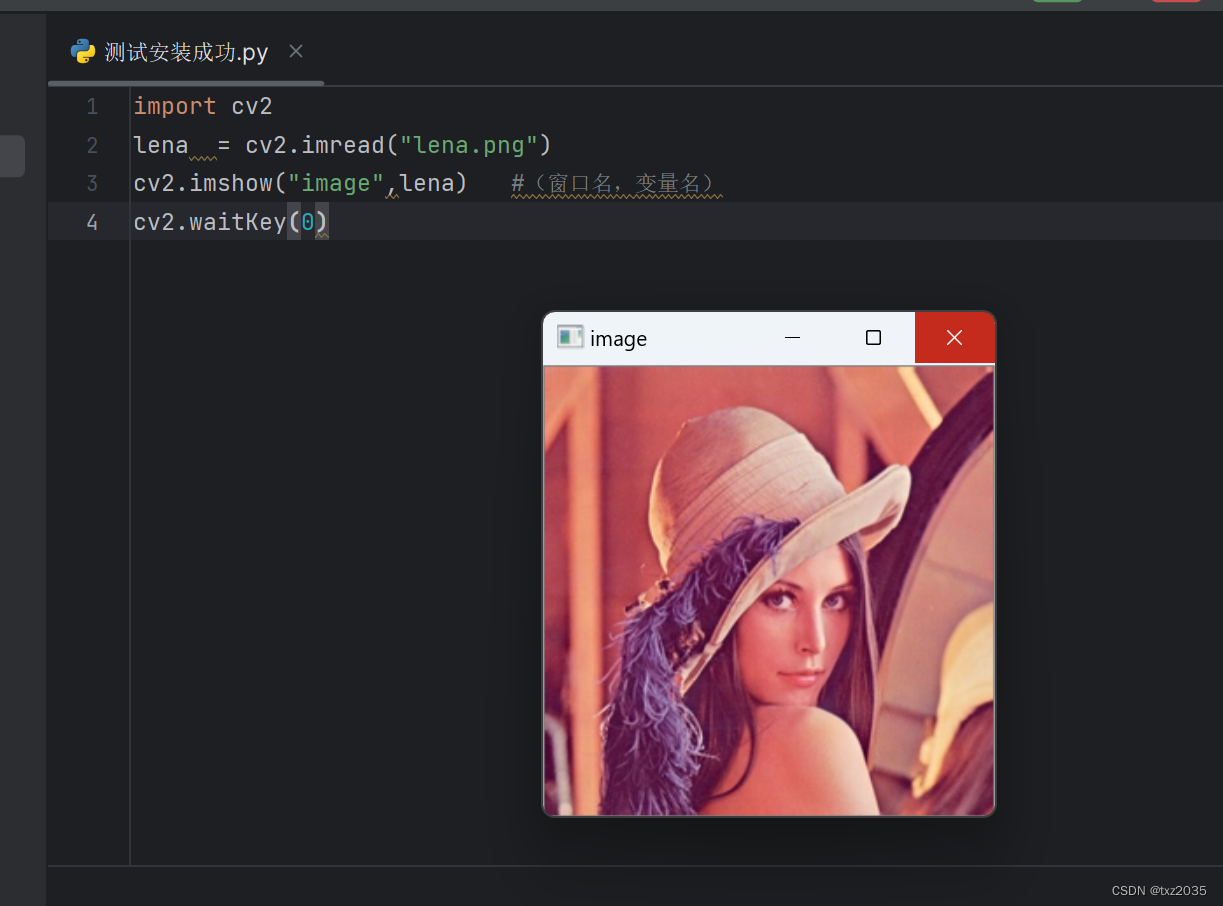
opencv入门-Opencv原理以及Opencv-Python安装
图像的表示 1,位数 计算机采用0/1编码的系统,数字图像也是0/1来记录信息,图像都是8位数图像,包含0~255灰度, 其中0代表最黑,1代表最白 3, 4,OpenCV部署方法 安装OpenCV之前…...
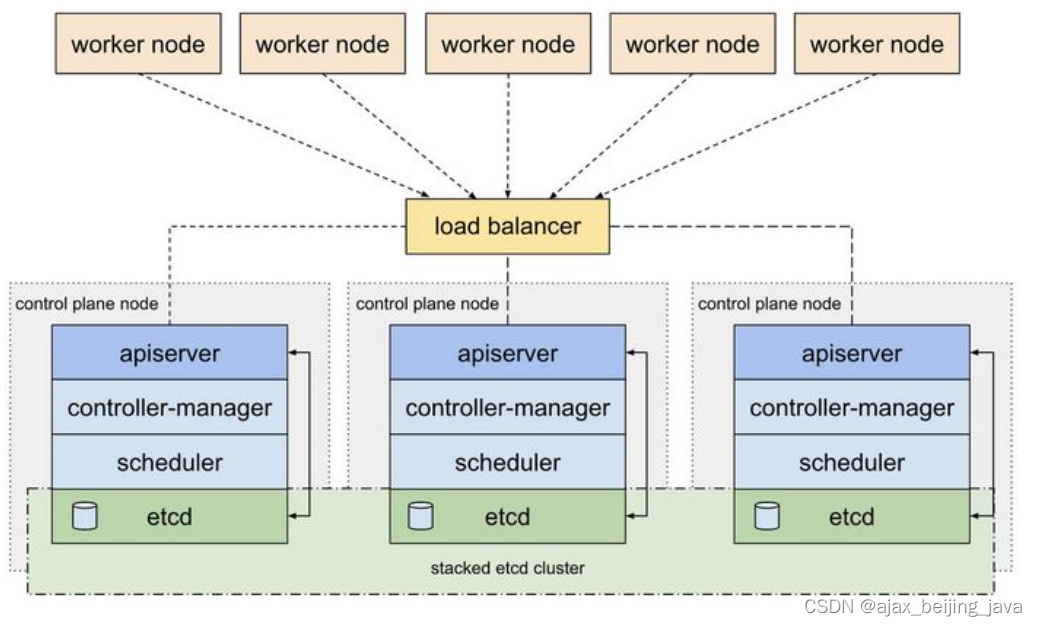
k8s etcd 简介
Etcd是CoreOS基于Raft协议开发的分布式key-value存储,可用于服务发现、共享配置以及一致性保障(如数据库选主、分布式锁等)。 如,Etcd也可以作为微服务的注册中心,比如SpringCloud也基于ETCD实现了注册中心功能&#…...
分页功能实现
大家好 , 我是苏麟 , 今天聊一聊分页功能 . Page分页构造器是mybatisplus包中的一个分页类 . Page分页 引入依赖 <dependency><groupId>com.baomidou</groupId><artifactId>mybatis-plus-boot-starter</artifactId><version>3.4.1</ver…...

四旋翼变形控制:RL与MPC在混合动力学中的对比
1. 四旋翼变形控制的技术挑战与解决方案四旋翼变形控制(Quadrotor Morpho-Transition)是当前机器人领域最具挑战性的前沿技术之一。这项技术使机器人能够在空中完成形态变换,实现从飞行模式到地面模式的平滑切换。想象一下,一架四…...

ThinkPad开机嘀嘀响或报2100/2110错误?可能是硬盘松了!自己动手检测与修复指南
ThinkPad开机嘀嘀响或报2100/2110错误?三步排查硬盘接触不良问题ThinkPad用户对那个标志性的开机"嘀嘀"声再熟悉不过——正常情况下它意味着系统自检通过。但当这个声音变成急促的报警音,伴随屏幕上出现"2100 Detection error"或&qu…...

D3KeyHelper:暗黑3玩家的智能按键助手,告别重复操作疲劳
D3KeyHelper:暗黑3玩家的智能按键助手,告别重复操作疲劳 【免费下载链接】D3keyHelper D3KeyHelper是一个有图形界面,可自定义配置的暗黑3鼠标宏工具。 项目地址: https://gitcode.com/gh_mirrors/d3/D3keyHelper 你是否曾在《暗黑破坏…...

配置OpenClaw Agent使用Taotoken作为后端模型提供商
🚀 告别海外账号与网络限制!稳定直连全球优质大模型,限时半价接入中。 👉 点击领取海量免费额度 配置OpenClaw Agent使用Taotoken作为后端模型提供商 基础教程类,指导希望使用OpenClaw等Agent工具的开发者,…...
)
GIS工程应用记录(AI辅助编程)
问题的问题:语境坍缩“从各个角度提出问题,AI做出对应积极答复和修改,结果没有什么变化。”这,就是元问题最核心的症状。你尝试了所有你已知的“高级”协作手段,但就像重拳打在棉花上,AI永远在积极回应&…...

LoRa物联网与动态基线算法在养殖体温监测中的实战应用
1. 项目概述:为什么我们需要一个智能体温监测系统?在规模化养殖场里干了十几年,我见过太多因为体温异常没被及时发现而导致的损失。一头育肥猪突然不吃食,等饲养员第二天巡栏发现时,可能已经高烧好几天,继发…...

qobuz-dl终极实战指南:专业无损音乐下载工具架构解析与高效应用
qobuz-dl终极实战指南:专业无损音乐下载工具架构解析与高效应用 【免费下载链接】qobuz-dl A complete Lossless and Hi-Res music downloader for Qobuz 项目地址: https://gitcode.com/gh_mirrors/qo/qobuz-dl 在数字音乐时代,追求极致音质的音…...

在数据预处理与分析流水线中集成大模型API进行智能标注与摘要
🚀 告别海外账号与网络限制!稳定直连全球优质大模型,限时半价接入中。 👉 点击领取海量免费额度 在数据预处理与分析流水线中集成大模型API进行智能标注与摘要 对于数据工程师而言,处理海量非结构化文本数据是一项常见…...

Godot 4.2 + C# 避坑指南:手把手教你打包发布你的第一个2D游戏到Steam
Godot 4.2 C# 避坑指南:从开发到Steam发布的完整实战手册当你终于完成心爱的2D游戏开发,准备向全世界展示你的作品时,打包发布这个看似简单的环节往往会成为独立开发者最大的噩梦。特别是使用Godot 4.2搭配C#的项目,从导出设置到…...

XZ9971,60V,5A,NMOS 封装:SOT223
封装:SOT223类型:NVDS:60V VGS: 20V ID:5ARDS(ON):10V <50mΩRDS(ON):4.5V <60mΩ型号: XZ9971 封装:SOT223类型&…...