Arcface部署应用实战
1、概述
人脸识别的一个比较常用的网络arcface,依赖于其特殊设计的loss函数,使得模型在训练的时候能够实现类间距离增大,类内的距离不断减小,最终使得所训练的backbone能够获取鉴别性很高的特征,便于人脸识别。
本文以专家博主Bubbliiiing所提供的仓库代码实现的arcface为基础,主要分享实现arcface模型动态batch推理的python和C++代码实现,至于训练和测试,可以参考仓库使用说明。仓库地址为:https://github.com/bubbliiiing/arcface-pytorch
2、cuda版本python快速推理
本节主要包含使用python实现arcface模型转化为onnx通用平台模型,然后转化为TensorRT所支持的加速engine全过程。
2.1 arcface模型转化为ONNX模型
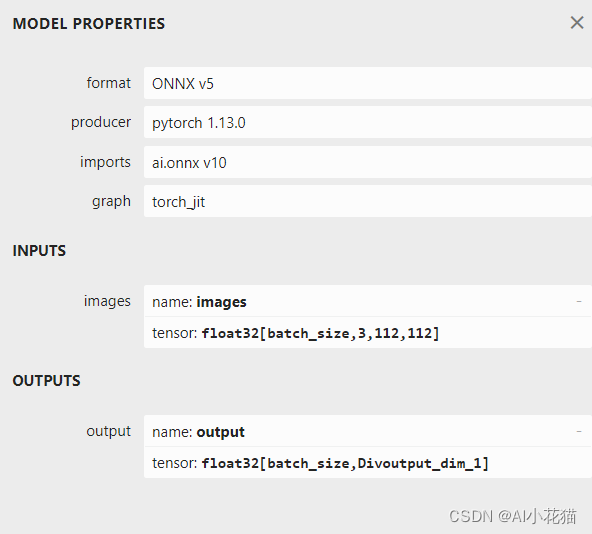
深度学习训练的模型转化为ONNX都是通用的代码使用方法,利用torch.onnx.export函数进行相应的导出,博主这里考虑在测试时会同时计算多张图片的特征图,因此将batch设置为动态,以方便后续使用。
代码实现如下:
def export_onnx(model, img, onnx_path, opset, dynamic=False, simplify=True, batch_size=1):torch.onnx.export(model, img, onnx_path, verbose=True, opset_version=opset,export_params=True,do_constant_folding=True,input_names=['images'],output_names=['output'],dynamic_axes={'images': {0: 'batch_size'}, # shape(1,3,112,112)'output': {0: 'batch_size'} # shape(1,128)} if dynamic else None)# Checksmodel_onnx = onnx.load(onnx_path) # load onnx modelonnx.checker.check_model(model_onnx) # check onnx modelif simplify:try:model_onnx, check = onnxsim.simplify(model_onnx,dynamic_input_shape=dynamic,test_input_shapes={'images': list(img.shape)} if dynamic else None)assert check, 'assert check failed'onnx.save(model_onnx, onnx_path)print('simplify onnx success')except Exception as e:print('simplify onnx failure')
具体的使用方案如下所示:
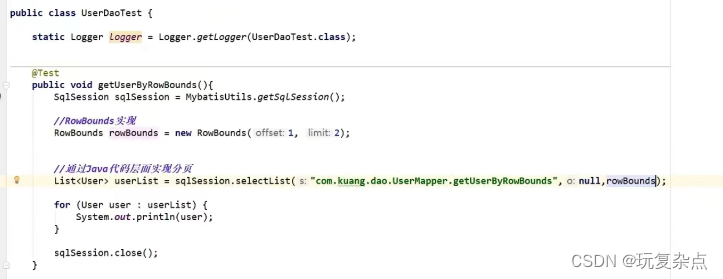
def convert2onnx_demo():model_path = './model_data/arcface_mobilefacenet.pth'device = torch.device('cuda' if torch.cuda.is_available() else 'cpu')print('Loading weights into state dict...')net = arcface(backbone='mobilefacenet', mode="predict").eval()net.load_state_dict(torch.load(model_path, map_location=device), strict=True)net = net.to(device)batch_size = 4print('{} model loaded.'.format(model_path))dummy_input = torch.randn(batch_size, 3, 112, 112).to(device)onnx_path = './model_data/arcface_mobilefacenet.onnx'opset = 10export_onnx(net, dummy_input, onnx_path, opset, dynamic=True, simplify=True)ort_session = ort.InferenceSession(onnx_path)outputs = ort_session.run(None, {'images': np.random.randn(batch_size, 3, 112, 112).astype(np.float32)})print(outputs[0])导出的onnx模型的输入输出如下所示:可以清楚的看到输入维度batch是动态变换的。
2.2 arcface ONNX模型转化为engine
onnx转换为engine方式有很多,可以借助trtexec.exe进行转换,也可以使用python编写相应的代码进行使用,博主采用python编写相应的脚本进行转换,具体代码转化如下:
def onnx2engine():import tensorrt as trtdef export_engine(onnx_path, engine_path, half, workspace=4, verbose=False):print('{} starting export with TensorRT {}...'.format(onnx_path, trt.__version__))# assert img.device.type != 'cpu', 'export running on CPU but must be on GPU, i.e. `python export.py --device 0`'if not os.path.exists(onnx_path):print(f'failed to export ONNX file: {onnx_path}')logger = trt.Logger(trt.Logger.INFO)if verbose:logger.min_severity = trt.Logger.Severity.VERBOSEbuilder = trt.Builder(logger)config = builder.create_builder_config()config.max_workspace_size = workspace * 1 << 30flag = (1 << int(trt.NetworkDefinitionCreationFlag.EXPLICIT_BATCH))network = builder.create_network(flag)parser = trt.OnnxParser(network, logger)if not parser.parse_from_file(str(onnx_path)):raise RuntimeError(f'failed to load ONNX file: {onnx_path}')## 支持动态batch使用必须profile = builder.create_optimization_profile()profile.set_shape("images", (1, 3, 112, 112), (8, 3, 112, 112), (16, 3, 112, 112))config.add_optimization_profile(profile)inputs = [network.get_input(i) for i in range(network.num_inputs)]outputs = [network.get_output(i) for i in range(network.num_outputs)]print('Network Description:')for inp in inputs:print('input {} with shape {} and dtype is {}\n'.format(inp.name, inp.shape, inp.dtype))for out in outputs:print('output {} with shape {} and dtype is {}\n'.format(out.name, out.shape, out.dtype))half &= builder.platform_has_fast_fp16print('building FP{} engine in {}'.format(16 if half else 32, engine_path))if half:config.set_flag(trt.BuilderFlag.FP16)with builder.build_engine(network, config) as engine, open(engine_path, 'wb') as t:t.write(engine.serialize())print("max_batch_szie = {}".format(builder.max_batch_size))print("flag= {}".format(flag))print('export success, saved as {f} ({file_size(f):.1f} MB)')onnx_path = './model_data/arcface_mobilefacenet.onnx'engine_path = './model_data/arcface_mobilefacenet.engine'half = Trueverbose = Trueexport_engine(onnx_path, engine_path, half, verbose=verbose)
其中需要重点注意的是,要使用动态batch完成engine的构建,必须要对profile 进行相应的设定,使得engine知道最小推理batch、最优推理batch以及最大推理batch。
2.3 arcface TensorRT快速推理
推理的代码还是相对比较简单的,简单总结如下:
- 图像组合成相应的推理batch
- 初始化TensorRT所需要的context
- 给动态输入的batch和输出结果分配host以及device上的内存空间
- 调用接口完成推理
- 相关后处理代码
本文具体代码如下所示:
"""
An example that uses TensorRT's Python api to make inferences.
"""
import ctypes
import os
import shutil
import random
import sys
import threading
import time
import cv2
import numpy as np
import pycuda.autoinit
import pycuda.driver as cuda
import tensorrt as trtLEN_ALL_RESULT = 128def get_img_path_batches(batch_size, img_dir):ret = []batch = []for root, dirs, files in os.walk(img_dir):for name in files:suffix = os.path.splitext(name)[-1]if suffix in ['.jpg', '.png', '.JPG', '.jpeg']:if len(batch) == batch_size:ret.append(batch)batch = []batch.append(os.path.join(root, name))if len(batch) > 0:ret.append(batch)return retclass ArcFaceTRT(object):"""description: A arcface class that warps TensorRT ops, preprocess and postprocess ops."""def __init__(self, engine_file_path, batch_size=1):self.ctx = cuda.Device(0).make_context()stream = cuda.Stream()TRT_LOGGER = trt.Logger(trt.Logger.INFO)runtime = trt.Runtime(TRT_LOGGER)with open(engine_file_path, 'rb') as f:engine = runtime.deserialize_cuda_engine(f.read())context = engine.create_execution_context()context.set_binding_shape(0, (batch_size, 3, 112, 112))  # 这句非常重要!!!定义batch为动态维度#host_inputs = []cuda_inputs = []host_outputs = []cuda_outputs = []bindings = []for binding in engine:print('binding: ', binding, engine.get_tensor_shape(binding))## 动态 batchdims = engine.get_tensor_shape(binding)if dims[0] == -1:dims[0] = batch_size# size = trt.volume(engine.get_tensor_shape(binding)) * engine.max_batch_sizesize = trt.volume(dims) * engine.max_batch_sizedtype = trt.nptype(engine.get_tensor_dtype(binding))# allocate host and device buffershost_mem = cuda.pagelocked_empty(size, dtype)cuda_mem = cuda.mem_alloc(host_mem.nbytes)# append the device buffer to device bindingsbindings.append(int(cuda_mem))# append to the appropriate listif engine.get_tensor_mode(binding).value == 1: ##  0 是NONE 1是INPUT 2是OUTPUT# if engine.binding_is_input(binding):self.input_w = engine.get_tensor_shape(binding)[-1]self.input_h = engine.get_tensor_shape(binding)[-2]host_inputs.append(host_mem)cuda_inputs.append(cuda_mem)else:host_outputs.append(host_mem)cuda_outputs.append(cuda_mem)# storeself.stream = streamself.context = contextself.engine = engineself.host_inputs = host_inputsself.cuda_inputs = cuda_inputsself.host_outputs = host_outputsself.cuda_outputs = cuda_outputsself.bindings = bindingsself.batch_size = batch_size# self.batch_size = engine.max_batch_sizedef infer(self, raw_image_generator):threading.Thread.__init__(self)# Make self the active context, pushing it on top of the context stack.self.ctx.push()# Restorestream = self.streamcontext = self.contextengine = self.enginehost_inputs = self.host_inputscuda_inputs = self.cuda_inputshost_outputs = self.host_outputscuda_outputs = self.cuda_outputsbindings = self.bindings# Do image preprocessbatch_image_raw = []batch_origin_h = []batch_origin_w = []batch_input_image = np.empty(shape=[self.batch_size, 3, self.input_h, self.input_w])# 组合为相应的batch进行处理for i, image_raw in enumerate(raw_image_generator):input_image, image_raw, origin_h, origin_w = self.preprocess_image(image_raw)batch_image_raw.append(image_raw)batch_origin_h.append(origin_h)batch_origin_w.append(origin_w)np.copyto(batch_input_image[i], input_image)batch_input_image = np.ascontiguousarray(batch_input_image)# Copy input image to host buffernp.copyto(host_inputs[0], batch_input_image.ravel())start = time.time()# Transfer input data  to the GPU.cuda.memcpy_htod_async(cuda_inputs[0], host_inputs[0], stream)# Run inference.context.execute_async_v2(bindings=bindings, stream_handle=stream.handle)# context.execute_async(batch_size=self.batch_size, bindings=bindings, stream_handle=stream.handle)# Transfer predictions back from the GPU.cuda.memcpy_dtoh_async(host_outputs[0], cuda_outputs[0], stream)# Synchronize the streamstream.synchronize()end = time.time()# Remove any context from the top of the context stack, deactivating it.self.ctx.pop()# Here we use the first row of output in that batch_size = 1output = host_outputs[0]# Do postprocessfeatures = []for i in range(self.batch_size):feature = output[i * LEN_ALL_RESULT:(i + 1) * LEN_ALL_RESULT]features.append(feature)print(feature.shape)return batch_image_raw, end - start, featuresdef destroy(self):# Remove any context from the top of the context stack, deactivating it.self.ctx.pop()def get_raw_image(self, image_path_batch):"""description: Read an image from image path"""for img_path in image_path_batch:yield cv2.imread(img_path)def get_vedio_frame(self, cap):for _ in range(self.batch_size):yield cap.read()def get_raw_image_zeros(self, image_path_batch=None):"""description: Ready data for warmup"""for _ in range(self.batch_size):yield np.zeros([self.input_h, self.input_w, 3], dtype=np.uint8)def preprocess_image(self, raw_bgr_image):"""description: Convert BGR image to RGB,resize and pad it to target size, normalize to [0,1],transform to NCHW format.param:input_image_path: str, image pathreturn:image:  the processed imageimage_raw: the original imageh: original heightw: original width"""image_raw = raw_bgr_imageh, w, c = image_raw.shapeimage = cv2.cvtColor(image_raw, cv2.COLOR_BGR2RGB)image = cv2.resize(image, (112, 112))image = image.astype(np.float32)image /= 255.0# HWC to CHW format:image = np.transpose(image, [2, 0, 1])# CHW to NCHW formatimage = np.expand_dims(image, axis=0)# Convert the image to row-major order, also known as "C order":image = np.ascontiguousarray(image)return image, image_raw, h, wdef img_infer(ArcFaceWraper, image_path_batch):batch_image_raw, use_time, res = ArcFaceWraper.infer(ArcFaceWraper.get_raw_image(image_path_batch))for i, feature in enumerate(res):print('input->{}, time->{:.2f}ms, feature shape = {}'.format(image_path_batch[i], use_time * 1000, feature.shape))def vedio_infer(ArcFaceWraper, cap):batch_image_raw, use_time = ArcFaceWraper.infer(ArcFaceWraper.get_vedio_frame(cap))print('input->{}, time->{:.2f}ms, saving into output/'.format(1, use_time * 1000))cv2.namedWindow('vedio', cv2.WINDOW_NORMAL)cv2.imshow('vedio', batch_image_raw[0])cv2.waitKey(1)def warmup(ArcFaceWraper):batch_image_raw, use_time, _ = ArcFaceWraper.infer(ArcFaceWraper.get_raw_image_zeros())print('warm_up->{}, time->{:.2f}ms'.format(batch_image_raw[0].shape, use_time * 1000))if __name__ == '__main__':from tqdm import tqdmbatch = 4# engine_file_path = r"D:\personal\project\code\arcface-pytorch-main\model_data\arcface_mobilefacenet.engine"engine_file_path = r"arcface\arcface_mobilefacenet.engine"arcface_wrapper = ArcFaceTRT(engine_file_path, batch_size=batch)try:print('batch size is', batch)image_dir = r"datasets"# image_path_batches = get_img_path_batches(arcface_wrapper.batch_size, image_dir)image_path_batches = get_img_path_batches(batch, image_dir)# warmup# for i in range(10):#     warmup(arcface_wrapper)for batch in tqdm(image_path_batches):img_infer(arcface_wrapper, batch)finally:# destroy the instancearcface_wrapper.destroy()
重点需要注意的是:
1、context需要batch动态维度,这也是进行动态batch推理的前提条件
2、针对输入的binding,需要将其dim[0]设置batch大小
2.4 测试效果
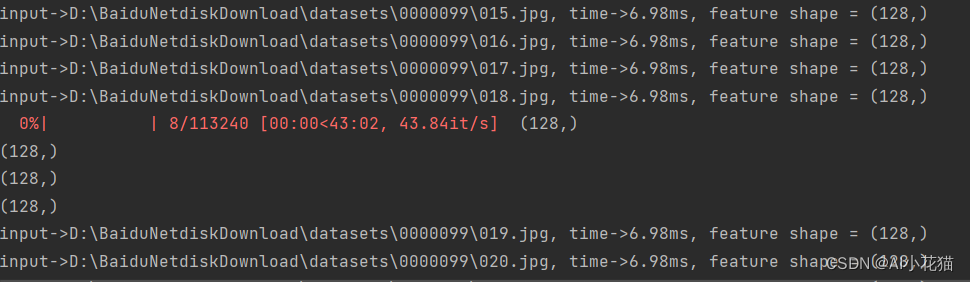
博主这边使用的是batch为4进行的推理,推理速度大概是6.98ms每个batch。
如果设置为batch为8,则推理时间如下:
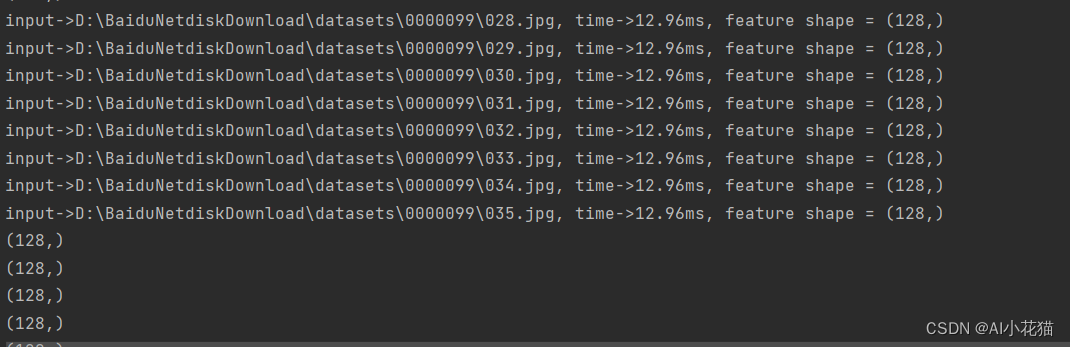
也可以设置为1~16之间的任意数值进行推理,具体数值区间和你生成engine时候所设定的kmin和kmax对应的shape是相关联的,比起单张推理速度会提升一部分,但是不成相应比例。
3、cuda版本C++快速推理
本节主要包含使用C++实现arcface模型转化为onnx通用平台模型,然后转化为TensorRT所支持的加速engine全过程。
由于模型的.pth模型转换为ONNX模型和前述2.1节的内容是一致的,因此本部分从模型已经成功转换为ONNX模型开始阐述。
3.1 arcface ONNX模型转化为engine
转换为engine的方式其实和python的转化相类似,主要还都是利用C++的TensorRT相应的API进行编写的。
具体实现如下所示:
void CreateEngine::trtFromOnnx(const std::string onnx_path,const std::string engine_out_path, unsigned int max_batch_size,size_t workspace ,bool half)
{if (onnx_path.empty()) {printf("failed to export ONNX file\n");}printf("***************start to create model engine********************\n");IBuilder* builder = createInferBuilder(gLogger);IBuilderConfig* config = builder->createBuilderConfig();config->setMaxWorkspaceSize(static_cast<size_t>(workspace*1) << 30);NetworkDefinitionCreationFlags flag = (1U << int(NetworkDefinitionCreationFlag::kEXPLICIT_BATCH));INetworkDefinition* network = builder->createNetworkV2(flag);IParser* parser = createParser(*network, gLogger);if (! parser->parseFromFile(onnx_path.c_str(), static_cast<int>(ILogger::Severity::kWARNING))) {//wrong information for (int32_t i = 0; i < parser->getNbErrors(); i++){std::cout << parser->getError(i)->desc() << std::endl;}}std::cout << "******************successfully parse the onnx model*********************" << std::endl;//danamic batch auto profile = builder->createOptimizationProfile();auto input_tensor = network->getInput(0);auto input_dims = input_tensor->getDimensions();// 配置最小:kMIN、最优:kOPT、最大范围:kMAX       指的是BatchSizeinput_dims.d[0] = 1;profile->setDimensions(input_tensor->getName(), OptProfileSelector::kMIN, input_dims);profile->setDimensions(input_tensor->getName(), OptProfileSelector::kOPT, input_dims);input_dims.d[0] = max_batch_size;profile->setDimensions(input_tensor->getName(), OptProfileSelector::kMAX, input_dims);//TensorRT – Using PreviewFeaturekFASTER_DYNAMIC_SHAPES_0805 can help improve performance and resolve potential functional issuesconfig->setPreviewFeature(PreviewFeature::kFASTER_DYNAMIC_SHAPES_0805, true);config->addOptimizationProfile(profile);//build enginehalf &= builder->platformHasFastFp16();if (half){config->setFlag(nvinfer1::BuilderFlag::kFP16);}ICudaEngine* engine = builder->buildEngineWithConfig(*network, *config);assert(engine != nullptr);IHostMemory* serialized_engine = engine->serialize();assert(serialized_engine != nullptr);// save enginestd::ofstream p(engine_out_path, std::ios::binary);if (!p) {std::cerr << "could not open output engine path" << std::endl;assert(false);}p.write(reinterpret_cast<const char*>(serialized_engine->data()), serialized_engine->size());//releasenetwork->destroy();parser->destroy();engine->destroy();config->destroy();serialized_engine->destroy();builder->destroy();std::cout << "**************successed transfer onnx to trt engine***************" << std::endl;
}
实现和python一个样,主要是添加profile以及指定动态batch的最大、最小和最优值。由于kFASTER_DYNAMIC_SHAPES_0805可以提升性能,此处使用的时候对其进行了添加。
3.2 arcface TensorRT快速推理
推理大致过程如下:
- 组装图片为相应的batch,并进行数据前处理
- 分别分配host以及device上的内存
- cuda加速推理获取结果
- 结果解码+后处理计算相似度
- 释放相应的内存
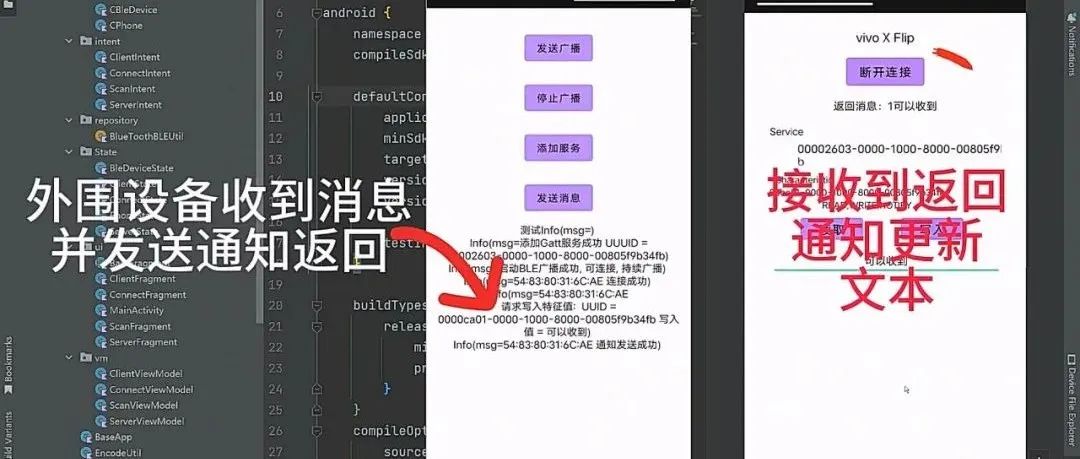
void ArcFaceInference::inference(std::vector<cv::Mat>& imgs, std::vector<cv::Mat>& res_batch)
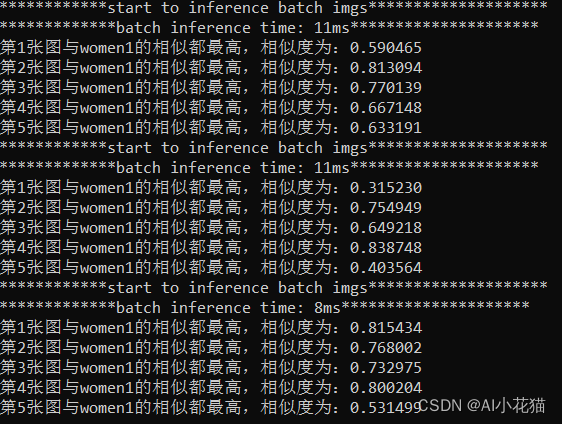
{int batch = imgs.size();cudaStream_t stream;CUDA_CHECK(cudaStreamCreate(&stream));//inputint input_numel = batch * 3 * imgs[0].cols * imgs[0].rows;float* cpu_input_buffer = nullptr;float* gpu_input_buffer = nullptr;CUDA_CHECK(cudaMallocHost((void**)(&cpu_input_buffer), input_numel * sizeof(float)));CUDA_CHECK(cudaMalloc((void**)(&gpu_input_buffer), input_numel * sizeof(float)));//outputauto output_dims = this->initEngine->engine->getBindingDimensions(1);output_dims.d[0] = batch;int output_numel = output_dims.d[0] * output_dims.d[1];float* cpu_output_buffer = nullptr;float* gpu_output_buffer = nullptr;CUDA_CHECK(cudaMallocHost((void**)(&cpu_output_buffer), output_numel * sizeof(float)));CUDA_CHECK(cudaMalloc((void**)(&gpu_output_buffer), output_numel * sizeof(float)));// set input dimauto input_dims = this->initEngine->engine->getBindingDimensions(0);input_dims.d[0] = batch;this->initEngine->context->setBindingDimensions(0, input_dims);//batch processbatchPreprocess(imgs,cpu_input_buffer);auto start = std::chrono::system_clock::now();std::cout << "************start to inference batch imgs********************" << std::endl;CUDA_CHECK(cudaMemcpyAsync(gpu_input_buffer, cpu_input_buffer, input_numel * sizeof(float), cudaMemcpyHostToDevice, stream));float* bindings[] = { gpu_input_buffer,gpu_output_buffer };bool success = this->initEngine->context->enqueueV2((void**)(bindings), stream, nullptr);CUDA_CHECK(cudaMemcpyAsync(cpu_output_buffer, gpu_output_buffer, output_numel * sizeof(float), cudaMemcpyDeviceToHost, stream));CUDA_CHECK(cudaStreamSynchronize(stream));auto end = std::chrono::system_clock::now();std::cout << "*************batch inference time: " << std::chrono::duration_cast<std::chrono::milliseconds>(end - start).count() << "ms" <<"*********************" << std::endl;//postprocessfor (int i = 0; i < batch; i++){cv::Mat result = cv::Mat(1, output_dims.d[1], CV_32FC1, static_cast<float*>(&cpu_output_buffer[i * output_dims.d[1]]));res_batch.emplace_back(result.clone());// 计算相似度float max_similarity = 0.0;std::string name = "";for (std::map<std::string, cv::Mat>::iterator iter = obsInfo.begin(); iter != obsInfo.end(); ++iter){float similarity = getSimilarity(result.clone(), iter->second);if (similarity>max_similarity){max_similarity = similarity;name = iter->first;}}if (!GETVECTOR){printf("第%i张图与%s的相似都最高,相似度为:%f\n", i + 1, name.c_str(), max_similarity);}}//releaseCUDA_CHECK(cudaStreamDestroy(stream));CUDA_CHECK(cudaFreeHost(cpu_input_buffer));CUDA_CHECK(cudaFreeHost(cpu_output_buffer));CUDA_CHECK(cudaFree(gpu_input_buffer));CUDA_CHECK(cudaFree(gpu_output_buffer));}3.3 测试效果
测试以人脸检测中的五个类别数据,先分一部分数据,提取其相对应的平均特征并进行保存,测试推理时候,用推理获取的特征与既有的特征进行相似度比对,取相似度最高者为对应的类别。
具体结果如下:
4 总结
arcface部署实际上还是比较简单的,难点在于如何快速实现多batch推理,以及如何能够更有效的让新来的特征加入table中,以达到动态扩充的目的。
本篇文章通过实际使用案例,详述了Arcface动态batch推理的详细过程部署的,如有不足指出,请大家多多指教。
———END————
相关文章:
Arcface部署应用实战
1、概述 人脸识别的一个比较常用的网络arcface,依赖于其特殊设计的loss函数,使得模型在训练的时候能够实现类间距离增大,类内的距离不断减小,最终使得所训练的backbone能够获取鉴别性很高的特征,便于人脸识别。 本文…...
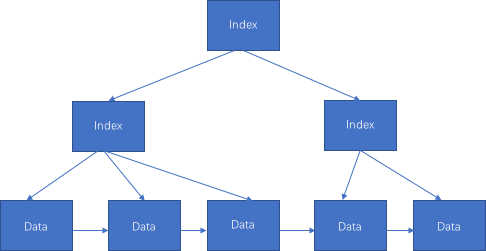
MySQL InnoDB 是怎么使用 B+ 树存数据的?
这里限定 MySQL InnoDB 存储引擎来进行阐述,避免不必要的阅读歧义。 首先通过一篇文章简要了解下 B 树的相关知识:你好,我是B树 。 B 树是在 B 树基础上的变种,主要区别包括: 1、所有数据都存储在叶节点,其…...

手撕红黑树
学了很久编程了,红黑树在我们耳边早就如雷贯耳,都说他是数据结构中最难的几种结构了,但是,实际上学会了之后,你会发现他还是很简单的,个人认为他还没有AVL树的旋转难,好了,老规矩&am…...
技术)
举例说明自然语言处理(NLP)技术
自然语言处理(NLP)技术是一种人工智能领域的技术,用于处理自然语言文本或语音信号。下面是一些自然语言处理技术的例子: 机器翻译:机器翻译是一种自然语言处理的技术,它可以将一种语言的文本翻译成另一种语…...

淘宝详情API接口在各种应用中的作用性
标题:淘宝详情API接口在各种应用中的作用性 一、引言 随着互联网的快速发展和电子商务的广泛应用,淘宝作为中国最大的C2C电商平台,其提供的API接口在各种应用中发挥着越来越重要的作用。本文将详细介绍淘宝详情API接口的背景、定义、类型&a…...

java用正则方法验证文件名是否合法
Java中用到文件操作时,经常要验证文件名是否合法. 用File类的createNewFile()方法的确很管用.但当要批量验证时,效率上就会有问题.正则匹配的开销比创建文件少了很多. 那么一个合法的文件(Win下)应该符合如下规则: 1.文件名不能为空,空在这里有两个意思: 文件名(包括扩展名…...
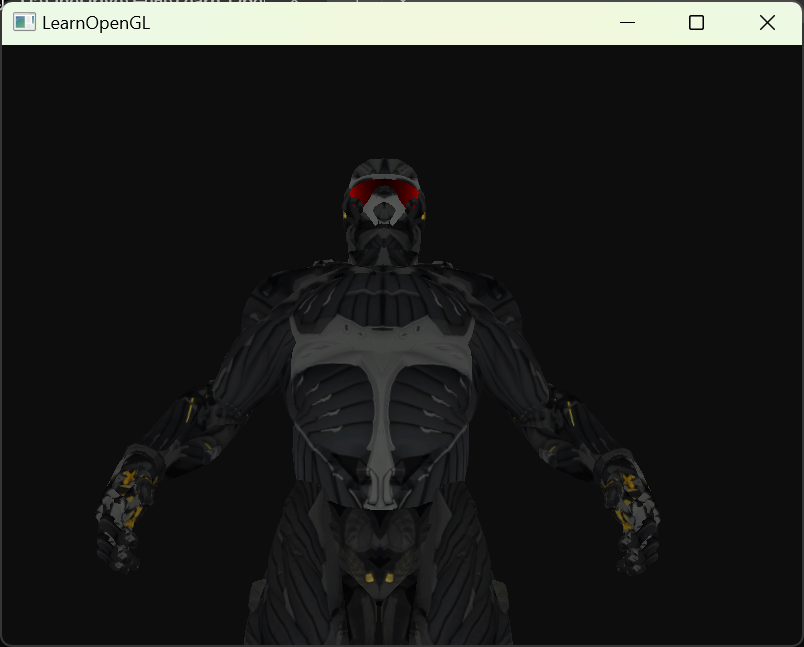
【learnopengl】Assimp构建与编译
文章目录 【learnopengl】Assimp构建与编译1 前言2 Assimp构建与编译2.1 下载源码2.2 CMake构建2.3 VS2022编译 3 在VS中配置Assimp库4 验证 【learnopengl】Assimp构建与编译 1 前言 最近在跟着LearnOpenGL这个网站学习OpenGL,这篇文章详细记录一下教程中关于Ass…...
小兔鲜商02
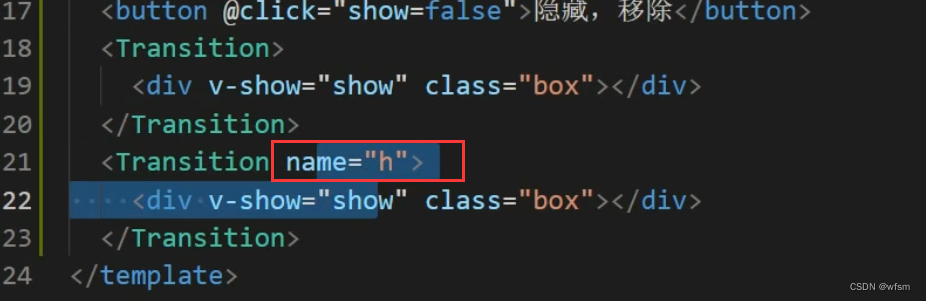
npm i vueuse/core -fvue插件使用: 许多公用的全局组件,,可以通过插件注册进去,就不用一个一个导入组件,, import XtxSkeleton from /components/library/xtx-skeletonexport default {install (app) {// …...

一键替换工程文件和场景中的UI对象字体
具体流程: 找到工程中使用到的所有字体找到工程和场景中包含Text的所有对象展示要替换的字体名字让用户选择通过用户选择的字体,展示响应的物体对象一键替换 通过AssetDatabase.FindAssets找到工程中包含的所有字体: private List<strin…...
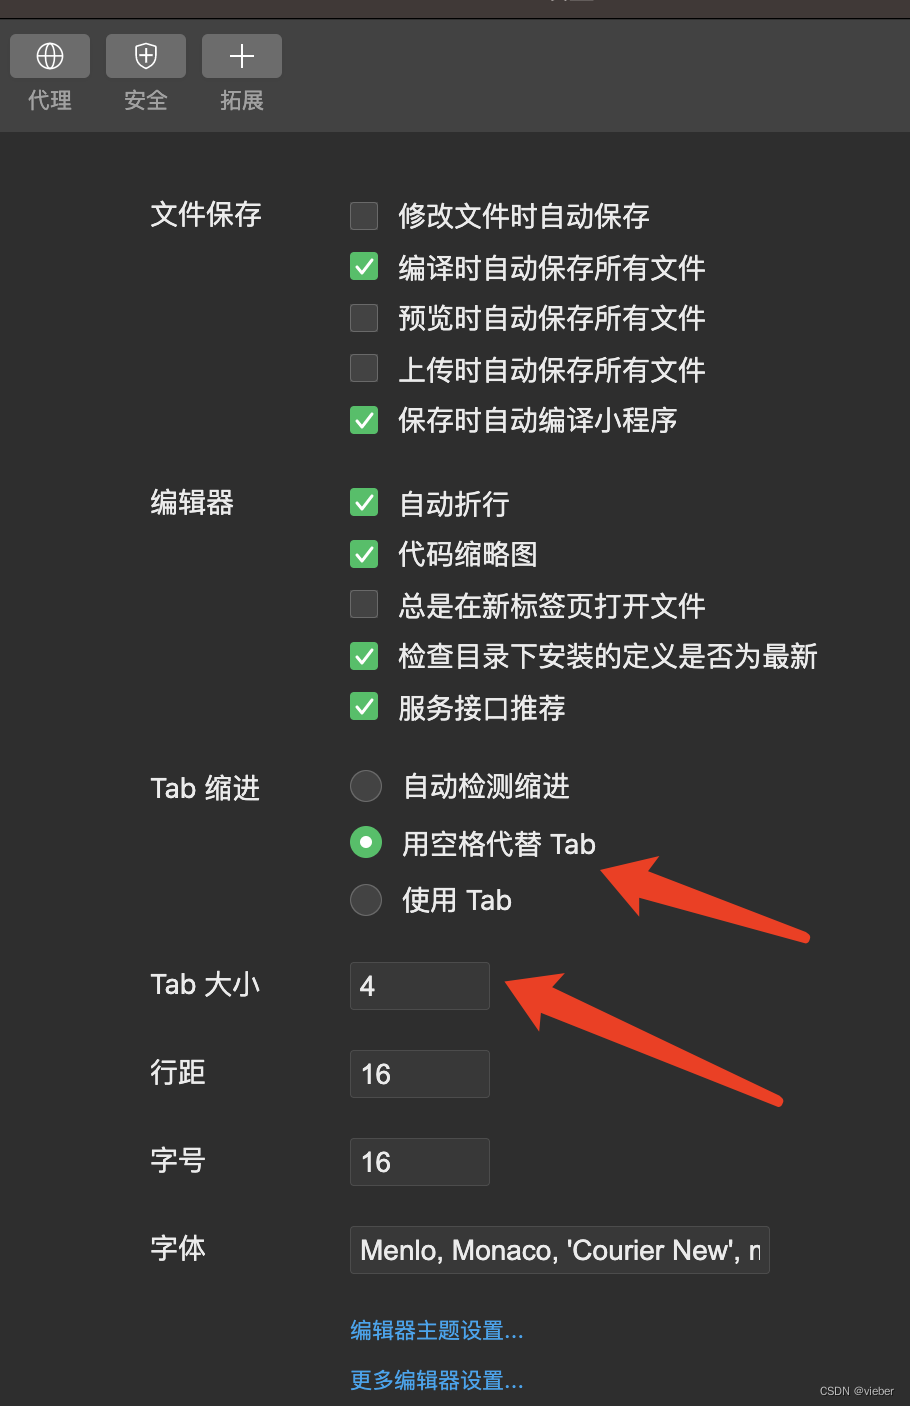
微信小程序编辑器代码格式缩进设置
第一步点击这个编辑器设置: 然后设置tab为空格,并且设置占几个空格,这里是4个空格。 这样就好了,文件保存就会自动设置好缩进格式了。...
Android Aidl跨进程通讯(二)--异常捕获处理
学更好的别人, 做更好的自己。 ——《微卡智享》 本文长度为1623字,预计阅读5分钟 前言 上一篇《Android Aidl跨进程通讯的简单使用》中介绍了跨进程的通讯处理,在进程间的数据通过Aidl实现了交互,项目中经常会遇到Bug,…...
)
Android中OkHttp源码阅读二(责任链模式)
博主前些天发现了一个巨牛的人工智能学习网站,通俗易懂,风趣幽默,忍不住也分享一下给大家 👉点击跳转到教程 Android OkHttp源码阅读详解一 看OkHttp源码,发现OkHttp里面使用了责任链设计模式,所以才要学习…...

2023年03月 C/C++(六级)真题解析#中国电子学会#全国青少年软件编程等级考试
C/C++编程(1~8级)全部真题・点这里 第1题:波兰表达式 波兰表达式是一种把运算符前置的算术表达式,例如普通的表达式2 + 3的波兰表示法为+ 2 3。波兰表达式的优点是运算符之间不必有优先级关系,也不必用括号改变运算次序,例如(2 + 3) * 4的波兰表示法为* + 2 3 4。本题求解…...
顺序表链表OJ题(1)——【LeetCode】
W...Y的主页 😊 代码仓库分享 💕 前言: 今天我们来回顾一下顺序表与链表,针对这一块我们也有许多OJ题目供大家参考。当我们学习完顺序表链表后避免不了一些习题的练习,这样才能巩固我们学习的内容。 话不多说…...

flex:1
问题1:“flex: 1” 与其他 “flex” 值有何区别? 答案: “flex: 1” 是 “flex” 属性的一种简写形式,它将 “flex-grow”、“flex-shrink” 和 “flex-basis” 设置为特定的值。与其他 “flex” 值相比,“flex: 1” …...
iOS练手项目知识点汇总
基础理解篇 Objective-C是一种面向对象的编程语言,它支持元编程。元编程是指编写程序来生成或操纵其他程序的技术。 Objective-C中,元编程可以使用Objective-C的动态特性来实现。例如可以使用Objective-C的运行时函数来动态地创建类、添加属性和方法等等…...
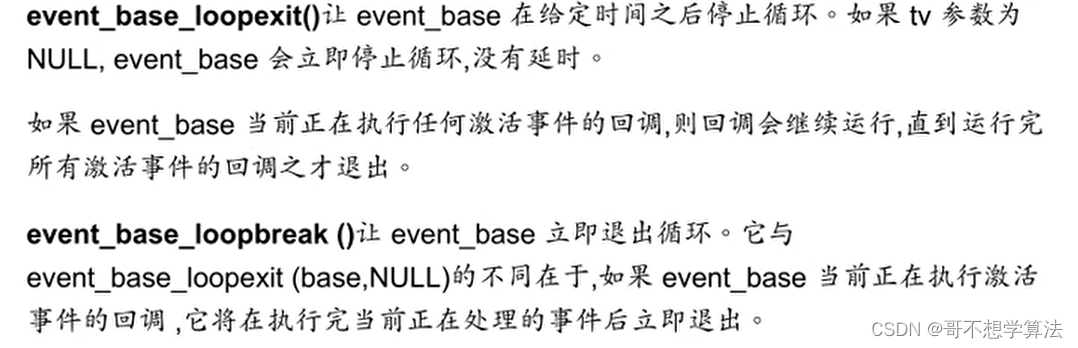
【Linux】Libevent相关小知识总结
Libevent是基于事件的,也就是说,相当于去注册一个事件,当这个事件发生的话,那么就会调用回调函数。...

【Spring Security】UserDetailsService 接口介绍
文章目录 UserDetailsService 介绍UserDetailsService 具体操作UserDetailsService 方法介绍 UserDetailsService 介绍 UserDetailsService 在 Spring Security 中主要承担查询系统内用户、验证密码、封装用户信息和角色权限。大白话就是你写一个实现类实现 UserDetailsServic…...
Mybatis学习|日志工厂、分页
1.日志工厂 如果一个数据库操作,出现了异常,我们需要排错。日志就是最好的助手! 曾经: sout、debug 现在:日志工厂! 我们主要掌握STDOUT_LOGGING 和LOG4j 在Mybatis中具体使用哪个一日志实现,在设置中设定! 在mybatis核心配置文件中&#…...
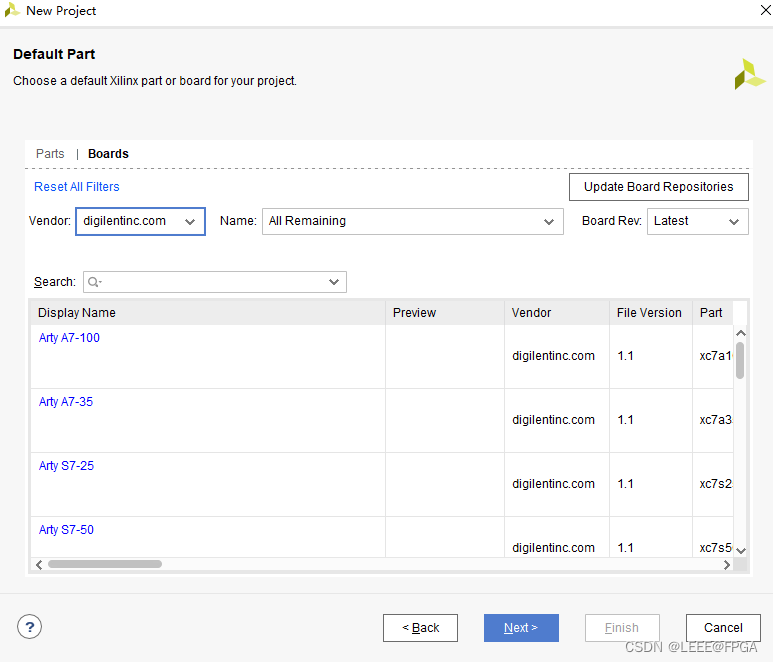
Vivado 添加FPGA开发板的Boards file的添加
1 digilent board file 下载地址 下载地址 : https://github.com/Digilent/vivado-boards 2 下载后 3 添加文件到 vivado 安装路径 把文件复制到 Vivado\2019.1\data\boards\board_files4 创建工程查看是否安装成功...

文墨共鸣大模型入门指南:Ubuntu 20.04系统下的保姆级部署教程
文墨共鸣大模型入门指南:Ubuntu 20.04系统下的保姆级部署教程 想试试最近挺火的文墨共鸣大模型,但被复杂的部署步骤劝退了?别担心,这篇教程就是为你准备的。咱们今天不谈复杂的原理,就手把手教你,如何在Ub…...

GTX1650也能跑!Windows11上OLLAMA+AnythingLLM本地部署Llama3保姆级教程
GTX1650也能跑!Windows11上OLLAMAAnythingLLM本地部署Llama3保姆级教程 老旧硬件也能玩转大模型?当GTX1650这样的入门级显卡遇上Llama3这类前沿AI模型,很多人第一反应可能是"跑不动"。但经过实测,只要合理配置和优化&am…...

电源管理入门-4子系统reset
之前的文章电源管理入门-1关机重启详解介绍了整机SoC的重启也可以说是reset,那么子系统的reset,例如某个驱动(网卡、USB等)或者某个子系统(NPU、ISP等运行在独立的M核或者R核上的AI系统),这些零…...

Android 离线语音合成技术选型指南:从MaryTTS到TensorFlowTTS
1. 为什么需要离线语音合成技术? 最近几年,越来越多的应用开始集成语音合成功能。你可能见过导航软件里实时播报路况的电子女声,或者听书App里流畅朗读小说的AI配音。这些场景背后,都离不开TTS(Text-To-Speech&#x…...

【手把手实战!fMRI数据预处理全流程解析】SPM12操作指南
1. fMRI数据预处理入门:为什么需要SPM12? 第一次接触fMRI数据分析的朋友,往往会被各种专业术语吓到——DICOM、NIFTI、头动校正、空间标准化...这些名词听起来就让人头大。但别担心,就像我第一次在实验室处理数据时导师说的&…...

别再自己造轮子了!用Qt的QModbusTcpClient库5分钟搞定Modbus TCP通讯
别再重复造轮子!用Qt的QModbusTcpClient库5分钟实现工业级Modbus TCP通信 在工业自动化领域,Modbus TCP协议因其简单可靠的特点,已成为PLC与上位机通信的事实标准。许多Qt开发者面对Modbus通信需求时,第一反应往往是手动封装协议栈…...

告别格式枷锁:ncmdumpGUI让音乐自由播放变得触手可及
告别格式枷锁:ncmdumpGUI让音乐自由播放变得触手可及 【免费下载链接】ncmdumpGUI C#版本网易云音乐ncm文件格式转换,Windows图形界面版本 项目地址: https://gitcode.com/gh_mirrors/nc/ncmdumpGUI 开篇痛点直击:那些被NCM格式困住的…...

多平台资源下载解决方案:res-downloader实现数字内容自由获取
多平台资源下载解决方案:res-downloader实现数字内容自由获取 【免费下载链接】res-downloader 视频号、小程序、抖音、快手、小红书、直播流、m3u8、酷狗、QQ音乐等常见网络资源下载! 项目地址: https://gitcode.com/GitHub_Trending/re/res-downloader 在数…...

GitHub开源项目分享:SenseVoice-Small模型微调与领域适配工具链
GitHub开源项目分享:SenseVoice-Small模型微调与领域适配工具链 最近在语音识别领域,一个挺有意思的现象是,很多通用模型虽然能力很强,但一遇到专业领域的对话,比如医生讨论病例、律师分析法条,准确率就容…...

QuickSnap:提升三维建模效率的快速对齐工具——三维建模爱好者的精准对齐解决方案
QuickSnap:提升三维建模效率的快速对齐工具——三维建模爱好者的精准对齐解决方案 【免费下载链接】quicksnap Blender addon to quickly snap objects/vertices/points to object origins/vertices/points 项目地址: https://gitcode.com/gh_mirrors/qu/quicksna…...