瑞芯微RK3588开发板:虚拟机yolov5模型转化、开发板上python脚本调用npu并部署 全流程
目录
- 0. 背景
- 1. 模型转化
- 1.1 基础环境
- 1.2 创建python环境
- 1.3 将yolov5s.pt转为yolov5s.onnx
- 1.4 将yolov5s.onnx转为yolov5s.rknn
- 2. 开发板部署
- 2.1. c版本
- 2.1. python版本(必须是python 3.9)
- 3. 性能测试
0. 背景
全面国产化,用瑞芯微rk3588开发板替代jetson nano开发板。
1. 模型转化
模型转化这一步,需要在笔记本上的ubuntu20.04桌面版的虚拟机内完成,包括yolov5s.pt转为yolov5s.onnx,yolov5s.onnx转为yolov5s.rknn等两个主要步骤。
主要参考博客《yolov5篇—yolov5训练pt模型并转换为rknn模型,部署在RK3588开发板上——从训练到部署全过程》
1.1 基础环境
基础环境:x86平台的ubuntu 20.04虚拟机(注意,这里必须要x86平台的计算机,一般笔记本就可以;虚拟机中系统版本为ubuntu 20.04桌面版)
1.2 创建python环境
- 虚拟机中安装miniconda,然后激活base环境
- 创建python 3.8的conda环境(注意,这里python版本必须为3.8),参考以下命令
conda create -n rk3588 python=3.8
conda activate rk3588
pip install numpy -i https://mirror.baidu.com/pypi/simple
cd ~/Desktop
git clone https://gitcode.net/mirrors/rockchip-linux/rknn-toolkit2.git
pip install -r rknn-toolkit2/doc/requirements_cp38-1.4.0.txt -i https://mirror.baidu.com/pypi/simple
pip install pandas==1.4.* pyyaml matplotlib==3.3.* seaborn -i https://mirror.baidu.com/pypi/simple
1.3 将yolov5s.pt转为yolov5s.onnx
首先,将yolov5项目代码下载到桌面(注意,这里的yolov5项目实际为v5.0版本),如下
cd ~/Desktop
git clone https://gitcode.net/mirrors/ultralytics/yolov5.git
cd yolov5
git reset --hard c5360f6e7009eb4d05f14d1cc9dae0963e949213
其次,从yolov5项目地址中找到yolov5s.pt的下载地址,用迅雷下载即可,将yolov5s.pt上传到虚拟机~/Desktop/yolov5/weights目录下;
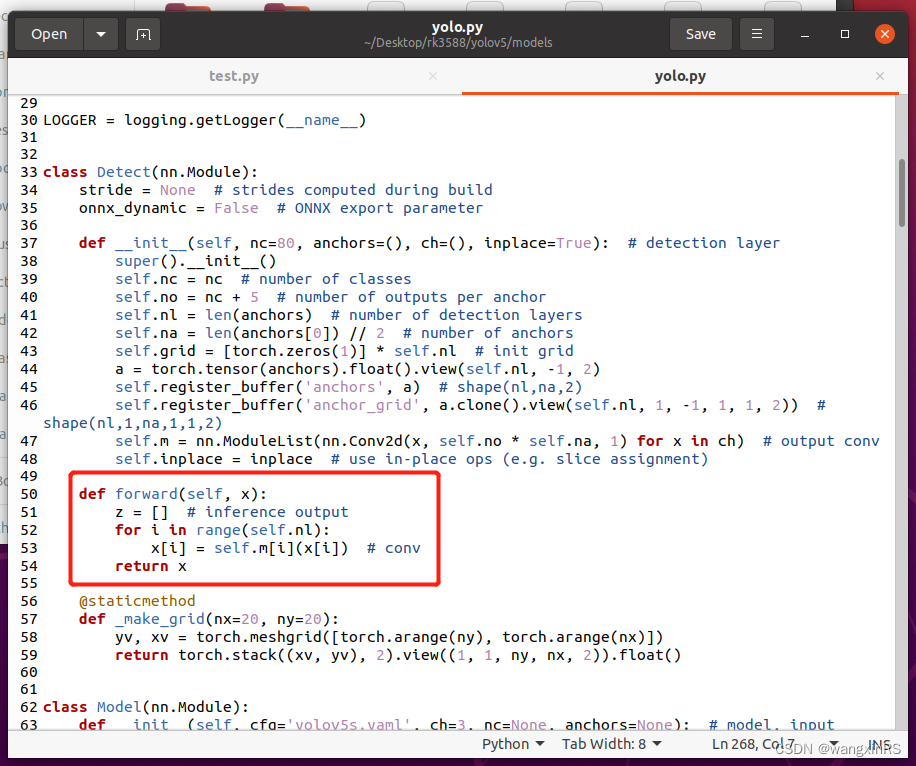
再次,修改~/Desktop/yolov5/models/yolo.py中的Detect函数,如下图所示(注意,该部分仅限于转化时使用,在训练时不能修改)
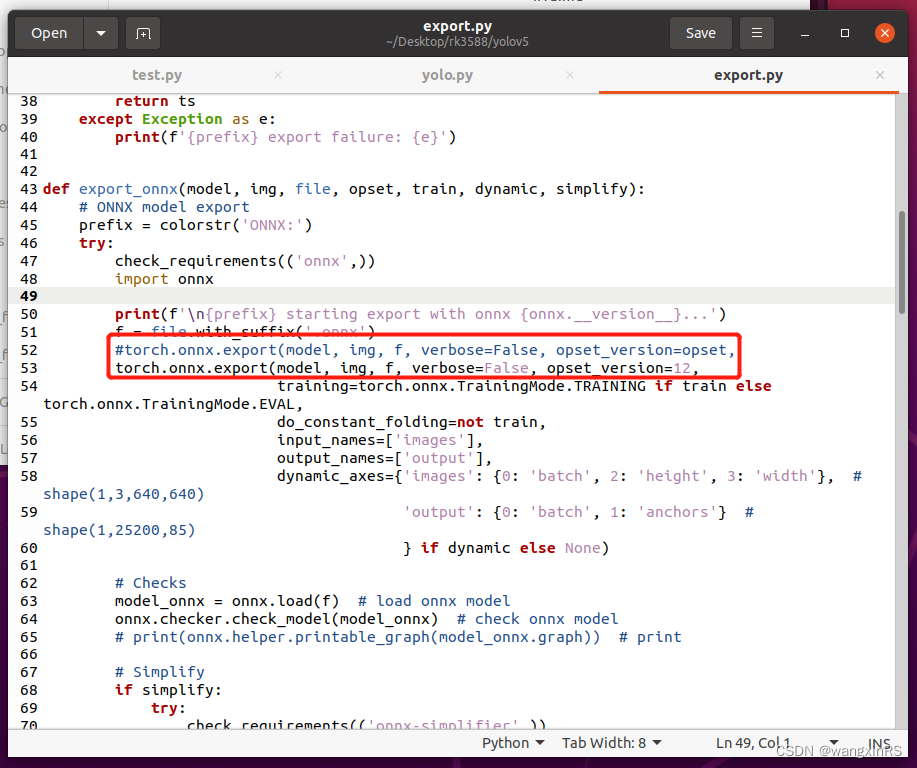
再次,修改~/Desktop/yolov5/export.py中的export_onnx()函数,如下图所示
最后,在命令行调用以下命令,在weights目录下,存在yolov5s.onnx文件:
python export.py --weights weights/yolov5s.pt --img 640 --batch 1 --include onnx
1.4 将yolov5s.onnx转为yolov5s.rknn
首先,下载rknn-toolkit2项目。该步骤实际上已经在环境准备中做完。
cd ~/Desktop
git clone https://gitcode.net/mirrors/rockchip-linux/rknn-toolkit2.git
其次,安装rknn-toolkit2的环境。该步骤实际上已经在环境准备中做完。
cd ~/Desktop/rknn-toolkit2
cd doc && pip install -r requirements_cp38-1.4.0.txt -i https://mirror.baidu.com/pypi/simple
再次,安装rknn-toolkit2工具包。
cd ~/Desktop/rknn-toolkit2
cd packages && pip install rknn_toolkit2-1.4.0_22dcfef4-cp38-cp38-linux_x86_64.whl -i https://mirror.baidu.com/pypi/simple
测试是否安装成功。在终端运行python环境,然后输入
from rknn.api import RKNN
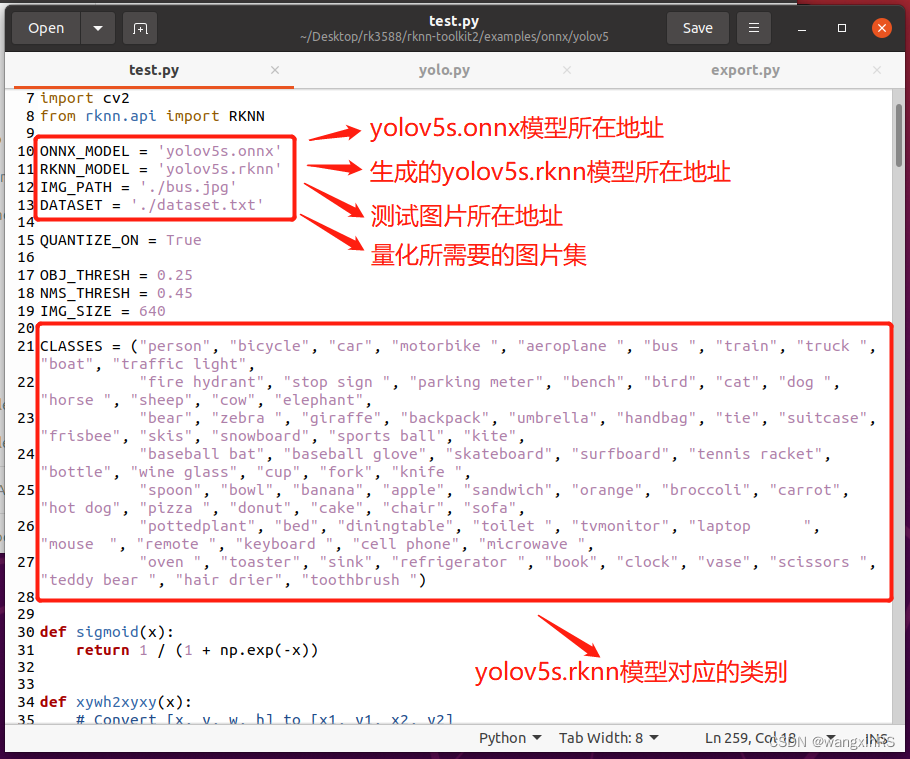
再次,将yolov5s.onnx复制到~/Desktop/rknn-toolkit2/examples/onnx/yolov5目录下,将该目录下的test.py作出一些修改,如下图

最后,执行python test.py,即可在同级目录下获得yolov5s.rknn。
2. 开发板部署
利用yolov5s.onnx,我们运行yolov5代码。这里区分为c版本和python版本。以下操作均在开发板上进行。
2.1. c版本
- 在rk3588开发板上下载官方demo
cd ~/Desktop
git clone https://gitcode.net/mirrors/rockchip-linux/rknpu2.git
- 修改文件。首先进入到rknpu2/examples/rknn_yolov5_demo目录下,然后修改include文件中的头文件postprocess.h,如下图

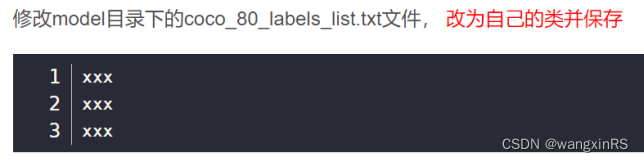
其次修改model目录下的coco_80_labels_list.txt文件,改为自己的类并保存,如下图
最后,将转换后的rknn文件放在model/RK3588目录下,编译并运行shell,该命令成功执行后,会生成install目录。
bash ./build-linux_RK3588.sh
(3)运行demo。将yolov5s.rknn上传到model/RK3588目录下,在model目录下放入需要推理的图片,运行
cd install/rknn_yolov5_demo_linux
./rknn_yolov5_demo ./model/RK3588/yolov5s.rknn ./model/bus.jpg
2.1. python版本(必须是python 3.9)
该版本API主要参考《RKNN Toolkit Lite2用户使用指南》。
- 更新源
# 默认注释了源码镜像以提高 apt update 速度,如有需要可自行取消注释
deb http://mirrors.tuna.tsinghua.edu.cn/ubuntu-ports/ focal main restricted universe multiverse
# deb-src https://mirrors.tuna.tsinghua.edu.cn/ubuntu-ports/ jammy main restricted universe multiverse
deb http://mirrors.tuna.tsinghua.edu.cn/ubuntu-ports/ focal-updates main restricted universe multiverse
# deb-src https://mirrors.tuna.tsinghua.edu.cn/ubuntu-ports/ jammy-updates main restricted universe multiverse
deb http://mirrors.tuna.tsinghua.edu.cn/ubuntu-ports/ focal-backports main restricted universe multiverse
# deb-src https://mirrors.tuna.tsinghua.edu.cn/ubuntu-ports/ jammy-backports main restricted universe multiverse
deb http://mirrors.tuna.tsinghua.edu.cn/ubuntu-ports/ focal-security main restricted universe multiverse
# deb-src https://mirrors.tuna.tsinghua.edu.cn/ubuntu-ports/ jammy-security main restricted universe multiverse
更新源:
sudo apt-get update
- miniconda安装
wget https://repo.anaconda.com/miniconda/Miniconda3-latest-Linux-aarch64.sh (在线安装)
推荐离线安装,进入miniconda官网,选择py3.8版本,用迅雷下载下来,如下
然后将Miniconda3-py38_23.1.0-1-Linux-aarch64.sh上传到rk3588板子的~/Downloads目录下,执行安装操作
bash ./Miniconda3-py38_23.1.0-1-Linux-aarch64.sh
- 创建python环境,主要包含numpy,opencv,psutils等。
conda create -n rk3588 python=3.9
conda activate rk3588
pip install numpy opencv-python -i https://mirror.baidu.com/pypi/simple
- 下载RKNN Toolkit2项目到桌面上
cd ~/Desktop && git clone https://gitcode.net/mirrors/rockchip-linux/rknn-toolkit2.git
- 安装RKNN Toolkit Lite2环境
cd rknn-toolkit2/rknn_toolkit_lite2/packages
pip install rknn_toolkit_lite2-1.4.0-cp39-cp39-linux_aarch64.whl -i https://mirror.baidu.com/pypi/simple
- 添加.so文件。这里主要为了确保python脚本可正常调用npu的C脚本。
cd ~/Downloads && git clone https://gitcode.net/mirrors/rockchip-linux/rknpu2.git
sudo cp rknpu2/runtime/RK3588/Linux/librknn_api/aarch64/librknn* /usr/lib
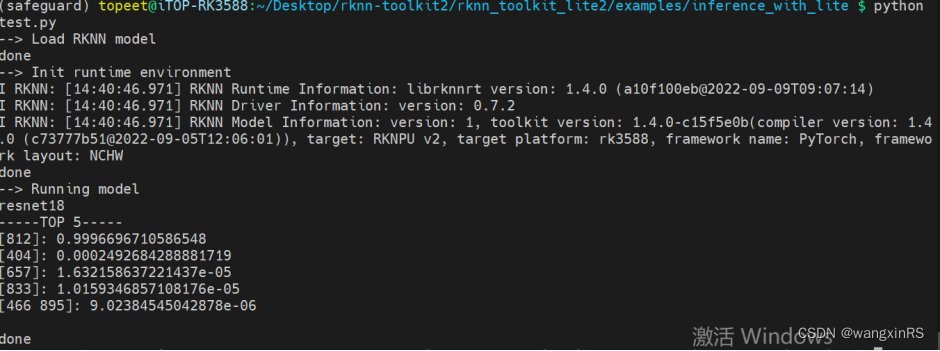
- 测试环境。测试案例在examples/inference_with_lite目录下。
cd rknn-toolkit2/rknn_toolkit_lite2/examples/inference_with_lite
python test.py
运行结果如下
- 测试yolov5的python脚本。在inference_with_lite目录下创建data,将测试图片放入该目录中;将yolov5s.rknn上传到inference_with_lite目录下;创建yolov5.py,对测试图片进行推理,并将结果保存到同级目录下res.jpg,(参考连接https://github.com/ChuanSe/yolov5-PT-to-RKNN/blob/main/detect.py)代码如下
import os
import urllib
import traceback
import time
import sys
import numpy as np
import cv2
#from rknn.api import RKNN
import platform
from rknnlite.api import RKNNLite
import multiprocessingONNX_MODEL = 'yolov5s.onnx'
RKNN_MODEL = 'yolov5s.rknn'
IMG_PATH = './data/car.png'
DATASET = './dataset.txt'QUANTIZE_ON = TrueOBJ_THRESH = 0.25
NMS_THRESH = 0.45
IMG_SIZE = 640CLASSES = ("person", "bicycle", "car", "motorbike ", "aeroplane ", "bus ", "train", "truck ", "boat", "traffic light","fire hydrant", "stop sign ", "parking meter", "bench", "bird", "cat", "dog ", "horse ", "sheep", "cow", "elephant","bear", "zebra ", "giraffe", "backpack", "umbrella", "handbag", "tie", "suitcase", "frisbee", "skis", "snowboard", "sports ball", "kite","baseball bat", "baseball glove", "skateboard", "surfboard", "tennis racket", "bottle", "wine glass", "cup", "fork", "knife ","spoon", "bowl", "banana", "apple", "sandwich", "orange", "broccoli", "carrot", "hot dog", "pizza ", "donut", "cake", "chair", "sofa","pottedplant", "bed", "diningtable", "toilet ", "tvmonitor", "laptop    ", "mouse  ", "remote ", "keyboard ", "cell phone", "microwave ","oven ", "toaster", "sink", "refrigerator ", "book", "clock", "vase", "scissors ", "teddy bear ", "hair drier", "toothbrush ")# decice tree for rk356x/rk3588
DEVICE_COMPATIBLE_NODE = '/proc/device-tree/compatible'def get_host():# get platform and device typesystem = platform.system()machine = platform.machine()os_machine = system + '-' + machineif os_machine == 'Linux-aarch64':try:with open(DEVICE_COMPATIBLE_NODE) as f:device_compatible_str = f.read()if 'rk3588' in device_compatible_str:host = 'RK3588'else:host = 'RK356x'except IOError:print('Read device node {} failed.'.format(DEVICE_COMPATIBLE_NODE))exit(-1)else:host = os_machinereturn hostINPUT_SIZE = 224
RK3588_RKNN_MODEL = 'resnet18_for_rk3588.rknn'def sigmoid(x):return 1 / (1 + np.exp(-x))def xywh2xyxy(x):# Convert [x, y, w, h] to [x1, y1, x2, y2]y = np.copy(x)y[:, 0] = x[:, 0] - x[:, 2] / 2  # top left xy[:, 1] = x[:, 1] - x[:, 3] / 2  # top left yy[:, 2] = x[:, 0] + x[:, 2] / 2  # bottom right xy[:, 3] = x[:, 1] + x[:, 3] / 2  # bottom right yreturn ydef process(input, mask, anchors):anchors = [anchors[i] for i in mask]grid_h, grid_w = map(int, input.shape[0:2])box_confidence = sigmoid(input[..., 4])box_confidence = np.expand_dims(box_confidence, axis=-1)box_class_probs = sigmoid(input[..., 5:])box_xy = sigmoid(input[..., :2])*2 - 0.5col = np.tile(np.arange(0, grid_w), grid_w).reshape(-1, grid_w)row = np.tile(np.arange(0, grid_h).reshape(-1, 1), grid_h)col = col.reshape(grid_h, grid_w, 1, 1).repeat(3, axis=-2)row = row.reshape(grid_h, grid_w, 1, 1).repeat(3, axis=-2)grid = np.concatenate((col, row), axis=-1)box_xy += gridbox_xy *= int(IMG_SIZE/grid_h)box_wh = pow(sigmoid(input[..., 2:4])*2, 2)box_wh = box_wh * anchorsbox = np.concatenate((box_xy, box_wh), axis=-1)return box, box_confidence, box_class_probsdef filter_boxes(boxes, box_confidences, box_class_probs):"""Filter boxes with box threshold. It's a bit different with origin yolov5 post process!# Argumentsboxes: ndarray, boxes of objects.box_confidences: ndarray, confidences of objects.box_class_probs: ndarray, class_probs of objects.# Returnsboxes: ndarray, filtered boxes.classes: ndarray, classes for boxes.scores: ndarray, scores for boxes."""boxes = boxes.reshape(-1, 4)box_confidences = box_confidences.reshape(-1)box_class_probs = box_class_probs.reshape(-1, box_class_probs.shape[-1])_box_pos = np.where(box_confidences >= OBJ_THRESH)boxes = boxes[_box_pos]box_confidences = box_confidences[_box_pos]box_class_probs = box_class_probs[_box_pos]class_max_score = np.max(box_class_probs, axis=-1)classes = np.argmax(box_class_probs, axis=-1)_class_pos = np.where(class_max_score >= OBJ_THRESH)boxes = boxes[_class_pos]classes = classes[_class_pos]scores = (class_max_score* box_confidences)[_class_pos]return boxes, classes, scoresdef nms_boxes(boxes, scores):"""Suppress non-maximal boxes.# Argumentsboxes: ndarray, boxes of objects.scores: ndarray, scores of objects.# Returnskeep: ndarray, index of effective boxes."""x = boxes[:, 0]y = boxes[:, 1]w = boxes[:, 2] - boxes[:, 0]h = boxes[:, 3] - boxes[:, 1]areas = w * horder = scores.argsort()[::-1]keep = []while order.size > 0:i = order[0]keep.append(i)xx1 = np.maximum(x[i], x[order[1:]])yy1 = np.maximum(y[i], y[order[1:]])xx2 = np.minimum(x[i] + w[i], x[order[1:]] + w[order[1:]])yy2 = np.minimum(y[i] + h[i], y[order[1:]] + h[order[1:]])w1 = np.maximum(0.0, xx2 - xx1 + 0.00001)h1 = np.maximum(0.0, yy2 - yy1 + 0.00001)inter = w1 * h1ovr = inter / (areas[i] + areas[order[1:]] - inter)inds = np.where(ovr <= NMS_THRESH)[0]order = order[inds + 1]keep = np.array(keep)return keepdef yolov5_post_process(input_data):masks = [[0, 1, 2], [3, 4, 5], [6, 7, 8]]anchors = [[10, 13], [16, 30], [33, 23], [30, 61], [62, 45],[59, 119], [116, 90], [156, 198], [373, 326]]boxes, classes, scores = [], [], []for input, mask in zip(input_data, masks):b, c, s = process(input, mask, anchors)b, c, s = filter_boxes(b, c, s)boxes.append(b)classes.append(c)scores.append(s)boxes = np.concatenate(boxes)boxes = xywh2xyxy(boxes)classes = np.concatenate(classes)scores = np.concatenate(scores)nboxes, nclasses, nscores = [], [], []for c in set(classes):inds = np.where(classes == c)b = boxes[inds]c = classes[inds]s = scores[inds]keep = nms_boxes(b, s)nboxes.append(b[keep])nclasses.append(c[keep])nscores.append(s[keep])if not nclasses and not nscores:return None, None, Noneboxes = np.concatenate(nboxes)classes = np.concatenate(nclasses)scores = np.concatenate(nscores)return boxes, classes, scoresdef draw(image, boxes, scores, classes):"""Draw the boxes on the image.# Argument:image: original image.boxes: ndarray, boxes of objects.classes: ndarray, classes of objects.scores: ndarray, scores of objects.all_classes: all classes name."""for box, score, cl in zip(boxes, scores, classes):top, left, right, bottom = boxprint('class: {}, score: {}'.format(CLASSES[cl], score))print('box coordinate left,top,right,down: [{}, {}, {}, {}]'.format(top, left, right, bottom))top = int(top)left = int(left)right = int(right)bottom = int(bottom)cv2.rectangle(image, (top, left), (right, bottom), (255, 0, 0), 2)cv2.putText(image, '{0} {1:.2f}'.format(CLASSES[cl], score),(top, left - 6),cv2.FONT_HERSHEY_SIMPLEX,0.6, (0, 0, 255), 2)def letterbox(im, new_shape=(640, 640), color=(0, 0, 0)):# Resize and pad image while meeting stride-multiple constraintsshape = im.shape[:2]  # current shape [height, width]if isinstance(new_shape, int):new_shape = (new_shape, new_shape)# Scale ratio (new / old)r = min(new_shape[0] / shape[0], new_shape[1] / shape[1])# Compute paddingratio = r, r  # width, height ratiosnew_unpad = int(round(shape[1] * r)), int(round(shape[0] * r))dw, dh = new_shape[1] - new_unpad[0], new_shape[0] - new_unpad[1]  # wh paddingdw /= 2  # divide padding into 2 sidesdh /= 2if shape[::-1] != new_unpad:  # resizeim = cv2.resize(im, new_unpad, interpolation=cv2.INTER_LINEAR)top, bottom = int(round(dh - 0.1)), int(round(dh + 0.1))left, right = int(round(dw - 0.1)), int(round(dw + 0.1))im = cv2.copyMakeBorder(im, top, bottom, left, right, cv2.BORDER_CONSTANT, value=color)  # add borderreturn im, ratio, (dw, dh)def scale_coords(img1_shape, coords, img0_shape, ratio_pad=None):# 将预测的坐标信息coords(相对img1_shape)转换回相对原图尺度(img0_shape)#:param img1_shape: 缩放后的图像大小  [H, W]=[384, 512]#:param coords: 预测的box信息 [7,4]  [anchor_nums, x1y1x2y2] 这个预测信息是相对缩放后的图像尺寸(img1_shape)的#:param img0_shape: 原图的大小  [H, W, C]=[375, 500, 3]#:param ratio_pad: 缩放过程中的缩放比例以及pad  一般不传入#:return: coords: 相对原图尺寸(img0_shape)的预测信息# Rescale coords (xyxy) from img1_shape to img0_shapeif ratio_pad is None:  # calculate from img0_shape# gain = old/new = 1.024  max(img1_shape): 求img1的较长边  这一步对应的是之前的letterbox步骤gain = max(img1_shape) / max(img0_shape)# wh padding 这一步起不起作用,完全取决于letterbox的方式# 当letterbox为letter_pad_img时,pad=(0.0, 64.0); 当letterbox为leeter_img时,pad=(0.0, 0.0)pad = (img1_shape[1] - img0_shape[1] * gain) / 2, (img1_shape[0] - img0_shape[0] * gain) / 2else:gain = ratio_pad[0][0]pad = ratio_pad[1]# 将相对img1的预测信息缩放得到相对原图img0的预测信息coords[:, [0, 2]] -= pad[0]  # x paddingcoords[:, [1, 3]] -= pad[1]  # y paddingcoords[:, :4] /= gain  # 缩放# 缩放到原图的预测结果,并对预测值进行了一定的约束,防止预测结果超出图像的尺寸clip_coords(coords, img0_shape)return coordsdef clip_coords(boxes, img_shape):# Clip bounding xyxy bounding boxes to image shape (height, width)# np.clip(c, a, b): 将矩阵c中所有的元素约束在[a, b]中间# 如果某个元素小于a,就将这个元素变为a;如果元素大于b,就将这个元素变为b# 这里将预测得到的xyxy做个约束,是因为当物体处于图片边缘的时候,预测值是有可能超过图片大小的#:param boxes: 函数开始=>缩放到原图的预测结果[7, 4]# 函数结束=>缩放到原图的预测结果,并对预测值进行了一定的约束,防止预测结果超出图像的尺寸#:param img_shape: 原图的shape [H, W, C]=[375, 500, 3]boxes[:, 0] = np.clip(boxes[:, 0], 0, img_shape[1])  # x1boxes[:, 1] = np.clip(boxes[:, 1], 0, img_shape[0])  # y1boxes[:, 2] = np.clip(boxes[:, 2], 0, img_shape[1])  # x2boxes[:, 3] = np.clip(boxes[:, 3], 0, img_shape[0])  # y2def yolov5Detection(roundNum):print('当前进程ID:{}'.format(os.getpid()))#host_name = get_host()rknn_model = 'yolov5s.rknn'# Create RKNN object#rknn = RKNN(verbose=True)#rknn_lite = RKNNLite(verbose=True) # 详细日志显示在终端上rknn_lite = RKNNLite()# load RKNN modelprint('--> Load RKNN model')ret = rknn_lite.load_rknn(rknn_model)if ret != 0:print('Load RKNN model failed')exit(ret)print('done')# Init runtime environmentprint('--> Init runtime environment')#ret = rknn.init_runtime()ret = rknn_lite.init_runtime(core_mask=RKNNLite.NPU_CORE_AUTO)# ret = rknn.init_runtime('rk3566')if ret != 0:print('Init runtime environment failed!')exit(ret)print('done')starttime = time.time()for ii in range(roundNum):print("进程{},执行第{}轮推理".format(os.getpid(), ii+1))# Set inputsimg0 = cv2.imread(IMG_PATH)img = img0.copy()img, ratio, (dw, dh) = letterbox(img, new_shape=(IMG_SIZE, IMG_SIZE))img = cv2.cvtColor(img, cv2.COLOR_BGR2RGB)img = cv2.resize(img, (IMG_SIZE, IMG_SIZE))# Inferenceprint('--> Running model')outputs = rknn_lite.inference(inputs=[img])#np.save('./onnx_yolov5_0.npy', outputs[0])#np.save('./onnx_yolov5_1.npy', outputs[1])#np.save('./onnx_yolov5_2.npy', outputs[2])print('done')# post processinput0_data = outputs[0]input1_data = outputs[1]input2_data = outputs[2]input0_data = input0_data.reshape([3, -1]+list(input0_data.shape[-2:]))input1_data = input1_data.reshape([3, -1]+list(input1_data.shape[-2:]))input2_data = input2_data.reshape([3, -1]+list(input2_data.shape[-2:]))input_data = list()input_data.append(np.transpose(input0_data, (2, 3, 0, 1)))input_data.append(np.transpose(input1_data, (2, 3, 0, 1)))input_data.append(np.transpose(input2_data, (2, 3, 0, 1)))boxes, classes, scores = yolov5_post_process(input_data) # 此时检测框为缩放后的尺寸img1_shape = img.shape  # letterbox缩放后的图片尺寸img0_shape = img0.shape  # 原始图片尺寸boxes = self.scale_coords(img1_shape, boxes, img0_shape)  # 将缩放后图片上的预测结果,调整到原图片尺寸上#img_1 = cv2.cvtColor(img, cv2.COLOR_RGB2BGR)img_1 = img0.copy()if boxes is not None:draw(img_1, boxes, scores, classes) # 在原图上做检测框#cv2.imwrite('res.jpg', img_1)# show output# cv2.imshow("post process result", img_1)# cv2.waitKey(0)# cv2.destroyAllWindows()#time.sleep(0.001)endtime = time.time()print("进程Pid:{}, 总耗时{}秒,单轮平均耗时{}秒".format(os.getpid(), endtime-starttime, (endtime-starttime) / float(roundNum)))rknn_lite.release()if __name__ == '__main__':roundNum = 1000total = 9processes = []for i in range(total):myprocess = multiprocessing.Process(target=yolov5Detection,args=(roundNum,))processes.append(myprocess)for i in range(total):processes[i].daemon = Trueprocesses[i].start()for _ in range(roundNum):print('主进程pid:{},当前共有{}个子进程'.format(os.getpid(), total))time.sleep(1)
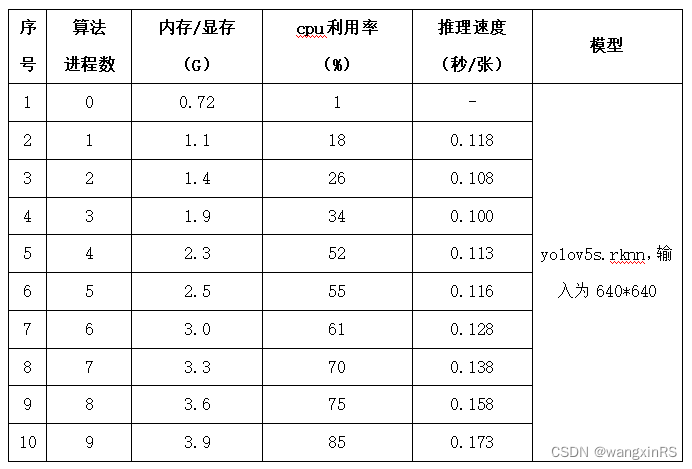
3. 性能测试
以下测试为1000次循环yolov5的图片读取、推理、后处理等步骤,下文的推理速度为单次读取、推理和后处理等完整流程的总耗时。
相关文章:
瑞芯微RK3588开发板:虚拟机yolov5模型转化、开发板上python脚本调用npu并部署 全流程
目录 0. 背景1. 模型转化1.1 基础环境1.2 创建python环境1.3 将yolov5s.pt转为yolov5s.onnx1.4 将yolov5s.onnx转为yolov5s.rknn 2. 开发板部署2.1. c版本2.1. python版本(必须是python 3.9) 3. 性能测试 0. 背景 全面国产化,用瑞芯微rk3588…...

【Redis专题】RedisCluster集群运维与核心原理剖析
目录 课程内容一、Redis集群架构模型二、Redis集群架构搭建(单机搭建)2.1 在服务器下新建各个节点的配置存放目录2.2 修改配置(以redis-8001.conf为例) 三、Java代码实战四、Redis集群原理分析4.1 槽位定位算法4.2 跳转重定位4.3 …...

我眼中的《视觉测量技术基础》
为什么会写这篇博客: 首先给大家说几点:看我的自我介绍对于学习这本书没有任何帮助,如果你是为了急切的想找一个视觉测量的解决方案那可以跳过自我介绍往下看或者换一篇博客看看,如果你是刚入门想学习计算机视觉的同学࿰…...

【Cisco Packet Tracer】管理方式,命令,接口trunk,VLAN
💐 🌸 🌷 🍀 🌹 🌻 🌺 🍁 🍃 🍂 🌿 🍄🍝 🍛 🍤 📃个人主页 :阿然成长日记 …...
深入协议栈了解TCP的三次握手、四次挥手、CLOSE-WAIT、TIME-WAIT。
TCP网络编程的代码网上很多,这里就不再赘述,简单用一个图展示一下tcp网络编程的流程: 1、深入connect、listen、accept系统调用,进一步理解TCP的三次握手 这三个函数都是系统调用,我们可以分为请求连接方和被…...
接口自动化测试系列-yml管理测试用例
项目源码 目录结构及项目介绍 整体目录结构,目录说明参考 测试用例结构类似httprunner写法,可参考demo 主要核心函数 用例读取转换json import yaml import main import os def yaml_r():curpath f{main.BASE_DIR}/quality_management_logic/ops_ne…...

开源对象存储系统minio部署配置与SpringBoot客户端整合访问
文章目录 1、MinIO安装部署1.1 下载 2、管理工具2.1、图形管理工具2.2、命令管理工具2.3、Java SDK管理工具 3、MinIO Server配置参数3.1、启动参数:3.2、环境变量3.3、Root验证参数 4、MinIO Client可用命令 官方介绍: MinIO 提供高性能、与S3 兼容的对…...
Matlab之数组字符串函数汇总
一、前言 在MATLAB中,数组字符串是指由字符组成的一维数组。字符串可以包含字母、数字、标点符号和空格等字符。MATLAB提供了一些函数和操作符来创建、访问和操作字符串数组。 二、字符串数组具体怎么使用? 1、使用单引号或双引号括起来的字符序列 例…...
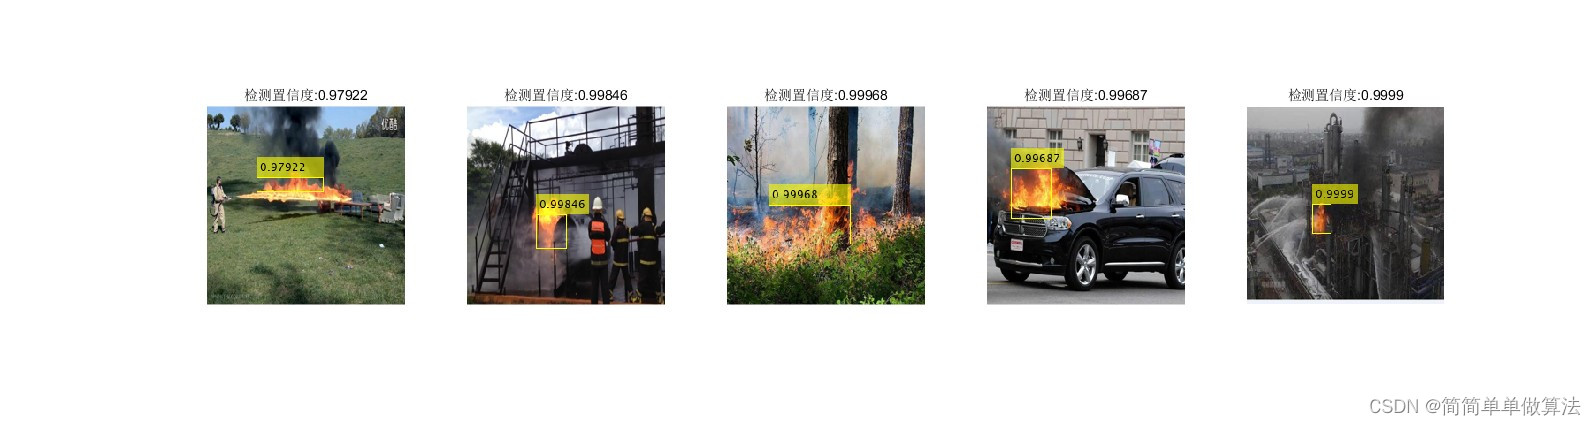
基于深度学习网络的火灾检测算法matlab仿真
目录 1.算法运行效果图预览 2.算法运行软件版本 3.部分核心程序 4.算法理论概述 5.算法完整程序工程 1.算法运行效果图预览 2.算法运行软件版本 matlab2022a 3.部分核心程序 ................................................................................ load F…...

【Linux】高级IO和多路转接 | select/poll/epoll
多路转接和高级IO 咳咳,写的时候出了点问题,标点符号全乱了(批量替换了几次),干脆就把全文的逗号和句号都改成英文的了(不然代码块里面的代码都是中文标点就跑不动了) 1.高级IO 1.1 五种IO模型…...

el-select 支持多选 搜索远程数据 组件抽取
el-select 支持多选 搜索远程数据 组件抽取 使用方式 import selectView from ./components/selectView<el-form><el-form-item label"选择器"><selectView v-model"selValue" change"handleChange"></el-form-item> …...

el-table纵向垂直表头
参考:https://www.jianshu.com/p/1f38eaffd070 <el-tablestyle"width: 100%":data"getValues":show-header"false"border:cell-style"cellStyle" ><el-table-columnv-for"(item, index) in getHeaders"…...

Pinyin4j介绍和简单使用
前言 Pinyin4j是一个Java库,用于将汉字转换为拼音。它是由中国清华大学的Tsinghua University和中国科学院计算技术研究所的研究人员开发的。Pinyin4j可以用于Java应用程序中,以便在需要时将汉字转换为拼音。例如,它可以用于中文输入法、文本…...

【数据结构】查找
【数据结构】查找 数据结构中,有顺序查找、二分查找、散列查找、插值查找、斐波那契额查找 1.顺序查找 条件:待查找的元素与数组中的元素按顺序排列。算法:从数组的第一个元素开始,逐个比较,直到找到目标元素或遍历完…...

第一次面试
1.多态的原理 2.编译原理 3.HTTPS的加密原理 4.说一说C11新特性 5.平时用过哪些STL容器 6.STL的比较器 原来就是自定义工具类hhhhhh 7.函数指针用过吗 8.I/O多路复用 9.Redis 问的基本都背过,但是一紧张啥都忘了hhhhhhhhh...
Nacos配置文件更新+热更新+多环境配置共享+集群搭建
对服务配置文件 场景: 如果多个服务对应的配置文件都需要更改时,可以利用配置管理,方便对配置文件进行更新,而且是在本地配置前先读取nacos的配置文件,优先级大于本地配置文件 配置步骤 1.首先在Nacos中的配置列表中增…...
李宏毅-机器学习hw4-self-attention结构-辨别600个speaker的身份
一、慢慢分析学习pytorch中的各个模块的参数含义、使用方法、功能: 1.encoder编码器中的nhead参数: self.encoder_layer nn.TransformerEncoderLayer( d_modeld_model, dim_feedforward256, nhead2) 所以说,这个nhead的意思,就…...

记一次使用NetworkManager管理Ubuntu网络无效问题分析
我们都知道CentOS、Redhat系列网络配置比较连贯,要么在/etc/sysconfig/network-scripts/ifcfg-网络设备名,文件中编辑后,重启网络服务;要么使用nmtui或者nmcli进行配置。但是,Ubuntu变动就比较大: 早期版本…...
Nginx重写功能
Nginx重写功能 一、Nginx常见模块二、访问路由location2.1location常用正则表达式2.2、location的分类2.3、location常用的匹配规则2.4、location优先级排列说明2.5、location示例2.6、location优先级总结2.7、实例2.7.1、location/{}与location/{}2.7.2、location/index.html{…...
王道考研计算机网络
文章目录 计算机网络体系结构计算机网络概述计算机网络的性能指标 计算机网络体系结构与参考模型错题 物理层通信基础基础概念奈奎斯特定理和香农定理编码与调制电路交换、报文交换和分组交换数据报与虚电路 传输介质物理层设备错题 数据链路层数据链路层的功能组帧差错控制检错…...

MKS Robin Nano Marlin 2.0固件架构解析与性能调优指南
MKS Robin Nano Marlin 2.0固件架构解析与性能调优指南 【免费下载链接】Mks-Robin-Nano-Marlin2.0-Firmware The firmware of Mks Robin Nano, based on Marlin-2.0.x, adding the color GUI. 项目地址: https://gitcode.com/gh_mirrors/mk/Mks-Robin-Nano-Marlin2.0-Firmwa…...

长期使用Taotoken Token Plan套餐对项目开发成本的实际影响
🚀 告别海外账号与网络限制!稳定直连全球优质大模型,限时半价接入中。 👉 点击领取海量免费额度 长期使用Taotoken Token Plan套餐对项目开发成本的实际影响 1. 从按需付费到固定预算的转变 在项目开发中引入大模型能力…...

别再被Word折磨了!百考通AI让你像“玩填空”一样搞定本科论文
论文写作不再是一座孤岛,而是一次有条不紊的旅程 又到了一年毕业季,朋友圈里开始交替出现两种状态:一种是晒答辩通过、手捧鲜花与导师合影的“上岸”喜讯,另一种则是深夜凌晨发出的、配着空白 Word 文档截图的“崩溃文学”。 “开…...

3步完成B站缓存视频转换:m4s转MP4的终极免费解决方案
3步完成B站缓存视频转换:m4s转MP4的终极免费解决方案 【免费下载链接】m4s-converter 一个跨平台小工具,将bilibili缓存的m4s格式音视频文件合并成mp4 项目地址: https://gitcode.com/gh_mirrors/m4/m4s-converter 你是否曾为B站视频下架而痛心不…...

大模型推理全链路拆解
从 token 调度到采样输出,追踪每一步张量维度的变化,搞懂 LLM 推理到底在算什么 01 为什么需要 Continuous Batching 批处理能提升 GPU 利用率——复用权重来均摊显存访问开销。但生成式任务的输出序列长度不可预测且差异巨大,传统"齐…...

Kafka Connect集群部署踩坑实录:从单机到高可用的完整配置与监控方案
Kafka Connect生产级部署实战:高可用架构设计与监控体系构建 当数据管道成为企业核心基础设施时,Kafka Connect的稳定性直接关系到业务连续性。去年某电商大促期间,因单点故障导致数据同步延迟6小时的教训仍历历在目——这正是我们需要深入探…...

防火墙和手动启动都试了?ArcGIS License Server无响应,可能是这两个核心文件在捣鬼
ArcGIS许可服务故障深度解析:当核心文件成为隐形杀手 当你面对ArcGIS License Server无响应的红色报错框,已经尝试了关闭防火墙、调整服务配置、甚至重启服务器等一系列标准操作后,那个令人沮丧的"cannot connect to license server sys…...

树莓派机械爪项目实战:从硬件连接到Python控制全解析
1. 项目概述:当树莓派遇上机械爪最近在折腾一个挺有意思的小项目,叫Demwunz/openclaw-pi-installation。光看这个名字,就能猜到个大概:这是一个为树莓派(Raspberry Pi)准备的机械爪(Claw&#x…...

基于IMAP的邮件自动化处理工具mymailclaw配置与实战指南
1. 项目概述:一个轻量级的邮件抓取与处理工具最近在折腾一个需要自动化处理邮件通知的小项目,发现市面上的方案要么太重,要么不够灵活。直到我遇到了psandis/mymailclaw这个项目,它就像一把小巧而锋利的瑞士军刀,专门用…...

AI编程助手CodeBuddy:VS Code扩展的架构、部署与高效使用指南
1. 项目概述:CodeBuddy,你的AI编程伙伴最近在GitHub上看到一个挺有意思的项目,叫codebuddy,作者是olasunkanmi-SE。光看名字就能猜个大概——“代码伙伴”,这显然是一个旨在辅助编程的工具。作为一个在开发一线摸爬滚打…...