【android 蓝牙开发——蓝牙耳机】
【android 蓝牙开发——传统蓝牙】
【android 蓝牙开发——BLE(低功耗)蓝牙 2021-10-09更新】
总结一下蓝牙开发的基本使用以及蓝牙耳机的断开和链接。
所以需权限:
<uses-permission android:name="android.permission.ACCESS_FINE_LOCATION" /><uses-permission android:name="android.permission.ACCESS_COARSE_LOCATION" /><uses-permission android:name="android.permission.BLUETOOTH" /><uses-permission android:name="android.permission.BLUETOOTH_ADMIN" /> <!-- Android12 的蓝牙权限 如果您的应用与已配对的蓝牙设备通信或者获取当前手机蓝牙是否打开 --><uses-permission android:name="android.permission.BLUETOOTH_CONNECT" /> <!-- Android12 的蓝牙权限 如果您的应用查找蓝牙设备(如蓝牙低功耗 (BLE) 外围设备) --><uses-permission android:name="android.permission.BLUETOOTH_SCAN" /> <!-- Android12 的蓝牙权限 如果您的应用使当前设备可被其他蓝牙设备检测到 --><uses-permission android:name="android.permission.BLUETOOTH_ADVERTISE" />
注意这里需要位置权限。
开启权限:
ActivityResultLauncher<Intent> bluetoothOpenLaunch;private void startBluetooth() {bluetoothOpenLaunch = registerForActivityResult(new ActivityResultContracts.StartActivityForResult(), new ActivityResultCallback<ActivityResult>() {@Overridepublic void onActivityResult(ActivityResult result) {System.out.println("MainActivity.onActivityResult" + result.getResultCode());if (Activity.RESULT_OK == result.getResultCode()) {getPermission();}}});Intent intent = new Intent(BluetoothAdapter.ACTION_REQUEST_ENABLE);if (Build.VERSION.SDK_INT >= Build.VERSION_CODES.S) {ArrayList<String> arrayListOf = new ArrayList<>();arrayListOf.add(Manifest.permission.BLUETOOTH_CONNECT);PermissionUtils.permission(String.valueOf(arrayListOf)).callback(new PermissionUtils.SimpleCallback() {@Overridepublic void onGranted() {System.out.println("MainActivity.onGranted");bluetoothOpenLaunch.launch(intent);}@Overridepublic void onDenied() {System.out.println("MainActivity.onDenied");ToastUtils.showLong("请开启蓝牙权限");}}).request();} else {bluetoothOpenLaunch.launch(intent);}}private void getPermission() {ArrayList<String> arrayListOf = new ArrayList<>();if (Build.VERSION.SDK_INT >= Build.VERSION_CODES.S) {arrayListOf.add(Manifest.permission.BLUETOOTH_SCAN);arrayListOf.add(Manifest.permission.BLUETOOTH_CONNECT);arrayListOf.add(Manifest.permission.BLUETOOTH_ADVERTISE);}arrayListOf.add(Manifest.permission.BLUETOOTH);arrayListOf.add(Manifest.permission.BLUETOOTH_ADMIN);arrayListOf.add(Manifest.permission.ACCESS_FINE_LOCATION);arrayListOf.add(Manifest.permission.ACCESS_COARSE_LOCATION);PermissionUtils.permission(String.valueOf(arrayListOf)).callback(new PermissionUtils.SimpleCallback() {@Overridepublic void onGranted() {ToastUtils.showLong("蓝牙相关权限已成功授权");BluetoothManager blueManager = (BluetoothManager) getSystemService(Context.BLUETOOTH_SERVICE);//mBluetoothAdapter = BluetoothAdapter.getDefaultAdapter()mBluetoothAdapter = blueManager.getAdapter();}@Overridepublic void onDenied() {ToastUtils.showLong("请开启蓝牙权限");}}).request();}
监听蓝牙连接配对等相关广播,建议直接采用以下方式:(也有其他方法,搜索低功耗蓝牙的方式 startLeScan )
//注册BoradcasrReceiverprivate void registerReceiver() {IntentFilter discoveryFilter = new IntentFilter();discoveryFilter.addAction(BluetoothAdapter.ACTION_DISCOVERY_STARTED);discoveryFilter.addAction(BluetoothAdapter.ACTION_DISCOVERY_FINISHED);discoveryFilter.addAction(BluetoothAdapter.ACTION_CONNECTION_STATE_CHANGED);discoveryFilter.addAction(BluetoothAdapter.ACTION_STATE_CHANGED);discoveryFilter.addAction(BluetoothDevice.ACTION_PAIRING_REQUEST);discoveryFilter.addAction(BluetoothDevice.ACTION_BOND_STATE_CHANGED);discoveryFilter.addAction(BluetoothDevice.ACTION_FOUND);registerReceiver(discoveryReceiver, discoveryFilter);}//蓝牙搜索广播的接收器@SuppressLint("MissingPermission")private BroadcastReceiver discoveryReceiver = new BroadcastReceiver() {String pin = "0000"; //此处为你要连接的蓝牙设备的初始密钥,一般为 1234 或 0000@Overridepublic void onReceive(Context context, Intent intent) {String action = intent.getAction();BluetoothDevice bluetoothDevice = intent.getParcelableExtra(BluetoothDevice.EXTRA_DEVICE); //获取设备,发现远程蓝牙设备if (BluetoothAdapter.ACTION_DISCOVERY_STARTED.equals(action)) {Log.i(TAG, "onReceive: 开始搜索");} else if (BluetoothAdapter.ACTION_DISCOVERY_FINISHED.equals(action)) {Log.i(TAG, "onReceive: 搜索结束");} else if (BluetoothDevice.ACTION_FOUND.equals(action)) {// //获取扫描到的设备String name = bluetoothDevice.getName();String address = bluetoothDevice.getAddress();Log.i(TAG, "onReceive: name=" + name + " address=" + address);/*if (bluetoothDevice.getBondState() == BluetoothDevice.BOND_BONDED) {Log.i(TAG, "已配对 onReceive: name=" + name + " address=" + address);} else {}*///已经配对boolean isExist = false;for (DeviceBean device : bluetoothDevices) {if (device.getAddress().equals(address)) {isExist = true;}}if (!isExist) {bluetoothDevices.add(new DeviceBean(name, address));mAdapter.notifyDataSetChanged();}} else if (BluetoothDevice.ACTION_BOND_STATE_CHANGED.equals(action)) {//Log.i(TAG, "onReceive: 绑定状态改变");int state = intent.getIntExtra(BluetoothDevice.EXTRA_BOND_STATE, BluetoothDevice.ERROR);Log.i(TAG, "onReceive: 绑定状态改变 state=" + state);if (state == 12) {Log.i(TAG, "onReceive: 绑定成功 ");ToastUtils.showLong("绑定成功");String name = bluetoothDevice.getName();String address = bluetoothDevice.getAddress();boolean isExist = false;for (DeviceBean device : pairedDevices) {if (device.getAddress().equals(address)) {isExist = true;}}if (!isExist) {/*for (DeviceBean device : pairedDevices) {device.setStatus(false);}*/DeviceBean deviceBean = new DeviceBean(name, address);deviceBean.setStatus(true);pairedDevices.add(0, deviceBean);mDevicePairedAdapter.notifyDataSetChanged();} else {for (DeviceBean device : pairedDevices) {if (device.getAddress().equals(address)) {device.setStatus(true);mDevicePairedAdapter.notifyDataSetChanged();break;}}}}} else if (BluetoothAdapter.ACTION_CONNECTION_STATE_CHANGED.equals(action)) {//Log.i(TAG, "onReceive: 连接状态改变");int state = intent.getIntExtra(BluetoothAdapter.EXTRA_CONNECTION_STATE, BluetoothAdapter.ERROR);String name = bluetoothDevice.getName();String address = bluetoothDevice.getAddress();Log.i(TAG, "onReceive: 连接状态改变 state=" + state);switch (state) {case 0://断开成功for (DeviceBean device : pairedDevices) {if (device.getAddress().equals(address)) {device.setStatus(false);mDevicePairedAdapter.notifyDataSetChanged();break;}}break;//case 1: break;case 2://连接成功Log.i(TAG, "onReceive: 连接成功 address=" + address);ToastUtils.showLong("连接成功");for (DeviceBean device : pairedDevices) {if (device.getAddress().equals(address)) {device.setStatus(true);mDevicePairedAdapter.notifyDataSetChanged();break;}}break;default:break;}} else if (BluetoothDevice.ACTION_PAIRING_REQUEST.equals(action)) {Log.i(TAG, "onReceive: 配对");try {// bluetoothDevice.setPairingConfirmation(true);// abortBroadcast();// bluetoothDevice.setPin(pin.getBytes());//1:/* ClsUtils.setPairingConfirmation(bluetoothDevice.getClass(),bluetoothDevice,true);//2:如果没有将广播终止,则会出现一个一闪而过的配对框。abortBroadcast();//3.调用setPin方法进行配对..boolean ret = ClsUtils.setPin(bluetoothDevice.getClass(), bluetoothDevice, pin);System.out.println("ConnectingDevicesActivity.onReceive ret="+ret);*/} catch (Exception e) {throw new RuntimeException(e);}} else if (BluetoothAdapter.ACTION_STATE_CHANGED.equals(action)) {Log.i(TAG, "onReceive: 蓝牙开关状态改变");int state = intent.getIntExtra(BluetoothAdapter.EXTRA_STATE, BluetoothAdapter.ERROR);switch (state) {case BluetoothAdapter.STATE_OFF:break;case BluetoothAdapter.STATE_ON:break;}} else {Log.i(TAG, "onReceive: else action=" + action);}}};我们也可以获取已配对蓝牙列表:
private void initData() {Set<BluetoothDevice> bondedDevices = mBluetoothAdapter.getBondedDevices();if (bondedDevices != null && bondedDevices.size() > 0) {for (BluetoothDevice bondedDevice : bondedDevices) {System.out.println("ConnectingDevicesActivity.initData name==" + bondedDevice.getName());DeviceBean deviceBean = new DeviceBean(bondedDevice.getName(), bondedDevice.getAddress());pairedDevices.add(deviceBean);}mDevicePairedAdapter.notifyDataSetChanged();}}
蓝牙耳机断开和连接的具体方法:
public boolean isDisconnected = false;/*** 断开蓝牙设备连接** @param bluetoothDevice BluetoothDevice*/public void disconnect(BluetoothDevice bluetoothDevice) {currentBluetoothDevice = bluetoothDevice;//获取A2DP代理对象mBluetoothAdapter.getProfileProxy(this, disconnectProfileServiceListener, BluetoothProfile.HEADSET);//获取HEADSET代理对象mBluetoothAdapter.getProfileProxy(this, disconnectProfileServiceListener, BluetoothProfile.A2DP);}private final BluetoothProfile.ServiceListener disconnectProfileServiceListener = new BluetoothProfile.ServiceListener() {@Overridepublic void onServiceDisconnected(int profile) {System.out.println("ConnectingDevicesActivity.onServiceDisconnected profile="+profile);}@Overridepublic void onServiceConnected(int profile, BluetoothProfile proxy) {try {if (profile == BluetoothProfile.HEADSET) {//使用HEADSET的协议断开蓝牙设备(使用了反射技术调用断开的方法)BluetoothHeadset bluetoothHeadset = (BluetoothHeadset) proxy;boolean isDisConnect = false;try {Method connect = null;if (isDisconnected) {connect = bluetoothHeadset.getClass().getDeclaredMethod("disconnect", BluetoothDevice.class); //disconnect connect} else {connect = bluetoothHeadset.getClass().getDeclaredMethod("connect", BluetoothDevice.class); //disconnect connect}connect.setAccessible(true);isDisConnect = (boolean) connect.invoke(bluetoothHeadset, currentBluetoothDevice);if (isDisconnected) {Log.d(TAG, "isDisConnect:" + (isDisConnect ? "断开通话成功" : "断开通话失败") + currentBluetoothDevice.getName());} else {Log.d(TAG, "isDisConnect:" + (isDisConnect ? "链接通话成功" : "链接通话失败") + currentBluetoothDevice.getName());}} catch (Exception e) {e.printStackTrace();}}if (profile == BluetoothProfile.A2DP) {//使用A2DP的协议断开蓝牙设备(使用了反射技术调用断开的方法)BluetoothA2dp bluetoothA2dp = (BluetoothA2dp) proxy;boolean isDisConnect = false;try {Method connect = null;if (isDisconnected) {connect = bluetoothA2dp.getClass().getDeclaredMethod("disconnect", BluetoothDevice.class);} else {connect = bluetoothA2dp.getClass().getDeclaredMethod("connect", BluetoothDevice.class);}connect.setAccessible(true);isDisConnect = (boolean) connect.invoke(bluetoothA2dp, currentBluetoothDevice);if (isDisconnected) {Log.d(TAG, "isDisConnect:" + (isDisConnect ? "断开音频成功" : "断开音频失败") + currentBluetoothDevice.getName());} else {Log.d(TAG, "isDisConnect:" + (isDisConnect ? "链接音频成功" : "链接音频失败") + currentBluetoothDevice.getName());}} catch (Exception e) {e.printStackTrace();}if (isDisConnect) {for (DeviceBean device : pairedDevices) {if (device.getAddress().equals(currentBluetoothDevice.getAddress())) {device.setStatus(!isDisconnected);mDevicePairedAdapter.notifyDataSetChanged();break;}}}}} catch (Exception e) {e.printStackTrace();}}};
源码
相关文章:

【android 蓝牙开发——蓝牙耳机】
【android 蓝牙开发——传统蓝牙】 【android 蓝牙开发——BLE(低功耗)蓝牙 2021-10-09更新】 总结一下蓝牙开发的基本使用以及蓝牙耳机的断开和链接。 所以需权限: <uses-permission android:name"android.permission.ACCESS_FIN…...
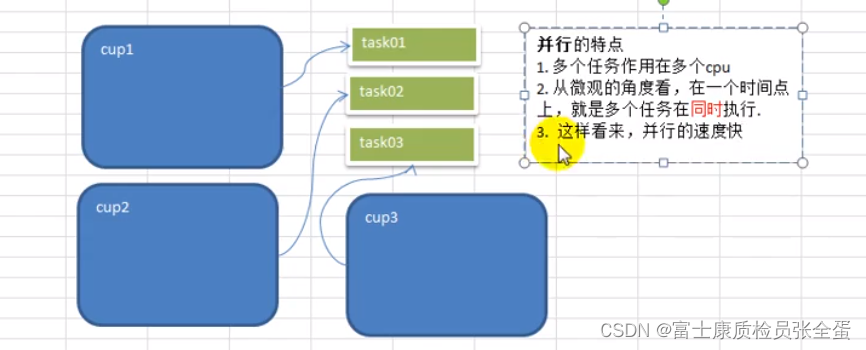
Golang goroutine 进程、线程、并发、并行
goroutine 看一个需求 需求:要求统计1-200000000000的数字中,哪些是素数? 分析思路: 1)传统的方法,就是使用一个循环,循环的判断各个数是不是素数(一个任务就分配给一个cpu去做,这样很不划算…...
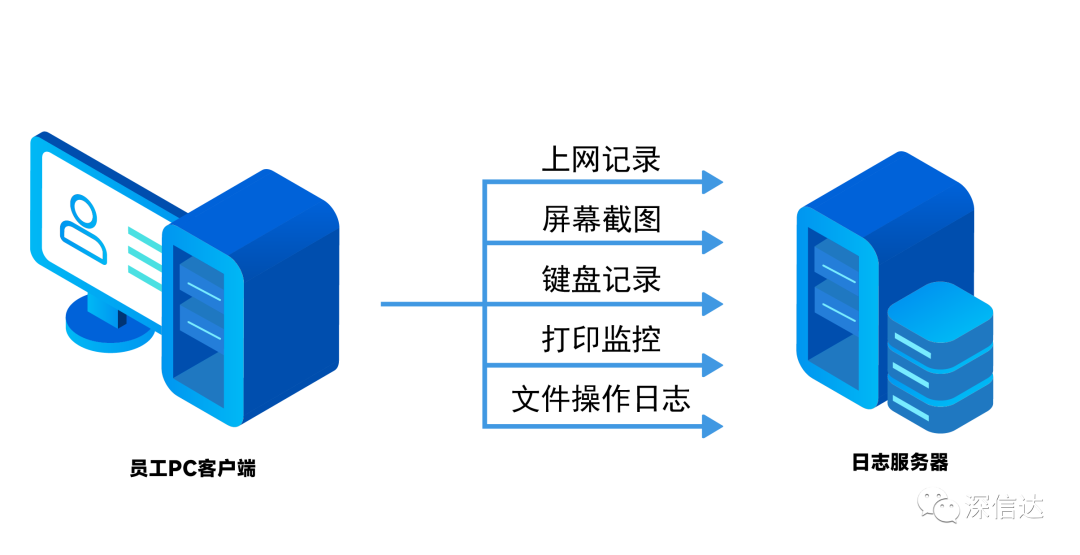
如何做到安全上网
随着信息化的发展,企业日常办公越来越依赖互联网,而访问互联网过程中,会遇到各种各样不容忽视的风险,例如员工主动故意的数据泄漏,后台应用程序偷偷向外部发信息,木马间谍软件的外联,以及各种挖…...
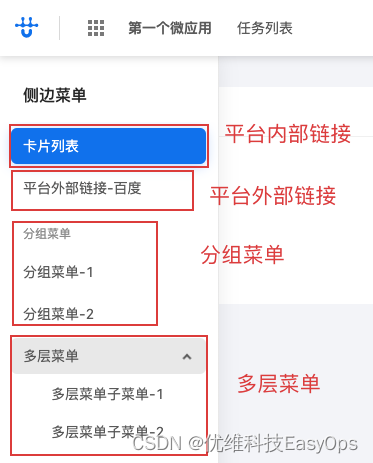
优维低代码实践:菜单
优维低代码技术专栏,是一个全新的、技术为主的专栏,由优维技术委员会成员执笔,基于优维7年低代码技术研发及运维成果,主要介绍低代码相关的技术原理及架构逻辑,目的是给广大运维人提供一个技术交流与学习的平台。 优维…...

git merge 如何撤销
如果只是 git merge 未进行其他 git 操作,可以使用 git merge --abort 撤销如果 git merge 之后,再 git add,可以使用 git reset HEAD 或 git reset HEAD file (前者多个文件,后者单个文件)如果 git merge 之后,再 git…...
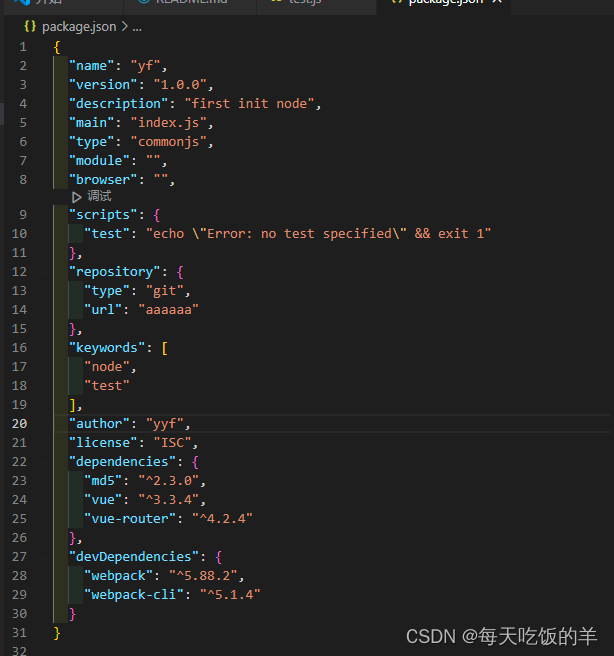
解读package.json 中的功能
使用 npm init 比较全 一步一步的走,用于完成 package.json 中的各个声明 npm init -y 生成简易的模板下面解读下 package.json 中的功能"version": "1.0.0", //版本号1. 主版本号:非常大的改动 vue2 和 vue3 的改变 2. 功能的升级,…...
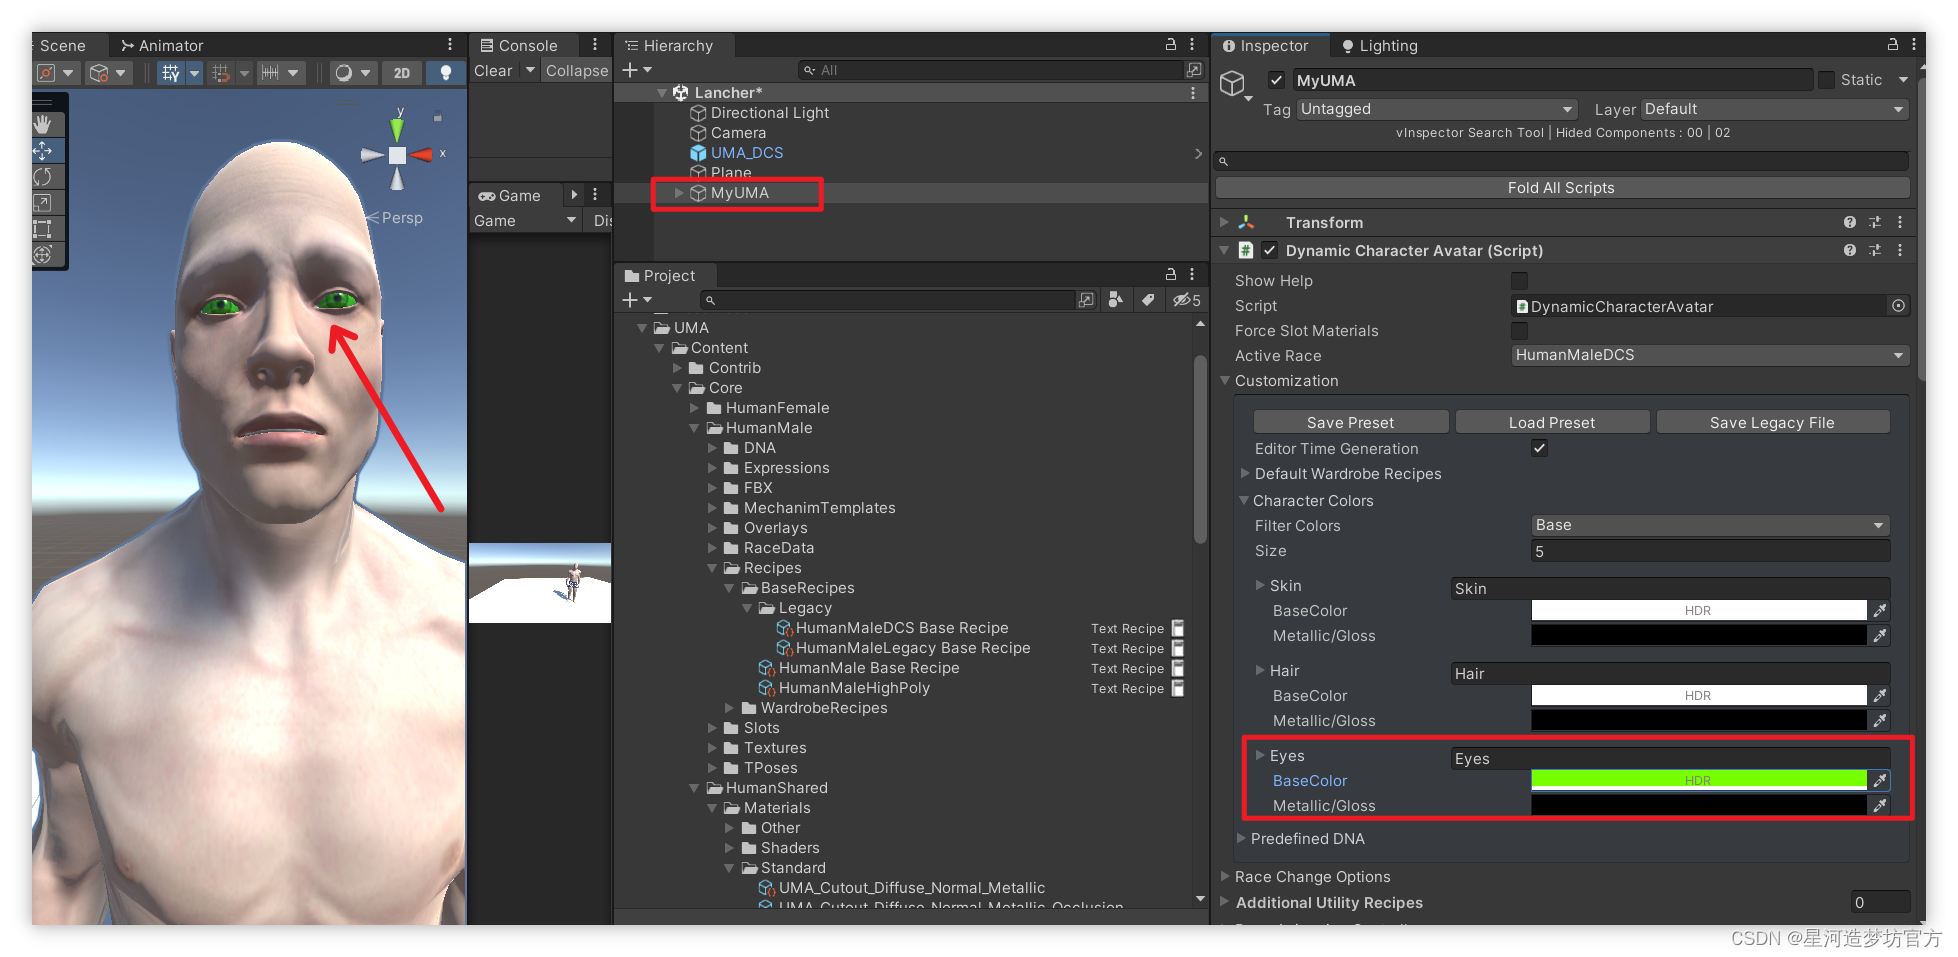
UMA 2 - Unity Multipurpose Avatar☀️四.UMA人物部位的默认颜色和自定义(共享)颜色
文章目录 🟥 人物颜色介绍1️⃣ 使用默认颜色2️⃣ 使用自定义颜色🟧 UMA自定义颜色的作用🟨 自定义颜色还可作为共享颜色🟥 人物颜色介绍 UMA不同部位的颜色分为默认的内置颜色和我们新定义的颜色. 1️⃣ 使用默认颜色 比如不勾选UseSharedColor时,使用的眼睛的默认…...
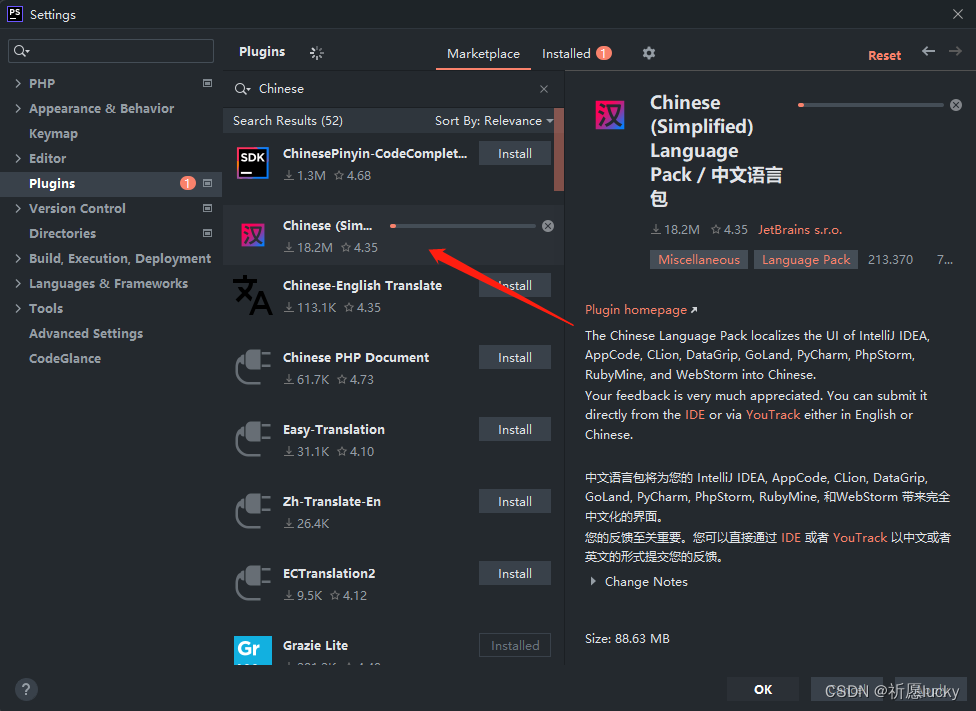
phpstorm配置php运行环境
1,首先安装phpstrom,按照提示的步骤一步一步来就行 2,新建一个项目然后在里面找到这个位置 3,找到php所在的位置,找不到就直接在搜索框中搜索 4,这里要配置php的运行环境,一定要记得自己安装软…...

算法训练营day49|动态规划 part10:(LeetCode 121. 买卖股票的最佳时机、122.买卖股票的最佳时机II)
121. 买卖股票的最佳时机 题目链接🔥 给定一个数组 prices ,它的第 i 个元素 prices[i] 表示一支给定股票第 i 天的价格。 你只能选择 某一天 买入这只股票,并选择在 未来的某一个不同的日子 卖出该股票。设计一个算法来计算你所能获取的最大…...

Swagger 使用教程
Swagger 官网: API Documentation & Design Tools for Teams | Swagger 整合swagger 依赖: springfox-swagger2 springfox-swagger-ui <dependency> <groupId>io.springfox</groupId> <artifactId>springfox-swagger2</a…...

单例模式-饿汉模式、懒汉模式
单例模式,是设计模式的一种。 在计算机这个圈子中,大佬们针对一些典型的场景,给出了一些典型的解决方案。 目录 单例模式 饿汉模式 懒汉模式 线程安全 单例模式 单例模式又可以理解为是单个实例(对象) 在有些场…...
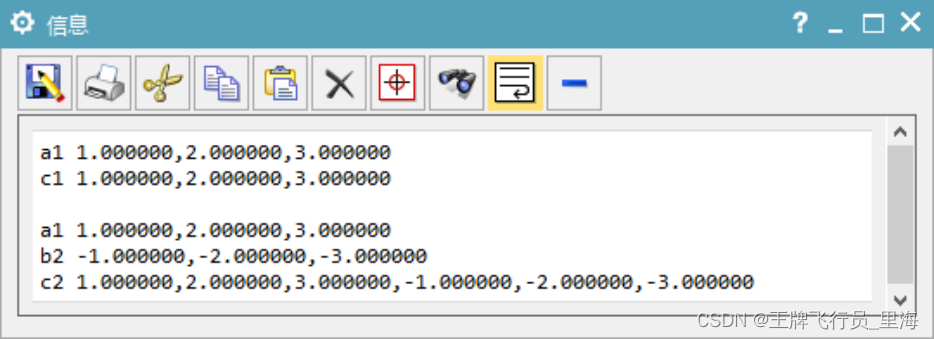
UG\NX二次开发 复制3元素的double数组到另一个数组 UF_VEC3_copy
文章作者:里海 来源网站:王牌飞行员_里海_里海NX二次开发3000例,里海BlockUI专栏,C\C++-CSDN博客 简介: UG\NX二次开发 复制3元素的double数组到另一个数组 UF_VEC3_copy。仔细看第二段代码 。 效果: 代码: #include "me.hpp"void ufusr(char* param, …...
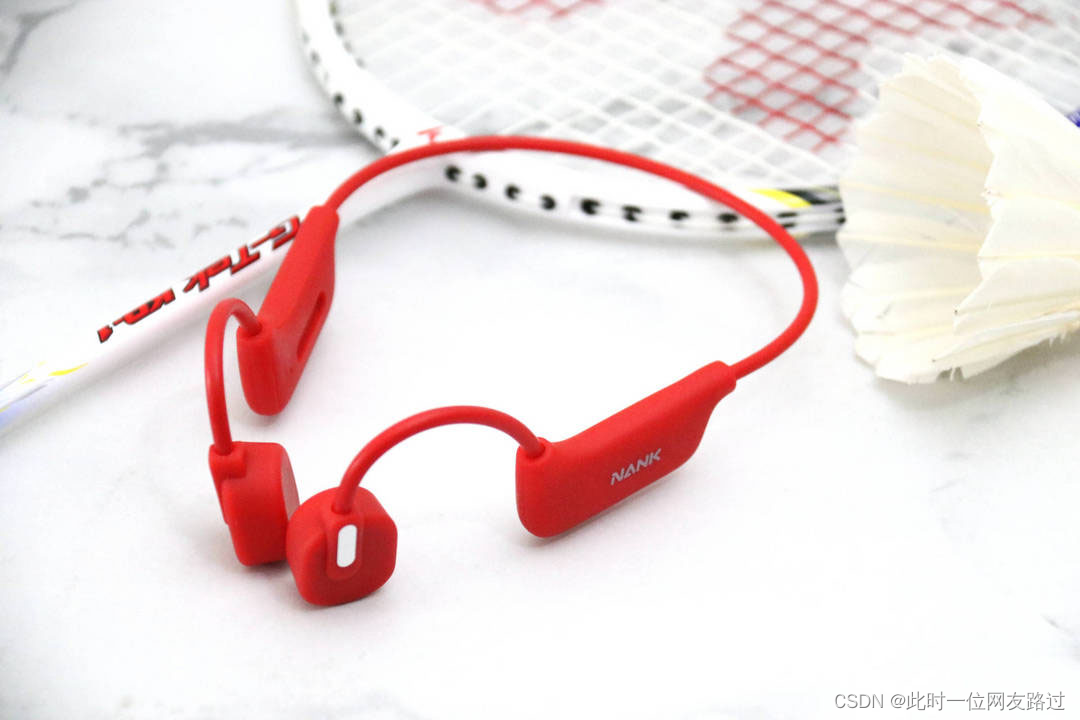
骨传导耳机对人体有危险吗?会损害听力吗?
如果在使用骨传导耳机的时候控制好时间和音量,是不会对人体带来危险和造成伤害的。 下面跟大家解释一下为什么骨传导耳机对人体没有危害,最大的原因就是骨传导耳机不需要空气传导,而是通过颅骨传到听觉中枢,传输过程中几乎没有噪…...
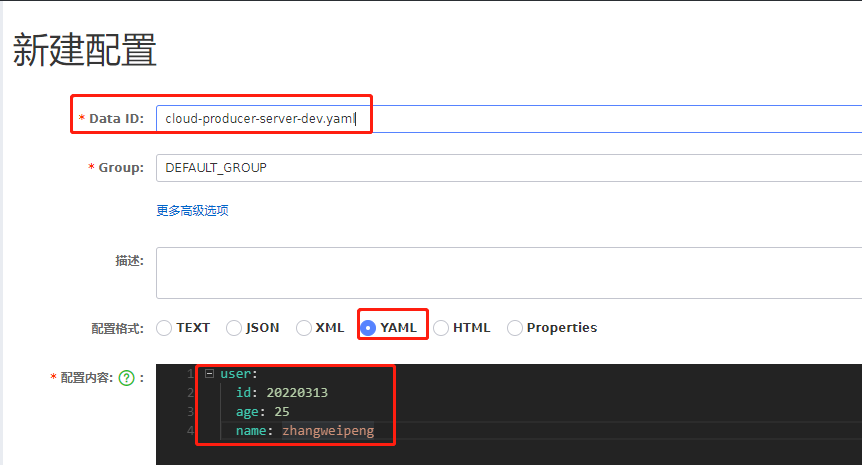
Spring Boot @Value读不到Nacos配置中心的值。(properties配置文件)
读不到配置中心的值, 配置中心的配置文件名字(Data ID的值)要以.properties结尾。 如果是yaml,就以yaml命名。...

Rocky Linux怎么安装mysql
Rocky Linux怎么安装mysql 在Rocky Linux上安装MySQL可以通过以下步骤实现: 更新软件包列表 ⭐️⭐️⭐️必要的,必须更新,更新会顺利很多!!!⭐️⭐️⭐️ 在安装MySQL之前,建议先更新软件包…...

轻量级软件FastGithub实现稳定访问github
当我们想访问全球最大的“同性交友网站”https://github.com/ 时,总会出现无法访问的界面,令人非常苦恼:幸运的是,有一种轻量级的软件可以帮助我们稳定地访问GitHub,那就是FastGithub。 什么是FastGithub?…...
芯科蓝牙BG27开发笔记6-精简第一个程序
1. 这些IO的控制代码在哪里? 还是蓝牙点灯程序: 首先需要对pinout做一些精简: 为了简化工程,去掉了不必要的IO。 至于PTI接口是什么,怎么用,不知道,现在不考虑: 但是提出以下问题…...

Android8.1 hal 加载wifi ko模块流程
Android如果发现wifi没有正常启动,从下面两个方面 1.是否正常编译出wifi ko文件,如果没有,说明编译的有问题,ko文件的地址vendor/lib/module/devices/wifi 2.如果有编译出ko文件,但还提示Wifi HAL start failed之类的…...
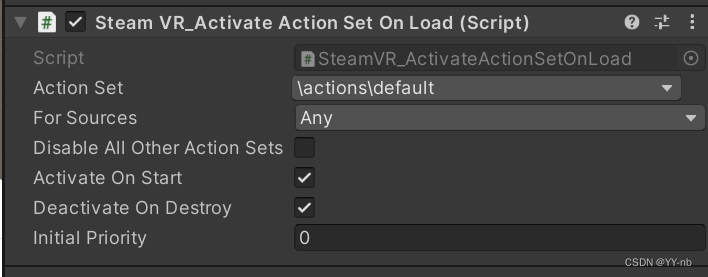
Unity SteamVR 开发教程:SteamVR Input 输入系统(2.x 以上版本)
文章目录 📕前言📕教程说明📕导入 SteamVR 插件📕SteamVR Input 窗口⭐action.json 文件⭐窗口面板⭐SteamVR_Input 目录 📕SteamVR 动作的类型⭐Boolean⭐Single⭐Vector2⭐Vector3⭐Pose⭐Skeleton⭐Vibration &…...

PyTorch中,卷积层、池化层、转置卷积层输出特征图形状计算公式总结
在PyTorch中,卷积层(Convolutional Layer)、池化层(Pooling Layer,例如最大池化层)、以及转置卷积层(Transpose Convolutional Layer,也称为反卷积层或上采样层)的输出特…...
——CLI 与 UI 配置详解)
OpenClaw入门教程(1)——CLI 与 UI 配置详解
# OpenClaw 核心概念详解(一):CLI 与 UI 配置 创建日期:2026-04-21 | 作者:AiToMoney团队 🐉 | 版本:v1.0 | 适用版本:OpenClaw 2026.4.14+ 📖 概述 OpenClaw 4.14 版本提供了两种配置方式:CLI(命令行) 和 UI(图形界面),相比 3.13 版本的手动编辑 JSON 文件…...

DSP架构设计与低功耗优化关键技术解析
1. DSP架构基础与性能挑战数字信号处理器(DSP)与传统微控制器在架构设计上存在本质差异。微控制器主要面向控制任务——处理输入数据、做出决策并调整输出设备状态,而DSP的核心使命是维持连续数据流的高效处理。这种差异直接体现在硬件架构的…...

Linux超级计算机Roadrunner的设计与优化实践
1. Linux超级计算机Roadrunner的设计背景与核心理念在1990年代末期,高性能计算领域正处于一个关键的转折点。传统超级计算机如Cray系列虽然性能强大,但价格昂贵且维护成本极高,使得大多数研究机构难以负担。与此同时,个人计算机性…...

Weaviate官方示例库全解析:从向量数据库入门到AI应用实战
1. 项目概述:一个向量数据库的“游乐场”如果你最近在折腾大语言模型应用,或者想给自己的数据加上一个智能的“记忆大脑”,那你大概率已经听说过向量数据库了。在众多选择中,Weaviate 以其开源、易用和强大的功能,成为…...
)
手把手教你用GD32F407和LWIP实现一个简易网络调试助手(UDP/TCP双模)
基于GD32F407与LWIP的智能网络调试工具开发实战 在嵌入式设备网络化需求日益增长的今天,如何快速构建一个稳定可靠的网络通信调试工具成为许多工程师面临的挑战。GD32F407作为国产MCU的优秀代表,搭配轻量级TCP/IP协议栈LWIP,能够为各类工业控…...

[hadoop] 初识Spark
初识Spark采用的方法是:由新手不断地追问老手问题,老手给出一定的回答。 在这个过程中,新手会慢慢理解Spark 参考资料: 《Hadoop 3.x大数据开发实战》 文章目录参考资料:11.11.2233.14555.166.16.21 Spark集群的启动…...

Go语言服务网格egress:外部服务访问
Go语言服务网格egress:外部服务访问 1. Egress代理 package egressimport ("net/http""net/url" )type EgressProxy struct {dialer *net.Dialertransport *http.Transport }func NewEgressProxy() *EgressProxy {return &EgressProxy{d…...

Ruby 变量
Ruby 变量 引言 在编程语言中,变量是存储数据的基本单元。Ruby 作为一种动态、面向对象的语言,同样依赖变量来存储和处理数据。本文将详细介绍 Ruby 中的变量类型、作用域、生命周期以及相关操作,帮助读者全面了解 Ruby 变量的使用。 变量类型 Ruby 中的变量类型主要分为…...

Dify 部署与使用
版本说明:本文基于 Dify 社区版最新稳定版(Docker Compose 部署方式)编写,涵盖部署原理、环境配置、Chat 应用、RAG 知识库、工作流编排及常见问题排查。 第1章 快速部署:从 0 到 1 启动 Dify 1.1 系统要求与架构概览 Dify 采用微服务架构设计,通过 Docker Compose 一…...
Transformer架构优化实战2026:注意力机制、KV Cache与推理加速完整指南
Transformer架构诞生已近十年,但它的工程优化故事才刚刚开始。2026年,理解并掌握Transformer的核心优化技术,是每个LLM工程师的必修课。一、为什么Transformer的优化如此重要一个7B参数的LLM在A100上推理时,如果没有优化ÿ…...