MySQL学习笔记3
MySQL的源码编译安装:
1、参考MySQL的源码安装官方文档:

2、源码安装定制选项:

3、源码安装三部曲:配置、编译、安装。
4、软件安装包:
mysql-boost-5.7.43.tar.gz
5、安装需求:
| 安装需求 | 具体配置 |
| 安装目录basedir | /mysql_3307 |
| 数据目录datadir | /mysql_3307/data |
| 端口号 | 3307 |
| socket文件位置 | $basedir/mysql.sock |
| 字符集 | utf8mb4 |
主要安装目录、端口和socket套接字不一样,就可以在一台服务器上安装两个mysql。
6、了解配置选项:
源码安装,可定制性比较强。

其中collation:
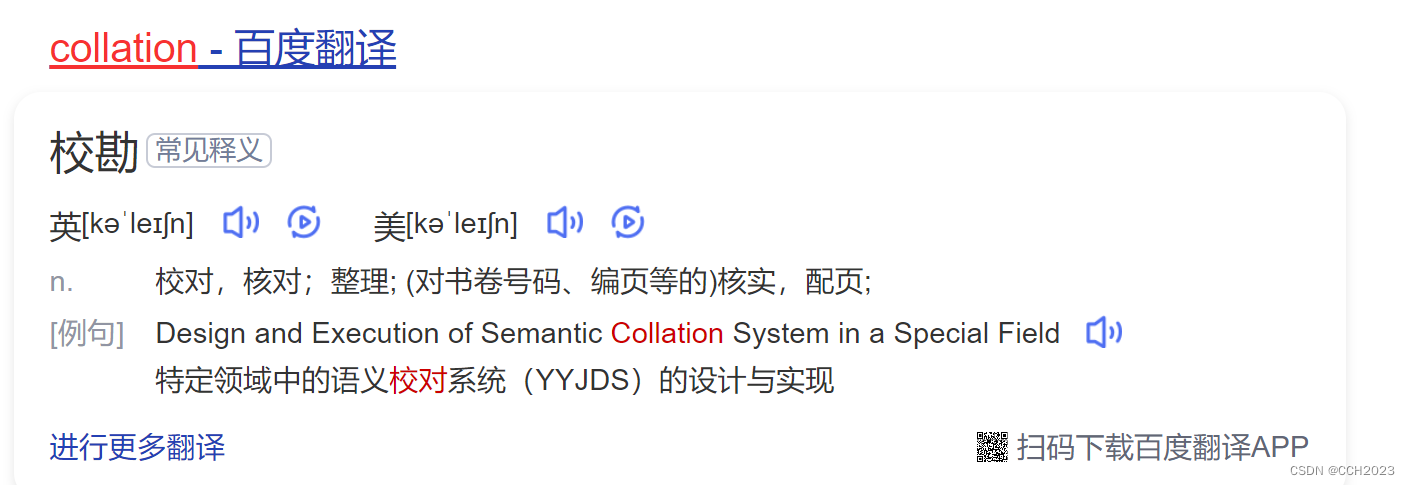
核对、校验的意思。
ENABLED_LOCAL_INFILE:外部数据,导入的时候,需要开启该功能。


安装步骤:
1)安装依赖包:
[root@mysql-server ~]# yum -y install ncurses-devel cmake libaio-devel openssl-devel
2)上传mysql源码包,并解压:
这个时候做一个拍照。
[root@mysql-server ~]# tar -zxvf mysql-boost-5.7.43.tar.gz3)进入到解压目录里配置:
[root@mysql-server ~]# cd mysql-5.7.434)编写脚本进行配置 vim myconfig.sh:
cmake . \
-DCMAKE_INSTALL_PREFIX=/mysql_3307 \
-DMYSQL_DATADIR=/mysql_3307/data \
-DMYSQL_TCP_PORT=3307 \
-DMYSQL_UNIX_ADDR=/mysql_3307/mysql.sock \
-DWITH_INNOBASE_STORAGE_ENGINE=1 \
-DWITH_PARTITION_STORAGE_ENGINE=1 \
-DWITH_FEDERATED_STORAGE_ENGINE=1 \
-DWITH_BLACKHOLE_STORAGE_ENGINE=1 \
-DWITH_MYISAM_STORAGE_ENGINE=1 \
-DENABLED_LOCAL_INFILE=1 \
-DEXTRA_CHARSETS=all \
-DDEFAULT_CHARSET=utf8mb4 \
-DDEFAULT_COLLATION=utf8mb4_general_ci \
-DWITH_SSL=system \
-DWITH_BOOST=/mysql_3307/boost \
-DDOWNLOAD_BOOST=1
说明:在这个配置里,如果还需要安装别的数据库,只要修改几个地方:
-DCMAKE_INSTALL_PREFIX
-DMYSQL_DATADIR
-DMYSQL_TCP_PORT
-DMYSQL_UNIX_ADDR
5)添加脚本执行权限,然后执行脚本。
[root@mysql-server mysql-5.7.43]# chmod +x mysqlconfig.sh
[root@mysql-server mysql-5.7.43]# ./mysqlconfig.sh

这个过程是一个配置的过程。
6)编译和安装:
make && make install也可以写成:
make -j2 && make install选项:
-j2:代表同时开启多个线程共同实现编译操作。

MySQL数据库的初始化工作:
1)进入到/mysql_3307
[root@mysql-server mysql-5.7.43]# cd /mysql_3307
[root@mysql-server mysql_3307]# pwd
/mysql_3307
2)创建mysql-files目录:
[root@mysql-server mysql_3307]# mkdir mysql-files
[root@mysql-server mysql_3307]# chown mysql:mysql mysql-files
[root@mysql-server mysql_3307]# chmod 750 mysql-files
3)初始化数据库:
[root@mysql-server mysql_3307]# bin/mysqld --initialize --user=mysql --basedir=/mysql_3307 --datadir=/mysql_3307/data
2023-09-22T16:03:38.325762Z 0 [Warning] TIMESTAMP with implicit DEFAULT value is deprecated. Please use --explicit_defaults_for_timestamp server option (see documentation for more details).
2023-09-22T16:03:38.507868Z 0 [Warning] InnoDB: New log files created, LSN=45790
2023-09-22T16:03:38.532672Z 0 [Warning] InnoDB: Creating foreign key constraint system tables.
2023-09-22T16:03:38.586904Z 0 [Warning] No existing UUID has been found, so we assume that this is the first time that this server has been started. Generating a new UUID: 97a3f645-5961-11ee-8c2b-000c295cf01e.
2023-09-22T16:03:38.587416Z 0 [Warning] Gtid table is not ready to be used. Table 'mysql.gtid_executed' cannot be opened.
2023-09-22T16:03:38.703329Z 0 [Warning] A deprecated TLS version TLSv1 is enabled. Please use TLSv1.2 or higher.
2023-09-22T16:03:38.703383Z 0 [Warning] A deprecated TLS version TLSv1.1 is enabled. Please use TLSv1.2 or higher.
2023-09-22T16:03:38.703732Z 0 [Warning] CA certificate ca.pem is self signed.
2023-09-22T16:03:38.736069Z 1 [Note] A temporary password is generated for root@localhost: _uhi%b?us9Qr

里面创建了data目录,data目录里面有mysql目录。
4)启动数据库:
[root@mysql-server mysql_3307]# cp support-files/mysql.server /etc/init.d/mysql_3307
[root@mysql-server mysql_3307]# service mysql_3307 start
常见启动异常的解决方案:

查看日志:
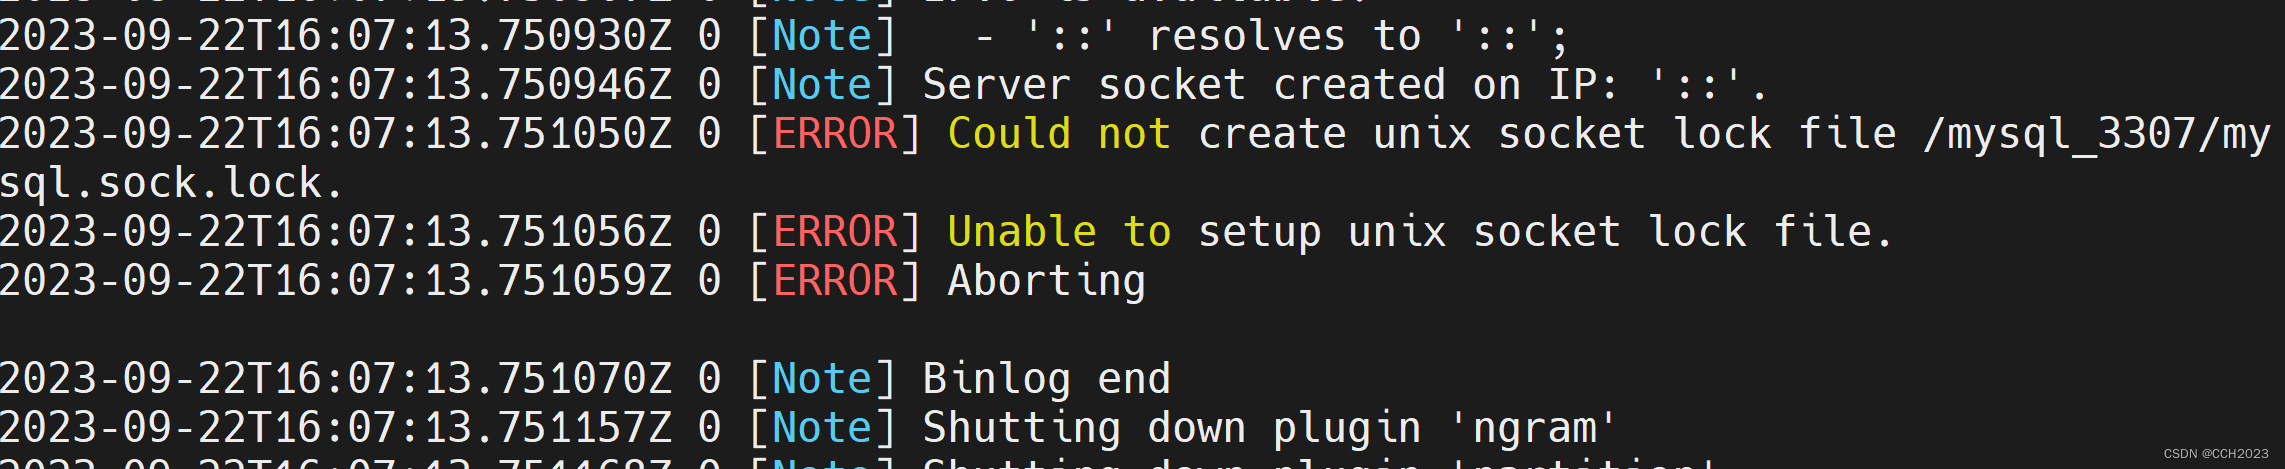
解决办法:很多问题跟权限有关,要理解权限、拥有者、所属组。
[root@mysql-server /]# chown -R mysql:mysql mysql_3307
也可以使用chmod命令更改权限,如果该了权限,可能不符合权限最小化的原则。
安装完后续配置:
[root@mysql-server mysql_3307]# cat my.cnf
[mysqld]
basedir=/mysql_3307
datadir=/mysql_3307/data
socket=/mysql_3307/mysql.sock[root@mysql-server mysql_3307]# service mysql_3307 restart
Shutting down MySQL.. SUCCESS!
Starting MySQL. SUCCESS!
别忘了要将mysql_3307重启。
设置数据库管理root的密码:
bin/mysqladmin -uroot password '1q2w3e4r' -p安全设置:
[root@mysql-server mysql_3307]# bin/mysql_secure_installationSecuring the MySQL server deployment.Enter password for user root:VALIDATE PASSWORD PLUGIN can be used to test passwords
and improve security. It checks the strength of password
and allows the users to set only those passwords which are
secure enough. Would you like to setup VALIDATE PASSWORD plugin?Press y|Y for Yes, any other key for No: n
Using existing password for root.
Change the password for root ? ((Press y|Y for Yes, any other key for No) : n... skipping.
By default, a MySQL installation has an anonymous user,
allowing anyone to log into MySQL without having to have
a user account created for them. This is intended only for
testing, and to make the installation go a bit smoother.
You should remove them before moving into a production
environment.Remove anonymous users? (Press y|Y for Yes, any other key for No) : y
Success.Normally, root should only be allowed to connect from
'localhost'. This ensures that someone cannot guess at
the root password from the network.Disallow root login remotely? (Press y|Y for Yes, any other key for No) : y
Success.By default, MySQL comes with a database named 'test' that
anyone can access. This is also intended only for testing,
and should be removed before moving into a production
environment.Remove test database and access to it? (Press y|Y for Yes, any other key for No) : y- Dropping test database...
Success.- Removing privileges on test database...
Success.Reloading the privilege tables will ensure that all changes
made so far will take effect immediately.Reload privilege tables now? (Press y|Y for Yes, any other key for No) : y
Success.All done!
添加mysql_3307的开机启动项:
[root@mysql-server ~]# chkconfig --add mysql_3307
[root@mysql-server ~]# chkconfig mysql_3307 on
[root@mysql-server ~]#
[root@mysql-server ~]# chkconfig --listNote: This output shows SysV services only and does not include nativesystemd services. SysV configuration data might be overridden by nativesystemd configuration.If you want to list systemd services use 'systemctl list-unit-files'.To see services enabled on particular target use'systemctl list-dependencies [target]'.mysql_3306      0:off   1:off   2:on    3:on    4:on    5:on    6:off
mysql_3307      0:off   1:off   2:on    3:on    4:on    5:on    6:off
netconsole      0:off   1:off   2:off   3:off   4:off   5:off   6:off
network         0:off   1:off   2:on    3:on    4:on    5:on    6:off
mysql常见问题解决方案:
1、如何访问不同的数据库?
方法一:直接使用==对应的客户==端软件访问:
访问5.7.31版本数据库:
[root@node1 ~]# /mysql_3306/bin/mysql -uroot -p
Enter password:
Welcome to the MySQL monitor.  Commands end with ; or \g.
Your MySQL connection id is 3
Server version: 5.7.31 MySQL Community Server (GPL)访问5.7.31版本数据库:
[root@node1 ~]# /mysql_3307/bin/mysql -uroot -p
Enter password:
Welcome to the MySQL monitor.  Commands end with ; or \g.
Your MySQL connection id is 7
Server version: 5.7.31 Source distribution方法二:==定义别名==的方式访问
[root@node1 ~]# alias mysql_3306="/mysql_3306/bin/mysql"
[root@node1 ~]# alias mysql_3307="/mysql_3307/bin/mysql"
[root@node1 ~]# mysql_3306 -uroot -p
Enter password:
Welcome to the MySQL monitor.  Commands end with ; or \g.
Your MySQL connection id is 4
Server version: 5.7.31 MySQL Community Server (GPL)[root@node1 ~]# mysql_3307 -uroot -p
Enter password:
Welcome to the MySQL monitor.  Commands end with ; or \g.
Your MySQL connection id is 8
Server version: 5.7.31 Source distribution方法三:==拷贝相应命令==到PATH可以识别的路径下==并重命名==
[root@node1 ~]# unalias mysql_3306
[root@node1 ~]# unalias mysql_3307
+++++++++++++++++++++我是华丽分隔符+++++++++++++++++++++++++++
[root@node1 ~]# cp /mysql_3306/bin/mysql /usr/bin/mysql_3306
[root@node1 ~]# cp /mysql_3307/bin/mysql /usr/bin/mysql_3307
[root@node1 ~]# which mysql_3306
/usr/bin/mysql_3306
[root@node1 ~]# which mysql_3307
/usr/bin/mysql_3307
我个人感觉还是倾向于第三种方法。
思考:我们之所以能够连接到数据库服务器的本质,就是套接字。
MySQL密码忘记了如何解决:
这个需要按照老师的步骤进行下联系。
[root@mysql-server ~]# ps aux |grep mysql
root        934  0.0  0.0 115544  1708 ?        S    13:08   0:00 /bin/sh /mysql_3307/bin/mysqld_safe --datadir=/mysql_3307/data --pid-file=/mysql_3307/data/mysql-server.lnmp.com.pid
mysql      1213  0.1  9.0 1144064 183968 ?      Sl   13:08   0:00 /mysql_3307/bin/mysqld --basedir=/mysql_3307 --datadir=/mysql_3307/data --plugin-dir=/mysql_3307/lib/plugin --user=mysql --log-error=mysql-server.lnmp.com.err --pid-file=/mysql_3307/data/mysql-server.lnmp.com.pid --socket=/mysql_3307/mysql.sock
root       1621  0.0  0.0  11824  1592 pts/0    S    13:13   0:00 /bin/sh /mysql_3306/bin/mysqld_safe --datadir=/mysql_3306/data --pid-file=/mysql_3306/data/mysql-server.lnmp.com.pid
mysql      1750  0.2  8.9 1121060 180816 pts/0  Sl   13:13   0:00 /mysql_3306/bin/mysqld --basedir=/mysql_3306 --datadir=/mysql_3306/data --plugin-dir=/mysql_3306/lib/plugin --user=mysql --log-error=mysql-server.lnmp.com.err --pid-file=/mysql_3306/data/mysql-server.lnmp.com.pid --socket=/tmp/mysql.sock
root       1887  0.0  0.0 112812   972 pts/0    S+   13:14   0:00 grep --color=auto mysql
[root@mysql-server ~]# service mysql_3306 restart
Shutting down MySQL.. SUCCESS!
Starting MySQL. SUCCESS!
[root@mysql-server ~]# service mysql_3307 restart
Shutting down MySQL.. SUCCESS!
Starting MySQL. SUCCESS!
mysqladmin工具的使用:
关闭数据库
[root@node1 ~]# mysqladmin shutdown -p
默认修改数据库管理员root密码
[root@node1 ~]# mysqladmin password 'newpass' -p
[root@node1 ~]# mysqladmin password '123' -uroot -h localhost -p查看扩展信息,比如变量
[root@node1 ~]# mysqladmin proc extended-status -p
创建数据库
[root@node1 ~]# mysqladmin create db01 -p
删除数据库
[root@node1 ~]# mysqladmin drop db01 -p
相关文章:
MySQL学习笔记3
MySQL的源码编译安装: 1、参考MySQL的源码安装官方文档: 2、源码安装定制选项: 3、源码安装三部曲:配置、编译、安装。 4、软件安装包: mysql-boost-5.7.43.tar.gz 5、安装需求: 安装需求具体配置安装目…...

快速掌握ES6
什么是ES6 ES6(ECMAScript 6),也被称为ES2015,是JavaScript的第六个版本,于2015年发布。ES6引入了许多新的语法和功能,旨在提高JavaScript的开发效率和代码质量。 ES6的一些主要特性和改进包括࿱…...

电池厂提供excel电池曲线zcv到mtk电池曲线zcv转换
#encoding:utf8 #电池厂提供excel电池曲线zcv到mtk电池曲线zcv转换 import pandas as pd import openpyxl import math # 读取Excel文件 df pd.read_excel("a55-zcv.xlsx") for j in range(0,10): if(j<3): offset0 #T0~T2 if(j3): offset…...

重写和重载、抽象类和接口
文章目录 前言一、重载与重写1.重载(Overload)(1)条件(2)举例 2.重写(Override)(1)规则(2)举例 3.重载和重写区别 二、抽象类与接口1.抽象类&…...

Untiy UDP局域网 异步发送图片
同步画面有问题,传图片吧 using System.Text; using System.Net.Sockets; using System.Collections; using System.Collections.Generic; using UnityEngine; using UnityEngine.Events; using System.Net; using System; using System.Threading.Tasks; using Sy…...

移动端H5封装一个 ScrollList 横向滚动列表组件,实现向左滑动
效果: 1.封装组件: <template><div class"scroll-list"><divclass"scroll-list-content":style"{ background, color, fontSize: size }"ref"scrollListContent"><div class"scroll…...

Docker一键安装和基本配置
一键安装脚本 注:该脚本需要root权限 curl -sSL https://get.docker.com/ | sh非root组用户赋权 sudo groupadd docker # 若使用一键安装脚本会自动创建这个组,提示已存在 sudo gpasswd -a ${USER} docker # 将当前用户添加到docker组,也…...

MVC设计思想理解和ASP.NET MVC理解
三层模式 三层模式包括:UI层,业务逻辑层,数据访问层,模型层 MVC设计思想和ASP.NET MVC理解 MVC设计思想: MVC的思想就是把我们的程序分为三个核心的模块,这三个模块的详细介绍如下: 模型(Model) :负责封装与引用程序的业务逻辑相关的数据以及对数据的处理方法。模型层有对…...
大模型应用选择对比
大模型应用选择对比 1、知识库对比:dify、fastgpt、langchatchat 2、agent构建器选择:flowise、langflow、bisheng 3、召回率提升方案...

c++STL概述
目录 STL基本概念 STL六大组件 STL的优点 STL三大组件 容器 算法 迭代器 普通的迭代器访问vector容器元素 算法for_each实现循环 迭代器指向的元素类型是自定义数据类型 迭代器指向容器 常用容器 string容器 string的基本概念 string容器的操作 string的构造函…...

利用容器技术优化DevOps流程
利用容器技术优化DevOps流程 随着云计算的快速发展,容器技术也日益流行。容器技术可以打包和分发应用程序,并实现快速部署和扩展。在DevOps流程中,容器技术可以大大优化开发、测试、部署和运维各个环节。本文将介绍如何利用容器技术优化DevO…...

91 # 实现 express 的优化处理
上一节实现 express 的请求处理,这一节来进行实现 express 的优化处理 让 layer 提供 match 方法去匹配 pathname,方便拓展让 layer 提供 handle_request 方法,方便拓展利用第三方库 methods 批量生成方法性能优化问题 进行路由懒加载&#…...
arcgis拓扑检查实现多个矢量数据之间消除重叠区域
目录 环境介绍: 操作任务: 步骤: 1、数据库和文件结构准备 2、建立拓扑规则 3、一直下一页默认参数后,进行拓扑检查 4、打开TP_CK_Topology,会自动带出拓扑要素,红色区域为拓扑错误的地方࿱…...

基于Vue+ELement搭建登陆注册页面实现后端交互
🎉🎉欢迎来到我的CSDN主页!🎉🎉 🏅我是Java方文山,一个在CSDN分享笔记的博主。📚📚 🌟推荐给大家我的专栏《ELement》。🎯🎯 …...

JS获取经纬度, 并根据经纬度得到城市信息
在JavaScript中,获取经纬度通常需要使用定位服务,比如HTML5的Geolocation API。然而拿到坐标后,将经纬度转换为城市信息,则需要使用逆地理编码服务接口,比如百度或者高德的 API, 但是他们收费都很高, 我们可以使用一些…...

mac m1 docker安装nacos
文章目录 引言I m1安装docker1.1 Docker 下载1.2 终端Docker相关命令II docker安装nacos2.1 安装nacos2.2 镜像启动see alsoMac 查看进程端口引言 使用docker方式安装是最方便的 I m1安装docker 1.1 Docker 下载 https://docs.docker.com/docker-for-mac/apple-silicon/点击…...
位段 联合体 枚举
Hello好久不见,今天分享的是接上次结构体没有分享完的内容,这次我们讲讲位段 枚举和联合体的概念以及他们的用法。 2.1 什么是位段 位段的声明和结构是类似的,有两个不同: 1.位段的成员必须是 int、unsigned int 或signed int 。 …...
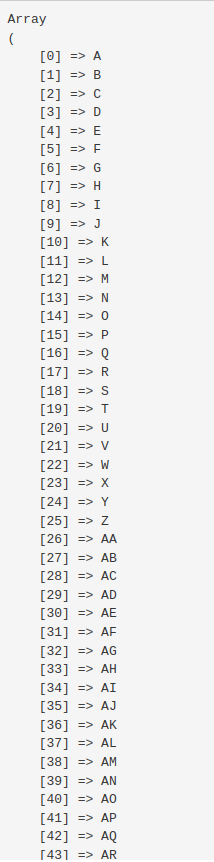
PHP循环获取Excel表头字母A-Z,当超过时输出AA,AB,AC,AD······
PHP循环获取Excel表头字母A-Z,当超过时输出AA,AB,AC,AD PHP循环生成Excel的列字母表 $count_num 26 * 27; $letter A; $arr []; while($count_num--){$arr[] $letter;$letter; }结果如下: 转为JSON更为直观: ["A","B&…...

识别准确率达 95%,华能东方电厂财务机器人实践探索
摘 要:基于华能集团公司大数据与人工智能构想理念,结合东方电厂实际工作需要,财务工作要向数字化、智能化纵深推进,随着财务数字化转型和升级加速,信息化水平不断提升,以及内部信息互联互通不断加深&#x…...

代码随想录算法训练营 单调栈part03
一、柱状图中最大的矩形 84. 柱状图中最大的矩形 - 力扣(LeetCode) 单调栈很重要的性质,就是单调栈里的顺序,是从小到大还是从大到小。 栈顶和栈顶的下一个元素以及要入栈的三个元素组成了我们要求最大面积的高度和宽度&#x…...

Claude-Crowed项目深度解析:构建高效AI应用的工具调用与流式响应实践
1. 项目概述与核心价值最近在折腾一些AI应用开发,发现一个挺有意思的项目,叫claude-crowed。这名字乍一看有点怪,像是“Claude”和“crowd”(人群)的混合体。简单来说,它是一个旨在让开发者能够更便捷地调用…...

现代Web开发工程化实践:从模板到自动化部署的完整指南
1. 项目概述:一个现代Web应用的基础设施蓝图 最近在梳理个人技术栈和项目模板时,我深度体验了 aerlinn13/saelind 这个仓库。它不是一个可以直接运行的业务应用,而是一个精心设计的、用于快速启动现代Web项目的 基础设施模板与开发环境配…...

猫抓cat-catch浏览器扩展:专业级资源嗅探与下载解决方案
猫抓cat-catch浏览器扩展:专业级资源嗅探与下载解决方案 【免费下载链接】cat-catch 猫抓 浏览器资源嗅探扩展 / cat-catch Browser Resource Sniffing Extension 项目地址: https://gitcode.com/GitHub_Trending/ca/cat-catch 你是否曾遇到这样的情况&#…...

工业主板选型与集成实战:从核心设计到故障排查
1. 项目概述:从一块主板看工业智能化的基石最近在整理一个老旧产线的智能化改造方案,客户指着产线控制柜里那台屏幕已经发黄、反应迟缓的工控机问我:“这东西还能用吗?换新的要多少钱?”我拆开一看,里面的主…...

【ElevenLabs火车站语音实战指南】:0代码接入、3步定制多语种AI广播,已验证上线率98.7%
更多请点击: https://intelliparadigm.com 第一章:ElevenLabs火车站语音实战指南总览 在高铁枢纽与城市轨道交通系统日益智能化的今天,动态语音播报已成为提升旅客体验的关键环节。ElevenLabs 提供的高保真、低延迟文本转语音(TT…...

如何快速实现跨平台输入法词库转换:开源工具的完整指南
如何快速实现跨平台输入法词库转换:开源工具的完整指南 【免费下载链接】imewlconverter ”深蓝词库转换“ 一款开源免费的输入法词库转换程序 项目地址: https://gitcode.com/gh_mirrors/im/imewlconverter 你是否曾经因为更换操作系统或输入法而丢失了多年…...

对比直接使用官方 API 接入 Taotoken 在稳定性上的体验差异
🚀 告别海外账号与网络限制!稳定直连全球优质大模型,限时半价接入中。 👉 点击领取海量免费额度 对比直接使用官方 API 接入 Taotoken 在稳定性上的体验差异 在构建依赖大模型能力的应用时,服务的稳定性直接关系到终端…...

011、逆Clark变换与逆Park变换
011、逆Clark变换与逆Park变换:从一次电机“鬼畜”抖动说起 有次调试一台永磁同步电机,电流环PI参数已经调得相当“丝滑”,转速响应也漂亮,结果一上负载,电机开始高频抖动,像踩了电门。示波器抓电流波形,发现三相电流里混着明显的6次谐波。当时第一反应是电流采样有问题…...
)
【限时首发】Midjourney Wine印相Pro Pack:含27套NFT酒标纹理库+4K酒液动态渲染Lora模型(仅开放48小时下载)
更多请点击: https://intelliparadigm.com 第一章:Midjourney Wine印相Pro Pack全景概览 Midjourney Wine印相Pro Pack 是一套专为数字艺术创作者设计的高保真风格化增强工具集,聚焦于葡萄酒文化、复古胶片质感与高端视觉叙事的深度融合。它…...
)
Kafka 核心组件及其作用(全解)
Kafka 是一个分布式、高吞吐量、高可用的消息队列与流处理平台,其架构设计围绕"水平扩展、持久化存储、低延迟"三大核心目标展开。以下是 Kafka 所有核心组件的详细解析,包含原理、作用、关键特性和生产级最佳实践。 一、Kafka 整体架构概览 K…...