vue重修002
文章目录
- 版权声明
- 一 指令修饰符
- 1. 什么是指令修饰符?
- 2. 按键修饰符
- 3. v-model修饰符
- 4. 事件修饰符
- 二 v-bind对样式控制的增强-操作class
- 1. 语法:
- 2. 对象语法
- 3. 数组语法
- 4. 代码练习
- 三 京东秒杀-tab栏切换导航高亮
- 四 v-bind对有样式控制的增强-操作style
- 1.语法
- 2.代码练习
- 3.进度条案例
- 五 v-model在其他表单元素的使用
- 1. 讲解内容
- 2. 代码
- 六 computed计算属性
- 1. 概念
- 2. 语法
- 3. 注意
- 4. 案例
- 5. 代码
- 七 computed计算属性 VS methods方法
- 1.computed计算属性
- 2.methods计算属性
- 3.计算属性的优势
- 4.总结
- 八 计算属性的完整写法
- 九 综合案例-成绩案例
- 十 watch侦听器(监视器)
- 1.作用
- 2.语法
- 3.侦听器代码
- 十一 翻译案例-代码实现
- 十二 watch侦听器
- 1.语法
- 2.需求
- 3.代码实现
- 4.总结
- 十三 综合案例
版权声明
- 本博客的内容基于我个人学习黑马程序员课程的学习笔记整理而成。我特此声明,所有版权属于黑马程序员或相关权利人所有。本博客的目的仅为个人学习和交流之用,并非商业用途。
- 我在整理学习笔记的过程中尽力确保准确性,但无法保证内容的完整性和时效性。本博客的内容可能会随着时间的推移而过时或需要更新。
- 若您是黑马程序员或相关权利人,如有任何侵犯版权的地方,请您及时联系我,我将立即予以删除或进行必要的修改。
- 对于其他读者,请在阅读本博客内容时保持遵守相关法律法规和道德准则,谨慎参考,并自行承担因此产生的风险和责任。
一 指令修饰符
1. 什么是指令修饰符?
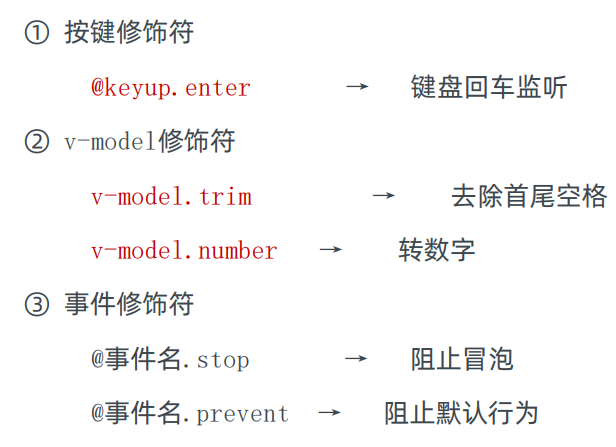
- 所谓指令修饰符就是通过“.”指明一些指令后缀 不同的后缀封装了不同的处理操作 —> 简化代码
2. 按键修饰符
- @keyup.enter —>当点击enter键的时候才触发
代码演示:
<!DOCTYPE html>
<html lang="en">
<head><meta charset="UTF-8"><meta http-equiv="X-UA-Compatible" content="IE=edge"><meta name="viewport" content="width=device-width, initial-scale=1.0"><title>Document</title>
</head>
<body><div id="app"><h3>@keyup.enter  →  监听键盘回车事件</h3><input v-model="username" type="text" @keyup.enter></div><script src="https://cdn.jsdelivr.net/npm/vue@2/dist/vue.js"></script><script>const app = new Vue({el: '#app',data: {username: ''},methods: {fn() {console.log(this.username)}}})</script>
</body>
</html>
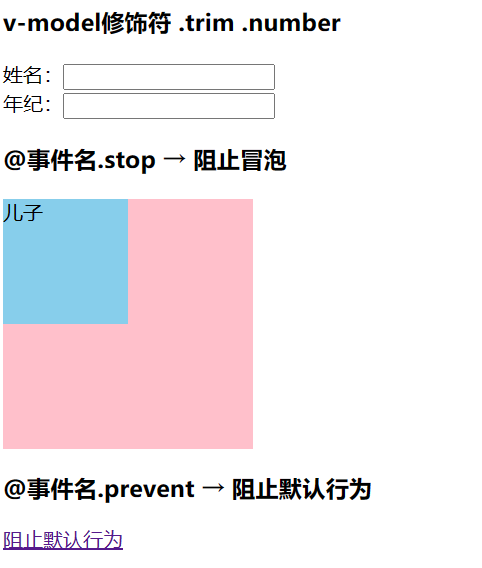
3. v-model修饰符
-
v-model.trim —>去除首位空格
-
v-model.number —>转数字
<h3>v-model修饰符 .trim .number</h3>姓名:<input v-model.trim="username" type="text" ><br>年纪:<input v-model.number="age" type="text"><br>
4. 事件修饰符
- @事件名.stop —> 阻止冒泡
- @事件名.prevent —>阻止默认行为
- @事件名.stop.prevent —>可以连用 即阻止事件冒泡也阻止默认行为
<!DOCTYPE html>
<html lang="en">
<head><meta charset="UTF-8"><meta http-equiv="X-UA-Compatible" content="IE=edge"><meta name="viewport" content="width=device-width, initial-scale=1.0"><title>Document</title><style>.father {width: 200px;height: 200px;background-color: pink;margin-top: 20px;}.son {width: 100px;height: 100px;background-color: skyblue;}</style>
</head>
<body><div id="app"><h3>v-model修饰符 .trim .number</h3>姓名:<input v-model.trim="username" type="text" ><br>年纪:<input v-model.number="age" type="text"><br><h3>@事件名.stop     →  阻止冒泡</h3><div @click="fatherFn" class="father" ><div @click.stop="sonFn" class="son" >儿子</div></div><h3>@事件名.prevent  →  阻止默认行为</h3><a  href="http://www.baidu.com" @click.prevent >阻止默认行为</a></div><script src="https://cdn.jsdelivr.net/npm/vue@2/dist/vue.js"></script><script>const app = new Vue({el: '#app',data: {username: '',age: '',},methods: {fatherFn () {alert('老父亲被点击了')},sonFn () {alert('儿子被点击了')}}})</script>
</body>
</html>
二 v-bind对样式控制的增强-操作class
- 为了方便开发者进行样式控制, Vue 扩展了 v-bind 的语法,可以针对 class 类名 和 style 行内样式 进行控制 。
1. 语法:
<div> :class = "对象/数组">这是一个div</div>
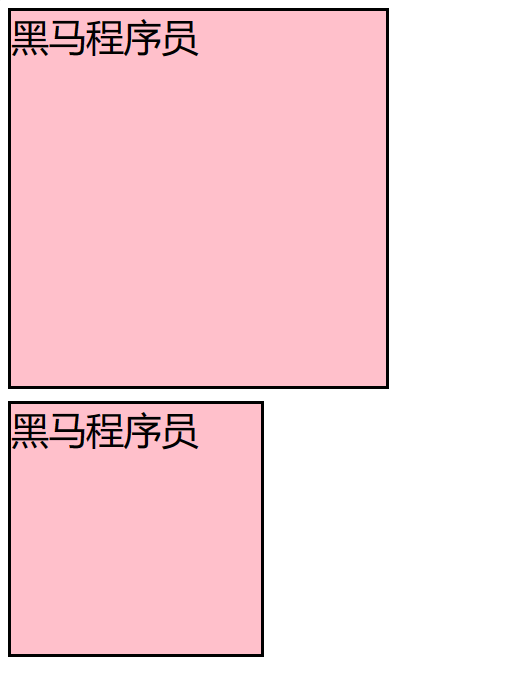
2. 对象语法
- 当class动态绑定的是对象时,键就是类名,值就是布尔值,如果值是true,就有这个类,否则没有这个类
<div class="box" :class="{ 类名1: 布尔值, 类名2: 布尔值 }"></div>
- 适用场景:一个类名,来回切换
<div class="box" :class="{ pink: true, big: true }">黑马程序员</div>
3. 数组语法
当class动态绑定的是数组时 → 数组中所有的类,都会添加到盒子上,本质就是一个 class 列表
<div class="box" :class="[ 类名1, 类名2, 类名3 ]"></div>
使用场景:批量添加或删除类
<div class="box" :class="['pink']">黑马程序员</div>
4. 代码练习
<!DOCTYPE html>
<html lang="en">
<head><meta charset="UTF-8"><meta http-equiv="X-UA-Compatible" content="IE=edge"><meta name="viewport" content="width=device-width, initial-scale=1.0"><title>Document</title><style>.box {width: 200px;height: 200px;border: 3px solid #000;font-size: 30px;margin-top: 10px;}.pink {background-color: pink;}.big {width: 300px;height: 300px;}</style>
</head>
<body><div id="app"><div class="box" :class="{ pink: true, big: true }">黑马程序员</div><div class="box" :class="['pink']">黑马程序员</div></div><script src="https://cdn.jsdelivr.net/npm/vue@2/dist/vue.js"></script><script>const app = new Vue({el: '#app',data: {}})</script>
</body>
</html>
三 京东秒杀-tab栏切换导航高亮
- 需求:
- 当点击tab页签时,被点击tab页签就高亮
- 思路:
- 基于数据,动态渲染tab(v-for)
- 准备一个下标 记录高亮的是哪一个 tab
- 基于下标动态切换class的类名
- 案例演示
<!DOCTYPE html>
<html lang="en">
<head><meta charset="UTF-8"><meta http-equiv="X-UA-Compatible" content="IE=edge"><meta name="viewport" content="width=device-width, initial-scale=1.0"><title>Document</title><style>* {margin: 0;padding: 0;}ul {display: flex;border-bottom: 2px solid #e01222;padding: 0 10px;}li {width: 100px;height: 50px;line-height: 50px;list-style: none;text-align: center;}li a {display: block;text-decoration: none;font-weight: bold;color: #333333;}li a.active {background-color: #e01222;color: #fff;}</style>
</head>
<body><div id="app"><ul><li @click="activeIndex=index" v-for="(item,index) in list" :key="index" ><a :class="{active : activeIndex===index}" href="#">{{item.name}}</a></li></ul></div><script src="https://cdn.jsdelivr.net/npm/vue@2/dist/vue.js"></script><script>const app = new Vue({el: '#app',data: {activeIndex: 2,list: [{ id: 1, name: '京东秒杀' },{ id: 2, name: '每日特价' },{ id: 3, name: '品类秒杀' }]}})</script>
</body>
</html>

四 v-bind对有样式控制的增强-操作style
1.语法
<div class="box" :style="{ CSS属性名1: CSS属性值, CSS属性名2: CSS属性值 }"></div>
2.代码练习
<!DOCTYPE html>
<html lang="en">
<head><meta charset="UTF-8"><meta http-equiv="X-UA-Compatible" content="IE=edge"><meta name="viewport" content="width=device-width, initial-scale=1.0"><title>Document</title><style>.box {width: 200px;height: 200px;background-color: rgb(187, 150, 156);}</style>
</head>
<body><div id="app"><div class="box" :style="{width: '400px',backgroundColor: 'green'} "></div></div><script src="https://cdn.jsdelivr.net/npm/vue@2/dist/vue.js"></script><script>const app = new Vue({el: '#app',data: {}})</script>
</body>
</html>

3.进度条案例
 <!DOCTYPE html>
<html lang="en">
<head><meta charset="UTF-8"><meta http-equiv="X-UA-Compatible" content="IE=edge"><meta name="viewport" content="width=device-width, initial-scale=1.0"><title>Document</title><style>.progress {height: 25px;width: 400px;border-radius: 15px;background-color: #272425;border: 3px solid #272425;box-sizing: border-box;margin-bottom: 30px;}.inner {width: 50%;height: 20px;border-radius: 10px;text-align: right;position: relative;background-color: #409eff;background-size: 20px 20px;box-sizing: border-box;transition: all 1s;}.inner span {position: absolute;right: -20px;bottom: -25px;}</style>
</head>
<body><div id="app"><div class="progress"><div class="inner" :style="{ width: percent + '%' }"><span>{{percent}}%</span></div></div><button @click="percent=25">设置25%</button><button @click="percent=50">设置50%</button><button @click="percent=75">设置75%</button><button @click="percent=100">设置100%</button></div><script src="https://cdn.jsdelivr.net/npm/vue@2/dist/vue.js"></script><script>const app = new Vue({el: '#app',data: {percent: 30}})</script>
</body>
</html>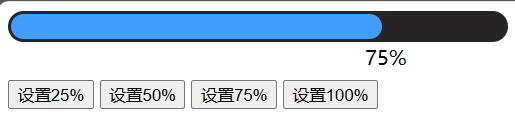
五 v-model在其他表单元素的使用
1. 讲解内容
- 常见的表单元素都可以用 v-model 绑定关联 → 快速 获取 或 设置 表单元素的值。它会根据 控件类型 自动选取 正确的方法 来更新元素
输入框  input:text   ——> value
文本域  textarea	 ——> value
复选框  input:checkbox  ——> checked
单选框  input:radio   ——> checked
下拉菜单 select    ——> value
...
2. 代码
<!DOCTYPE html>
<html lang="en">
<head><meta charset="UTF-8"><meta http-equiv="X-UA-Compatible" content="IE=edge"><meta name="viewport" content="width=device-width, initial-scale=1.0"><title>Document</title><style>textarea {display: block;width: 240px;height: 100px;margin: 10px 0;}</style>
</head>
<body><div id="app"><h3>小黑学习网</h3>姓名:<input type="text" v-model="username"><br><br>是否单身:<input type="checkbox" v-model="isSingle"><br><br><!--前置理解:1. name:  给单选框加上 name 属性 可以分组 → 同一组互相会互斥2. value: 给单选框加上 value 属性,用于提交给后台的数据结合 Vue 使用 → v-model-->性别:<input type="radio" name="gender" v-model="gender" value="1">男<input type="radio" name="gemder" v-model="gender" value="2">女<br><br><!--前置理解:1. option 需要设置 value 值,提交给后台2. select 的 value 值,关联了选中的 option 的 value 值结合 Vue 使用 → v-model-->所在城市:<select v-model.trim="cityId"><option value="1" >北京</option><option value="2">上海</option><option value="3">成都</option><option value="4">南京</option></select><br><br>自我描述:<textarea v-model="desc"></textarea><button>立即注册</button></div><script src="https://cdn.jsdelivr.net/npm/vue@2/dist/vue.js"></script><script>const app = new Vue({el: '#app',data: {username: '',isSingle: false,gender: "2",cityId: '102',desc: ""}})</script>
</body>
</html>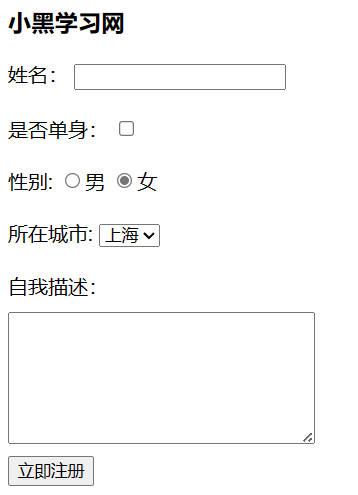
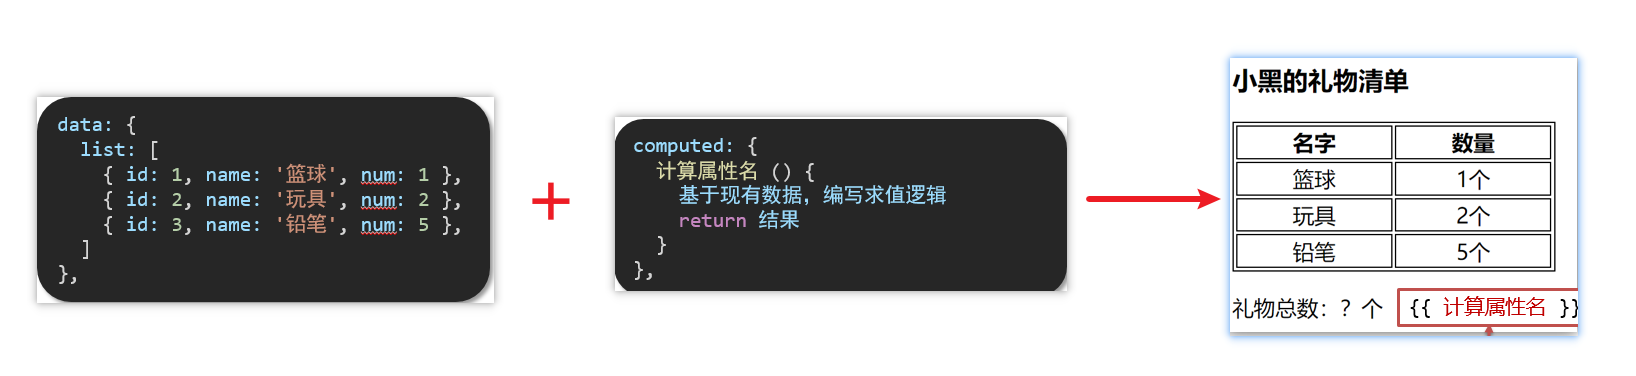
六 computed计算属性
1. 概念
- 基于现有的数据,计算出来的新属性。 依赖的数据变化,自动重新计算。
2. 语法
- 声明在 computed 配置项中,一个计算属性对应一个函数
- 使用起来和普通属性一样使用 {{ 计算属性名}}
3. 注意
- computed配置项和data配置项是同级的
- computed中的计算属性虽然是函数的写法,但他依然是个属性
- computed中的计算属性不能和data中的属性同名
- 使用computed中的计算属性和使用data中的属性是一样的用法
- computed中计算属性内部的this依然指向的是Vue实例
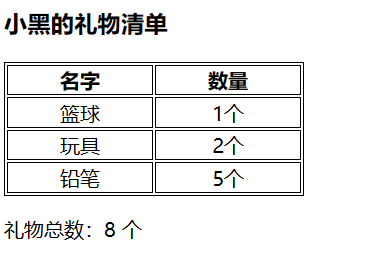
4. 案例
- 比如使用计算属性实现下面这个业务场景
5. 代码
<!DOCTYPE html>
<html lang="en">
<head><meta charset="UTF-8"><meta http-equiv="X-UA-Compatible" content="IE=edge"><meta name="viewport" content="width=device-width, initial-scale=1.0"><title>Document</title><style>table {border: 1px solid #000;text-align: center;width: 240px;}th,td {border: 1px solid #000;}h3 {position: relative;}</style>
</head>
<body><div id="app"><h3>小黑的礼物清单</h3><table><tr><th>名字</th><th>数量</th></tr><tr v-for="(item, index) in list" :key="item.id"><td>{{ item.name }}</td><td>{{ item.num }}个</td></tr></table><!-- 目标:统计求和,求得礼物总数 --><p>礼物总数:{{count}} 个</p></div><script src="https://cdn.jsdelivr.net/npm/vue@2/dist/vue.js"></script><script>const app = new Vue({el: '#app',data: {// 现有的数据list: [{ id: 1, name: '篮球', num: 1 },{ id: 2, name: '玩具', num: 2 },{ id: 3, name: '铅笔', num: 5 },]},computed:{count() {let total = this.list.reduce((sum, item) => sum + item.num, 0)return total}}})</script>
</body>
</html>
七 computed计算属性 VS methods方法
1.computed计算属性
- 作用:封装了一段对于数据的处理,求得一个结果
语法:
- 写在computed配置项中
- 作为属性,直接使用
- js中使用计算属性: this.计算属性
- 模板中使用计算属性:{{计算属性}}
2.methods计算属性
作用:给Vue实例提供一个方法,调用以处理业务逻辑。
语法:
- 写在methods配置项中
- 作为方法调用
- js中调用:this.方法名()
- 模板中调用 {{方法名()}} 或者 @事件名=“方法名”
3.计算属性的优势
- 缓存特性(提升性能)
计算属性会对计算出来的结果缓存,再次使用直接读取缓存,
依赖项变化了,会自动重新计算 → 并再次缓存 - methods没有缓存特性
- 通过代码比较
<style>table {border: 1px solid #000;text-align: center;width: 300px;}th,td {border: 1px solid #000;}h3 {position: relative;}span {position: absolute;left: 145px;top: -4px;width: 16px;height: 16px;color: white;font-size: 12px;text-align: center;border-radius: 50%;background-color: #e63f32;}</style><div id="app"><h3>小黑的礼物清单🛒<span>?</span></h3><table><tr><th>名字</th><th>数量</th></tr><tr v-for="(item, index) in list" :key="item.id"><td>{{ item.name }}</td><td>{{ item.num }}个</td></tr></table><p>礼物总数:{{ totalCount }} 个</p></div><script src="https://cdn.jsdelivr.net/npm/vue@2/dist/vue.js"></script><script>const app = new Vue({el: '#app',data: {// 现有的数据list: [{ id: 1, name: '篮球', num: 3 },{ id: 2, name: '玩具', num: 2 },{ id: 3, name: '铅笔', num: 5 },]},computed: {totalCount () {let total = this.list.reduce((sum, item) => sum + item.num, 0)return total}}})</script>
4.总结
-
computed有缓存特性,methods没有缓存
-
当一个结果依赖其他多个值时,推荐使用计算属性
-
当处理业务逻辑时,推荐使用methods方法,比如事件的处理函数
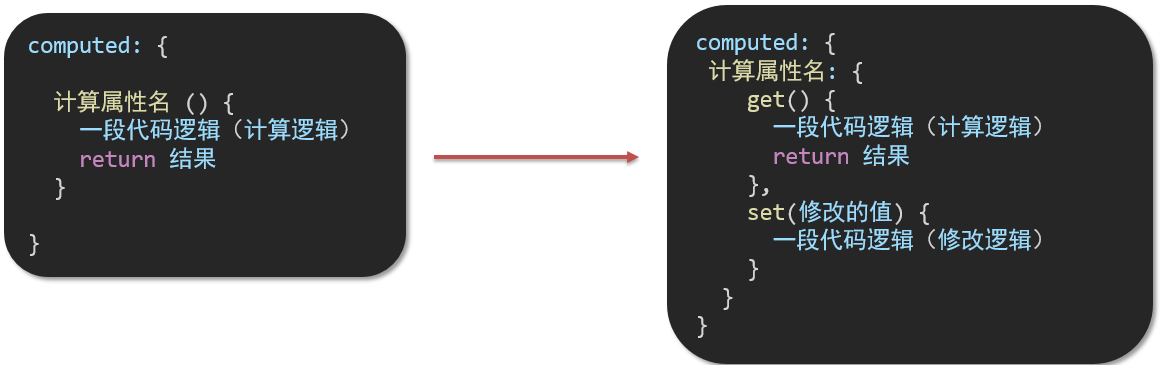
八 计算属性的完整写法
计算属性也是属性,能访问,应该也能修改
- 计算属性默认的简写,只能读取访问,不能 “修改”
- 如果要 “修改” → 需要写计算属性的完整写法
- 完整写法代码演示
<!DOCTYPE html>
<html lang="en">
<head><meta charset="UTF-8"><meta http-equiv="X-UA-Compatible" content="IE=edge"><meta name="viewport" content="width=device-width, initial-scale=1.0"><title>Document</title><style>input {width: 30px;}</style>
</head>
<body><div id="app">姓:<input type="text" v-model="firstName"> +名:<input type="text" v-model="lastName"> =<span>{{ fullName }}</span><br><br><button @click="changeName">改名卡</button></div><script src="https://cdn.jsdelivr.net/npm/vue@2/dist/vue.js"></script><script>const app = new Vue({el: '#app',data: {firstName: '刘',lastName: '备',},methods: {changeName () {this.fullName = '黄忠'}},computed: {// 完整写法 → 获取 + 设置fullName: {// (1) 当fullName计算属性,被获取求值时,执行get(有缓存,优先读缓存)//     会将返回值作为,求值的结果get () {return this.firstName + this.lastName},// (2) 当fullName计算属性,被修改赋值时,执行set//     修改的值,传递给set方法的形参set (value) {this.firstName = value.slice(0, 1)this.lastName = value.slice(1)}}}})</script>
</body>
</html>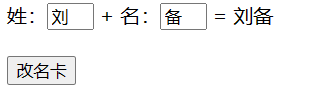
九 综合案例-成绩案例
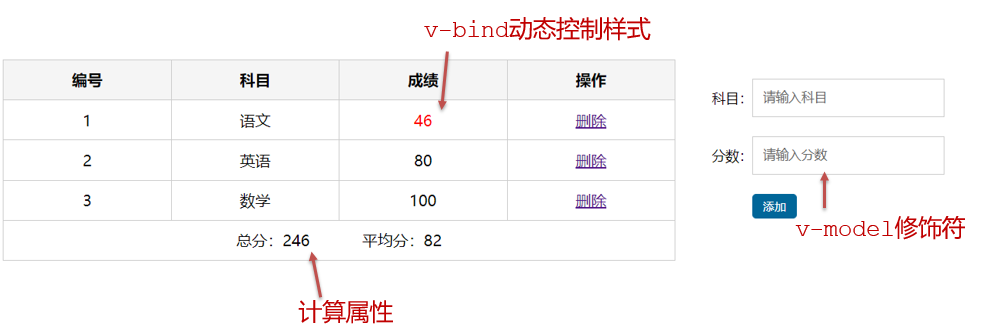
功能描述:
- 渲染功能
- 删除功能
- 添加功能
- 统计总分,求平均分
思路分析:
- 渲染功能 v-for :key v-bind:动态绑定class的样式
- 删除功能 v-on绑定事件, 阻止a标签的默认行为
- v-model的修饰符 .trim、 .number、 判断数据是否为空后 再添加、添加后清空文本框的数据
- 使用计算属性computed 计算总分和平均分的值
<!DOCTYPE html>
<html lang="en">
<head><meta charset="UTF-8" /><meta http-equiv="X-UA-Compatible" content="IE=edge" /><meta name="viewport" content="width=device-width, initial-scale=1.0" /><link rel="stylesheet" href="./styles/index.css" /><title>Document</title><style>a {text-decoration: none;color: #3f85ed;}</style>
</head>
<body><div id="app" class="score-case"><div class="table"><table><thead><tr><th>编号</th><th>科目</th><th>成绩</th><th>操作</th></tr></thead><tbody v-if="list.length > 0" ><tr v-for="(item, index) in list" :key="item.id"><td>{{index}}</td><td>{{item.subject}}</td><td :class="{red : item.score<60 }">{{item.score}}</td><td><a href="#" @click.prevent="del(item.id)">删除</a></td></tr></tbody><tbody v-else><tr><td colspan="5"><span class="none">暂无数据</span></td></tr></tbody><tfoot><tr><td colspan="5"><span>总分:{{ totalScore }}</span><span style="margin-left: 50px" >平均分:{{averageScore}}</span></td></tr></tfoot></table></div><div class="form"><div class="form-item"><div class="label">科目:</div><div class="input"><inputtype="text"placeholder="请输入科目"v-model.trim="subject"/></div></div><div class="form-item"><div class="label">分数:</div><div class="input"><inputtype="text"placeholder="请输入分数"v-model.number="score"/></div></div><div class="form-item"><div class="label"></div><div class="input"><button class="submit" @click="add" @keyup.enter="add">添加</button></div></div></div></div><script src="https://cdn.jsdelivr.net/npm/vue@2/dist/vue.js"></script><script>const app = new Vue({el: '#app',data: {list: [{ id: 1, subject: '语文', score: 20 },{ id: 7, subject: '数学', score: 99 },{ id: 12, subject: '英语', score: 70 },],subject: '',score: ''},methods:{del(id) {this.list = this.list.filter(item => item.id !== id)},add() {if (!this.subject) {alert('请输入科目')return}if (typeof this.score !== 'number') {alert('请输入正确的成绩')return}this.list.unshift({id: +new Date(),subject: this.subject,score: this.score})this.subject = ''this.score = ''}},computed:{totalScore(){return this.list.reduce((sum,item)=>sum+item.score,0)},averageScore () {if (this.list.length === 0) {return 0}return (this.totalScore / this.list.length).toFixed(2)}}})</script>
</body>
</html>
十 watch侦听器(监视器)
1.作用
- 监视数据变化,执行一些业务逻辑或异步操作
2.语法
- watch同样声明在跟data同级的配置项中
- 简单写法: 简单类型数据直接监视
- 完整写法:添加额外配置项
data: { words: '苹果',obj: {words: '苹果'}
},watch: {// 该方法会在数据变化时,触发执行数据属性名 (newValue, oldValue) {一些业务逻辑 或 异步操作。 },'对象.属性名' (newValue, oldValue) {一些业务逻辑 或 异步操作。 }
}
3.侦听器代码
 <!DOCTYPE html>
<html lang="en"><head><meta charset="UTF-8" /><meta http-equiv="X-UA-Compatible" content="IE=edge" /><meta name="viewport" content="width=device-width, initial-scale=1.0" /><title>Document</title><style>* {margin: 0;padding: 0;box-sizing: border-box;font-size: 18px;}#app {padding: 10px 20px;}.query {margin: 10px 0;}.box {display: flex;}textarea {width: 300px;height: 160px;font-size: 18px;border: 1px solid #dedede;outline: none;resize: none;padding: 10px;}textarea:hover {border: 1px solid #1589f5;}.transbox {width: 300px;height: 160px;background-color: #f0f0f0;padding: 10px;border: none;}.tip-box {width: 300px;height: 25px;line-height: 25px;display: flex;}.tip-box span {flex: 1;text-align: center;}.query span {font-size: 18px;}.input-wrap {position: relative;}.input-wrap span {position: absolute;right: 15px;bottom: 15px;font-size: 12px;}.input-wrap i {font-size: 20px;font-style: normal;}</style></head><body><div id="app"><!-- 条件选择框 --><div class="query"><span>翻译成的语言:</span><select><option value="italy">意大利</option><option value="english">英语</option><option value="german">德语</option></select></div><!-- 翻译框 --><div class="box"><div class="input-wrap"><textarea v-model="obj.words"></textarea><span><i>⌨️</i>文档翻译</span></div><div class="output-wrap"><div class="transbox">mela</div></div></div></div><script src="https://cdn.jsdelivr.net/npm/vue@2/dist/vue.js"></script><script src="https://cdn.jsdelivr.net/npm/axios/dist/axios.min.js"></script><script>// 接口地址:https://applet-base-api-t.itheima.net/api/translate// 请求方式:get// 请求参数:// (1)words:需要被翻译的文本(必传)// (2)lang: 需要被翻译成的语言(可选)默认值-意大利// -----------------------------------------------const app = new Vue({el: '#app',data: {// words: ''obj: {words: ''}},// 具体讲解:(1) watch语法 (2) 具体业务实现watch: {// 该方法会在数据变化时调用执行// newValue新值, oldValue老值(一般不用)// words (newValue) {//   console.log('变化了', newValue)// }'obj.words' (newValue) {console.log('变化了', newValue)}}})</script></body>
</html>
十一 翻译案例-代码实现
 <!DOCTYPE html>
<html lang="en"><head><meta charset="UTF-8" /><meta http-equiv="X-UA-Compatible" content="IE=edge" /><meta name="viewport" content="width=device-width, initial-scale=1.0" /><title>Document</title><style>* {margin: 0;padding: 0;box-sizing: border-box;font-size: 18px;}#app {padding: 10px 20px;}.query {margin: 10px 0;}.box {display: flex;}textarea {width: 300px;height: 160px;font-size: 18px;border: 1px solid #dedede;outline: none;resize: none;padding: 10px;}textarea:hover {border: 1px solid #1589f5;}.transbox {width: 300px;height: 160px;background-color: #f0f0f0;padding: 10px;border: none;}.tip-box {width: 300px;height: 25px;line-height: 25px;display: flex;}.tip-box span {flex: 1;text-align: center;}.query span {font-size: 18px;}.input-wrap {position: relative;}.input-wrap span {position: absolute;right: 15px;bottom: 15px;font-size: 12px;}.input-wrap i {font-size: 20px;font-style: normal;}</style></head><body><div id="app"><!-- 条件选择框 --><div class="query"><span>翻译成的语言:</span><select><option value="italy">意大利</option><option value="english">英语</option><option value="german">德语</option></select></div><!-- 翻译框 --><div class="box"><div class="input-wrap"><textarea v-model="obj.words"></textarea><span><i>⌨️</i>文档翻译</span></div><div class="output-wrap"><div class="transbox">{{ result }}</div></div></div></div><script src="https://cdn.jsdelivr.net/npm/vue@2/dist/vue.js"></script><script src="https://cdn.jsdelivr.net/npm/axios/dist/axios.min.js"></script><script>// 接口地址:https://applet-base-api-t.itheima.net/api/translate// 请求方式:get// 请求参数:// (1)words:需要被翻译的文本(必传)// (2)lang: 需要被翻译成的语言(可选)默认值-意大利// -----------------------------------------------const app = new Vue({el: '#app',data: {// words: ''obj: {words: ''},result: '', // 翻译结果// timer: null // 延时器id},// 具体讲解:(1) watch语法 (2) 具体业务实现watch: {// 该方法会在数据变化时调用执行// newValue新值, oldValue老值(一般不用)// words (newValue) {//   console.log('变化了', newValue)// }'obj.words' (newValue) {// console.log('变化了', newValue)// 防抖: 延迟执行 → 干啥事先等一等,延迟一会,一段时间内没有再次触发,才执行clearTimeout(this.timer)this.timer = setTimeout(async () => {const res = await axios({url: 'https://applet-base-api-t.itheima.net/api/translate',params: {words: newValue}})this.result = res.data.dataconsole.log(res.data.data)}, 300)}}})</script></body>
</html>
十二 watch侦听器
1.语法
- 完整写法 —>添加额外的配置项
- deep:true 对复杂类型进行深度监听
- immdiate:true 初始化 立刻执行一次
data: {obj: {words: '苹果',lang: 'italy'},
},watch: {// watch 完整写法对象: {deep: true, // 深度监视immdiate:true,//立即执行handler函数handler (newValue) {console.log(newValue)}}
}
2.需求
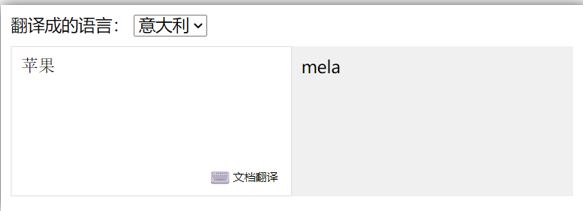
- 当文本框输入的时候 右侧翻译内容要时时变化
- 当下拉框中的语言发生变化的时候 右侧翻译的内容依然要时时变化
- 如果文本框中有默认值的话要立即翻译
3.代码实现
<!DOCTYPE html>
<html lang="en"><head><meta charset="UTF-8" /><meta http-equiv="X-UA-Compatible" content="IE=edge" /><meta name="viewport" content="width=device-width, initial-scale=1.0" /><title>Document</title><style>* {margin: 0;padding: 0;box-sizing: border-box;font-size: 18px;}#app {padding: 10px 20px;}.query {margin: 10px 0;}.box {display: flex;}textarea {width: 300px;height: 160px;font-size: 18px;border: 1px solid #dedede;outline: none;resize: none;padding: 10px;}textarea:hover {border: 1px solid #1589f5;}.transbox {width: 300px;height: 160px;background-color: #f0f0f0;padding: 10px;border: none;}.tip-box {width: 300px;height: 25px;line-height: 25px;display: flex;}.tip-box span {flex: 1;text-align: center;}.query span {font-size: 18px;}.input-wrap {position: relative;}.input-wrap span {position: absolute;right: 15px;bottom: 15px;font-size: 12px;}.input-wrap i {font-size: 20px;font-style: normal;}</style></head><body><div id="app"><!-- 条件选择框 --><div class="query"><span>翻译成的语言:</span><select v-model="obj.lang"><option value="italy">意大利</option><option value="english">英语</option><option value="german">德语</option></select></div><!-- 翻译框 --><div class="box"><div class="input-wrap"><textarea v-model="obj.words"></textarea><span><i>⌨️</i>文档翻译</span></div><div class="output-wrap"><div class="transbox">{{ result }}</div></div></div></div><script src="https://cdn.jsdelivr.net/npm/vue@2/dist/vue.js"></script><script src="https://cdn.jsdelivr.net/npm/axios/dist/axios.min.js"></script><script>const app = new Vue({el: '#app',data: {obj: {words: '小黑',lang: 'italy'},result: '', // 翻译结果},watch: {obj: {deep: true, // 深度监视immediate: true, // 立刻执行,一进入页面handler就立刻执行一次handler (newValue) {clearTimeout(this.timer)this.timer = setTimeout(async () => {const res = await axios({url: 'https://applet-base-api-t.itheima.net/api/translate',params: newValue})this.result = res.data.dataconsole.log(res.data.data)}, 300)}}}})</script></body>
</html>
4.总结
- watch侦听器的写法
- 简单写法
watch: {数据属性名 (newValue, oldValue) {一些业务逻辑 或 异步操作。 },'对象.属性名' (newValue, oldValue) {一些业务逻辑 或 异步操作。 }
}
- 完整写法
watch: {// watch 完整写法数据属性名: {deep: true, // 深度监视(针对复杂类型)immediate: true, // 是否立刻执行一次handlerhandler (newValue) {console.log(newValue)}}
}
十三 综合案例
- 购物车案例
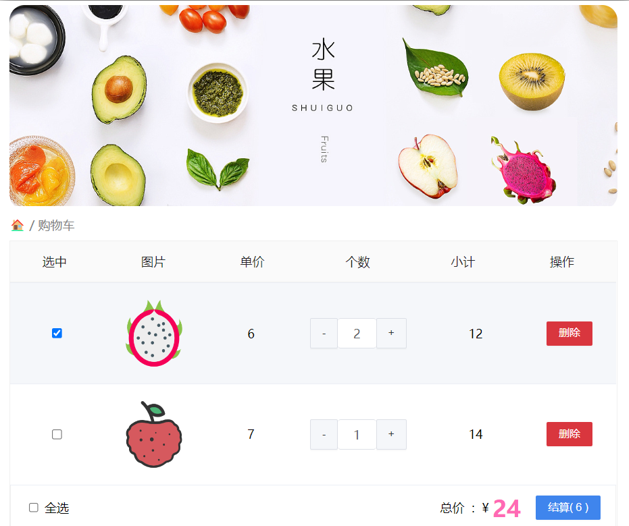
需求说明:
- 渲染功能
- 删除功能
- 修改个数
- 全选反选
- 统计 选中的 总价 和 总数量
- 持久化到本地
实现思路:
- 基本渲染: v-for遍历、:class动态绑定样式
- 删除功能 : v-on 绑定事件,获取当前行的id
- 修改个数 : v-on绑定事件,获取当前行的id,进行筛选出对应的项然后增加或减少
- 全选反选
- 必须所有的小选框都选中,全选按钮才选中 → every
- 如果全选按钮选中,则所有小选框都选中
- 如果全选取消,则所有小选框都取消选中
声明计算属性,判断数组中的每一个checked属性的值,看是否需要全部选
-
统计 选中的 总价 和 总数量 :通过计算属性来计算选中的总价和总数量
-
持久化到本地: 在数据变化时都要更新下本地存储 watch
<!DOCTYPE html>
<html lang="en"><head><meta charset="UTF-8" /><meta http-equiv="X-UA-Compatible" content="IE=edge" /><meta name="viewport" content="width=device-width, initial-scale=1.0" /><title>Document</title><style>* {margin: 0;padding: 0;box-sizing: border-box;font-size: 18px;}#app {padding: 10px 20px;}.query {margin: 10px 0;}.box {display: flex;}textarea {width: 300px;height: 160px;font-size: 18px;border: 1px solid #dedede;outline: none;resize: none;padding: 10px;}textarea:hover {border: 1px solid #1589f5;}.transbox {width: 300px;height: 160px;background-color: #f0f0f0;padding: 10px;border: none;}.tip-box {width: 300px;height: 25px;line-height: 25px;display: flex;}.tip-box span {flex: 1;text-align: center;}.query span {font-size: 18px;}.input-wrap {position: relative;}.input-wrap span {position: absolute;right: 15px;bottom: 15px;font-size: 12px;}.input-wrap i {font-size: 20px;font-style: normal;}</style></head><body><div id="app"><!-- 条件选择框 --><div class="query"><span>翻译成的语言:</span><select v-model="obj.lang"><option value="italy">意大利</option><option value="english">英语</option><option value="german">德语</option></select></div><!-- 翻译框 --><div class="box"><div class="input-wrap"><textarea v-model="obj.words"></textarea><span><i>⌨️</i>文档翻译</span></div><div class="output-wrap"><div class="transbox">{{ result }}</div></div></div></div><script src="https://cdn.jsdelivr.net/npm/vue@2/dist/vue.js"></script><script src="https://cdn.jsdelivr.net/npm/axios/dist/axios.min.js"></script><script>// 需求:输入内容,修改语言,都实时翻译// 接口地址:https://applet-base-api-t.itheima.net/api/translate// 请求方式:get// 请求参数:// (1)words:需要被翻译的文本(必传)// (2)lang: 需要被翻译成的语言(可选)默认值-意大利// -----------------------------------------------const app = new Vue({el: '#app',data: {obj: {words: '小黑',lang: 'italy'},result: '', // 翻译结果},watch: {obj: {deep: true, // 深度监视immediate: true, // 立刻执行,一进入页面handler就立刻执行一次handler (newValue) {clearTimeout(this.timer)this.timer = setTimeout(async () => {const res = await axios({url: 'https://applet-base-api-t.itheima.net/api/translate',params: newValue})this.result = res.data.dataconsole.log(res.data.data)}, 300)}}</script></body>
</html>
相关文章:
vue重修002
文章目录 版权声明一 指令修饰符1. 什么是指令修饰符?2. 按键修饰符3. v-model修饰符4. 事件修饰符 二 v-bind对样式控制的增强-操作class1. 语法:2. 对象语法3. 数组语法4. 代码练习 三 京东秒杀-tab栏切换导航高亮四 v-bind对有样式控制的增强-操作sty…...

[PowerQuery] PowerAutoMate 刷新PowerBI 数据
通过PowerBI Automate 进行PowerBI 数据刷新之前,需要有Power Automate 授权或者Power Automate 试用账户,可以通过如下的地址进行申请注册。 https://flow.microsoft.com/zh-cn/ 完成Power Automate 登录之后,选中计划的云端流后创建,图为创建计划的云端流的操作步骤。 …...

C语言中各种接口标准
1.POSIX(Portable Operating System Interface,可移植操作系统接口):是一个定义了操作系统接口标准的家族。它旨在提供一致的API(Application Programming Interface,应用程序编程接口)和环境&a…...

vscode常用插件
koroFileHeader: 设置详情, 文件头自动注释 code runner: 支持多语言编译运行 git lens: git 提交可视化查看工具 Markdown配套软件: Markdown All in One: Markdown文档工具集成Markdown PDF: Markdown文档导出为PDFMarkdown Preview Enhanced: 分屏查…...
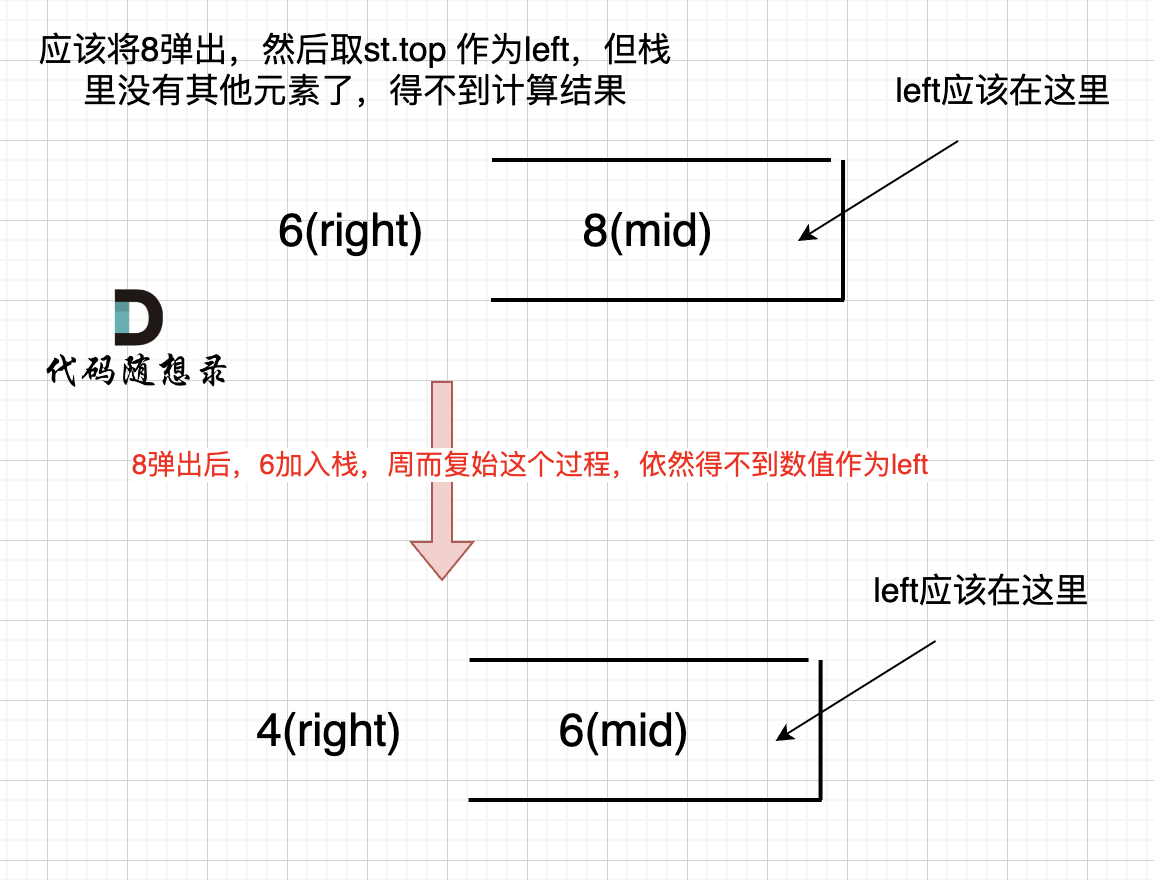
代码随想录算法训练营day60|84.柱状图中最大的矩形 |完结撒花~
84.柱状图中最大的矩形 力扣题目链接 给定 n 个非负整数,用来表示柱状图中各个柱子的高度。每个柱子彼此相邻,且宽度为 1 。 求在该柱状图中,能够勾勒出来的矩形的最大面积。 1 < heights.length <10^5 0 < heights[i] < 10^…...
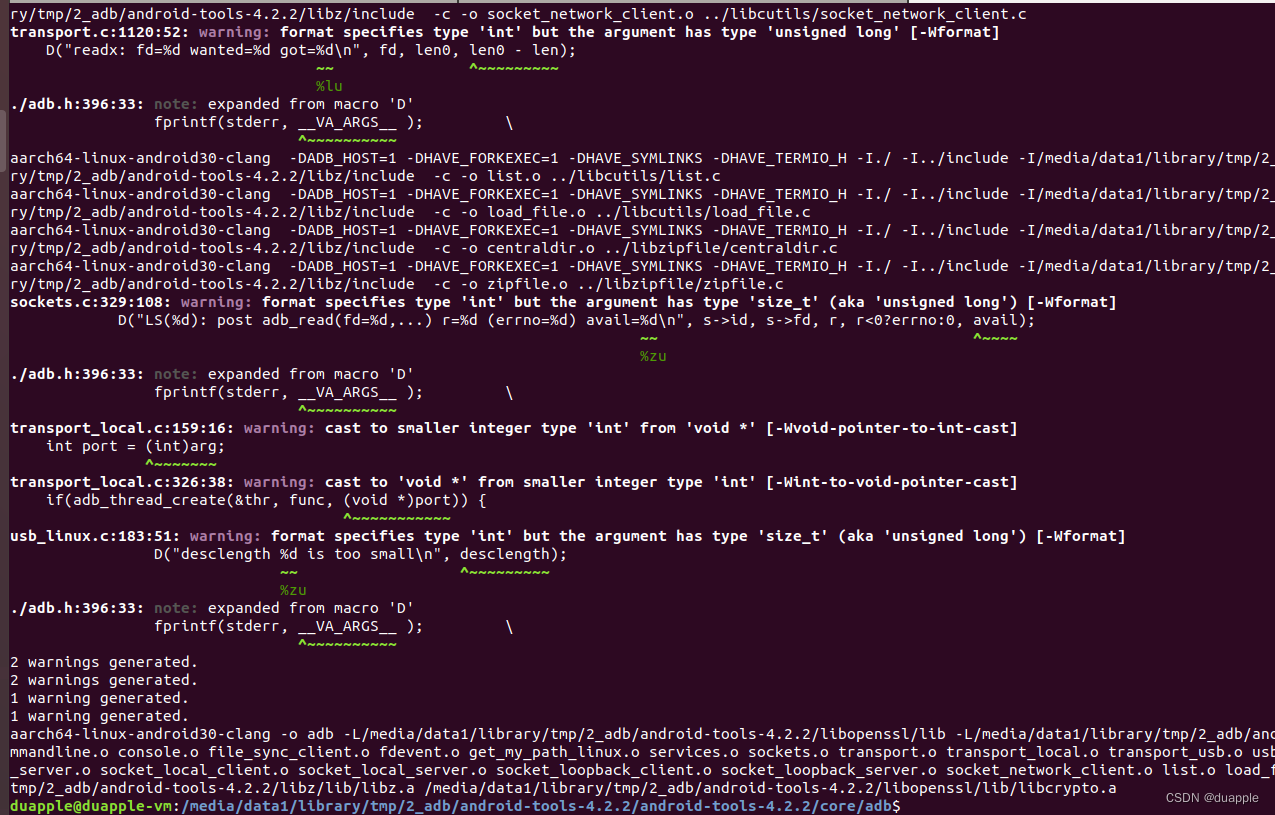
在 android 上使用 adb client
adb tool 分为 adb 和 adbd。 adb 用作 host 使用,包含了client和server,adbd 则作为 device 端,在 android 源码目录下,共用一套源码。但 android 源码下的 adb,不支持把 adb 编译为 android 平台的 adb client。因此…...
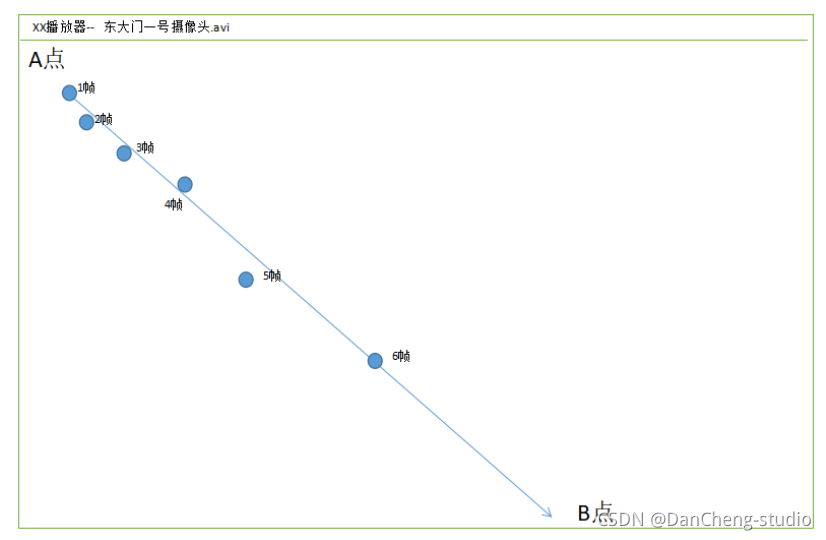
竞赛选题 基于深度学习的视频多目标跟踪实现
文章目录 1 前言2 先上成果3 多目标跟踪的两种方法3.1 方法13.2 方法2 4 Tracking By Detecting的跟踪过程4.1 存在的问题4.2 基于轨迹预测的跟踪方式 5 训练代码6 最后 1 前言 🔥 优质竞赛项目系列,今天要分享的是 基于深度学习的视频多目标跟踪实现 …...
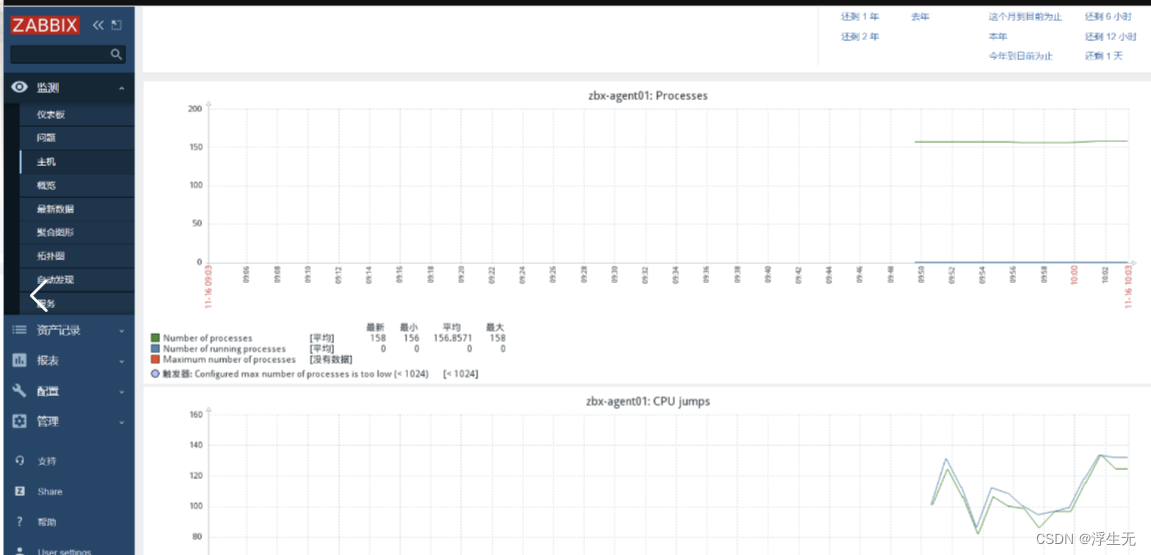
分布式应用之监控平台zabbix的认识与搭建
一、监控系统的相关知识 1.1 监控系统运用的原因 当我们需要实时关注与其相关的各项指标是否正常,往往存在着很多的服务器、网络设备等硬件资源,如果我们想要能够更加方便的、集中的监控他们,zabix可以实现集中监控管理的应用程序 监控的…...

C语言大佬的必杀技---宏的高级用法
C语言大佬的必杀技—宏的高级用法 目录: 字符串化标记的拼接宏的嵌套替换多条语句防止一个文件被重复包含宏和函数的区别 可能大家在学习的时候用得比较少,但是在一些代码量比较大的时候,这样使用,可以大大的提高代码的可读性,…...

@Retryable和Guava retry
文章目录 一、spring的Retryable1.1 作用:1.2链接:https://www.cnblogs.com/EasonJim/p/7684649.html1.3 坑1.4 Recover补充依赖 二、Guava-retry:使用 一、spring的Retryable 1.1 作用: Retryable注解,被注解的方法…...
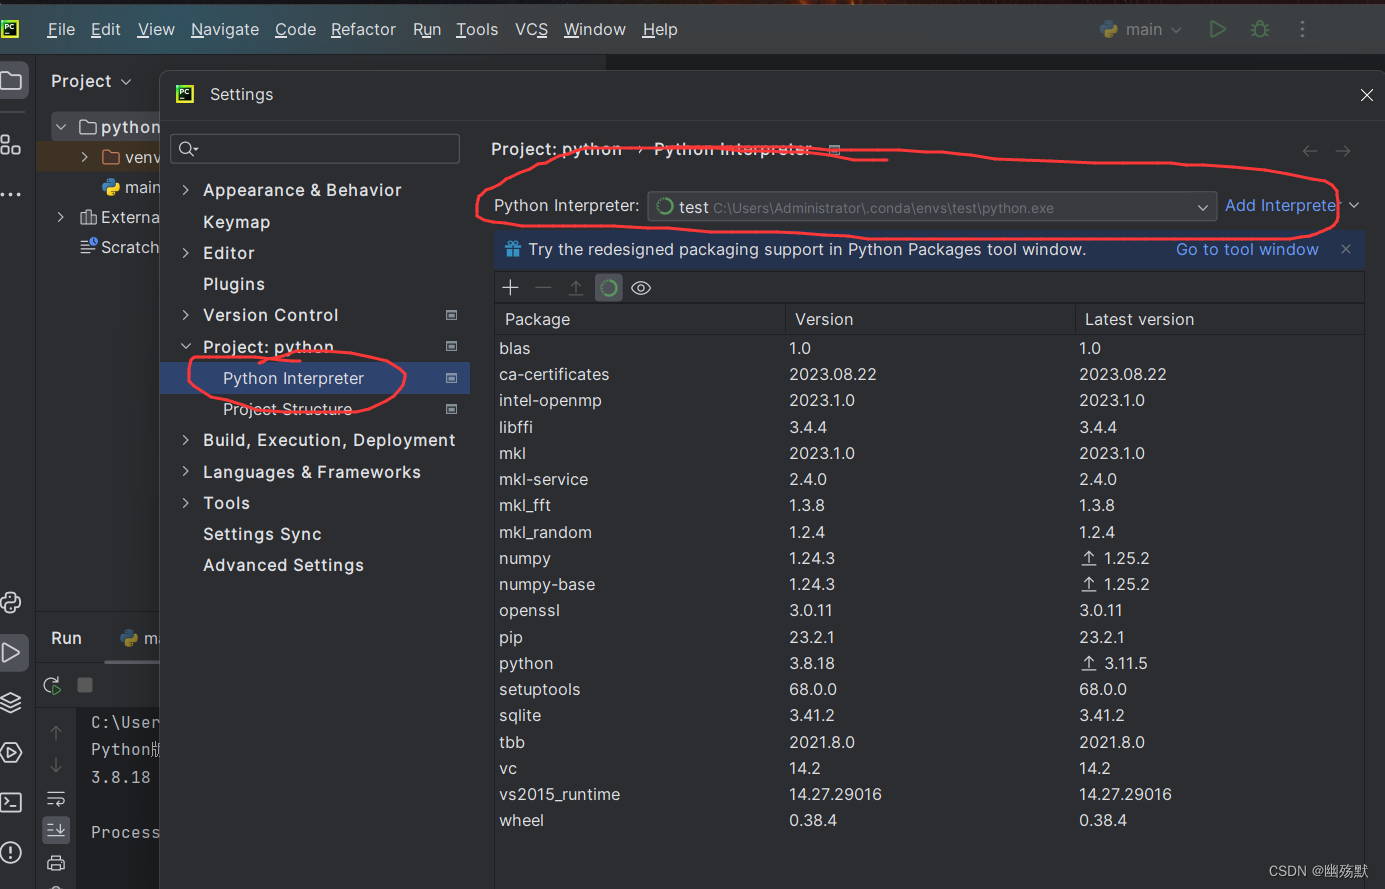
conda的安装和使用
参考资料: https://www.bilibili.com/read/cv8956636/?spm_id_from333.999.0.0 https://www.bilibili.com/video/BV1Mv411x775/?spm_id_from333.999.0.0&vd_source98d31d5c9db8c0021988f2c2c25a9620 目录 conda是啥以及作用conda的安装conda的启动conda的配置…...

K8S:pod集群调度及相关操作
文章目录 一.pod集群调度概念1.调度约束( List-Watch组件)2.List-Watch的工作机制(1)List-Watch的工作机制流程(2)List-Watch的工作机制图示 3.调度的过程(1)调度的任务(2)调度选择p…...

阿里云便宜服务器2核2G配置经济型e实例一年182元性能测评
阿里云服务器经济型e实例2核2G配置优惠价格182.04元一年,系统盘ESSD Entry盘20GB起,公网带宽默认按使用流量,也可以选择按固定带宽计费,带宽值从1M到100M可选,阿腾云分享阿里云服务器2核2G优惠价格、详细配置及e系列CP…...

资讯| 工信部拟筹建元宇宙标准化工作组;《权游》作者起诉OpenAI
元宇宙赛道 工信部:优先开展“元宇宙 工业制造”等行业应用标准研制 9月18日,工业和信息化部科技司就《工业和信息化部元宇宙标准化工作组筹建方案(征求意见稿)》(以下简称《方案》)公开征求意见。 工业…...

Win10安装Docker Desktop并运行Tutorial示例
背景 前段时间一个项目需要在开发环境直接使用 Docker ,为了省事便计划在本地安装 Desktop 版的 Docker 。其实安装过程比较简单,可视化安装即可,主要是对安装与初步使用时遇到的问题做个记录。 下载安装 下载地址:https://dow…...

1、靶机——Pinkys-Place v3(1)
文章目录 一、环境二、获取flag11、扫描局域网内存活主机1.1 查看kali的IP地址1.2 扫描存活主机 2、粗略扫描靶机端口(服务)3、寻找ftp服务漏洞4、扫描端口详细信息5、匿名登录ftp 一、环境 攻击机:kali 靶机:Pinkys-Place v3&am…...
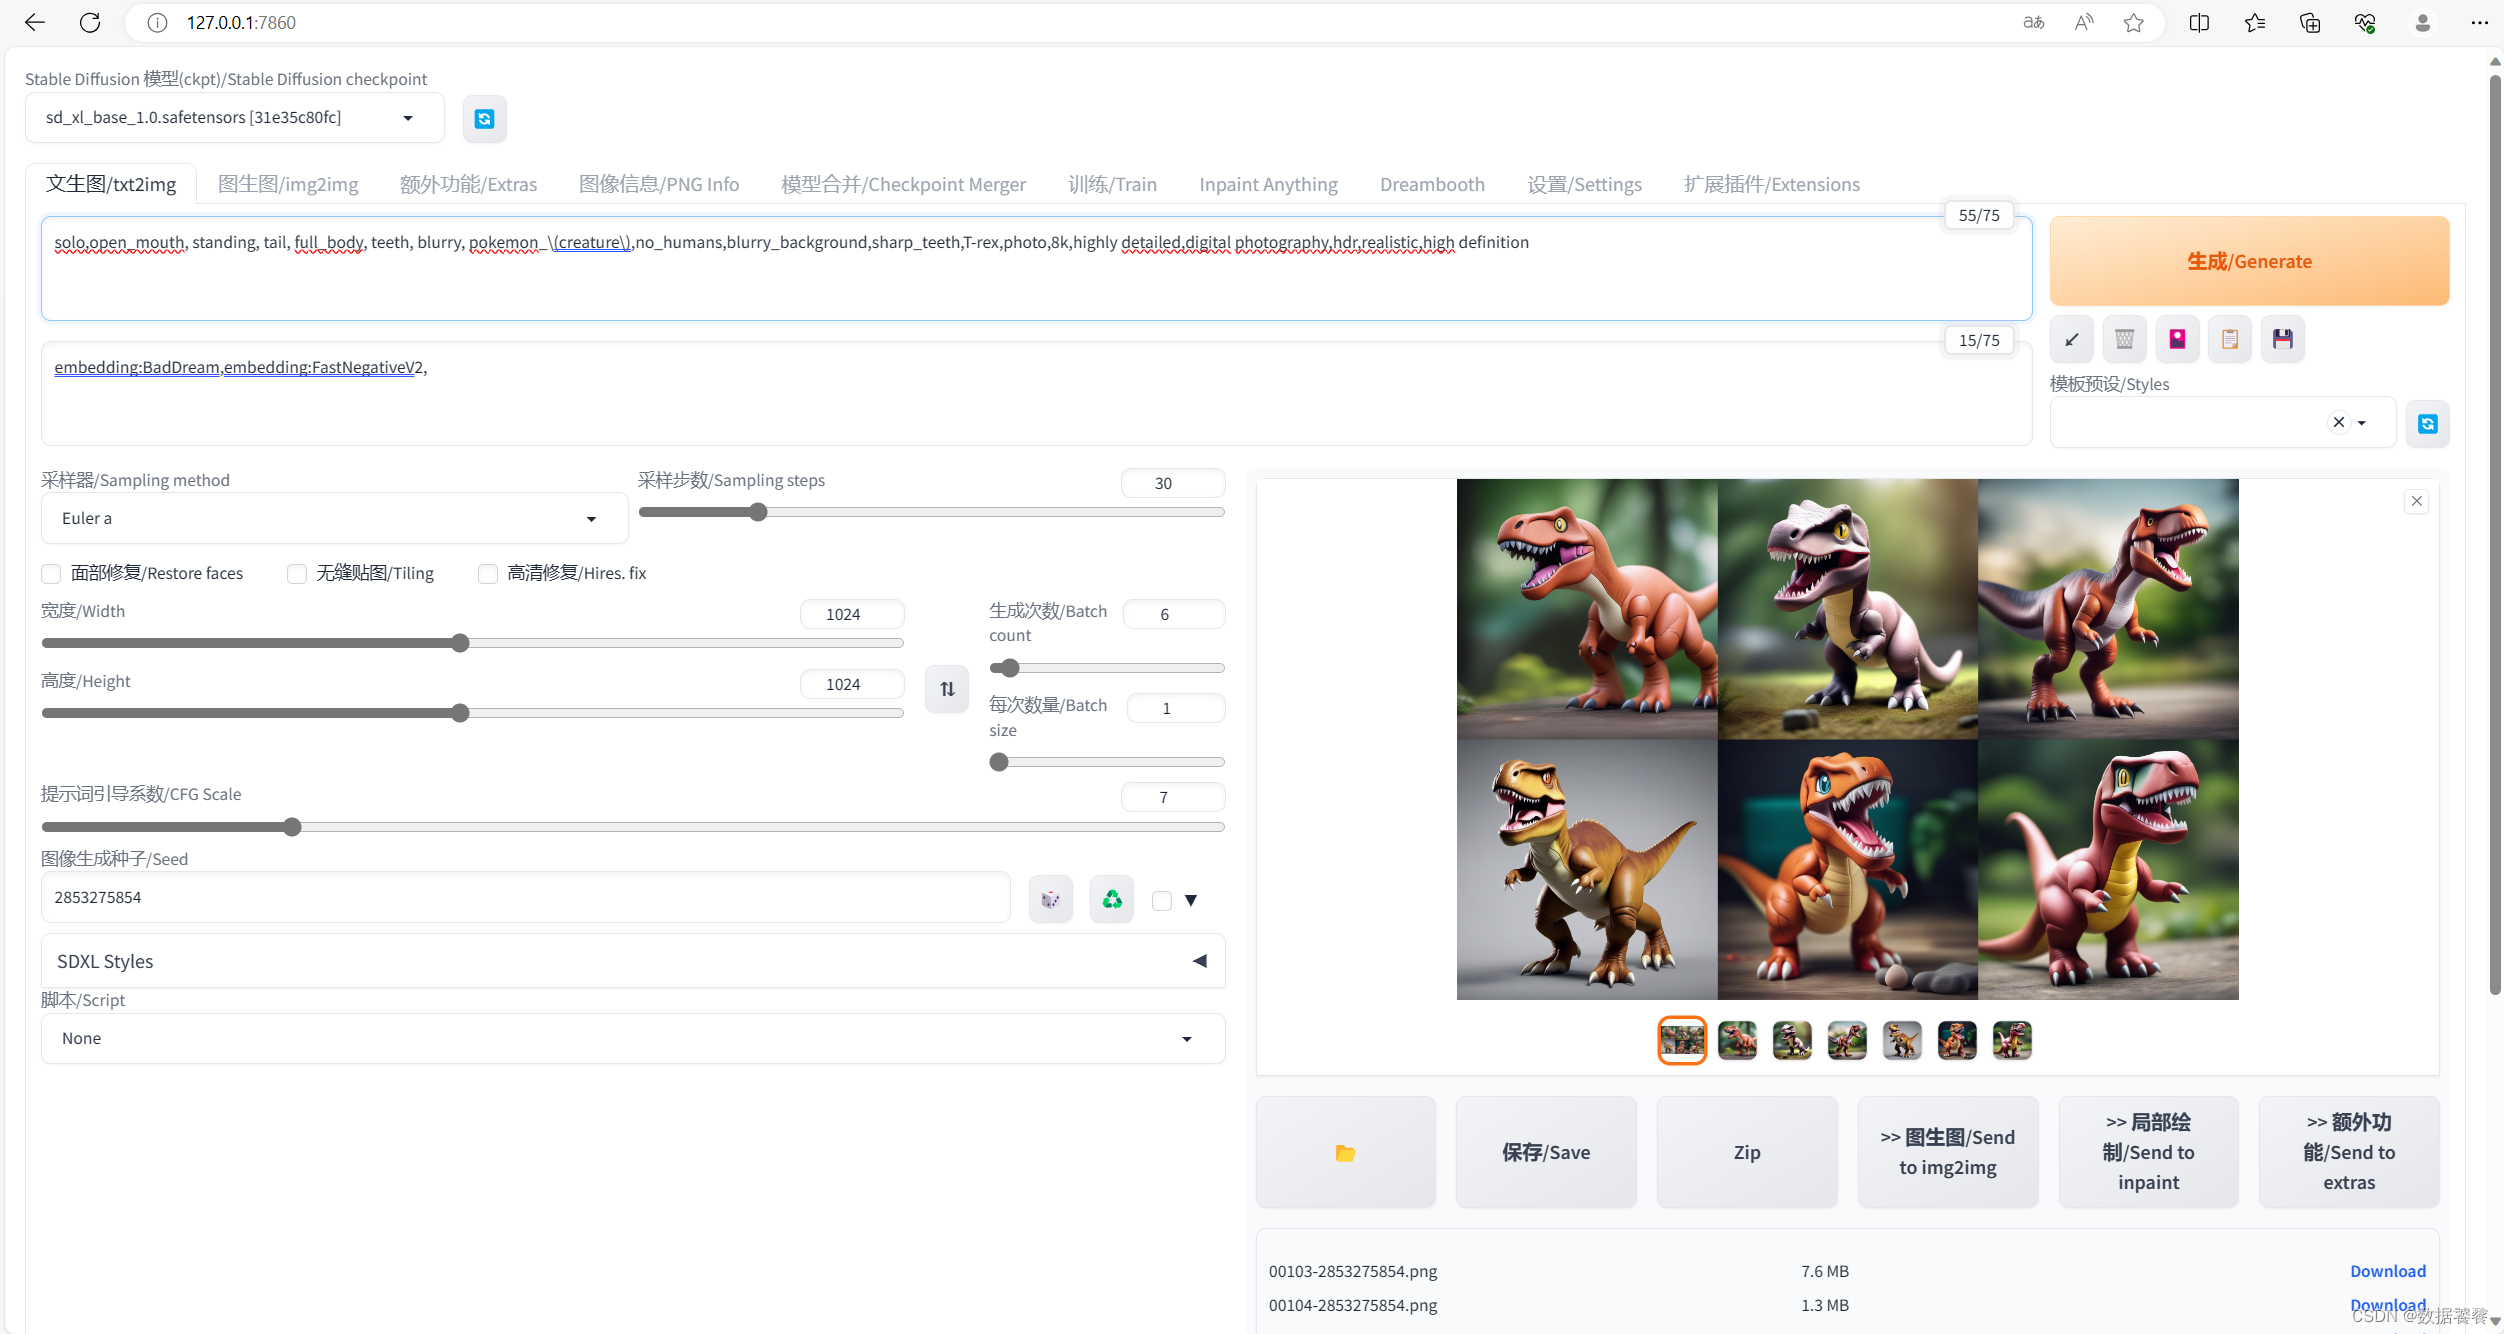
【AIGC】Stable Diffusion Prompt 每日一练0916
一、前言 1.1 写在前面 本文是一个系列,有点类似随笔,每天一次更新,重点就Stable Diffusion Prompt进行专项训练,本文是第022篇《Stable Diffusion Prompt 每日一练0916》。上一篇《Stable Diffusion Prompt 每日一练0915》 1.…...
【C语言】指针经典笔试题(上)
C语言的一大重头戏就是指针。 对于指针有一些认识: 1.指针是存放变量的地址,一般说的指针和指针变量是一个概念。 2.地址的单位是字节,大小在不同编译器环境下有所不同,32位机器是4个字节,64位机器是8个字节。 3.数组名…...

缓存问题解决方案
《服务器开发技术、方法与实用解决方案》 一、缓存预热 在系统刚启动或活动刚开始时,如果缓存中没有数据,那么大量请求将直接访问数据库。如果瞬时访问流量巨大,则可能导致数据库因过载而宕机,甚至引发系统雪崩。因此需要将缓存…...

数据结构————寻路算法
(一)基础补充 二维数组 定义:基本概念与方法和一维数组相似,一般形式为:类型符 数组名[常量表达式][常量表达式]; 其中,数组长度只能是常量;通常把二维数组第一个下标理解成行,第二个下标为列,常量表达式: 表达式里面只有常量的式子(如数字类常量); 二维数组常…...

基于 JiuwenClaw AgentTeam 集群模式的年会策划实战:从源码部署到多智能体协作落地
目录 摘要 一、引言:JiuwenClaw AgentTeam 让复杂任务迎刃而解 1.1 为什么选择年会策划作为 AgentTeam 实战场景 1.2 本文实战目标 二、JiuwenClaw 概述 2.1 JiuwenClaw 的核心特性 2.2 JiuwenClaw 的系统架构 2.3 JiuwenClaw 的三种运行模式 2.3.1 规划模…...

TinyTroupe:轻量级智能体协作范式与确定性AI工程实践
1. 项目概述:这不是另一个“小模型”,而是一套轻量级智能体协作范式你可能已经看过不少标题带“Tiny”“Mini”“Lite”的AI项目,它们大多是在说“把大模型压缩一下,跑在手机上”。但 Microsoft 的TinyTroupe完全不是这个路数——…...

抖音下载器:三步实现无水印高清素材批量获取
抖音下载器:三步实现无水印高清素材批量获取 【免费下载链接】douyin-downloader A practical Douyin downloader for both single-item and profile batch downloads, with progress display, retries, SQLite deduplication, and browser fallback support. 抖音批…...

从布朗运动到伊藤公式:金融随机世界的建模基石
1. 从花粉运动到股票价格:布朗运动的金融启示 1827年,英国植物学家罗伯特布朗在显微镜下观察到花粉颗粒在水中的不规则舞动,这个看似简单的物理现象却在80年后被爱因斯坦用数学语言精确描述。有趣的是,当我们将显微镜换成股票行情…...

AI模型评估实战:从原理到实践,用Evaliphy简化评测全流程
1. 项目概述:当AI测试遇上“简化”难题最近和几个做AI应用开发的朋友聊天,大家不约而同地提到了同一个痛点:模型效果评估太折腾了。这让我想起自己去年折腾一个文本分类项目时的经历——为了评估模型在几个不同测试集上的表现,我写…...

终极指南:Visual C++运行库一键修复完整教程
终极指南:Visual C运行库一键修复完整教程 【免费下载链接】vcredist AIO Repack for latest Microsoft Visual C Redistributable Runtimes 项目地址: https://gitcode.com/gh_mirrors/vc/vcredist 你是否曾经遇到过打开软件时突然弹出"无法启动此程序…...

解密智能图片分层:掌握Layerdivider提升设计效率的实战指南
解密智能图片分层:掌握Layerdivider提升设计效率的实战指南 【免费下载链接】layerdivider A tool to divide a single illustration into a layered structure. 项目地址: https://gitcode.com/gh_mirrors/la/layerdivider 在数字创意领域,我们常…...

观测多模型API调用延迟与稳定性选择合适服务商
🚀 告别海外账号与网络限制!稳定直连全球优质大模型,限时半价接入中。 👉 点击领取海量免费额度 观测多模型API调用延迟与稳定性选择合适服务商 在实际项目开发中,直接依赖单一模型服务商可能会面临服务波动或响应延迟…...

3大技术突破:APK Installer如何重新定义Windows上的安卓应用体验
3大技术突破:APK Installer如何重新定义Windows上的安卓应用体验 【免费下载链接】APK-Installer An Android Application Installer for Windows 项目地址: https://gitcode.com/GitHub_Trending/ap/APK-Installer APK Installer是一款革命性的Windows平台安…...

从图文到视频:用 Python 打造公众号文章自动化转视频号的爆款流水线
摘要:本文详解一套完全基于开源工具(Python + edge-tts + ffmpeg)的自动化系统,可将任意微信公众号文章一键转换为横屏/竖屏视频,直接用于视频号分发。全程无需剪辑软件、无需出镜、无需复杂配置,5 分钟部署,1 条命令生成专业级视频。 🔥 为什么你需要这个? 在 AIGC…...