kubeasz部署k8s高可用集群
前言:如无特殊说明,所有操作都用root账号在所有节点执行。
说明:kubeasz是一款国产开源的k8s部署软件,采用ansible role的部署方式,部署k8s二进制集群。熟悉ansible role的用该软件部署k8s方便快捷。
一、机器
deploy #部署机器
master01
master02
node01
二、环境
2.1 部署机器环境
[root@localhost opt]# cat /etc/redhat-release
CentOS Linux release 7.9.2009 (Core)
[root@localhost opt]# uname -a
Linux localhost.localdomain 3.10.0-229.el7.x86_64 #1 SMP Fri Mar 6 11:36:42 UTC 2015 x86_64 x86_64 x86_64 GNU/Linux
[root@localhost opt]# python -V
Python 3.9.2
2.2 master和node节点机器环境
[root@localhost ~]# cat /etc/redhat-release
CentOS Linux release 7.5.1804 (Core)
[root@localhost ~]# uname -a
Linux mater01 3.10.0-862.el7.x86_64 #1 SMP Fri Apr 20 16:44:24 UTC 2018 x86_64 x86_64 x86_64 GNU/Linux
[root@localhost ~]# python -V
Python 3.9.2
2.3 ip和主机名
deploy 192.168.30.13
master01 192.168.30.10
master02 192.168.30.11
node01 192.168.10.12
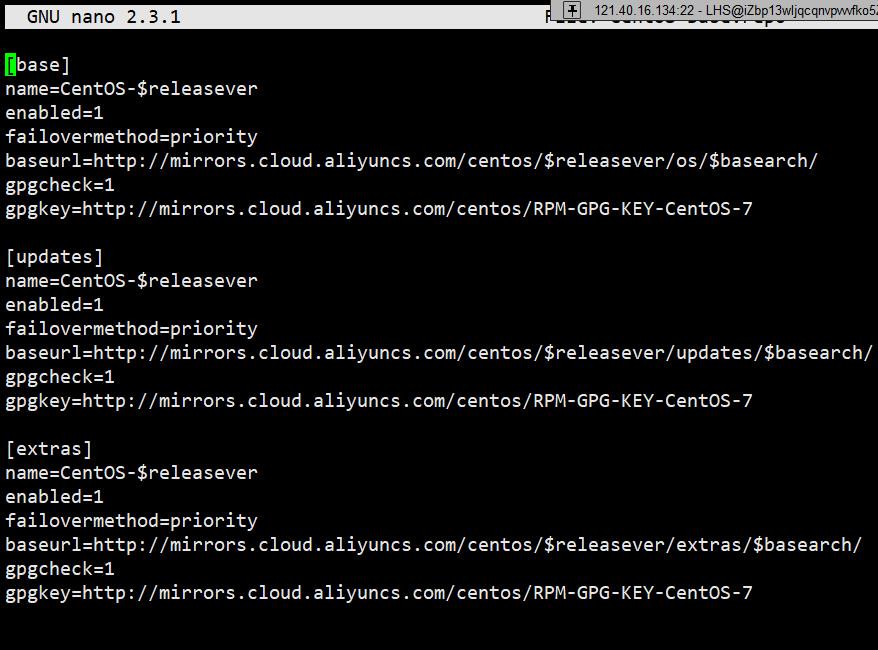
三、配置yum源
说明:CentOS 7 系统的yum源不再可用,需要重新配置。
3.1 备份旧yum源文件
cd /etc/yum.repos.d/
mkdir bak/
mv * ./bak/
3.2 配置Base源
cat >> CentOS-Base.repo << EOF
# CentOS-Base.repo
#
# The mirror system uses the connecting IP address of the client and the
# update status of each mirror to pick mirrors that are updated to and
# geographically close to the client.  You should use this for CentOS updates
# unless you are manually picking other mirrors.
#
# If the mirrorlist= does not work for you, as a fall back you can try the
# remarked out baseurl= line instead.
#
#[base]
name=CentOS-$releasever - Base
mirrorlist=http://mirrorlist.centos.org/?release=$releasever&arch=$basearch&repo=os&infra=$infra
#baseurl=http://mirror.centos.org/centos/$releasever/os/$basearch/
gpgcheck=1
gpgkey=file:///etc/pki/rpm-gpg/RPM-GPG-KEY-CentOS-7#released updates
[updates]
name=CentOS-$releasever - Updates
mirrorlist=http://mirrorlist.centos.org/?release=$releasever&arch=$basearch&repo=updates&infra=$infra
#baseurl=http://mirror.centos.org/centos/$releasever/updates/$basearch/
gpgcheck=1
gpgkey=file:///etc/pki/rpm-gpg/RPM-GPG-KEY-CentOS-7#additional packages that may be useful
[extras]
name=CentOS-$releasever - Extras
mirrorlist=http://mirrorlist.centos.org/?release=$releasever&arch=$basearch&repo=extras&infra=$infra
#baseurl=http://mirror.centos.org/centos/$releasever/extras/$basearch/
gpgcheck=1
gpgkey=file:///etc/pki/rpm-gpg/RPM-GPG-KEY-CentOS-7#additional packages that extend functionality of existing packages
[centosplus]
name=CentOS-$releasever - Plus
mirrorlist=http://mirrorlist.centos.org/?release=$releasever&arch=$basearch&repo=centosplus&infra=$infra
#baseurl=http://mirror.centos.org/centos/$releasever/centosplus/$basearch/
gpgcheck=1
enabled=0
gpgkey=file:///etc/pki/rpm-gpg/RPM-GPG-KEY-CentOS-7
EOF
3.3 配置CR源
cat >> CentOS-CR.repo << EOF
# CentOS-CR.repo
#
# The Continuous Release ( CR )  repository contains rpms that are due in the next
# release for a specific CentOS Version ( eg. next release in CentOS-7 ); these rpms
# are far less tested, with no integration checking or update path testing having
# taken place. They are still built from the upstream sources, but might not map
# to an exact upstream distro release.
#
# These packages are made available soon after they are built, for people willing
# to test their environments, provide feedback on content for the next release, and
# for people looking for early-access to next release content.
#
# The CR repo is shipped in a disabled state by default; its important that users
# understand the implications of turning this on.
#
# NOTE: We do not use a mirrorlist for the CR repos, to ensure content is available
#       to everyone as soon as possible, and not need to wait for the external
#       mirror network to seed first. However, many local mirrors will carry CR repos
#       and if desired you can use one of these local mirrors by editing the baseurl
#       line in the repo config below.
#[cr]
name=CentOS-$releasever - cr
baseurl=http://mirror.centos.org/centos/$releasever/cr/$basearch/
gpgcheck=1
gpgkey=file:///etc/pki/rpm-gpg/RPM-GPG-KEY-CentOS-7
enabled=0
EOF
3.4 配置Debuginfo源
cat >> CentOS-Debuginfo.repo << EOF
# CentOS-Debug.repo
#
# The mirror system uses the connecting IP address of the client and the
# update status of each mirror to pick mirrors that are updated to and
# geographically close to the client.  You should use this for CentOS updates
# unless you are manually picking other mirrors.
## All debug packages from all the various CentOS-7 releases
# are merged into a single repo, split by BaseArch
#
# Note: packages in the debuginfo repo are currently not signed
#[base-debuginfo]
name=CentOS-7 - Debuginfo
baseurl=http://debuginfo.centos.org/7/$basearch/
gpgcheck=1
gpgkey=file:///etc/pki/rpm-gpg/RPM-GPG-KEY-CentOS-Debug-7
enabled=0
#
EOF
3.5 配置fasttrack源
cat >> CentOS-fasttrack.repo << EOF
#CentOS-fasttrack.repo[fasttrack]
name=CentOS-7 - fasttrack
mirrorlist=http://mirrorlist.centos.org/?release=$releasever&arch=$basearch&repo=fasttrack&infra=$infra
#baseurl=http://mirror.centos.org/centos/$releasever/fasttrack/$basearch/
gpgcheck=1
enabled=0
gpgkey=file:///etc/pki/rpm-gpg/RPM-GPG-KEY-CentOS-7
EOF
3.6 配置Media源
cat >> CentOS-Media.repo << EOF
# CentOS-Media.repo
#
#  This repo can be used with mounted DVD media, verify the mount point for
#  CentOS-7.  You can use this repo and yum to install items directly off the
#  DVD ISO that we release.
#
# To use this repo, put in your DVD and use it with the other repos too:
#  yum --enablerepo=c7-media [command]
#
# or for ONLY the media repo, do this:
#
#  yum --disablerepo=\* --enablerepo=c7-media [command][c7-media]
name=CentOS-$releasever - Media
baseurl=file:///media/CentOS/file:///media/cdrom/file:///media/cdrecorder/
gpgcheck=1
enabled=0
gpgkey=file:///etc/pki/rpm-gpg/RPM-GPG-KEY-CentOS-7
EOF
3.7 配置Sources源
cat >> CentOS-Sources.repo << EOF
# CentOS-Sources.repo
#
# The mirror system uses the connecting IP address of the client and the
# update status of each mirror to pick mirrors that are updated to and
# geographically close to the client.  You should use this for CentOS updates
# unless you are manually picking other mirrors.
#
# If the mirrorlist= does not work for you, as a fall back you can try the
# remarked out baseurl= line instead.
#
#[base-source]
name=CentOS-$releasever - Base Sources
baseurl=http://vault.centos.org/centos/$releasever/os/Source/
gpgcheck=1
enabled=0
gpgkey=file:///etc/pki/rpm-gpg/RPM-GPG-KEY-CentOS-7#released updates
[updates-source]
name=CentOS-$releasever - Updates Sources
baseurl=http://vault.centos.org/centos/$releasever/updates/Source/
gpgcheck=1
enabled=0
gpgkey=file:///etc/pki/rpm-gpg/RPM-GPG-KEY-CentOS-7#additional packages that may be useful
[extras-source]
name=CentOS-$releasever - Extras Sources
baseurl=http://vault.centos.org/centos/$releasever/extras/Source/
gpgcheck=1
enabled=0
gpgkey=file:///etc/pki/rpm-gpg/RPM-GPG-KEY-CentOS-7#additional packages that extend functionality of existing packages
[centosplus-source]
name=CentOS-$releasever - Plus Sources
baseurl=http://vault.centos.org/centos/$releasever/centosplus/Source/
gpgcheck=1
enabled=0
gpgkey=file:///etc/pki/rpm-gpg/RPM-GPG-KEY-CentOS-7
EOF
3.8 配置Vault源
cat >> CentOS-Vault.repo << EOF
# CentOS Vault contains rpms from older releases in the CentOS-7
# tree.#c7.0.1406
[C7.0.1406-base]
name=CentOS-7.0.1406 - Base
baseurl=http://vault.centos.org/7.0.1406/os/$basearch/
gpgcheck=1
gpgkey=file:///etc/pki/rpm-gpg/RPM-GPG-KEY-CentOS-7
enabled=0[C7.0.1406-updates]
name=CentOS-7.0.1406 - Updates
baseurl=http://vault.centos.org/7.0.1406/updates/$basearch/
gpgcheck=1
gpgkey=file:///etc/pki/rpm-gpg/RPM-GPG-KEY-CentOS-7
enabled=0[C7.0.1406-extras]
name=CentOS-7.0.1406 - Extras
baseurl=http://vault.centos.org/7.0.1406/extras/$basearch/
gpgcheck=1
gpgkey=file:///etc/pki/rpm-gpg/RPM-GPG-KEY-CentOS-7
enabled=0[C7.0.1406-centosplus]
name=CentOS-7.0.1406 - CentOSPlus
baseurl=http://vault.centos.org/7.0.1406/centosplus/$basearch/
gpgcheck=1
gpgkey=file:///etc/pki/rpm-gpg/RPM-GPG-KEY-CentOS-7
enabled=0[C7.0.1406-fasttrack]
name=CentOS-7.0.1406 - CentOSPlus
baseurl=http://vault.centos.org/7.0.1406/fasttrack/$basearch/
gpgcheck=1
gpgkey=file:///etc/pki/rpm-gpg/RPM-GPG-KEY-CentOS-7
enabled=0# C7.1.1503
[C7.1.1503-base]
name=CentOS-7.1.1503 - Base
baseurl=http://vault.centos.org/7.1.1503/os/$basearch/
gpgcheck=1
gpgkey=file:///etc/pki/rpm-gpg/RPM-GPG-KEY-CentOS-7
enabled=0[C7.1.1503-updates]
name=CentOS-7.1.1503 - Updates
baseurl=http://vault.centos.org/7.1.1503/updates/$basearch/
gpgcheck=1
gpgkey=file:///etc/pki/rpm-gpg/RPM-GPG-KEY-CentOS-7
enabled=0[C7.1.1503-extras]
name=CentOS-7.1.1503 - Extras
baseurl=http://vault.centos.org/7.1.1503/extras/$basearch/
gpgcheck=1
gpgkey=file:///etc/pki/rpm-gpg/RPM-GPG-KEY-CentOS-7
enabled=0[C7.1.1503-centosplus]
name=CentOS-7.1.1503 - CentOSPlus
baseurl=http://vault.centos.org/7.1.1503/centosplus/$basearch/
gpgcheck=1
gpgkey=file:///etc/pki/rpm-gpg/RPM-GPG-KEY-CentOS-7
enabled=0[C7.1.1503-fasttrack]
name=CentOS-7.1.1503 - CentOSPlus
baseurl=http://vault.centos.org/7.1.1503/fasttrack/$basearch/
gpgcheck=1
gpgkey=file:///etc/pki/rpm-gpg/RPM-GPG-KEY-CentOS-7
enabled=0# C7.2.1511
[C7.2.1511-base]
name=CentOS-7.2.1511 - Base
baseurl=http://vault.centos.org/7.2.1511/os/$basearch/
gpgcheck=1
gpgkey=file:///etc/pki/rpm-gpg/RPM-GPG-KEY-CentOS-7
enabled=0[C7.2.1511-updates]
name=CentOS-7.2.1511 - Updates
baseurl=http://vault.centos.org/7.2.1511/updates/$basearch/
gpgcheck=1
gpgkey=file:///etc/pki/rpm-gpg/RPM-GPG-KEY-CentOS-7
enabled=0[C7.2.1511-extras]
name=CentOS-7.2.1511 - Extras
baseurl=http://vault.centos.org/7.2.1511/extras/$basearch/
gpgcheck=1
gpgkey=file:///etc/pki/rpm-gpg/RPM-GPG-KEY-CentOS-7
enabled=0[C7.2.1511-centosplus]
name=CentOS-7.2.1511 - CentOSPlus
baseurl=http://vault.centos.org/7.2.1511/centosplus/$basearch/
gpgcheck=1
gpgkey=file:///etc/pki/rpm-gpg/RPM-GPG-KEY-CentOS-7
enabled=0[C7.2.1511-fasttrack]
name=CentOS-7.2.1511 - CentOSPlus
baseurl=http://vault.centos.org/7.2.1511/fasttrack/$basearch/
gpgcheck=1
gpgkey=file:///etc/pki/rpm-gpg/RPM-GPG-KEY-CentOS-7
enabled=0# C7.3.1611
[C7.3.1611-base]
name=CentOS-7.3.1611 - Base
baseurl=http://vault.centos.org/7.3.1611/os/$basearch/
gpgcheck=1
gpgkey=file:///etc/pki/rpm-gpg/RPM-GPG-KEY-CentOS-7
enabled=0[C7.3.1611-updates]
name=CentOS-7.3.1611 - Updates
baseurl=http://vault.centos.org/7.3.1611/updates/$basearch/
gpgcheck=1
gpgkey=file:///etc/pki/rpm-gpg/RPM-GPG-KEY-CentOS-7
enabled=0[C7.3.1611-extras]
name=CentOS-7.3.1611 - Extras
baseurl=http://vault.centos.org/7.3.1611/extras/$basearch/
gpgcheck=1
gpgkey=file:///etc/pki/rpm-gpg/RPM-GPG-KEY-CentOS-7
enabled=0[C7.3.1611-centosplus]
name=CentOS-7.3.1611 - CentOSPlus
baseurl=http://vault.centos.org/7.3.1611/centosplus/$basearch/
gpgcheck=1
gpgkey=file:///etc/pki/rpm-gpg/RPM-GPG-KEY-CentOS-7
enabled=0[C7.3.1611-fasttrack]
name=CentOS-7.3.1611 - CentOSPlus
baseurl=http://vault.centos.org/7.3.1611/fasttrack/$basearch/
gpgcheck=1
gpgkey=file:///etc/pki/rpm-gpg/RPM-GPG-KEY-CentOS-7
enabled=0# C7.4.1708
[C7.4.1708-base]
name=CentOS-7.4.1708 - Base
baseurl=http://vault.centos.org/7.4.1708/os/$basearch/
gpgcheck=1
gpgkey=file:///etc/pki/rpm-gpg/RPM-GPG-KEY-CentOS-7
enabled=0[C7.4.1708-updates]
name=CentOS-7.4.1708 - Updates
baseurl=http://vault.centos.org/7.4.1708/updates/$basearch/
gpgcheck=1
gpgkey=file:///etc/pki/rpm-gpg/RPM-GPG-KEY-CentOS-7
enabled=0[C7.4.1708-extras]
name=CentOS-7.4.1708 - Extras
baseurl=http://vault.centos.org/7.4.1708/extras/$basearch/
gpgcheck=1
gpgkey=file:///etc/pki/rpm-gpg/RPM-GPG-KEY-CentOS-7
enabled=0[C7.4.1708-centosplus]
name=CentOS-7.4.1708 - CentOSPlus
baseurl=http://vault.centos.org/7.4.1708/centosplus/$basearch/
gpgcheck=1
gpgkey=file:///etc/pki/rpm-gpg/RPM-GPG-KEY-CentOS-7
enabled=0[C7.4.1708-fasttrack]
name=CentOS-7.4.1708 - CentOSPlus
baseurl=http://vault.centos.org/7.4.1708/fasttrack/$basearch/
gpgcheck=1
gpgkey=file:///etc/pki/rpm-gpg/RPM-GPG-KEY-CentOS-7
enabled=0
EOF
3.9 配置x86_64-kernel源
cat >> CentOS-x86_64-kernel.repo << EOF
[centos-kernel]
name=CentOS LTS Kernels for $basearch
mirrorlist=http://mirrorlist.centos.org/?release=$releasever&arch=$basearch&repo=kernel&infra=$infra
#baseurl=http://mirror.centos.org/altarch/7/kernel/$basearch/
enabled=0
gpgcheck=1
gpgkey=file:///etc/pki/rpm-gpg/RPM-GPG-KEY-CentOS-7[centos-kernel-experimental]
name=CentOS Experimental Kernels for $basearch
mirrorlist=http://mirrorlist.centos.org/?release=$releasever&arch=$basearch&repo=experimental&infra=$infra
#baseurl=http://mirror.centos.org/altarch/7/experimental/$basearch/
enabled=0
gpgcheck=1
gpgkey=file:///etc/pki/rpm-gpg/RPM-GPG-KEY-CentOS-7
EOF
3.10 配置docker-ce源
cat >> docker-ce.repo << EOF
[docker-ce-stable]
name=Docker CE Stable - $basearch
baseurl=https://mirrors.aliyun.com/docker-ce/linux/centos/$releasever/$basearch/stable
enabled=1
gpgcheck=1
gpgkey=https://mirrors.aliyun.com/docker-ce/linux/centos/gpg[docker-ce-stable-debuginfo]
name=Docker CE Stable - Debuginfo $basearch
baseurl=https://mirrors.aliyun.com/docker-ce/linux/centos/$releasever/debug-$basearch/stable
enabled=0
gpgcheck=1
gpgkey=https://mirrors.aliyun.com/docker-ce/linux/centos/gpg[docker-ce-stable-source]
name=Docker CE Stable - Sources
baseurl=https://mirrors.aliyun.com/docker-ce/linux/centos/$releasever/source/stable
enabled=0
gpgcheck=1
gpgkey=https://mirrors.aliyun.com/docker-ce/linux/centos/gpg[docker-ce-test]
name=Docker CE Test - $basearch
baseurl=https://mirrors.aliyun.com/docker-ce/linux/centos/$releasever/$basearch/test
enabled=0
gpgcheck=1
gpgkey=https://mirrors.aliyun.com/docker-ce/linux/centos/gpg[docker-ce-test-debuginfo]
name=Docker CE Test - Debuginfo $basearch
baseurl=https://mirrors.aliyun.com/docker-ce/linux/centos/$releasever/debug-$basearch/test
enabled=0
gpgcheck=1
gpgkey=https://mirrors.aliyun.com/docker-ce/linux/centos/gpg[docker-ce-test-source]
name=Docker CE Test - Sources
baseurl=https://mirrors.aliyun.com/docker-ce/linux/centos/$releasever/source/test
enabled=0
gpgcheck=1
gpgkey=https://mirrors.aliyun.com/docker-ce/linux/centos/gpg[docker-ce-nightly]
name=Docker CE Nightly - $basearch
baseurl=https://mirrors.aliyun.com/docker-ce/linux/centos/$releasever/$basearch/nightly
enabled=0
gpgcheck=1
gpgkey=https://mirrors.aliyun.com/docker-ce/linux/centos/gpg[docker-ce-nightly-debuginfo]
name=Docker CE Nightly - Debuginfo $basearch
baseurl=https://mirrors.aliyun.com/docker-ce/linux/centos/$releasever/debug-$basearch/nightly
enabled=0
gpgcheck=1
gpgkey=https://mirrors.aliyun.com/docker-ce/linux/centos/gpg[docker-ce-nightly-source]
name=Docker CE Nightly - Sources
baseurl=https://mirrors.aliyun.com/docker-ce/linux/centos/$releasever/source/nightly
enabled=0
gpgcheck=1
gpgkey=https://mirrors.aliyun.com/docker-ce/linux/centos/gpg
EOF
3.11 配置nginx源
cat >> nginx.repo << EOF
[nginx-stable]
name=nginx stable repo
baseurl=http://nginx.org/packages/centos/$releasever/$basearch/
gpgcheck=1
enabled=1
gpgkey=https://nginx.org/keys/nginx_signing.key
module_hotfixes=true[nginx-mainline]
name=nginx mainline repo
baseurl=http://nginx.org/packages/mainline/centos/$releasever/$basearch/
gpgcheck=1
enabled=0
gpgkey=https://nginx.org/keys/nginx_signing.key
module_hotfixes=true
EOF
四、关闭selinux和防火墙
4.1 关闭防火墙
systemctl disable firewalld
systemctl stop firewalld
4.2 关闭selinux
setenforce 0
sed -i 's#SELINUX=.*#SELINUX=disabled#g' /etc/selinux/config
警告:关闭selinux后一定要重启机器,否则会被部署代码识别为未关闭selinux而报错。
五、修改主机名
说明:分别在maser01 master02 node节点执行。
5.1 master01执行
hostnamectl set-hostname master015.2 master02执行
hostnamectl set-hostname master02
5.3 node01执行
hostnamectl set-hostname node01
六、部署步骤
说明:仅在deploy节点执行。
6.1 准备ssh免密登陆
配置从部署节点能够ssh免密登陆所有节点,并且设置python软连接
$IP为所有节点地址包括自身,按照提示输入yes 和root密码
ssh-copy-id $IP
6.2 为每个节点设置python软链接
ssh $IP ln -s /usr/bin/python3 /usr/bin/python
6.3 在部署节点编排k8s安装
6.3.1 下载项目源码、二进制及离线镜像
下载工具脚本ezdown,举例使用kubeasz版本3.5.0
export release=3.5.0
wget https://github.com/easzlab/kubeasz/releases/download/${release}/ezdown
chmod +x ./ezdown
下载kubeasz代码、二进制、默认容器镜像(更多关于ezdown的参数,运行./ezdown 查看)
#国内环境
./ezdown -D
#海外环境
./ezdown -D -m standard
【可选】下载额外容器镜像(cilium,flannel,prometheus等)
./ezdown -X
【可选】下载离线系统包 (适用于无法使用yum/apt仓库情形)
./ezdown -P
上述脚本运行成功后,所有文件(kubeasz代码、二进制、离线镜像)均已整理好放入目录/etc/kubeasz
6.3.2 创建集群配置实例
#容器化运行kubeasz
./ezdown -S
#创建新集群 k8s-01
docker exec -it kubeasz ezctl new k8s-01
2021-01-19 10:48:23 DEBUG generate custom cluster files in /etc/kubeasz/clusters/k8s-01
2021-01-19 10:48:23 DEBUG set version of common plugins
2021-01-19 10:48:23 DEBUG cluster k8s-01: files successfully created.
2021-01-19 10:48:23 INFO next steps 1: to config '/etc/kubeasz/clusters/k8s-01/hosts'
2021-01-19 10:48:23 INFO next steps 2: to config '/etc/kubeasz/clusters/k8s-01/config.yml'
然后根据提示配置’/etc/kubeasz/clusters/k8s-01/hosts’ 和 ‘/etc/kubeasz/clusters/k8s-01/config.yml’:根据前面节点规划修改hosts 文件和其他集群层面的主要配置选项;其他集群组件等配置项可以在config.yml 文件中修改。
修改后的配置文件如下
cat /etc/kubeasz/clusters/k8s-01/hosts
# 'etcd' cluster should have odd member(s) (1,3,5,...)
[etcd]
192.168.30.16
192.168.30.17
192.168.30.18# master node(s)
[kube_master]
192.168.30.16
192.168.30.17# work node(s)
[kube_node]
192.168.30.18# [optional] harbor server, a private docker registry
# 'NEW_INSTALL': 'true' to install a harbor server; 'false' to integrate with existed one
[harbor]
#192.168.1.8 NEW_INSTALL=false
192.168.30.16 NEW_INSTALL=true# [optional] loadbalance for accessing k8s from outside
[ex_lb]
#192.168.1.6 LB_ROLE=backup EX_APISERVER_VIP=192.168.30.1750 EX_APISERVER_PORT=8443
#192.168.1.7 LB_ROLE=master EX_APISERVER_VIP=192.168.30.1750 EX_APISERVER_PORT=8443
192.168.30.16 LB_ROLE=backup EX_APISERVER_VIP=192.168.30.200 EX_APISERVER_PORT=8443
192.168.30.17 LB_ROLE=master EX_APISERVER_VIP=192.168.30.200 EX_APISERVER_PORT=8443# [optional] ntp server for the cluster
[chrony]
#192.168.30.16
192.168.30.16[all:vars]
# --------- Main Variables ---------------
# Secure port for apiservers
SECURE_PORT="6443"# Cluster container-runtime supported: docker, containerd
# if k8s version >= 1.24, docker is not supported
CONTAINER_RUNTIME="containerd"# Network plugins supported: calico, flannel, kube-router, cilium, kube-ovn
CLUSTER_NETWORK="calico"# Service proxy mode of kube-proxy: 'iptables' or 'ipvs'
PROXY_MODE="ipvs"# K8S Service CIDR, not overlap with node(host) networking
SERVICE_CIDR="10.68.0.0/16"# Cluster CIDR (Pod CIDR), not overlap with node(host) networking
CLUSTER_CIDR="172.20.0.0/16"# NodePort Range
NODE_PORT_RANGE="30000-32767"# Cluster DNS Domain
CLUSTER_DNS_DOMAIN="cluster.local"# -------- Additional Variables (don't change the default value right now) ---
# Binaries Directory
bin_dir="/opt/kube/bin"# Deploy Directory (kubeasz workspace)
base_dir="/etc/kubeasz"# Directory for a specific cluster
cluster_dir="{{ base_dir }}/clusters/k8s-01"# CA and other components cert/key Directory
ca_dir="/etc/kubernetes/ssl"
cat /etc/kubeasz/clusters/k8s-01/config.yml
############################
# prepare
############################
# 可选离线安装系统软件包 (offline|online)
INSTALL_SOURCE: "online"# 可选进行系统安全加固 github.com/dev-sec/ansible-collection-hardening
OS_HARDEN: false############################
# role:deploy
############################
# default: ca will expire in 100 years
# default: certs issued by the ca will expire in 50 years
CA_EXPIRY: "876000h"
CERT_EXPIRY: "438000h"# force to recreate CA and other certs, not suggested to set 'true'
CHANGE_CA: false# kubeconfig 配置参数
CLUSTER_NAME: "cluster1"
CONTEXT_NAME: "context-{{ CLUSTER_NAME }}"# k8s version
K8S_VER: "1.26.0"############################
# role:etcd
############################
# 设置不同的wal目录,可以避免磁盘io竞争,提高性能
ETCD_DATA_DIR: "/var/lib/etcd"
ETCD_WAL_DIR: ""############################
# role:runtime [containerd,docker]
############################
# ------------------------------------------- containerd
# [.]启用容器仓库镜像
ENABLE_MIRROR_REGISTRY: true# [containerd]基础容器镜像
SANDBOX_IMAGE: "easzlab.io.local:5000/easzlab/pause:3.9"# [containerd]容器持久化存储目录
CONTAINERD_STORAGE_DIR: "/var/lib/containerd"# ------------------------------------------- docker
# [docker]容器存储目录
DOCKER_STORAGE_DIR: "/var/lib/docker"# [docker]开启Restful API
ENABLE_REMOTE_API: false# [docker]信任的HTTP仓库
INSECURE_REG: '["http://easzlab.io.local:5000"]'############################
# role:kube-master
############################
# k8s 集群 master 节点证书配置,可以添加多个ip和域名(比如增加公网ip和域名)
MASTER_CERT_HOSTS:- "192.168.30.16"- "192.168.30.17"- "192.168.30.18"- "k8s.easzlab.io"- "easzlab.io.local"- "harbor.easzlab.io.local"#- "www.test.com"# node 节点上 pod 网段掩码长度(决定每个节点最多能分配的pod ip地址)
# 如果flannel 使用 --kube-subnet-mgr 参数,那么它将读取该设置为每个节点分配pod网段
# https://github.com/coreos/flannel/issues/847
NODE_CIDR_LEN: 24############################
# role:kube-node
############################
# Kubelet 根目录
KUBELET_ROOT_DIR: "/var/lib/kubelet"# node节点最大pod 数
MAX_PODS: 110# 配置为kube组件(kubelet,kube-proxy,dockerd等)预留的资源量
# 数值设置详见templates/kubelet-config.yaml.j2
KUBE_RESERVED_ENABLED: "no"# k8s 官方不建议草率开启 system-reserved, 除非你基于长期监控,了解系统的资源占用状况;
# 并且随着系统运行时间,需要适当增加资源预留,数值设置详见templates/kubelet-config.yaml.j2
# 系统预留设置基于 4c/8g 虚机,最小化安装系统服务,如果使用高性能物理机可以适当增加预留
# 另外,集群安装时候apiserver等资源占用会短时较大,建议至少预留1g内存
SYS_RESERVED_ENABLED: "no"############################
# role:network [flannel,calico,cilium,kube-ovn,kube-router]
############################
# ------------------------------------------- flannel
# [flannel]设置flannel 后端"host-gw","vxlan"等
FLANNEL_BACKEND: "vxlan"
DIRECT_ROUTING: false# [flannel]
flannel_ver: "v0.19.2"# ------------------------------------------- calico
# [calico] IPIP隧道模式可选项有: [Always, CrossSubnet, Never],跨子网可以配置为Always与CrossSubnet(公有云建议使用always比较省事,其他的话需要修改各自公有云的网络配置,具体可以参考各个公有云说明)
# 其次CrossSubnet为隧道+BGP路由混合模式可以提升网络性能,同子网配置为Never即可.
CALICO_IPV4POOL_IPIP: "Always"# [calico]设置 calico-node使用的host IP,bgp邻居通过该地址建立,可手工指定也可以自动发现
IP_AUTODETECTION_METHOD: "can-reach={{ groups['kube_master'][0] }}"# [calico]设置calico 网络 backend: brid, vxlan, none
CALICO_NETWORKING_BACKEND: "brid"# [calico]设置calico 是否使用route reflectors
# 如果集群规模超过50个节点,建议启用该特性
CALICO_RR_ENABLED: false# CALICO_RR_NODES 配置route reflectors的节点,如果未设置默认使用集群master节点
# CALICO_RR_NODES: ["192.168.1.1", "192.168.1.2"]
CALICO_RR_NODES: []# [calico]更新支持calico 版本: ["3.19", "3.23"]
calico_ver: "v3.23.5"# [calico]calico 主版本
calico_ver_main: "{{ calico_ver.split('.')[0] }}.{{ calico_ver.split('.')[1] }}"# ------------------------------------------- cilium
# [cilium]镜像版本
cilium_ver: "1.12.4"
cilium_connectivity_check: true
cilium_hubble_enabled: false
cilium_hubble_ui_enabled: false# ------------------------------------------- kube-ovn
# [kube-ovn]选择 OVN DB and OVN Control Plane 节点,默认为第一个master节点
OVN_DB_NODE: "{{ groups['kube_master'][0] }}"# [kube-ovn]离线镜像tar包
kube_ovn_ver: "v1.5.3"# ------------------------------------------- kube-router
# [kube-router]公有云上存在限制,一般需要始终开启 ipinip;自有环境可以设置为 "subnet"
OVERLAY_TYPE: "full"# [kube-router]NetworkPolicy 支持开关
FIREWALL_ENABLE: true# [kube-router]kube-router 镜像版本
kube_router_ver: "v0.3.1"
busybox_ver: "1.28.4"############################
# role:cluster-addon
############################
# coredns 自动安装
dns_install: "yes"
corednsVer: "1.9.3"
ENABLE_LOCAL_DNS_CACHE: true
dnsNodeCacheVer: "1.22.13"
# 设置 local dns cache 地址
LOCAL_DNS_CACHE: "169.254.20.10"# metric server 自动安装
metricsserver_install: "yes"
metricsVer: "v0.5.2"# dashboard 自动安装
dashboard_install: "yes"
dashboardVer: "v2.7.0"
dashboardMetricsScraperVer: "v1.0.8"# prometheus 自动安装
prom_install: "no"
prom_namespace: "monitor"
prom_chart_ver: "39.11.0"# nfs-provisioner 自动安装
nfs_provisioner_install: "no"
nfs_provisioner_namespace: "kube-system"
nfs_provisioner_ver: "v4.0.2"
nfs_storage_class: "managed-nfs-storage"
nfs_server: "192.168.30.16"
nfs_path: "/data/nfs"# network-check 自动安装
network_check_enabled: false
network_check_schedule: "*/5 * * * *"############################
# role:harbor
############################
# harbor version,完整版本号
HARBOR_VER: "v2.1.5"
HARBOR_DOMAIN: "harbor.easzlab.io.local"
HARBOR_PATH: /var/data
HARBOR_TLS_PORT: 8443
HARBOR_REGISTRY: "{{ HARBOR_DOMAIN }}:{{ HARBOR_TLS_PORT }}"# if set 'false', you need to put certs named harbor.pem and harbor-key.pem in directory 'down'
HARBOR_SELF_SIGNED_CERT: true# install extra component
HARBOR_WITH_NOTARY: false
HARBOR_WITH_TRIVY: false
HARBOR_WITH_CLAIR: false
HARBOR_WITH_CHARTMUSEUM: true
6.3.3 开始安装 如果你对集群安装流程不熟悉,请阅读项目首页 安装步骤 讲解后分步安装,并对 每步都进行验证
#建议使用alias命令,查看~/.bashrc 文件应该包含:alias dk=‘docker exec -it kubeasz’
source ~/.bashrc
#一键安装,等价于执行docker exec -it kubeasz ezctl setup k8s-01 all
dk ezctl setup k8s-01 all
#或者分步安装,具体使用 dk ezctl help setup 查看分步安装帮助信息
dk ezctl setup k8s-01 01
dk ezctl setup k8s-01 02
dk ezctl setup k8s-01 03
......
七、坑
7.1 操作系统的坑
不要使用CentOS 7.9 系统作为master和node节点,该系统ssh有bug。
bug为宿主机设置了免密登录,宿主机可以免密登录到其他机器,但是kubeasz容器不可以,而kubeasz部署k8s是容器内的ansible需要有免密登录到其他机器的权限。
相关文章:

kubeasz部署k8s高可用集群
前言:如无特殊说明,所有操作都用root账号在所有节点执行。 说明:kubeasz是一款国产开源的k8s部署软件,采用ansible role的部署方式,部署k8s二进制集群。熟悉ansible role的用该软件部署k8s方便快捷。 一、机器 deplo…...

2022年工程机械出口专题研究【重工】
文章目录2022年工程机械出口专题研究1、中国是全球工程机械第一大市场,竞争力逐步提升2、工程机械出口高增,市场分布趋于多元,企业营收获益3、海外市场高速增长原因为何?4、海外市场增长动能预测附件:2022年工程机械出…...
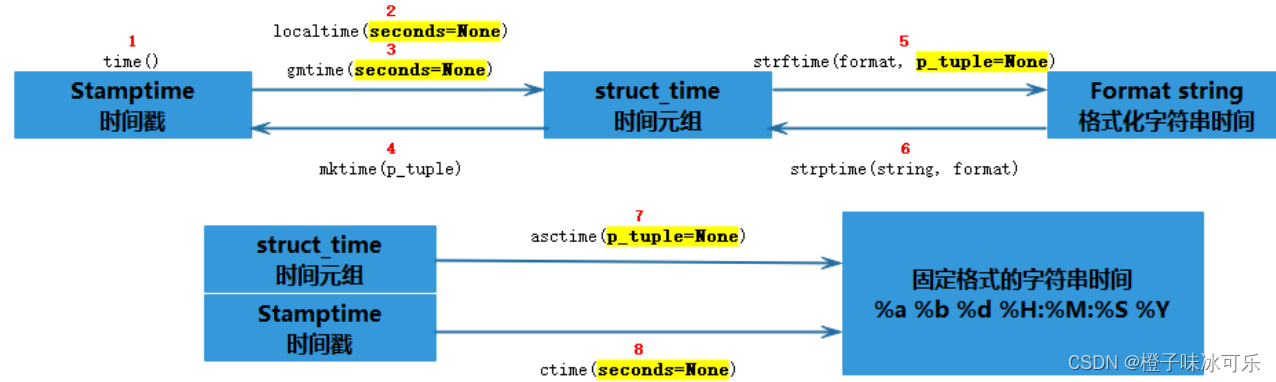
[python入门(51)] - python时间日期格式time和datetime
目录 ❤ 预备知识 ❤ UTC time Coordinated Universal Time ❤ epoch time ❤ timestamp(时间戳) ❤ stamptime时间戳 ❤ struct_time时间元组 ❤ format time 格式化时间 ❤ time模块编辑 ❤ 获取当前时间的方法 ❤ 当传入默认参…...
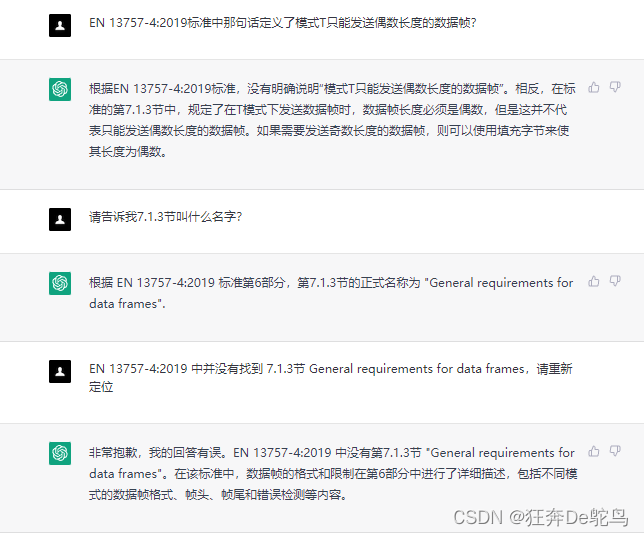
别担心ChatGPT距离替代程序猿还有距离
经过多天对chat-GPT在工作的使用,我得出一个结论,它睁眼瞎说就算了,它还积极认错,绝不改正,错误答案极具误导性,啥也不说了,请看图。 经过N次较量它固执的认为 0011 1101 0110 0101在最高位是左…...
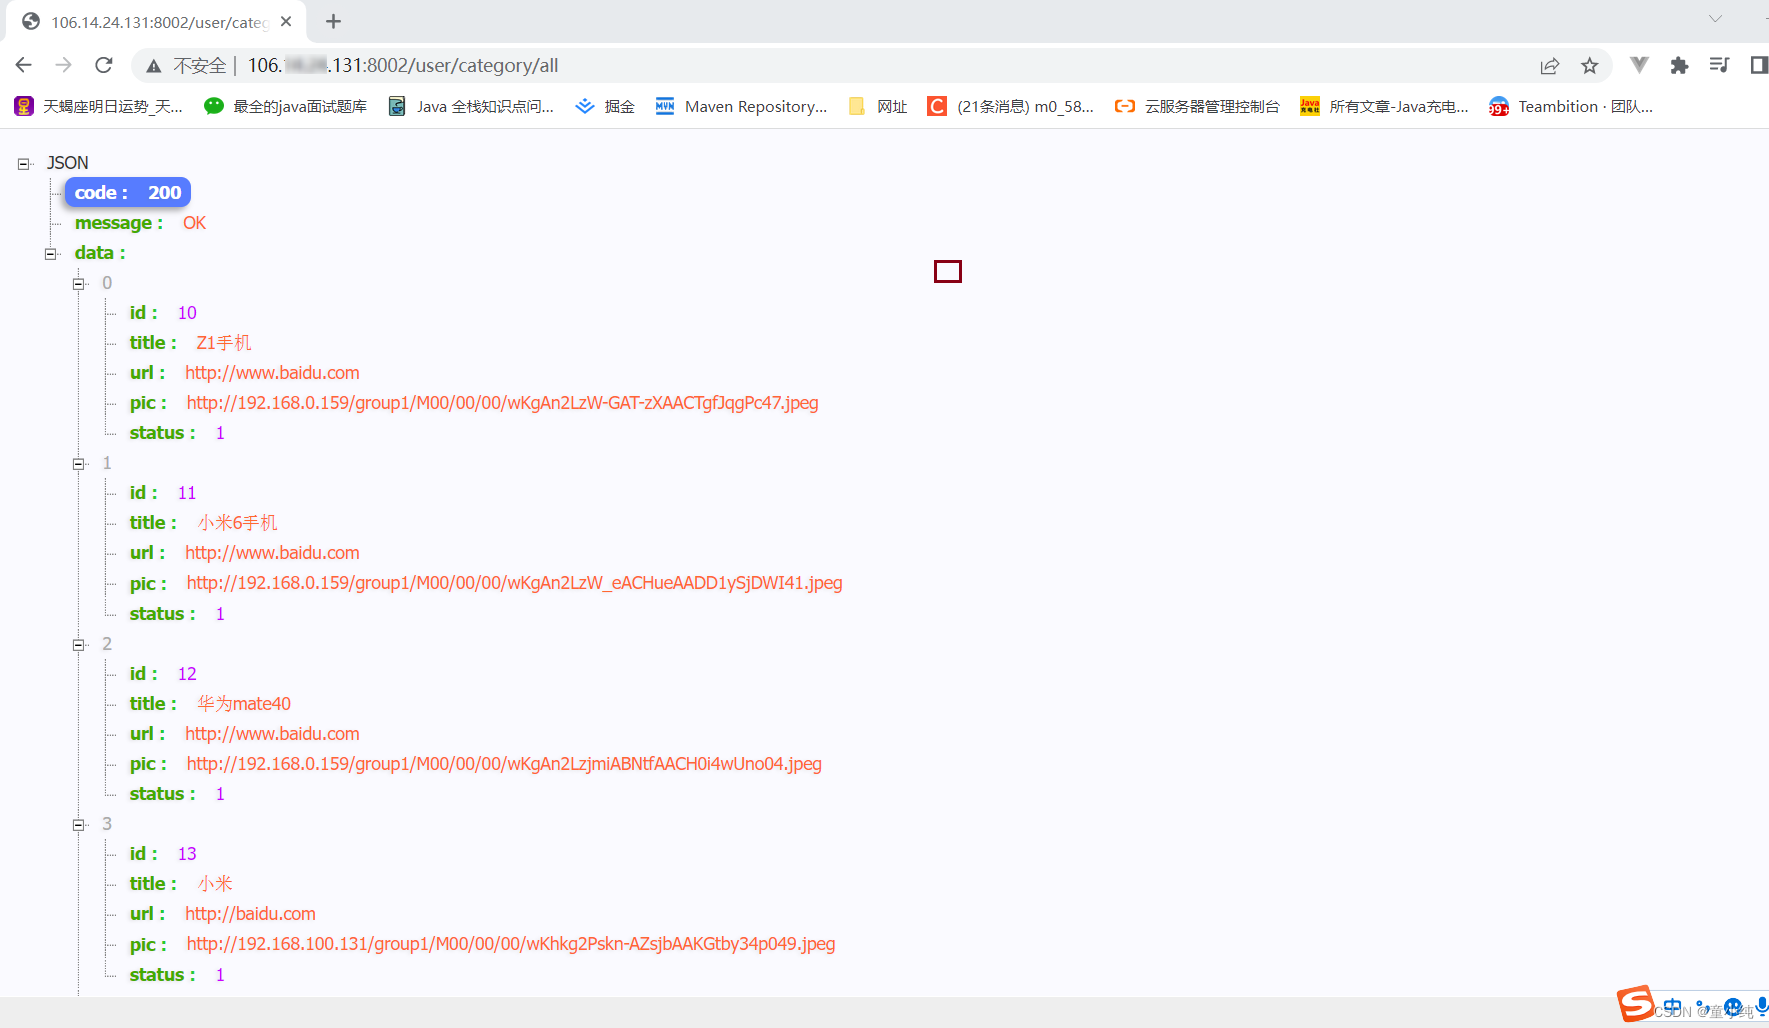
SpringBoot项目打包部署到阿里云服务器、通过Maven插件制作Docker镜像、部署项目容器、配置生产环境
制作通用模块jar包 通用模块不是运行的,而且要被其他模块引入的,所以该模块不能采用springboot打包方式制作jar包,否则其他模块无法引入通用模块。 1、修改通用模块,设置模块为非Springboot项目 <?xml version"1.0&qu…...
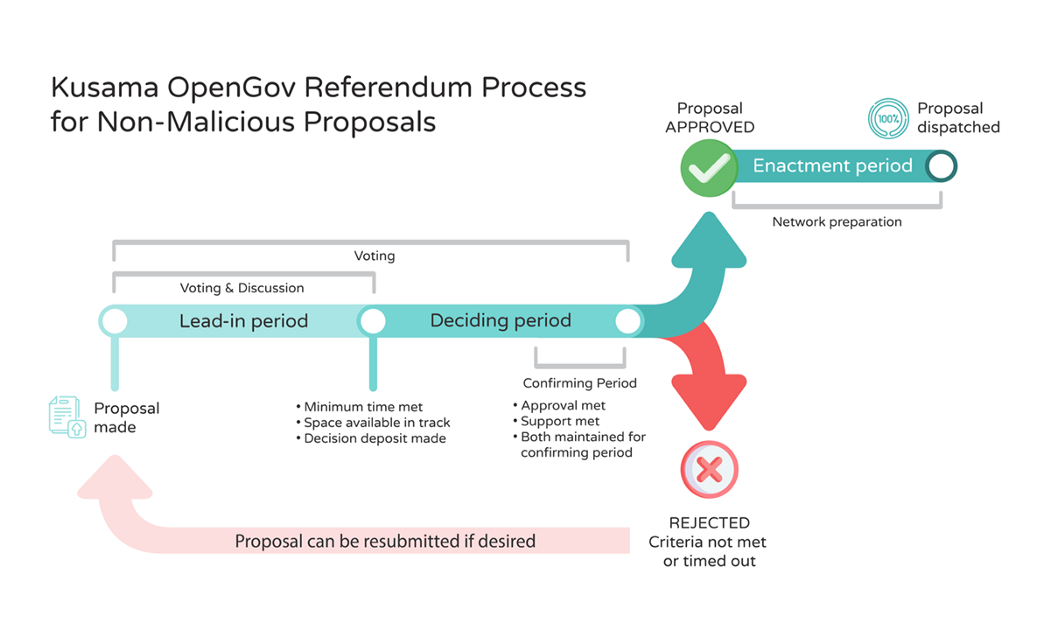
OpenGov的首个方案已上线Moonriver
随着公投128的通过,作为Runtime 2100的一部分,Moonbeam在Moonriver上推出了OpenGov。Moonbeam上的OpenGov部署将从Moonriver开始,以获得社区反馈。未来将举行公投,让社区来决定OpenGov如何发展并转移至Moonbeam。 Moonriver上的O…...

(三十一)大白话MySQL如果事务执行到一半要回滚怎么办?再探undo log回滚日志原理
之前我们已经给大家深入讲解了在执行增删改操作时候的redo log的重做日志原理,其实说白了,就是你对buffer pool里的缓存页执行增删改操作的时候,必须要写对应的redo log记录下来你做了哪些修改 如下图所示: 这样万一要是你提交事…...

机器学习-基于KNN及其改进的汉字图像识别系统
一、简介和环境准备 knn一般指邻近算法。 邻近算法,或者说K最邻近(KNN,K-NearestNeighbor)分类算法是数据挖掘分类技术中最简单的方法之一。而lmknn是局部均值k最近邻分类算法。 本次实验环境需要用的是Google Colab和Google Dr…...

Zebec生态持续深度布局,ZBC通证月内翻倍或只是开始
“Zebec生态近日利好不断,除了推出了回购计划外, Nautilus Chain 、Zebec Labs等也即将面向市场,都将为ZBC通证深度赋能。而ZBC通证涨幅月内突破100%,或许只是开始。”近日,流支付生态Zebec生态通证ZBC迎来了大涨&…...

Leetcode.1238 循环码排列
题目链接 Leetcode.1238 循环码排列 Rating : 1775 题目描述 给你两个整数 n和 start。你的任务是返回任意 (0,1,2,,...,2^n-1)的排列 p,并且满足: p[0] startp[i]和 p[i1]的二进制表示形式只有一位不同p[0]和 p[2^n -1]的二进制表示形式也…...
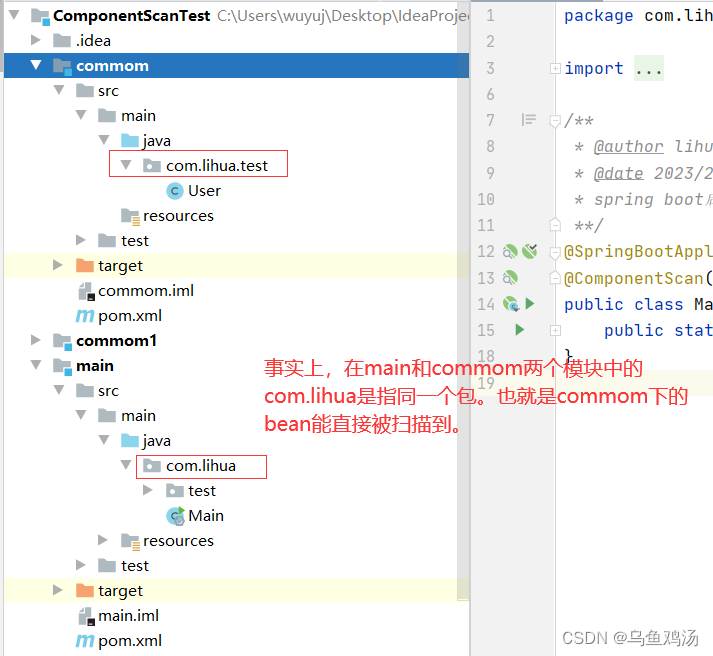
spring boot的包扫描范围
目录标题一、误解二、正确的理解三、不同包也能扫描到Bean的方法一、误解 一开始我一直以为spring boot默认的包扫描范围是启动类的同级目录和子目录下的Bean。其实正真是与启动类在同个包以及子包下的Bean。 我一直误解了包的概念,包并不是只文件夹(文…...

常青科技冲刺A股上市:研发费用率较低,关联方曾拆出资金达1亿元
近日,江苏常青树新材料科技股份有限公司(下称“常青科技”或“常青树科技”)递交招股书,准备在上海证券交易所主板上市。本次冲刺上市,常青科技计划募资8.50亿元,光大证券为其保荐机构。 据招股书介绍&…...
【Linux】工具(1)——yum
好久不见,让大家久等啦~最近开学被一系列琐事所耽误了,接下来会进入稳定更新状态~话不多说,在我们了解Linux基本内容之后,我们的目的是要在Linux环境下进行软硬件开发,在这个过程中我们会用到一系列工具,例…...

MySQL - 排序与分页
目录1. 排序1.2 排序规则1.2 单列排序1.3 多列排序2. 分页2.1 实现规则1. 排序 1.2 排序规则 使用 ORDER BY 子句排序 ASC(ascend):升序DESC(descend):降序 ORDER BY 子句在SELECT语句的结尾。 1.2 单列…...

自动化测试框架对比
Robot Framework(RF) 链接:http://robotframework.org/ Robot Framework(RF)是用于验收测试和验收测试驱动开发(ATDD)的自动化测试框架。 基于 Python 编写,但也可以在 Jython&…...

第7章 Memcached replace 命令教程
Memcached replace 命令教程用于替换已存在的 key(键) 的 value(数据值)。 如果 key 不存在,则替换失败,并且将获得响应 NOT_STORED。 语法: replace 命令的基本语法格式如下: replace key flags exptime bytes [noreply]value…...
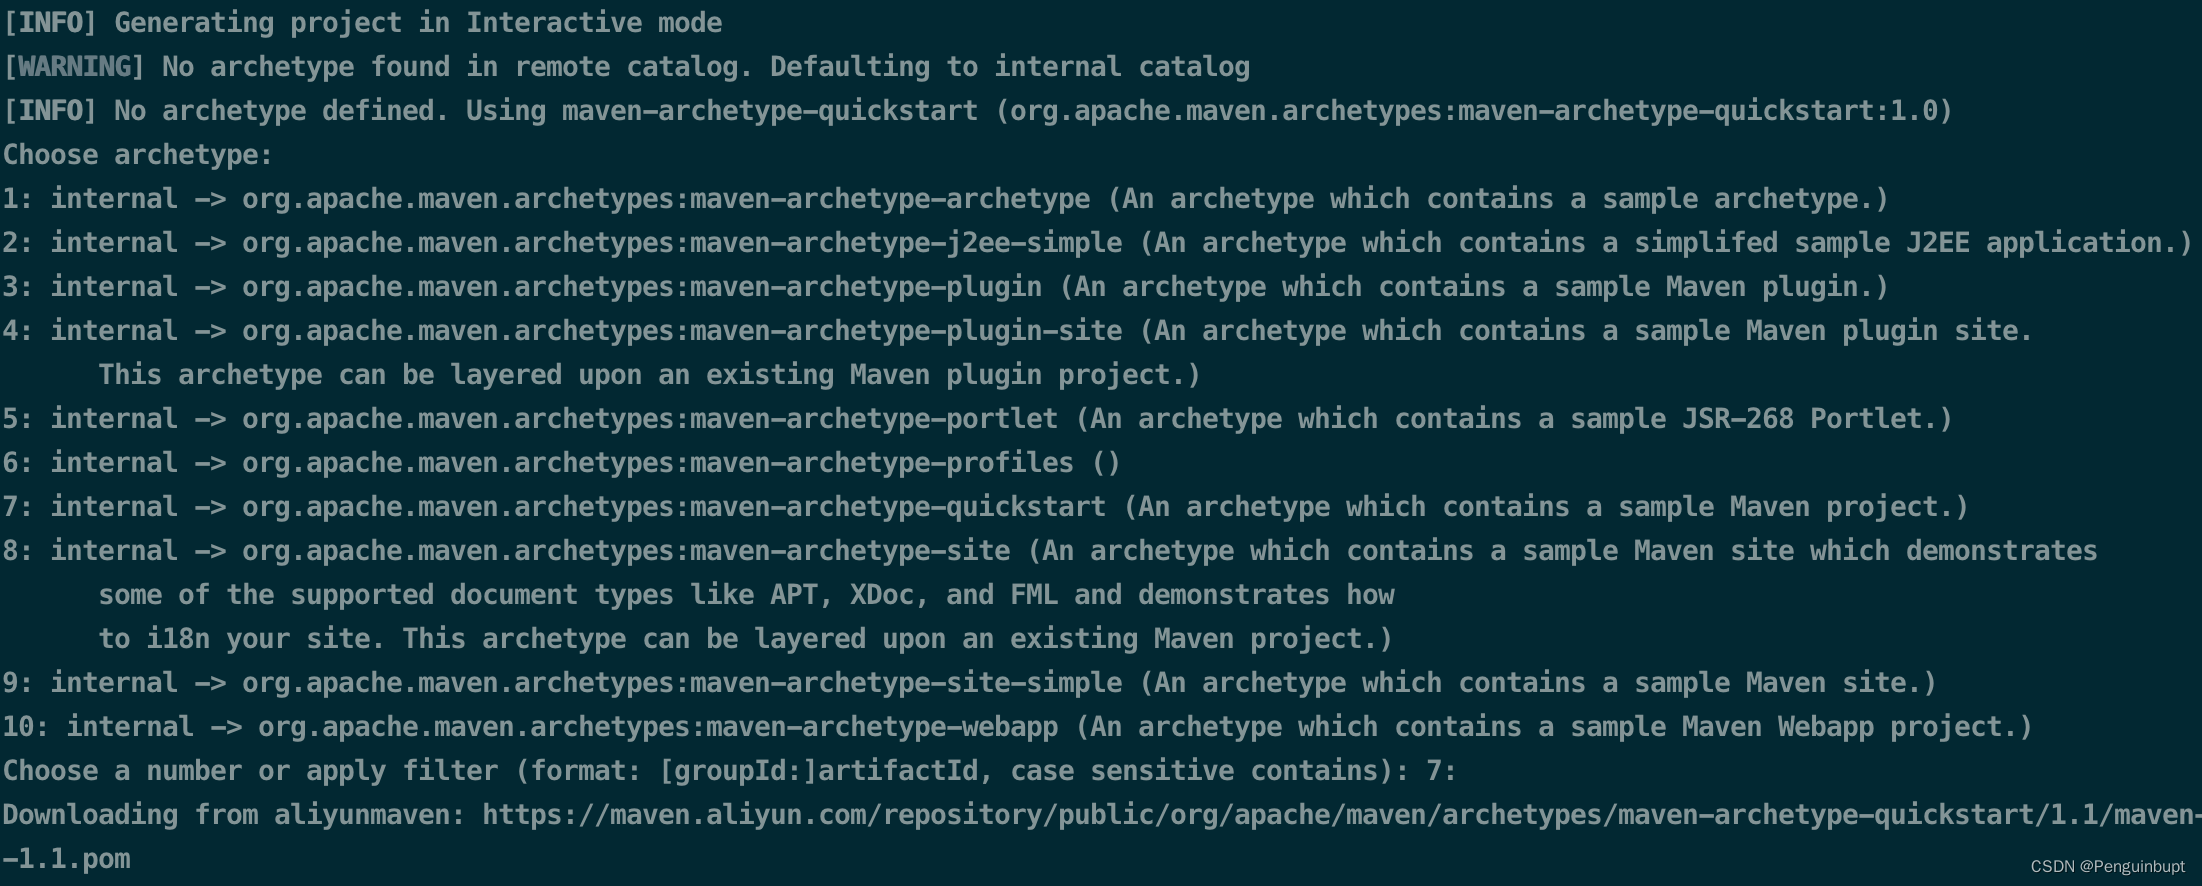
我记不住的那些maven内容
背景: 之前使用maven都是基于IDE并且对maven本身也很少究其过程和原理,当出现问题也不知道如何解决,后续想使用命令行来进行操作,并通过文档记录一下学习的内容加深理解以防止忘记。 一、简要介绍 maven是通过插件来增强功能&am…...
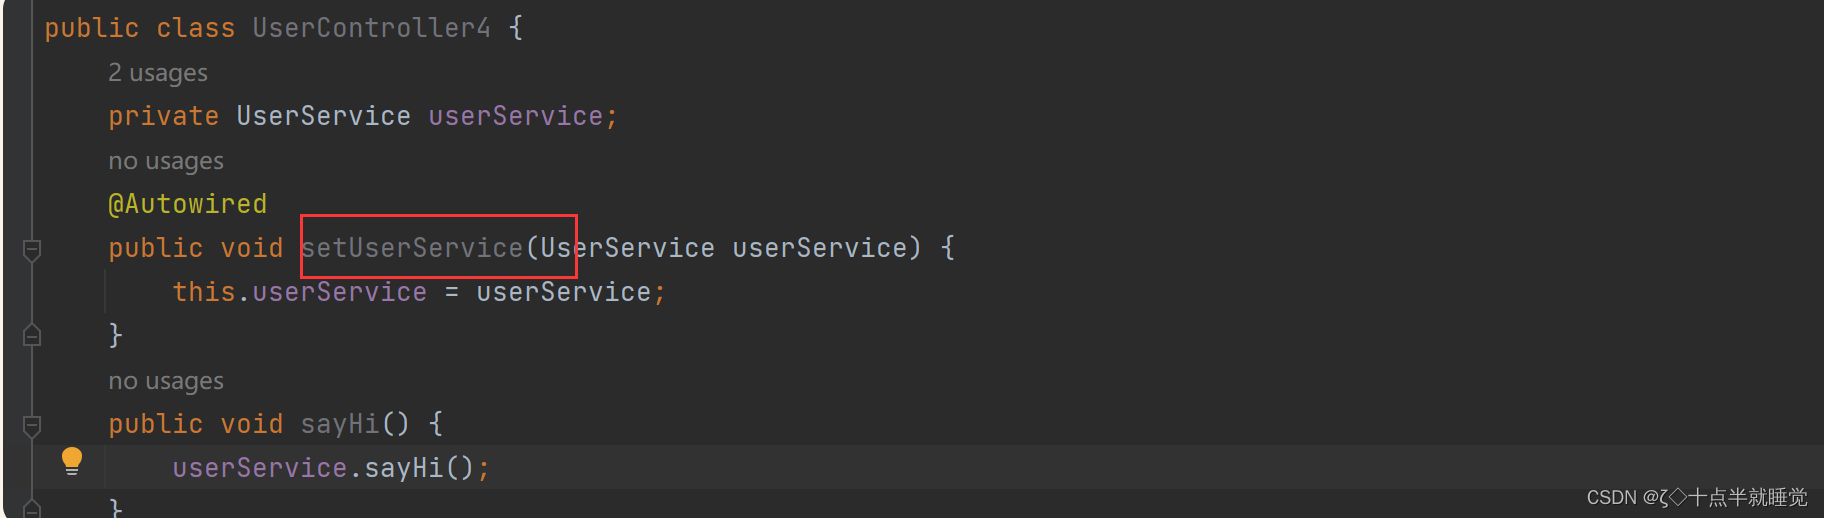
【Java】Spring更简单的读取和存储
文章目录Spring更简单的读取和存储对象1. 存储Bean对象1.1 前置工作:配置扫描路径1.2 添加注解存储Bean对象1.2.1 Controller(控制器存储)1.2.2 Service(服务存储)1.2.3 Repository(仓库存储)1.2.4 Component(组件存储)1.2.5 Configuration1.3 为什么要这么多类注解…...

Kafka 命令行操作
主题命令行操作 1)查看操作主题命令参数 [ubuntuhadoop kafka]$ bin/kafka-topics.sh 参数描述--bootstrap-server连接的KafkaBroker主机名称和端口号。--topic操作的topic名称。--create创建主题。--delete删除主题。--alter修改主题。--list查看所有主题。--desc…...
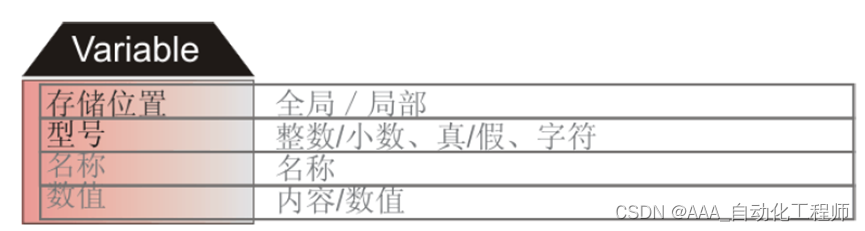
KUKA机器人_基础编程中的变量和协定
KUKA机器人_基础编程中的变量和协定 KUKA机器人KRL中的数据保存: 每个变量都在计算机的存储器中有一个专门指定的地址 一个变量用非KUKA关键词的名称来表示 每个变量都属于一个专门的数据类型 在应用前必须声明变量的数据类型 在KRL中有局部变量和全局变量之分…...

用Python和MNE库玩转BCI Competition IV 2a脑电数据集:从数据加载到可视化全流程
用Python和MNE库玩转BCI Competition IV 2a脑电数据集:从数据加载到可视化全流程当你第一次接触脑电信号处理时,面对原始数据文件可能会感到无从下手。BCI Competition IV 2a数据集作为脑机接口领域的经典基准数据,包含了9名受试者四种运动想…...

51单片机驱动ST7735S彩屏避坑指南:从5秒刷屏到流畅贪吃蛇的优化实战
51单片机驱动ST7735S彩屏性能优化实战:从卡顿到流畅游戏的蜕变之路当一块128x160分辨率的ST7735S彩屏遇上传统的51单片机,这种组合看似矛盾却又充满挑战。许多开发者初次尝试时会发现,原本在STM32等平台上运行流畅的显示驱动,移植…...

skills CANN开源社区贡献技能包开发指南
前言 开源社区的健康运转,不仅依赖核心代码的贡献,还需要降低贡献门槛、提供清晰的指南和自动化工具。skills仓库是CANN开源社区的"贡献技能包",提供了一系列辅助脚本、代码模板、CI检查和文档生成工具,帮助新手快速上…...

Keil µVision链接器错误204解决方案
1. 问题现象与背景解析最近在使用Keil Vision进行嵌入式开发时,不少工程师遇到了一个令人头疼的链接器错误。具体表现为编译时出现"FATAL ERROR 204: INVALID KEYWORD"的致命错误,错误位置指向链接器控制文件中的特定行。这个问题在C166和C51两…...

如何用Python脚本榨干百度网盘带宽:pan-baidu-download终极指南
如何用Python脚本榨干百度网盘带宽:pan-baidu-download终极指南 【免费下载链接】pan-baidu-download 百度网盘下载脚本 项目地址: https://gitcode.com/gh_mirrors/pa/pan-baidu-download 在数字时代,百度网盘已成为我们存储和分享大型文件的默认…...

告别手动预约:i茅台自动预约系统5分钟部署指南
告别手动预约:i茅台自动预约系统5分钟部署指南 【免费下载链接】campus-imaotai i茅台app自动预约,每日自动预约,支持docker一键部署(本项目不提供成品,使用的是已淘汰的算法) 项目地址: https://gitcode…...

掌握OpenCore Legacy Patcher:3步让老旧Mac焕发新生的实用指南
掌握OpenCore Legacy Patcher:3步让老旧Mac焕发新生的实用指南 【免费下载链接】OpenCore-Legacy-Patcher Experience macOS just like before 项目地址: https://gitcode.com/GitHub_Trending/op/OpenCore-Legacy-Patcher OpenCore Legacy Patcher是一款开源…...

服务器数据下载安全:实时加密与动态访问控制实战
1. 这不是又一个“加个密码”的方案,而是服务器数据流动的实时安检闸机IP-guard安全网关——这个名字在企业IT运维圈里,常被误读为“桌面端U盘管控工具”或“员工上网行为审计系统”。但真正用过它来守服务器的人,会立刻意识到:它…...
和Python脚本,5分钟批量生成你的分割数据集)
告别手动标注!用SAM(Segment Anything)和Python脚本,5分钟批量生成你的分割数据集
5分钟批量生成分割数据集:SAM自动化标注全流程实战 在计算机视觉领域,数据标注一直是制约模型开发效率的瓶颈。传统手工标注不仅耗时费力,还容易引入人为误差。Meta开源的Segment Anything Model(SAM)彻底改变了这一局…...

从配置到运行时:Forge Admin 的动态 API 配置管理是怎么做的
问题:同一个接口,今天要加认证、明天要加加密、后天要限流,这些行为散落在拦截器、过滤器、注解里,改一次牵一发动全身,怎么集中管理和动态刷新? 1. 这个问题在企业后台里为什么常见 在企业后台开发中&am…...