【 SuperPoint 】图像特征提取上的对比实验
1. SIFT,SuperPoint 都具有提取图片特征点,并且输出特征描述子的特性,本篇文章从特征点的提取数量,特征点的正确匹配数量来探索一下二者的优劣。
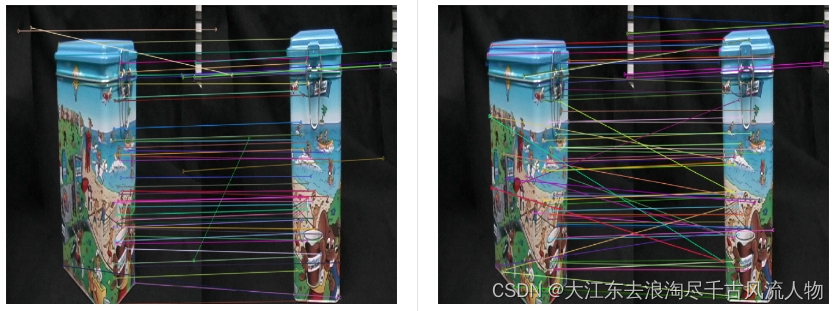
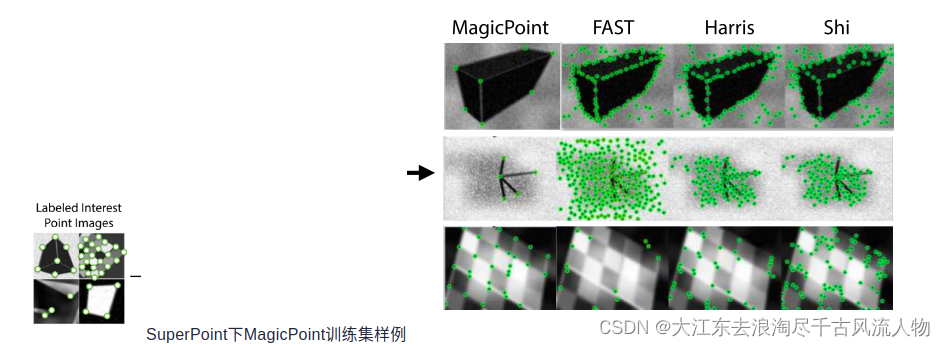
SuperPoint提取到的特征点数量要少一些,可以理解,我想原因大概是SuperPoint训练使用的是合成数据集,含有很多形状,并且只标出了线段的一些拐点,而sift对图像的像素值变化敏感。
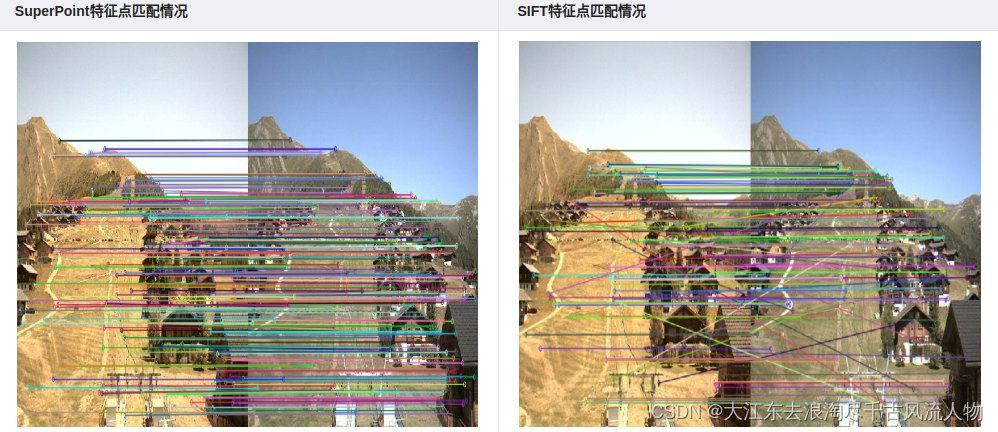
在特征点匹配上,感觉不出有什么明显的差异,但是很明显,SuperPoint的鲁棒性更高一些,sift匹配有很多的错点,比如SIFT第三幅图中的牛奶盒子,由于物体没有上下的起伏,可以认为连线中的斜线都是错匹配。
在形状较为复杂的情况下
正如上文所说,SuperPoint对形状较多的图片敏感。
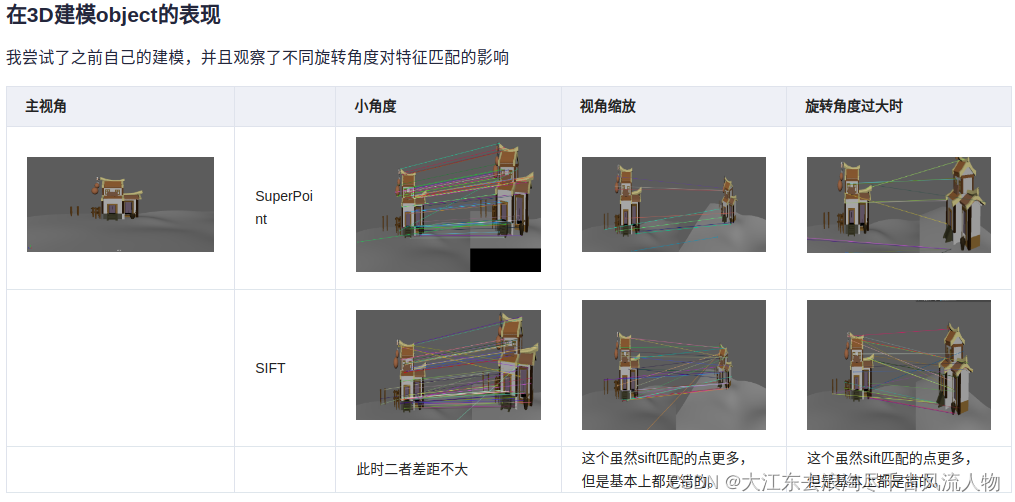
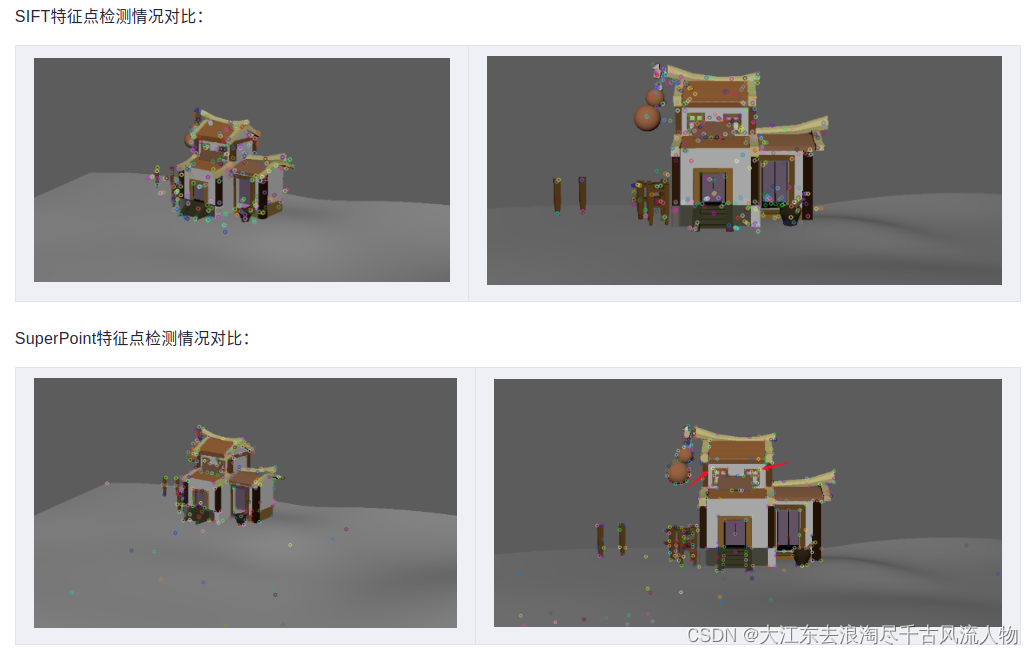
同样值得注意的是,第一张图的窗子的点,SuperPoint并没有检测出来。
2. 总结
在捕捉特征点的时候,SuperPoint对形状的特征点敏感,SIFT对像素的变化敏感
在进行特征点匹配的时候,SuperPoint的特征描述子鲁棒性更好一些
视角变化较大的情况下,二者的表现都差强人意
代码
SIFT.py:
from __future__ import print_function
import cv2 as cv
import numpy as np
import argparsepic1 = "./1.ppm"
pic2 = "./6.ppm"parser = argparse.ArgumentParser(description='Code for Feature Matching with FLANN tutorial.')
parser.add_argument('--input1', help='Path to input image 1.', default=pic1)
parser.add_argument('--input2', help='Path to input image 2.', default=pic2)
args = parser.parse_args()
img_object = cv.imread(pic1)
img_scene = cv.imread(pic2)
if img_object is None or img_scene is None:print('Could not open or find the images!')exit(0)#-- Step 1: Detect the keypoints using SURF Detector, compute the descriptors
minHessian = 600
detector = cv.xfeatures2d_SURF.create(hessianThreshold=minHessian)
keypoints_obj, descriptors_obj = detector.detectAndCompute(img_object, None)
keypoints_scene, descriptors_scene = detector.detectAndCompute(img_scene, None)#-- Step 2: Matching descriptor vectors with a FLANN based matcher
# Since SURF is a floating-point descriptor NORM_L2 is used
matcher = cv.DescriptorMatcher_create(cv.DescriptorMatcher_FLANNBASED)
knn_matches = matcher.knnMatch(descriptors_obj, descriptors_scene, 2)#-- Filter matches using the Lowe's ratio test
ratio_thresh = 0.75
good_matches = []
for m,n in knn_matches:if m.distance < ratio_thresh * n.distance:good_matches.append(m)print("The number of keypoints in image1 is", len(keypoints_obj))
print("The number of keypoints in image2 is", len(keypoints_scene))
#-- Draw matches
img_matches = np.empty((max(img_object.shape[0], img_scene.shape[0]), img_object.shape[1]+img_scene.shape[1], 3), dtype=np.uint8)
cv.drawMatches(img_object, keypoints_obj, img_scene, keypoints_scene, good_matches, img_matches, flags=cv.DrawMatchesFlags_NOT_DRAW_SINGLE_POINTS)cv.namedWindow("Good Matches of SIFT", 0)
cv.resizeWindow("Good Matches of SIFT", 1024, 1024)
cv.imshow('Good Matches of SIFT', img_matches)
cv.waitKey()
使用sift.py时,只需要修改第6,7行的图片路径即可。
SuperPoint
import numpy as np
import os
import cv2
import torch# Jet colormap for visualization.
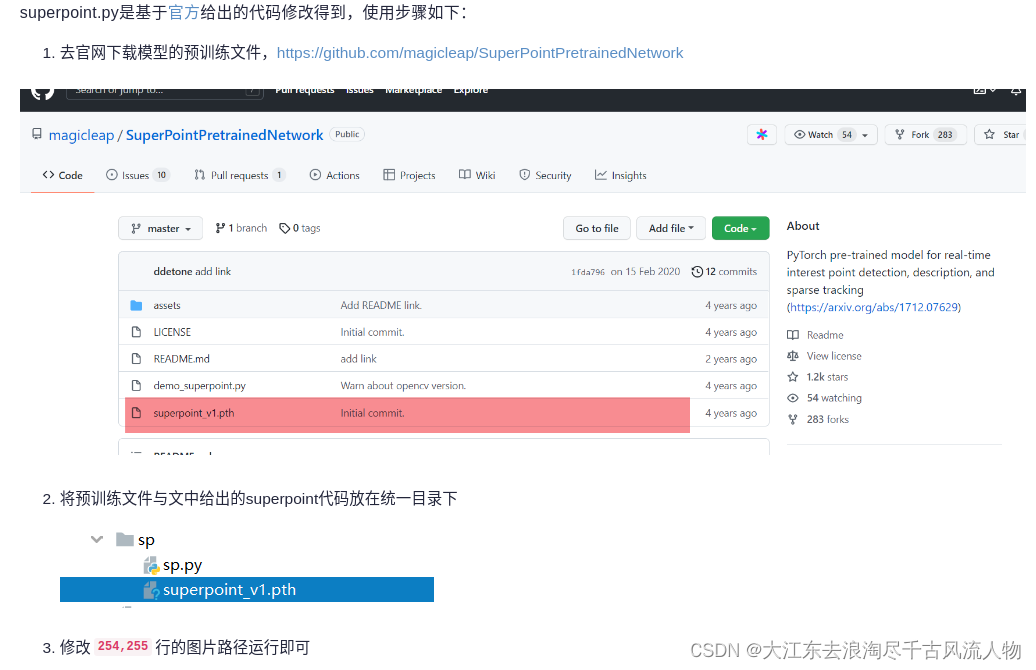
myjet = np.array([[0., 0., 0.5],[0., 0., 0.99910873],[0., 0.37843137, 1.],[0., 0.83333333, 1.],[0.30044276, 1., 0.66729918],[0.66729918, 1., 0.30044276],[1., 0.90123457, 0.],[1., 0.48002905, 0.],[0.99910873, 0.07334786, 0.],[0.5, 0., 0.]])class SuperPointNet(torch.nn.Module):""" Pytorch definition of SuperPoint Network. """def __init__(self):super(SuperPointNet, self).__init__()self.relu = torch.nn.ReLU(inplace=True)self.pool = torch.nn.MaxPool2d(kernel_size=2, stride=2)c1, c2, c3, c4, c5, d1 = 64, 64, 128, 128, 256, 256# Shared Encoder.self.conv1a = torch.nn.Conv2d(1, c1, kernel_size=3, stride=1, padding=1)self.conv1b = torch.nn.Conv2d(c1, c1, kernel_size=3, stride=1, padding=1)self.conv2a = torch.nn.Conv2d(c1, c2, kernel_size=3, stride=1, padding=1)self.conv2b = torch.nn.Conv2d(c2, c2, kernel_size=3, stride=1, padding=1)self.conv3a = torch.nn.Conv2d(c2, c3, kernel_size=3, stride=1, padding=1)self.conv3b = torch.nn.Conv2d(c3, c3, kernel_size=3, stride=1, padding=1)self.conv4a = torch.nn.Conv2d(c3, c4, kernel_size=3, stride=1, padding=1)self.conv4b = torch.nn.Conv2d(c4, c4, kernel_size=3, stride=1, padding=1)# Detector Head.self.convPa = torch.nn.Conv2d(c4, c5, kernel_size=3, stride=1, padding=1)self.convPb = torch.nn.Conv2d(c5, 65, kernel_size=1, stride=1, padding=0)# Descriptor Head.self.convDa = torch.nn.Conv2d(c4, c5, kernel_size=3, stride=1, padding=1)self.convDb = torch.nn.Conv2d(c5, d1, kernel_size=1, stride=1, padding=0)def forward(self, x):""" Forward pass that jointly computes unprocessed point and descriptortensors.Inputx: Image pytorch tensor shaped N x 1 x H x W.Outputsemi: Output point pytorch tensor shaped N x 65 x H/8 x W/8.desc: Output descriptor pytorch tensor shaped N x 256 x H/8 x W/8."""# Shared Encoder.x = self.relu(self.conv1a(x))x = self.relu(self.conv1b(x))x = self.pool(x)x = self.relu(self.conv2a(x))x = self.relu(self.conv2b(x))x = self.pool(x)x = self.relu(self.conv3a(x))x = self.relu(self.conv3b(x))x = self.pool(x)x = self.relu(self.conv4a(x))x = self.relu(self.conv4b(x))# Detector Head.cPa = self.relu(self.convPa(x))semi = self.convPb(cPa)# Descriptor Head.cDa = self.relu(self.convDa(x))desc = self.convDb(cDa)dn = torch.norm(desc, p=2, dim=1) # Compute the norm.desc = desc.div(torch.unsqueeze(dn, 1)) # Divide by norm to normalize.return semi, descclass SuperPointFrontend(object):""" Wrapper around pytorch net to help with pre and post image processing. """def __init__(self, weights_path, nms_dist, conf_thresh, nn_thresh,cuda=False):self.name = 'SuperPoint'self.cuda = cudaself.nms_dist = nms_distself.conf_thresh = conf_threshself.nn_thresh = nn_thresh # L2 descriptor distance for good match.self.cell = 8 # Size of each output cell. Keep this fixed.self.border_remove = 4 # Remove points this close to the border.# Load the network in inference mode.self.net = SuperPointNet()if cuda:# Train on GPU, deploy on GPU.self.net.load_state_dict(torch.load(weights_path))self.net = self.net.cuda()else:# Train on GPU, deploy on CPU.self.net.load_state_dict(torch.load(weights_path,map_location=lambda storage, loc: storage))self.net.eval()def nms_fast(self, in_corners, H, W, dist_thresh):"""Run a faster approximate Non-Max-Suppression on numpy corners shaped:3xN [x_i,y_i,conf_i]^TAlgo summary: Create a grid sized HxW. Assign each corner location a 1, restare zeros. Iterate through all the 1's and convert them either to -1 or 0.Suppress points by setting nearby values to 0.Grid Value Legend:-1 : Kept.0 : Empty or suppressed.1 : To be processed (converted to either kept or supressed).NOTE: The NMS first rounds points to integers, so NMS distance might notbe exactly dist_thresh. It also assumes points are within image boundaries.Inputsin_corners - 3xN numpy array with corners [x_i, y_i, confidence_i]^T.H - Image height.W - Image width.dist_thresh - Distance to suppress, measured as an infinty norm distance.Returnsnmsed_corners - 3xN numpy matrix with surviving corners.nmsed_inds - N length numpy vector with surviving corner indices."""grid = np.zeros((H, W)).astype(int) # Track NMS data.inds = np.zeros((H, W)).astype(int) # Store indices of points.# Sort by confidence and round to nearest int.inds1 = np.argsort(-in_corners[2, :])corners = in_corners[:, inds1]rcorners = corners[:2, :].round().astype(int) # Rounded corners.# Check for edge case of 0 or 1 corners.if rcorners.shape[1] == 0:return np.zeros((3, 0)).astype(int), np.zeros(0).astype(int)if rcorners.shape[1] == 1:out = np.vstack((rcorners, in_corners[2])).reshape(3, 1)return out, np.zeros((1)).astype(int)# Initialize the grid.for i, rc in enumerate(rcorners.T):grid[rcorners[1, i], rcorners[0, i]] = 1inds[rcorners[1, i], rcorners[0, i]] = i# Pad the border of the grid, so that we can NMS points near the border.pad = dist_threshgrid = np.pad(grid, ((pad, pad), (pad, pad)), mode='constant')# Iterate through points, highest to lowest conf, suppress neighborhood.count = 0for i, rc in enumerate(rcorners.T):# Account for top and left padding.pt = (rc[0] + pad, rc[1] + pad)if grid[pt[1], pt[0]] == 1: # If not yet suppressed.grid[pt[1] - pad:pt[1] + pad + 1, pt[0] - pad:pt[0] + pad + 1] = 0grid[pt[1], pt[0]] = -1count += 1# Get all surviving -1's and return sorted array of remaining corners.keepy, keepx = np.where(grid == -1)keepy, keepx = keepy - pad, keepx - padinds_keep = inds[keepy, keepx]out = corners[:, inds_keep]values = out[-1, :]inds2 = np.argsort(-values)out = out[:, inds2]out_inds = inds1[inds_keep[inds2]]return out, out_indsdef run(self, img):""" Process a numpy image to extract points and descriptors.Inputimg - HxW numpy float32 input image in range [0,1].Outputcorners - 3xN numpy array with corners [x_i, y_i, confidence_i]^T.desc - 256xN numpy array of corresponding unit normalized descriptors.heatmap - HxW numpy heatmap in range [0,1] of point confidences."""assert img.ndim == 2, 'Image must be grayscale.'assert img.dtype == np.float32, 'Image must be float32.'H, W = img.shape[0], img.shape[1]inp = img.copy()inp = (inp.reshape(1, H, W))inp = torch.from_numpy(inp)inp = torch.autograd.Variable(inp).view(1, 1, H, W)if self.cuda:inp = inp.cuda()# Forward pass of network.outs = self.net.forward(inp)semi, coarse_desc = outs[0], outs[1]# Convert pytorch -> numpy.semi = semi.data.cpu().numpy().squeeze()# --- Process points.# C = np.max(semi)# dense = np.exp(semi - C) # Softmax.# dense = dense / (np.sum(dense)) # Should sum to 1.dense = np.exp(semi) # Softmax.dense = dense / (np.sum(dense, axis=0) + .00001) # Should sum to 1.# Remove dustbin.nodust = dense[:-1, :, :]# Reshape to get full resolution heatmap.Hc = int(H / self.cell)Wc = int(W / self.cell)nodust = nodust.transpose(1, 2, 0)heatmap = np.reshape(nodust, [Hc, Wc, self.cell, self.cell])heatmap = np.transpose(heatmap, [0, 2, 1, 3])heatmap = np.reshape(heatmap, [Hc * self.cell, Wc * self.cell])xs, ys = np.where(heatmap >= self.conf_thresh) # Confidence threshold.if len(xs) == 0:return np.zeros((3, 0)), None, Nonepts = np.zeros((3, len(xs))) # Populate point data sized 3xN.pts[0, :] = yspts[1, :] = xspts[2, :] = heatmap[xs, ys]pts, _ = self.nms_fast(pts, H, W, dist_thresh=self.nms_dist) # Apply NMS.inds = np.argsort(pts[2, :])pts = pts[:, inds[::-1]] # Sort by confidence.# Remove points along border.bord = self.border_removetoremoveW = np.logical_or(pts[0, :] < bord, pts[0, :] >= (W - bord))toremoveH = np.logical_or(pts[1, :] < bord, pts[1, :] >= (H - bord))toremove = np.logical_or(toremoveW, toremoveH)pts = pts[:, ~toremove]# --- Process descriptor.D = coarse_desc.shape[1]if pts.shape[1] == 0:desc = np.zeros((D, 0))else:# Interpolate into descriptor map using 2D point locations.samp_pts = torch.from_numpy(pts[:2, :].copy())samp_pts[0, :] = (samp_pts[0, :] / (float(W) / 2.)) - 1.samp_pts[1, :] = (samp_pts[1, :] / (float(H) / 2.)) - 1.samp_pts = samp_pts.transpose(0, 1).contiguous()samp_pts = samp_pts.view(1, 1, -1, 2)samp_pts = samp_pts.float()if self.cuda:samp_pts = samp_pts.cuda()desc = torch.nn.functional.grid_sample(coarse_desc, samp_pts)desc = desc.data.cpu().numpy().reshape(D, -1)desc /= np.linalg.norm(desc, axis=0)[np.newaxis, :]return pts, desc, heatmapif __name__ == '__main__':print('==> Loading pre-trained network.')# This class runs the SuperPoint network and processes its outputs.fe = SuperPointFrontend(weights_path="superpoint_v1.pth",nms_dist=4,conf_thresh=0.015,nn_thresh=0.7,cuda=True)print('==> Successfully loaded pre-trained network.')pic1 = "./1.ppm"pic2 = "./6.ppm"image1_origin = cv2.imread(pic1)image2_origin = cv2.imread(pic2)image1 = cv2.imread(pic1, cv2.IMREAD_GRAYSCALE).astype(np.float32)image2 = cv2.imread(pic2, cv2.IMREAD_GRAYSCALE).astype(np.float32)image1 = image1 / 255.image2 = image2 / 255.if image1 is None or image2 is None:print('Could not open or find the images!')exit(0)# -- Step 1: Detect the keypoints using SURF Detector, compute the descriptorskeypoints_obj, descriptors_obj, h1 = fe.run(image1)keypoints_scene, descriptors_scene, h2 = fe.run(image2)## to transfer array ==> KeyPointskeypoints_obj = [cv2.KeyPoint(keypoints_obj[0][i], keypoints_obj[1][i], 1)for i in range(keypoints_obj.shape[1])]keypoints_scene = [cv2.KeyPoint(keypoints_scene[0][i], keypoints_scene[1][i], 1)for i in range(keypoints_scene.shape[1])]print("The number of keypoints in image1 is", len(keypoints_obj))print("The number of keypoints in image2 is", len(keypoints_scene))# -- Step 2: Matching descriptor vectors with a FLANN based matcher# Since SURF is a floating-point descriptor NORM_L2 is usedmatcher = cv2.DescriptorMatcher_create(cv2.DescriptorMatcher_FLANNBASED)knn_matches = matcher.knnMatch(descriptors_obj.T, descriptors_scene.T, 2)# -- Filter matches using the Lowe's ratio testratio_thresh = 0.75good_matches = []for m, n in knn_matches:if m.distance < ratio_thresh * n.distance:good_matches.append(m)# -- Draw matchesimg_matches = np.empty((max(image1_origin.shape[0], image2_origin.shape[0]), image1_origin.shape[1] + image2_origin.shape[1], 3),dtype=np.uint8)cv2.drawMatches(image1_origin, keypoints_obj, image2_origin, keypoints_scene, good_matches, img_matches,flags=cv2.DrawMatchesFlags_NOT_DRAW_SINGLE_POINTS)cv2.namedWindow("Good Matches of SuperPoint", 0)cv2.resizeWindow("Good Matches of SuperPoint", 1024, 1024)cv2.imshow('Good Matches of SuperPoint', img_matches)cv2.waitKey()superpoint.py是基于官方给出的代码修改得到,使用步骤如下:
去官网下载模型的预训练文件,https://github.com/magicleap/SuperPointPretrainedNetwork
3. 笔者自己也操作跑了一个小视频:
4. https://download.csdn.net/download/Darlingqiang/88387732
参考:SIFT,SuperPoint在图像特征提取上的对比实验
相关文章:
【 SuperPoint 】图像特征提取上的对比实验
1. SIFT,SuperPoint 都具有提取图片特征点,并且输出特征描述子的特性,本篇文章从特征点的提取数量,特征点的正确匹配数量来探索一下二者的优劣。 SuperPoint提取到的特征点数量要少一些,可以理解,我想原因大…...
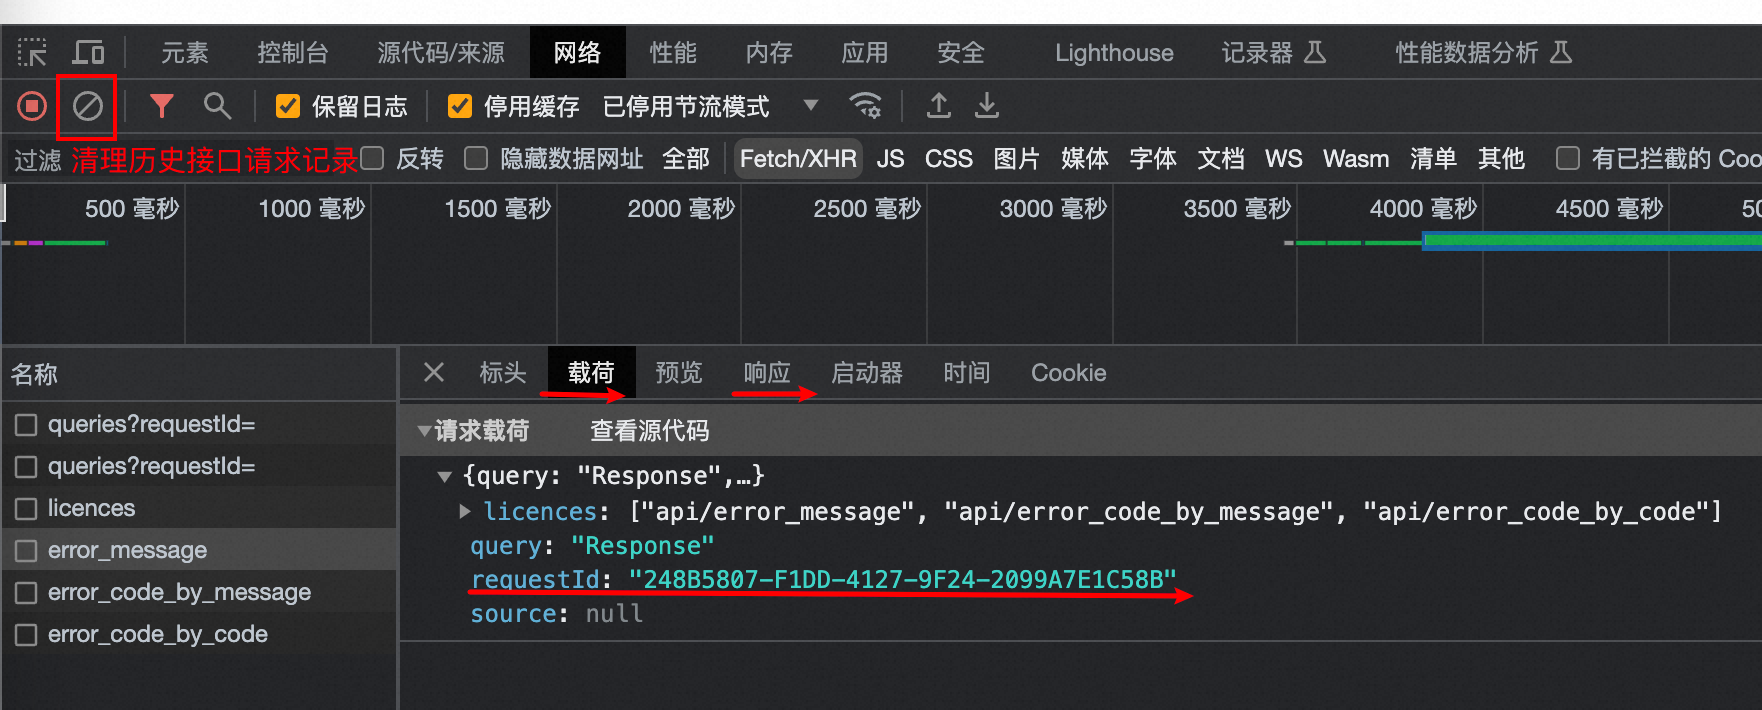
Chrome获取RequestId
Chrome获取RequestId 参考:https://help.aliyun.com/zh/redis/how-do-i-obtain-the-id-of-a-request 在浏览器页面按下F12键,打开开发者工具页面; 在开发者工具页面,单击Network(网络); 在playload(载荷)窗口中找到目…...

cesium 雷达扫描 (线行扩散效果)
cesium 雷达扫描 (线行扩散效果) 1、实现方法 使用ellipse方法加载圆型,修改ellipse中material方法来实现效果 2、示例代码 2.1、 <!DOCTYPE html> <html lang="en"><head><<...

【React】React组件生命周期以及触发顺序(部分与vue做比较)
最近在学习React,发现其中的生命周期跟Vue有一些共同点,但也有比较明显的区别,并且执行顺序也值得讨论一下,于是总结了一些资料在这里,作为学习记录。 v17.0.1后生命周期图片 初始化阶段 由ReactDOM.render()触发 —…...

【C++】多线程的学习笔记——白话文版(bushi
目录 为什么要使用多线程 例子 代码 结果 首先要先学的库——thread库 thread的简介 thread的具体使用方法 基本变量的定义 注意(小重点) join函数的解读(重点) detach函数的解读 注意 关于vector和thread是联合使用 …...
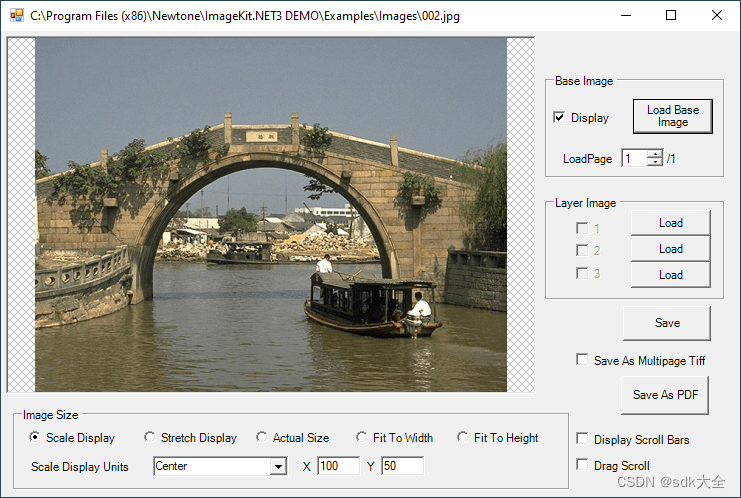
图像处理: ImageKit.NET 3.0.10704 Crack
关于 ImageKit.NET3 100% 原生 .NET 图像处理组件。 ImageKit.NET 可让您快速轻松地向 .NET 应用程序添加图像处理功能。从 TWAIN 扫描仪和数码相机检索图像;加载和保存多种格式的图像文件;对图像应用图像滤镜和变换;在显示屏、平移窗口或缩略…...
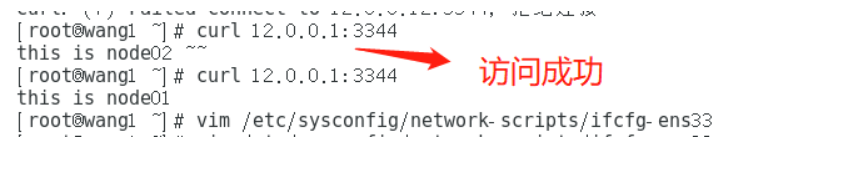
K8S内容分发网络之集群,nginx,负载均衡,防火墙
K8S内容分发网络之集群,nginx,负载均衡,防火墙 一、Kubernetes 区域可采用 Kubeadm 方式进行安装。1.所有节点,关闭防火墙规则,关闭selinux,关闭swap交换2.修改主机名3.所有节点修改hosts文件4.调整内核参数…...

不愧是疑问解决神器!你强任你强
不愧是疑问解决神器!你强任你强👍👍👍 在过去,我习惯用这种方式来阅读书籍或文章:先快速浏览一遍,然后再进行复读,并最终总结所学的知识点。然而,长期以来,我…...
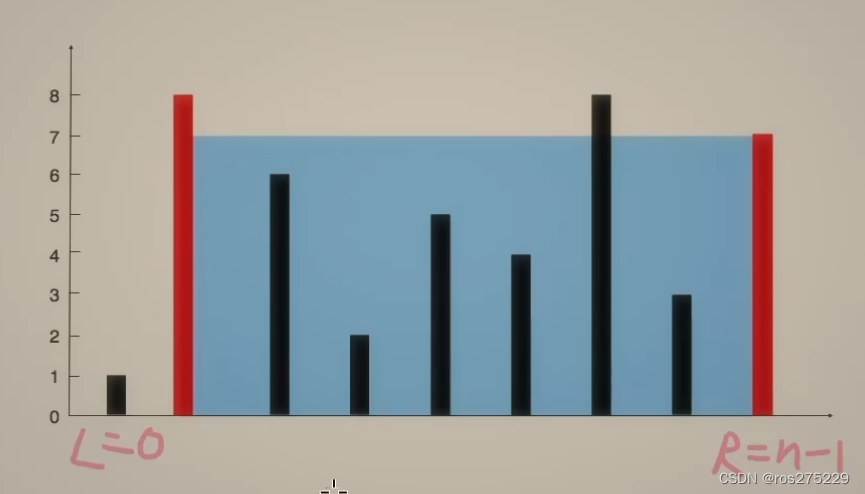
盛最多水的容器 接雨水【基础算法精讲 02】
盛雨水最多的容器 链接 : 11 盛最多水的容器 思路 : 双指针 : 1.对于两条确定的边界,l和r,取中间的线m与r组成容器,如果m的高度>l的高度,那么整个容器的长度会减小,如果低于l的高度,那么不仅高度可…...
之—— 主题的functions.php)
WordPress主题开发( 十二)之—— 主题的functions.php
WordPress主题开发( 十)之—— 主题的functions.php 介绍使用functions.php vs. 插件创建和使用functions.php在functions.php中的常见用途1. 使用WordPress钩子2. 启用WordPress功能3. 定义可重用的函数4. 添加自动Feed链接5. 自定义导航菜单6. 文本域加…...

代码的工厂模式
概念: 代码的工厂模式是一种设计模式,用于创建对象实例而无需直接调用构造函数。它提供了一种更加灵活和可维护的方式来创建对象,尤其是在需要根据不同情况创建不同类型的对象时非常有用。工厂模式隐藏了对象的创建细节,使代码更…...
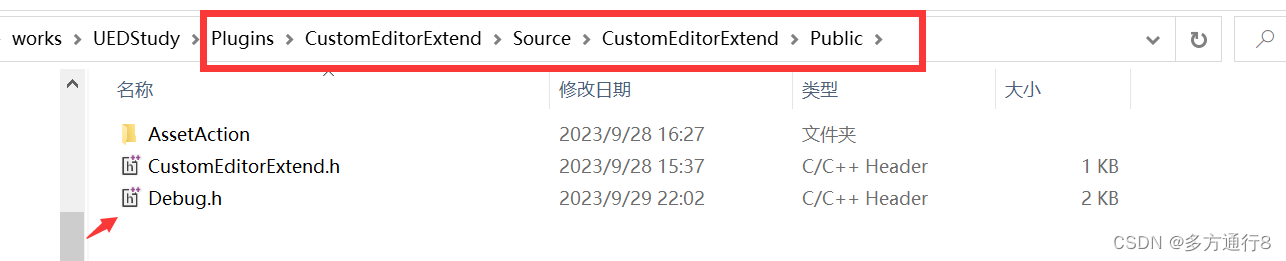
UE5.1编辑器拓展【一、脚本化资产行为,通知,弹窗,高效复制多个同样的资产】
目录 插件制作 添加新的类:AssetActionUtility 添加新的模块:EditorScriptingUtilities 路径了解 添加debug的头文件 代码【debug.h】内涵注释: 写函数 .h文件 .cpp文件 插件制作 首先第一步是做一个插件:…...

mac openssl 版本到底怎么回事 已解决
在mac 安装node多版本的时候,有可能把原有的 openssl1.1 版本 直接要再一次升级了,无奈的 php环境 编译器是 openssl 1.1 还是 3.0 ,今天来个底朝天的找问题。 brew search openssl 有安装 三个版本。 但是错误提示 是第二个版本。 brew …...

AWS】在EC2上创建root用户,并使用root用户登录
最近有项目需要使用AWS的EC2服务器; 在创建服务器实例之后发现,没有root用户,仔细阅读AWS EC2文档,发现默认是ec2-user用户; 那我们需要创建一个root用户 1.创建 root 用户 注意:必须要要在ec2-user用户下…...

9月24日回顾
1.微程序控制器的组成:指令译码器、微地址寄存器(输出和暂存控制信息),时序电路、最核心的部件是控制存储器(只读ROM组成)—用来存储微指令 2.突发读写:比如说突发地址为8,那么只需…...
Spring注册Bean系列--方法1:@Component
原文网址:Spring注册Bean系列--方法1:Component_IT利刃出鞘的博客-CSDN博客 简介 本文介绍Spring注册Bean的方法:Component。 注册Bean的方法我写了一个系列,见:Spring注册Bean(提供Bean)系列--方法大全_IT利刃出鞘…...
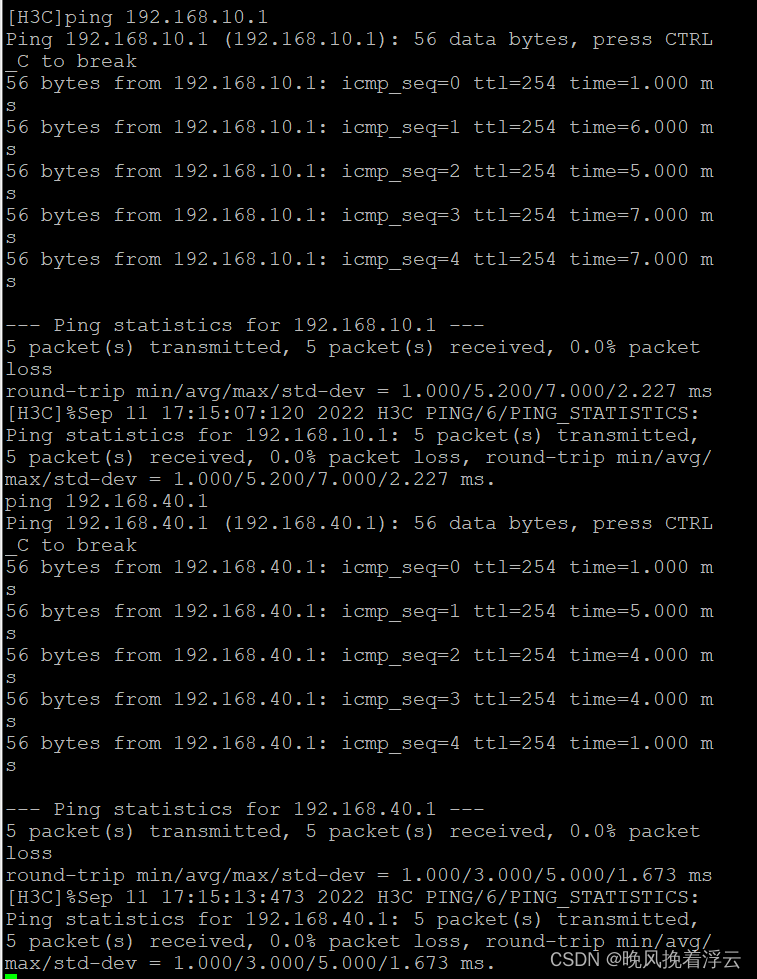
防火墙基础之H3C防火墙和三层交换机链路聚合的配置
H3C防火墙和三层交换机链路聚合的配置 原理概述: 防火墙(英语:Firewall)技术是通过有机结合各类用于安全管理与筛选的软件和硬件设备,帮助计算机网络于其内、外网之间构建一道相对隔绝的保护屏障,以保…...

管理类联考——数学——汇总篇——知识点突破——算数——记忆
文章目录 整体利用目录大纲/记忆宫殿目录大纲记忆宫殿 局部用各种方法数字编码法常见整除特点 歌决记忆法谐音记忆法理解记忆法比较记忆法转图像记忆法可视化法 整体利用目录大纲/记忆宫殿 目录大纲 记忆宫殿 局部用各种方法 学习记忆——数学篇——汇总——顺口溜记忆法谐…...
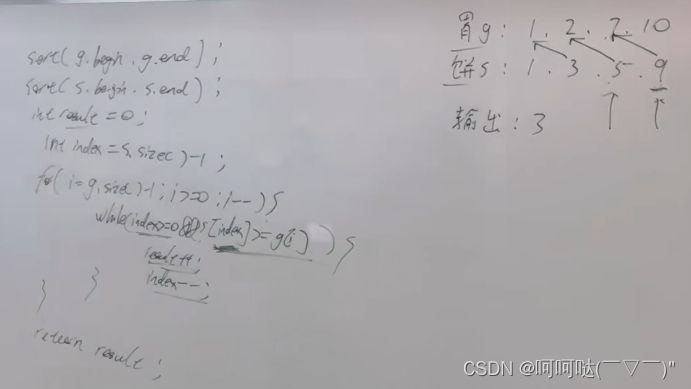
leetCode 455.分发饼干 贪心算法
455. 分发饼干 - 力扣(LeetCode) 假设你是一位很棒的家长,想要给你的孩子们一些小饼干。但是,每个孩子最多只能给一块饼干。 对每个孩子 i,都有一个胃口值 g[i],这是能让孩子们满足胃口的饼干的最小尺寸&…...

vue3简易文字验证码
大神勿喷,简易版本,demo中可以用一下。 需要几个文字自己codelen 赋值 灵活点直接父组件传过去,可以自己改造 首先创建一个生成数字的js **mathcode.js**function MathCode(num){let str "寻寻觅觅冷冷清清凄凄惨惨戚戚乍暖还寒时候…...

基于XGBoost与SHAP的分子气味预测:从特征工程到可解释性分析
1. 项目概述与核心价值在香水设计、食品风味工业乃至环境监测领域,一个核心且持久的挑战是:如何从分子的化学结构出发,准确预测其气味?这不仅仅是化学家或调香师的直觉游戏,更是一个复杂的、高维度的模式识别问题。传统…...

从电磁炉到户外电源:拆解单相SVPWM如何让你的逆变器更安静、更高效
从电磁炉到户外电源:单相SVPWM如何实现静音与高效的双重突破当你深夜用电磁炉煮面时,是否曾被突然的蜂鸣声吓一跳?或是发现户外电源给设备充电时,散热风扇的噪音盖过了山林鸟鸣?这些常见问题背后,隐藏着一个…...

论文创新点像挤牙膏?导师强推这几个AI论文平台
想写论文又快又好,关键是用对 AI 工具、走对流程——资深教授普遍推荐:千笔AI(中文全流程首选) 豆包学术版(轻量高效) DeepSeek 学术版(理工 / 长文本) Grammarly Academicÿ…...
Transient、QuickEye、VerifyEye傻傻分不清?一文讲透Ansys里三种眼图仿真方法的适用场景与避坑指南
Transient、QuickEye、VerifyEye深度解析:Ansys眼图仿真技术选型实战指南 在高速数字系统设计中,眼图分析是评估信号完整性的黄金标准。面对Ansys工具链中三种截然不同的眼图生成方法,工程师常常陷入选择困境——是追求精确度的传统瞬态分析&…...

告别鼠标手!5分钟上手开源鼠标连点器MouseClick,轻松实现自动化点击
告别鼠标手!5分钟上手开源鼠标连点器MouseClick,轻松实现自动化点击 【免费下载链接】MouseClick 🖱️ MouseClick 🖱️ 是一款功能强大的鼠标连点器和管理工具,采用 QT Widget 开发 ,具备跨平台兼容性 。软…...

基于可解释机器学习的城市人口流动空间降尺度分析实践
1. 项目概述:从宏观到微观,解码城市脉搏在城市的肌理中,人口的流动如同血液的循环,承载着经济活力、社会互动与空间结构的全部信息。无论是城市规划师优化公交线路,还是商业分析师评估店铺选址,亦或是公共卫…...

告别CAJ格式困扰:3分钟学会用开源工具将知网文献转为PDF
告别CAJ格式困扰:3分钟学会用开源工具将知网文献转为PDF 【免费下载链接】caj2pdf Convert CAJ (China Academic Journals) files to PDF. 转换中国知网 CAJ 格式文献为 PDF。佛系转换,成功与否,皆是玄学。 项目地址: https://gitcode.com/…...

PCL 法向量夹角剔除错误匹配点对【2026最新版】
目录 一、 算法简介 1、主要函数 2、参考文献 二、 代码实现 三、 结果展示 四、 参考链接 博客长期更新,本文最新更新时间为:2026年5月24日。代码在PCL1.15.1中测试通过 一、 算法简介 在三维点云配准中,对应点(correspondence)的准确性直接决定了配准算法的精度和鲁棒性…...

C++ vector容器总结
vector基本概念功能:vector数据结构和数组非常相似,也称为单端数组vector与普通数组区别:不同之处在于数组是静态空间,而vector可以动态扩展动态扩展:并不是在原空间之后续接新空间,而是找更大的内存空间&a…...
)
用Python复现Nature论文:仅需100次循环数据,提前预测锂电池寿命(附完整代码与数据集)
用Python实战预测锂电池寿命:从数据特征到模型部署全解析锂电池作为现代能源存储的核心组件,其寿命预测一直是工业界和学术界关注的焦点。传统方法往往需要等待电池出现明显容量衰减才能进行判断,而最新研究表明,通过分析早期循环…...