竞赛选题 深度学习 YOLO 实现车牌识别算法
文章目录
- 0 前言
- 1 课题介绍
- 2 算法简介
- 2.1网络架构
- 3 数据准备
- 4 模型训练
- 5 实现效果
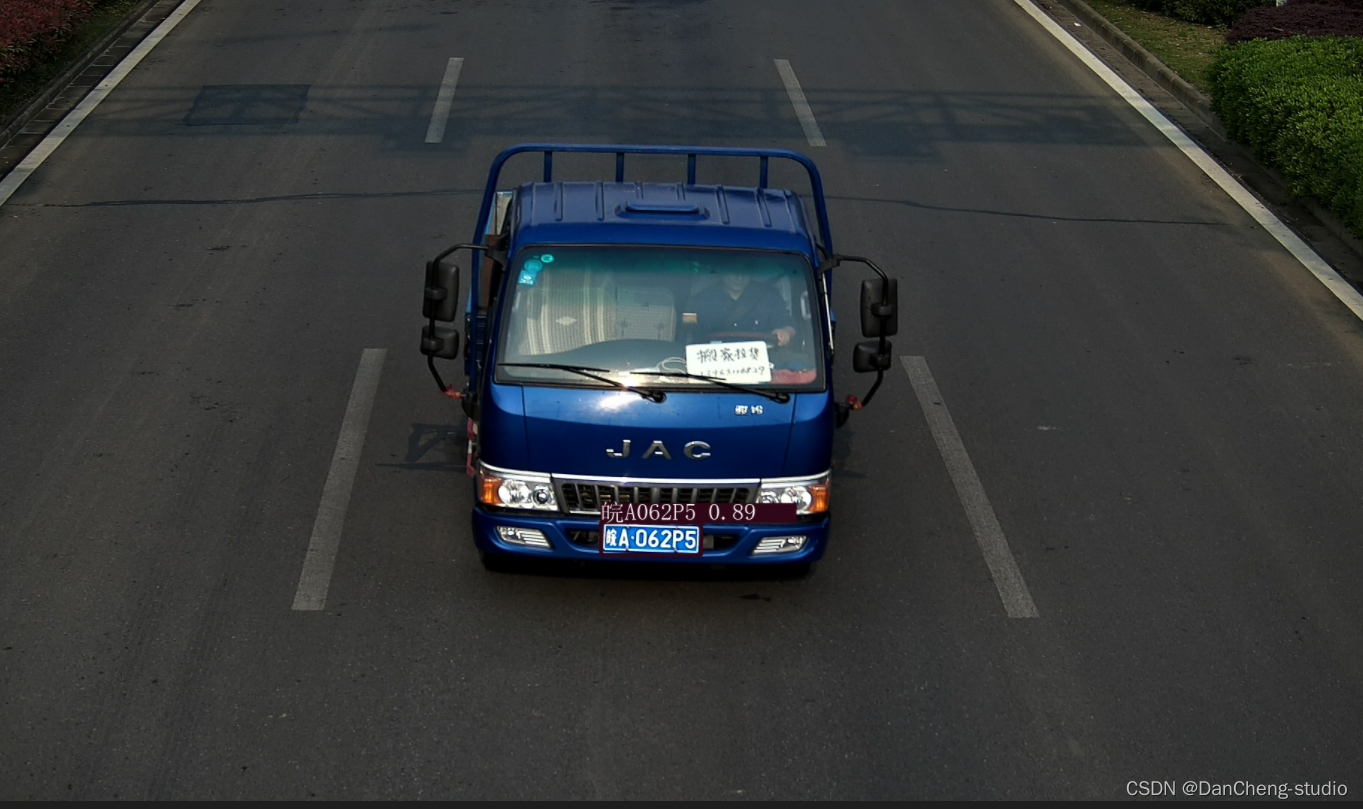
- 5.1 图片识别效果
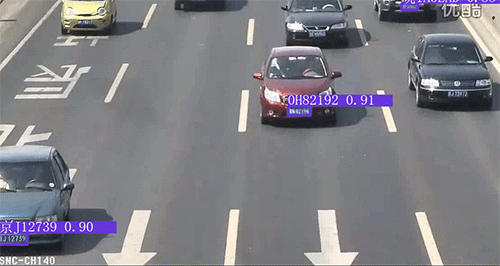
- 5.2视频识别效果
- 6 部分关键代码
- 7 最后
0 前言
🔥 优质竞赛项目系列,今天要分享的是
🚩 基于yolov5的深度学习车牌识别系统实现
该项目较为新颖,适合作为竞赛课题方向,学长非常推荐!
🥇学长这里给一个题目综合评分(每项满分5分)
- 难度系数:4分
- 工作量:4分
- 创新点:3分
🧿 更多资料, 项目分享:
https://gitee.com/dancheng-senior/postgraduate
1 课题介绍
智能车牌识别是现代智能交通系统的重要组成部分, 广泛应用于高速公路、停车场、路口等场景。随着大数 据、人工智能的不断发展,智能车牌识别在数据处理、自
适应学习以及特殊场景训练等方面都有较大程度提升,具 有更强的容错性和鲁棒性。通过车牌号码的自动识别与跟 踪,能有效降低车辆自动化管理的成本,规范车辆不规范
行为,为社会稳定与居民便捷生活提供坚实保障。
2 算法简介
YOLOv5是一种单阶段目标检测算法,该算法在YOLOv4的基础上添加了一些新的改进思路,使其速度与精度都得到了极大的性能提升。主要的改进思路如下所示:
输入端:在模型训练阶段,提出了一些改进思路,主要包括Mosaic数据增强、自适应锚框计算、自适应图片缩放;
基准网络:融合其它检测算法中的一些新思路,主要包括:Focus结构与CSP结构;
Neck网络:目标检测网络在BackBone与最后的Head输出层之间往往会插入一些层,Yolov5中添加了FPN+PAN结构;
Head输出层:输出层的锚框机制与YOLOv4相同,主要改进的是训练时的损失函数GIOU_Loss,以及预测框筛选的DIOU_nms。
2.1网络架构
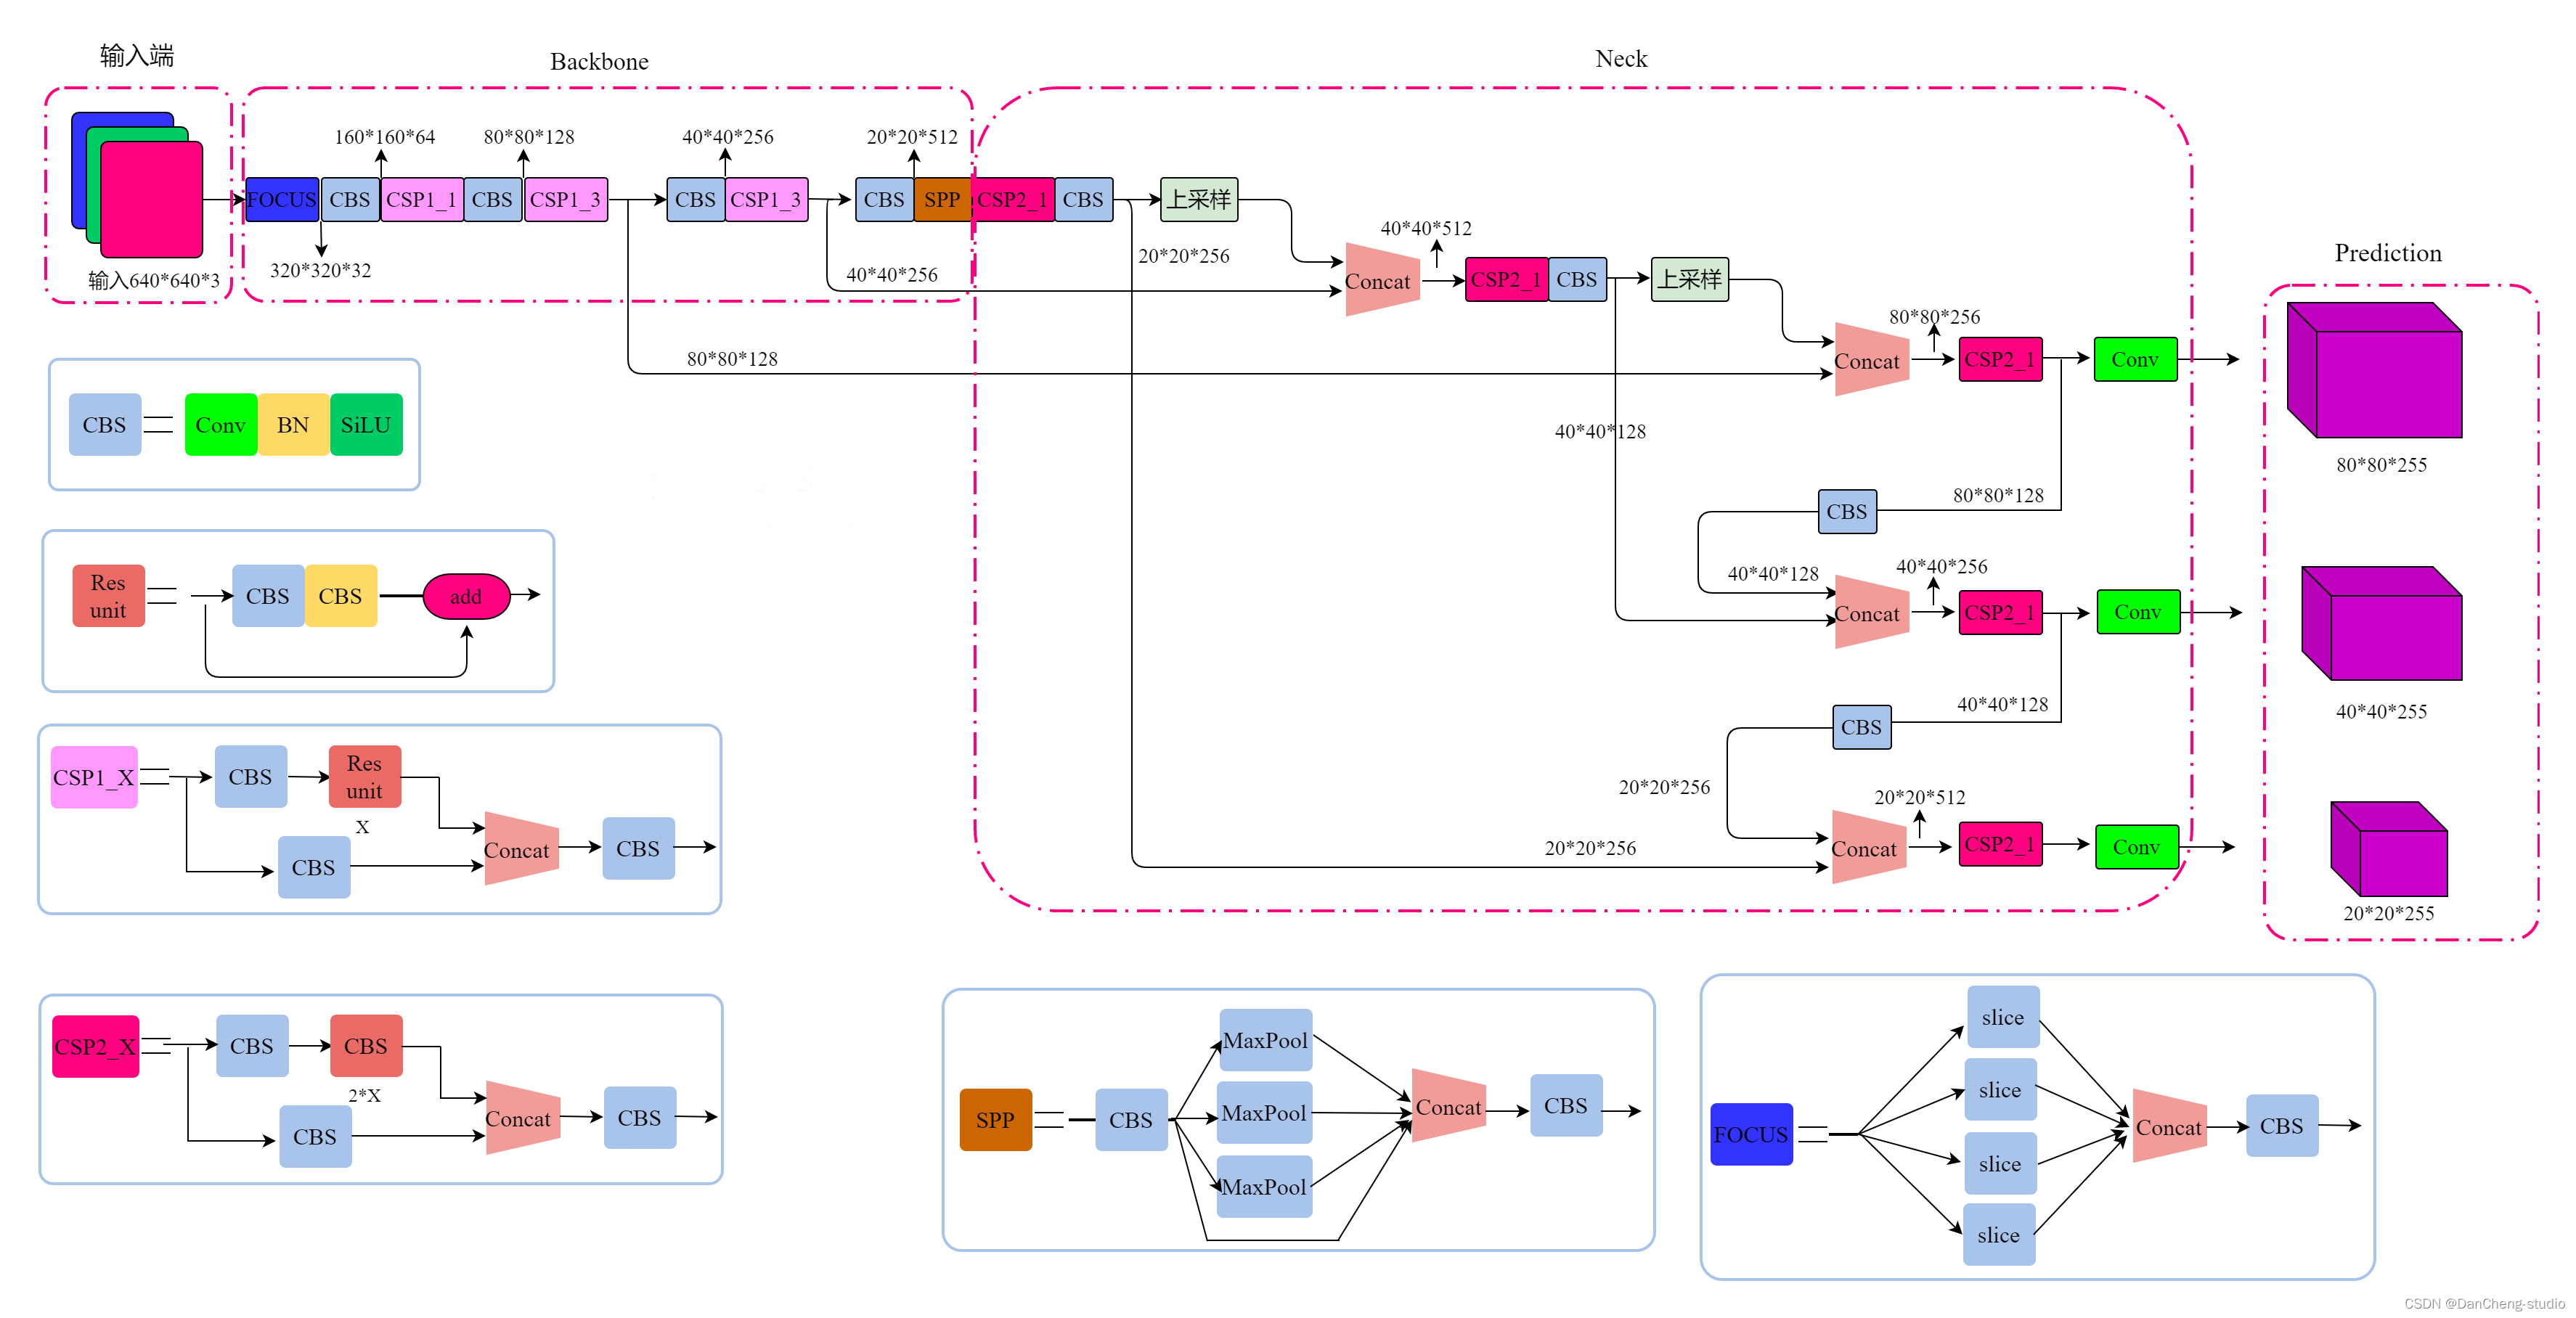
上图展示了YOLOv5目标检测算法的整体框图。对于一个目标检测算法而言,我们通常可以将其划分为4个通用的模块,具体包括:输入端、基准网络、Neck网络与Head输出端,对应于上图中的4个红色模块。YOLOv5算法具有4个版本,具体包括:YOLOv5s、YOLOv5m、YOLOv5l、YOLOv5x四种,本文重点讲解YOLOv5s,其它的版本都在该版本的基础上对网络进行加深与加宽。
- 输入端-输入端表示输入的图片。该网络的输入图像大小为608*608,该阶段通常包含一个图像预处理阶段,即将输入图像缩放到网络的输入大小,并进行归一化等操作。在网络训练阶段,YOLOv5使用Mosaic数据增强操作提升模型的训练速度和网络的精度;并提出了一种自适应锚框计算与自适应图片缩放方法。
- 基准网络-基准网络通常是一些性能优异的分类器种的网络,该模块用来提取一些通用的特征表示。YOLOv5中不仅使用了CSPDarknet53结构,而且使用了Focus结构作为基准网络。
- Neck网络-Neck网络通常位于基准网络和头网络的中间位置,利用它可以进一步提升特征的多样性及鲁棒性。虽然YOLOv5同样用到了SPP模块、FPN+PAN模块,但是实现的细节有些不同。
- Head输出端-Head用来完成目标检测结果的输出。针对不同的检测算法,输出端的分支个数不尽相同,通常包含一个分类分支和一个回归分支。YOLOv4利用GIOU_Loss来代替Smooth L1 Loss函数,从而进一步提升算法的检测精度。
3 数据准备
大家可选用公开的车牌识别数据集。如标注好的 CCPD 数据集, CCPD 数据集一共包含超多 25 万张图片,每种图片大小 720x1160x3,选取部分
CCPD 数据集作为本设计中的车牌检 测与识别的数据集,总共包含 9 项。
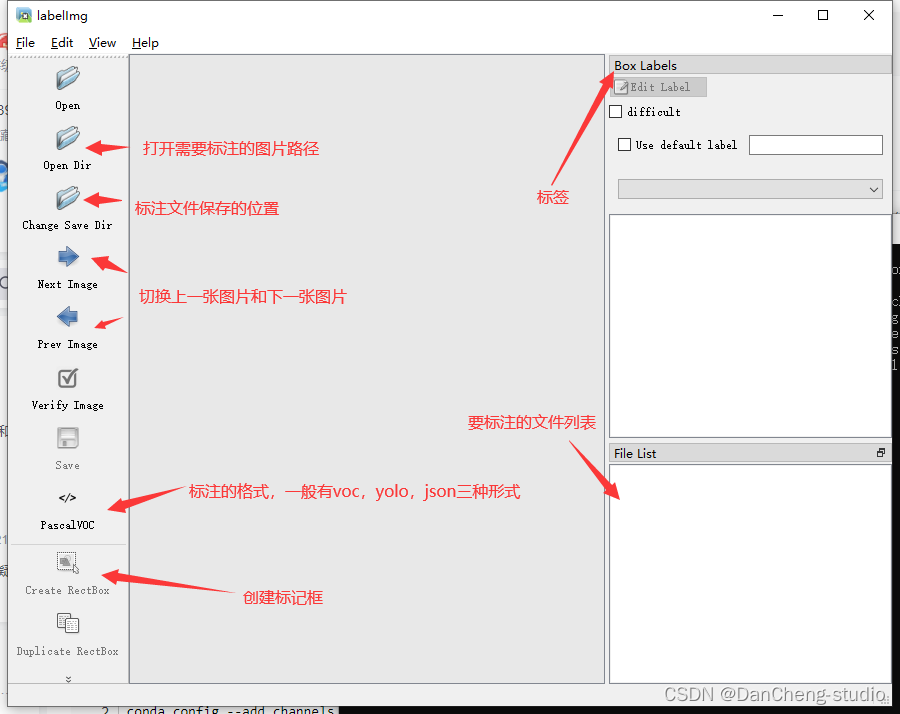
也可自己收集车牌图片标注数据集,数据标注这里推荐的软件是labelimg,通过pip指令即可安装。具体使用可上网查看教程。
4 模型训练
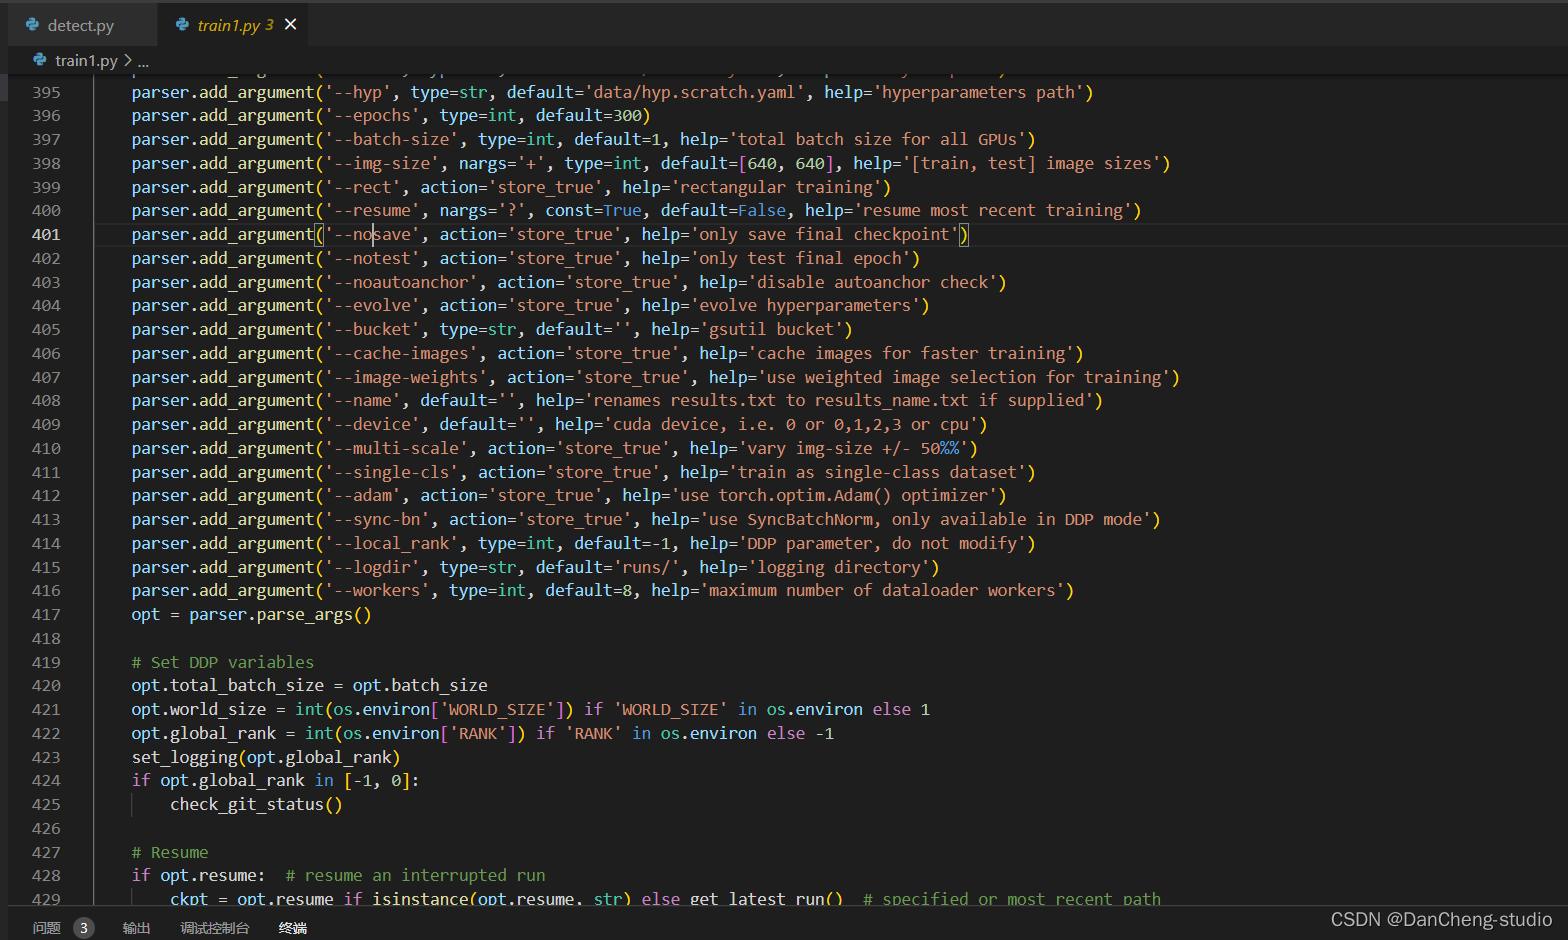
修改train.py中的weights、cfg、data、epochs、batch_size、imgsz、device、workers等参数
训练代码成功执行之后会在命令行中输出下列信息,接下来就是安心等待模型训练结束即可。

5 实现效果
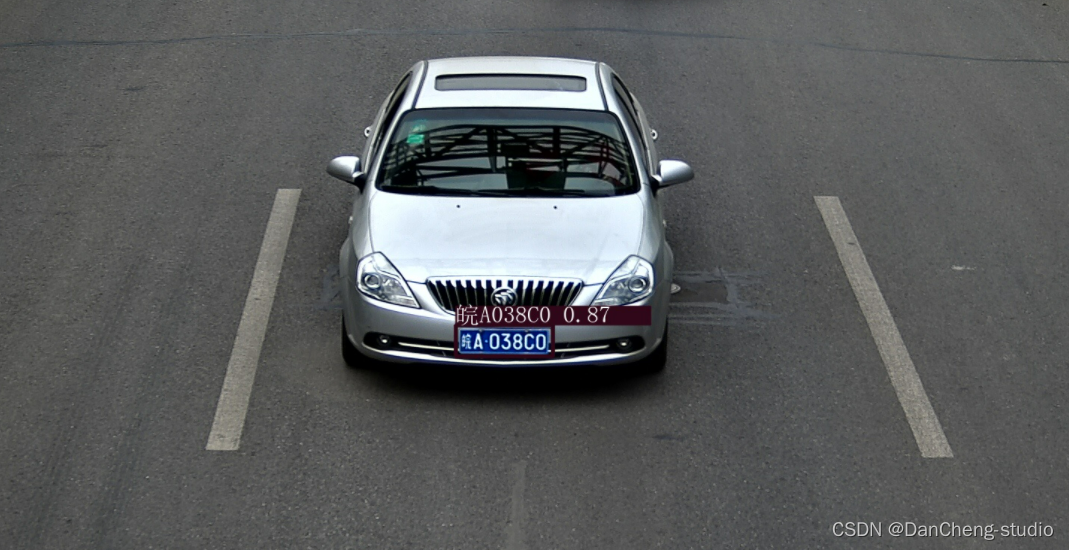
来看看我们要实现的效果,我们将会通过数据来训练一个车牌识别的模型,并用pyqt5进行封装,实现图片车牌识别、视频车牌识别和摄像头实时车牌识别的功能。
if __name__ == '__main__':parser = argparse.ArgumentParser()parser.add_argument('--weights', nargs='+', type=str, default='./weights/last.pt', help='model.pt path(s)')parser.add_argument('--source', type=str, default='./inference/images', help='source') # file/folder, 0 for webcamparser.add_argument('--output', type=str, default='inference/output', help='output folder') # output folderparser.add_argument('--img-size', type=int, default=640, help='inference size (pixels)')parser.add_argument('--conf-thres', type=float, default=0.8, help='object confidence threshold')parser.add_argument('--iou-thres', type=float, default=0.5, help='IOU threshold for NMS')parser.add_argument('--device', default='', help='cuda device, i.e. 0 or 0,1,2,3 or cpu')parser.add_argument('--view-img', action='store_true', help='display results',default=True)parser.add_argument('--save-txt', action='store_true', help='save results to *.txt')parser.add_argument('--classes', nargs='+', type=int, help='filter by class')parser.add_argument('--agnostic-nms', action='store_true', help='class-agnostic NMS')parser.add_argument('--augment', action='store_true', help='augmented inference')parser.add_argument('--update', action='store_true', help='update all models')opt = parser.parse_args()print(opt)with torch.no_grad():if opt.update: # update all models (to fix SourceChangeWarning)for opt.weights in ['yolov5s.pt', 'yolov5m.pt', 'yolov5l.pt', 'yolov5x.pt', 'yolov3-spp.pt']:detect()create_pretrained(opt.weights, opt.weights)else:
5.1 图片识别效果
5.2视频识别效果
6 部分关键代码
篇幅有限,仅展示部分代码
class Detect(nn.Module):stride = None # strides computed during buildonnx_dynamic = False # ONNX export parameterdef __init__(self, nc=80, anchors=(), ch=(), inplace=True): # detection layersuper().__init__()self.nc = nc # number of classesself.no = nc + 5 # number of outputs per anchorself.nl = len(anchors) # number of detection layersself.na = len(anchors[0]) // 2 # number of anchorsself.grid = [torch.zeros(1)] * self.nl # init gridself.anchor_grid = [torch.zeros(1)] * self.nl # init anchor gridself.register_buffer('anchors', torch.tensor(anchors).float().view(self.nl, -1, 2)) # shape(nl,na,2)self.m = nn.ModuleList(nn.Conv2d(x, self.no * self.na, 1) for x in ch) # output convself.inplace = inplace # use in-place ops (e.g. slice assignment)def forward(self, x):z = [] # inference outputfor i in range(self.nl):x[i] = self.m[i](x[i]) # convbs, _, ny, nx = x[i].shape # x(bs,255,20,20) to x(bs,3,20,20,85)x[i] = x[i].view(bs, self.na, self.no, ny, nx).permute(0, 1, 3, 4, 2).contiguous()if not self.training: # inferenceif self.onnx_dynamic or self.grid[i].shape[2:4] != x[i].shape[2:4]:self.grid[i], self.anchor_grid[i] = self._make_grid(nx, ny, i)y = x[i].sigmoid()if self.inplace:y[..., 0:2] = (y[..., 0:2] * 2 - 0.5 + self.grid[i]) * self.stride[i] # xyy[..., 2:4] = (y[..., 2:4] * 2) ** 2 * self.anchor_grid[i] # whelse: # for YOLOv5 on AWS Inferentia https://github.com/ultralytics/yolov5/pull/2953xy = (y[..., 0:2] * 2 - 0.5 + self.grid[i]) * self.stride[i] # xywh = (y[..., 2:4] * 2) ** 2 * self.anchor_grid[i] # why = torch.cat((xy, wh, y[..., 4:]), -1)z.append(y.view(bs, -1, self.no))return x if self.training else (torch.cat(z, 1), x)def _make_grid(self, nx=20, ny=20, i=0):d = self.anchors[i].deviceif check_version(torch.__version__, '1.10.0'): # torch>=1.10.0 meshgrid workaround for torch>=0.7 compatibilityyv, xv = torch.meshgrid([torch.arange(ny).to(d), torch.arange(nx).to(d)], indexing='ij')else:yv, xv = torch.meshgrid([torch.arange(ny).to(d), torch.arange(nx).to(d)])grid = torch.stack((xv, yv), 2).expand((1, self.na, ny, nx, 2)).float()anchor_grid = (self.anchors[i].clone() * self.stride[i]) \.view((1, self.na, 1, 1, 2)).expand((1, self.na, ny, nx, 2)).float()return grid, anchor_gridclass Model(nn.Module):def __init__(self, cfg='yolov5s.yaml', ch=3, nc=None, anchors=None): # model, input channels, number of classessuper().__init__()if isinstance(cfg, dict):self.yaml = cfg # model dictelse: # is *.yamlimport yaml # for torch hubself.yaml_file = Path(cfg).namewith open(cfg, encoding='ascii', errors='ignore') as f:self.yaml = yaml.safe_load(f) # model dict# Define modelch = self.yaml['ch'] = self.yaml.get('ch', ch) # input channelsif nc and nc != self.yaml['nc']:LOGGER.info(f"Overriding model.yaml nc={self.yaml['nc']} with nc={nc}")self.yaml['nc'] = nc # override yaml valueif anchors:LOGGER.info(f'Overriding model.yaml anchors with anchors={anchors}')self.yaml['anchors'] = round(anchors) # override yaml valueself.model, self.save = parse_model(deepcopy(self.yaml), ch=[ch]) # model, savelistself.names = [str(i) for i in range(self.yaml['nc'])] # default namesself.inplace = self.yaml.get('inplace', True)# Build strides, anchorsm = self.model[-1] # Detect()if isinstance(m, Detect):s = 256 # 2x min stridem.inplace = self.inplacem.stride = torch.tensor([s / x.shape[-2] for x in self.forward(torch.zeros(1, ch, s, s))]) # forwardm.anchors /= m.stride.view(-1, 1, 1)check_anchor_order(m)self.stride = m.strideself._initialize_biases() # only run once# Init weights, biasesinitialize_weights(self)self.info()LOGGER.info('')def forward(self, x, augment=False, profile=False, visualize=False):if augment:return self._forward_augment(x) # augmented inference, Nonereturn self._forward_once(x, profile, visualize) # single-scale inference, traindef _forward_augment(self, x):img_size = x.shape[-2:] # height, widths = [1, 0.83, 0.67] # scalesf = [None, 3, None] # flips (2-ud, 3-lr)y = [] # outputsfor si, fi in zip(s, f):xi = scale_img(x.flip(fi) if fi else x, si, gs=int(self.stride.max()))yi = self._forward_once(xi)[0] # forward# cv2.imwrite(f'img_{si}.jpg', 255 * xi[0].cpu().numpy().transpose((1, 2, 0))[:, :, ::-1]) # saveyi = self._descale_pred(yi, fi, si, img_size)y.append(yi)y = self._clip_augmented(y) # clip augmented tailsreturn torch.cat(y, 1), None # augmented inference, traindef _forward_once(self, x, profile=False, visualize=False):y, dt = [], [] # outputsfor m in self.model:if m.f != -1: # if not from previous layerx = y[m.f] if isinstance(m.f, int) else [x if j == -1 else y[j] for j in m.f] # from earlier layersif profile:self._profile_one_layer(m, x, dt)x = m(x) # runy.append(x if m.i in self.save else None) # save outputif visualize:feature_visualization(x, m.type, m.i, save_dir=visualize)return xdef _descale_pred(self, p, flips, scale, img_size):# de-scale predictions following augmented inference (inverse operation)if self.inplace:p[..., :4] /= scale # de-scaleif flips == 2:p[..., 1] = img_size[0] - p[..., 1] # de-flip udelif flips == 3:p[..., 0] = img_size[1] - p[..., 0] # de-flip lrelse:x, y, wh = p[..., 0:1] / scale, p[..., 1:2] / scale, p[..., 2:4] / scale # de-scaleif flips == 2:y = img_size[0] - y # de-flip udelif flips == 3:x = img_size[1] - x # de-flip lrp = torch.cat((x, y, wh, p[..., 4:]), -1)return pdef _clip_augmented(self, y):# Clip YOLOv5 augmented inference tailsnl = self.model[-1].nl # number of detection layers (P3-P5)g = sum(4 ** x for x in range(nl)) # grid pointse = 1 # exclude layer counti = (y[0].shape[1] // g) * sum(4 ** x for x in range(e)) # indicesy[0] = y[0][:, :-i] # largei = (y[-1].shape[1] // g) * sum(4 ** (nl - 1 - x) for x in range(e)) # indicesy[-1] = y[-1][:, i:] # smallreturn ydef _profile_one_layer(self, m, x, dt):c = isinstance(m, Detect) # is final layer, copy input as inplace fixo = thop.profile(m, inputs=(x.copy() if c else x,), verbose=False)[0] / 1E9 * 2 if thop else 0 # FLOPst = time_sync()for _ in range(10):m(x.copy() if c else x)dt.append((time_sync() - t) * 100)if m == self.model[0]:LOGGER.info(f"{'time (ms)':>10s} {'GFLOPs':>10s} {'params':>10s} {'module'}")LOGGER.info(f'{dt[-1]:10.2f} {o:10.2f} {m.np:10.0f} {m.type}')if c:LOGGER.info(f"{sum(dt):10.2f} {'-':>10s} {'-':>10s} Total")def _initialize_biases(self, cf=None): # initialize biases into Detect(), cf is class frequency# https://arxiv.org/abs/1708.02002 section 3.3# cf = torch.bincount(torch.tensor(np.concatenate(dataset.labels, 0)[:, 0]).long(), minlength=nc) + 1.m = self.model[-1] # Detect() modulefor mi, s in zip(m.m, m.stride): # fromb = mi.bias.view(m.na, -1) # conv.bias(255) to (3,85)b.data[:, 4] += math.log(8 / (640 / s) ** 2) # obj (8 objects per 640 image)b.data[:, 5:] += math.log(0.6 / (m.nc - 0.999999)) if cf is None else torch.log(cf / cf.sum()) # clsmi.bias = torch.nn.Parameter(b.view(-1), requires_grad=True)def _print_biases(self):m = self.model[-1] # Detect() modulefor mi in m.m: # fromb = mi.bias.detach().view(m.na, -1).T # conv.bias(255) to (3,85)LOGGER.info(('%6g Conv2d.bias:' + '%10.3g' * 6) % (mi.weight.shape[1], *b[:5].mean(1).tolist(), b[5:].mean()))# def _print_weights(self):# for m in self.model.modules():# if type(m) is Bottleneck:# LOGGER.info('%10.3g' % (m.w.detach().sigmoid() * 2)) # shortcut weightsdef fuse(self): # fuse model Conv2d() + BatchNorm2d() layersLOGGER.info('Fusing layers... ')for m in self.model.modules():if isinstance(m, (Conv, DWConv)) and hasattr(m, 'bn'):m.conv = fuse_conv_and_bn(m.conv, m.bn) # update convdelattr(m, 'bn') # remove batchnormm.forward = m.forward_fuse # update forwardself.info()return selfdef autoshape(self): # add AutoShape moduleLOGGER.info('Adding AutoShape... ')m = AutoShape(self) # wrap modelcopy_attr(m, self, include=('yaml', 'nc', 'hyp', 'names', 'stride'), exclude=()) # copy attributesreturn mdef info(self, verbose=False, img_size=640): # print model informationmodel_info(self, verbose, img_size)def _apply(self, fn):# Apply to(), cpu(), cuda(), half() to model tensors that are not parameters or registered buffersself = super()._apply(fn)m = self.model[-1] # Detect()if isinstance(m, Detect):m.stride = fn(m.stride)m.grid = list(map(fn, m.grid))if isinstance(m.anchor_grid, list):m.anchor_grid = list(map(fn, m.anchor_grid))return selfdef parse_model(d, ch): # model_dict, input_channels(3)LOGGER.info(f"\n{'':>3}{'from':>18}{'n':>3}{'params':>10} {'module':<40}{'arguments':<30}")anchors, nc, gd, gw = d['anchors'], d['nc'], d['depth_multiple'], d['width_multiple']na = (len(anchors[0]) // 2) if isinstance(anchors, list) else anchors # number of anchorsno = na * (nc + 5) # number of outputs = anchors * (classes + 5)layers, save, c2 = [], [], ch[-1] # layers, savelist, ch outfor i, (f, n, m, args) in enumerate(d['backbone'] + d['head']): # from, number, module, argsm = eval(m) if isinstance(m, str) else m # eval stringsfor j, a in enumerate(args):try:args[j] = eval(a) if isinstance(a, str) else a # eval stringsexcept NameError:passn = n_ = max(round(n * gd), 1) if n > 1 else n # depth gainif m in [Conv, GhostConv, Bottleneck, GhostBottleneck, SPP, SPPF, DWConv, MixConv2d, Focus, CrossConv,BottleneckCSP, C3, C3TR, C3SPP, C3Ghost]:c1, c2 = ch[f], args[0]if c2 != no: # if not outputc2 = make_divisible(c2 * gw, 8)args = [c1, c2, *args[1:]]if m in [BottleneckCSP, C3, C3TR, C3Ghost]:args.insert(2, n) # number of repeatsn = 1elif m is nn.BatchNorm2d:args = [ch[f]]elif m is Concat:c2 = sum(ch[x] for x in f)elif m is Detect:args.append([ch[x] for x in f])if isinstance(args[1], int): # number of anchorsargs[1] = [list(range(args[1] * 2))] * len(f)elif m is Contract:c2 = ch[f] * args[0] ** 2elif m is Expand:c2 = ch[f] // args[0] ** 2else:c2 = ch[f]m_ = nn.Sequential(*(m(*args) for _ in range(n))) if n > 1 else m(*args) # modulet = str(m)[8:-2].replace('__main__.', '') # module typenp = sum(x.numel() for x in m_.parameters()) # number paramsm_.i, m_.f, m_.type, m_.np = i, f, t, np # attach index, 'from' index, type, number paramsLOGGER.info(f'{i:>3}{str(f):>18}{n_:>3}{np:10.0f} {t:<40}{str(args):<30}') # printsave.extend(x % i for x in ([f] if isinstance(f, int) else f) if x != -1) # append to savelistlayers.append(m_)if i == 0:ch = []ch.append(c2)return nn.Sequential(*layers), sorted(save)7 最后
🧿 更多资料, 项目分享:
https://gitee.com/dancheng-senior/postgraduate
相关文章:
竞赛选题 深度学习 YOLO 实现车牌识别算法
文章目录 0 前言1 课题介绍2 算法简介2.1网络架构 3 数据准备4 模型训练5 实现效果5.1 图片识别效果5.2视频识别效果 6 部分关键代码7 最后 0 前言 🔥 优质竞赛项目系列,今天要分享的是 🚩 基于yolov5的深度学习车牌识别系统实现 该项目较…...
Direct3D网格(一)
创建网格 我们可以用D3DXCreateMeshFVF函数创建一个"空"网格对象 ,空网格对象是指我们指定了网格的面片总数和顶点总数,然后由该函数为顶点缓存、索引缓存和属性缓存分配大小合适的内存,之后即可手工填入网格数据。 HRESULT WINA…...
C语言打印菱形
一、运行结果图 二、源代码 # define _CRT_SECURE_NO_WARNINGS # include <stdio.h>int main() {//初始化变量值;int line 0;int i 0;int j 0;//获取变量值;scanf("%d", &line);//循环打印上半部分;for (i 0; i <…...
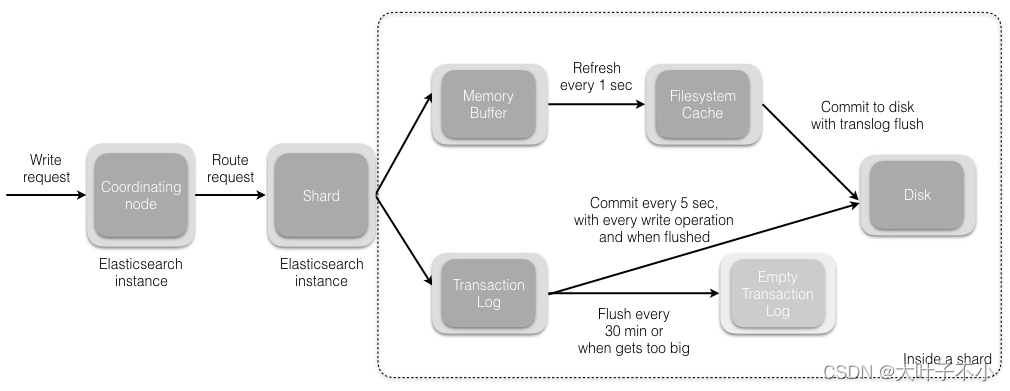
ElasticSearch搜索引擎:数据的写入流程
一、ElasticSearch 写数据的总体流程: (1)ES 客户端选择一个节点 node 发送请求过去,这个节点就是协调节点 coordinating node (2)协调节点对 document 进行路由,通过 hash 算法计算出数据应该…...

python3 调用 另外一个python脚本
3种python调用其他脚本脚本的方法_python 调用python脚本_linjingyg的博客-CSDN博客 Python之系统交互(调用系统命令)subprocess_subprocess.getoutput(cmd) 参数格式不正确-CSDN博客 subprocess.call()只能返回状态码。subprocess.getoutput(cmd)只能输出命令结果。 str(py…...

【13】c++设计模式——>简单工厂模式
工厂模式的定义 c中的工厂模式是一种创建型设计模式,它提供一种创建对象的接口,但具体创建的对象类型可以在运行时决定,这样可以将对象的创建与使用代码分离,提高代码的灵活性和可维护性。 在c中实现工厂模式,通常会定…...

系统架构设计:2 论软件设计方法及其应用
目录 一 软件设计方法 1结构化设计 2信息工程 3面向对象设计 4原型设计...

基于Winform的UDP通信
1、文件结构 2、UdpReceiver.cs using System; using System.Collections.Generic; using System.Linq; using System.Net; using System.Net.Sockets; using System.Text; using System.Threading.Tasks;namespace UDPTest.Udp {public class UdpStateEventArgs : EventArgs…...
掌握 BERT:自然语言处理 (NLP) 从初级到高级的综合指南(1)
简介 BERT(来自 Transformers 的双向编码器表示)是 Google 开发的革命性自然语言处理 (NLP) 模型。它改变了语言理解任务的格局,使机器能够理解语言的上下文和细微差别。在本文[1]中,我们将带您踏上从 BERT 基础知识到高级概念的旅…...
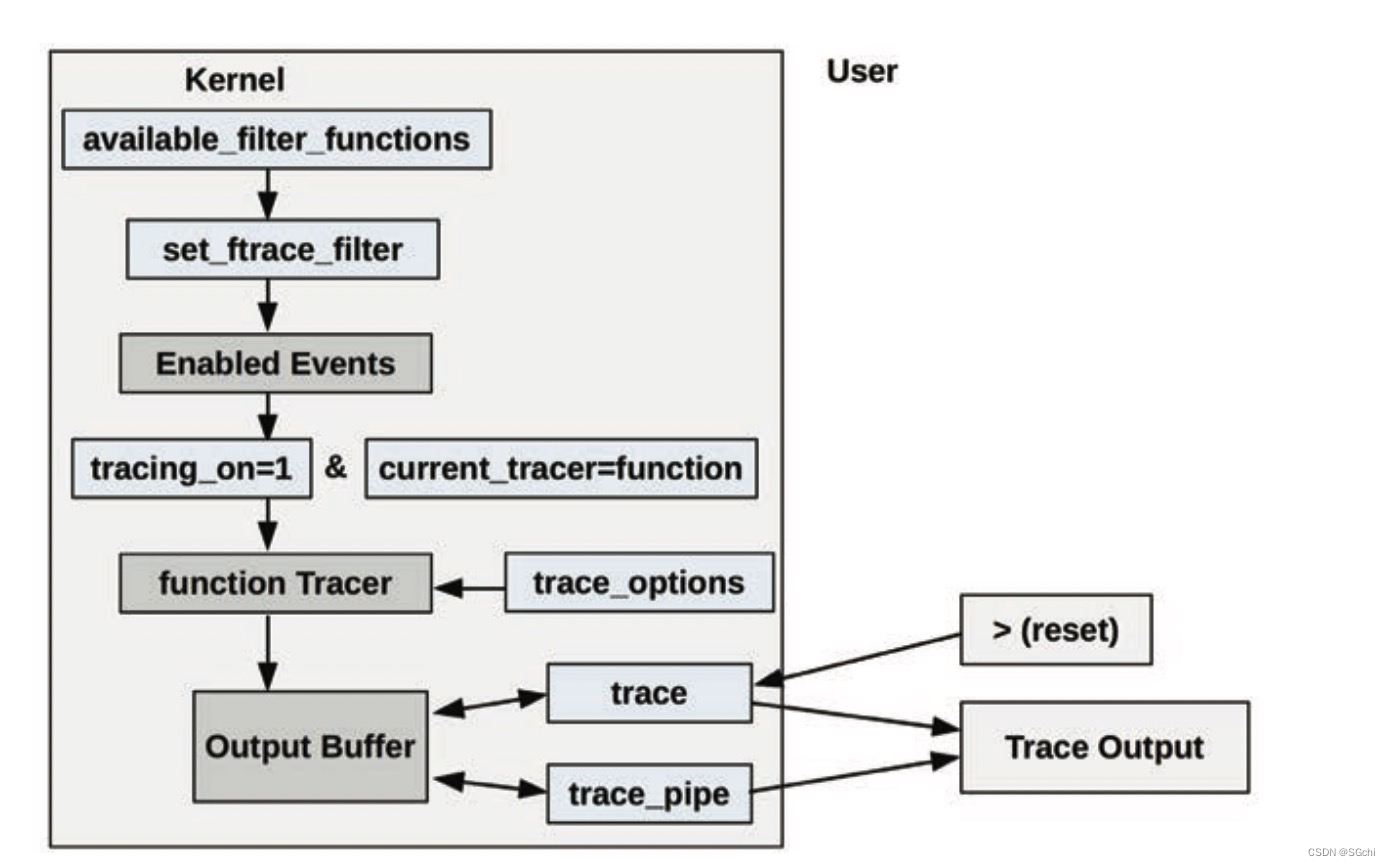
Linux Ftrace介绍
文章目录 一、简介二、内核函数调用跟踪参考链接: 一、简介 Ftrace 是 Linux 官方提供的跟踪工具,在 Linux 2.6.27 版本中引入。Ftrace 可在不引入任何前端工具的情况下使用,让其可以适合在任何系统环境中使用。 Ftrace 可用来快速排查以下相…...

Go语言进阶------>init()函数
Init()包初始化 执行优先级 Init()函数的执行优先级比main()函数的执行优先级要高,也就是说程序会优先执行Init()函数之后再执行main()函数. 代码如下 package mainimport "fmt"func init() {fmt.Println("执行了Init()函数") }func main() {fmt.Println…...

云计算:常用微服务框架
目录 一、理论 1.Java微服务框架 2.Go微服务框架 3.Python微服务框架 4.Node.js微服务框架 5..Net微服务框架 一、理论 1.Java微服务框架 Spring Cloud:最早最成熟,Java开源微服务框架方案 SpringBoot:全新框架,设计目的是…...
jmeter添加断言(详细图解)
先创建一个线程组,再创建一个http请求。 为了方便观察,我们添加两个监听器,察看结果树和断言结果。 添加断言:响应断言,响应断言也是比较常用的一个断言 设置响应断言:正常情况下响应代码是200。选择响应代…...

few shot object detection via feature reweight笔记
摘要部分 few shot很多用的都是faster R-CNN为基础,本文用的是one-stage 结构。 用了一个meta feature learner和reweighting模块。 和其他的few shot一样,先学习base数据集,再推广到novel数据集。 feature learner会从base数据集中提取meta…...

工会排队模式:电商新营销模式吸引消费者,提升销售!
随着电商行业的繁荣发展,私域流量已经成为了电商平台争夺消费者和促进销售的重要手段。工会排队模式正是在这种背景下应运而生的一种创新性的电商营销模式。这种模式通过奖金池的资金来为消费者和商家提供返现和排队奖励,构建了一个实现消费者和商家共赢…...
国际红外技术及设备展览会)
定档通知2024中国(北京)国际红外技术及设备展览会
时间:2024年7月14-16日 地点:北京国家会议中心 ◆展会背景background: 各有关红外企业厂商:2024年7月14~16日,2024中国国际红外技术及设…...

自助建站系统,一建建站系统api版,自动建站
安装推荐php7.2或7.2以下都行 可使用虚拟主机或者服务器进行搭建。 分站进入网站后台 域名/admin 初始账号123456qq.com密码123456 找到后台的网站设置 将主站域名及你在主站的通信secretId和通信secretKey填进去。 即可正常使用 通信secretId和通信secretKey在主站的【账号…...

算法框架-LLM-1-Prompt设计(一)
原文:算法框架-LLM-1-Prompt设计(一) - 知乎 目录 收起 1 prompt-engineering-for-developers 1.1 Prompt Engineering 1.1.1 提示原则 1. openai的环境 2. 两个基本原则 3. 示例 eg.1 eg.2 结构化输出 eg.3 模型检验 eg.4 提供示…...
一个rar压缩包如何分成三个?
一个rar压缩包体积太大了,想要将压缩包分为三个,该如何做到?其实很简单,方法就在我们经常使用的WinRAR当中。 我们先将压缩包内的文件解压出来,然后查看一下,然后打开WinRAR软件,找到文件&…...

批量获取拼多多商品详情数据,拼多多商品详情API接口
批量获取拼多多商品详情数据可以采用以下方式: 使用拼多多开放平台API接口。 拼多多开放平台提供了API接口,可以通过API接口获取拼多多平台上的商品信息,使用API接口需要进行权限申请和认证,操作较为复杂。 使用第三方工具。 市面…...

TPS40192与TPS40193多相降压控制器:DCR与CS电流检测方案深度对比与设计实践
1. 项目概述:从两颗芯片说起最近在做一个大电流的分布式电源项目,板子上需要给核心处理器和一堆外围芯片供电,电流需求从几安培到几十安培不等,电压轨也有好几路。这种场景下,传统的线性稳压器(LDO…...

OpenAgents:从零构建数据驱动的AI智能体平台实战指南
1. 项目概述:当AI不只是聊天,而是能替你“干活”的智能体最近在AI圈子里,一个名为“OpenAgents”的项目热度持续攀升。它不是一个简单的聊天机器人,也不是一个封闭的单一应用。简单来说,OpenAgents是一个开源的、数据驱…...

避坑指南:Halcon在C# WinForm中图像处理的内存管理与窗口显示问题
Halcon与C#联合开发中的内存管理与窗口显示避坑指南 引言 在工业视觉应用开发中,Halcon与C#的联合开发模式因其高效性和灵活性而广受欢迎。然而,许多开发者在实际项目中常会遇到一些棘手的"坑",尤其是内存管理和窗口显示方面的问题…...
)
别只装AlexNet了!手把手教你在MATLAB里玩转更多预训练模型(VGG, ResNet, MobileNet安装指南)
别只装AlexNet了!手把手教你在MATLAB里玩转更多预训练模型(VGG, ResNet, MobileNet安装指南) 当你第一次在MATLAB中调用alexnet函数时,那种"开箱即用"的体验确实令人惊艳。但就像一位米其林大厨不会只满足于使用基础厨具…...

NotebookLM讨论模块写作:为什么87%的用户输出缺乏论证纵深?3个可立即部署的认知框架
更多请点击: https://intelliparadigm.com 第一章:NotebookLM讨论模块写作的认知断层诊断 NotebookLM 的讨论模块(Discussion Panel)旨在基于用户上传的文档生成上下文感知的对话,但实践中常出现“理解正确却表达失焦…...

直播抠图技术100谈之25---调色中曲线是最优解
为什么曲线调色是最优解 蓝松抠图在即将发布的版本中特意重写了曲线调节,把达芬奇的二级曲线重新做了一遍,并模仿达芬奇的节点图做了自己的节点图。我们为什么要重新设计曲线,因为我们认为调色中曲线是最优解; 结论 在所有调色手段…...
)
紧急通告:OpenAI已于2024年6月1日灰度上线ChatGPT Pay API V2.1,当前仅向Stripe白名单商户开放(附申请通道+审核时效倒计时)
更多请点击: https://codechina.net 第一章:ChatGPT实时支付功能在哪里 ChatGPT 本身并不原生支持实时支付功能。OpenAI 官方发布的 ChatGPT(包括免费版、Plus 订阅版及 Team/Enterprise 版)定位为人工智能对话助手,…...

蓝桥杯嵌入式:从零到一的考场环境搭建与避坑指南
1. 蓝桥杯嵌入式开发环境概述 参加蓝桥杯嵌入式比赛,环境搭建是第一个需要攻克的难关。很多同学第一次参赛时,往往把大量时间花在调试环境上,等到真正开始写代码时已经手忙脚乱。我在担任多届蓝桥杯志愿者时,见过太多选手因为环境…...

快手推荐算法实战解析:从三层漏斗架构到多目标优化
1. 项目概述:从“刷”到“懂”,快手推荐算法的冰山一角 刷快手,可能是很多人每天的习惯性动作。手指一划,一个接一个的短视频,好像总能精准地戳中你的笑点、泪点或是知识盲区。你有没有想过,为什么你看到的…...

深度解析AzurLaneAutoScript:碧蓝航线自动化脚本的技术架构与应用实践
深度解析AzurLaneAutoScript:碧蓝航线自动化脚本的技术架构与应用实践 【免费下载链接】AzurLaneAutoScript Azur Lane bot (CN/EN/JP/TW) 碧蓝航线脚本 | 无缝委托科研,全自动大世界 项目地址: https://gitcode.com/gh_mirrors/az/AzurLaneAutoScript…...