Flutter视图原理之三棵树的建立过程
目录
- 三棵树的关系
- 树的构建过程
- 1.updateChild函数(element的复用)
- 2.inflateWidget函数
- 3.mount函数
- 3.1 componentElement的实现
- 3.2 RenderObjectElement的实现
- 3.2.1 attachRenderObject函数
- 4.performRebuild函数
- 总结三棵树创建流程
三棵树的关系
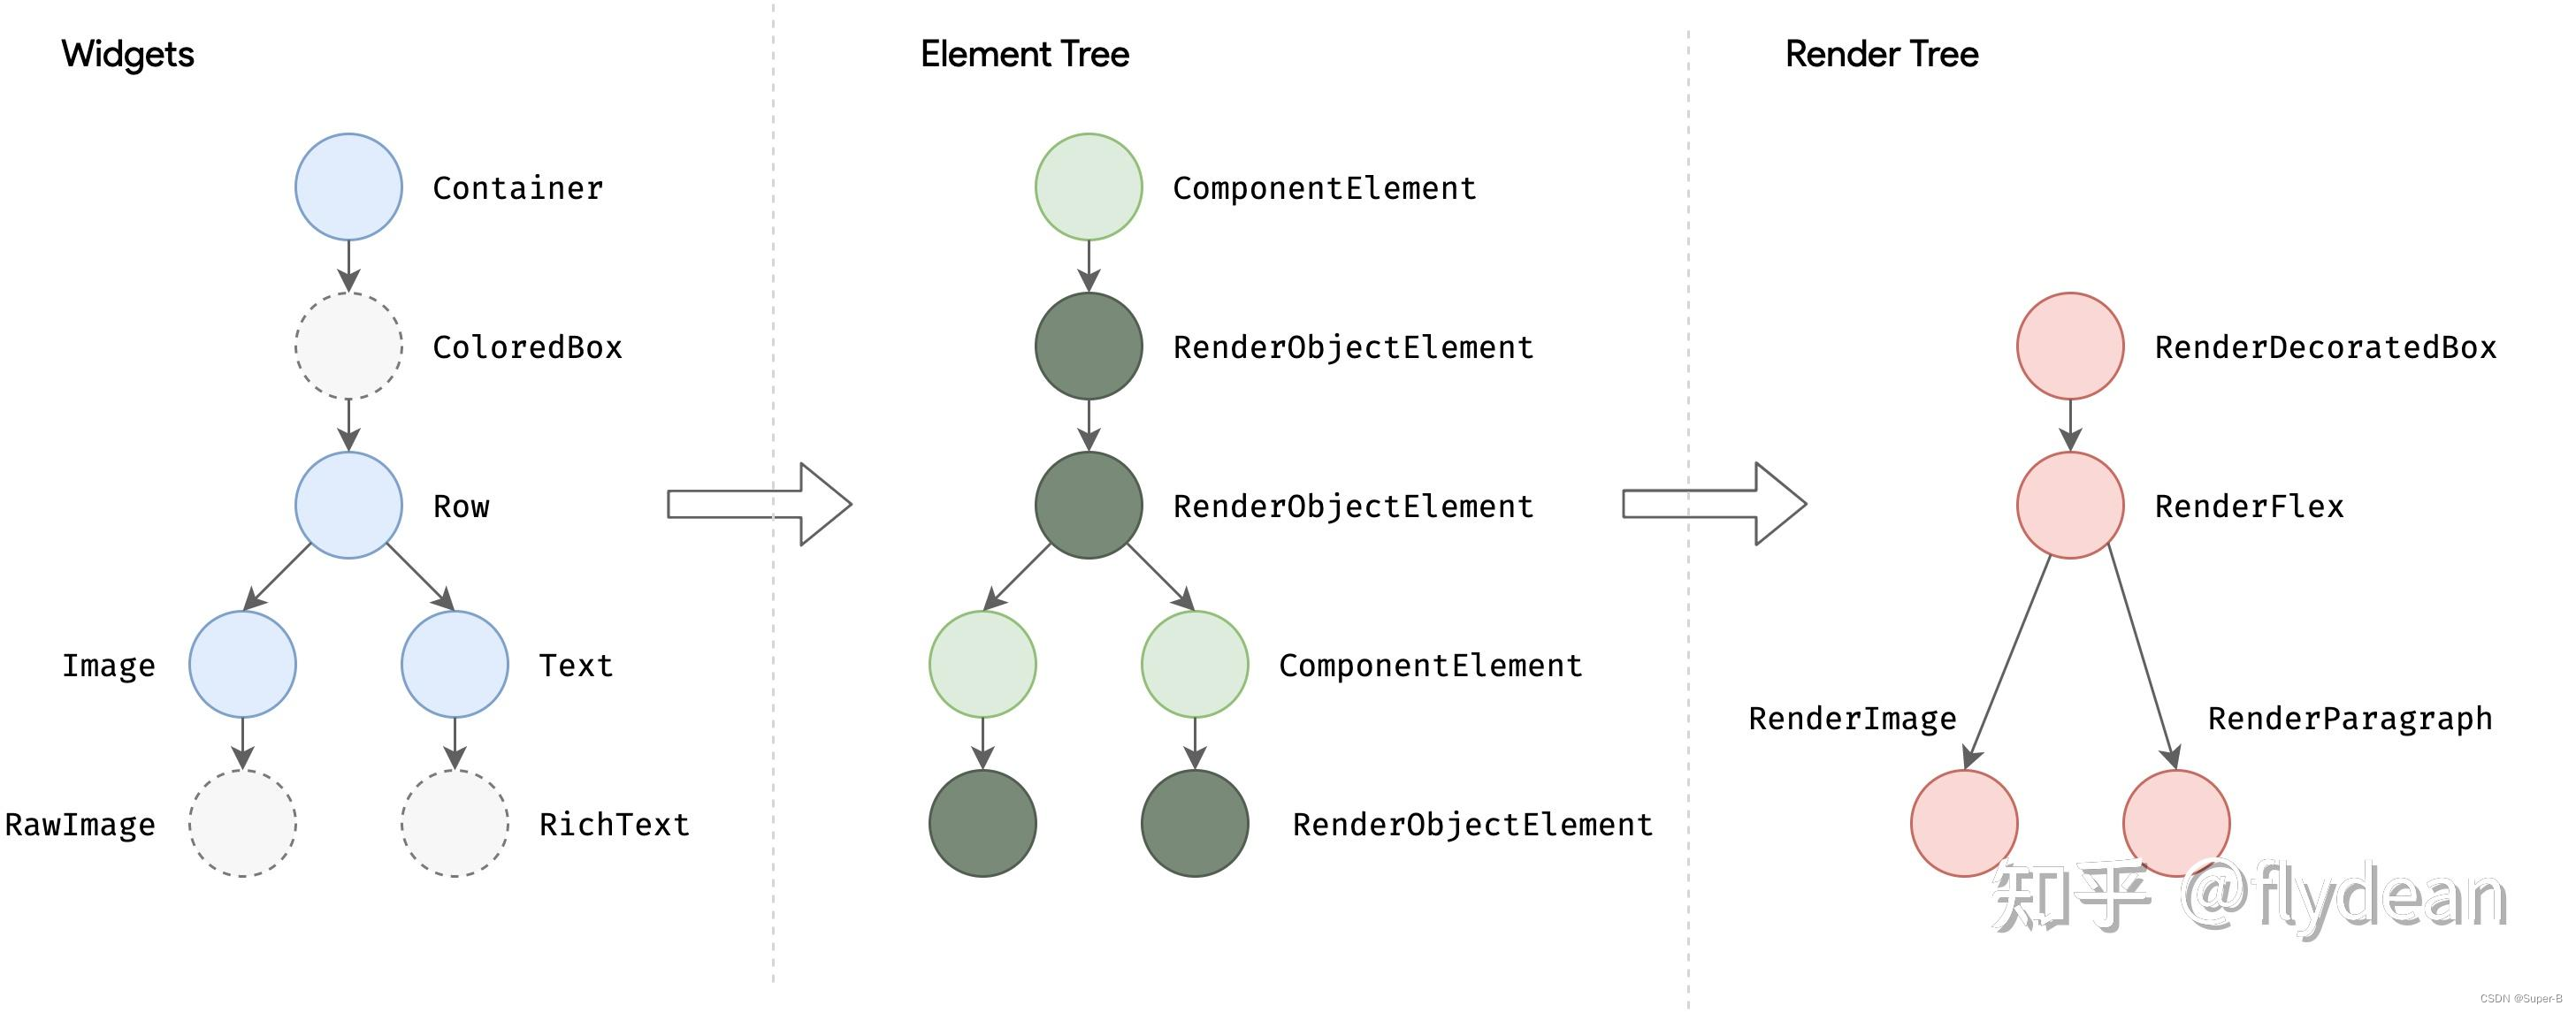
Flutter 中存在 Widget 、 Element 、RenderObject 三棵树,其中 Widget与 Element 是一对多的关系 ,Element 与 RenderObject 是一一对应的关系。
Element 中持有Widget 和 RenderObject , 而 Element 与 RenderObject 是一一对应的关系(除去 Element 不存在 RenderObject 的情况,如 ComponentElement是不具备 RenderObject),当 RenderObject 的 isRepaintBoundary 为 true 时,那么个区域形成一个 Layer,所以不是每个 RenderObject 都具有 Layer 的,因为这受 isRepaintBoundary 的影响。
Flutter 中 Widget 不可变,每次保持在一帧,如果发生改变是通过 State 实现跨帧状态保存,而真实完成布局和绘制数组的是 RenderObject , Element 充当两者的桥梁, State 就是保存在 Element 中。
一个可能的三棵树实例如下:
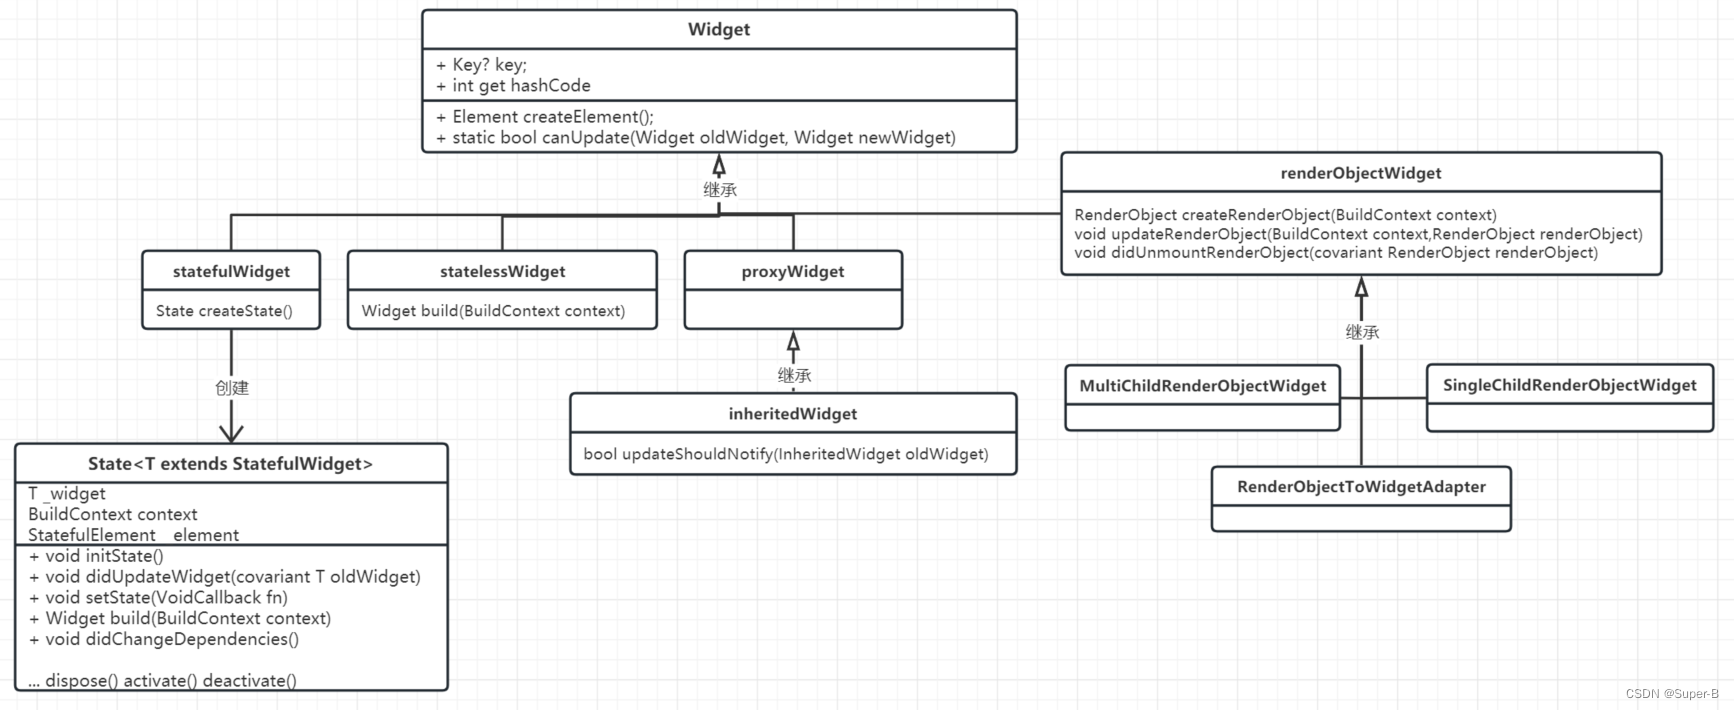
先看下widget继承关系:
对应的element继承关系:
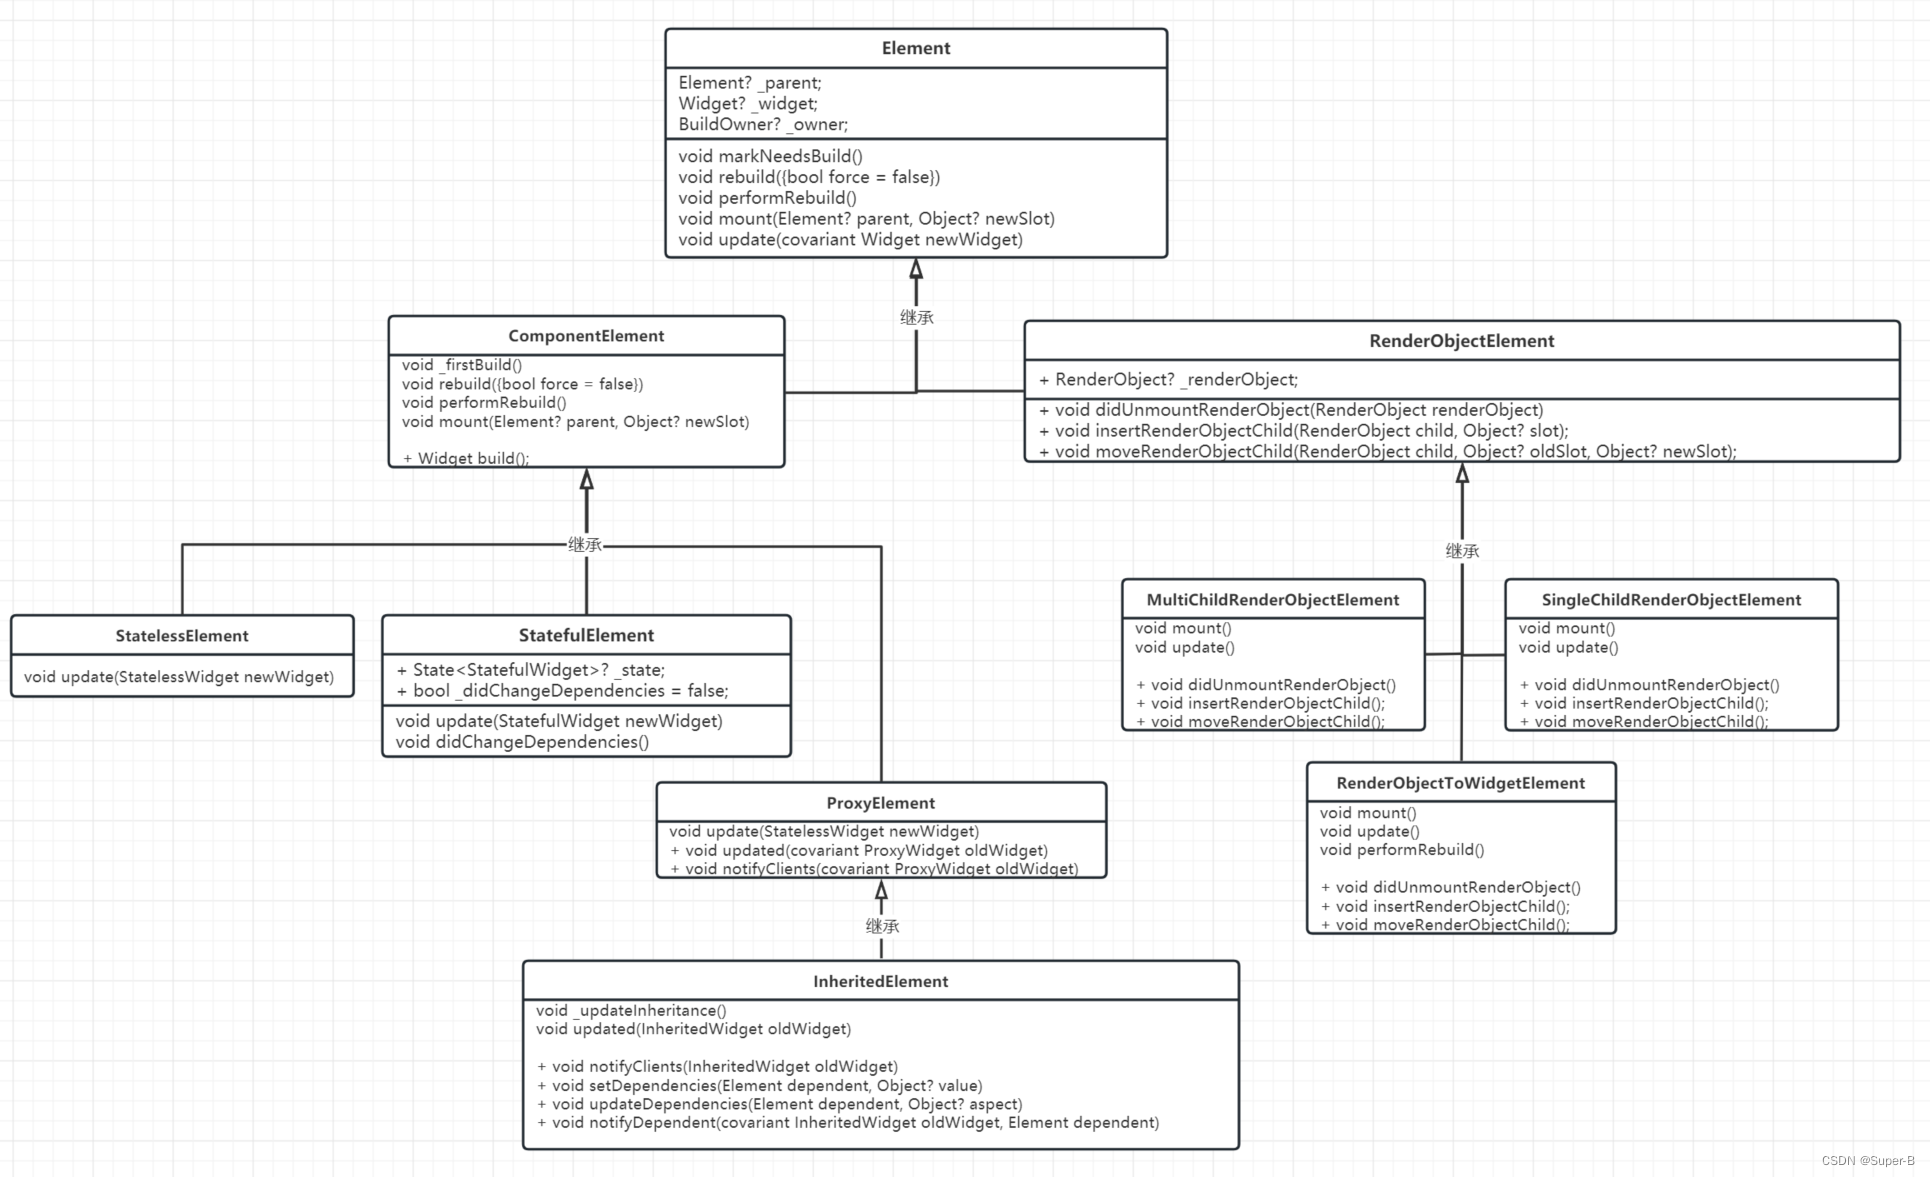
通过上图可以看出,每个widget对应一个element类型,但是只有renderObjectElement类持有renderObject,只有renderObjectWidget才能创建render对象。因此flutter视图的三棵树结构,widget和element是一一对应的,但是renderObjectElement才对应一个render节点。
树的构建过程
flutter视图的入口是:
runApp(const MyApp());class MyApp extends StatelessWidget {const MyApp({super.key});Widget build(BuildContext context) {return MaterialApp(/....省略);}}
跟踪进入runApp函数:
void runApp(Widget app) {//1 final WidgetsBinding binding = WidgetsFlutterBinding.ensureInitialized();assert(binding.debugCheckZone('runApp'));//2binding..scheduleAttachRootWidget(binding.wrapWithDefaultView(app))//3..scheduleWarmUpFrame();
}
- 第一步首先确认engine绑定flutter framework,是个阻塞过程
scheduleAttachRootWidget将app组件添加到根视图树上- 向native平台层请求绘制一帧的信号
先看第二步:
void attachRootWidget(Widget rootWidget) {final bool isBootstrapFrame = rootElement == null;_readyToProduceFrames = true;_rootElement = RenderObjectToWidgetAdapter<RenderBox>(container: renderView,debugShortDescription: '[root]',child: rootWidget,).attachToRenderTree(buildOwner!, rootElement as RenderObjectToWidgetElement<RenderBox>?);if (isBootstrapFrame) {SchedulerBinding.instance.ensureVisualUpdate();}}
RenderObjectToWidgetAdapter有两个成员,child:孩子widget,container:提供render功能容器,将rootWidget作为的child元素,renderView作为container。重点是attachToRenderTree函数,
RenderObjectToWidgetElement<T> attachToRenderTree(BuildOwner owner, [ RenderObjectToWidgetElement<T>? element ]) {if (element == null) {//。。。省略owner.buildScope(element!, () {element!.mount(null, null);});} else {//。。。省略}return element!;}
第一次element为空,那么进入第一个判断,首先调用buildScope,内部会回调element!.mount方法,
void buildScope(Element context, [ VoidCallback? callback ]) {if (callback == null && _dirtyElements.isEmpty) {return;}try {_scheduledFlushDirtyElements = true;callback();_dirtyElements.sort(Element._sort);_dirtyElementsNeedsResorting = false;int dirtyCount = _dirtyElements.length;int index = 0;while (index < dirtyCount) {final Element element = _dirtyElements[index];element.rebuild();index += 1;//。。。省略}return true;}());}}
首先回调callback,接着对脏元素集合调用rebuild方法。第一次肯定列表是空的,那么应该执行callback方法,也就进入了element.mount方法中,
void mount(Element? parent, Object? newSlot) {assert(parent == null);super.mount(parent, newSlot);_rebuild();assert(_child != null);}
mount方法也是个关键函数,函数的注释:
将此元素添加到给定父级的给定插槽中的树中。
当新创建的元素添加到
树是第一次。使用此方法初始化状态
取决于有父母。独立于父级的状态可以
更容易在构造函数中初始化。
此方法将元素从“初始”生命周期状态转换为
“活动”生命周期状态。
重写此方法的子类可能也希望重写
[update], [visitChildren], [RenderObjectElement.insertRenderObjectChild],
[RenderObjectElement.moveRenderObjectChild],以及
[RenderObjectElement.removeRenderObjectChild]。
此方法的实现应从调用继承的
方法,如 ‘super.mount(parent, newSlot)’。
注:其中newSlot参数,是parent renderObject的插槽位置对象,parent的子renderObject组成一个顺序列表或者是单个节点,插槽的结构是列表中的索引位置和前一个插槽元素的对象,parent将插槽传递给child保存起来,child可以确认自己在parent的布局位置。
首先调用_rebuild()方法,
RenderObjectToWidgetElement类
void _rebuild() {_child = updateChild(_child, (widget as RenderObjectToWidgetAdapter<T>).child, _rootChildSlot);
}
Element类
Element? updateChild(Element? child, Widget? newWidget, Object? newSlot) {//。。。省略final Element newChild;if (child != null) {bool hasSameSuperclass = true;// When the type of a widget is changed between Stateful and Stateless via// hot reload, the element tree will end up in a partially invalid state.// That is, if the widget was a StatefulWidget and is now a StatelessWidget,// then the element tree currently contains a StatefulElement that is incorrectly// referencing a StatelessWidget (and likewise with StatelessElement).//// To avoid crashing due to type errors, we need to gently guide the invalid// element out of the tree. To do so, we ensure that the `hasSameSuperclass` condition// returns false which prevents us from trying to update the existing element// incorrectly.//// For the case where the widget becomes Stateful, we also need to avoid// accessing `StatelessElement.widget` as the cast on the getter will// cause a type error to be thrown. Here we avoid that by short-circuiting// the `Widget.canUpdate` check once `hasSameSuperclass` is false.//1bool hasSameSuperclass = true;final int oldElementClass = Element._debugConcreteSubtype(child);final int newWidgetClass = Widget._debugConcreteSubtype(newWidget);hasSameSuperclass = oldElementClass == newWidgetClass;if (hasSameSuperclass && child.widget == newWidget) {// We don't insert a timeline event here, because otherwise it's// confusing that widgets that "don't update" (because they didn't// change) get "charged" on the timeline.if (child.slot != newSlot) {updateSlotForChild(child, newSlot);}newChild = child;} else if (hasSameSuperclass && Widget.canUpdate(child.widget, newWidget)) {if (child.slot != newSlot) {updateSlotForChild(child, newSlot);}child.update(newWidget);newChild = child;} else {deactivateChild(child);// The [debugProfileBuildsEnabled] code for this branch is inside// [inflateWidget], since some [Element]s call [inflateWidget] directly// instead of going through [updateChild].newChild = inflateWidget(newWidget, newSlot);}} else {// The [debugProfileBuildsEnabled] code for this branch is inside// [inflateWidget], since some [Element]s call [inflateWidget] directly// instead of going through [updateChild].newChild = inflateWidget(newWidget, newSlot);}return newChild;}
1.updateChild函数(element的复用)
更新element对象分为下面几种情况:
- child不为空
element的创建,首先判断旧的child element元素是否和新的widget元素class类型匹配,对应匹配关系如下:
| element | widget | hasSameSuperclass |
|---|---|---|
| StatefulElement | StatefulWidget | Y |
| StatelessElement | StatelessWidget | Y |
- 如果匹配hasSameSuperclass,并且element.widget和新传递进来的newWidget对象相同,那么说明widget是复用的(我们知道widget是不可变的,每次都要新建widget,所以在使用const定义的widget的情况下,widget使用的常量对象,符合这个判断),对child做slot更新,newChild更新为child。
- 如果匹配hasSameSuperclass,并且widget.canUpdate判断成立,这个判断判断element对应的widget和newWidget对应的class类型和key是否相同(这种情况下,如果给widget定义了globalKey,并且参数使用const定义的话,那么判断是可以成立的),对child做slot更新,调用child.update(newWidget),newChild更新为child。
2.1 child.update方法,首先更新element的widget,然后根据子类的覆写实现,statelessElement的实现是直接调用element的rebuild方法,statefullElement实现是更新state的widget并且回调didUpdateWidget钩子函数,然后调用rebuild方法
static bool canUpdate(Widget oldWidget, Widget newWidget) {return oldWidget.runtimeType == newWidget.runtimeType&& oldWidget.key == newWidget.key;}
- 如果旧的element无法更新的话,需要解除绑定关系,将旧的element回收,用于后面的视图build复用;然后inflateWidget根据newWidget新建一个element。
void deactivateChild(Element child) {assert(child._parent == this);child._parent = null;child.detachRenderObject();owner!._inactiveElements.add(child); // this eventually calls child.deactivate()}
- child为空
- inflateWidget根据newWidget新建一个element
2.inflateWidget函数
Element inflateWidget(Widget newWidget, Object? newSlot) {//。。。s省略try {final Key? key = newWidget.key;if (key is GlobalKey) {final Element? newChild = _retakeInactiveElement(key, newWidget);if (newChild != null) {newChild._parent == nullnewChild._activateWithParent(this, newSlot);final Element? updatedChild = updateChild(newChild, newWidget, newSlot);return updatedChild!;}}final Element newChild = newWidget.createElement();newChild.mount(this, newSlot);return newChild;}}
- 首先判断newWidget是否拥有globalKey,如果有的话尝试从复用池中获取拥有相同key的element元素,然后对该元素进行updateChild操作,这样又回到上面的起点了,这样看起来element更新是深度递归的。
- 如果没有key,那么直接创建一个新的element,然后element进行mount挂载操作,也就是将element加入到这个element树中。
3.mount函数
重点看看mount函数:
void mount(Element? parent, Object? newSlot) {assert(_lifecycleState == _ElementLifecycle.initial);assert(_parent == null);assert(parent == null || parent._lifecycleState == _ElementLifecycle.active);assert(slot == null);_parent = parent;_slot = newSlot;_lifecycleState = _ElementLifecycle.active;_depth = _parent != null ? _parent!.depth + 1 : 1;if (parent != null) {// Only assign ownership if the parent is non-null. If parent is null// (the root node), the owner should have already been assigned.// See RootRenderObjectElement.assignOwner()._owner = parent.owner;}assert(owner != null);final Key? key = widget.key;if (key is GlobalKey) {owner!._registerGlobalKey(key, this);}_updateInheritance();attachNotificationTree();}
- 首先对该widget进行参数判断,因为是新的widget,所以依赖关系都是空的,这里需要进行parent关联操作,生命周期设置,树的深度设置,owner是和parent使用的同一个,注册全局key。
- _updateInheritance,保存来自parent的_inheritedElements对象,这个对象集合里面包含着这棵树所有的inheritedElement(如果自己也是inheritedElement,也要将自己加入集合),这个类型的element具有从上下文继承数据的功能,可以根据类型读取数据,对应类型数据改变,可以通知所有依赖这个数据的inheritedElement去更新视图。
- attachNotificationTree,保存parent的_notificationTree集合,如果自己是NotifiableElementMixin类型,会将自己加入到parent._notificationTree集合中,这个集合是接受通知集合,一般的widget也不需要这个功能(不去深究)。
注: 从上面代码分析可知,mount是element从initial -> active的时间点。
mount是element基本接口,子类会对其进行复写,并且super调用
3.1 componentElement的实现
componentElement类,是负责组合子element的作用的,相当于Android View视图中的viewGroup,但是它也没有绘制功能,仅仅是负责排列组合子element。
component Element的复写:
void mount(Element? parent, Object? newSlot) {super.mount(parent, newSlot);firstBuild();}void _firstBuild() {rebuild(); // This eventually calls performRebuild.}void rebuild({bool force = false}) {、//。。。省略if (_lifecycleState != _ElementLifecycle.active || (!_dirty && !force)) {return;}//。。。省略try {performRebuild();}}
会进行一次rebuild操作,内部直接调用的performRebuild()。
3.2 RenderObjectElement的实现
RenderObjectElement类,是起绘制作用的element,相当于Android View视图中的view,视图的正真的绘制操作都在里面实现。
RenderObjectElement复写:
void mount(Element? parent, Object? newSlot) {super.mount(parent, newSlot);_renderObject = (widget as RenderObjectWidget).createRenderObject(this);attachRenderObject(newSlot);super.performRebuild(); // clears the "dirty" flag}
- 由RenderObjectWidget创建RenderObject,这个RenderObject是正真实现绘制功能的类。
- attachRenderObject函数,主要是将parent.newSlot传递给自己,然后和parent建立关联,这个关联主要是renderTree的关联。
3.2.1 attachRenderObject函数
void attachRenderObject(Object? newSlot) {assert(_ancestorRenderObjectElement == null);_slot = newSlot;_ancestorRenderObjectElement = _findAncestorRenderObjectElement();_ancestorRenderObjectElement?.insertRenderObjectChild(renderObject, newSlot);final ParentDataElement<ParentData>? parentDataElement = _findAncestorParentDataElement();if (parentDataElement != null) {_updateParentData(parentDataElement.widget as ParentDataWidget<ParentData>);}}
- _ancestorRenderObjectElement,
RenderObjectElement? _findAncestorRenderObjectElement() {Element? ancestor = _parent;while (ancestor != null && ancestor is! RenderObjectElement) {ancestor = ancestor._parent;}return ancestor as RenderObjectElement?;}
向上递归获取第一个RenderObjectElement类型的祖先,然后将当前子renderObject插入到这个祖先RenderObjectElement的孩子中或者孩子队列中。
可以看出也不是所有的element都是RenderObjectElement类型的,componentElement以及它的子类就不是,那么就会被跳过继续向上递归。
进而也就有了文章开头的那三棵树的关系,widget和element是一对一关系的,build过程中,element创建一定需要widget去配置或者更新,renderObject的创建只有RenderObjectWidget才有这个接口功能,因此像componentElement类型的就没有renderObject。
SingleChildRenderObjectElement类的实现,这个类只包含一个单独的renderObject,直接赋值子child,:
void insertRenderObjectChild(RenderObject child, Object? slot) {final RenderObjectWithChildMixin<RenderObject> renderObject = this.renderObject as RenderObjectWithChildMixin<RenderObject>;assert(slot == null);assert(renderObject.debugValidateChild(child));renderObject.child = child;assert(renderObject == this.renderObject);}
MultiChildRenderObjectElement类的实现,这个类包含多个renderObject,按照自己定义的排列规则排列子renderObject,将child插入到子child队列中对应的位置,上面说了slot已经将child的位置定下来了,可以根据slot的位置,将child插入到指定位置。
void insertRenderObjectChild(RenderObject child, IndexedSlot<Element?> slot) {final ContainerRenderObjectMixin<RenderObject, ContainerParentDataMixin<RenderObject>> renderObject = this.renderObject;assert(renderObject.debugValidateChild(child));renderObject.insert(child, after: slot.value?.renderObject);assert(renderObject == this.renderObject);}void insert(ChildType child, { ChildType? after }) {adoptChild(child);_insertIntoChildList(child, after: after);}void adoptChild(RenderObject child) {setupParentData(child);markNeedsLayout();markNeedsCompositingBitsUpdate();markNeedsSemanticsUpdate();child._parent = this;if (attached) {child.attach(_owner!);}redepthChild(child);}
adoptChild函数所作的事情是,绑定parentData数据,child根据parent的布局数据layout的时候有用,接下来就是标记parent需要重新layout,child和parent进行关联。
void _insertIntoChildList(ChildType child, { ChildType? after }) {final ParentDataType childParentData = child.parentData! as ParentDataType;_childCount += 1;assert(_childCount > 0);if (after == null) {// insert at the start (_firstChild)childParentData.nextSibling = _firstChild;if (_firstChild != null) {final ParentDataType firstChildParentData = _firstChild!.parentData! as ParentDataType;firstChildParentData.previousSibling = child;}_firstChild = child;_lastChild ??= child;} else {final ParentDataType afterParentData = after.parentData! as ParentDataType;if (afterParentData.nextSibling == null) {// insert at the end (_lastChild); we'll end up with two or more childrenassert(after == _lastChild);childParentData.previousSibling = after;afterParentData.nextSibling = child;_lastChild = child;} else {// insert in the middle; we'll end up with three or more children// set up links from child to siblingschildParentData.nextSibling = afterParentData.nextSibling;childParentData.previousSibling = after;// set up links from siblings to childfinal ParentDataType childPreviousSiblingParentData = childParentData.previousSibling!.parentData! as ParentDataType;final ParentDataType childNextSiblingParentData = childParentData.nextSibling!.parentData! as ParentDataType;childPreviousSiblingParentData.nextSibling = child;childNextSiblingParentData.previousSibling = child;assert(afterParentData.nextSibling == child);}}}
插入操作,以下几种情况:
- 前驱为空,那么当前插入的child是队列的第一个元素,直接插入;
- 前驱不为空,如果前驱的next指针为空,那么前驱是尾部元素,child插入到尾部;
- 前驱不为空,并且前驱在队列中间,那么将child插入到前驱的后面。
- parentDataElement
ParentDataElement<ParentData>? _findAncestorParentDataElement() {Element? ancestor = _parent;ParentDataElement<ParentData>? result;while (ancestor != null && ancestor is! RenderObjectElement) {if (ancestor is ParentDataElement<ParentData>) {result = ancestor;break;}ancestor = ancestor._parent;}}
向上递归获取第一个parentDataElement类型的祖先,然后将当前子renderObject传递给祖先,祖先会验证自己的data和子child的data的数据是否一致,不一致会标记脏,下一帧会重新layout,否则不管。
void _updateParentData(ParentDataWidget<ParentData> parentDataWidget) {if (applyParentData) {parentDataWidget.applyParentData(renderObject); }}void applyParentData(RenderObject renderObject) {//。。。s省略if (needsLayout) {markNeedsLayout();}}
其中实现了ParentDataWidget的子类有:
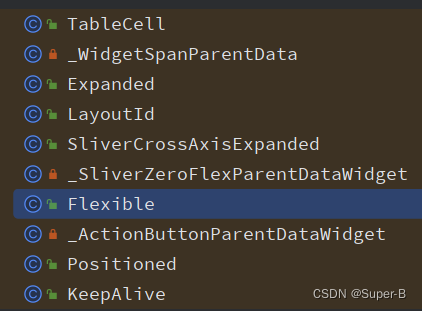
这些布局也说明了一个问题,子child的布局属性变化,会导致parent布局重新layout,这样好像会影响性能。
4.performRebuild函数
performRebuild也是element的基本接口,
void performRebuild() {_dirty = false;}
不同的子类也会有不同的实现,component Element的复写:
void performRebuild() {Widget? built;try {built = build();}try {_child = updateChild(_child, built, slot);}}Widget build();
-
调用build方法,构建出本element所需要的widget组件;widget的build函数由子类实现提供,componentElement的子类主要有StatelessElement,StatefulElement,ProxyElement三个,
1.1 StatelessElement使用child的widget来构建,Widget build() => (widget as StatelessWidget).build(this);
1.2 ProxyElement直接使用childWidget build() => (widget as ProxyWidget).child;
1.3 StatefulElement使用state来创建Widget build() => state.build(this); -
调用updateChild,用新构建出的widget去更新旧的child element元素,这个
updateChild方法上面已经讲过,可以知道,如果element的子element还有child的话,一直递归调用updateChild函数,可以推测出,element树的构建也是深度递归进行的。
总结三棵树创建流程
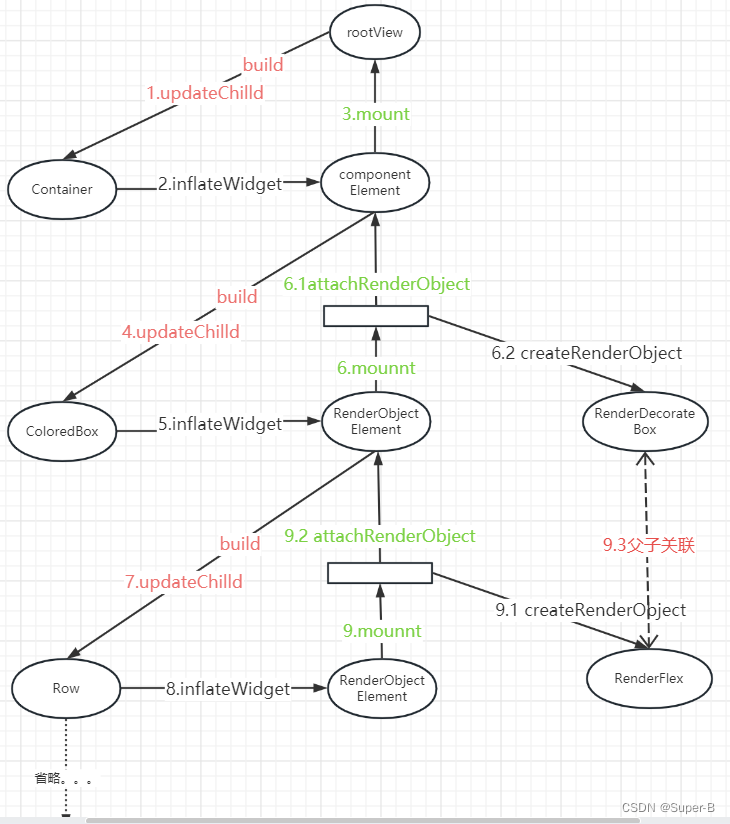
上面梳理了整个树创建的过程,调用链:updateChild -> inflateWidget -> mount -> performRebuild -> (child -> updateChild递归调用)
假如有以下widget树:
return Container(decoration: BoxDecoration(borderRadius: BorderRadius.all(Radius.circular(8.0.r)),border: Border.all(color: CtrColor.lineRegular, width: 1),),child: const Row(children: [Image(image: AssetImage("static/images/ic_net_error.png")),Text("data")],));
可以画出整个树创建的流程图:
相关文章:
Flutter视图原理之三棵树的建立过程
目录 三棵树的关系树的构建过程1.updateChild函数(element的复用)2.inflateWidget函数3.mount函数3.1 componentElement的实现3.2 RenderObjectElement的实现3.2.1 attachRenderObject函数 4.performRebuild函数 总结三棵树创建流程 三棵树的关系 Flutt…...

详细解析冒泡排序,JS如何基本实现的。
目录 冒泡排序是什么: 使用冒泡排序是为了什么: DEMO示例: 冒泡排序是什么: 冒泡排序(Bubble Sort)是一种简单的比较排序算法,它通过多次遍历待排序的元素,比较相邻元素的大小,如果它们的顺序不正确就交换它们&…...

如何消除CSDN博文代码中自动添加的行号
哪里有自定义目录标题 编写CSDN博文,使用代码块的linux命令行,预览时没有代码行号,但发布文章后自动添加了行号。 git clone https://github.com/mikel-brostrom/yolo_tracking.git cd yolo_tracking pip install -v -e .为什么预览和发布的…...
定制效果在线定制印刷系统源码 DIY在线定制系统源码 云印刷定制系统源码手机、PC端实时互通
支持各类产品的在线定制,无论是水杯雨伞U盘还是T恤衬衫四件套,均可轻松进行定制 独创制作间概念,同一套模板可以重复对应不同制作间 手机、PC端实时互通,客户可通过任意途径进行图片上传、编辑,一方修改另一方即时可见…...

算法|每日一题|同积元组|哈希统计
1726.同积元组 原题地址: 力扣每日一题:同积元组 给你一个由 不同 正整数组成的数组 nums ,请你返回满足 a * b c * d 的元组 (a, b, c, d) 的数量。其中 a、b、c 和 d 都是 nums 中的元素,且 a ! b ! c ! d 。 class Solution …...

最新AI创作系统ChatGPT网站H5源码V2.6.4+搭建部署教程+支持GPT4.0+支持ai绘画(Midjourney)/支持Prompt预设应用
一、AI创作系统 SparkAi创作系统是基于OpenAI很火的ChatGPT进行开发的Ai智能问答系统AI绘画系统,支持OpenAI GPT全模型国内AI全模型。本期针对源码系统整体测试下来非常完美,可以说SparkAi是目前国内一款的ChatGPT对接OpenAI软件系统。那么如何搭建部署…...

最新!两步 永久禁止谷歌浏览器 Google Chrome 自动更新
先放效果图: CSDN这个问题最火的大哥的用了没用 像他这样连浏览器都打不开 为什么要禁止chrome自动更新 看到很多搞笑的大哥,说为啥要禁止; 我觉得最大的原因就是chromedriver跟不上chrome的自动更新,导致我们做selenium爬虫的…...

在Java中线程和进程的区别
在Java中,线程和进程的区别与一般的操作系统环境下类似,但在Java语言层面上也有一些特点。下面是在Java中线程和进程的区别: 定义:在Java中,进程是指一个正在运行的应用程序实例,而线程是进程中的执行单元。…...

【高危安全通告】Oracle 10月月度安全漏洞预警
近日,安全狗应急响应中心关注到Oracle官方发布安全公告,共披露出在Oracle Weblogic中存在的6个高危漏洞。 漏洞描述 CVE-2023-22069:Oracle Weblogic 远程代码执行漏洞 Oracle WebLogic Server存在远程代码执行漏洞,该漏洞的CVS…...
卷王问卷考试系统SurveyKing,开源调查问卷和考试系统源码
卷王问卷考试系统/SurveyKing是一个功能最强大的开源调查问卷和考试系统,可以快速部署,并适用于各行业。该系统提供了在线表单设计、数据收集、统计和分析等功能,支持20多种题型,多种创建问卷方式和多种问卷设置。 无论您是需要进…...

uniapp开发微信小程序,webview内嵌h5,h5打开pdf地址,解决方案
根据公司要求,让我写一个h5,后续会嵌入到合作公司的微信小程序的webview中,如果是自己公司微信小程序,可以采取先下载下来pdf,然后通过wx.openDocument,进行单纯的预览操作,这个可以根据这个老哥…...
Swift使用Embassy库进行数据采集:热点新闻自动生成器
概述 爬虫程序是一种可以自动从网页上抓取数据的软件。爬虫程序可以用于各种目的,例如搜索引擎、数据分析、内容聚合等。本文将介绍如何使用Swift语言和Embassy库编写一个简单的爬虫程序,该程序可以从新闻网站上采集热点信息,并生成一个简单…...
【AIGC核心技术剖析】改进视频修复的传播和变压器(动态滤除环境中的物体)
基于流的传播和时空变压器是视频修复(VI)中的两种主流机制。尽管这些组件有效,但它们仍然受到一些影响其性能的限制。以前基于传播的方法在图像域或特征域中单独执行。与学习隔离的全局图像传播可能会由于光流不准确而导致空间错位。此外&…...
Win系统VMware虚拟机安装配置(二)
系统的安装得分两个步骤,第一步得配置一台电脑,选配 cpu,内存,磁盘,网卡等硬 件。第二步才是安装系统。 一、配置电脑 1、 进入 VMware 双击 VMware 图标,看到如下界面。 2、 自定义新的虚拟机 3、…...

基于枚举实现的观察者模式
文章目录 前言一、观察者1.定义一个观察者接口2.察者接口具体实现类 二、主题1.定义一个主题接口2.主题接口具体实现类 三、枚举维护观察者1.定义枚举类维护观察者 四、观察者模式测试1.定义观察者模式测试接口2.观察者模式测试运行结果 前言 本文介绍使用枚举的方式实现的观察…...

基于神经网络的图像识别研究
基于神经网络的图像识别是计算机视觉领域的一个热门研究方向,尤其是深度学习技术的兴起。以下是一些与基于神经网络的图像识别相关的关键主题和研究方向: 1. 卷积神经网络(CNN): CNN是图像识别领域最重要的神经网络之…...

基于SSM的工资管理系统
基于SSM的工资管理系统 开发语言:Java数据库:MySQL技术:SpringSpringMVCMyBatisVue工具:IDEA/Ecilpse、Navicat、Maven 系统展示 登录界面 管理员界面 通知公告 考勤管理 工资管理 请假管理 摘要 基于SSM(Spring、S…...

微服务负载均衡实践
概述 本文介绍微服务的服务调用和负载均衡,使用spring cloud的loadbalancer及openfeign两种技术来实现。 本文的操作是在微服务的初步使用的基础上进行。 环境说明 jdk1.8 maven3.6.3 mysql8 spring cloud2021.0.8 spring boot2.7.12 idea2022 步骤 改造Eu…...

php定时任务
PHP实现执行定时任务的几种思路详解_php 精准定时任务_我是高手高手高高手的博客-CSDN博客 1.Linux服务器上使用CronTab定时执行php 我们先从相对比较复杂的服务器执行php谈起。服务器上安装了php,就可以执行php文件,无论是否安装了nginx或Apache这样的…...
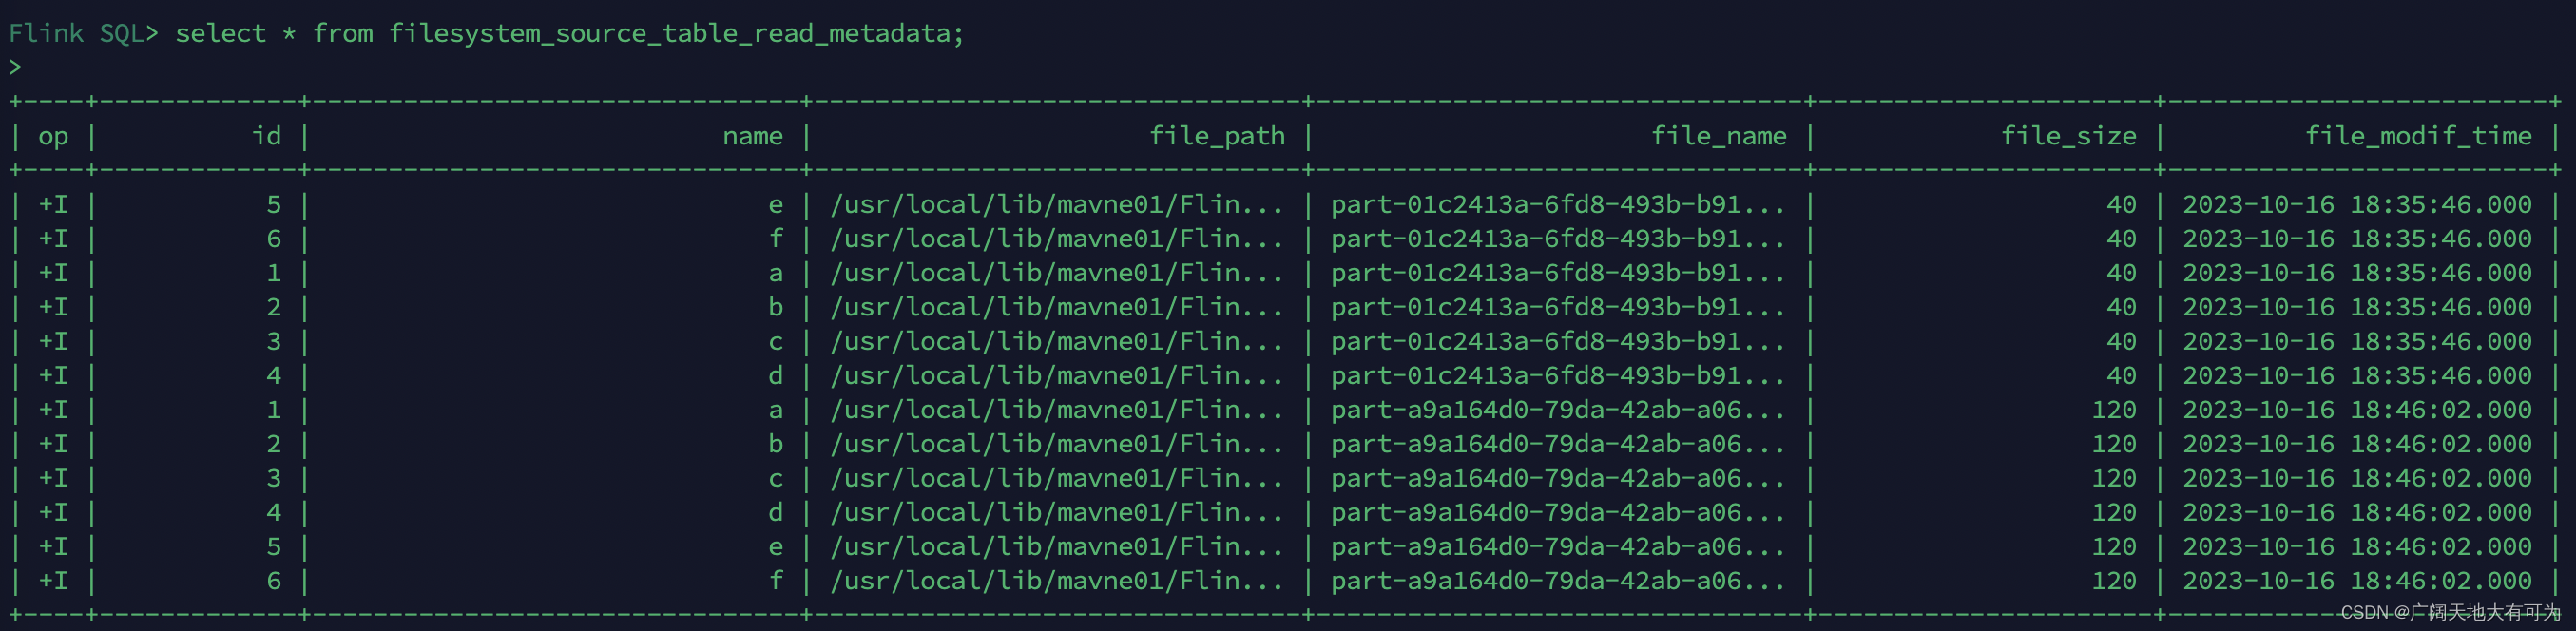
2.2 如何使用FlinkSQL读取写入到文件系统(HDFS\Local\Hive)
目录 1、文件系统 SQL 连接器 2、如何指定文件系统类型 3、如何指定文件格式 4、读取文件系统 4.1 开启 目录监控 4.2 可用的 Metadata 5、写出文件系统 5.1 创建分区表 5.2 滚动策略、文件合并、分区提交 5.3 指定 Sink Parallelism 6、示例_通过FlinkSQL读取kafk…...

OpenClaw镜像体验:Qwen3.5-9B云端部署避坑指南
OpenClaw镜像体验:Qwen3.5-9B云端部署避坑指南 1. 为什么选择云端镜像而非本地部署 去年冬天,当我第一次尝试在本地MacBook Pro上部署OpenClaw时,整整浪费了两个周末的时间。Node版本冲突、Python依赖缺失、CUDA驱动不兼容——这些看似简单…...

如何高效使用FFmpegGUI:面向新手的完整视频处理工具指南
如何高效使用FFmpegGUI:面向新手的完整视频处理工具指南 【免费下载链接】ffmpegGUI ffmpeg GUI 项目地址: https://gitcode.com/gh_mirrors/ff/ffmpegGUI FFmpegGUI是一款让零基础用户也能轻松掌握专业视频处理的跨平台图形界面工具。这款基于Electron和Rea…...

Mac 本地轻量级 K8s 开发环境实战指南
1. 为什么要在Mac上搭建轻量级K8s环境? 作为开发者,我们经常需要在本地测试Kubernetes应用,但传统方案要么太重(如完整K8s集群),要么太慢(如云环境)。在Mac上搭建轻量级K8s环境可以完…...

VVC/VTM编码分析进阶:如何利用DecoderAnalyserApp深度解读CU划分与语法元素
VVC/VTM编码分析进阶:如何利用DecoderAnalyserApp深度解读CU划分与语法元素 在视频编码领域,VVC(Versatile Video Coding)作为新一代标准,其编码效率相比前代HEVC有显著提升。而VTM(VVC Test Model…...
)
RabbitMQ 3.13.0实战:5分钟搞定MQTT 5.0协议配置与特性测试(附Docker命令)
RabbitMQ 3.13.0实战:5分钟搞定MQTT 5.0协议配置与特性测试(附Docker命令) 物联网开发者们,好消息!RabbitMQ 3.13.0正式支持MQTT 5.0协议了。作为消息中间件的标杆产品,这次更新让RabbitMQ在物联网领域的竞…...

Ostrakon-VL扫描终端实战案例:连锁快餐店菜单图像结构化解析
Ostrakon-VL扫描终端实战案例:连锁快餐店菜单图像结构化解析 1. 项目背景与价值 在连锁快餐行业,菜单更新是日常运营的重要环节。传统方式需要人工录入新品信息、核对价格变动,这个过程既耗时又容易出错。我们基于Ostrakon-VL-8B多模态大模…...

javaweb农家乐民宿客房美食预订活动管理系统
目录 同行可拿货,招校园代理 ,本人源头供货商系统功能模块划分核心业务流程设计数据分析功能技术实现要点 项目技术支持源码获取详细视频演示 :文章底部获取博主联系方式!同行可合作 同行可拿货,招校园代理 ,本人源头供货商 系统功能模块划分 用户管理…...

Wan2.2-I2V-A14B企业应用:合规可控的AI视频生成私有云部署方案
Wan2.2-I2V-A14B企业应用:合规可控的AI视频生成私有云部署方案 1. 企业级视频生成解决方案概述 在当今内容创作需求爆炸式增长的环境下,企业面临着视频制作成本高、周期长的挑战。Wan2.2-I2V-A14B私有部署镜像提供了一套完整的解决方案,让企…...

手柄不兼容PC游戏?试试ViGEmBus的虚拟控制器仿真技术
手柄不兼容PC游戏?试试ViGEmBus的虚拟控制器仿真技术 【免费下载链接】ViGEmBus Windows kernel-mode driver emulating well-known USB game controllers. 项目地址: https://gitcode.com/gh_mirrors/vi/ViGEmBus 你是否遇到过这样的情况:新买的…...

FlowState Lab 日志分析与性能调优实战
FlowState Lab 日志分析与性能调优实战 1. 为什么需要关注模型服务性能 当你把FlowState Lab模型部署上线后,可能会遇到这样的情况:请求量一大,响应就开始变慢,甚至出现超时。这时候就需要关注服务的性能表现。性能调优不是玄学…...