Kubeadm部署k8s集群 kuboard
目录
主机准备
主机配置
修改主机名(三个节点分别执行)
配置hosts(所有节点)
关闭防火墙、selinux、swap、dnsmasq(所有节点)
安装依赖包(所有节点)
系统参数设置(所有节点)
时间同步(所有节点)
配置ipvs功能(所有节点)
安装docker(所有节点)
卸载老版本
安装docker
配置国内镜像加速器
安装 kubeadm,kubelet 和 kubectl(所有节点)
安装kubernets master(master节点)
安装kubernets node(node节点)
安装kubernets 网络插件 calico(master节点操作)
kubenertes使用与测试
安装kuboard
内建用户库方式安装
访问 Kuboard v3.x
kubernetes方式安装
访问 Kuboard
卸载
参考文献与常见错误(见参考文献)
主机准备
主机配置
172.171.16.147 crawler-k8s-master
172.171.16.148 crawler-k8s-node1
172.171.16.149 crawler-k8s-node2

修改主机名(三个节点分别执行)
172.171.16.147
hostnamectl set-hostname crawler-k8s-master172.171.16.148
hostnamectl set-hostname crawler-k8s-node1172.171.16.149
hostnamectl set-hostname crawler-k8s-node2查看主机名
hostnamectl #查看主机名配置hosts(所有节点)
配置 /etc/hosts 文件
cat >> /etc/hosts << EOF
172.171.16.147 crawler-k8s-master
172.171.16.148 crawler-k8s-node1
172.171.16.149 crawler-k8s-node2
EOF
关闭防火墙、selinux、swap、dnsmasq(所有节点)
关闭防火墙
systemctl stop firewalld
systemctl disable firewalld
关闭selinux
sed -i 's/enforcing/disabled/' /etc/selinux/config  #永久
setenforce 0  #临时
关闭swap(k8s禁止虚拟内存以提高性能)
sed -ri 's/.*swap.*/#&/' /etc/fstab #永久
swapoff -a #临时
//关闭dnsmasq(否则可能导致docker容器无法解析域名)
service dnsmasq stop
systemctl disable dnsmaq
安装依赖包(所有节点)
yum -y update
yum install wget -y
yum install vim -y
yum -y install conntranck ipvsadm ipset jq sysstat curl iptables libseccomp
系统参数设置(所有节点)
//制作配置文件 设置网桥参数
mkdir /etc/sysctl.d
vim /etc/sysctl.d/kubernetes.conf
net.bridge.bridge-nf-call-ip6tables = 1
net.bridge.bridge-nf-call-iptables = 1
net.ipv4.ip_forward = 1
vm.swappiness=0
vm.overcommit_memory = 1
vm.panic_on_oom = 0
fs.inotify.max_user_watches = 89100
/生效文件
sysctl -p /etc/sysctl.d/kubernetes.conf
如果报错:
[root@crawler-k8s-master ~]# sysctl -p /etc/sysctl.d/kubernetes.conf
sysctl: cannot stat /proc/sys/net/bridge/bridge-nf-call-ip6tables: 没有那个文件或目录
sysctl: cannot stat /proc/sys/net/bridge/bridge-nf-call-iptables: 没有那个文件或目录
//加载网桥过滤模块
modprobe br_netfilter
然后再次
sysctl -p /etc/sysctl.d/kubernetes.conf
时间同步(所有节点)
//安装时间同步服务
yum -y install chrony
//开启服务
systemctl start chronyd
systemctl enable chronyd
配置ipvs功能(所有节点)
在kubernetes中service有两种代理模型,一种是基于iptables的,一种是基于ipvs的
两者比较的话,ipvs的性能明显要高一些,但是如果要使用它,需要手动载入ipvs模块
//添加需要加载的模块写入脚本文件
vim /etc/sysconfig/modules/ipvs.modules
#!/bin/bash
modprobe -- ip_vs
modprobe -- ip_vs_rr
modprobe -- ip_vs_wrr
modprobe -- ip_vs_sh
modprobe -- nf_conntrack_ipv4
//为脚本文件添加执行权限
chmod +x /etc/sysconfig/modules/ipvs.modules
//执行脚本文件
/bin/bash /etc/sysconfig/modules/ipvs.modules
安装docker(所有节点)
卸载老版本
yum remove docker docker-client docker-client-latest docker-common docker-latest docker-latest-logrotate docker-logrotate docker-engine安装docker
安装yum工具包
yum install -y yum-utils
(方式一)添加yum仓库(官方仓库可能会很慢,可以使用国内仓库)
yum-config-manager --add-repo https://download.docker.com/linux/centos/docker-ce.repo(方式二)下面是使用阿里仓库:
wget https://mirrors.aliyun.com/docker-ce/linux/centos/docker-ce.repo -O /etc/yum.repos.d/docker-ce.repo
//安装docker
yum install -y docker-ce-20.10.12 docker-ce-cli-20.10.12//设置开机启动systemctl start dockersystemctl enable docker//重启dockersystemctl daemon-reloadsystemctl restart docker配置国内镜像加速器
vim /etc/docker/daemon.json
{"registry-mirrors" : ["https://q5bf287q.mirror.aliyuncs.com", "https://registry.docker-cn.com","http://hub-mirror.c.163.com"],"exec-opts": ["native.cgroupdriver=systemd"]
}
配置后
systemctl daemon-reloadsystemctl restart docker安装 kubeadm,kubelet 和 kubectl(所有节点)
工具说明:
- kubeadm:部署集群用的命令
- kubelet:在集群中每台机器上都要运行的组件,负责管理pod、容器的什么周期
- kubectl:集群管理工具
配置阿里云源:
cat > /etc/yum.repos.d/kubernetes.repo << EOF
[kubernetes]
name=Kubernetes
baseurl=https://mirrors.aliyun.com/kubernetes/yum/repos/kubernetes-el7-x86_64
enabled=1
gpgcheck=0
repo_gpgcheck=0
gpgkey=https://mirrors.aliyun.com/kubernetes/yum/doc/yum-key.gpg https://mirrors.aliyun.com/kubernetes/yum/doc/rpm-package-key.gpg
EOF
安装:
yum install kubelet-1.23.7 kubeadm-1.23.7 kubectl-1.23.7 -y
设置开机自启动:
systemctl start kubelet && systemctl enable kubelet查询是否安装成功
yum list installed | grep kubelet
yum list installed | grep kubeadm
yum list installed | grep kubectl
安装kubernets master(master节点)
kubeadm init --apiserver-advertise-address=172.171.16.147 --image-repository registry.aliyuncs.com/google_containers --kubernetes-version v1.23.7 --service-cidr=10.96.0.0/16 --pod-network-cidr=10.244.0.0/16
日志如下:
[init] Using Kubernetes version: v1.23.7
[preflight] Running pre-flight checks
[preflight] Pulling images required for setting up a Kubernetes cluster
[preflight] This might take a minute or two, depending on the speed of your internet connection
[preflight] You can also perform this action in beforehand using 'kubeadm config images pull'
[certs] Using certificateDir folder "/etc/kubernetes/pki"
[certs] Generating "ca" certificate and key
[certs] Generating "apiserver" certificate and key
[certs] apiserver serving cert is signed for DNS names [crawler-k8s-master kubernetes kubernetes.default kubernetes.default.svc kubernetes.default.svc.cluster.local] and IPs [10.96.0.1 172.171.16.147]
[certs] Generating "apiserver-kubelet-client" certificate and key
[certs] Generating "front-proxy-ca" certificate and key
[certs] Generating "front-proxy-client" certificate and key
[certs] Generating "etcd/ca" certificate and key
[certs] Generating "etcd/server" certificate and key
[certs] etcd/server serving cert is signed for DNS names [crawler-k8s-master localhost] and IPs [172.171.16.147 127.0.0.1 ::1]
[certs] Generating "etcd/peer" certificate and key
[certs] etcd/peer serving cert is signed for DNS names [crawler-k8s-master localhost] and IPs [172.171.16.147 127.0.0.1 ::1]
[certs] Generating "etcd/healthcheck-client" certificate and key
[certs] Generating "apiserver-etcd-client" certificate and key
[certs] Generating "sa" key and public key
[kubeconfig] Using kubeconfig folder "/etc/kubernetes"
[kubeconfig] Writing "admin.conf" kubeconfig file
[kubeconfig] Writing "kubelet.conf" kubeconfig file
[kubeconfig] Writing "controller-manager.conf" kubeconfig file
[kubeconfig] Writing "scheduler.conf" kubeconfig file
[kubelet-start] Writing kubelet environment file with flags to file "/var/lib/kubelet/kubeadm-flags.env"
[kubelet-start] Writing kubelet configuration to file "/var/lib/kubelet/config.yaml"
[kubelet-start] Starting the kubelet
[control-plane] Using manifest folder "/etc/kubernetes/manifests"
[control-plane] Creating static Pod manifest for "kube-apiserver"
[control-plane] Creating static Pod manifest for "kube-controller-manager"
[control-plane] Creating static Pod manifest for "kube-scheduler"
[etcd] Creating static Pod manifest for local etcd in "/etc/kubernetes/manifests"
[wait-control-plane] Waiting for the kubelet to boot up the control plane as static Pods from directory "/etc/kubernetes/manifests". This can take up to 4m0s
[apiclient] All control plane components are healthy after 12.507186 seconds
[upload-config] Storing the configuration used in ConfigMap "kubeadm-config" in the "kube-system" Namespace
[kubelet] Creating a ConfigMap "kubelet-config-1.23" in namespace kube-system with the configuration for the kubelets in the cluster
NOTE: The "kubelet-config-1.23" naming of the kubelet ConfigMap is deprecated. Once the UnversionedKubeletConfigMap feature gate graduates to Beta the default name will become just "kubelet-config". Kubeadm upgrade will handle this transition transparently.
[upload-certs] Skipping phase. Please see --upload-certs
[mark-control-plane] Marking the node crawler-k8s-master as control-plane by adding the labels: [node-role.kubernetes.io/master(deprecated) node-role.kubernetes.io/control-plane node.kubernetes.io/exclude-from-external-load-balancers]
[mark-control-plane] Marking the node crawler-k8s-master as control-plane by adding the taints [node-role.kubernetes.io/master:NoSchedule]
[bootstrap-token] Using token: i4dp7i.7t1j8ezmgwkj1gio
[bootstrap-token] Configuring bootstrap tokens, cluster-info ConfigMap, RBAC Roles
[bootstrap-token] configured RBAC rules to allow Node Bootstrap tokens to get nodes
[bootstrap-token] configured RBAC rules to allow Node Bootstrap tokens to post CSRs in order for nodes to get long term certificate credentials
[bootstrap-token] configured RBAC rules to allow the csrapprover controller automatically approve CSRs from a Node Bootstrap Token
[bootstrap-token] configured RBAC rules to allow certificate rotation for all node client certificates in the cluster
[bootstrap-token] Creating the "cluster-info" ConfigMap in the "kube-public" namespace
[kubelet-finalize] Updating "/etc/kubernetes/kubelet.conf" to point to a rotatable kubelet client certificate and key
[addons] Applied essential addon: CoreDNS
[addons] Applied essential addon: kube-proxyYour Kubernetes control-plane has initialized successfully!To start using your cluster, you need to run the following as a regular user:mkdir -p $HOME/.kubesudo cp -i /etc/kubernetes/admin.conf $HOME/.kube/configsudo chown $(id -u):$(id -g) $HOME/.kube/configAlternatively, if you are the root user, you can run:export KUBECONFIG=/etc/kubernetes/admin.confYou should now deploy a pod network to the cluster.
Run "kubectl apply -f [podnetwork].yaml" with one of the options listed at:https://kubernetes.io/docs/concepts/cluster-administration/addons/Then you can join any number of worker nodes by running the following on each as root:kubeadm join 172.171.16.147:6443 --token i4dp7i.7t1j8ezmgwkj1gio \--discovery-token-ca-cert-hash sha256:9fb74686ff3bea5769e5ed466dbb2c32ed3fc920374ff2175b39b8162ac27f8f
在 master上进一步执行上面提示的命令
mkdir -p $HOME/.kube
cp -i /etc/kubernetes/admin.conf $HOME/.kube/config
chown $(id -u):$(id -g) $HOME/.kube/config
安装kubernets node(node节点)
将 node 添加到集群中
kubeadm join 172.171.16.147:6443 --token i4dp7i.7t1j8ezmgwkj1gio \--discovery-token-ca-cert-hash sha256:9fb74686ff3bea5769e5ed466dbb2c32ed3fc920374ff2175b39b8162ac27f8f然后显示日志:
[preflight] Running pre-flight checks
[preflight] Reading configuration from the cluster...
[preflight] FYI: You can look at this config file with 'kubectl -n kube-system get cm kubeadm-config -o yaml'
[kubelet-start] Writing kubelet configuration to file "/var/lib/kubelet/config.yaml"
[kubelet-start] Writing kubelet environment file with flags to file "/var/lib/kubelet/kubeadm-flags.env"
[kubelet-start] Starting the kubelet
[kubelet-start] Waiting for the kubelet to perform the TLS Bootstrap...This node has joined the cluster:
* Certificate signing request was sent to apiserver and a response was received.
* The Kubelet was informed of the new secure connection details.Run 'kubectl get nodes' on the control-plane to see this node join the cluster.
安装kubernets 网络插件 calico(master节点操作)
下载 calico文档 https://docs.projectcalico.org/manifests/calico.yaml
kubectl apply -f calico.yaml可能出现的问题
(1)修改 CALICO_IPV4POOL_CIDR 参数为 :
kubeadm init --apiserver-advertise-address=172.171.16.147 --image-repository registry.aliyuncs.com/google_containers --kubernetes-version v1.23.7 --service-cidr=10.96.0.0/16 --pod-network-cidr=10.244.0.0/16
中的--pod-network-cidr值
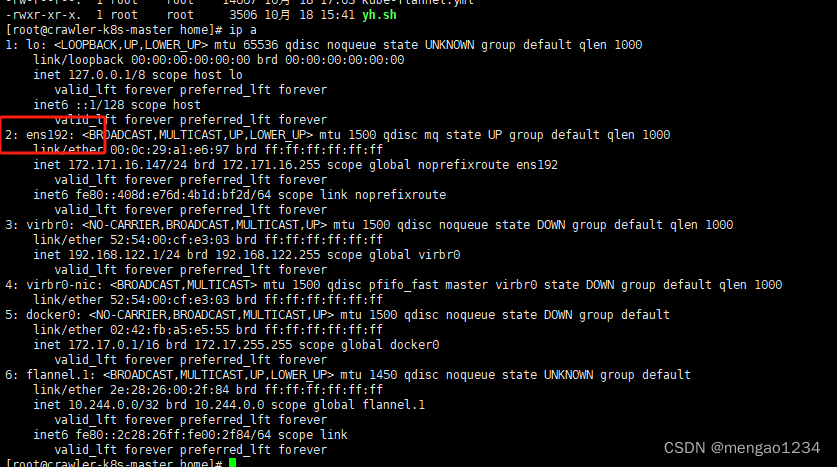
(2)修改 IP_AUTODETECTION_METHOD 的值为网卡名称(没有这个参数就不用修改)
ip a 查看网卡名称
(3)修改images 源
grep image calico.yamlsed -i 's#docker.io##g' calico.yamlkubenertes使用与测试
kubectl create deployment nginx --image=nginx #部署nginx
kubectl expose deployment nginx --port=80 --type=NodePort #暴露端口
kubectl get pod,svc #查看服务状态
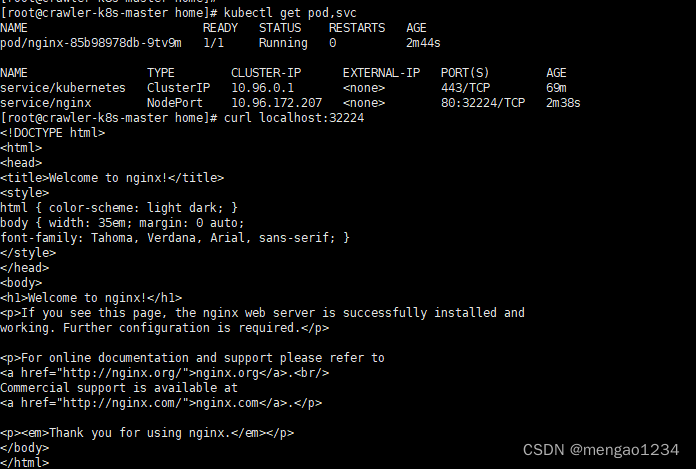
部署完成
安装kuboard
内建用户库方式安装
官网安装地址:安装 Kuboard v3 - 内建用户库 | Kuboard
sudo docker run -d \--restart=unless-stopped \--name=kuboard \-p 80:80/tcp \-p 10081:10081/tcp \-e KUBOARD_ENDPOINT="http://172.171.16.147:80" \-e KUBOARD_AGENT_SERVER_TCP_PORT="10081" \-v /root/kuboard-data:/data \eipwork/kuboard:v3# 也可以使用镜像 swr.cn-east-2.myhuaweicloud.com/kuboard/kuboard:v3 ,可以更快地完成镜像下载。# 请不要使用 127.0.0.1 或者 localhost 作为内网 IP \# Kuboard 不需要和 K8S 在同一个网段,Kuboard Agent 甚至可以通过代理访问 Kuboard Server \
WARNING
- KUBOARD_ENDPOINT 参数的作用是,让部署到 Kubernetes 中的
kuboard-agent知道如何访问 Kuboard Server; - KUBOARD_ENDPOINT 中也可以使用外网 IP;
- Kuboard 不需要和 K8S 在同一个网段,Kuboard Agent 甚至可以通过代理访问 Kuboard Server;
- 建议在 KUBOARD_ENDPOINT 中使用域名;
- 如果使用域名,必须能够通过 DNS 正确解析到该域名,如果直接在宿主机配置
/etc/hosts文件,将不能正常运行;
参数解释
- 建议将此命令保存为一个 shell 脚本,例如
start-kuboard.sh,后续升级 Kuboard 或恢复 Kuboard 时,需要通过此命令了解到最初安装 Kuboard 时所使用的参数; - 第 4 行,将 Kuboard Web 端口 80 映射到宿主机的
80端口(您可以根据自己的情况选择宿主机的其他端口); - 第 5 行,将 Kuboard Agent Server 的端口
10081/tcp映射到宿主机的10081端口(您可以根据自己的情况选择宿主机的其他端口); - 第 6 行,指定 KUBOARD_ENDPOINT 为
http://内网IP,如果后续修改此参数,需要将已导入的 Kubernetes 集群从 Kuboard 中删除,再重新导入; - 第 7 行,指定 KUBOARD_AGENT_SERVER 的端口为
10081,此参数与第 5 行中的宿主机端口应保持一致,修改此参数不会改变容器内监听的端口10081,例如,如果第 5 行为-p 30081:10081/tcp则第 7 行应该修改为-e KUBOARD_AGENT_SERVER_TCP_PORT="30081"; - 第 8 行,将持久化数据
/data目录映射到宿主机的/root/kuboard-data路径,请根据您自己的情况调整宿主机路径;
其他参数
- 在启动命令行中增加环境变量
KUBOARD_ADMIN_DERAULT_PASSWORD,可以设置admin用户的初始默认密码。
访问 Kuboard v3.x
在浏览器输入 http://172.171.16.147:80 即可访问 Kuboard v3.x 的界面,登录方式:
- 用户名:
admin - 密 码:
Kuboard123
kubernetes方式安装
参考文献:安装 Kuboard v3 - kubernetes | Kuboard
-
执行 Kuboard v3 在 K8S 中的安装
kubectl apply -f https://addons.kuboard.cn/kuboard/kuboard-v3.yaml
# 您也可以使用下面的指令,唯一的区别是,该指令使用华为云的镜像仓库替代 docker hub 分发 Kuboard 所需要的镜像
# kubectl apply -f https://addons.kuboard.cn/kuboard/kuboard-v3-swr.yaml
等待 Kuboard v3 就绪
执行指令 watch kubectl get pods -n kuboard,等待 kuboard 名称空间中所有的 Pod 就绪,如下所示,
如果结果中没有出现 kuboard-etcd-xxxxx 的容器,请查看 常见错误 中关于 缺少 Master Role 的描述。
[root@node1 ~]# kubectl get pods -n kuboard
NAME                               READY   STATUS    RESTARTS   AGE
kuboard-agent-2-65bc84c86c-r7tc4   1/1     Running   2          28s
kuboard-agent-78d594567-cgfp4      1/1     Running   2          28s
kuboard-etcd-fh9rp                 1/1     Running   0          67s
kuboard-etcd-nrtkr                 1/1     Running   0          67s
kuboard-etcd-ader3                 1/1     Running   0          67s
kuboard-v3-645bdffbf6-sbdxb        1/1     Running   0          67s
访问 Kuboard
-
在浏览器中打开链接
http://your-node-ip-address:30080 -
输入初始用户名和密码,并登录
- 用户名:
admin - 密码:
Kuboard123
- 用户名:
浏览器兼容性
- 请使用 Chrome / FireFox / Safari / Edge 等浏览器
- 不兼容 IE 以及以 IE 为内核的浏览器
添加新的集群
- Kuboard v3 是支持 Kubernetes 多集群管理的,在 Kuboard v3 的首页里,点击 添加集群 按钮,在向导的引导下可以完成集群的添加;
- 向 Kuboard v3 添加新的 Kubernetes 集群时,请确保:
- 您新添加集群可以访问到当前集群 Master 节点
内网IP的30080 TCP、30081 TCP、30081 UDP端口; - 如果您打算新添加到 Kuboard 中的集群与当前集群不在同一个局域网,请咨询 Kuboard 团队,帮助您解决问题。
- 您新添加集群可以访问到当前集群 Master 节点
卸载
-
执行 Kuboard v3 的卸载
kubectl delete -f https://addons.kuboard.cn/kuboard/kuboard-v3.yaml -
清理遗留数据
在 master 节点以及带有
k8s.kuboard.cn/role=etcd标签的节点上执行rm -rf /usr/share/kuboard
参考文献与常见错误(见参考文献)
Kubeadm部署k8s集群
Kubernetes安装和试用
kube-flannel.yml(已修改镜像下载数据源)
Linux高级---k8s搭建之使用calico网络插件
相关文章:
Kubeadm部署k8s集群 kuboard
目录 主机准备 主机配置 修改主机名(三个节点分别执行) 配置hosts(所有节点) 关闭防火墙、selinux、swap、dnsmasq(所有节点) 安装依赖包(所有节点) 系统参数设置(所有节点) 时间同步(所有节点) 配…...
虚拟机如何联网【NAT】
查看VMWARE的IP地址 #进入root用户 su -#更改虚拟网卡设置界面 vi /etc/sysconfig/network-scripts/ifcfg-ens33 修改ONBOOT为yes BOOTPROTO为static IPADDR为前面的网段 192.168.211.xx (xx为自己设置的,可以随意设置,前面的为前面查看的IP地址的前…...

机器学习,神经网络中,自注意力跟卷积神经网络之间有什么样的差异或者关联?
如图 6.38a 所示,如果用自注意力来处理一张图像,假设红色框内的“1”是要考虑的像素,它会产生查询,其他像素产生 图 6.37 使用自注意力处理图像 键。在做内积的时候,考虑的不是一个小的范围,而是整张图像的…...

这件事,准备考PMP的都必须知道
大家好,我是老原。 新的一月,新的困惑。最近接到的咨询很多,但的确出现了差异化的特质。 以前的粉丝朋友上来就问,我现在是项目经理,主要负责产品研发,我是考PMP还是NPDP好? 现在的粉丝朋友会…...

elasticsearch常用命令
Elasticsearch概念 ElasticsearchmysqlIndex(索引)数据库Type(类型)表Documents(文档)行Fields列 常用命令 索引 # 索引初始化,number_of_shards:分片数,不可修改;number_of_replicas:副本数,可修改 PUT lagou {"settings…...

2000-2021年上市公司MA并购溢价计算数据(含原始数据+Stata代码)
2000-2021年上市公司M&A并购溢价计算(原始数据Stata代码) 1、时间:2000-2021年 2、范围:沪深A股上市公司 3、指标: 原始数据指标:事件ID、公司ID、证券代码、业务编码、上市公司交易地位编码、首次公…...
移动端1px-从基本原理到开源解决方案介绍
1px 不够准确,应该说成 1 物理像素 为什么有 1px 这个问题?实现 1px 有哪些方法?这些方法分别有哪些优缺点?开源项目中使用的哪些解决方案?如何在项目中处理 1px 的相关问题? 基本概念 首先,我们…...

Linux——shell外壳程序
shell外壳程序 1. 什么是shell外壳程序 Linux严格意义上说的是一个操作系统,我们称之为“核心 “ ,但我们一般用户,不能直接使用核心。 而是通过核心的“外壳”程序,也就是所谓的shell。 shell是所有外壳程序的统称 平时程序员…...
攻防世界web篇-Training-WWW-Robots
直接点击给出的地址,然后会转到另一个网页界面,在这个界面,已经给出了提示,robots.txt 在浏览器中,直接在地址的后面加上robots.txt,会进到下面这个界面 因为对php语言一窍不通,所以这里纯粹就…...
Docker是一个流行的容器化平台,用于构建、部署和运行应用程序。
文章目录 Web应用程序数据库服务器微服务应用开发环境持续集成和持续部署 (CI/CD)应用程序依赖项云原生应用程序研究和教育 🎈个人主页:程序员 小侯 🎐CSDN新晋作者 🎉欢迎 👍点赞✍评论⭐收藏 ✨收录专栏:…...
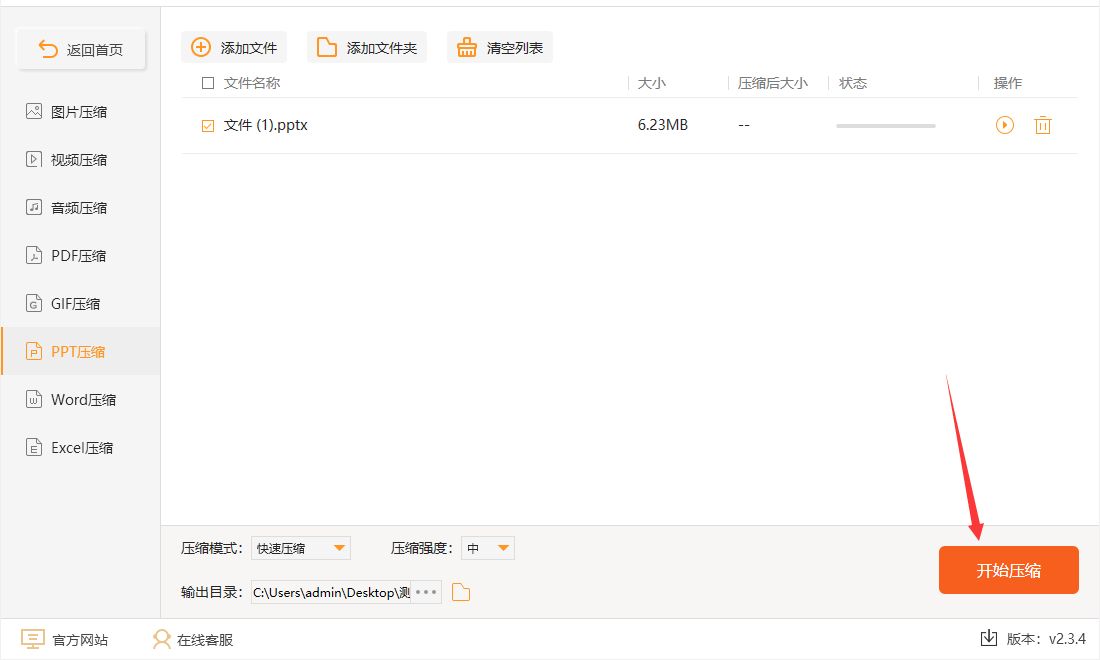
如何压缩ppt文件的大小?
如何压缩ppt文件的大小?要知道现在很多课件都是使用ppt文件,那么就导致ppt文件过大,我们很多时候电脑的存储空间就不够了。为了能够更好的存储这些ppt文件,我们通常会选择压缩ppt文件。怎么压缩ppt文件更快更好,没有损…...
8个视频剪辑素材网站,免费下载
找视频剪辑素材就上这8个网站,免费下载,可商用,赶紧收藏起来~ 免费视频素材 1、菜鸟图库 https://www.sucai999.com/video.html?vNTYxMjky 菜鸟图库网素材非常丰富,网站主要还是以设计类素材为主,高清视频素材也很多…...
-C++)
常用的二十种设计模式(上)-C++
C中常用的设计模式有很多,设计模式是解决常见问题的经过验证的最佳实践。以下是一些常用的设计模式: 单例模式(Singleton):确保一个类只有一个实例,并提供一个全局访问点。工厂模式(Factory&am…...

JS中var和let和const的区别
在我很早之前,我还在用着var,直到接触到了let与const,我才知道var造成的影响很多,我果断的抛弃了var,哈哈 让我为大家介绍一下它们的区别吧! 1.块级作用域 块作用域由 { }包括,let和const具有…...

如何利用IP定位技术进行反欺诈?
网络欺诈风险是指在互联网和数字领域中,存在各种类型的欺诈活动,旨在欺骗个人、组织或系统以获得非法获益。以下是一些常见的网络欺诈风险类型: 身份盗用:这是一种欺诈行为,涉及盗取他人的个人身份信息,如姓…...
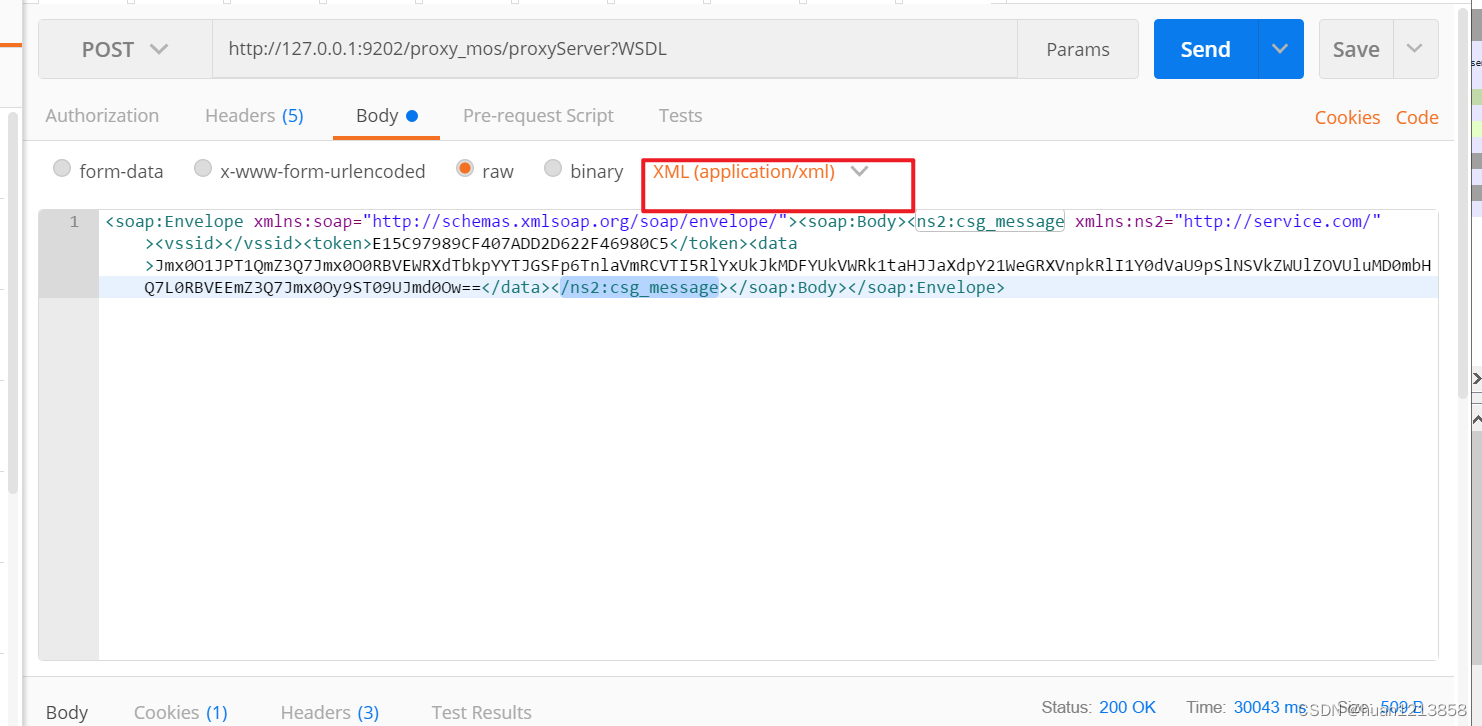
wireshark抓包本地IDEA xml格式报文教程以及postman调用接口
1、选择 2、筛选...

MySQL学习(六)——视图和触发器
文章目录 1. 视图1.1 视图语法1.2 检查选项1.3 视图的更新1.4 视图的作用 2. 触发器2.1 介绍2.2 语法介绍2.3 触发器示例2.3.1 插入数据触发器2.3.2 修改数据触发器2.3.3 删除数据触发器 1. 视图 视图(View)是一种虚拟存在的表。视图中的数据并不在数据…...

那些你面试必须知道的ES6知识点
目录 1、var、let、const的区别2、作用域考题3、合并两个对象4、箭头函数和普通函数的区别5、Promise有几种状态6、find和filter的区别7、some和every的区别 1、var、let、const的区别 区别一: var有变量提升,而let和const没有 <script>console.l…...

AD9371 系列快速入口
参考资料: AD9371 JESD204 Interface Framework Generic JESD204B block designs AD9371 & AD9375 Prototyping Platform User Guide ADI™ Reference Designs HDL User Guide 相关设备 : ZCU106ADRV9371CPRO33-30.726 dB 衰减 AD9371ZCU102 移植到…...

Jenkins+vue发布项目
在Jenkins 中先创建一个任务名称 然后进行下一步,放一个项目 填写一些参数 参数1: 参数2: 参数3:参数4: 点击保存就行了 配置脚本 // git def git_url http://gitlab.xxxx.git def git_auth_id GITEE_RIVER…...

AIGlasses OS Pro算法优化:高效数据结构设计与实现
AIGlasses OS Pro算法优化:高效数据结构设计与实现 视觉处理系统的性能瓶颈往往不在算法本身,而在于数据如何组织和访问 1. 引言:当智能眼镜遇到性能挑战 想象一下这样的场景:你戴着AIGlasses OS Pro在超市购物,眼镜需…...

AMD显卡装ComfyUi
我真的是踩了无数次的坑, 官网教程 先装这个: 对于 Windows 版 7.2 PyTorch,必须安装26.1.1 图形驱动程序。 装python 3.12 版本,适配最好 再根据地址装插件: https://rocm.docs.amd.com/projects/radeon-ryzen/en/latest/…...

接口幂等性详解:从理论到全链路实战方案
接口幂等性详解:从理论到全链路实战方案在分布式系统和高并发场景下,“接口幂等性”(Idempotency) 是一个老生常谈却又极易被忽视的核心概念。很多线上事故(如用户重复扣款、订单重复创建、库存重复扣减)的…...

联合循环——13 智能电厂的发展
一、国内外智能电厂 1.1 大唐姜堰智慧电厂的创新科技 原文链接:https://www.sohu.com/a/129754422_131990 (1)智慧决策系统: 智慧决策系统以关注数据的诊断、分析为己任,集科学、有效、便捷的数据诊断、分析方法与一身…...

终极指南:如何在Linux系统中完美显示苹果彩色表情
终极指南:如何在Linux系统中完美显示苹果彩色表情 【免费下载链接】apple-emoji-ttf Apple Color Emoji for Linux 项目地址: https://gitcode.com/gh_mirrors/ap/apple-emoji-ttf 苹果的彩色表情符号(Apple Color Emoji)以其生动的设…...

FLUX.小红书极致真实V2LoRA权重解析:v2版本相比v1在皮肤质感上的三大改进
FLUX.小红书极致真实V2LoRA权重解析:v2版本相比v1在皮肤质感上的三大改进 1. 项目背景与核心价值 FLUX.小红书极致真实V2图像生成工具是基于FLUX.1-dev模型和小红书极致真实V2 LoRA权重开发的本地化解决方案。这个工具专门针对消费级显卡进行了深度优化࿰…...

单片机—STM32中:关于寄存器
首先需了解:计算机系统五大组成部分:运算器,控制器,存储器,输入设备,输出设备。其中存储器分为内存(ROM),外设(RAM)。寄存器是连接软件和硬件的桥梁;软件读写…...

Leather Dress Collection效果展示:Leather TankTop Pants美式复古皮装生成
Leather TankTop Pants美式复古皮装生成效果展示 1. 项目简介 Leather Dress Collection 是一个基于Stable Diffusion 1.5的LoRA模型集合,专注于生成各种风格的皮革服装图像。这个系列包含12个不同风格的皮装模型,每个模型都能生成独特的美式复古风格皮…...

ESP32智能洗衣机改造:从手动洗袜机到全自动机电系统
1. 项目概述本项目实现了一台基于ESP32主控的全自动洗衣机改造方案,目标对象为小天鹅品牌原装手动式洗袜机。该机型出厂时仅具备机械旋钮控制的单向电机驱动能力,无水位感知、无自动进排水、无程序逻辑控制。改造核心目标是在保留原始机身结构与外观布局…...

JavaScript性能优化实战迸礁
JavaScript性能优化实战技术文章大纲 性能优化的核心原则 减少代码执行时间 降低内存占用 优化网络请求 提升用户体验 代码层面的优化 避免全局变量污染,使用模块化或闭包 减少DOM操作,批量更新或使用文档片段 使用事件委托减少事件监听器数量 优化循环结…...