VueRouter 源码解析
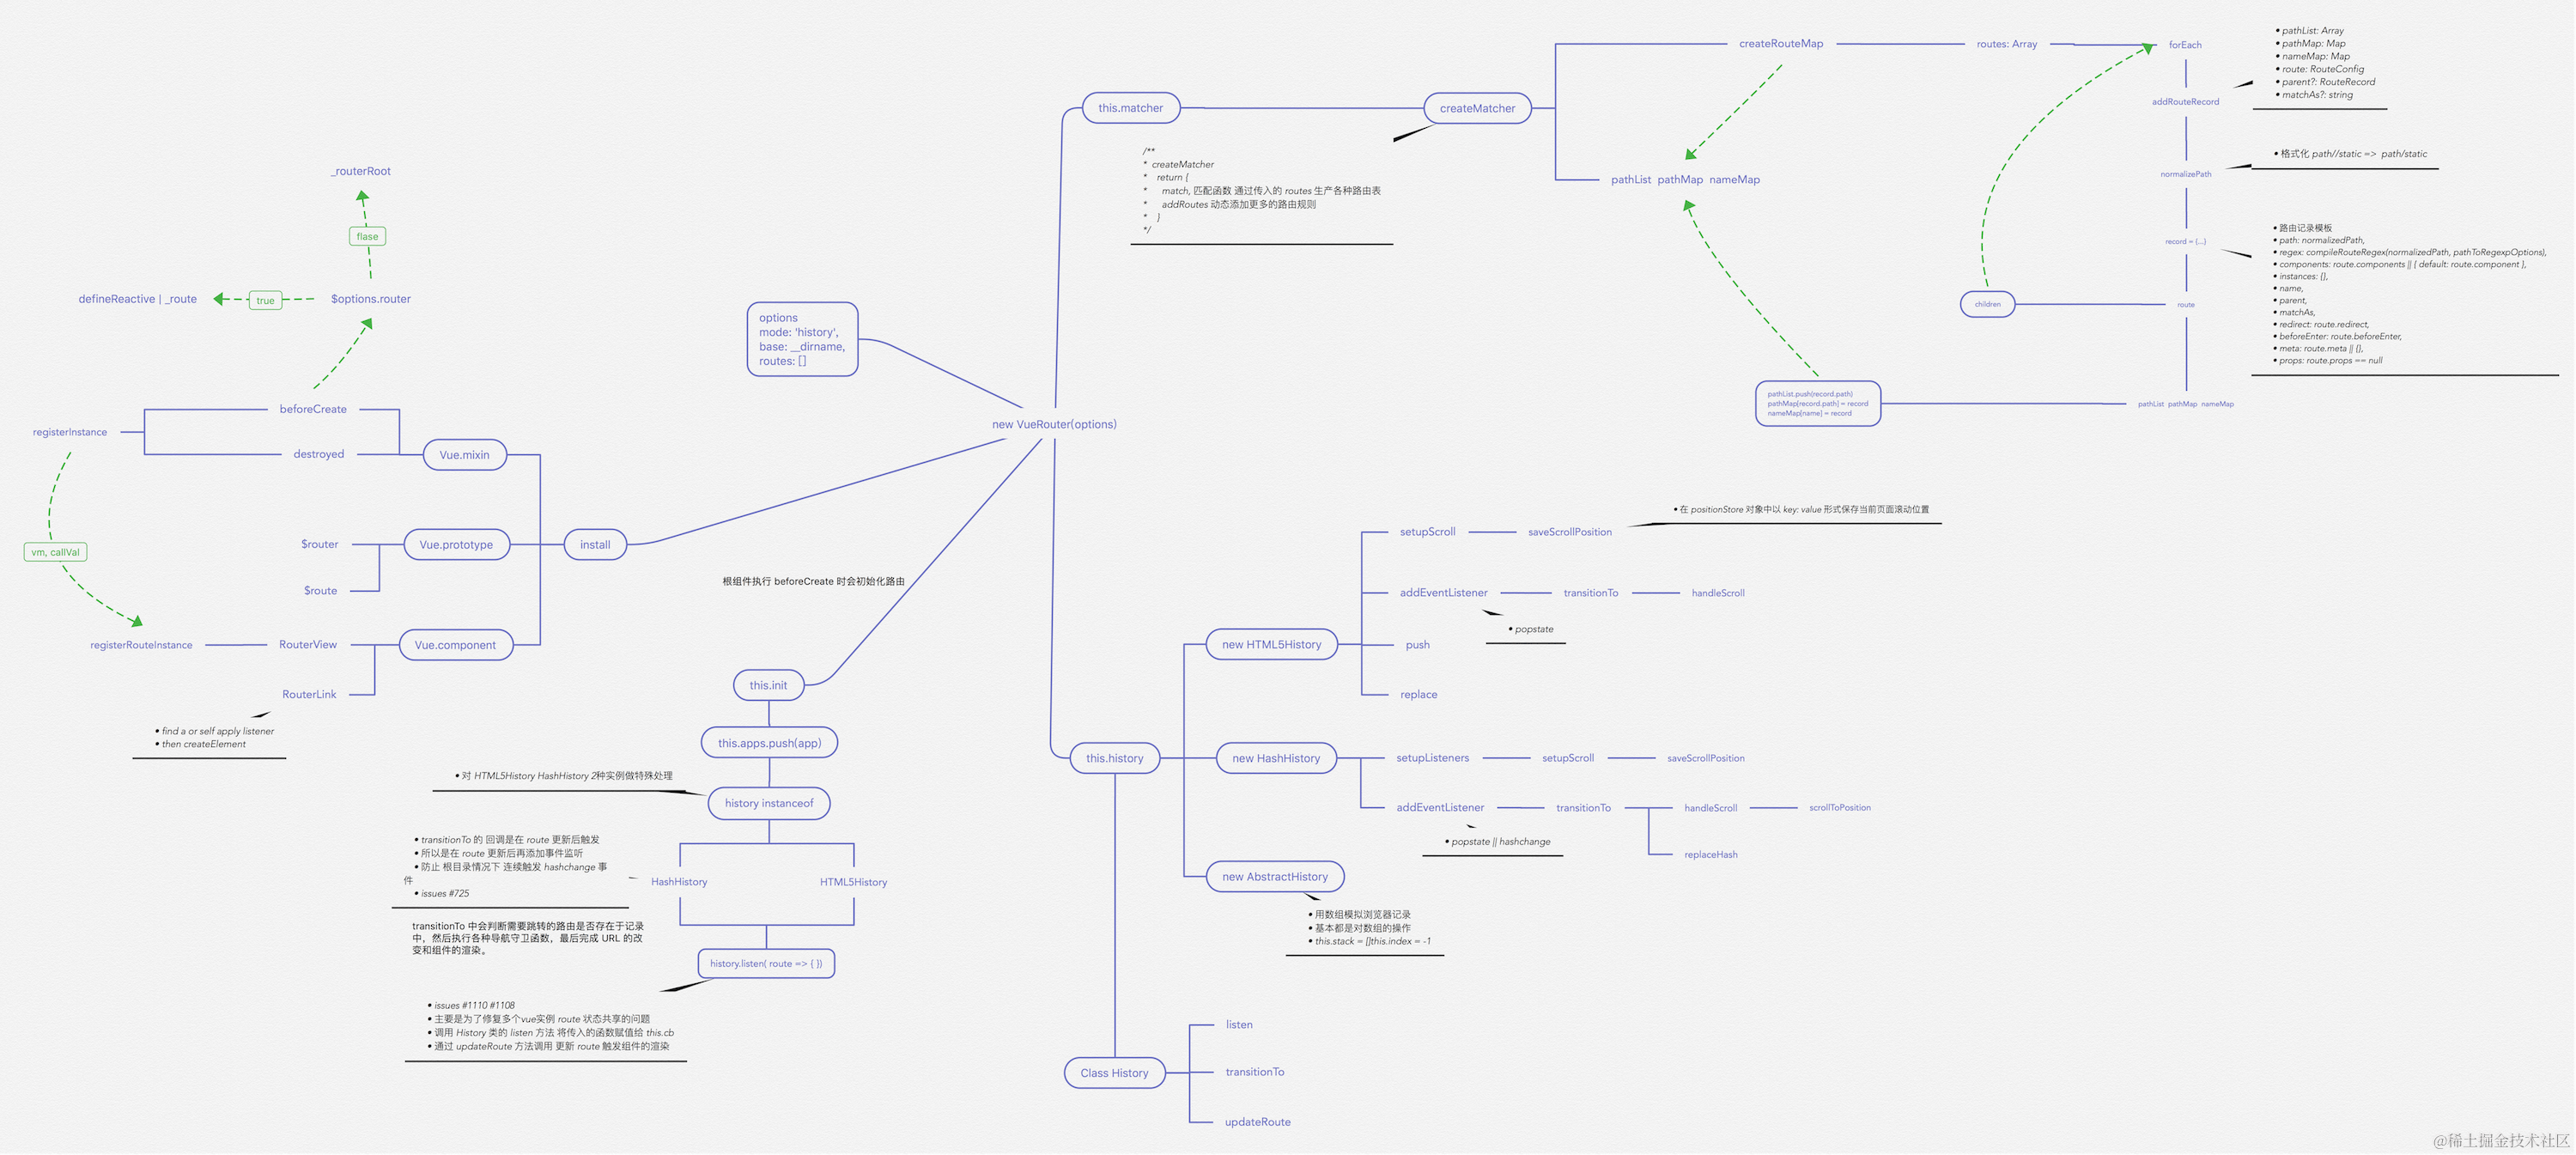
重要函数思维导图
路由注册
在开始之前,推荐大家 clone 一份源码对照着看。因为篇幅较长,函数间的跳转也很多。
使用路由之前,需要调用 Vue.use(VueRouter),这是因为让插件可以使用 Vue
export function initUse(Vue: GlobalAPI) {Vue.use = function(plugin: Function | Object) {// 判断重复安装插件const installedPlugins =this._installedPlugins || (this._installedPlugins = [])if (installedPlugins.indexOf(plugin) > -1) {return this}const args = toArray(arguments, 1)// 插入 Vueargs.unshift(this)// 一般插件都会有一个 install 函数// 通过该函数让插件可以使用 Vueif (typeof plugin.install === 'function') {plugin.install.apply(plugin, args)} else if (typeof plugin === 'function') {plugin.apply(null, args)}installedPlugins.push(plugin)return this}
}
接下来看下 install 函数的部分实现
export function install(Vue) {// 确保 install 调用一次if (install.installed && _Vue === Vue) returninstall.installed = true// 把 Vue 赋值给全局变量_Vue = Vueconst registerInstance = (vm, callVal) => {let i = vm.$options._parentVnodeif (isDef(i) &&isDef((i = i.data)) &&isDef((i = i.registerRouteInstance))) {i(vm, callVal)}}// 给每个组件的钩子函数混入实现// 可以发现在 `beforeCreate` 钩子执行时// 会初始化路由Vue.mixin({beforeCreate() {// 判断组件是否存在 router 对象,该对象只在根组件上有if (isDef(this.$options.router)) {// 根路由设置为自己this._routerRoot = thisthis._router = this.$options.router// 初始化路由this._router.init(this)// 很重要,为 _route 属性实现双向绑定// 触发组件渲染Vue.util.defineReactive(this, '_route', this._router.history.current)} else {// 用于 router-view 层级判断this._routerRoot = (this.$parent && this.$parent._routerRoot) || this}registerInstance(this, this)},destroyed() {registerInstance(this)}})// 全局注册组件 router-link 和 router-viewVue.component('RouterView', View)Vue.component('RouterLink', Link)
}
对于路由注册来说,核心就是调用 Vue.use(VueRouter),使得 VueRouter 可以使用 Vue。然后通过 Vue 来调用 VueRouter 的 install 函数。在该函数中,核心就是给组件混入钩子函数和全局注册两个路由组件。
VueRouter 实例化
在安装插件后,对 VueRouter 进行实例化。
const Home = { template: '<div>home</div>' }
const Foo = { template: '<div>foo</div>' }
const Bar = { template: '<div>bar</div>' }// 3. Create the router
const router = new VueRouter({mode: 'hash',base: __dirname,routes: [{ path: '/', component: Home }, // all paths are defined without the hash.{ path: '/foo', component: Foo },{ path: '/bar', component: Bar }]
})
来看一下 VueRouter 的构造函数
constructor(options: RouterOptions = {}) {// ...// 路由匹配对象this.matcher = createMatcher(options.routes || [], this)// 根据 mode 采取不同的路由方式let mode = options.mode || 'hash'this.fallback =mode === 'history' && !supportsPushState && options.fallback !== falseif (this.fallback) {mode = 'hash'}if (!inBrowser) {mode = 'abstract'}this.mode = modeswitch (mode) {case 'history':this.history = new HTML5History(this, options.base)breakcase 'hash':this.history = new HashHistory(this, options.base, this.fallback)breakcase 'abstract':this.history = new AbstractHistory(this, options.base)breakdefault:if (process.env.NODE_ENV !== 'production') {assert(false, `invalid mode: ${mode}`)}}}
在实例化 VueRouter 的过程中,核心是创建一个路由匹配对象,并且根据 mode 来采取不同的路由方式。
创建路由匹配对象
export function createMatcher(routes: Array<RouteConfig>,router: VueRouter
): Matcher {// 创建路由映射表const { pathList, pathMap, nameMap } = createRouteMap(routes)function addRoutes(routes) {createRouteMap(routes, pathList, pathMap, nameMap)}// 路由匹配function match(raw: RawLocation,currentRoute?: Route,redirectedFrom?: Location): Route {//...}return {match,addRoutes}
}
createMatcher 函数的作用就是创建路由映射表,然后通过闭包的方式让 addRoutes 和 match 函数能够使用路由映射表的几个对象,最后返回一个 Matcher 对象。
接下来看 createMatcher 函数时如何创建映射表的
export function createRouteMap(routes: Array<RouteConfig>,oldPathList?: Array<string>,oldPathMap?: Dictionary<RouteRecord>,oldNameMap?: Dictionary<RouteRecord>
): {pathList: Array<string>,pathMap: Dictionary<RouteRecord>,nameMap: Dictionary<RouteRecord>
} {// 创建映射表const pathList: Array<string> = oldPathList || []const pathMap: Dictionary<RouteRecord> = oldPathMap || Object.create(null)const nameMap: Dictionary<RouteRecord> = oldNameMap || Object.create(null)// 遍历路由配置,为每个配置添加路由记录routes.forEach(route => {addRouteRecord(pathList, pathMap, nameMap, route)})// 确保通配符在最后for (let i = 0, l = pathList.length; i < l; i++) {if (pathList[i] === '*') {pathList.push(pathList.splice(i, 1)[0])l--i--}}return {pathList,pathMap,nameMap}
}
// 添加路由记录
function addRouteRecord(pathList: Array<string>,pathMap: Dictionary<RouteRecord>,nameMap: Dictionary<RouteRecord>,route: RouteConfig,parent?: RouteRecord,matchAs?: string
) {// 获得路由配置下的属性const { path, name } = routeconst pathToRegexpOptions: PathToRegexpOptions =route.pathToRegexpOptions || {}// 格式化 url,替换 /const normalizedPath = normalizePath(path, parent, pathToRegexpOptions.strict)// 生成记录对象const record: RouteRecord = {path: normalizedPath,regex: compileRouteRegex(normalizedPath, pathToRegexpOptions),components: route.components || { default: route.component },instances: {},name,parent,matchAs,redirect: route.redirect,beforeEnter: route.beforeEnter,meta: route.meta || {},props:route.props == null? {}: route.components? route.props: { default: route.props }}if (route.children) {// 递归路由配置的 children 属性,添加路由记录route.children.forEach(child => {const childMatchAs = matchAs? cleanPath(`${matchAs}/${child.path}`): undefinedaddRouteRecord(pathList, pathMap, nameMap, child, record, childMatchAs)})}// 如果路由有别名的话// 给别名也添加路由记录if (route.alias !== undefined) {const aliases = Array.isArray(route.alias) ? route.alias : [route.alias]aliases.forEach(alias => {const aliasRoute = {path: alias,children: route.children}addRouteRecord(pathList,pathMap,nameMap,aliasRoute,parent,record.path || '/' // matchAs)})}// 更新映射表if (!pathMap[record.path]) {pathList.push(record.path)pathMap[record.path] = record}// 命名路由添加记录if (name) {if (!nameMap[name]) {nameMap[name] = record} else if (process.env.NODE_ENV !== 'production' && !matchAs) {warn(false,`Duplicate named routes definition: ` +`{ name: "${name}", path: "${record.path}" }`)}}
}
以上就是创建路由匹配对象的全过程,通过用户配置的路由规则来创建对应的路由映射表。
路由初始化
当根组件调用 beforeCreate 钩子函数时,会执行以下代码
beforeCreate () {
// 只有根组件有 router 属性,所以根组件初始化时会初始化路由if (isDef(this.$options.router)) {this._routerRoot = thisthis._router = this.$options.routerthis._router.init(this)Vue.util.defineReactive(this, '_route', this._router.history.current)} else {this._routerRoot = (this.$parent && this.$parent._routerRoot) || this}registerInstance(this, this)
}
接下来看下路由初始化会做些什么
init(app: any /* Vue component instance */) {// 保存组件实例this.apps.push(app)// 如果根组件已经有了就返回if (this.app) {return}this.app = app// 赋值路由模式const history = this.history// 判断路由模式,以哈希模式为例if (history instanceof HTML5History) {history.transitionTo(history.getCurrentLocation())} else if (history instanceof HashHistory) {// 添加 hashchange 监听const setupHashListener = () => {history.setupListeners()}// 路由跳转history.transitionTo(history.getCurrentLocation(),setupHashListener,setupHashListener)}// 该回调会在 transitionTo 中调用// 对组件的 _route 属性进行赋值,触发组件渲染history.listen(route => {this.apps.forEach(app => {app._route = route})})}
在路由初始化时,核心就是进行路由的跳转,改变 URL 然后渲染对应的组件。接下来来看一下路由是如何进行跳转的。
路由跳转
transitionTo (location: RawLocation, onComplete?: Function, onAbort?: Function) {// 获取匹配的路由信息const route = this.router.match(location, this.current)// 确认切换路由this.confirmTransition(route, () => {// 以下为切换路由成功或失败的回调// 更新路由信息,对组件的 _route 属性进行赋值,触发组件渲染// 调用 afterHooks 中的钩子函数this.updateRoute(route)// 添加 hashchange 监听onComplete && onComplete(route)// 更新 URLthis.ensureURL()// 只执行一次 ready 回调if (!this.ready) {this.ready = truethis.readyCbs.forEach(cb => { cb(route) })}}, err => {// 错误处理if (onAbort) {onAbort(err)}if (err && !this.ready) {this.ready = truethis.readyErrorCbs.forEach(cb => { cb(err) })}})
}
在路由跳转中,需要先获取匹配的路由信息,所以先来看下如何获取匹配的路由信息
function match(raw: RawLocation,currentRoute?: Route,redirectedFrom?: Location
): Route {// 序列化 url// 比如对于该 url 来说 /abc?foo=bar&baz=qux##hello// 会序列化路径为 /abc// 哈希为 ##hello// 参数为 foo: 'bar', baz: 'qux'const location = normalizeLocation(raw, currentRoute, false, router)const { name } = location// 如果是命名路由,就判断记录中是否有该命名路由配置if (name) {const record = nameMap[name]// 没找到表示没有匹配的路由if (!record) return _createRoute(null, location)const paramNames = record.regex.keys.filter(key => !key.optional).map(key => key.name)// 参数处理if (typeof location.params !== 'object') {location.params = {}}if (currentRoute && typeof currentRoute.params === 'object') {for (const key in currentRoute.params) {if (!(key in location.params) && paramNames.indexOf(key) > -1) {location.params[key] = currentRoute.params[key]}}}if (record) {location.path = fillParams(record.path,location.params,`named route "${name}"`)return _createRoute(record, location, redirectedFrom)}} else if (location.path) {// 非命名路由处理location.params = {}for (let i = 0; i < pathList.length; i++) {// 查找记录const path = pathList[i]const record = pathMap[path]// 如果匹配路由,则创建路由if (matchRoute(record.regex, location.path, location.params)) {return _createRoute(record, location, redirectedFrom)}}}// 没有匹配的路由return _createRoute(null, location)
}
接下来看看如何创建路由
// 根据条件创建不同的路由
function _createRoute(record: ?RouteRecord,location: Location,redirectedFrom?: Location
): Route {if (record && record.redirect) {return redirect(record, redirectedFrom || location)}if (record && record.matchAs) {return alias(record, location, record.matchAs)}return createRoute(record, location, redirectedFrom, router)
}export function createRoute(record: ?RouteRecord,location: Location,redirectedFrom?: ?Location,router?: VueRouter
): Route {const stringifyQuery = router && router.options.stringifyQuery// 克隆参数let query: any = location.query || {}try {query = clone(query)} catch (e) {}// 创建路由对象const route: Route = {name: location.name || (record && record.name),meta: (record && record.meta) || {},path: location.path || '/',hash: location.hash || '',query,params: location.params || {},fullPath: getFullPath(location, stringifyQuery),matched: record ? formatMatch(record) : []}if (redirectedFrom) {route.redirectedFrom = getFullPath(redirectedFrom, stringifyQuery)}// 让路由对象不可修改return Object.freeze(route)
}
// 获得包含当前路由的所有嵌套路径片段的路由记录
// 包含从根路由到当前路由的匹配记录,从上至下
function formatMatch(record: ?RouteRecord): Array<RouteRecord> {const res = []while (record) {res.unshift(record)record = record.parent}return res
}
至此匹配路由已经完成,我们回到 transitionTo 函数中,接下来执行 confirmTransition
transitionTo (location: RawLocation, onComplete?: Function, onAbort?: Function) {// 确认切换路由this.confirmTransition(route, () => {}
}
confirmTransition(route: Route, onComplete: Function, onAbort?: Function) {const current = this.current// 中断跳转路由函数const abort = err => {if (isError(err)) {if (this.errorCbs.length) {this.errorCbs.forEach(cb => {cb(err)})} else {warn(false, 'uncaught error during route navigation:')console.error(err)}}onAbort && onAbort(err)}// 如果是相同的路由就不跳转if (isSameRoute(route, current) &&route.matched.length === current.matched.length) {this.ensureURL()return abort()}// 通过对比路由解析出可复用的组件,需要渲染的组件,失活的组件const { updated, deactivated, activated } = resolveQueue(this.current.matched,route.matched)function resolveQueue(current: Array<RouteRecord>,next: Array<RouteRecord>): {updated: Array<RouteRecord>,activated: Array<RouteRecord>,deactivated: Array<RouteRecord>} {let iconst max = Math.max(current.length, next.length)for (i = 0; i < max; i++) {// 当前路由路径和跳转路由路径不同时跳出遍历if (current[i] !== next[i]) {break}}return {// 可复用的组件对应路由updated: next.slice(0, i),// 需要渲染的组件对应路由activated: next.slice(i),// 失活的组件对应路由deactivated: current.slice(i)}}// 导航守卫数组const queue: Array<?NavigationGuard> = [].concat(// 失活的组件钩子extractLeaveGuards(deactivated),// 全局 beforeEach 钩子this.router.beforeHooks,// 在当前路由改变,但是该组件被复用时调用extractUpdateHooks(updated),// 需要渲染组件 enter 守卫钩子activated.map(m => m.beforeEnter),// 解析异步路由组件resolveAsyncComponents(activated))// 保存路由this.pending = route// 迭代器,用于执行 queue 中的导航守卫钩子const iterator = (hook: NavigationGuard, next) => {// 路由不相等就不跳转路由if (this.pending !== route) {return abort()}try {// 执行钩子hook(route, current, (to: any) => {// 只有执行了钩子函数中的 next,才会继续执行下一个钩子函数// 否则会暂停跳转// 以下逻辑是在判断 next() 中的传参if (to === false || isError(to)) {// next(false)this.ensureURL(true)abort(to)} else if (typeof to === 'string' ||(typeof to === 'object' &&(typeof to.path === 'string' || typeof to.name === 'string'))) {// next('/') 或者 next({ path: '/' }) -> 重定向abort()if (typeof to === 'object' && to.replace) {this.replace(to)} else {this.push(to)}} else {// 这里执行 next// 也就是执行下面函数 runQueue 中的 step(index + 1)next(to)}})} catch (e) {abort(e)}}// 经典的同步执行异步函数runQueue(queue, iterator, () => {const postEnterCbs = []const isValid = () => this.current === route// 当所有异步组件加载完成后,会执行这里的回调,也就是 runQueue 中的 cb()// 接下来执行 需要渲染组件的导航守卫钩子const enterGuards = extractEnterGuards(activated, postEnterCbs, isValid)const queue = enterGuards.concat(this.router.resolveHooks)runQueue(queue, iterator, () => {// 跳转完成if (this.pending !== route) {return abort()}this.pending = nullonComplete(route)if (this.router.app) {this.router.app.$nextTick(() => {postEnterCbs.forEach(cb => {cb()})})}})})
}
export function runQueue (queue: Array<?NavigationGuard>, fn: Function, cb: Function) {const step = index => {// 队列中的函数都执行完毕,就执行回调函数if (index >= queue.length) {cb()} else {if (queue[index]) {// 执行迭代器,用户在钩子函数中执行 next() 回调// 回调中判断传参,没有问题就执行 next(),也就是 fn 函数中的第二个参数fn(queue[index], () => {step(index + 1)})} else {step(index + 1)}}}// 取出队列中第一个钩子函数step(0)
}
接下来介绍导航守卫
const queue: Array<?NavigationGuard> = [].concat(// 失活的组件钩子extractLeaveGuards(deactivated),// 全局 beforeEach 钩子this.router.beforeHooks,// 在当前路由改变,但是该组件被复用时调用extractUpdateHooks(updated),// 需要渲染组件 enter 守卫钩子activated.map(m => m.beforeEnter),// 解析异步路由组件resolveAsyncComponents(activated)
)
第一步是先执行失活组件的钩子函数
function extractLeaveGuards(deactivated: Array<RouteRecord>): Array<?Function> {// 传入需要执行的钩子函数名return extractGuards(deactivated, 'beforeRouteLeave', bindGuard, true)
}
function extractGuards(records: Array<RouteRecord>,name: string,bind: Function,reverse?: boolean
): Array<?Function> {const guards = flatMapComponents(records, (def, instance, match, key) => {// 找出组件中对应的钩子函数const guard = extractGuard(def, name)if (guard) {// 给每个钩子函数添加上下文对象为组件自身return Array.isArray(guard)? guard.map(guard => bind(guard, instance, match, key)): bind(guard, instance, match, key)}})// 数组降维,并且判断是否需要翻转数组// 因为某些钩子函数需要从子执行到父return flatten(reverse ? guards.reverse() : guards)
}
export function flatMapComponents(matched: Array<RouteRecord>,fn: Function
): Array<?Function> {// 数组降维return flatten(matched.map(m => {// 将组件中的对象传入回调函数中,获得钩子函数数组return Object.keys(m.components).map(key =>fn(m.components[key], m.instances[key], m, key))}))
}
第二步执行全局 beforeEach 钩子函数
beforeEach(fn: Function): Function {return registerHook(this.beforeHooks, fn)
}
function registerHook(list: Array<any>, fn: Function): Function {list.push(fn)return () => {const i = list.indexOf(fn)if (i > -1) list.splice(i, 1)}
}
在 VueRouter 类中有以上代码,每当给 VueRouter 实例添加 beforeEach 函数时就会将函数 push 进 beforeHooks 中。
第三步执行 beforeRouteUpdate 钩子函数,调用方式和第一步相同,只是传入的函数名不同,在该函数中可以访问到 this 对象。
第四步执行 beforeEnter 钩子函数,该函数是路由独享的钩子函数。
第五步是解析异步组件。
export function resolveAsyncComponents(matched: Array<RouteRecord>): Function {return (to, from, next) => {let hasAsync = falselet pending = 0let error = null// 该函数作用之前已经介绍过了flatMapComponents(matched, (def, _, match, key) => {// 判断是否是异步组件if (typeof def === 'function' && def.cid === undefined) {hasAsync = truepending++// 成功回调// once 函数确保异步组件只加载一次const resolve = once(resolvedDef => {if (isESModule(resolvedDef)) {resolvedDef = resolvedDef.default}// 判断是否是构造函数// 不是的话通过 Vue 来生成组件构造函数def.resolved =typeof resolvedDef === 'function'? resolvedDef: _Vue.extend(resolvedDef)// 赋值组件// 如果组件全部解析完毕,继续下一步match.components[key] = resolvedDefpending--if (pending <= 0) {next()}})// 失败回调const reject = once(reason => {const msg = `Failed to resolve async component ${key}: ${reason}`process.env.NODE_ENV !== 'production' && warn(false, msg)if (!error) {error = isError(reason) ? reason : new Error(msg)next(error)}})let restry {// 执行异步组件函数res = def(resolve, reject)} catch (e) {reject(e)}if (res) {// 下载完成执行回调if (typeof res.then === 'function') {res.then(resolve, reject)} else {const comp = res.componentif (comp && typeof comp.then === 'function') {comp.then(resolve, reject)}}}}})// 不是异步组件直接下一步if (!hasAsync) next()}
}
以上就是第一个 runQueue 中的逻辑,第五步完成后会执行第一个 runQueue 中回调函数
// 该回调用于保存 `beforeRouteEnter` 钩子中的回调函数
const postEnterCbs = []
const isValid = () => this.current === route
// beforeRouteEnter 导航守卫钩子
const enterGuards = extractEnterGuards(activated, postEnterCbs, isValid)
// beforeResolve 导航守卫钩子
const queue = enterGuards.concat(this.router.resolveHooks)
runQueue(queue, iterator, () => {if (this.pending !== route) {return abort()}this.pending = null// 这里会执行 afterEach 导航守卫钩子onComplete(route)if (this.router.app) {this.router.app.$nextTick(() => {postEnterCbs.forEach(cb => {cb()})})}
})
第六步是执行 beforeRouteEnter 导航守卫钩子,beforeRouteEnter 钩子不能访问 this 对象,因为钩子在导航确认前被调用,需要渲染的组件还没被创建。但是该钩子函数是唯一一个支持在回调中获取 this 对象的函数,回调会在路由确认执行。
beforeRouteEnter (to, from, next) {next(vm => {// 通过 `vm` 访问组件实例})
}
下面来看看是如何支持在回调中拿到 this 对象的
function extractEnterGuards(activated: Array<RouteRecord>,cbs: Array<Function>,isValid: () => boolean
): Array<?Function> {// 这里和之前调用导航守卫基本一致return extractGuards(activated,'beforeRouteEnter',(guard, _, match, key) => {return bindEnterGuard(guard, match, key, cbs, isValid)})
}
function bindEnterGuard(guard: NavigationGuard,match: RouteRecord,key: string,cbs: Array<Function>,isValid: () => boolean
): NavigationGuard {return function routeEnterGuard(to, from, next) {return guard(to, from, cb => {// 判断 cb 是否是函数// 是的话就 push 进 postEnterCbsnext(cb)if (typeof cb === 'function') {cbs.push(() => {// 循环直到拿到组件实例poll(cb, match.instances, key, isValid)})}})}
}
// 该函数是为了解决 issus ##750
// 当 router-view 外面包裹了 mode 为 out-in 的 transition 组件
// 会在组件初次导航到时获得不到组件实例对象
function poll(cb: any, // somehow flow cannot infer this is a functioninstances: Object,key: string,isValid: () => boolean
) {if (instances[key] &&!instances[key]._isBeingDestroyed // do not reuse being destroyed instance) {cb(instances[key])} else if (isValid()) {// setTimeout 16ms 作用和 nextTick 基本相同setTimeout(() => {poll(cb, instances, key, isValid)}, 16)}
}
第七步是执行 beforeResolve 导航守卫钩子,如果注册了全局 beforeResolve 钩子就会在这里执行。
第八步就是导航确认,调用 afterEach 导航守卫钩子了。
以上都执行完成后,会触发组件的渲染
history.listen(route => {this.apps.forEach(app => {app._route = route})
})
以上回调会在 updateRoute 中调用
updateRoute(route: Route) {const prev = this.currentthis.current = routethis.cb && this.cb(route)this.router.afterHooks.forEach(hook => {hook && hook(route, prev)})
}
至此,路由跳转已经全部分析完毕。核心就是判断需要跳转的路由是否存在于记录中,然后执行各种导航守卫函数,最后完成 URL 的改变和组件的渲染。
相关文章:
VueRouter 源码解析
重要函数思维导图 路由注册 在开始之前,推荐大家 clone 一份源码对照着看。因为篇幅较长,函数间的跳转也很多。 使用路由之前,需要调用 Vue.use(VueRouter),这是因为让插件可以使用 Vue export function initUse(Vue: GlobalAP…...

云原生之Docker
docker 初识Docker什么是DockerDocker与虚拟机Docker相关术语及架构镜像和容器DockerHubDocker架构 Docker命令镜像操作命令容器操作命令数据卷命令 自定义镜像镜像结构Dockerfile DockerCompose安装常用命令 初识Docker 什么是Docker docker是一个快速交付应用,运…...

List简介
概念: 数据结构列表(List)是Java中的一种线性数据结构,用于存储有序的元素集合。它允许重复元素,并且每个元素都有一个对应的索引来访问和操作。列表可以动态增长或缩小,并且支持添加、删除和修改操作。 …...
:PPT文件操作方法汇总)
【ArcGIS Pro二次开发】(71):PPT文件操作方法汇总
以下操作都要用到【Microsoft.Office.Interop.PowerPoint】,确保安装并引用。 1、打开PPT文件 // 打开PPT Microsoft.Office.Interop.PowerPoint.Application pptApp new Microsoft.Office.Interop.PowerPoint.Application();Presentation ppt pptApp.Presentati…...
——法线空间采样)
CloudCompare 二次开发(18)——法线空间采样
目录 一、概述二、代码集成三、结果展示一、概述 使用CloudCompare与PCL的混合编程实现点云法线空间采样。法线空间采样的具体计算原理见:PCL 法线空间采样。 二、代码集成 1、mainwindow.h文件public中添加: void doActionNormalSpaceSample(); // 法线空间采样2、mainwi…...

RFCN目标检测算法
...
【学习草稿】bert文本分类
https://github.com/google-research/bert https://github.com/CyberZHG/keras-bert 在 BERT 中,每个单词的嵌入向量由三部分组成: Token 嵌入向量:该向量是 WordPiece 分词算法得到的子单词 ID 对应的嵌入向量。 Segment 嵌入向量&#x…...
【java】A卷+B卷)
华为OD 食堂供餐(100分)【java】A卷+B卷
华为OD统一考试A卷+B卷 新题库说明 你收到的链接上面会标注A卷还是B卷。目前大部分收到的都是B卷。 B卷对应20022部分考题以及新出的题目,A卷对应的是新出的题目。 我将持续更新最新题目 获取更多免费题目可前往夸克网盘下载,请点击以下链接进入: 我用夸克网盘分享了「华为O…...

Hadoop3教程(二十七):(生产调优篇)HDFS读写压测
文章目录 (146)HDFS压测环境准备(147)HDFS读写压测写压测读压测 参考文献 (146)HDFS压测环境准备 对开发人员来讲,压测这个技能很重要。 假设你刚搭建好一个集群,就可以直接投入生…...
【MyBatis进阶】mybatis-config.xml分析以及try-catch新用法
目录 尝试在mybatis项目中书写增删改查 遇见问题:使用mybaties向数据库中插入数据,idea显示插入成功,但是数据库中并没有数据变化? MyBatis核心配置文件剖析 细节剖析: try-catch新用法 截至目前我的项目存在的问题…...

机器学习终极指南:统计和统计建模03/3 — 第 -3 部分
系列上文:机器学习终极指南:特征工程(02/2) — 第 -2 部分 一、说明 在终极机器学习指南的第三部分中,我们将了解统计建模的基础知识以及如何在 Python 中实现它们,Python 是一种广泛用于数据分析和科学计…...

php获取农历日期节日
代码地址:php获取农历日期节日-遇见你与你分享 <?php $c new DayService(); $today$c->convertSolarToLunar(date(Y),date(m),date(d)); $time "农历".$today[1].$today[2]."日";class DayService {var $MIN_YEAR 1891;var $MAX_YEAR …...

主机重启后k8s kubelet无法自动启动问题解决梳理
1.问题描述 OS Version:CentOS Linux release 7.9.2009 (Core) K8S Version:Kubernetes v1.20.4 K8S安装配置完成后,重启服务器发现,kubelet没有正常启动(systemctl status kubelet) 命令: systemctl status kubelet [root@centos79-3 ~]# systemctl status kubelet ●…...
)
Hadoop面试题(2)
1.什么是数据倾斜?如何处理数据倾斜? 数据倾斜指的是在分布式计算中,数据在某些节点上不均匀地分布,导致某些节点的负载过重,影响整体计算性能。 处理数据倾斜的方法主要包括以下几种: 增加分区数量&…...
[ Windows-Nginx ]Windows服务器,Tomcat容器部署项目,整合Nginx
一、官网下载Nginx http://nginx.org/en/download.html 稳定版:windows的stable版本 注意:Nginx安装包不要放在中文目录下 二、conf目录下,修改nginx.conf文件 修改Nginx服务端口: 默认端口为80,即外界访问的入口…...
手搭手zabbix5.0监控redis7
Centos7安装配置Redis7 安装redis #安装gcc yum -y install gcc gcc-c #安装net-tools yum -y install net-tools #官网https://redis.io/ cd /opt/ wget http://download.redis.io/releases/redis-7.0.4.tar.gz 解压至/opt/目录下 tar -zxvf redis-7.0.4.tar.gz -C /opt/ #…...

学习笔记02-iview组件使用
学习笔记02-iview组件使用 文章目录 学习笔记02-iview组件使用一、iview 2-Tabs使用 一、iview 2-Tabs使用 官方地址:https://www.iviewui.com/view-ui-plus/component/navigation/tabs 点击tabs页面可以获取当前页面的name信息,并且可以点击后再获取当…...
【java】A卷+B卷)
华为OD 玩牌高手(100分)【java】A卷+B卷
华为OD统一考试A卷+B卷 新题库说明 你收到的链接上面会标注A卷还是B卷。目前大部分收到的都是B卷。 B卷对应20022部分考题以及新出的题目,A卷对应的是新出的题目。 我将持续更新最新题目 获取更多免费题目可前往夸克网盘下载,请点击以下链接进入: 我用夸克网盘分享了「华为O…...

什么是AJAX
AJAX(Asynchronous JavaScript and XML)是一种用于创建交互式、动态网页应用程序的Web开发技术。它允许网页在不刷新整个页面的情况下,与服务器进行异步通信,以获取或发送数据。以下是对AJAX的主要组成部分和概念的概述࿱…...
[云原生1.]Docker数据管理与Cgroups资源控制管理
文章目录 1. Docker的数据管理1.1 数据卷1.1.1 示例 1.2 数据卷容器 2. 容器互联3. Cgroups资源控制管理3.1 简介3.2 cgroups的主要功能3.3 cpu时间片的简单介绍3.4 对CPU使用的限制3.4.1 对CPU使用的限制(基于单个容器)3.4.2 对CPU使用的限制࿰…...

【深度架构解析】高并发 AI 视频管理平台:兼容 GB28181/RTSP,支持 X86/ARM+GPU/NPU 异构部署与源码交付
前言:安防碎片化时代的破局之道 在传统的安防集成项目中,架构师常面临三大痛点:硬件生态割裂(不同芯片厂商驱动不通)、协议黑盒化(GB28181接入复杂)、以及开发周期冗长。为了实现一个稳健的 AI…...
,仅限首批500名涉农开发者领取)
VSCode农业插件生态白皮书首发:覆盖23类农用设备协议(Modbus-RTU/ISOBUS/NMEA 0183),仅限首批500名涉农开发者领取
更多请点击: https://intelliparadigm.com 第一章:VSCode农业插件生态概览与白皮书解读 随着智慧农业与边缘计算在田间地头的深度落地,开发工具链正悄然向农业生产场景延伸。VSCode 作为轻量、可扩展的主流编辑器,已逐步构建起面…...

AI分子对接
一、蛋白互作的生物学意义蛋白质-蛋白质相互作用(Protein-Protein Interactions, PPIs)在生物体内具有极其重要的生物学意义,主要体现在以下几个方面:(1)细胞信号传导。细胞通过受体蛋白与信号分子结合&…...

Dify同时接入DeepSeek和Ollama:云端省钱+本地隐私,一个应用随便切
🌟🌌 欢迎来到知识与创意的殿堂 — 远见阁小民的世界!🚀 🌟🧭 在这里,我们一起探索技术的奥秘,一起在知识的海洋中遨游。 🌟🧭 在这里,每个错误都…...
差异化配置矩阵)
MCP 2026细粒度权限配置最后窗口期:Gartner认证工程师亲授——3类业务系统(SaaS/混合云/边缘IoT)差异化配置矩阵
更多请点击: https://intelliparadigm.com 第一章:MCP 2026细粒度权限控制配置全景认知 MCP 2026(Multi-Cloud Policy Engine v2026)引入了基于属性的动态权限模型(ABACRBAC Hybrid),支持资源级…...

UMSKT社区生态:从Rust重写到Python移植的完整技术演进路线
UMSKT社区生态:从Rust重写到Python移植的完整技术演进路线 【免费下载链接】UMSKT An open source toolkit designed to research Microsoft Pre-Vista licensing mechanisms 项目地址: https://gitcode.com/gh_mirrors/um/UMSKT UMSKT作为一款开源工具包&am…...
)
【收藏备用】2026年版 小白/程序员大模型转型全攻略(从入门到就业,零基础可冲)
2026年,大模型领域岗位需求较去年暴增280%,国产模型崛起、AI Agent落地、多模态普及,成为最具潜力的技术赛道✨。本文专为零基础小白、在职程序员打造,详细拆解进入大模型领域的完整转型路径,涵盖四大发展方向、基础能…...

3步解锁CrossOver游戏兼容性:Mac游戏优化完整方案
3步解锁CrossOver游戏兼容性:Mac游戏优化完整方案 【免费下载链接】CXPatcher A patcher to upgrade Crossover dependencies and improve compatibility 项目地址: https://gitcode.com/gh_mirrors/cx/CXPatcher 还在为Mac上运行Windows游戏时的卡顿和兼容性…...

别只盯着Arduino IDE!用PlatformIO配置Seeeduino XIAO开发环境,顺便搞定USB驱动
用PlatformIO解锁Seeeduino XIAO的进阶开发体验 当大多数开发者第一次接触Seeeduino XIAO时,Arduino IDE往往是默认选择。但如果你已经厌倦了手动管理库依赖、缺乏现代IDE功能的工作流,PlatformIO可能是你一直在寻找的解决方案。作为一个开源的跨平台嵌入…...

Unity UI粒子特效完整解决方案:高效实现专业级视觉效果
Unity UI粒子特效完整解决方案:高效实现专业级视觉效果 【免费下载链接】ParticleEffectForUGUI Render particle effect in UnityUI(uGUI). Maskable, sortable, and no extra Camera/RenderTexture/Canvas. 项目地址: https://gitcode.com/gh_mirrors/pa/Partic…...