【Release】Photoshop ICO file format plug-in 3.0
【Introduction】
The Photoshop ICO plug-in is a file format plug-in developed for Photoshop, which allows Photoshop to directly read and write ICO format files. Because Photoshop has powerful pixel bitmap editing functions, it has many users and a good user base, which makes it convenient, simple and fast to use Photoshop to create icons. And basically reduces the need for multiple software to work together. In other words, you can use Photoshop to complete most of the work. The remaining small tasks, such as merging icon files, are relatively simple tasks, and the corresponding software is easier to develop and provide.
After a period of intense development, after 13 years (version 2.0 was released in 2010) I can finally release the latest version (V3.0) of the ICO file format plug-in. I have made a lot of functional upgrades in this update. The most important new features include:
(1) A new X64 version is added, which is almost zero cost for development, but is a very important requirement for users. Because today's software and PCs have generally entered the x64 era.
(2) Added support for icons containing PNG format images. This format was introduced and supported by Windows Vista. PNG format images use zlib compression, which can greatly reduce the file size, but some older software may not support. When saving the icon, the user can choose whether to use PNG format to compress the 32 BPP image.
(3) Added support for reading and writing mouse cursor files (cursor), and supports setting hotspot.
(4) Provide stronger and more friendly UI support on the read and write options dialog box, especially when saving icons, users can preview automatically generated images of other sizes and qualities in real time. Users are free to select the images they want to include in the file. Especially when generating other low-quality icons based on 32 BPP, the alpha threshold parameter provided by the original V2.0 version cannot be visually previewed, making the setting of this parameter very blind. Now users can see generated image in real time by dragging the slider control.
(5) Use a better quality full-pixel interpolation image reduction algorithm written by myself. The resulting small image quality is better than the 4-pixel interpolation of version 2.0.
(6) The oct-tree algorithm is still used to generate indexed-color images. To generate a mono-bitmap of 1 BPP image, a relatively simple grayscale threshold method is used.
(7) Added UI multi-language support. The plug-in has built-in Chinese and English language resources. Click the national flag icon on the dialog box to switch the interface language. Users can also easily add third-party language support to plug-ins through language resource template files. Or if the user is dissatisfied with the built-in language, they can "override" the plug-in's built-in language resources by adding an XML file of language resources, because external language resource files have a higher priority than the plug-in's built-in language resources. Implementing multiple languages adds a lot of development effort. Although this function is of little significance to Chinese people, it is a feature that I value very much, so I tried my best to implement it.
(8) Added support for inserting BPP16 R5G6B5 format images. The V2.0 version of the plug-in already supports the reading or saving of BPP16 images. Although images in this format are very rare nowadays, and some image reading software may not support this format or can not handle it properly, images in this format still exist, mainly in order to reduce file size on special devices (such as older mobile phones) or historical periods. Therefore, the plug-in supports both BPP16 types of R5G5B5 (555) and R5G6B5 (565) inserted to the file. But it is available only when user chooses to insert a new image. When saving, the plug-in will not insert BPP16 images by default.
【Download link】 The following is the download link for the new version of ICO plug-in V3.0:
ICO V3.0.3
| version | release date | filename | md5 |
| 3.0.3 | 2023-10-19 | ICO.8BI | 0a518e2c36d7aae853d53c9de870578d |
| ICO64.8BI | fab002b0ab00144b6776ee022269f8d8 | ||
| PsPlugInSetup.exe | 8e6ca3ecd4bf11f711b9ba9c946fae3f |
Check files MD5 to make sure these files are keep intact since released from author.
The x86 (32-bit) version is the version I mainly debug, using Photoshop CS (8.0.1) for testing. The x64 version is simply tested with Photoshop CS4 (11.0, 64 bit).
【Function introduction】
(1) Extract the icon or cursor file from a PE (Portable Executable) file (EXE, DLL, OCX, etc).
This is a function that has been available since ICO 2.0, and it is also a distinguished feature: it can extract icon or cursor resources directly from PE files without resorting to third-party software, which makes it simple and easy to obtain and edit icons or cursors in other PE files.
Open a PE file containing icons and cursor files. Note that if the file has an EXE suffix, you need to change the file suffix to DLL before it can be opened. This is the same as the requirement in V2.0 (Because when opening a file with an EXE suffix directly , Photoshop will not call the file format plug-ins). For example, when opening "shell32.dll", a list of icon resources will pop up. If there are both icon and cursor resources, they are displayed in groups, where the first group is icons and the second group is cursors, as shown in the following figure:
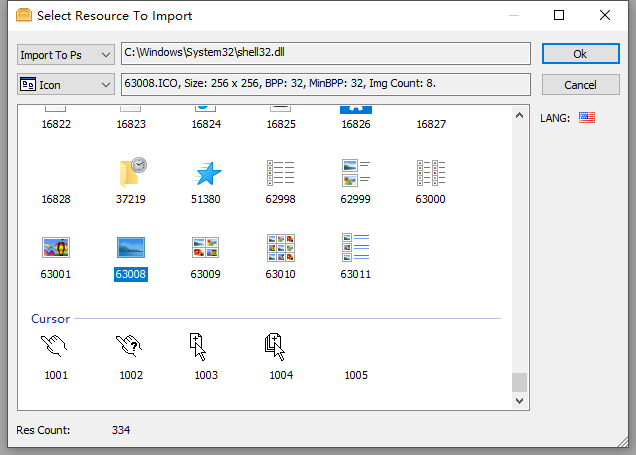
Users can select a resource and import it into PS for editing. However, since only one PS resource can be imported at a time, and each resource can only import one image, it will be different from the resources in the PE file when saving, or to say it will be saved in a lossy manner. In order to avoid this, you can also choose not to go through PS, but directly export the icon to the hard disk file as it is in PE (bypass photoshop). Users can select all icons and cursors in a PE file at one time, then select a destination folder and click "OK" to export all icons and cursors in the PE file as they are.
In newer Windows versions, some DLL icons and other immutable resources are separated into another file with the suffix ".mun" (essentially also a DLL file, but with a different suffix) and placed in "C:\Windows\SystemResources". It may be because these DLLs can have multiple versions for different languages, but resources such as these icons are unchanged. Therefore, in order to avoid having these resources form multiple copies with the DLL, these unchanged resources are removed from the original DLL. Strip it into another DLL for "sharing". Therefore, the ICO plug-in has added support for opening files with the "mun" suffix.
(2) When the user open a ICON or CURSOR file, if it contains multiple images, an image selection dialog box will pop up, asking the user to select the image to be read:
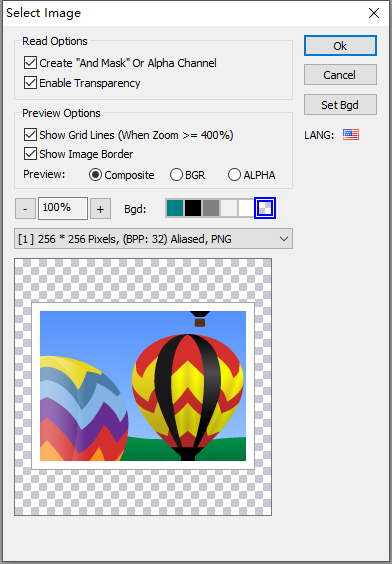
Here, the user can select an image, zoom in and out of the image, set the background of the icon, and view the effect of combining the icon with different background colors. Pixel grid lines can also be displayed (pixel grid lines are only displayed for zoom percents >= 400%). By default, the plugin will select the best quality image among the images first. If the icon has only one image, this dialog box will not be displayed and the only image will be opened directly into the Photoshop document. After opening the icon, if the image has AND MASK (non-PNG image), the AND MASK is added to a new channel in Photoshop. Previously in V2.0, this channel was consistent with the data in the icon, but it would be different from the user's intuition (white in AND MASK represents transparent pixels, black represents opaque pixels), so in order to be more close to user intuition, in V3.0, I inverted this channel. Now the Alpha channel corresponding to the selection will be a subset of the selection generated from AND MASK channel.
The user can chooses to preview the composite effect and Alpha channel information. When the mouse moves in the image, the bottom of the dialog box will display the mouse position in image coordinates and pixel's BGRA information.
In this dialog box, the shortcut keys [CTRL] [+] and [CTRL] [-] are supported to zoom the image, and [CTRL] ['] is supported to switch the display pixel grid state. Users familiar with Photoshop can know these shortcut keys are the same as those of Photoshop.
(3) When the user opens a cursor (CURSOR) file, this dialog box will also add an option: "Highlight Hotspot". When turned on, the cursor hotspot will use a red cross to indicate its location, as shown in the figure below :
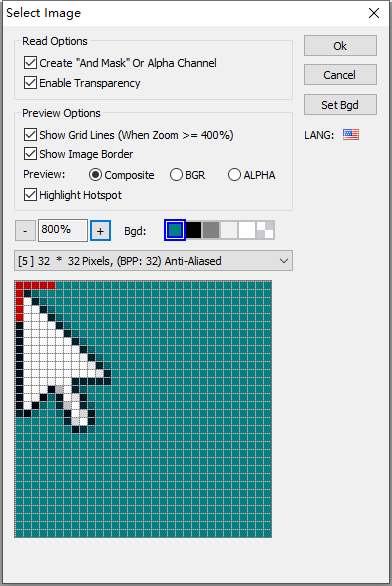
When the cursor file is opened, the hotspot will be added to the Photoshop document as an independent channel, and the user can view the hotspot position of the cursor through the channel.
(4) When saving the icon, the save options dialog box will pop up:
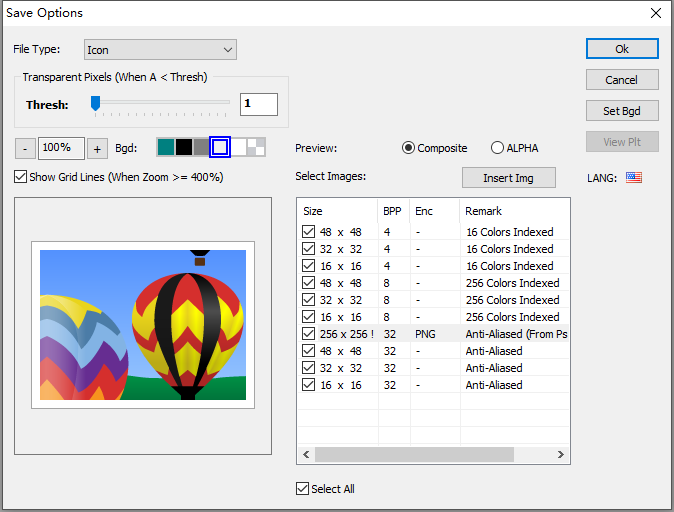
This dialog box is one of the extremely important functional enhancements of version 3.0 plug-in compared to V2.0. First, the dialog box has been inserted with other recommended images of size and quality. Users can check the images they need and preview each generated image. If these images do not meet user needs, you can also click the "Insert Image" button to insert images of other sizes and qualities (including 16BPP: R5G5B5 or R5G6B5). The most important thing here is that when generating other BPP images from a 32 BPP image, it is equivalent to generating an aliased image from an anti-aliased image. A very important parameter here is the parameter that distinguishes transparent pixels from opaque pixels: "Alpha threshold". In a 32 BPP image, each pixel has an alpha information (between 0 - 255) that controls alpha compositing with the background. 0 represents fully transparent, 255 represents fully opaque, and values in between are composites of translucencies. When downgrading to a BPP less than 32, these pixels with an alpha value between 0 and 255 must choose to either become transparent or opaque. This is the role of the alpha threshold parameter. The logic of the plug-in is to ask the user to set an alpha threshold:
If the pixel's ALPHA value < AlphaThreshold, then the pixel becomes a transparent pixel, otherwise the pixel is opaque.
The schematic code is as follows:
// The following code takes the generated target image as 24 BPP as an example.
if (pSrc[ 3 ] < AlphaThresh) {// When Alpha < AlphaThresh, make the pixel transparent. pAND[col / 8 ] |= ( 1 << ( 7 - (col & 7 )));pXOR[ 0 ] = 0 ; // explicit make XOR black. (won't change bkgnd); pXOR[ 1 ] = 0 ;pXOR[ 2 ] = 0 ;
} else  {// When Alpha >= AlphaThresh, make the pixel opaque. pXOR[ 0 ] = pSrc[ 0 ];pXOR[ 1 ] = pSrc[ 1 ];pXOR[ 2 ] = pSrc[ 2 ];
}
So if AlphaThreshold = 0, the image will be completely opaque. If AlphaThreshold = 256, the image will be completely transparent.
The alpha threshold slider is provided on the dialog box. Users can drag the slider to see the impact of changes in this parameter on the generated image results in real time. Many 32 BPP images may have a fading shadow, so its most important role is to control the size of the black edge of this shadow in the jagged image. We can see the impact of the alpha threshold parameter on the generated image from the following figure:
We can see that when AlphaThresh = 1 (default value), the generated image retains the most pixels of the original image, which makes the shadow larger. As AlphaThresh is increased, the shadow portion of the image will gradually shrink. When dragging the adjustment slider, the user will be able to see the effect of the generated image in real time, so the quality of the generated image can be better adjusted. In the v2.0 version of the plug-in, this parameter cannot be previewed in real time, so it can only be set based on feeling, making the generated image effect difficult to control.
(5) When saving as a cursor, the user can set the cursor's hotspot:
The user can select the file type to save to. When the "Cursor" type is selected, the dialog box will display a button for "Hotspot" settings. Click the Set Hotspot button to set the hotspot by pressing the mouse on the image (this operation Same as in Visual Studio), or directly enter the corresponding value in the text box. But I don't provide the option to highlight hotspots here, because it's not that important.
(6) The concept of main image.
When saving, there is one image among all images that comes directly from the Photoshop document. This image is called the main image, or source image. All other images are based on the data of this main image and then generated. from. Therefore, the main image plays a very important role. It is in the listview list, and an exclamation mark is added after the size. The remarks also specifically indicate "from PS document" to indicate that this is the main image. The main function of the main image is that the alpha threshold and hot spot settings of the main image will be automatically propagated to other "sub-images" (where the hot spot is set in equal proportions in other images). Therefore, when the main image is selected, the controls corresponding to alpha threshold and hotspot will be displayed in bold font, which means that the settings at this time will be automatically propagated to all other images. When a non-main image is selected, these settings will only be effective for the currently selected image, and other images will not be affected. In other words, the main image acts as a general control over the parameters of other images, and each image can have its own individual settings.
(7) For images without transparency information, a button to set the transparent color will be displayed when saving. The difference here with the V2.0 version is that I have simplified the transparent settings here, because the options for setting transparent colors here in the V2.0 version are a bit fancy, but they are not necessary because this requirement is not meet often, so in the V3.0 version, I simplified this function to only provide the function of setting a transparent color, I think that is simple but enough and easy to understood by user. The user sets a transparent color to make the image partially transparent, because some resources used in development are bitmaps with a transparent color, so they can be easily converted into icons.
(8) For each 32 BPP image, the user can choose whether to use PNG encoding. The recommendation here is to use PNG encoding for images exceeding 48 pixels in size to make the image size smaller. However, some image software may not support PNG-encoded images, so users need to consider this. To modify the image encoding settings, just double-click the encoding column of the corresponding image, and a combobox will pop up. The user can switch the encoding. If PNG encoding is not selected, the plug-in uses the uncompressed BI_RGB (Windows bitmap format) method for encoding.
It should be noted that only 32 BPP images can be modified for encoding. Non-32 BPP images can only be stored in BMP. This is because if you use PNG encoding for BPP1 - BPP 24 images (although they can be saved in PNG encoding), the transparent information carried in the icon AND MASK will be lost. Therefore, other BPPs (smaller then 32 and has no alpha channel) do not support compressed with PNG format.
(9) Comparison of the results of the full-pixel interpolation reduction algorithm used by ICO 3.0 and the color-on-color (delete pixels) or four-pixel interpolation algorithm used by ICO 2.0, as shown in the figure below:
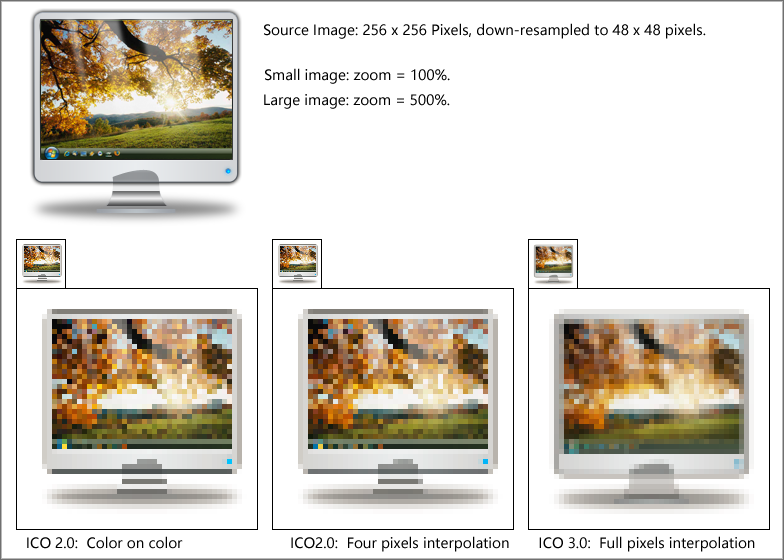
The algorithm here is to reduce a 256 x 256 32 BPP image to a 48 x 48 pixel 32 BPP small image. The comparison effect here may not be very obvious in distinguishing "good from bad", but it can explain some problems. That is, whether the ICO 2.0 algorithm uses pixel deletion (COLOR ON COLOR) or four-pixel interpolation, it loses a large amount of color information of intermediate pixels, resulting in a "sharpened" sense. If a specific image If it is not coincident with a certain scaling ratio, important color information will be lost, making the results unsatisfactory. Since ICO 3.0 participates in interpolation of all pixels of the original image, the result will still appear smooth, the visual effect will be more natural, and the subjective feeling will be closer to the original image.
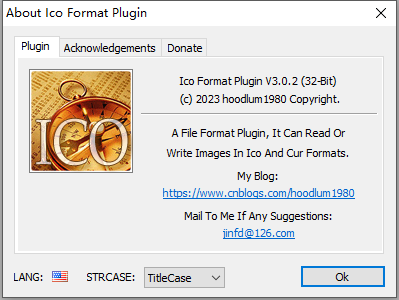
(10) When the ICO plugin is using English (flag = "us") language, it can set the language's strcase, it has 4 options: None, LowerCase, UpperCase, TitleCase. "None" means use terms as it is in the language resource, "TitleCase" means capitalized the first Alphabet Character of a word. To change this setting, you can only by means of opening ICO plugin's About Dialogbox, It will display a combobox at the bottom of about dialogbox, you can change this setting. Note: this setting is only available to the lanuage that its flag attributes is "us", other lanuages does not have this option and not affected.
【FAQ】
(1) When saving, why does the ICO format not appear in the file type?
Answer: Because the maximum size of ICO and CURSOR files is 256 x 256 pixels. Therefore, if any of the height and width of the Photoshop document exceeds 256 pixels, the ICO file format will be automatically hidden by Photoshop when saving. This is because the maximum size of the document is specified in the PIPL attribute of the plug-in to be 256 X 256 pixels. . Therefore, if you want to save it in ICO format, please first scale the image size of the Photoshop document to less than 256 x 256 pixels. Then you can choose ICO format when saving.
(2) When saving as ICO, how to change the image encoding to PNG encoding, or disable the use of PNG encoding?
Answer: Only images with BPP = 32 support saving in PNG encoding. For 32 BPP images, double-click the "Encoding" column of the ListView in the lower right corner of the save options dialog box with the mouse, select the encoding in the pop-up combo box, "-" means not to use PNG encoding, and then click the mouse elsewhere to make the combo box disappear. Entering focus completes the settings for encoding the image. Encoding settings can be set for each 32 BPP image. Note that some older software may not support decoding ICO files containing PNG-encoded images.
(3) Can I directly edit the color and Alpha value of a certain pixel of an image on the save options dialog box, or select a file as the inserted image?
Answer: The current version (ICO V3.0.2) is not supported yet. In the future, similar functions may be introduced if the requirements are evaluated and the implementation is reasonable.
(4) How to add new language support to the plug-in?
Answer: Edit "ICO_LANG_TEMPL.xml" in the compressed package, translate the Text of the elements in the file to the corresponding language, then rename the file to "ICO.LANG.<your-language>.xml', and copy it to the plug-in The directory where it is installed. If the file content can be loaded correctly, click the flag icon on the dialog box and you will see that the corresponding menu item is added, then you can switch to this language. The language ID is also id of corrisponding national flag. The ID can be obtained by checking files such as FLAGS_00_3F.png in the compressed package. The plug-in has built-in flag icons for more than 200 countries or regions. The LangID defines mainly depends on ISO_3166-1_alpha-2, you can also refer to iso-3166-country-codes. With few exceptions that are 3 or 4 chars, so when you set LangID in xml, you must obey the LangID defines list in the png images (while its string case is not sensitive, for eg: you can use either "us" or "US"). Here is some language IDs maybe commonly used for localization:
| LangID | Country or Region |
| cn | China |
| gb | United Kingdom of Great Britain and Northern Ireland |
| hk | Hong Kong |
| jp | Japan |
| kr | Korea, Republic of |
| tw | TaiWan, Province of China |
| us | United States of America |
Notice that I did not consider right-to-left writing languages, because I am not familar with these kind of lanuages, and I do not know what the effect is if use them.
(5) How to install plug-ins manually?
Answer: Take x86 as an example, x64 is similar: copy the ICO.8BI (32-bit version) file to Photoshop's file format plug-in directory (for example, C:\Program Files\Adobe\Photoshop CS\Plug-in\File Format) folder, restart Photoshop. If there is the following menu in the PS menu: Help-About Plug-in-ICO..., it means that the plug-in is installed successfully.
(6) How to uninstall the ICO plug-in:
Answer: Delete ICO.8BI or ICO64.8BI from the plug-in installation directory. Then open the Registry Editor and delete the following registry keys (if they exist), which are used to store user-selected interface language information:
"HKEY_USERS\<your user id class>\SOFTWARE\Classes\VirtualStore\MACHINE\SOFTWARE \Wow6432Node\Adobe\Photoshop\hoodlum1980\ICO"
"HKEY_USERS\<your user id class>\SOFTWARE\Classes\VirtualStore\MACHINE\SOFTWARE\Adobe\Photoshop\hoodlum1980\ICO" "
"HKEY_LOCAL_MACHINE\SOFTWARE\Wow6432Node\Adobe\Photoshop\ hoodlum1980\ICO"
"HKEY_LOCAL_MACHINE\SOFTWARE\Adobe\Photoshop\hoodlum1980\ICO"
(7) Does the ICO plugin support save from a MonoBitmap mode in Photoshop?
Answer: No. I had concided this issue for a while, and finally I decide not to support monobitmap mode in Photoshop. Because I test this mode and I find monobitmap mode does not support transparency, If you save a monobitmap image as a icon (or cursor), you will got a totally opaque icon, while for a icon (or cursor), transparency is essential, So I decided to not support monobitmap mode in Photoshop.
(8)Does the ICO plugin support generate a thumbnail image when browsing files?
Answer: Currenly no (at version 3.0.3). The first reason is I think all ICO files can be previewed by system, so this feature is not quite necessary. But for a PE file, only when you choose to open it then you can know if it contains icon or cursor resources. So I think this feature is useful when you select a PE file in "open file" dialog, to feedback user if the PE file contains icons or cursors, so maybe I will add this feature in future version.
【Reference】
(1) A Simple Method for Color Quantization: Octree Quantization. (This Octree algorithm is used for generating 4BPP or 8BPP indexed images)
(2) famfamfam flag icons (by mjames@gmail.com).
【Version history】
(1) V3.0.3: Select image dialog box: Remove the "Show image border" checkbox, because this option is of little significance. Added [Ctrl]-['] shortcut key to switch the display pixel grid state. 2023-10-19.
相关文章:
【Release】Photoshop ICO file format plug-in 3.0
【Introduction】 The Photoshop ICO plug-in is a file format plug-in developed for Photoshop, which allows Photoshop to directly read and write ICO format files. Because Photoshop has powerful pixel bitmap editing functions, it has many users and a good us…...

List.of() Vs Arrays.asList()
java中list.of和Arrays.asList方法有什么区别? 简介 Java 提供了几种用于创建列表的方便方法,包括 List.of 和 Arrays.aslist。尽管这两种方法都可以很简单的创建集合对象,但它们实际上是有一些显著差异的。本文将介绍 Java 中的 List.of()…...

机器学习-计算数据之间的距离
目录 欧氏距离 欧氏距离应用场景: 聚类分析:在聚类算法中(K-means)中,可以使用欧式距离来衡量数据点之间的相似性或距离,以便于将他们划分到不用的簇中。特征匹配:在计算机视觉和图像处理中,可以使用欧氏…...
Uniapp软件库源码 全新带勋章功能(包含前后端源码)
Uniapp软件库全新带勋章功能,搭建好后台 在前端找到 util 这个文件 把两个js文件上面的填上自己的域名, 电脑需要下载:HBuilderX 登录账号 没有账号就注册账号,然后上传文件,打包选择 “发行” 可以打包app h5等等。…...

陪诊小程序|陪诊小程序关爱健康,无忧陪伴
随着社会发展和人们生活水平的提高,健康问题成为人们关注的焦点。然而,在就医过程中,许多患者常常感到孤独和无助,缺乏得到家人陪伴的温暖与安慰。为了解决这一问题,我们公司开发了一款创新的陪诊小程序软件࿰…...
uni-app小程序使用DCloud(插件市场)流程
一、DCloud(插件市场) DCloud 是uni-app官方插件市场,里面有官方、团队、个人发布的众多插件,包括uni-ui、uni-pay 等。而像uni-ui这种大型组件库都有官方文档可参考,但一些团队或个人发布的小型插件没有文档…...
非平稳信号分析和处理、STFT的瞬时频率研究(Matlab代码实现)
💥💥💞💞欢迎来到本博客❤️❤️💥💥 🏆博主优势:🌞🌞🌞博客内容尽量做到思维缜密,逻辑清晰,为了方便读者。 ⛳️座右铭&a…...

SIPp使用经验
xml文件,建议<?xml version"1.0" encoding"UTF-8" ?>,不建议ISO-8859-1命令行传key参数 sipp -key contact_port 9999 ...<send retrans"500"><![CDATA[REGISTER sip:[field1]:[remote_port] SIP/2.0Vi…...
ChessGPT:免费好用的国际象棋对弈AI机器人
对于国际象棋初学者,需要找一个对手来练棋。ChessGPT,就是一个免费好用的AI对弈机器人,非常适合新手来提升,是一个很好的练习伙伴。网站地址是:https://www.chess.com/play/computer,也有手机版app…...
【java】A卷+B卷)
华为OD 区间交集(200分)【java】A卷+B卷
华为OD统一考试A卷+B卷 新题库说明 你收到的链接上面会标注A卷还是B卷。目前大部分收到的都是B卷。 B卷对应20022部分考题以及新出的题目,A卷对应的是新出的题目。 我将持续更新最新题目 获取更多免费题目可前往夸克网盘下载,请点击以下链接进入: 我用夸克网盘分享了「华为O…...
Python算法:八大排序算法以及速度比较
⭐️⭐️⭐️⭐️⭐️欢迎来到我的博客⭐️⭐️⭐️⭐️⭐️ 🐴作者:秋无之地 🐴简介:CSDN爬虫、后端、大数据领域创作者。目前从事python爬虫、后端和大数据等相关工作,主要擅长领域有:爬虫、后端、大数据…...

半导体用超高纯管材行业头部企业市场占有率及排名调研报告
内容摘要 本文调研和分析全球半导体用超高纯管材发展现状及未来趋势,核心内容如下: (1)全球市场总体规模,分别按销量和按收入进行了统计分析,历史数据2018-2022年,预测数据2023至2029年。 &…...

Qt中的线程同步:确保多线程程序的安全性
在现代计算机编程中,多线程编程已经变得非常常见,因为它可以提高程序的性能和响应能力。然而,多线程编程也引入了许多挑战,其中一个主要挑战是线程同步。线程同步是确保多个线程协同工作时数据的安全性和一致性的关键问题。Qt作为一种流行的C++框架,提供了丰富的工具和类来…...
ESRI ArcGIS Desktop 10.8.2图文安装教程及下载
ArcGIS 是由美国著名的地理信息系统公司 Esri 开发的一款地理信息系统软件,它是目前全球最流行的 GIS 软件之一。ArcGIS 提供了图形化用户界面和数据分析工具,可以帮助用户管理、分析和可视化各种空间数据。ArcGIS Desktop是一个完整的桌面GIS软件套件&a…...

笔记本电脑Windows10安装
0 前提 安装windows10的电脑为老版联想笔记本电脑,内部没有硬盘,临时加装了1T的硬盘。 1u盘准备 准备u盘,大小大于16G。u盘作为系统盘时,需要将内部的其他文件备份,然后格式化。u盘格式化后,插入一款可以…...
跨域方案的抉择
前言 遇到跨域问题的时候,到底是使用CORS来解决,还是使用代理呢? 判断依据不是技术层面,而是你的生产环境。 首先要关注的是生产环境里面到底是一种什么样的情况,到底有没有跨域,然后根据生产环境的情况&a…...

接口测试(jmeter和postman 接口使用)
接口测试基础知识 接口测试主要用于检测外部系统与系统之间以及内部各个子系统之间的交互点。把前端(client)和后端(server)联系起来,测试的重点是要检查数据的交换,传递和控制管理过程,以及系…...
doc与docx文档转html,格式样式不变(包含图片转换)
最近做一个富文本的需求,要求把文档内容转换到富文本内,文档中的格式也好,样式也好,图片啥的都要一致展示;踩了不少坑,据说word文档其实是一个压缩包,我不是特别清楚但是也能理解,自…...
CSS页面基本布局
前提回顾 1. 超文本标记语言(HTML)是一种标记语言,用来结构化我们的网页内容并赋予内容含义; (超文本标记语言(英语:HyperText Markup Language /ˈhaɪpətekst ˈmɑːkʌp ˈlŋɡwɪdʒ /…...
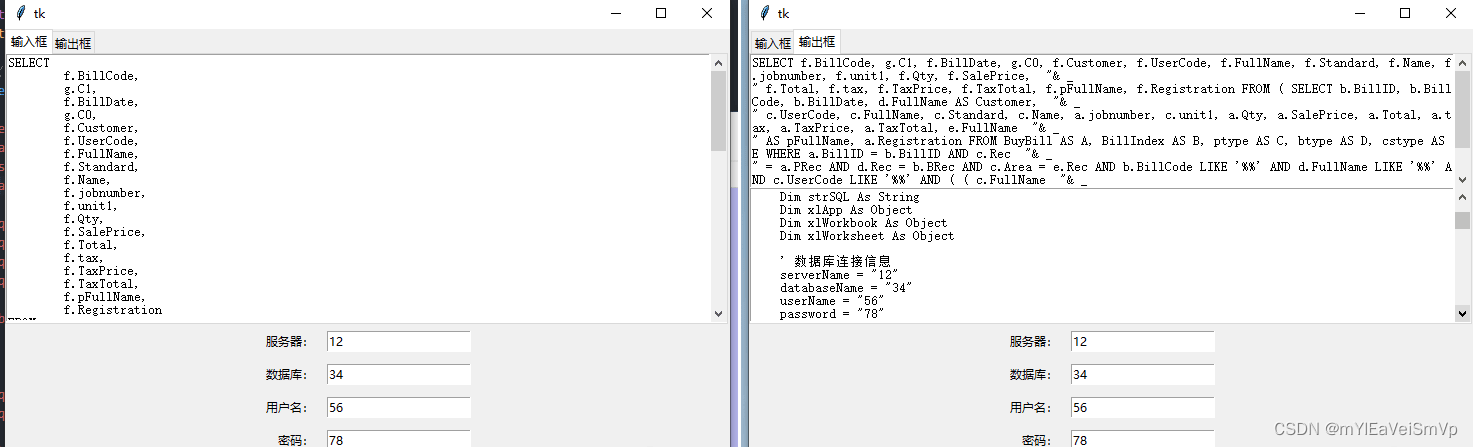
SQL查询命令互转vba格式
最近搞个Excel的vba查询数据库,发现vba有代码行长度限制需要转换下就弄了这个,布局和功能暂且这样了,哪位大佬如果有兴趣的可以再美化下! 这次更新了SQL命令互转VBA格式, SQL原始格式要分行的不能一坨贴进去࿰…...
)
还在用JDK 8?手把手带你把若依3.8.3项目迁移到JDK 17 + SpringBoot 3.1.2(含Maven POM完整配置清单)
从JDK 8到JDK 17:若依3.8.3项目现代化迁移实战指南 当Java生态已全面拥抱模块化与云原生时代,仍停留在JDK 8的技术栈就像用蒸汽机车参加F1比赛。本文将带你完成若依3.8.3项目从JDK 8 SpringBoot 2.5到JDK 17 SpringBoot 3.1的技术跃迁,这份…...

朋友家信号差,我用手机和Python脚本‘借’了个网:记一次小米路由器4A千兆版的WIFI渗透与提权实战
从访客到管理员:一次小米路由器4A千兆版的趣味网络探索 朋友新搬了家,邀请我去做客。刚进门就发现手机信号只有可怜的一格,刷个朋友圈都要转半天。朋友不好意思地笑笑:"这小区信号一直不好,要不你连我家WiFi吧&am…...

PyTorch光流实战:从双向光流、遮挡掩码到一致性检查的完整流程解析
1. 光流基础与PyTorch环境搭建 光流估计是计算机视觉中的经典问题,简单来说就是计算视频中相邻两帧之间每个像素的运动矢量。想象一下你在看一群蚂蚁搬家,光流就是用来量化每只蚂蚁从上一帧到当前帧移动了多少距离和方向的技术。在PyTorch中实现光流处理…...
)
别再只用XGBoost了!用PyTorch-Forecasting的TFT模型搞定销量预测(附完整代码避坑指南)
从XGBoost到TFT:销量预测的深度学习实战转型指南 当我们在电商大促前夜反复调整库存参数时,当零售门店经理对着忽高忽低的销售曲线皱眉时,一个精准的销量预测模型可能就是解开困局的金钥匙。过去五年间,XGBoost和LightGBM凭借其出…...

Windows 10下微信CCD检测机制全解析:从OllyDbg调试到封号风险规避
Windows平台微信CCD检测机制深度剖析与合规研究指南 在Windows生态中进行即时通讯软件的安全研究时,开发者常会遇到客户端环境检测机制的挑战。微信作为主流通讯工具,其Windows客户端实现的CCD(Client Configuration Data)上报机制…...

浪潮NF5280M6服务器上ESXi 6.7双网卡聚合实战:从交换机LACP到vSphere IP哈希配置全流程
浪潮NF5280M6服务器ESXi 6.7双网卡聚合实战:从交换机到虚拟化的全链路配置 在企业虚拟化环境中,网络带宽和冗余始终是核心诉求。当我们在浪潮NF5280M6服务器上部署ESXi 6.7时,如何充分发挥双网卡性能成为关键。本文将深入解析从华为交换机LAC…...

SystemVerilog接口实战:从模块化连接到验证效率提升
1. SystemVerilog接口:模块化设计的革命 第一次看到SystemVerilog接口时,我正被一个大型SoC项目折磨得焦头烂额。当时项目中两个主要模块之间有近200根连线,每次修改信号都要在十几个文件中同步更新,稍有不慎就会导致仿真失败。直…...
终极Android ViewPager动画指南:PageTransformerHelp完整安装与配置教程
终极Android ViewPager动画指南:PageTransformerHelp完整安装与配置教程 【免费下载链接】PageTransformerHelp :1: A PageTransformer library for Android ViewPager,have some Banner styles. ViewPager 实现轮播图、实现卡片切换。 项目地址: https://gitcode…...

H8SX单片机USB大容量存储设备开发实战指南
1. H8SX单片机USB大容量存储设备开发概述在嵌入式系统开发中,实现USB大容量存储设备(Mass Storage Class,简称MSC)功能是一项常见需求。H8SX系列单片机作为瑞萨电子推出的高性能微控制器,其内置的USB模块为开发者提供了…...

开源情绪感知虚拟岛屿:脑机接口与生理信号交互实践
1. 项目概述:一个开源的情绪感知与交互虚拟岛屿最近在GitHub上闲逛,发现了一个挺有意思的项目,叫“open-vibe-island”。光看名字,你可能会觉得这是个游戏或者某种虚拟社交空间。但点进去深入研究后,我发现它的内核远比…...