SpringSecurity+ Oauth2.0+JWT 0-1
这里写目录标题
- 准备工作
- 准备SQL
- 添加用户
- 添加依赖
- 准备UserInfo
- UserMapper
- UserService
- UserServiceImpl
- 配置SpringDataUserDetailsService
- 授权服务器:AuthorizationServer
- 配置客户端详细信息
- 管理令牌
- 定义TokenConfig
- 定义AuthorizationServerTokenServices
- 令牌访问端点配置
- 在AuthorizationServer配置令牌访问端点
- 令牌端点的安全约束
- web安全配置
- 授权码模式
- 获取授权码
- 简化模式(直接获取token)
- 密码模式获取token
- 客户端模式
- 搭建资源服务器
- 添加依赖
- 资源服务器配置
- ResouceServerConfig
- 添加安全访问控制
- 编写资源
- JWT令牌
- 在授权服务器中更改原来TokenConfig
- 定义JWT令牌服务
- 校验jwt令牌
- 完善环境配置
- 创建表
- 配置授权服务
- 首先使用密码模式获取token
- 使用授权码模式获取token
- 上面是授权服务器和认证服务器分开的.现在准备整合在一起
- 到此结束
准备工作
准备SQL
CREATE TABLE `user` (`id` int NOT NULL AUTO_INCREMENT,`username` varchar(255) CHARACTER SET utf8mb4 COLLATE utf8mb4_0900_ai_ci DEFAULT NULL,`password` varchar(255) DEFAULT NULL,`salt` varchar(255) DEFAULT NULL,PRIMARY KEY (`id`)
) ENGINE=InnoDB AUTO_INCREMENT=16 DEFAULT CHARSET=utf8mb4 COLLATE=utf8mb4_0900_ai_ci;
添加用户
INSERT INTO `security_oauth_demo`.`user`(`id``username`,`password`, `salt`)VALUES
(1, 'admin''$2a$10$WuZUcd3Uc1IQ8uNTuIPrvuoToxiZ/CNtfgQL/M/vFQu63pYYQExZK', '1');
添加依赖
<modelVersion>4.0.0</modelVersion><parent><groupId>org.springframework.boot</groupId><artifactId>spring-boot-starter-parent</artifactId><version>2.1.3.RELEASE</version><relativePath/> <!-- lookup parent from repository --></parent><properties><java.version>1.8</java.version><druid.version>1.1.14</druid.version><fastjson.version>1.2.68</fastjson.version><security.oauth2.version>2.3.5.RELEASE</security.oauth2.version></properties><dependencies><!-- SpringBoot 核心包 --><dependency><groupId>org.springframework.boot</groupId><artifactId>spring-boot-starter</artifactId></dependency><!-- SpringBoot 测试 --><dependency><groupId>org.springframework.boot</groupId><artifactId>spring-boot-starter-test</artifactId><scope>test</scope></dependency><!-- SpringBoot Web容器 --><dependency><groupId>org.springframework.boot</groupId><artifactId>spring-boot-starter-web</artifactId></dependency><!-- spring-boot-devtools --><dependency><groupId>org.springframework.boot</groupId><artifactId>spring-boot-devtools</artifactId><optional>true</optional> <!-- 表示依赖不会传递 --></dependency><!-- spring security 安全认证 --><dependency><groupId>org.springframework.boot</groupId><artifactId>spring-boot-starter-security</artifactId></dependency><!--若依使用的 spring security oauth2 开放授权 --><dependency><groupId>org.springframework.security.oauth</groupId><artifactId>spring-security-oauth2</artifactId><version>${security.oauth2.version}</version></dependency><!-- Mysql驱动包 --><dependency><groupId>mysql</groupId><artifactId>mysql-connector-java</artifactId><scope>runtime</scope></dependency><!-- SpringBoot集成mybatis框架 --><!--mybatis-plus--><dependency><groupId>com.baomidou</groupId><artifactId>mybatis-plus-boot-starter</artifactId><version>3.3.1</version></dependency><!--阿里数据库连接池 --><dependency><groupId>com.alibaba</groupId><artifactId>druid-spring-boot-starter</artifactId><version>${druid.version}</version></dependency><!--常用工具类 --><dependency><groupId>org.apache.commons</groupId><artifactId>commons-lang3</artifactId></dependency><!-- 阿里JSON解析器 --><dependency><groupId>com.alibaba</groupId><artifactId>fastjson</artifactId><version>${fastjson.version}</version></dependency><!--Spring框架基本的核心工具--><dependency><groupId>org.springframework</groupId><artifactId>spring-context-support</artifactId></dependency><!-- jwt--><dependency><groupId>org.springframework.security</groupId><artifactId>spring-security-jwt</artifactId><version>1.1.0.RELEASE</version></dependency><dependency><groupId>org.projectlombok</groupId><artifactId>lombok</artifactId><version>1.18.26</version></dependency></dependencies><build><plugins><plugin><groupId>org.springframework.boot</groupId><artifactId>spring-boot-maven-plugin</artifactId></plugin></plugins></build>
准备UserInfo
import com.baomidou.mybatisplus.annotation.IdType;
import com.baomidou.mybatisplus.annotation.TableId;
import com.baomidou.mybatisplus.annotation.TableName;
import lombok.Data;import java.io.Serializable;@Data
@TableName("user")
public class UserInfo implements Serializable {private static final long serialVersionUID = 1L;@TableId(value = "id",type = IdType.AUTO)private Integer id;private String username;private String password;private String salt;}
UserMapper
import com.baomidou.mybatisplus.core.mapper.BaseMapper;
import com.yc.entity.UserInfo;
import org.apache.ibatis.annotations.Mapper;@Mapper
public interface UserMapper extends BaseMapper<UserInfo> {
}
UserService
import com.baomidou.mybatisplus.extension.service.IService;
import com.yc.entity.UserInfo;
public interface UserService extends IService<UserInfo> {String login(UserInfo user);String add(UserInfo user);String findOne(UserInfo user);String update(UserInfo user);}
UserServiceImpl
import com.alibaba.fastjson.JSONObject;
import com.baomidou.mybatisplus.core.conditions.query.QueryWrapper;
import com.baomidou.mybatisplus.extension.service.impl.ServiceImpl;
import com.yc.entity.UserInfo;
import com.yc.mapper.UserMapper;import org.springframework.beans.factory.annotation.Autowired;
import org.springframework.stereotype.Service;@Service
public class UserServiceImpl   extends ServiceImpl<UserMapper, UserInfo>      implements  UserService {@AutowiredUserMapper userMapper;/*** 模拟登录* @param user* @return*/@Overridepublic String login(UserInfo user) {UserInfo sysUser = userMapper.selectOne(new QueryWrapper<UserInfo>().lambda().eq(UserInfo::getUsername, user.getUsername()));JSONObject jsonObject = new JSONObject();jsonObject.put("code", "200");jsonObject.put("msg", "登录成功");return jsonObject.toString();}@Overridepublic String add(UserInfo user) {int insert = userMapper.insert(user);return insert +"";}@Overridepublic String findOne(UserInfo user) {UserInfo sysUser = userMapper.selectOne(new QueryWrapper<UserInfo>().lambda().eq(UserInfo::getUsername, user.getUsername()));return sysUser.getUsername();}@Overridepublic String update(UserInfo user) {QueryWrapper<UserInfo> wrapper = new QueryWrapper<>();wrapper.eq("id", user.getId());int update = userMapper.update(user, wrapper);return "成功更新"+ update+ "条数据";}
配置SpringDataUserDetailsService
import com.baomidou.mybatisplus.core.conditions.query.QueryWrapper;
import com.yc.entity.UserInfo;
import com.yc.mapper.UserMapper;
import org.springframework.beans.factory.annotation.Autowired;
import org.springframework.security.core.authority.SimpleGrantedAuthority;
import org.springframework.security.core.userdetails.User;
import org.springframework.security.core.userdetails.UserDetails;
import org.springframework.security.core.userdetails.UserDetailsService;
import org.springframework.security.core.userdetails.UsernameNotFoundException;
import org.springframework.security.crypto.password.PasswordEncoder;
import org.springframework.stereotype.Service;import javax.annotation.Resource;
import java.util.ArrayList;
import java.util.List;@Service
public class SpringDataUserDetailsService  implements UserDetailsService {@Resourceprivate UserMapper userMapper;@AutowiredPasswordEncoder passwordEncoder;@Overridepublic UserDetails loadUserByUsername(String s) throws UsernameNotFoundException {if (s == null || "".equals(s)) {throw new RuntimeException("用户不能为空");}// 调用方法查询用户UserInfo sysUser = userMapper.selectOne(new QueryWrapper<UserInfo>().lambda().eq(UserInfo::getUsername, s));List<SimpleGrantedAuthority> authorities = new ArrayList<>();authorities.add(new SimpleGrantedAuthority("ROLE_FRONT_USER"  ));return new User(sysUser.getUsername(),sysUser.getPassword(), authorities);}
授权服务器:AuthorizationServer
AuthorizationServer 需要继承AuthorizationServerConfigurerAdapter
import org.springframework.security.oauth2.config.annotation.configurers.ClientDetailsServiceConfigurer;
import org.springframework.security.oauth2.config.annotation.web.configuration.AuthorizationServerConfigurerAdapter;
import org.springframework.security.oauth2.config.annotation.web.configurers.AuthorizationServerEndpointsConfigurer;
import org.springframework.security.oauth2.config.annotation.web.configurers.AuthorizationServerSecurityConfigurer;@Configuration
@EnableAuthorizationServer
public class AuthorizationServer extends AuthorizationServerConfigurerAdapter {@Overridepublic void configure(ClientDetailsServiceConfigurer clients) throws Exception {super.configure(clients);}@Overridepublic void configure(AuthorizationServerEndpointsConfigurer endpoints) throws Exception {super.configure(endpoints);}@Overridepublic void configure(AuthorizationServerSecurityConfigurer security) throws Exception {super.configure(security);}
}
AuthorizationServerConfigurerAdapter源码

- AuthorizationServerSecurityConfigurer:配置令牌端点(Token Endpoint)的安全约束
- ClientDetailsServiceConfigurer:配置OAuth2客户端
- AuthorizationServerEndpointsConfigurer:配置授权(authorization)以及令牌(token)的访问端点和令牌服务(token services)
配置客户端详细信息
ClientDetailsServiceConfigurer 能够使用内存或者JDBC来实现客户端详情服务(ClientDetailsService),
ClientDetailsService负责查找ClientDetails,而ClientDetails有几个重要的属性如下列表
- clientId:(必须的)用来标识客户的Id。
- secret:(需要值得信任的客户端)客户端安全码,如果有的话
- scope:用来限制客户端的访问范围,如果为空(默认)的话,那么客户端拥有全部的访问范围。
- authorizedGrantTypes:此客户端可以使用的授权类型,默认为空。
- authorities:此客户端可以使用的权限(基于Spring Security authorities)。
客户端详情(Client Details)能够在应用程序运行的时候进行更新,可以通过访问底层的存储服务(例如将客户
端详情存储在一个关系数据库的表中,就可以使用 JdbcClientDetailsService)或者通过自己实现
ClientRegistrationService接口(同时你也可以实现 ClientDetailsService 接口)来进行管理。
我们暂时使用内存方式存储客户端详情信息,配置如下:
// clients.withClientDetails(clientDetailsService);clients.inMemory()// 使用in‐memory存储.withClient("c1")// client_id.secret(new BCryptPasswordEncoder().encode("secret"))//资源服务id.resourceIds("res1")// 该client允许的授权类型 authorization_code,password,refresh_token,implicit,client_credentials.authorizedGrantTypes("authorization_code", "password", "client_credentials", "implicit", "refresh_token").scopes("all")// 允许的授权范围 是一个标识.autoApprove(false)//false代表如果是授权码模式 就跳转到授权的页面.//加上验证回调地址.redirectUris("http://www.baidu.com");
管理令牌
AuthorizationServerTokenServices 接口定义了一些操作使得你可以对令牌进行一些必要的管理,令牌可以被用来
加载身份信息,里面包含了这个令牌的相关权限。
自己可以创建 AuthorizationServerTokenServices 这个接口的实现,则需要继承 DefaultTokenServices 这个类,
里面包含了一些有用实现,你可以使用它来修改令牌的格式和令牌的存储。默认的,当它尝试创建一个令牌的时
候,是使用随机值来进行填充的,除了持久化令牌是委托一个 TokenStore 接口来实现以外,这个类几乎帮你做了
所有的事情。并且 TokenStore 这个接口有一个默认的实现,它就是 InMemoryTokenStore ,如其命名,所有的
令牌是被保存在了内存中。除了使用这个类以外,你还可以使用一些其他的预定义实现,下面有几个版本,它们都实现了TokenStore 接口:
- InMemoryTokenStore:这个版本的实现是被默认采用的,它可以完美的工作在单服务器上(即访问并发量
压力不大的情况下,并且它在失败的时候不会进行备份),大多数的项目都可以使用这个版本的实现来进行
尝试,你可以在开发的时候使用它来进行管理,因为不会被保存到磁盘中,所以更易于调试。 - JdbcTokenStore:这是一个基于JDBC的实现版本,令牌会被保存进关系型数据库。使用这个版本的实现时,
你可以在不同的服务器之间共享令牌信息,使用这个版本的时候请注意把"spring-jdbc"这个依赖加入到你的
classpath当中。 - JwtTokenStore:这个版本的全称是 JSON Web Token(JWT),它可以把令牌相关的数据进行编码(因此对
于后端服务来说,它不需要进行存储,这将是一个重大优势),但是它有一个缺点,那就是撤销一个已经授
权令牌将会非常困难,所以它通常用来处理一个生命周期较短的令牌以及撤销刷新令牌(refresh_token)。
另外一个缺点就是这个令牌占用的空间会比较大,如果你加入了比较多用户凭证信息。JwtTokenStore 不会保存任何数据,但是它在转换令牌值以及授权信息方面与 DefaultTokenServices 所扮演的角色是一样的。
定义TokenConfig
import org.springframework.context.annotation.Bean;
import org.springframework.context.annotation.Configuration;
import org.springframework.security.oauth2.provider.token.TokenStore;
import org.springframework.security.oauth2.provider.token.store.InMemoryTokenStore;/***  * 令牌存储策略*/
@Configuration
public class TokenConfig  {@Beanpublic TokenStore tokenStore() {//内存模式return new InMemoryTokenStore();}
}
定义AuthorizationServerTokenServices
//令牌服务@Autowiredprivate TokenStore tokenStore;//客户端详情服务@Autowiredprivate ClientDetailsService clientDetailsService;/** ** 配置令牌服务* 不管是什么模式都需要配置* 需要使用到客户端clientDetailsService和令牌服务tokenStore*/@Beanpublic AuthorizationServerTokenServices tokenService() {DefaultTokenServices service=new DefaultTokenServices();//客户端详情service.setClientDetailsService(clientDetailsService);//刷新tokenservice.setSupportRefreshToken(true);//令牌服务service.setTokenStore(tokenStore);// 令牌默认有效期2小时service.setAccessTokenValiditySeconds(7200);// 刷新令牌默认有效期3天service.setRefreshTokenValiditySeconds(259200);return service;}
令牌访问端点配置
AuthorizationServerEndpointsConfigurer 这个对象的实例可以完成令牌服务以及令牌endpoint配置。
配置授权类型(Grant Types)
AuthorizationServerEndpointsConfigurer 通过设定以下属性决定支持的授权类型(Grant Types):
- authenticationManager:认证管理器,当你选择了资源所有者密码(password)授权类型的时候,请设置
这个属性注入一个 AuthenticationManager 对象。 - userDetailsService:如果你设置了这个属性的话,那说明你有一个自己的 UserDetailsService 接口的实现, 或者你可以把这个东西设置到全局域上面去(例如 GlobalAuthenticationManagerConfigurer 这个配置对
象),当你设置了这个之后,那么 “refresh_token” 即刷新令牌授权类型模式的流程中就会包含一个检查,用
来确保这个账号是否仍然有效,假如说你禁用了这个账户的话。 - authorizationCodeServices:这个属性是用来设置授权码服务的(即 AuthorizationCodeServices 的实例对 象),主要用于 “authorization_code” 授权码类型模式。
- implicitGrantService:这个属性用于设置隐式授权模式,用来管理隐式授权模式的状态。不常用
- tokenGranter:当你设置了这个东西(即 TokenGranter 接口实现),那么授权将会交由你来完全掌控,并
且会忽略掉上面的这几个属性,这个属性一般是用作拓展用途的,即标准的四种授权模式已经满足不了你的
需求的时候,才会考虑使用这个
配置授权端点的URL(Endpoint URLs):
AuthorizationServerEndpointsConfigurer 这个配置对象有一个叫做 pathMapping() 的方法用来配置端点URL链
接,它有两个参数:
- 第一个参数:String 类型的,这个端点URL的默认链接。
- 第二个参数:String 类型的,你要进行替代的URL链接。
以上的参数都将以 “/” 字符为开始的字符串,框架的默认URL链接如下列表,可以作为这个 pathMapping() 方法的 第一个参数: - /oauth/authorize:授权端点。
- /oauth/token:令牌端点。
- /oauth/confirm_access:用户确认授权提交端点。
- /oauth/error:授权服务错误信息端点。
- /oauth/check_token:用于资源服务访问的令牌解析端点。
- /oauth/token_key:提供公有密匙的端点,如果你使用JWT令牌的话。
需要注意的是授权端点这个URL应该被Spring Security保护起来只供授权用户访问.
在AuthorizationServer配置令牌访问端点
@Bean
public AuthorizationCodeServices authorizationCodeServices() { //设置授权码模式的授权码如何
存取,暂时采用内存方式
return new InMemoryAuthorizationCodeServices();
}@Autowired
private AuthorizationCodeServices authorizationCodeServices;@Autowired
private AuthenticationManager authenticationManager;@Overridepublic void configure(AuthorizationServerEndpointsConfigurer endpoints) {endpoints//密码模式所需要的.authenticationManager(authenticationManager)//授权码模式所需要的.authorizationCodeServices(authorizationCodeServices)//如果你设置了这个属性的话,那说明你有一个自己的 UserDetailsService 接口的实现//.userDetailsService(null)//令牌管理服务.tokenServices(tokenService())//自定义令牌端点URL//  .pathMapping("/oauth/token","/user/token")//自定义授权端点URL//   .pathMapping("/oauth/authorize","/user/authorize")//允许POST提交.allowedTokenEndpointRequestMethods(HttpMethod.POST);}
令牌端点的安全约束
AuthorizationServerSecurityConfigurer用来配置令牌端点(Token Endpoint)的安全约束,在
AuthorizationServer中配置如下
@Overridepublic void configure(AuthorizationServerSecurityConfigurer security) throws Exception {security//tokenkey这个endpoint当使用JwtToken且使用非对称加密时,资源服务用于获取公钥而开放的,这里指这个endpoint完全公开。.tokenKeyAccess("permitAll()")//checkToken这个endpoint完全公开.checkTokenAccess("permitAll()")//允许表单认证.allowFormAuthenticationForClients() ;}
- tokenkey这个endpoint当使用JwtToken且使用非对称加密时,资源服务用于获取公钥而开放的,这里指这个 endpoint完全公开。
- checkToken这个endpoint完全公开
- 允许表单认证
web安全配置
@Configuration
@EnableGlobalMethodSecurity(securedEnabled = true,prePostEnabled = true)
public class WebSecurityConfig extends WebSecurityConfigurerAdapter {@Beanpublic PasswordEncoder passwordEncoder() {return new BCryptPasswordEncoder();}//安全拦截机制(最重要)@Overrideprotected void configure(HttpSecurity http) throws Exception {http.csrf().disable().authorizeRequests().antMatchers("/r/**").authenticated()//所有/r/**的请求必须认证通过.anyRequest().permitAll()//除了/r/**,其它的请求可以访问.and().formLogin()//允许表单登录.loginPage("/login-view")//登录页面.loginProcessingUrl("/login").successForwardUrl("/login-success")//自定义登录成功的页面地址.and().sessionManagement().sessionCreationPolicy(SessionCreationPolicy.IF_REQUIRED).and().logout().logoutUrl("/logout").logoutSuccessUrl("/login-view?logout");}/***  * oauth2.0 密码模式下需要认证管理器* 密码模式所需要的** @return* @throws Exception*/@Bean@Overridepublic AuthenticationManager authenticationManagerBean() throws Exception{return super.authenticationManagerBean();}}
授权码模式
获取授权码
浏览器访问
http://localhost:8081/oauth/authorize?client_id=c1&response_type=code&scope=all&redirect_uri=http://www.baidu.com
会跳转到登录页面

输入账号admin 密码123
点击授权
得到授权码
客户端拿着授权码向授权服务器索要访问access_token
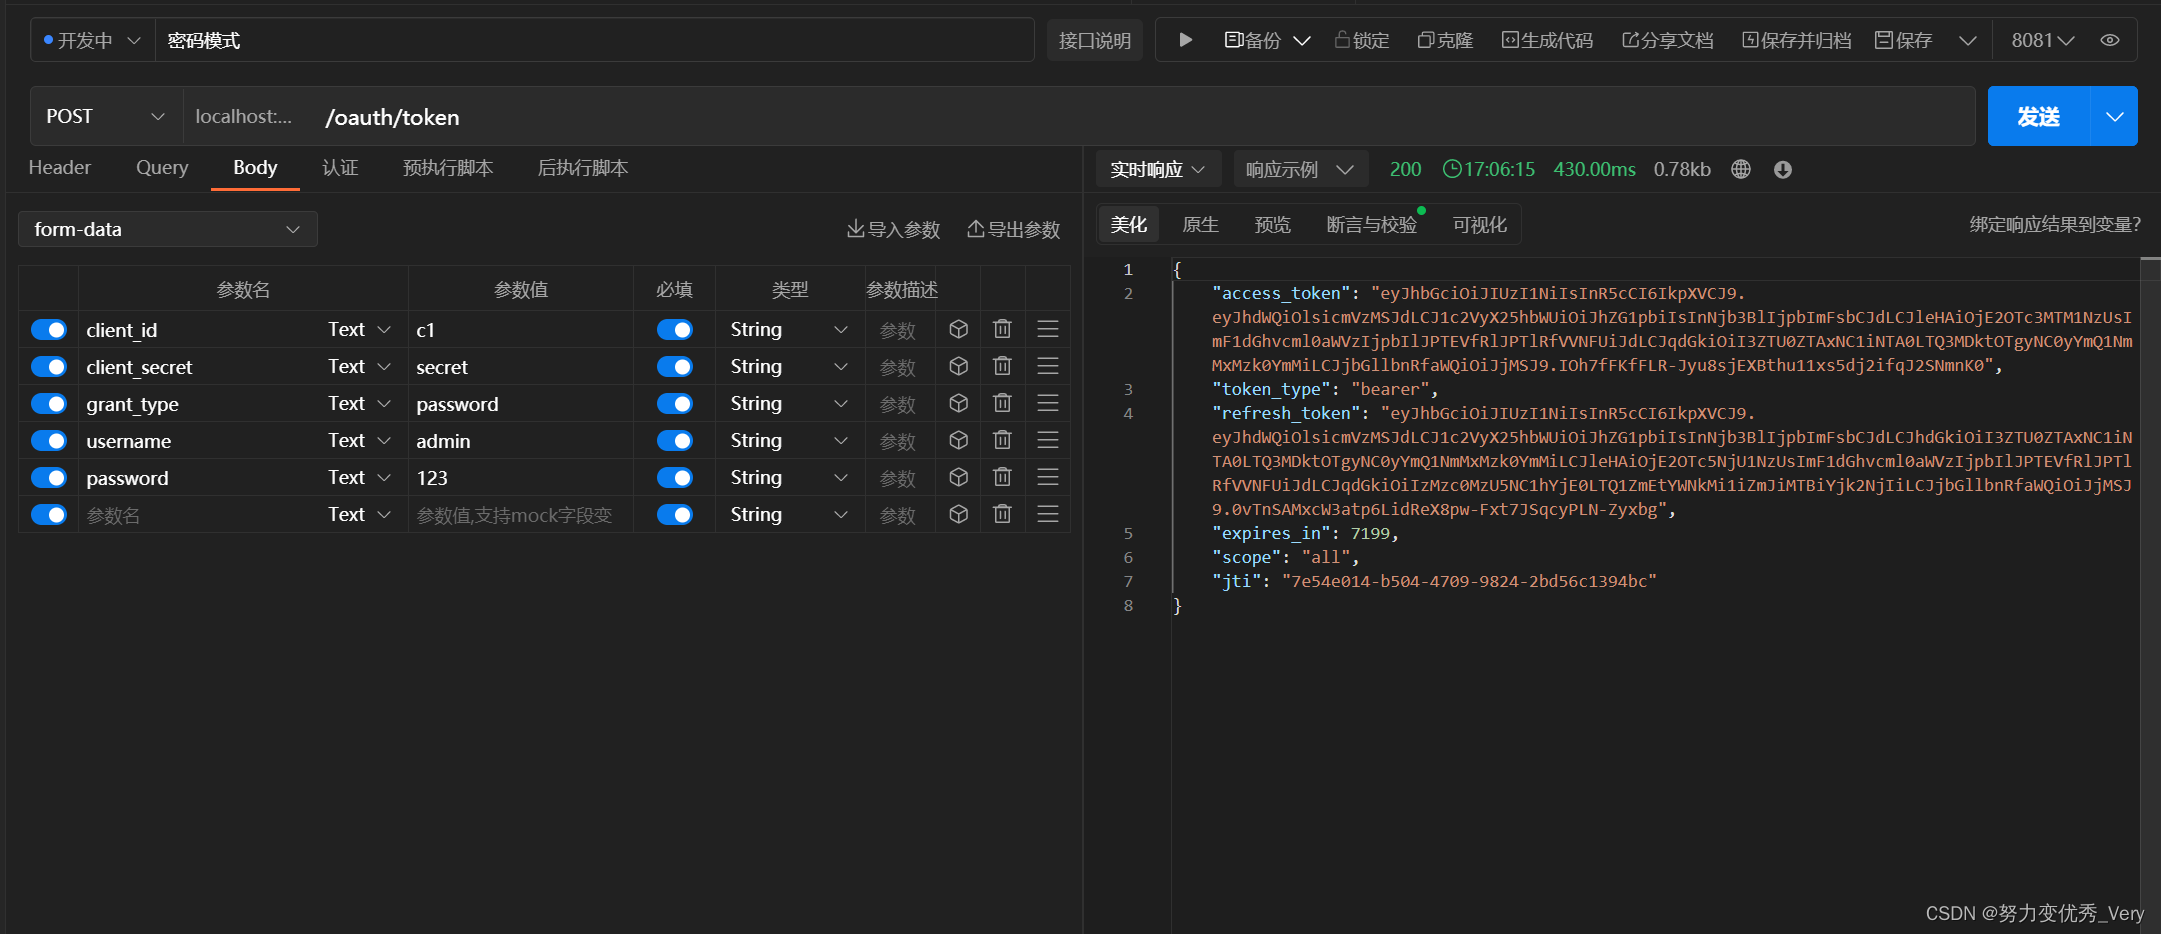
http://localhost:8081/oauth/token
参数
- code : 刚刚获取的授权码
- client_id :c1
- client_secret :secret
- grant_type : authorization_code 授权码模式
- redirect_uri :http://www.baidu.com

简化模式(直接获取token)
参数描述同授权码模式 ,注意response_type=token,说明是简化模式。
一般来说,简化模式用于没有服务器端的第三方单页面应用,因为没有服务器端就无法接收授权码。
http://localhost:8081/oauth/authorize?client_id=c1&response_type=token&scope=all&redirect_uri=http://www.baidu.com
密码模式获取token
参数列表如下:
client_id:客户端准入标识。
client_secret:客户端秘钥。
grant_type:授权类型,填写password表示密码模式
username:资源拥有者用户名。
password:资源拥有者密码
这种模式十分简单,但是却意味着直接将用户敏感信息泄漏给了client,因此这就说明这种模式只能用于client是我
们自己开发的情况下。因此密码模式一般用于我们自己开发的,第一方原生App或第一方单页面应用。

客户端模式
参数列表如下
client_id:客户端准入标识。
client_secret:客户端秘钥。
grant_type:授权类型,填写client_credentials表示客户端模式
这种模式是最方便但最不安全的模式。因此这就要求我们对client完全的信任,而client本身也是安全的。因
此这种模式一般用来提供给我们完全信任的服务器端服务。比如,合作方系统对接,拉取一组用户信息。
搭建资源服务器
添加依赖
<parent><groupId>org.springframework.boot</groupId><artifactId>spring-boot-starter-parent</artifactId><version>2.1.3.RELEASE</version><relativePath/> <!-- lookup parent from repository --></parent><properties><java.version>1.8</java.version><druid.version>1.1.14</druid.version><fastjson.version>1.2.68</fastjson.version><security.oauth2.version>2.3.5.RELEASE</security.oauth2.version></properties><dependencies><!-- SpringBoot 核心包 --><dependency><groupId>org.springframework.boot</groupId><artifactId>spring-boot-starter</artifactId></dependency><!-- SpringBoot 测试 --><dependency><groupId>org.springframework.boot</groupId><artifactId>spring-boot-starter-test</artifactId><scope>test</scope></dependency><!-- SpringBoot Web容器 --><dependency><groupId>org.springframework.boot</groupId><artifactId>spring-boot-starter-web</artifactId></dependency><!-- spring-boot-devtools --><dependency><groupId>org.springframework.boot</groupId><artifactId>spring-boot-devtools</artifactId><optional>true</optional> <!-- 表示依赖不会传递 --></dependency><!-- spring security 安全认证 --><dependency><groupId>org.springframework.boot</groupId><artifactId>spring-boot-starter-security</artifactId></dependency><!--若依使用的 spring security oauth2 开放授权 --><dependency><groupId>org.springframework.security.oauth</groupId><artifactId>spring-security-oauth2</artifactId><version>${security.oauth2.version}</version></dependency><!--常用工具类 --><dependency><groupId>org.apache.commons</groupId><artifactId>commons-lang3</artifactId></dependency><!-- 阿里JSON解析器 --><dependency><groupId>com.alibaba</groupId><artifactId>fastjson</artifactId><version>${fastjson.version}</version></dependency><!--Spring框架基本的核心工具--><dependency><groupId>org.springframework</groupId><artifactId>spring-context-support</artifactId></dependency><!-- jwt--><dependency><groupId>org.springframework.security</groupId><artifactId>spring-security-jwt</artifactId><version>1.1.0.RELEASE</version></dependency><dependency><groupId>org.projectlombok</groupId><artifactId>lombok</artifactId><version>1.18.26</version></dependency></dependencies><build><plugins><plugin><groupId>org.springframework.boot</groupId><artifactId>spring-boot-maven-plugin</artifactId></plugin></plugins></build>
资源服务器配置
@EnableResourceServer 注解到一个 @Configuration 配置类上,并且必须使用 ResourceServerConfigurer 这个
配置对象来进行配置(可以选择继承自 ResourceServerConfigurerAdapter 然后覆写其中的方法,参数就是这个
对象的实例),下面是一些可以配置的属性:
ResourceServerSecurityConfigurer中主要包括:
- tokenServices:ResourceServerTokenServices 类的实例,用来实现令牌服务。
- tokenStore:TokenStore类的实例,指定令牌如何访问,与tokenServices配置可选
- resourceId:这个资源服务的ID,这个属性是可选的,但是推荐设置并在授权服务中进行验证。
- 其他的拓展属性例如 tokenExtractor 令牌提取器用来提取请求中的令牌。
HttpSecurity配置这个与Spring Security类似: - 请求匹配器,用来设置需要进行保护的资源路径,默认的情况下是保护资源服务的全部路径。
- 通过http.authorizeRequests()来设置受保护资源的访问规则
- 其他的自定义权限保护规则通过 HttpSecurity 来进行配置。
- @EnableResourceServer 注解自动增加了一个类型为 OAuth2AuthenticationProcessingFilter 的过滤器链
编写ResouceServerConfig:
ResouceServerConfig
import org.springframework.context.annotation.Bean;
import org.springframework.context.annotation.Configuration;
import org.springframework.security.config.annotation.web.builders.HttpSecurity;
import org.springframework.security.config.http.SessionCreationPolicy;
import org.springframework.security.oauth2.config.annotation.web.configuration.EnableResourceServer;
import org.springframework.security.oauth2.config.annotation.web.configuration.ResourceServerConfigurerAdapter;
import org.springframework.security.oauth2.config.annotation.web.configurers.ResourceServerSecurityConfigurer;
import org.springframework.security.oauth2.provider.token.RemoteTokenServices;
import org.springframework.security.oauth2.provider.token.ResourceServerTokenServices;@Configuration
@EnableResourceServer
public class ResouceServerConfig  extendsResourceServerConfigurerAdapter {//授权服务器配置的资源id 保持一致public static final String RESOURCE_ID = "res1";@Overridepublic void configure(ResourceServerSecurityConfigurer resources) {resources.resourceId(RESOURCE_ID).tokenServices(tokenService()).stateless(true);}@Overridepublic void configure(HttpSecurity http) throws Exception {http.authorizeRequests()//授权服务器配置的允许的授权范围  是一个标识 保持一致.antMatchers("/**").access("#oauth2.hasScope('all')").and().csrf().disable().sessionManagement().sessionCreationPolicy(SessionCreationPolicy.STATELESS);}//资源服务令牌解析服务@Beanpublic ResourceServerTokenServices tokenService() {
//使用远程服务请求授权服务器校验token,必须指定校验token 的url、client_id,client_secretRemoteTokenServices service=new RemoteTokenServices();//授权服务器地址认证token的  /*** 在这里面配置的security  //tokenkey这个endpoint当使用JwtToken且使用非对称加密时,资源服务用于获取公钥而开放的,这里指这个endpoint完全公开。.tokenKeyAccess("permitAll()")//checkToken这个endpoint完全公开.checkTokenAccess("permitAll()")//允许表单认证.allowFormAuthenticationForClients() ;**/service.setCheckTokenEndpointUrl("http://localhost:8081/oauth/check_token");//客户端idservice.setClientId("c1");//service.setClientSecret("secret");return service;}
添加安全访问控制
import org.springframework.context.annotation.Configuration;
import org.springframework.security.config.annotation.web.builders.HttpSecurity;
import org.springframework.security.config.annotation.web.configuration.WebSecurityConfigurerAdapter;@Configuration
public class WebSecurityConfig extends WebSecurityConfigurerAdapter {//安全拦截机制(最重要)@Overrideprotected void configure(HttpSecurity http) throws Exception {http.csrf().disable().authorizeRequests().antMatchers("/user/**").authenticated()//所有/user/**的请求必须认证通过//拦截其它的请求可以访问.anyRequest().permitAll();}
}
编写资源
@RestController@RequestMapping(value = "/user")
public class UserController {@GetMapping(value = "/test")public String r1(){return "访问资源1";}
}
获取到token之后
测试访问资源

完成访问
JWT令牌
在授权服务器中更改原来TokenConfig
@Configuration
public class TokenConfig  {
//    @Bean
//    public TokenStore tokenStore() {
//        //内存模式
//        return new InMemoryTokenStore();
//    }/****/private String SIGNING_KEY = "TOKEN_CAT";@Beanpublic TokenStore tokenStore() {return new JwtTokenStore(accessTokenConverter());}@Beanpublic JwtAccessTokenConverter accessTokenConverter() {JwtAccessTokenConverter converter = new JwtAccessTokenConverter();converter.setSigningKey(SIGNING_KEY); //对称秘钥,资源服务器使用该秘钥来验证return converter;}
}
定义JWT令牌服务
**更改AuthorizationServer中的AuthorizationServerTokenServices **
@Autowiredprivate JwtAccessTokenConverter accessTokenConverter;@Beanpublic AuthorizationServerTokenServices tokenService() {DefaultTokenServices service=new DefaultTokenServices();//客户端详情service.setClientDetailsService(clientDetailsService);//刷新tokenservice.setSupportRefreshToken(true);//令牌服务service.setTokenStore(tokenStore);新添加的代码TokenEnhancerChain tokenEnhancerChain = new TokenEnhancerChain();tokenEnhancerChain.setTokenEnhancers(Arrays.asList(accessTokenConverter));service.setTokenEnhancer(tokenEnhancerChain);新添加的代码// 令牌默认有效期2小时service.setAccessTokenValiditySeconds(7200);// 刷新令牌默认有效期3天service.setRefreshTokenValiditySeconds(259200);return service;}
使用密码模式测试生成令牌
校验jwt令牌
资源服务需要和授权服务拥有一致的签字、令牌服务等
- 将授权服务中的TokenConfig类拷贝到资源 服务中
@Configuration
public class TokenConfig {
//    @Bean
//    public TokenStore tokenStore() {
//        //内存模式
//        return new InMemoryTokenStore();
//    }/****/private String SIGNING_KEY = "TOKEN_CAT";@Beanpublic TokenStore tokenStore() {return new JwtTokenStore(accessTokenConverter());}@Beanpublic JwtAccessTokenConverter accessTokenConverter() {JwtAccessTokenConverter converter = new JwtAccessTokenConverter();converter.setSigningKey(SIGNING_KEY); //对称秘钥,资源服务器使用该秘钥来验证return converter;}
- 屏蔽资源 服务原来的令牌服务类
更改 ResouceServerConfig配置类
注入TokenStore
  @AutowiredTokenStore tokenStore;
@Overridepublic void configure(ResourceServerSecurityConfigurer resources) {resources.resourceId(RESOURCE_ID)
//                .tokenServices(tokenService())//使用自己配置的令牌服务.tokenStore(  tokenStore).stateless(true);}
测试验证token

完善环境配置
截止目前客户端信息和授权码仍然存储在内存中,生产环境中通过会存储在数据库中,下边完善环境的配置
创建表
 CREATE TABLE `oauth_client_details` (`client_id` varchar(255) CHARACTER SET utf8mb3 COLLATE utf8mb3_general_ci NOT NULL COMMENT '客户端标\r\n识',`resource_ids` varchar(255) CHARACTER SET utf8mb3 COLLATE utf8mb3_general_ci DEFAULT NULL COMMENT '接入资源列表',`client_secret` varchar(255) CHARACTER SET utf8mb3 COLLATE utf8mb3_general_ci DEFAULT NULL COMMENT '客户端秘钥',`scope` varchar(255) CHARACTER SET utf8mb3 COLLATE utf8mb3_general_ci DEFAULT NULL,`authorized_grant_types` varchar(255) CHARACTER SET utf8mb3 COLLATE utf8mb3_general_ci DEFAULT NULL,`web_server_redirect_uri` varchar(255) CHARACTER SET utf8mb3 COLLATE utf8mb3_general_ci DEFAULT NULL,`authorities` varchar(255) CHARACTER SET utf8mb3 COLLATE utf8mb3_general_ci DEFAULT NULL,`access_token_validity` int DEFAULT NULL,`refresh_token_validity` int DEFAULT NULL,`additional_information` longtext CHARACTER SET utf8mb3 COLLATE utf8mb3_general_ci,`create_time` timestamp NULL DEFAULT CURRENT_TIMESTAMP ON UPDATE CURRENT_TIMESTAMP,`archived` tinyint DEFAULT NULL,`trusted` tinyint DEFAULT NULL,`autoapprove` varchar(255) CHARACTER SET utf8mb3 COLLATE utf8mb3_general_ci DEFAULT NULL,PRIMARY KEY (`client_id`) USING BTREE
) ENGINE=InnoDB DEFAULT CHARSET=utf8mb3 COMMENT='接入客户端信息';DROP TABLE IF EXISTS `oauth_code`;
CREATE TABLE `oauth_code` (
`create_time` timestamp(0) NOT NULL DEFAULT CURRENT_TIMESTAMP,
`code` varchar(255) CHARACTER SET utf8 COLLATE utf8_general_ci NULL DEFAULT NULL,
`authentication` blob NULL,
INDEX `code_index`(`code`) USING BTREE
) ENGINE = InnoDB CHARACTER SET = utf8 COLLATE = utf8_general_ci ROW_FORMAT = Compact;
插入数据
INSERT INTO `security_oauth_demo`.`oauth_client_details`(`client_id`, `resource_ids`, `client_secret`, `scope`, `authorized_grant_types`, `web_server_redirect_uri`, `authorities`, `access_token_validity`, `refresh_token_validity`, `additional_information`, `create_time`, `archived`, `trusted`, `autoapprove`) VALUES ('c1', 'res1', '$2a$10$3CCcmHbkYEz55brA3BL6J.B7VW4HxsnkYmJ/Yz95f0Gvkpnammpoi', 'ROLE_ADMIN,ROLE_USER,ROLE_API', 'client_credentials,password,authorization_code,implicit,refresh_token', 'http://www.baidu.com', NULL, 7200, 259200, NULL, '2023-10-19 09:51:20', 0, 0, 'false');
INSERT INTO `security_oauth_demo`.`oauth_client_details`(`client_id`, `resource_ids`, `client_secret`, `scope`, `authorized_grant_types`, `web_server_redirect_uri`, `authorities`, `access_token_validity`, `refresh_token_validity`, `additional_information`, `create_time`, `archived`, `trusted`, `autoapprove`) VALUES ('c2', 'res1', '$2a$10$3CCcmHbkYEz55brA3BL6J.B7VW4HxsnkYmJ/Yz95f0Gvkpnammpoi', 'ROLE_ADMIN,ROLE_USER,ROLE_API', 'client_credentials,password,authorization_code,implicit,refresh_token', 'http://www.baidu.com', NULL, 7200, 259200, NULL, '2023-10-19 09:51:20', 0, 0, 'false');
配置授权服务
修改AuthorizationServer:
ClientDetailsService和AuthorizationCodeServices从数据库读取数据。
/**
* 1.客户端详情相关配置
*/
注入ClientDetailsService
/*** 客户端认证服务 因为之前使用的是内存模式 直接配置信息就好了* 现在使用的是数据库 所以要配置数据库信息* @param dataSource* @return*/@Beanpublic ClientDetailsService clientDetailsService(DataSource dataSource) {ClientDetailsService clientDetailsService = new JdbcClientDetailsService(dataSource);((JdbcClientDetailsService) clientDetailsService).setPasswordEncoder( new BCryptPasswordEncoder() );return clientDetailsService;}
客户端配置使用刚刚的数据库模式 clientDetailsService
@Overridepublic void configure(ClientDetailsServiceConfigurer clients) throws Exception {clients.withClientDetails(clientDetailsService);
//        clients.inMemory()// 使用in‐memory存储
//                .withClient("c1")// client_id
//                .secret(new BCryptPasswordEncoder().encode("secret"))
//                //资源服务id
//                .resourceIds("res1")
//                // 该client允许的授权类型  authorization_code,password,refresh_token,implicit,client_credentials
//                .authorizedGrantTypes("authorization_code", "password", "client_credentials", "implicit", "refresh_token")
//                .scopes("all")// 允许的授权范围  是一个标识
//                .autoApprove(false)//false代表如果是授权码模式 就跳转到授权的页面.
//                  //加上验证回调地址
//                .redirectUris("http://www.baidu.com");}
配置授权码模式也使用数据库
原来的注释掉
//    @Bean
//    public AuthorizationCodeServices authorizationCodeServices() {
//        //设置授权码模式的授权码如何 存取,暂时采用内存方式
//        return new InMemoryAuthorizationCodeServices();
//    }//使用DataSource 模式@Beanpublic AuthorizationCodeServices authorizationCodeServices(DataSource dataSource) {return new JdbcAuthorizationCodeServices(dataSource);//设置授权码模式的授权码如何存取}
首先使用密码模式获取token
其中oauth_client_details表中client_secret客户端密钥字段 是secret使用new BCryptPasswordEncoder() 加密模式进行加密的,如果不能使用自行进行加密

使用授权码模式获取token
http://localhost:8081/oauth/authorize?client_id=c1&response_type=code&scope=all&redirect_uri=http://www.baidu.com
获取异常,错误信息如下
Resolved [error=“invalid_scope”, error_description=“Invalid scope: all”, scope=“ROLE_ADMIN ROLE_USER ROLE_API”]
意思是scope传入的是all,而数据库是这些ROLE_ADMIN ROLE_USER ROLE_API
更改scope为其中一个再次进行测试
http://localhost:8081/oauth/authorize?client_id=c1&response_type=code&scope=ROLE_API&redirect_uri=http://www.baidu.com
获取到授权码

上面是授权服务器和认证服务器分开的.现在准备整合在一起
在授权服务器添加资源服务器ResouceServerConfig
import com.yc.config.handler.CustomAccessDeniedHandler;
import com.yc.config.handler.CustomAuthExceptionEntryPoint;
import org.springframework.beans.factory.annotation.Autowired;
import org.springframework.context.annotation.Configuration;
import org.springframework.security.config.annotation.web.builders.HttpSecurity;
import org.springframework.security.config.http.SessionCreationPolicy;
import org.springframework.security.oauth2.config.annotation.web.configuration.EnableResourceServer;
import org.springframework.security.oauth2.config.annotation.web.configuration.ResourceServerConfigurerAdapter;
import org.springframework.security.oauth2.config.annotation.web.configurers.ResourceServerSecurityConfigurer;
import org.springframework.security.oauth2.provider.token.TokenStore;@Configuration
@EnableResourceServer
public class ResouceServerConfig extendsResourceServerConfigurerAdapter {public static final String RESOURCE_ID = "res1";@AutowiredTokenStore tokenStore;/*** 自定义访问无权限资源时的异常*/@Autowiredprivate CustomAccessDeniedHandler accessDeniedHandler;/*** 自定义认证失败的异常*/@Autowiredprivate CustomAuthExceptionEntryPoint exceptionEntryPoint;@Overridepublic void configure(ResourceServerSecurityConfigurer resources) {resources//必须拥有RESOURCE_ID 配置, 如果不使用克注释掉.resourceId(RESOURCE_ID)//使用自己配置的令牌服务.tokenStore(  tokenStore)//   自定义认证失败的异常 自定义访问无权限资源时的异常.authenticationEntryPoint(exceptionEntryPoint).accessDeniedHandler(accessDeniedHandler).stateless(true);}@Overridepublic void configure(HttpSecurity http) throws Exception {/*** 拦截所有请求,同时scopes必须使用all的     如果不需要可以使用下面的注释掉,或者使用下面的认证配置*   .antMatchers("/**").access("#oauth2.hasScope('all')")*/http.authorizeRequests().antMatchers("/**").access("#oauth2.hasScope('all')").and().csrf().disable().sessionManagement().sessionCreationPolicy(SessionCreationPolicy.STATELESS);/****/// 所有请求必须认证通过
//        http.authorizeRequests()
//                // 过滤放行
//                .antMatchers().permitAll()
//                .anyRequest().authenticated();}}
CustomAccessDeniedHandler
import org.springframework.security.access.AccessDeniedException;
import org.springframework.security.web.access.AccessDeniedHandler;
import org.springframework.stereotype.Component;import javax.servlet.http.HttpServletRequest;
import javax.servlet.http.HttpServletResponse;
import java.io.IOException;/*** 自定义访问无权限资源时的异常* * @author  */
@Component
public class CustomAccessDeniedHandler implements AccessDeniedHandler
{@Overridepublic void handle(HttpServletRequest request, HttpServletResponse response,AccessDeniedException accessDeniedException) throws IOException{System.out.println("权限不足,请联系管理员");System.out.println("权限不足,请联系管理员");System.out.println("权限不足,请联系管理员");System.out.println("权限不足,请联系管理员");System.out.println("权限不足,请联系管理员");System.out.println("权限不足,请联系管理员");System.out.println("权限不足,请联系管理员");System.out.println("权限不足,请联系管理员");System.out.println("权限不足,请联系管理员");System.out.println("权限不足,请联系管理员");System.out.println("权限不足,请联系管理员");System.out.println("权限不足,请联系管理员");System.out.println("权限不足,请联系管理员");response.setStatus(200);response.setContentType("application/json");response.setCharacterEncoding("utf-8");response.getWriter().print("权限不足,请联系管理员");}
}
CustomAuthExceptionEntryPoint
import org.springframework.security.core.AuthenticationException;
import org.springframework.security.web.AuthenticationEntryPoint;
import org.springframework.stereotype.Component;import javax.servlet.http.HttpServletRequest;
import javax.servlet.http.HttpServletResponse;
import java.io.IOException;/*** 自定义认证失败的异常* * @author  */
@Component
public class    CustomAuthExceptionEntryPoint implements AuthenticationEntryPoint
{@Overridepublic void commence(HttpServletRequest request, HttpServletResponse response,AuthenticationException authException) throws IOException{System.out.println("令牌不合法,禁止访问");System.out.println("令牌不合法,禁止访问");System.out.println("令牌不合法,禁止访问");System.out.println("令牌不合法,禁止访问");System.out.println("令牌不合法,禁止访问");System.out.println("令牌不合法,禁止访问");System.out.println("令牌不合法,禁止访问");System.out.println("令牌不合法,禁止访问");System.out.println("令牌不合法,禁止访问");System.out.println("令牌不合法,禁止访问");System.out.println("令牌不合法,禁止访问");System.out.println("令牌不合法,禁止访问");System.out.println("令牌不合法,禁止访问");System.out.println("令牌不合法,禁止访问");System.out.println("令牌不合法,禁止访问");response.setStatus(200);response.setContentType("application/json");response.setCharacterEncoding("utf-8");response.getWriter().print("令牌不合法,禁止访问");}
}
到此结束
相关文章:
SpringSecurity+ Oauth2.0+JWT 0-1
这里写目录标题 准备工作准备SQL添加用户添加依赖准备UserInfoUserMapperUserServiceUserServiceImpl配置SpringDataUserDetailsService 授权服务器:AuthorizationServer配置客户端详细信息管理令牌定义TokenConfig定义AuthorizationServerTokenServices 令牌访问端…...
-开发bug总结5)
Echart图表收起/展开后无法重新渲染实现自适应(亲测有效)-开发bug总结5
问题描述: 后台管理系统,左侧的菜单栏是可以展开/收起的,默认是展开,此时页面上的图表加载正常,如果收起后再展开,页面底部就会出现滚动轴,图表没有重新绘制。 网上也查了很多方法。基本都是通…...

互联网Java工程师面试题·Java 面试篇·第二弹
目录 15、什么是不可变对象(immutable object)?Java 中怎么创建一个不可变对象? 16、我们能创建一个包含可变对象的不可变对象吗? 17、Java 中应该使用什么数据类型来代表价格? 18、怎么将 byte 转换为 Str…...
【ARM裸机】ARM入门
1.ARM成长史 2.ARM的商业模式和生态系统 ARM只设计CPU,但是不生产CPU 3.为什么使用三星:S5PV210 4.各种版本号 0. ARM和Cortex Cortex就是ARM公司一个系列处理器的名称。比如英特尔旗下处理器有酷睿,奔腾,赛扬。ARM在最初的处理器…...

webGL编程指南 第三章 矩阵旋转三角形rotatedTriangle_Matrix
我会持续更新关于wegl的编程指南中的代码。 当前的代码不会使用书中的缩写,每一步都是会展开写。希望能给后来学习的一些帮助 git代码地址 :git 接着 上一节中 接着做平移的转化。在本次的案例案例中主要是xy的坐标变量相加,同时传递个给相…...

【常用的Git命令】
Git是一个版本控制系统,它拥有众多的命令。以下是一些常用的Git命令: 配置相关命令: git config --global user.name "Your Name":设置用户姓名git config --global user.email "youremailexample.com":设置用…...

cnn 直线检测笔记
目录 mlsd直线检测: ULSD-ISPRS曲线检测 划线标注工具: 可视化标注代码: mlsd直线检测: mlsd_pytorch...

【Edabit 算法 ★☆☆☆☆☆】 Return Something to Me!
【Edabit 算法 ★☆☆☆☆☆】 Return Something to Me! strings language_fundamentals Instructions Write a function that returns the string "something" joined with a space " " and the given argument a. Examples giveMeSomething(“is bett…...

【Redis】数据结构之dict
目录 dict的基本结构dict的相关操作函数底层通用的之查找插入key-value对应该放入ht表的哪个槽rehash过程 dict的基本结构 typedef struct dict {dictType *type;void *privdata;dictht ht[2];long rehashidx; /* rehashing not in progress if rehashidx -1 */unsigned long…...

curl命令服务器上执行http请求
1. 现在本地使用postman生成curl命令 注意: 将ip改成127.0.0.1,端口是实际服务运行的端口 curl --location --request POST http://127.0.0.1:63040/content/course/list?pageNo1&pageSize2 \ --header Content-Type: application/json \ --data-raw {"courseName&q…...
图论03-【无权无向】-图的深度优先遍历-路径问题/检测环/二分图
文章目录 1. 代码仓库2. 单源路径2.1 思路2.2 主要代码 3. 所有点对路径3.1 思路3.2 主要代码 4. 路径问题的优化-提前结束递归4.1 思路4.2 主要代码 5. 检测环5.1 思路5.2 主要代码 5. 二分图5.1 思路5.2 主要代码5.2.1 遍历每个联通分量5.2.2 递归判断相邻两点的颜色是否一致…...

算法题java
一、四向链表,输入n生成一个多维4向链表 Datastatic class ListNode<T>{private T val;ListNode<T> up,down,left,right;public ListNode(T val){this.val val;}}public static void main(String[] args){ListNode<Integer> node getResult(8);…...

MySQL数据的基础语法
MySQL 是一种强大的关系型数据库管理系统(RDBMS),它使用 SQL(Structured Query Language)来管理和操作数据。以下是 MySQL 数据库的基础 SQL 语法,包括创建数据库、创建表、插入、查询、更新和删除数据等基…...
)
阿里面试(持续更新)
一面: 1 HashMap 实现原理,ConcurrentHashMap 实现原理 HashMap和ConcurrentHashMap都是存储键值对的数据结构,不同的是HashMap是线程不安全的,ConcurrentHashMap是线程安全的,HashMap在高并发情况下会出现数据不一致…...
龙芯3A3000源码编译安装deepin-ide
安装环境 系统为统信专业版1050 CPU为龙芯3A3000 安装步骤 1.安装所有依赖库 sudo apt-get install git debhelper cmake qt5-qmake qtbase5-dev qttools5-dev qttools5-dev-tools lxqt-build-tools libssl-dev llvm llvm-dev libclang-dev libutf8proc-dev libmicrohttpd-d…...
学成在线第二天-查询课程、查询课程分类、新增课程接口实现以及跨域的处理思路和全局异常处理的使用以及面试题
目录 一、接口的实现 二、跨域的处理思路 三、全局异常处理 四、面试题 五、总结 一、接口的实现 1. 查询课程接口 思路: 典型的分页查询 按需查询 模糊查询的查询 controller: ApiOperation(value "课程列表", notes "课程…...

【OpenCV概念】 11— 对象检测
一、说明 这都是关于物体识别的。物体识别是指通过计算机视觉技术,自动识别图像或视频中的物体及其属性和特征,是人工智能领域的一个分支。物体识别可应用于多个领域,包括工业自动化、智能家居、医疗、安防等。请随时阅读这篇文章:…...

TensorRT学习笔记--常用卷积、激活、池化和FC层算子API
目录 1--Tensor算子API 1-1--卷积算子 1-2--激活算子 1-3--池化算子 1-4--FC层算子 2--代码实例 3--编译运行 1--Tensor算子API TensorRT提供了卷积层、激活函数和池化层三种最常用算子的API: // 创建一个空的网络 nvinfer1::INetworkDefinition* network …...

【Edabit 算法 ★☆☆☆☆☆】 Less Than 100?
【Edabit 算法 ★☆☆☆☆☆】 Less Than 100? language_fundamentals math validation Instructions Given two numbers, return true if the sum of both numbers is less than 100. Otherwise return false. Examples lessThan100(22, 15) // true // 22 15 37lessTha…...

C++中的智能指针:更安全、更便利的内存管理
在C++编程中,动态内存管理一直是一个重要且具有挑战性的任务。传统的C++中,程序员需要手动分配和释放内存,这往往会导致内存泄漏和悬挂指针等严重问题。为了解决这些问题,C++11引入了智能指针(Smart Pointers)这一概念,它们是一种高级的内存管理工具,可以自动管理内存的…...

Node.js + Angular + WebSocket:FUXA企业级工业可视化监控系统架构设计
Node.js Angular WebSocket:FUXA企业级工业可视化监控系统架构设计 【免费下载链接】FUXA Web-based Process Visualization (SCADA/HMI/Dashboard) software 项目地址: https://gitcode.com/gh_mirrors/fu/FUXA FUXA是一款基于Web的开源SCADA/HMI系统&…...

基于Pixhawk 6C的模块化无人机数据采集平台设计与实现
1. 项目概述:基于Pixhawk 6C的模块化无人机数据采集平台 这个项目源于我多年对小型无人机自主控制系统的探索。从早期的Erle Robotics时代开始,我就被机载计算和自主飞行的可能性深深吸引。如今,通过Pixhawk 6C飞控、M10 GPS模块和915MHz数传…...

如何快速掌握网盘直链下载助手:八大网盘下载加速终极教程
如何快速掌握网盘直链下载助手:八大网盘下载加速终极教程 【免费下载链接】Online-disk-direct-link-download-assistant 一个基于 JavaScript 的网盘文件下载地址获取工具。基于【网盘直链下载助手】修改 ,支持 百度网盘 / 阿里云盘 / 中国移动云盘 / 天…...

智能自动化神器:3个核心功能彻底改变你的英雄联盟游戏体验
智能自动化神器:3个核心功能彻底改变你的英雄联盟游戏体验 【免费下载链接】League-Toolkit An all-in-one toolkit for LeagueClient. Gathering power 🚀. 项目地址: https://gitcode.com/gh_mirrors/le/League-Toolkit League Akari是一款为英…...

I2C总线长距离传输解决方案与信号完整性优化
1. I2C总线长距离传输的挑战与解决方案在嵌入式系统和设备间通信中,I2C总线因其简单的两线制设计(SCL时钟线和SDA数据线)而广受欢迎。然而标准I2C协议最初设计用于板级短距离通信,当需要扩展到20米甚至更长距离时,会遇…...

【收藏级】2026年大模型风口来袭!程序员/小白转行必看,附热门岗位全解析
2026年,随着AI大模型从“聊天对话”迈入“Agent主动执行”的范式跃迁,叠加国产模型的强势崛起,AI行业迎来新一轮爆发期。对于深耕技术的程序员,或是想要入门AI的小白来说,这不再是“可选”的转型机会,而是“…...

别再只ping 127.0.0.1了!聊聊这个‘回环地址’在开发、测试和网络屏蔽中的5个实战用法
127.0.0.1的五大实战应用:从开发调试到网络优化 每次在终端输入ping 127.0.0.1看到"Reply from 127.0.0.1"的响应时,你是否想过这个特殊的IP地址还能做什么?对于开发者、测试工程师和网络爱好者来说,127.0.0.1远不止是一…...

让你的技术文档和Readme“活”起来:GitHub/GitLab Markdown表情使用指南与最佳实践
让你的技术文档和Readme“活”起来:GitHub/GitLab Markdown表情使用指南与最佳实践 在开源项目的世界里,第一印象往往决定了开发者是否会驻足深入了解你的项目。而技术文档和Readme作为项目的"门面",如何让它们在众多同类项目中脱颖…...
)
别再只测TCP了!用iperf3的UDP模式给你的网络做个‘压力体检’(附丢包率与抖动分析指南)
用iperf3的UDP模式解锁网络质量深度诊断:从参数配置到业务场景实战 当开发视频会议系统时,我们团队曾遇到一个诡异现象:在带宽监控显示充足的情况下,用户仍频繁抱怨卡顿。直到用iperf3的UDP模式进行测试,才发现网络抖动…...

LM在教育场景的应用:美术教学中AI辅助人像构图与光影教学可视化
LM在教育场景的应用:美术教学中AI辅助人像构图与光影教学可视化 1. 引言:AI如何改变美术教育 传统美术教学中,人像构图与光影表现一直是教学难点。学生需要大量时间练习才能掌握这些抽象概念,而教师也面临示范作品制作耗时、难以…...