I.MX6U开发板上的Qt串口编程
真正串口通讯所需的功能是比较多的,此处的上位机只实现发送和接收功能。因为Linux、windows和开发板上均有串口,所以所开发的上位机在其上都是可以运行的。
文章目录
- 1. 资源简介
- 2. 应用实例
- 2.1 项目简介:
- 2.2 03_serialport.pro
- 2.3 mainwindow.h
- 2.4 mainwindow.cpp
- 3. 程序运行效果
- 4. 串口测试
1. 资源简介
在正点原子的 I.MX6U 开发板的出厂系统里,默认已经配置了两路串口可用。一路是调试串口UART1(对应系统里的节点/dev/ttymxc0),另一路是UART3(对应系统里的节点/dev/ttymxc2)。由于 UART1 已经作为调试串口被使用。所以我们只能对 UART3 编程,(如需要使用多路串口,请自行设计底板与系统)。
2. 应用实例
2.1 项目简介:
Qt 串口的使用示例,应用到正点原子 I.MX6U 开发板上。
2.2 03_serialport.pro
在 03_serialport.pro 里, 我们需要使用串口,需要在 pro 项目文件中添加串口模块的支持,如下。
1 # 添加串口模块支持
2 QT += core gui serialport
3 4
greaterThan(QT_MAJOR_VERSION, 4): QT += widgets
5 6
CONFIG += c++11
7 8
# The following define makes your compiler emit warnings if you use
9 # any Qt feature that has been marked deprecated (the exact warnings
10 # depend on your compiler). Please consult the documentation of the
11 # deprecated API in order to know how to port your code away from it.
12 DEFINES += QT_DEPRECATED_WARNINGS
13
14 # You can also make your code fail to compile if it uses deprecated APIs.
15 # In order to do so, uncomment the following line.
16 # You can also select to disable deprecated APIs only up to a certain
version of Qt.
17 #DEFINES += QT_DISABLE_DEPRECATED_BEFORE=0x060000 # disables all the
APIs deprecated before Qt 6.0.0
18
19 SOURCES += \
20 main.cpp \
21 mainwindow.cpp
22
23 HEADERS += \
24 mainwindow.h
25
26 # Default rules for deployment.
27 qnx: target.path = /tmp/$${TARGET}/bin
28 else: unix:!android: target.path = /opt/$${TARGET}/bin
29 !isEmpty(target.path): INSTALLS += target
第 2 行,添加的 serialport 就是串口模块的支持。
2.3 mainwindow.h
在头文件“mainwindow.h”的代码如下。
1 #ifndef MAINWINDOW_H
2 #define MAINWINDOW_H
3 4
#include <QMainWindow>
5 #include <QSerialPort>
6 #include <QSerialPortInfo>
7 #include <QPushButton>
8 #include <QTextBrowser>
9 #include <QTextEdit>
10 #include <QVBoxLayout>
11 #include <QLabel>
12 #include <QComboBox>
13 #include <QGridLayout>
14 #include <QMessageBox>
15 #include <QDebug>
16
17 class MainWindow : public QMainWindow
18 {
19 Q_OBJECT
20
21 public:
22 MainWindow(QWidget *parent = nullptr);
23 ~MainWindow();
24
25 private:
26 /* 串口对象 */
27 QSerialPort *serialPort;
28
29 /* 用作接收数据 */
30 QTextBrowser *textBrowser;
31
32 /* 用作发送数据 */
33 QTextEdit *textEdit;
34
35 /* 按钮 */
36 QPushButton *pushButton[2];
37
38 /* 下拉选择盒子 */
39 QComboBox *comboBox[5];
40
41 /* 标签 */
42 QLabel *label[5];
43
44 /* 垂直布局 */
45 QVBoxLayout *vboxLayout;
46
47 /* 网络布局 */
48 QGridLayout *gridLayout;
49
50 /* 主布局 */
51 QWidget *mainWidget;
52
53 /* 设置功能区域 */
54 QWidget *funcWidget;
55
56 /* 布局初始化 */
57 void layoutInit();
58
59 /* 扫描系统可用串口 */
60 void scanSerialPort();
61
62 /* 波特率项初始化 */
63 void baudRateItemInit();
64
65 /* 数据位项初始化 */
66 void dataBitsItemInit();
67
68 /* 检验位项初始化 */
69 void parityItemInit();
70
71 /* 停止位项初始化 */
72 void stopBitsItemInit();
73
74 private slots:
75 void sendPushButtonClicked();
76 void openSerialPortPushButtonClicked();
77 void serialPortReadyRead();
78 };
79 #endif // MAINWINDOW_H
上面代码是在 mianwindow.h 里声明需要用到的变量,方法及槽函数。
2.4 mainwindow.cpp
mainwindow.cpp 的代码如下。
1 #include "mainwindow.h"
2 #include <QDebug>
3 #include <QGuiApplication>
4 #include <QScreen>
5 #include <QRect>
6 7
MainWindow::MainWindow(QWidget *parent)
8 : QMainWindow(parent)
9 {
10 /* 布局初始化 */
11 layoutInit();
12
13 /* 扫描系统的串口 */
14 scanSerialPort();
15
16 /* 波特率项初始化 */
17 baudRateItemInit();
18
19 /* 数据位项初始化 */
20 dataBitsItemInit();
21
22 /* 检验位项初始化 */
23 parityItemInit();
24
25 /* 停止位项初始化 */
26 stopBitsItemInit();
27 }
28
29 void MainWindow::layoutInit()
30 {
31 /* 获取屏幕的分辨率, Qt 官方建议使用这
32 * 种方法获取屏幕分辨率,防上多屏设备导致对应不上
33 * 注意,这是获取整个桌面系统的分辨率
34 */
35 QList <QScreen *> list_screen = QGuiApplication::screens();
36
37 /* 如果是 ARM 平台,直接设置大小为屏幕的大小 */
38 #if __arm__
39 /* 重设大小 */
40 this->resize(list_screen.at(0)->geometry().width(),
41 list_screen.at(0)->geometry().height());
42 #else
43 /* 否则则设置主窗体大小为 800x480 */
44 this->resize(800, 480);
45 #endif
46 /* 初始化 */
47 serialPort = new QSerialPort(this);
48 textBrowser = new QTextBrowser();
49 textEdit = new QTextEdit();
50 vboxLayout = new QVBoxLayout();
51 funcWidget = new QWidget();
52 mainWidget = new QWidget();
53 gridLayout = new QGridLayout();
54
55 /* QList 链表,字符串类型 */
56 QList <QString> list1;
57 list1<<"串口号:"<<"波特率:"<<"数据位:"<<"检验位:"<<"停止位:";
58
59 for (int i = 0; i < 5; i++) {
60 label[i] = new QLabel(list1[i]);
61 /* 设置最小宽度与高度 */
62 label[i]->setMinimumSize(80, 30);
63 /* 自动调整 label 的大小 */
64 label[i]->setSizePolicy(
65 QSizePolicy::Expanding,
66 QSizePolicy::Expanding
67 );
68 /* 将 label[i]添加至网格的坐标(0, i) */
69 gridLayout->addWidget(label[i], 0, i);
70 }
71
72 for (int i = 0; i < 5; i++) {
73 comboBox[i] = new QComboBox();
74 comboBox[i]->setMinimumSize(80, 30);
75 /* 自动调整 label 的大小 */
76 comboBox[i]->setSizePolicy(
77 QSizePolicy::Expanding,
78 QSizePolicy::Expanding
79 );
80 /* 将 comboBox[i]添加至网格的坐标(1, i) */
81 gridLayout->addWidget(comboBox[i], 1, i);
82 }
83
84 /* QList 链表,字符串类型 */
85 QList <QString> list2;
86 list2<<"发送"<<"打开串口";
87
88 for (int i = 0; i < 2; i++) {
89 pushButton[i] = new QPushButton(list2[i]);
90 pushButton[i]->setMinimumSize(80, 30);
91 /* 自动调整 label 的大小 */
92 pushButton[i]->setSizePolicy(
93 QSizePolicy::Expanding,
94 QSizePolicy::Expanding
95 );
96 /* 将 pushButton[0]添加至网格的坐标(i, 5) */
97 gridLayout->addWidget(pushButton[i], i, 5);
98 }
99 pushButton[0]->setEnabled(false);
100
101 /* 布局 */
102 vboxLayout->addWidget(textBrowser);
103 vboxLayout->addWidget(textEdit);
104 funcWidget->setLayout(gridLayout);
105 vboxLayout->addWidget(funcWidget);
106 mainWidget->setLayout(vboxLayout);
107 this->setCentralWidget(mainWidget);
108
109 /* 占位文本 */
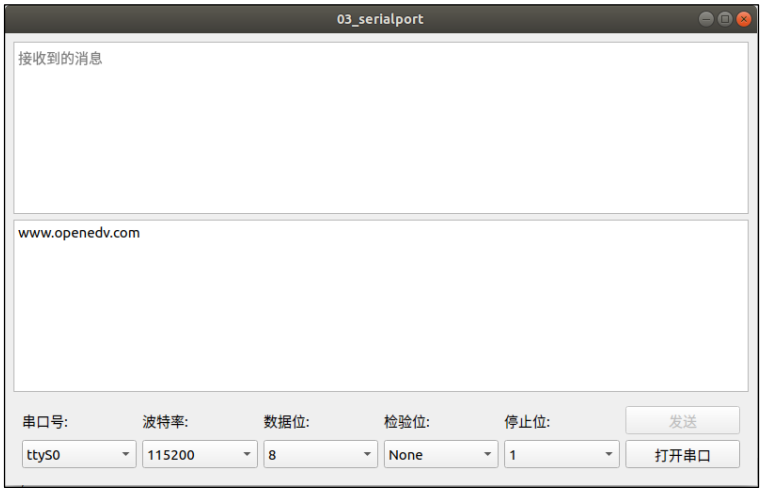
110 textBrowser->setPlaceholderText("接收到的消息");
111 textEdit->setText("www.openedv.com");
112
113 /* 信号槽连接 */
114 connect(pushButton[0], SIGNAL(clicked()),
115 this, SLOT(sendPushButtonClicked()));
116 connect(pushButton[1], SIGNAL(clicked()),
117 this, SLOT(openSerialPortPushButtonClicked()));
118
119 connect(serialPort, SIGNAL(readyRead()),
120 this, SLOT(serialPortReadyRead()));
121 }
122
123 void MainWindow::scanSerialPort()
124 {
125 /* 查找可用串口 */
126 foreach (const QSerialPortInfo &info,
127 QSerialPortInfo::availablePorts()) {
128 comboBox[0]->addItem(info.portName());
129 }
130 }
131
132 void MainWindow::baudRateItemInit()
133 {
134 /* QList 链表,字符串类型 */
135 QList <QString> list;
136 list<<"1200"<<"2400"<<"4800"<<"9600"
137 <<"19200"<<"38400"<<"57600"
138 <<"115200"<<"230400"<<"460800"
139 <<"921600";
140 for (int i = 0; i < 11; i++) {
141 comboBox[1]->addItem(list[i]);
142 }
143 comboBox[1]->setCurrentIndex(7);
144 }
145
146 void MainWindow::dataBitsItemInit()
147 {
148 /* QList 链表,字符串类型 */
149 QList <QString> list;
150 list<<"5"<<"6"<<"7"<<"8";
151 for (int i = 0; i < 4; i++) {
152 comboBox[2]->addItem(list[i]);
153 }
154 comboBox[2]->setCurrentIndex(3);
155 }
156
157 void MainWindow::parityItemInit()
158 {
159 /* QList 链表,字符串类型 */
160 QList <QString> list;
161 list<<"None"<<"Even"<<"Odd"<<"Space"<<"Mark";
162 for (int i = 0; i < 5; i++) {
163 comboBox[3]->addItem(list[i]);
164 }
165 comboBox[3]->setCurrentIndex(0);
166 }
167
168 void MainWindow::stopBitsItemInit()
169 {
170 /* QList 链表,字符串类型 */
171 QList <QString> list;
172 list<<"1"<<"2";
173 for (int i = 0; i < 2; i++) {
174 comboBox[4]->addItem(list[i]);
175 }
176 comboBox[4]->setCurrentIndex(0);
177 }
178
179 void MainWindow::sendPushButtonClicked()
180 {
181 /* 获取 textEdit 数据,转换成 utf8 格式的字节流 */
182 QByteArray data = textEdit->toPlainText().toUtf8();
183 serialPort->write(data);
184 }
185
186 void MainWindow::openSerialPortPushButtonClicked()
187 {
188 if (pushButton[1]->text() == "打开串口") {
189 /* 设置串口名 */
190 serialPort->setPortName(comboBox[0]->currentText());
191 /* 设置波特率 */
192 serialPort->setBaudRate(comboBox[1]->currentText().toInt());
193 /* 设置数据位数 */
194 switch (comboBox[2]->currentText().toInt()) {
195 case 5:
196 serialPort->setDataBits(QSerialPort::Data5);
197 break;
198 case 6:
199 serialPort->setDataBits(QSerialPort::Data6);
200 break;
201 case 7:
202 serialPort->setDataBits(QSerialPort::Data7);
203 break;
204 case 8:
205 serialPort->setDataBits(QSerialPort::Data8);
206 break;
207 default: break;
208 }
209 /* 设置奇偶校验 */
210 switch (comboBox[3]->currentIndex()) {
211 case 0:
212 serialPort->setParity(QSerialPort::NoParity);
213 break;
214 case 1:
215 serialPort->setParity(QSerialPort::EvenParity);
216 break;
217 case 2:
218 serialPort->setParity(QSerialPort::OddParity);
219 break;
220 case 3:
221 serialPort->setParity(QSerialPort::SpaceParity);
222 break;
223 case 4:
224 serialPort->setParity(QSerialPort::MarkParity);
225 break;
226 default: break;
227 }
228 /* 设置停止位 */
229 switch (comboBox[4]->currentText().toInt()) {
230 case 1:
231 serialPort->setStopBits(QSerialPort::OneStop);
232 break;
233 case 2:
234 serialPort->setStopBits(QSerialPort::TwoStop);
235 break;
236 default: break;
237 }
238 /* 设置流控制 */
239 serialPort->setFlowControl(QSerialPort::NoFlowControl);
240 if (!serialPort->open(QIODevice::ReadWrite))
241 QMessageBox::about(NULL, "错误",
242 "串口无法打开!可能串口已经被占用! ");
243 else {
244 for (int i = 0; i < 5; i++)
245 comboBox[i]->setEnabled(false);
246 pushButton[1]->setText("关闭串口");
247 pushButton[0]->setEnabled(true);
248 }
249 } else {
250 serialPort->close();
251 for (int i = 0; i < 5; i++)
252 comboBox[i]->setEnabled(true);
253 pushButton[1]->setText("打开串口");
254 pushButton[0]->setEnabled(false);
255 }
256 }
257
258 void MainWindow::serialPortReadyRead()
259 {
260 /* 接收缓冲区中读取数据 */
261 QByteArray buf = serialPort->readAll();
262 textBrowser->insertPlainText(QString(buf));
263 }
264
265 MainWindow::~MainWindow()
266 {
267 }
第 29~121 行, 界面布局初始化设置,在嵌入式里,根据实际的屏的大小,设置全屏显示。
其中我们用到垂直布局和网格布局。
习布局内容,学以致用理解的时候到了。
第 123~130 行, 查找系统可用的串口, 并添加串口名到 comboBox[0]中。
第 132~144 行, 波特率初始化,预设常用的波特率, 115200 作为默认选项。 并添加波特率
到 comboBox[1]中。
第 146~155 行, 数据位项初始化,设置默认数据位为 8。
第 157~166 行, 校验位项初始化,默认无校验位。
第 168~177 行, 停止位项初始化,默认停止位为 1。
第 179~184 行, 发送数据,点击发送按钮时触发。
第 186~256 行, 打开或者关闭串口。以我们设置的项使用 Qt 串口提供的设置串口的方法
如 setDataBits(QSerialPort::DataBits)等,按第 188~239 行步骤设置完串口需要配置的参数就可以
打开或者关闭串口了。
第 258~263 行, 从缓冲区里读出数据,并显示到 textBrowser 里。
3. 程序运行效果
下面为 Ubuntu 上仿真界面的效果,请将程序交叉编译后到开发板运行,用串口线连接开发板的 UART3 到电脑串口,在电脑用正点原子的 XCOM 上位机软件(或者本程序亦可当上位机软件),设置相同的串口参数,选择串口号为 ttymxc2 (注意 ttymxc0 已经作为调试串口被使用了!),点击打开串口就可以进行消息收发了。默认参数为波特率为 115200,数据位为 8,校验为 None,停止位为 1,流控为关闭。
4. 串口测试
关于串口测试的硬件软件,请参考“01【正点原子】I.MX6U用户快速体验V2.6”
实际测试时,请参考Qt串口编程3-开发板验证,下图是实现了上位机与板卡连接的UI上位机的通讯。
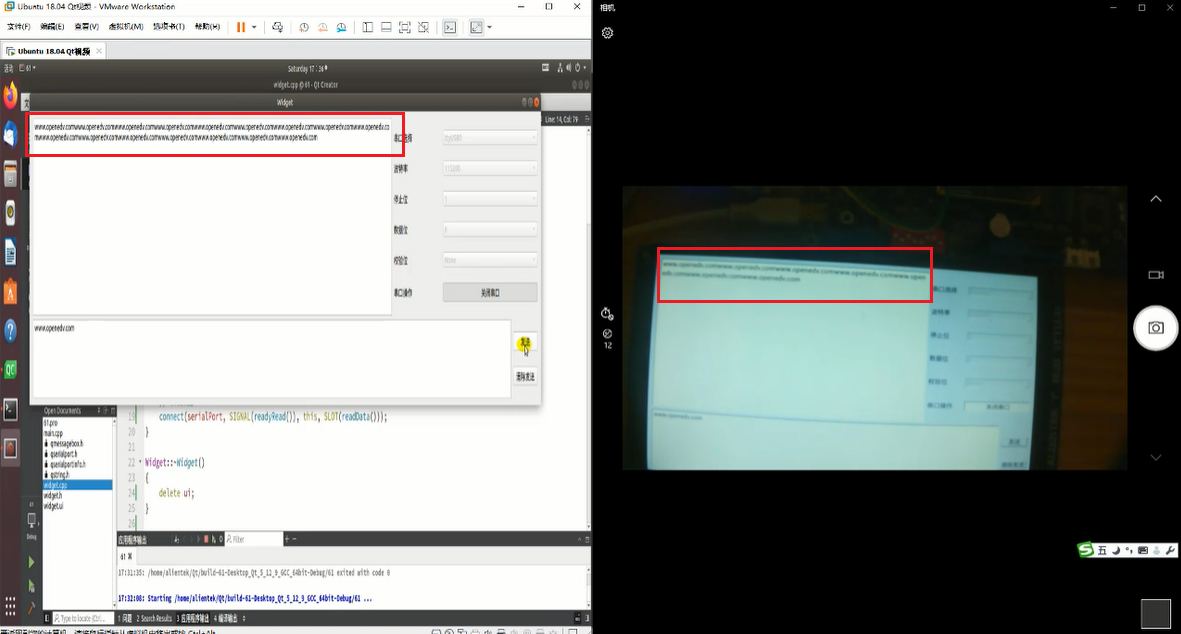
对应地址:Qt串口编程1-上位机界面设计,Qt串口编程2-编写程序功能,Qt串口编程3-开发板验证
相关文章:
I.MX6U开发板上的Qt串口编程
真正串口通讯所需的功能是比较多的,此处的上位机只实现发送和接收功能。因为Linux、windows和开发板上均有串口,所以所开发的上位机在其上都是可以运行的。 文章目录 1. 资源简介2. 应用实例2.1 项目简介:2.2 03_serialport.pro2.3 mainwind…...

深入理解多线程编程和 JVM 内存模型
文章目录 1. 理解进程和线程的概念进程(Process)线程(Thread) 2. 理解竞态条件和死锁竞态条件(Race Condition)死锁(Deadlock) 3. JVM 内存模型堆(Heap)栈&am…...

QML(25)——文本输入框组件的区别(TextField TextInput TextArea TextEdit)
目录 效果展示适用场景文本组件TextLabelText和Label的区别 单行文本输入框TextFieldTextInputTextField 和 TextInput的区别 多行文本输入框TextAreaTextArea 和 TextEdit 的区别 效果展示 适用场景 场景组件属性短文本Text长文本 末尾省略Textelide: Text.ElideRight文本设置…...
SpringBoot连接MySQL密码错误,报错:Access denied for user
记:一次连接MySQL报密码错误,Access denied for user 检查步骤: 核对用户和密码是否正确,用工具登陆试下。如果配置文件是yml格式,配置密码是123456这种纯数字,记得加上单/双引号。检查云上数据库配置&am…...
如何使用visual studio 2010构建SQLite3.lib文件
sqlite3官网只提供了dll,并没有lib文件。需要自己生成sqlite3.lib。因项目升级到x64,以前并没有生成64位的链接库,需要自己创建。本人电脑操作系统windows 10, 开发环境为visual studio 2010。下面是详细生成过程。 1. 从源下载源(…...

反转链表review
反转链表 /*** Definition for singly-linked list.* public class ListNode {* int val;* ListNode next;* ListNode() {}* ListNode(int val) { this.val val; }* ListNode(int val, ListNode next) { this.val val; this.next next; }* }*/ class …...
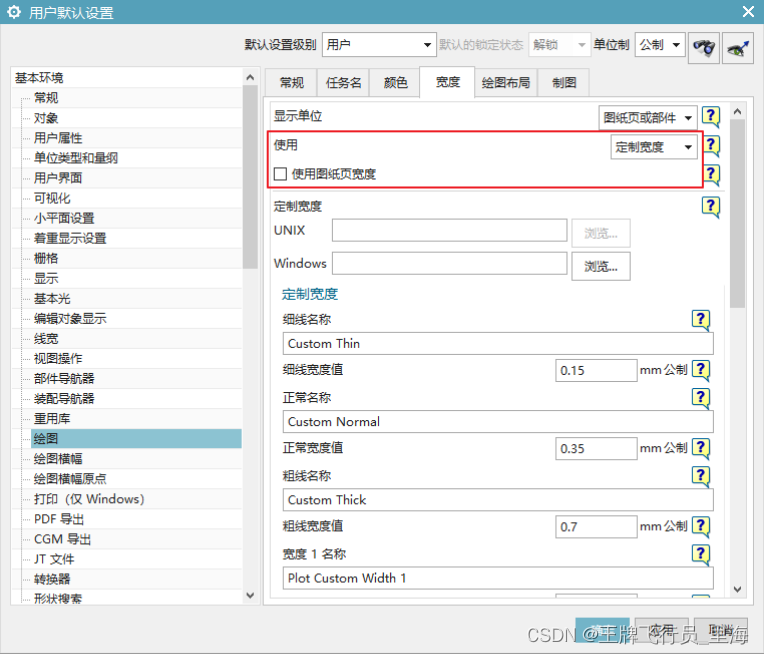
UG\NX二次开发 获取用户默认设置中的绘图信息 UF_PLOT_ask_session_job_options
文章作者:里海 来源网站:《里海NX二次开发3000例专栏》 感谢粉丝订阅 感谢 m0_58724732 订阅本专栏,非常感谢。 简介 UG\NX二次开发 获取用户默认设置中的绘图信息 UF_PLOT_ask_session_job_options 效果 代码 #include "me.hp...

数字图像处理实验记录五(图像的空间域增强-锐化处理)
前言: 文章目录 一、基础知识1,什么是锐化?2,为什么要锐化?3,怎么进行锐化? 二、实验要求任务1:任务2:任务3: 三、实验记录:任务1:任…...

基于水基湍流优化的BP神经网络(分类应用) - 附代码
基于水基湍流优化的BP神经网络(分类应用) - 附代码 文章目录 基于水基湍流优化的BP神经网络(分类应用) - 附代码1.鸢尾花iris数据介绍2.数据集整理3.水基湍流优化BP神经网络3.1 BP神经网络参数设置3.2 水基湍流算法应用 4.测试结果…...

0010【Edabit ★☆☆☆☆☆】Maximum Edge of a Triangle
【Edabit 算法 ★☆☆☆☆☆】Maximum Edge of a Triangle algorithms math numbers Instructions Create a function that finds the maximum range of a triangle’s third edge, where the side lengths are all integers. Examples nextEdge(8, 10) // 17 nextEdge(5, 7…...
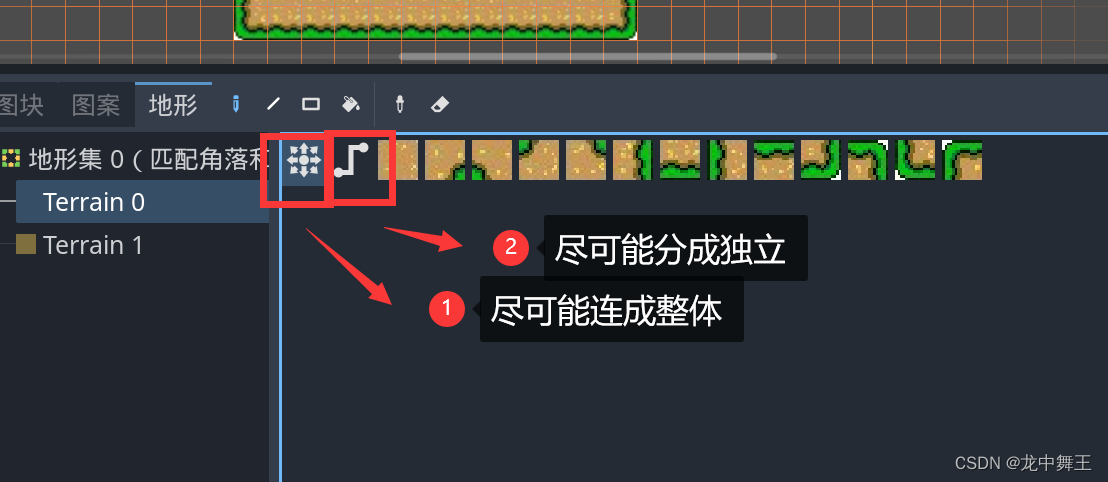
Godot 官方2D C#重构(3):TileMap使用
文章目录 前言Godot Tilemap使用Tilemap使用TileSet和TilemapTilemap 图片资源添加TileSet,开始切图导入图片切图 简单添加TileMap如何使用 Auto Tilemap使用Auto Tilemap 前言 Godot 官方 教程 Godot 2d 官方案例C#重构 专栏 Godot 2d 重构 github地址 Godot Tilem…...
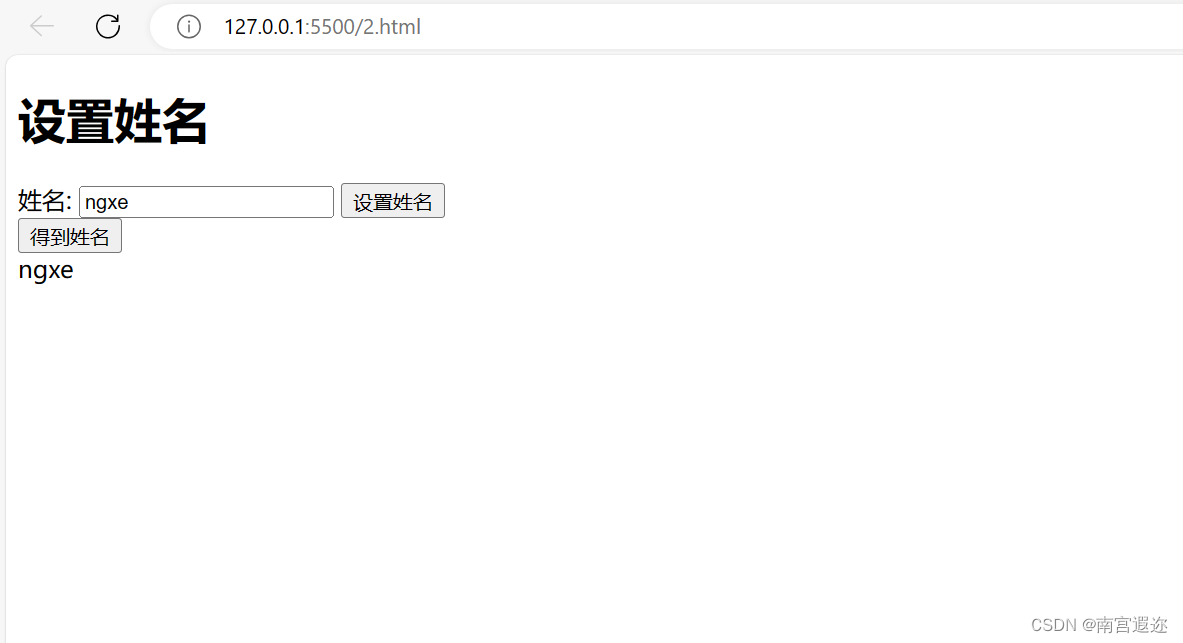
6.DApp-用Web3实现前端与智能合约的交互
题记 用Web3实现前端与智能合约的交互,以下是操作流程和代码。 准备ganache环境 文章地址:4.DApp-MetaMask怎么连接本地Ganache-CSDN博客 准备智能合约 文章地址: 2.DApp-编写和运行solidity智能合约-CSDN博客 编写index.html文件 <!…...

数据异常值检测
数据异常值检测 参考: 数据异常值的检测方法-基于Python 独家 | 每个数据科学家应该知道的五种检测异常值的方法(附Python代码) 异常检测主要方法总结 14种数据异常值检验的方法! 14种数据异常值检验的方法 浅谈数据挖掘中的…...

监听redis键失效事件实现延迟功能
用Redis实现延迟队列,我研究了两种方案,发现并不简单 SpringBoot实现Redis失效监听事件—KeyExpirationEventMessageListener Redis 监听过期的key(KeyExpirationEventMessageListener) 项目背景 需求上说,需要延迟…...

使用UniApp实现视频数组自动下载与播放功能:一步步指导
🌷🍁 博主猫头虎 带您 Go to New World.✨🍁 🦄 博客首页——猫头虎的博客🎐 🐳《面试题大全专栏》 文章图文并茂🦕生动形象🦖简单易学!欢迎大家来踩踩~🌺 &a…...
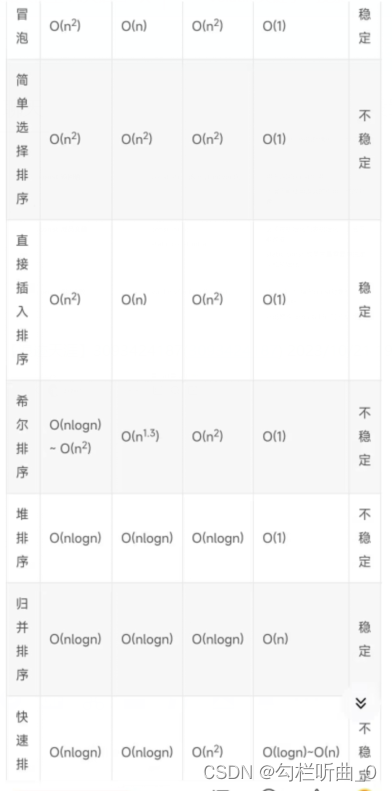
C语言笔试面试必刷题
🎊【面经】专题正在持续更新中,内含C语言,数据结构,Linux,网络编程等✨,欢迎大家前往订阅本专题,获取更多详细信息哦🎏🎏🎏 🪔本系列专栏 - …...

window11安装Python环境
python环境安装 访问Python官网:https://www.python.org/ 点击downloads按钮,在下拉框中选择系统类型(windows/Mac OS/Linux等) 选择下载最新版本的Python cmd命令如果出现版本号以及>>>则表示安装成功 如果出现命令行中输入python出现如下错误 可能…...
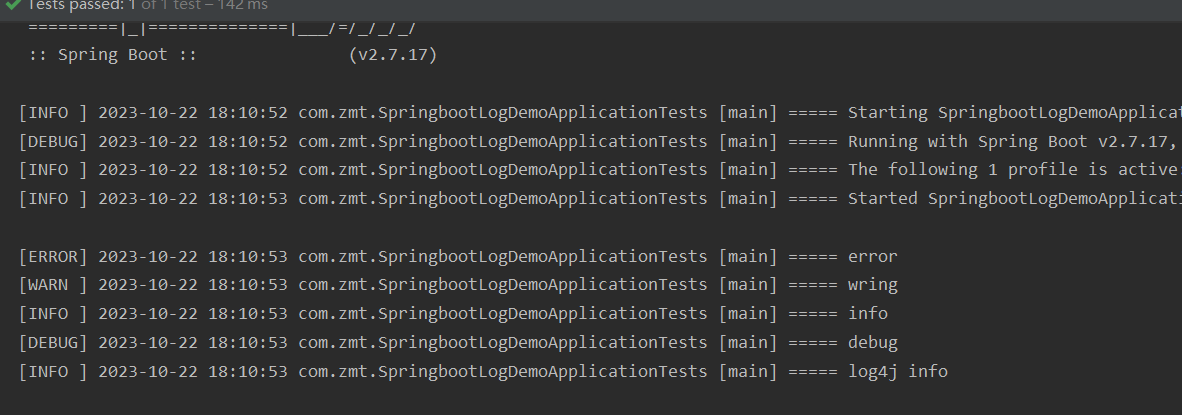
SpringBoot中的日志使用
SpringBoot的默认使用 观察SpringBoot的Maven依赖图 可以看出来,SpringBoot默认使用的日志系统是使用Slf4j作为门户,logback作为日志实现 编写一个测试代码看是否是这样 SpringBootTest class SpringbootLogDemoApplicationTests {//使用Slf4j来创建LOG…...

微信小程序中监听横屏竖屏
直接上代码 第一步:在你想要监听页面的json文件中添加此节点 "pageOrientation": "auto" 第二步:wx.onWindowResize() page({ onLoad() {this.kstd()},kstd(){ // 监听屏幕旋转事件 wx.onWindowResize((res)>{// …...
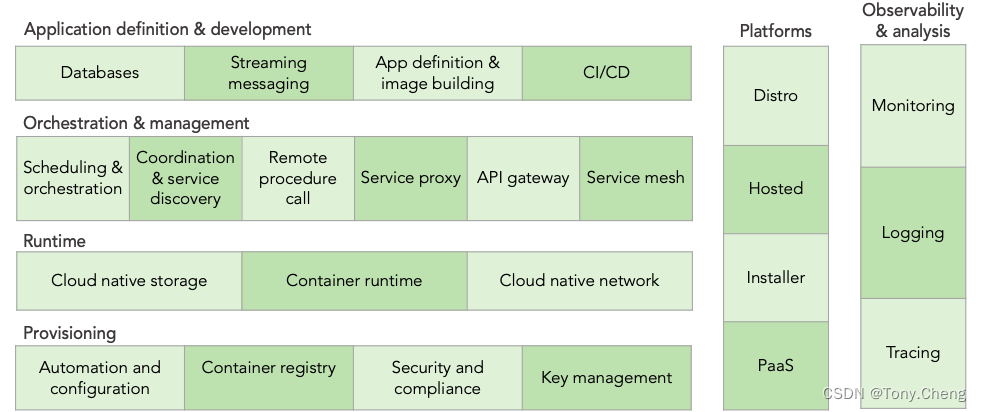
云原生概述
1. 何谓云原生 云原生是一种构建和运行应用程序的方法,是一套技术体系和方法论。云原生(CloudNative)是一个组合词,CloudNative。Cloud表示应用程序位于云中,而不是传统的数据中心;Native表示应用程序从设…...

从手机信号到芯片时钟:聊聊“扩频”技术的前世今生与硬件设计中的巧妙应用
从手机信号到芯片时钟:聊聊“扩频”技术的前世今生与硬件设计中的巧妙应用 想象一下音乐会散场时的人流:如果所有人都挤在同一个出口,必然造成拥堵甚至踩踏风险。聪明的场馆管理者会采取"分时段放行"或"多通道疏导"策略—…...

KingbaseES人大金仓数据库Windows部署实战:从零安装到服务启动排障
1. KingbaseES数据库简介与安装准备 KingbaseES是人大金仓自主研发的一款关系型数据库管理系统,它在国产数据库领域占据重要地位。作为一款兼容PostgreSQL协议的产品,KingbaseES在政务、金融等行业有着广泛应用。我第一次接触KingbaseES是在一个政府信息…...

智能代码生成与发布管理全链路拆解,从Prompt工程到灰度发布SOP落地实操
第一章:智能代码生成与发布管理全链路拆解,从Prompt工程到灰度发布SOP落地实操 2026奇点智能技术大会(https://ml-summit.org) 现代研发效能的跃迁已不再依赖单一工具升级,而是始于对Prompt意图的精准建模,终于生产环境流量的可…...

别只调API!深入理解ESP32 BLE安全的三个阶段:配对、绑定与加密到底在干啥?
别只调API!深入理解ESP32 BLE安全的三个阶段:配对、绑定与加密到底在干啥? 当你用ESP32开发BLE应用时,是否遇到过这样的场景:设备配对时突然失败,绑定后密钥莫名其妙丢失,或者加密链路时断时续&…...

海康威视第一季营收207亿:同比增12% 净利27.8亿 高毅资产减持
雷递网 乐天 4月17日杭州海康威视数字技术股份有限公司(证券代码:002415 证券简称:海康威视)今日发布截至2025年的年报。财报显示,海康威视2026年第一季度营收为207.15亿元,较上年同期的185.3亿元增长11.78…...

5分钟掌握微信数据库密钥提取:Sharp-dumpkey终极指南
5分钟掌握微信数据库密钥提取:Sharp-dumpkey终极指南 【免费下载链接】Sharp-dumpkey 基于C#实现的获取微信数据库密钥的小工具 项目地址: https://gitcode.com/gh_mirrors/sh/Sharp-dumpkey 当你需要迁移微信聊天记录或恢复误删的重要对话时,是否…...

别再手动调色了!用MATLAB bar函数绘制多组堆叠柱状图的配色自动化技巧
MATLAB堆叠柱状图配色自动化:告别手动调色的高效解决方案 科研图表绘制中,堆叠柱状图是展示多维度数据的利器,但每次手动设置子柱颜色的繁琐操作让不少研究者头疼。想象一下,当你处理包含20组数据、每组5个子柱的复杂图表时&#…...

当AI开始“理财“:智能投顾是帮你赚钱还是割韭菜?
写在前面:2024年,A股市场迎来了一波AI投资热潮。各大券商、基金公司纷纷推出AI智能投顾产品,宣称"AI选股,稳赚不赔"、“智能分析,收益跑赢大盘”。然而,事实真的如此美好吗?当AI开始帮…...

OBS Advanced Timer:直播时间管理的终极解决方案
OBS Advanced Timer:直播时间管理的终极解决方案 【免费下载链接】obs-advanced-timer 项目地址: https://gitcode.com/gh_mirrors/ob/obs-advanced-timer 在直播的世界里,时间就是一切。无论是教学直播的章节控制、游戏直播的BOSS战计时&#x…...

从源码到实战:手把手教你编译与定制化iperf网络性能测试工具
1. iperf工具简介与适用场景 iperf是一款经典的开源网络性能测试工具,它通过测量TCP/UDP带宽来评估网络质量。我第一次接触这个工具是在调试嵌入式设备的网络吞吐量时,当时需要验证百兆网口的实际传输速率是否达标。相比简单的ping命令,iperf…...