03_Flutter自定义下拉菜单
03_Flutter自定义下拉菜单
在Flutter的内置api中,可以使用showMenu实现类似下拉菜单的效果,或者使用PopupMenuButton组件,PopupMenuButton内部也是使用了showMenu这个api,但是使用showMenu时,下拉面板的显示已经被约定死了,只能放一个简单的列表,没有办法定制下来面板的ui,并且下拉面板的宽高需要通过指定constraints进行限制,下面是一个简单的showMenu的用法:
Container(height: 44,margin: EdgeInsetsDirectional.only(top: 30, start: 30, end: 30),color: Colors.red,child: Builder(builder: (context) {return GestureDetector(onTap: () {final RenderBox button = context.findRenderObject()! as RenderBox;final RenderBox overlay = Navigator.of(context).overlay!.context.findRenderObject()! as RenderBox;Offset offset = Offset(0.0, button.size.height);RelativeRect position = RelativeRect.fromRect(Rect.fromPoints(button.localToGlobal(offset, ancestor: overlay),button.localToGlobal(button.size.bottomRight(Offset.zero) + offset, ancestor: overlay),),Offset.zero & overlay.size,);showMenu(context: context,position: position,constraints: BoxConstraints(maxWidth: 315, maxHeight: 200),items: List.generate(5, (index) => PopupMenuItem(child: Container(width: 375,height: 44,alignment: AlignmentDirectional.center,child: Text("item"),))));},);},),
)

接下来,我们将参照showMenu的源码,依葫芦画个瓢,自定义一个下拉菜单的api,并可自由定制下拉面板的布局内容,篇幅有点长,请耐心观看。
一.确定下拉面板的起始位置
查看PopupMenuButton的源码,可以知道,PopupMenuButton在确定下拉面板的起始位置时,是先获取下拉面板依赖的按钮的边界位置和整个页面的显示区域边界,通过这两个边界计算得到一个RelativeRect,这个RelativeRect就是用来描述下拉面板的起始位置的。
showPopup(BuildContext context) {final RenderBox button = context.findRenderObject()! as RenderBox;final RenderBox overlay = Navigator.of(context).overlay!.context.findRenderObject()! as RenderBox;Offset offset = Offset(0.0, button.size.height);RelativeRect position = RelativeRect.fromRect(Rect.fromPoints(button.localToGlobal(offset, ancestor: overlay),button.localToGlobal(button.size.bottomRight(Offset.zero) + offset, ancestor: overlay),),Offset.zero & overlay.size,);
}
注:上述代码中用的的context对象,必须是下拉面板依赖的按钮对应的context,否则最后计算出来的RelativeRect是不对的。计算过程不做过多解释了,直接上图:

二.确定下拉面板的布局约束
- 水平方向确定最大宽度,比较简单,下拉面板的最大宽度和它所依赖的按钮的宽度一致即可
- 垂直方向上的最大高度,上一步已经确定了position的值,垂直方向上的最大高度可以取position.top - buttonHeight - padding.top - kToolbarHeight和constraints.biggest.height - position.top - padding.bottom的最大值,padding为安全区域的大小
- 使用CustomSingleChildLayout作为下拉面板的父容器,并实现一个SingleChildLayoutDelegate,重写getConstraintsForChild,确定约束
EdgeInsets padding = MediaQuery.paddingOf(context);class _CustomPopupRouteLayout extends SingleChildLayoutDelegate {final RelativeRect position;_CustomPopupRouteLayout(this.position);BoxConstraints getConstraintsForChild(BoxConstraints constraints) {Size buttonSize = position.toSize(constraints.biggest);double constraintsWidth = buttonSize.width;double constraintsHeight = max(position.top - buttonSize.height - padding.top - kToolbarHeight, constraints.biggest.height - position.top - padding.bottom);return BoxConstraints.loose(Size(constraintsWidth, constraintsHeight));}bool shouldRelayout(covariant _CustomPopupRouteLayout oldDelegate) {return position != oldDelegate.position;}
}
三.显示下拉面板
我们先把下拉面板显示出来看看效果,这里的下拉面板其实是一个弹出层,而在Flutter中,所有的弹出层的显示和页面路由是一样的,都是通过Navigator.push进行显示,参照showMenu的源码,这里的弹出层我们让其继承PopupRoute
class _CustomPopupRoute<T> extends PopupRoute<T> {final RelativeRect position;final String? barrierLabel;_CustomPopupRoute({required this.position,required this.barrierLabel,});Color? get barrierColor => null;bool get barrierDismissible => true;Duration get transitionDuration => Duration(milliseconds: 200);Widget buildPage(BuildContext context, Animation<double> animation, Animation<double> secondaryAnimation) {return CustomSingleChildLayout(delegate: _CustomPopupRouteLayout(position),child: Material(child: Container(color: Colors.yellow,width: double.infinity,height: double.infinity,alignment: AlignmentDirectional.center,child: Text("popup content"),),),);}}
showPopup(BuildContext context) {final RenderBox button = context.findRenderObject()! as RenderBox;final RenderBox overlay = Navigator.of(context).overlay!.context.findRenderObject()! as RenderBox;Offset offset = Offset(0.0, button.size.height);RelativeRect position = RelativeRect.fromRect(Rect.fromPoints(button.localToGlobal(offset, ancestor: overlay),button.localToGlobal(button.size.bottomRight(Offset.zero) + offset, ancestor: overlay),),Offset.zero & overlay.size,);Navigator.of(context).push(_CustomPopupRoute(position: position, barrierLabel: MaterialLocalizations.of(context).modalBarrierDismissLabel));
}

如图,黄色区域就是下拉面板,可以看到,点击按钮下拉面板显示,点击下拉面板以外的区域,下拉面板关闭,但是位置好像不对,因为我们根本就没去确定下拉面板的位置。
四.确定下拉面板的位置
Offset getPositionForChild(Size size, Size childSize) {return super.getPositionForChild(size, childSize);
}
只需要重写SingleChildLayoutDelegate的getPositionForChild方法,返回一个Offset对象,Offset的x、y的值就代表下拉面板左上角的位置,那么问题来了,x、y的值怎么确定?
-
确定x
x = position.left
-
确定y
position.top + constraintsHeight > size.height - paddingBottom时

position.top + constraintsHeight <= size.height - paddingBottom时

EdgeInsets padding = MediaQuery.paddingOf(context);class _CustomPopupRouteLayout extends SingleChildLayoutDelegate {final RelativeRect position;EdgeInsets padding;_CustomPopupRouteLayout(this.position, this.padding);BoxConstraints getConstraintsForChild(BoxConstraints constraints) {Size buttonSize = position.toSize(constraints.biggest);double constraintsWidth = buttonSize.width;double constraintsHeight = max(position.top - buttonSize.height - padding.top - kToolbarHeight, constraints.biggest.height - position.top - padding.bottom);return BoxConstraints.loose(Size(constraintsWidth, constraintsHeight));}Offset getPositionForChild(Size size, Size childSize) {double x = position.left;double y = position.top;final double buttonHeight = size.height - position.top - position.bottom;double constraintsHeight = max(position.top - buttonHeight - padding.top - kToolbarHeight, size.height - position.top - padding.bottom);if(position.top + constraintsHeight > size.height - padding.bottom) {y = position.top - childSize.height - buttonHeight;}return Offset(x, y);}bool shouldRelayout(covariant _CustomPopupRouteLayout oldDelegate) {return position != oldDelegate.position || padding != oldDelegate.padding;}
}

六.下拉动画实现
创建动画插值器,其值从0 ~ 1之间变化,动画时长为PopupRoute中重写的transitionDuration,及200ms时间内,从0变到1,或者从1变到0
final CurveTween heightFactorTween = CurveTween(curve: const Interval(0.0, 1.0));
使用AnimatedBuilder改造PopupRoute的布局结构,根据heightFactorTween的动画执行值 * 下拉菜单内容容器的高度,改变拉菜单内容的高度即可,这里暂时将高度设置为固定值300。
class _CustomPopupRoute<T> extends PopupRoute<T> {...Widget buildPage(BuildContext context, Animation<double> animation, Animation<double> secondaryAnimation) {EdgeInsets padding = MediaQuery.paddingOf(context);final CurveTween heightFactorTween = CurveTween(curve: const Interval(0.0, 1.0));return MediaQuery.removePadding(context: context,removeTop: true,removeBottom: true,removeLeft: true,removeRight: true,child: CustomSingleChildLayout(delegate: _CustomPopupRouteLayout(position, padding),child: AnimatedBuilder(animation: animation,builder: (context, child) {return Material(child: Container(height: 300*heightFactorTween.evaluate(animation),child: child,));},child: Container(color: Colors.yellow,width: double.infinity,height: 300,alignment: AlignmentDirectional.center,child: Text("popup content"),),),),);}
}

下拉动画效果已经出来了,但是实际情况下,下拉面板的高度是不能直接在组件层固定写死的,所以这里需要动态计算出下拉面板的高度。
七.下拉面板动态高度,支持下拉动画
想要获取组件的高度,需要等到组件的layout完成后,才能获取到组件的大小,因此,我们需要自定义一个RenderObject,重写其performLayout,在子控件第一次layout完后,获取到子控件的初始高度,子控件的初始化高度结合动画的高度比例系数来最终确定自身的大小。
class _RenderHeightFactorBox extends RenderShiftedBox {double _heightFactor;_RenderHeightFactorBox({RenderBox? child,double? heightFactor,}):_heightFactor = heightFactor ?? 1.0, super(child);double get heightFactor => _heightFactor;set heightFactor(double value) {if (_heightFactor == value) {return;}_heightFactor = value;markNeedsLayout();}void performLayout() {final BoxConstraints constraints = this.constraints;if (child == null) {size = constraints.constrain(Size.zero);return;}child!.layout(constraints, parentUsesSize: true);size = constraints.constrain(Size(child!.size.width,child!.size.height,));child!.layout(constraints.copyWith(maxWidth: size.width, maxHeight: size.height * heightFactor), parentUsesSize: true);size = constraints.constrain(Size(child!.size.width,child!.size.height,));}
}
接着定义一个SingleChildRenderObjectWidget,并引用_RenderHeightFactorBox
class _HeightFactorBox extends SingleChildRenderObjectWidget {final double? heightFactor;const _HeightFactorBox({super.key,this.heightFactor,super.child,});RenderObject createRenderObject(BuildContext context) => _RenderHeightFactorBox(heightFactor: heightFactor);void updateRenderObject(BuildContext context, _RenderHeightFactorBox renderObject) {renderObject.heightFactor = heightFactor ?? 1.0;}
}
最后把下拉面板中,执行动画的child使用_HeightFactorBox包裹,并传入heightFactorTween的执行结果即可。
Widget buildPage(BuildContext context, Animation<double> animation, Animation<double> secondaryAnimation) {EdgeInsets padding = MediaQuery.paddingOf(context);final CurveTween heightFactorTween = CurveTween(curve: const Interval(0.0, 1.0));return MediaQuery.removePadding(context: context,removeTop: true,removeBottom: true,removeLeft: true,removeRight: true,child: CustomSingleChildLayout(delegate: _CustomPopupRouteLayout(position, padding),child: AnimatedBuilder(animation: animation,builder: (context, child) {return Material(child: _HeightFactorBox(heightFactor: heightFactorTween.evaluate(animation),child: child,));},child: Container(color: Colors.yellow,width: double.infinity,height: double.infinity,alignment: AlignmentDirectional.center,child: Text("popup content"),),),),);
}
八.完整代码
class TestPage extends StatelessWidget {Widget build(BuildContext context) {return Scaffold(appBar: AppBar(title: Text("下拉菜单"),backgroundColor: Colors.blue,),body: Container(width: 375,child: Column(mainAxisSize: MainAxisSize.max,mainAxisAlignment: MainAxisAlignment.spaceBetween,crossAxisAlignment: CrossAxisAlignment.center,children: [Container(height: 44,margin: const EdgeInsetsDirectional.only(top: 30, start: 30, end: 30),color: Colors.red,child: Builder(builder: (context) {return GestureDetector(onTap: () {showPopup(context: context, builder: (context) {return Container(height: 400,decoration: const BoxDecoration(color: Colors.yellow),child: SingleChildScrollView(physics: const ClampingScrollPhysics(),child: Column(mainAxisSize: MainAxisSize.max,mainAxisAlignment: MainAxisAlignment.center,crossAxisAlignment: CrossAxisAlignment.stretch,children: List<Widget>.generate(29, (index) {int itemIndex = index ~/ 2;if(index.isEven) {return Container(height: 44,alignment: AlignmentDirectional.center,child: Text("item$itemIndex"),);} else {return Container(height: 1,color: Colors.grey,);}}),),),);});},);},),),],),),);}}showPopup({required BuildContext context,required WidgetBuilder builder,double? elevation,Color? shadowColor,Duration animationDuration = const Duration(milliseconds: 200)
}) {final RenderBox button = context.findRenderObject()! as RenderBox;final RenderBox overlay = Navigator.of(context).overlay!.context.findRenderObject()! as RenderBox;Offset offset = Offset(0.0, button.size.height);RelativeRect position = RelativeRect.fromRect(Rect.fromPoints(button.localToGlobal(offset, ancestor: overlay),button.localToGlobal(button.size.bottomRight(Offset.zero) + offset, ancestor: overlay),),Offset.zero & overlay.size,);Navigator.of(context).push(_CustomPopupRoute(position: position,builder: builder,elevation: elevation,shadowColor: shadowColor,animationDuration: animationDuration,barrierLabel: MaterialLocalizations.of(context).modalBarrierDismissLabel));
}class _CustomPopupRoute<T> extends PopupRoute<T> {final WidgetBuilder builder;final RelativeRect position;final double? elevation;final Color? shadowColor;final String? barrierLabel;final Duration animationDuration;_CustomPopupRoute({required this.builder,required this.position,required this.barrierLabel,this.elevation,this.shadowColor,Duration? animationDuration}): animationDuration = animationDuration ?? const Duration(milliseconds: 200),super(traversalEdgeBehavior: TraversalEdgeBehavior.closedLoop);Color? get barrierColor => null;bool get barrierDismissible => true;Duration get transitionDuration => animationDuration;Widget buildPage(BuildContext context, Animation<double> animation, Animation<double> secondaryAnimation) {EdgeInsets padding = MediaQuery.paddingOf(context);final CurveTween heightFactorTween = CurveTween(curve: const Interval(0.0, 1.0));return MediaQuery.removePadding(context: context,removeTop: true,removeBottom: true,removeLeft: true,removeRight: true,child: CustomSingleChildLayout(delegate: _CustomPopupRouteLayout(position, padding),child: AnimatedBuilder(animation: animation,builder: (context, child) {return Material(child: _HeightFactorBox(heightFactor: heightFactorTween.evaluate(animation),child: child,));},child: builder(context),),),);}}class _CustomPopupRouteLayout extends SingleChildLayoutDelegate {final RelativeRect position;EdgeInsets padding;double childHeightMax = 0;_CustomPopupRouteLayout(this.position, this.padding);BoxConstraints getConstraintsForChild(BoxConstraints constraints) {Size buttonSize = position.toSize(constraints.biggest);double constraintsWidth = buttonSize.width;double constraintsHeight = max(position.top - buttonSize.height - padding.top - kToolbarHeight, constraints.biggest.height - position.top - padding.bottom);return BoxConstraints.loose(Size(constraintsWidth, constraintsHeight));}Offset getPositionForChild(Size size, Size childSize) {double x = position.left;double y = position.top;final double buttonHeight = size.height - position.top - position.bottom;double constraintsHeight = max(position.top - buttonHeight - padding.top - kToolbarHeight, size.height - position.top - padding.bottom);if(position.top + constraintsHeight > size.height - padding.bottom) {y = position.top - childSize.height - buttonHeight;}return Offset(x, y);}bool shouldRelayout(covariant _CustomPopupRouteLayout oldDelegate) {return position != oldDelegate.position || padding != oldDelegate.padding;}
}class _RenderHeightFactorBox extends RenderShiftedBox {double _heightFactor;_RenderHeightFactorBox({RenderBox? child,double? heightFactor,}):_heightFactor = heightFactor ?? 1.0, super(child);double get heightFactor => _heightFactor;set heightFactor(double value) {if (_heightFactor == value) {return;}_heightFactor = value;markNeedsLayout();}void performLayout() {final BoxConstraints constraints = this.constraints;if (child == null) {size = constraints.constrain(Size.zero);return;}child!.layout(constraints, parentUsesSize: true);size = constraints.constrain(Size(child!.size.width,child!.size.height,));child!.layout(constraints.copyWith(maxWidth: size.width, maxHeight: size.height * heightFactor), parentUsesSize: true);size = constraints.constrain(Size(child!.size.width,child!.size.height,));}
}class _HeightFactorBox extends SingleChildRenderObjectWidget {final double? heightFactor;const _HeightFactorBox({super.key,this.heightFactor,super.child,});RenderObject createRenderObject(BuildContext context) => _RenderHeightFactorBox(heightFactor: heightFactor);void updateRenderObject(BuildContext context, _RenderHeightFactorBox renderObject) {renderObject.heightFactor = heightFactor ?? 1.0;}
}

相关文章:
03_Flutter自定义下拉菜单
03_Flutter自定义下拉菜单 在Flutter的内置api中,可以使用showMenu实现类似下拉菜单的效果,或者使用PopupMenuButton组件,PopupMenuButton内部也是使用了showMenu这个api,但是使用showMenu时,下拉面板的显示已经被约定…...
如何查看多开的逍遥模拟器的adb连接端口号
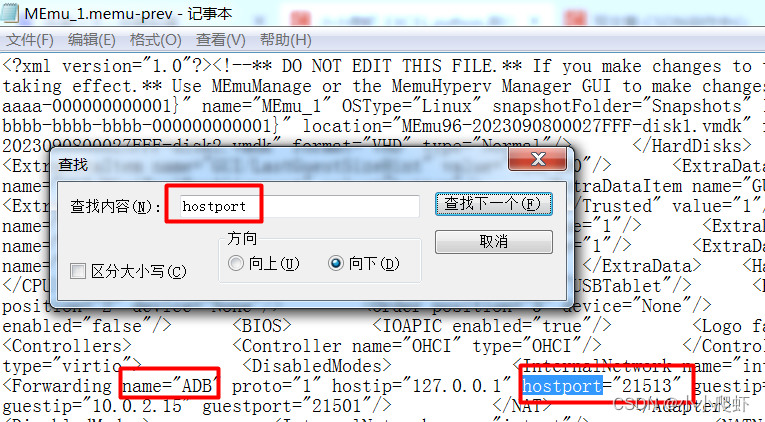
逍遥模拟器默认端口号为:21503。 不过,使用多开器多开的时候,端口就不一定是21503了。 如何查看? 进入G:\xiaoyao\Microvirt\MEmu\MemuHyperv VMs路径中 每多开一个模拟器,就会多出一个文件夹。 进入你要查找端口号…...
2023年中国道路扫雪车分类、市场规模及发展前景分析[图]
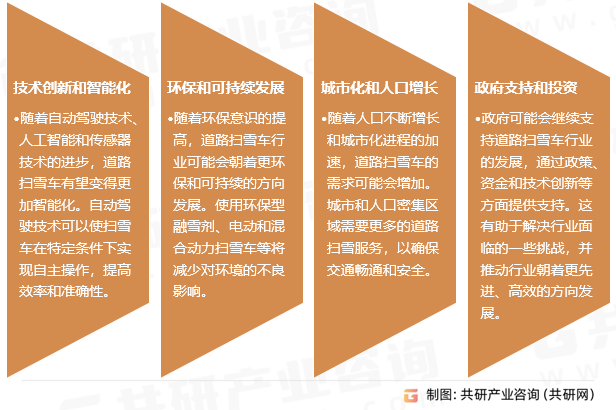
道路扫雪车是一种专门用于清除道路上积雪和冰雪的机动车辆,通常配备有雪铲、扫雪刷、除冰剂喷洒系统等装置,用于在雪季或寒冷气候条件下,对道路进行清扫、除雪、除冰等作业,以确保道路的通行安全。 道路扫雪车行业分类 资料来源&…...

【机器学习】迁移学习(Transfer)详解!
1. 什么是迁移学习 迁移学习(Transfer Learning)是一种机器学习方法,就是把为任务 A 开发的模型作为初始点,重新使用在为任务 B 开发模型的过程中。迁移学习是通过从已学习的相关任务中转移知识来改进学习的新任务,虽然大多数机器学习算法都是…...

软件测试面试题
软件测试面试时一份好简历的重要性 软件的生命周期(prdctrm) 计划阶段(planning)-〉需求分析(requirement)-〉设计阶段(design)-〉编码(coding)->测试&am…...

分治算法解决归并排序问题
分治算法定义:分治算法是一种问题解决方法,它将一个大问题划分为多个相同或相似的子问题,然后递归地解决这些子问题,最后将子问题的解合并得到原问题的解 作用: 排序算法分治算法在排序算法中得到广泛应用。例如&…...
Spring Security漏洞防护—HttpFirewall和 HTTPS
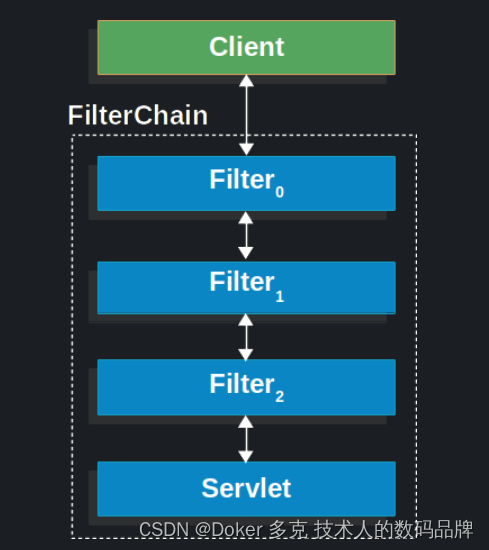
一、HttpFirewall Spring Security有几个领域,你所定义的 pattern 会针对传入的请求进行测试,以决定应该如何处理请求。这发生在 FilterChainProxy 决定请求应该通过哪个过滤链时,以及 FilterSecurityInterceptor 决定哪些安全约束适用于请求…...

Makefile泛谈
Makefile工作原理 1、检查规则中的依赖文件是否存在。 2、若依赖文件不存在,则寻找是否有规则用来生成该依赖文件。 譬如,执行文件会先寻找.o文件是否存在,如果不存在,就会再寻找是否有规则可以生成该依赖文件。如果缺少了main.…...

Python的快捷键
Python Python使用的小快招关于注释关于格式写主函数如何看函数源代码 Python使用的小快招 本文主要记录了写python代码的时候提高效率的一些小妙招 关于注释 选中要注释的代码,然后按下Ctrl /即可对多段代码注释。 关于格式 对于python代码的格式,…...

css为盒子设置滚动条隐藏滚动条
省流:为盒子设置宽高,设置滚动条方向,隐藏滚动条。 首先,要为需要添加滚动条的盒子设置固定的高度和宽度,这样才能让内容超过盒子的边缘。 .box {width: 300px;height: 300px; }然后,给盒子加入overflow属…...
:视频花屏和绿屏)
音视频开发常见问题(四):视频花屏和绿屏
摘要 本文介绍了视频视频花屏/绿屏问题的常见原因,如丢失关键帧、metadata的变化、硬件编解码的兼容性问题和颜色格式不一致问题。以及排查方法和解决策略,包括检查视频数据格式、排查自采集/自渲染模块问题、联系第三方音视频SDK技术支持等。最后&…...
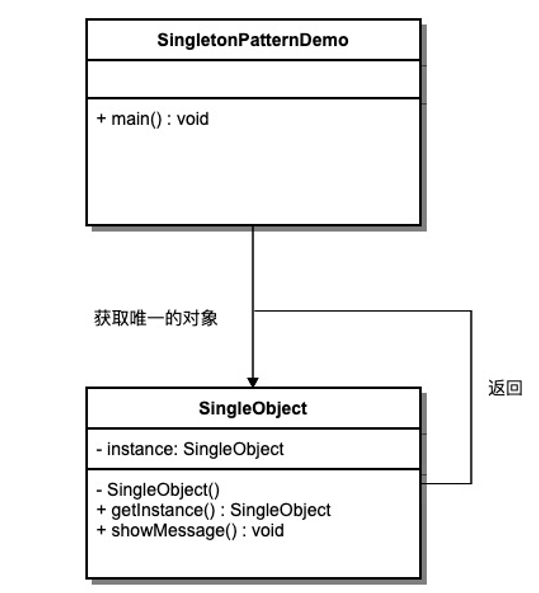
设计模式—创建型模式之单例模式
设计模式—创建型模式之单例模式 介绍 单例模式说明:一个单一的类,负责创建自己的对象,同时确保系统中只有单个对象被创建。 单例模式特点: 某个类只能有一个实例;(构造器私有)它必须自行创…...

7.现代卷积神经网络
#pic_center R 1 R_1 R1 R 2 R^2 R2 目录 知识框架No.1 深度卷积神经网络 AlexNet一、AlexNet二、D2L代码注意点三、QA No.2 使用块的网络 VGG一、VGG二、D2L代码注意点三、QA No.3 网络中的网络 NiN一、NIN二、D2L代码注意点三、QA No.4 含并行连结的网络 GoogLeNet / Incep…...
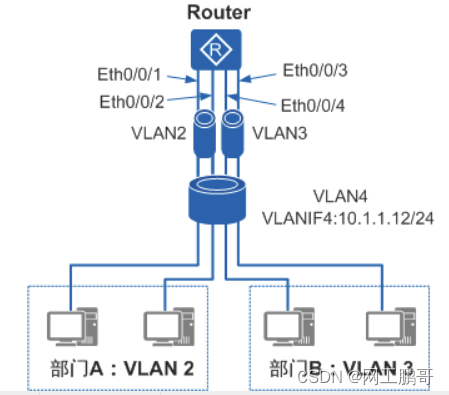
配置Super-VLAN下的DHCP服务器示例
组网需求 如图1所示,某公司拥有两个部门,为了节省IP地址,部门A和部门B规划为同一网段;为了提升业务安全性,将不同部门的用户划分到不同VLAN中。企业管理员为了方便统一管理,希望部门内终端通过DHCP服务器动…...

【开源】基于SpringBoot的城市桥梁道路管理系统的设计和实现
目录 一、摘要1.1 项目介绍1.2 项目录屏 二、功能模块三、系统展示四、核心代码4.1 查询城市桥梁4.2 新增城市桥梁4.3 编辑城市桥梁4.4 删除城市桥梁4.5 查询单个城市桥梁 五、免责说明 一、摘要 1.1 项目介绍 基于VueSpringBootMySQL的城市桥梁道路管理系统,支持…...

关于根据动态数量的对象的某属性的数组数量呈乘机式增长的数据处理
adta是原始数组,currentIndex默认是零,currentObject初始对象,result处理生成的结果 function generateObjects(data, currentIndex, currentObject, result) {if (currentIndex data.length) {result.push(currentObject);return;}const currentCode data[currentIndex].co…...

数据分析和互联网医院小程序:提高医疗决策的准确性和效率
互联网医院小程序已经在医疗领域取得了显著的进展,为患者和医疗从业者提供了更便捷和高效的医疗服务。随着数据分析技术的快速发展,互联网医院小程序能够利用大数据来提高医疗决策的准确性和效率。本文将探讨数据分析在互联网医院小程序中的应用…...
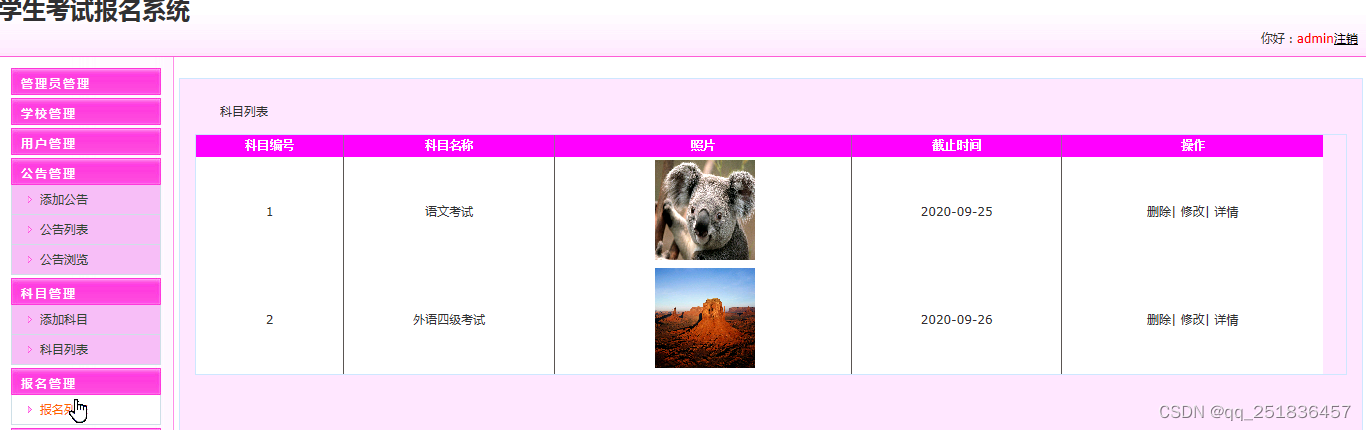
asp.net学生考试报名管理系统VS开发sqlserver数据库web结构c#编程Microsoft Visual Studio
一、源码特点 asp.net学生考试报名管理系统是一套完善的web设计管理系统系统,系统具有完整的源代码和数据库,系统主要采用B/S模式开发。开发环境为vs2010,数据库为sqlserver2008,使 用c#语言开发 应用技术:asp…...

Python之前端的学习
前端学哪些内容 1. HTML # 网页的骨架、只是负责显示一些内容,但是显示出来的内容不好看,没样式 2. CSS # 对网页骨架的美化、让网页变得更加的好看而已 3. JavaScript # html、css都是不能动的,静态的,js就是让网页能够动起来…...
——广播)
Python之numpy数组学习(五)——广播
Python之numpy数组学习(五)——广播 目录 Python之numpy数组学习(五)——广播 本文章向大家介绍Python之numpy数组学习(五)——广播,主要内容包括其使用实例、应用技巧、基本知识点总结和需要注意事项,具有一定的参考价值,需要的朋友可以参考一下。 前言 前面我们…...
:揭秘那个让虚拟世界“有重量感“的阴影魔法)
环境光遮蔽(Ambient Occlusion):揭秘那个让虚拟世界“有重量感“的阴影魔法
一、一个让我"开窍"的老木匠故事 我有个朋友是传统家具的修复师,他给我讲过一个让我至今难忘的故事。他说他刚入行时跟着一位 70 多岁的老木匠师父学习——师父让他做的第一件事不是雕花、不是榫卯——而是"看阴影"——这个看似奇怪的训练改变了…...

从多路复用到三维光阵:Arduino驱动8x8x8 LED立方体全解析
1. 项目概述:用Arduino点亮一个三维世界几年前,我第一次在创客展上看到一个8x8x8的LED立方体,那种由数百个光点构成的、在三维空间中流动的动画效果,瞬间就把我吸引住了。它不像普通的平面LED屏,而是真正有“深度”的光…...

内网环境下Win7系统批量离线补丁部署实战指南
1. 内网Win7补丁部署的挑战与解决方案老旧Win7系统在内网环境中的安全隐患就像漏雨的屋顶,看似不影响日常使用,但随时可能引发严重后果。我经手过几十家单位的系统加固项目,发现这些场景存在三个典型痛点:首先是补丁来源问题&…...
上午题回忆与解析(非标答版))
2026上半年数据库系统工程师(软考)上午题回忆与解析(非标答版)
本文为考后回忆整理,非官方标准答案,旨在为考后对答案及下半年备考的同学提供参考。题目顺序和表述可能与原卷有出入,欢迎在评论区指正、补充。📊 整体考情分析 刚结束的2026年上半年数据库系统工程师考试,上午题的风格…...

Spring Security OAuth2 /oauth/token 401原因与Content-Type规范
1. 问题现场还原:一个看似简单却让开发停摆两小时的/oauth/token请求刚接手一个老项目做安全加固,第一件事就是验证OAuth2密码模式的token获取流程。我照着文档写了一条curl命令:curl -X POST http://localhost:8080/oauth/token回车执行&…...

探索Windows 10上的Android世界:揭秘WSA-Windows-10项目的3个技术突破
探索Windows 10上的Android世界:揭秘WSA-Windows-10项目的3个技术突破 【免费下载链接】WSA-Windows-10 This is a backport of Windows Subsystem for Android to Windows 10. 项目地址: https://gitcode.com/gh_mirrors/ws/WSA-Windows-10 想象一下&#…...

Gazebo Sim多旋翼控制:四轴飞行器动力学建模与PID调参
Gazebo Sim多旋翼控制:四轴飞行器动力学建模与PID调参 【免费下载链接】gz-sim Open source robotics simulator. The latest version of Gazebo. 项目地址: https://gitcode.com/gh_mirrors/gz/gz-sim Gazebo Sim是一款功能强大的开源机器人模拟器ÿ…...
)
Windows开机自动全屏打开指定网页?一个快捷方式参数就搞定(Chrome/Edge/Firefox教程)
Windows开机自动全屏展示网页的终极方案每次开机都要手动打开浏览器、输入网址、切换全屏模式?这种重复操作不仅浪费时间,还容易在重要演示时手忙脚乱。想象一下:电脑启动后自动全屏显示你的仪表盘、会议日程或是监控大屏,整个过程…...

机器学习的最佳实践:这7个原则让你的模型更稳定
对于软件测试从业者而言,机器学习技术正在快速融入测试流程:从自动化测试用例生成、缺陷预测到测试环境异常检测,机器学习模型的稳定性直接决定了测试结果的可靠性——如果模型在测试环境波动、输入数据变化时性能骤降,不仅无法提…...

CentOS 8/Stream 8系统DNF换源后,安装软件还是慢?试试这几个排查命令和优化技巧
CentOS 8/Stream 8系统DNF换源后安装缓慢的深度排查与优化指南当你已经按照教程将CentOS 8/Stream 8的DNF源切换为国内镜像,却发现软件安装速度依然不尽如人意时,这种体验确实令人沮丧。作为长期使用CentOS系统的技术专家,我完全理解这种&quo…...