【PythonRS】Pyrsgis库安装+基础函数使用教程
pyrsgis库是一个用于处理地理信息系统(GIS)数据的Python库。它提供了一组功能强大的工具,可以帮助开发人员使用Python语言创建、处理、分析和可视化GIS数据。通过使用pyrsgis库,开发人员可以更轻松地理解和利用地理信息。
pyrsgis库包含了许多常见的GIS操作和功能,例如读取和写入shapefile文件、转换坐标系、执行空间查询、计算地理特征属性等。它提供了许多方便使用的类和方法,例如GeoPandas、Shapely、Fiona、Rasterio、Pyproj和GDAL等,这些都可以帮助开发人员更高效地处理GIS数据。
一、Pyrsgis库安装
Pyrsgis可以直接通过pip install pyrsgis安装,同样也可以下载压缩包然后本地安装。PyPI中Pyrsgis包下载地址:pyrsgis · PyPI

二、导入库和函数
这些都是我后面代码需要使用到的函数,注意要导入,别到时候报错。
import os
from pyrsgis import raster, convert, ml
三、基础操作代码展示
1)获取影像基本信息
def Get_data(filepath):# 获取影像基本信息ds, data_arr = raster.read(filepath) # 基础信息资源和数组ds_bands = ds.RasterCount # 波段数ds_width = ds.RasterXSize # 宽度ds_height = ds.RasterYSize # 高度ds_bounds = ds.bbox # 四至范围ds_geo = ds.GeoTransform # 仿射地理变换参数ds_prj = ds.Projection # 投影坐标系print("影像的宽度为:" + str(ds_width))print("影像的高度为:" + str(ds_height))print("仿射地理变换参数为:" + str(ds_geo))print("投影坐标系为:" + str(ds_prj))2)计算NDVI
这里给大家介绍一个经典案例,就是NDVI的计算。通过这个应该很容易就能理解Pyrsgis库的数据结构了。
def Get_NDVI(filepath):# 计算NDVIds, data_arr = raster.read(filepath)red_arr = data_arr[3, :, :]nir_arr = data_arr[4, :, :]result_arr = (nir_arr - red_arr) / (nir_arr + red_arr)# result_arr = (data_arr[4, :, :] - data_arr[3, :, :]) / (data_arr[4, :, :] + data_arr[3, :, :])output_file = r'E:/path_to_your_file/landsat8_result.tif'raster.export(result_arr, ds, output_file, dtype='float32', bands="all", nodata=0, compress="LZW")# 写入的数组,基础信息,路径,格式,波段,无效值,压缩方式3)空间位置裁剪
这里的裁剪主要是按照输入的空间矩形进行裁剪,并没有演示如何使用shp进行裁剪。这个可以应用于分幅裁剪、滑动裁剪等。空行分割的是实现这个功能的两种函数的使用方式。
def Clip_data(filepath):# 按掩膜提取ds, data_arr = raster.read(filepath)print('Original bounding box:', ds.bbox)print('Original shape of raster:', data_arr.shape)new_ds, clipped_arr = raster.clip(ds, data_arr, x_min=770000, x_max=790000, y_min=1420000, y_max=1440000)raster.export(clipped_arr, new_ds, r'E:/path_to_your_file/clipped_file.tif')infile = r'E:/path_to_your_file/your_file.tif'outfile = r'E:/path_to_your_file/clipped_file.tif'raster.clip_file(infile, x_min=770000, x_max=790000, y_min=1420000, y_max=1440000, outfile=outfile)4)移除无效值
这里的函数是移除无效值的,如-9999之类的,理论上应该也可以修改其他的DN值,但我自己没去试过,大家可以自行尝试。
def Modify_data(filepath):# 修改影像数组,如移除无效值ds, data_arr = raster.read(filepath)new_ds, new_arr = raster.trim(ds, data_arr, remove=-9999)print('Shape of the input array:', data_arr.shape)print('Shape of the trimmed array:', new_arr.shape)ds, data_arr = raster.read(filepath)new_arr = raster.trim_array(data_arr, remove=-9999)print('Shape of the input array:', data_arr.shape)print('Shape of the trimmed array:', new_arr.shape)infile = r'E:/path_to_your_file/your_file.tif'outfile = r'E:/path_to_your_file/trimmed_file.tif'raster.trim_file(infile, -9999, outfile)5)平移影像
按照x、y方向进行影像平移,可选像素和坐标进行平移。
def Shift_data(filepath):# 平移影像ds, data_arr = raster.read(filepath)new_ds = raster.shift(ds, x=10, y=10) # x,y方向偏移量。按栅格的投影单位移动数据源 或分别按细胞数print('Original bounding box:', ds.bbox)print('Modified bounding box:', new_ds.bbox)new_ds = raster.shift(ds, x=10, y=10, shift_type='cell') # shift_type='coordinate'print('Modified bounding box:', new_ds.GeoTransform)raster.export(data_arr, new_ds, r'E:/path_to_your_file/shifted_file.tif')infile = r'E:/path_to_your_file/your_file.tif'outfile = r'E:/path_to_your_file/shifted_file.tif'raster.shift_file(infile, x=10, y=10, outfile=outfile, shift_type='cell')6)数组、表、CSV互转(包含剔除值)
这里的函数是数组、表、CSV互转,在转换的同时可以通过参数移除某些DN值。
def Convert_data(filepath):# 数组转表、CSV,修改值input_file = r'E:/path_to_your_file/raster_file.tif'ds, data_arr = raster.read(input_file) # Shape of the input array: (6, 800, 400)data_table = convert.array_to_table(data_arr) # Shape of the reshaped array: (320000, 6)# 该函数将单波段或多波段栅格数组转换为表,其中 列表示输入波段,每行表示一个单元格。input_file = r'E:/path_to_your_file/raster_file.tif'ds, data_arr = raster.read(input_file)data_table = convert.array_to_table(data_arr)print('Shape of the input array:', data_arr.shape) # Shape of the input array: (6, 800, 400)print('Shape of the reshaped array:', data_table.shape) # Shape of the reshaped array: (320000, 6)input_file = r'E:/path_to_your_file/raster_file.tif'new_data_arr = convert.table_to_array(data_table, n_rows=ds.RasterYSize, n_cols=ds.RasterXSize)print('Shape of the array with newly added bands:', new_data_arr.shape)# Shape of the array with newly added bands: (8, 800, 400)new_data_arr = convert.table_to_array(data_table[:, -2:], n_rows=ds.RasterYSize, n_cols=ds.RasterXSize)print('Shape of the array with newly added bands:', new_data_arr.shape)# Shape of the array with newly added bands: (2, 800, 400)# 表转数组input_file = r'E:/path_to_your_file/raster_file.tif'output_file = r'E:/path_to_your_file/tabular_file.csv'convert.raster_to_csv(input_file, filename=output_file)input_dir = r'E:/path_to_your_file/'output_file = r'E:/path_to_your_file/tabular_file.csv'convert.raster_to_csv(input_dir, filename=output_file)convert.raster_to_csv(input_dir, filename=output_file, negative=False, remove=[10, 54, 127], badrows=False)# 数组转表,可剔除负值、目标值、坏波段input_file = r'E:/path_to_your_file/raster_file.tif'out_csvfile = input_file.replace('.tif', '.csv')convert.raster_to_csv(input_file, filename=out_csvfile, negative=False)new_csvfile = r'E:/path_to_your_file/predicted_file.tif'out_tiffile = new_csvfile.replace('.csv', '.tif')convert.csv_to_raster(new_csvfile, ref_raster=input_file, filename=out_tiffile, compress='DEFLATE')convert.csv_to_raster(new_csvfile, ref_raster=input_file, filename=out_tiffile,cols=['Blue', 'Green', 'KMeans', 'RF_Class'], compress='DEFLATE')# 数组将堆叠并导出为多光谱文件convert.csv_to_raster(new_csvfile, ref_raster=input_file, filename=out_tiffile,cols=['Blue', 'Green', 'KMeans', 'RF_Class'], stacked=False, compress='DEFLATE')# 将每列导出为单独的波段,请将参数设置为 。stacked=False7)制作深度学习标签
此函数根据单波段或多波段栅格阵列生成影像片。图像芯片可以用作深度学习模型的直接输入(例如。卷积神经网络),输出格式:(4198376, 7, 7, 6)
def Create_CNN(filepath):# 此函数根据单波段或多波段栅格阵列生成影像片。图像 芯片可以用作深度学习模型的直接输入(例如。卷积神经网络)# -----------------------------数组生成深度学习芯片-----------------------------infile = r'E:/path_to_your_file/your_file.tif'ds, data_arr = raster.read(infile)image_chips = ml.array_to_chips(data_arr, y_size=7, x_size=7)print('Shape of input array:', data_arr.shape) # Shape of input array: (6, 2054, 2044)print('Shape of generated image chips:', image_chips.shape) # Shape of generated image chips: (4198376, 7, 7, 6)infile = r'E:/path_to_your_file/your_file.tif'ds, data_arr = raster.read(infile)image_chips = ml.array2d_to_chips(data_arr, y_size=5, x_size=5)print('Shape of input array:', data_arr.shape) # Shape of input array: (2054, 2044)print('Shape of generated image chips:', image_chips.shape) # Shape of generated image chips: (4198376, 5, 5)# ----------------------------影像直接生成深度学习芯片----------------------------infile_2d = r'E:/path_to_your_file/your_2d_file.tif'image_chips = ml.raster_to_chips(infile_2d, y_size=7, x_size=7)print('Shape of single band generated image chips:', image_chips.shape)# Shape of single bandgenerated image chips: (4198376, 7, 7)infile_3d = r'E:/path_to_your_file/your_3d_file.tif'image_chips = ml.raster_to_chips(infile_3d, y_size=7, x_size=7)print('Shape of multiband generated image chips:', image_chips.shape)# Shape of multiband generated image chips: (4198376, 7, 7, 6)8)翻转影像
按照东西或南北方向翻转影像
def Reverse_Image(filepath):# 按照东西、南北方向反转影像# -------------------------------北向、东向翻转--------------------------------input_file = r'E:/path_to_your_file/your_file.tif'ds, data_arr = raster.read(input_file)north_arr, east_arr = raster.north_east(data_arr)print(north_arr.shape, east_arr.shape)north_arr, east_arr = raster.north_east(data_arr, flip_north=True, flip_east=True)north_arr = raster.north_east(data_arr, layer='north')from matplotlib import pyplot as pltplt.imshow(north_arr)plt.show()plt.imshow(east_arr)plt.show()input_file = r'E:/path_to_your_file/your_file.tif'ds, data_arr = raster.read(input_file)north_arr, east_arr = raster.north_east(data_arr)print(north_arr.shape, east_arr.shape)north_arr = raster.north_east(data_arr, layer='north')from matplotlib import pyplot as pltplt.imshow(north_arr)plt.show()plt.imshow(east_arr)plt.show()raster.export(north_arr, ds, r'E:/path_to_your_file/northing.tif', dtype='float32')raster.export(east_arr, ds, r'E:/path_to_your_file/easting.tif', dtype='float32')# -------------------------使用参考.tif文件生成北向栅格----------------------------reference_file = r'E:/path_to_your_file/your_file.tif'raster.northing(file1, r'E:/path_to_your_file/northing_number.tif', flip=False, value='number')raster.northing(file1, r'E:/path_to_your_file/northing_normalised.tif', value='normalised') # 输出栅格进行归一化raster.northing(file1, r'E:/path_to_your_file/northing_coordinates.tif', value='coordinates')raster.northing(file1, r'E:/path_to_your_file/northing_number_compressed.tif', compress='DEFLATE')reference_file = r'E:/path_to_your_file/your_file.tif'raster.easting(file1, r'E:/path_to_your_file/easting_number.tif', flip=False, value='number')raster.easting(file1, r'E:/path_to_your_file/easting_normalised.tif', value='normalised')raster.easting(file1, r'E:/path_to_your_file/easting_normalised.tif', value='normalised')raster.easting(file1, r'E:/path_to_your_file/easting_number_compressed.tif', compress='DEFLATE')四、总结
Pyrsgis库之前使用的时候是因为要进行卷积神经网络的深度学习,然后里面制作深度学习标签的函数还是不错的,可以用一行代码实现标签的制作。但是如果数据过大,内存就会溢出报错,这个是Pyrsgis库没有解决的,当然我也没解决=。=大家可以自己尝试一下,有解决办法可以和我分享一下。总的来说Pyrsgis和Rasterio这两个库都还不错,都在GDAL的基础上进行了二开,方便了很多操作。
相关文章:
【PythonRS】Pyrsgis库安装+基础函数使用教程
pyrsgis库是一个用于处理地理信息系统(GIS)数据的Python库。它提供了一组功能强大的工具,可以帮助开发人员使用Python语言创建、处理、分析和可视化GIS数据。通过使用pyrsgis库,开发人员可以更轻松地理解和利用地理信息。 pyrsgis库包含了许多常见的GIS操…...

线扫相机DALSA--分频倍频计算公式及原理
分频倍频计算公式及原理 推导原理: 假设编码器脉冲精度为P;同步轮/辊周长为C,Fov为视野,Res为线扫相机分辨率,N代表N倍频编码器,分频为D,倍频为M 线扫项目常规采用N(N 4࿰…...
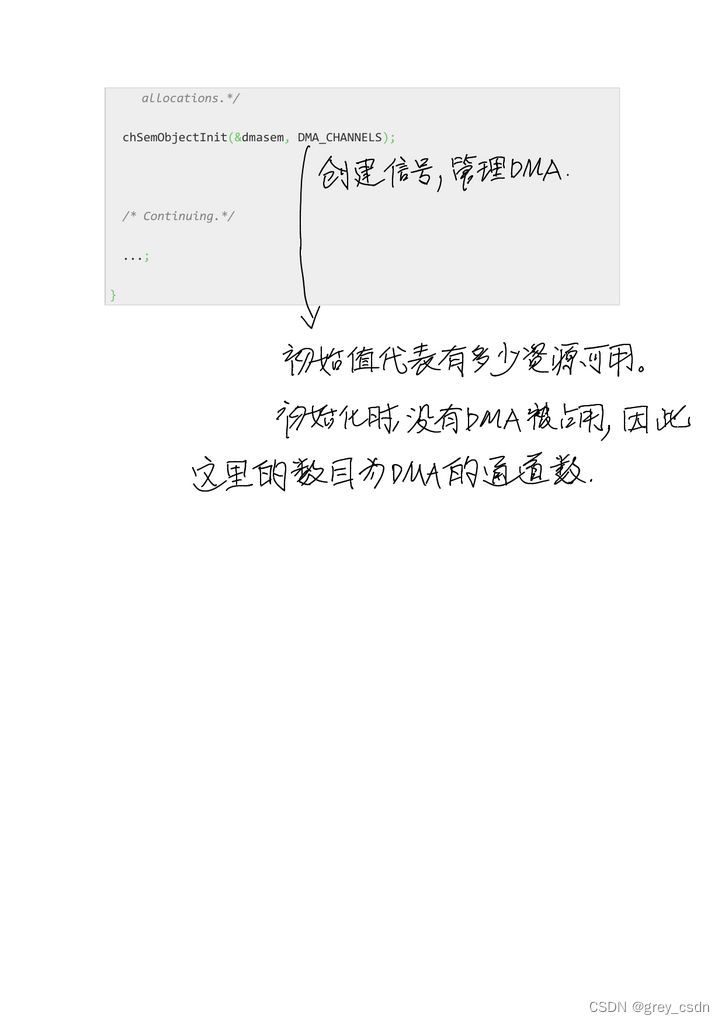
1818_ChibiOS的计数信号量
全部学习汇总: GreyZhang/g_ChibiOS: I found a new RTOS called ChibiOS and it seems interesting! (github.com) 之前见过计数信号量,也是在FreeRTOS中看到的。也看到过这样的功能在驱动设计中的应用,但是当时没有理解这个使用的方式。 1.…...
企业微信接入芋道SpringBoot项目
背景:使用芋道框架编写了一个数据看板功能需要嵌入到企业微信中,方便各级人员实时观看 接入企业微信的话肯定不能像平常pc端一样先登录再根据权限看页面,不然的话不如直接手机浏览器打开登录账号来得更为方便,所以迎面而来面临两…...

群晖上搭建teamspeak3语音服务器
什么是 TeamSpeak ? TeamSpeak (简称 TS)是一款团队语音通讯工具,但比一般的通讯工具具有更多的功能而且使用方便。它由服务器端程序和客户端程序两部分组成,如果不是想自己架设 TS 服务器,只需下载客户端程…...
Python爬虫(二十四)_selenium案例:执行javascript脚本
本章叫介绍如何使用selenium在浏览器中使用js脚本,更多内容请参考:Python学习指南 隐藏百度图片 #-*- coding:utf-8 -*- #本篇将模拟执行javascript语句from selenium import webdriver from selenium.webdriver.common.keys import Keysdriver webdri…...

Devops团队
DevOps(Development 和 Operations的缩写)是一种软件开发和运维(IT运营)之间协作和沟通的文化、原则和实践。DevOps团队是专注于实施DevOps原则的团队,旨在促进软件开发和运维之间的紧密协作,以加速软件交付…...

力扣labuladong——一刷day10
提示:文章写完后,目录可以自动生成,如何生成可参考右边的帮助文档 文章目录 前言一、力扣76. 最小覆盖子串二、力扣567. 字符串的排列三、力扣438. 找到字符串中所有字母异位词四、力扣3. 无重复字符的最长子串 前言 一、力扣76. 最小覆盖子串…...

https下载图片
OpenSSL用法示例 OpenSSL源码安装 对于ubuntu,懒得编译源码可以直接安装 sudo apt-get install libssl–dev /usr/include/openssl/ssl.h CMakeLists中添加 link_libraries(ssl crypto) apt-get安装不需要再制定libssl.a, libcrypto.a的路径了, 就像用libc标…...
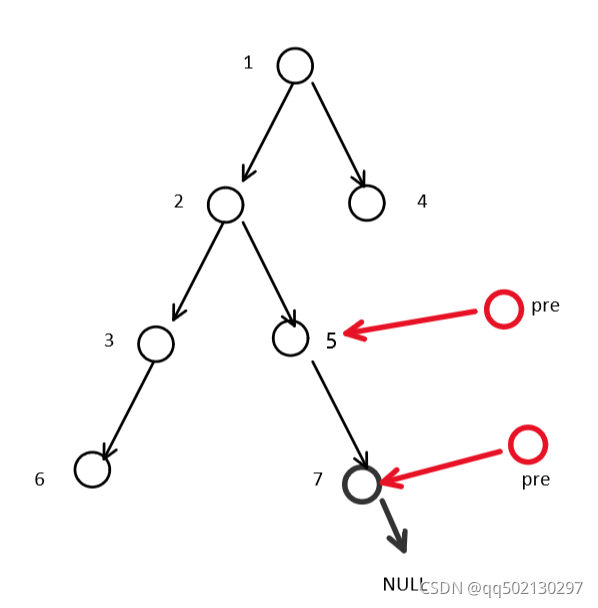
二叉树的后续遍历(迭代法)
迭代法实现二叉树的后续遍历 1、递归版本 public static void dfs(TreeNode root){if(rootnull){return;}if(root.left!null)dfs(root.left);if(root.right!null)dfs(root.right);System.out.println(root.val); }从递归版本可以看出我们第一步需要遍历完所有的左节点 这里我…...

CVE-2021-41773/42013 apache路径穿越漏洞
影响范围 CVE-2021-41773 Apache HTTP server 2.4.49 CVE-2021-42013 Apache HTTP server 2.4.49/2.4.50 漏洞原理 Apache HTTP Server 2.4.49版本使用的ap_normalize_path函数在对路径参数进行规范化时会先进行url解码,然后判断是否存在…/的路径穿越符…...

前端性能测试工具WebPagetest
简介:一款web性能在线性能评测工具,可测试有关页面在各种条件下的性能,并且提供深入诊断信息。 WebPagetest 的主页:https://www.webpagetest.org/,也就是工具的使用界面。 注意:WebPageTest 并不是完全免…...

易语言软件定制软件开发脚本开发协议软件电脑网站APP应用视频制作工程制作
随着信息技术的不断发展,易语言软件定制开发已成为许多公司的一项重要业务。本文将探讨如何利用易语言承接软件定制软件开发脚本开发协议软件电脑网站APP应用视频制作工程制作。 一、易语言概述 易语言是一种简单易学的编程语言,它采用中文编程ÿ…...

Windows上配置IP端口转发
在通常涉及到使用网络地址转换(NAT)规则,可以使用一些工具和命令行选项来实现。以下是在Windows上配置端口转发的一般步骤: **注意:端口转发需要管理员权限,因此请确保以管理员身份运行命令行工具。** 1.…...
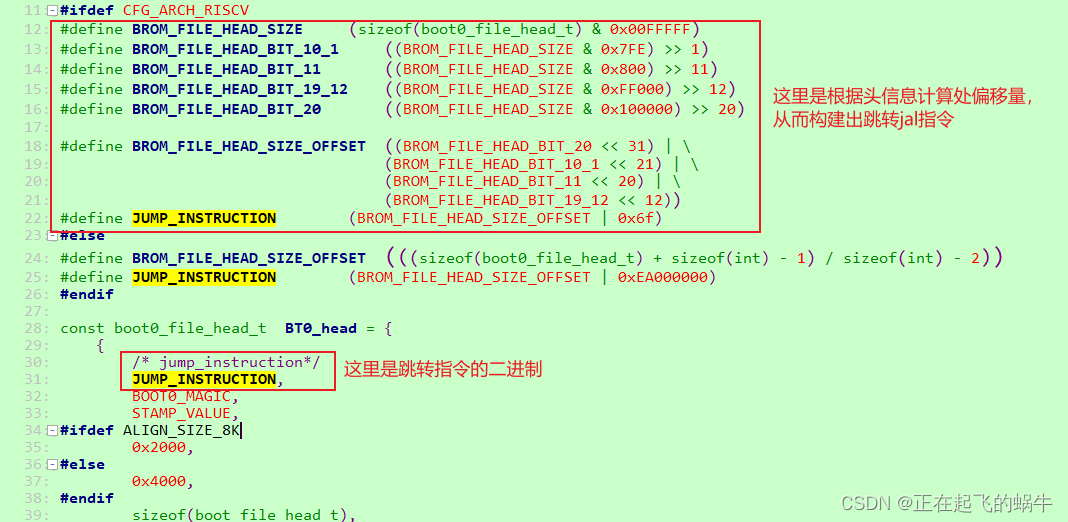
韦东山D1S板子——汇编启动代码第一行分析(.long 0x0300006f)
1、汇编启动源码 2、分析二进制:0x0300006f 2.1、反汇编代码 2.2、jal指令 jal指令的作用:跳转到当前PC值偏移offset处执行,其中offset由jal指令的bi[31:12]表示; 2.3、分析指令:j 20030 <reset> j 20030 //伪…...

了解单域名证书和通配符证书的区别,选择合适的SSL证书解决方案
随着互联网的不断发展,网站安全性问题一直备受关注,在保护网站数据安全的过程中,SSL证书一直发挥着至关重要的作用。而在选择SSL证书时,单域名证书和通配符证书是两种常见的选择。本文将详细介绍单域名证书和通配符证书的区别&…...

【LeetCode】7. 整数反转
题目链接 文章目录 Python3官方解法 ⟮ O ( ∣ x ∣ ) 、 O ( 1 ) ⟯ \lgroup O(|x|)、O(1)\rgroup ⟮O(∣x∣)、O(1)⟯写法2写法3 C官方解法 ⟮ O ( ∣ x ∣ ) 、 O ( 1 ) ⟯ \lgroup O(|x|)、O(1)\rgroup ⟮O(∣x∣)、O(1)⟯ Python3 官方解法 ⟮ O ( ∣ x ∣ ) 、 O ( 1…...

防止请求重复提交:注解+拦截器的实现方案
文章目录 了解请求重复提交解决思路具体实现 了解请求重复提交 请求重复提交是指用户在一次请求还未处理完成时,重复提交了相同的请求。这种情况通常发生在网络延迟、用户误操作或系统性能不佳等情况下。 请求重复提交可能会导致以下问题和影响: 数据不…...
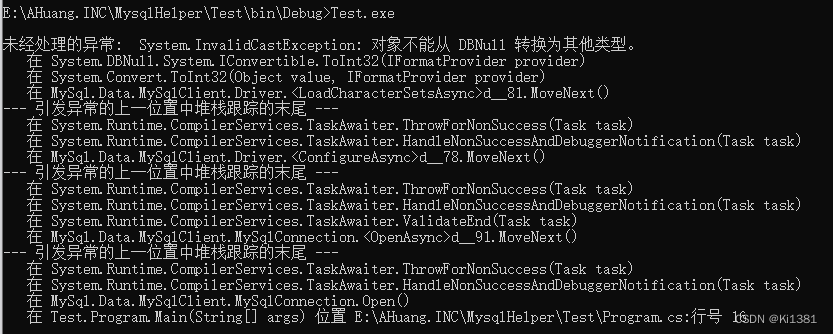
C#使用mysql-connector-net驱动连接mariadb报错
给树莓派用最新的官方OS重刷了一下,并且用apt install mariadb-server装上“mysql”作为我的测试服务器。然后神奇的事情发生了,之前用得好好的程序突然就报错了,经过排查,发现在连接数据库的Open阶段就报错了。写了个最单纯的Con…...
SpringBoot 定时任务:@EnableScheduling @Scheduled
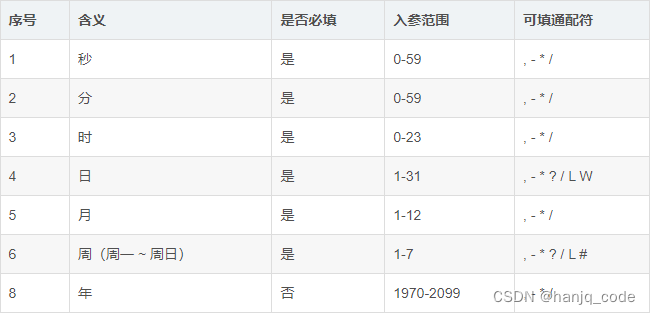
Scheduled注解参数 cron参数 这个参数是最经常使用的参数,表示接收一个cron参数,cron它是一个表达式,最多接收7个参数,从左到右分别表示:秒 分 时 天 月 周 年;参数以空格隔开,其中年不是必须参…...
)
Unity开发者速查手册:Sora 2模型权重量化适配指南(INT8精度损失<0.3%,已验证于RTX 4090/Apple M3 Ultra)
更多请点击: https://codechina.net 第一章:Sora 2与Unity整合概述 Sora 2 是 OpenAI 推出的下一代视频生成模型,具备高保真时序建模与物理感知能力;而 Unity 作为主流实时3D开发引擎,广泛用于游戏、仿真与数字孪生场…...

模拟调音台数字化改造:基于STM32与MOTU音频接口的智能控制方案
1. 项目概述:为老旧模拟调音台注入数字灵魂在不少社区广播电台、校园电台或是小型制作室里,你依然能看到那些服役了十几年甚至几十年的模拟调音台。它们皮实耐用,推子手感扎实,旋钮的阻尼感让人安心,但面对如今以数字文…...
:setup / onboard 与本地配置初始化)
OpenClaw 源码解析(五):setup / onboard 与本地配置初始化
1. 本期目标 上一期我们分析了 OpenClaw 的 CLI 启动链路:用户输入 openclaw 命令后,程序会先经过 entry.ts、run-main、Commander Program 构建和命令注册流程,然后再进入具体命令逻辑。 这一期继续往下看,重点分析两个最基础的…...

ESP32屏幕项目救星:用TFT_eSPI库的Touch_calibrate例程,5分钟搞定LittleVGL触摸校准
ESP32屏幕开发实战:5分钟完成LittleVGL触摸校准的高效方法论 当一块全新的ILI9341XPT2046电阻屏摆在你面前时,大多数开发者会迫不及待地跳进LittleVGL的配置深渊。但真正高效的硬件开发者知道,在编写任何图形界面代码之前,有一个关…...

摄影老司机_给照片加边框工具
使用简单, 支持自定义主题 自定义logo 内置四个常用的logo 为什么没有佳能? 因为我没有佳能 外框和内框是什么意思? 外框就是纯色边框 内框,就是将你上传的照片复制一张,放大,作为外框 外框宽度可以自定义 摄影师署名自定义 相机型号有时候识别出来又臭又长,说的就是尼康,所以…...

亿万富翁不再相信比特币
亿万富翁首次公开称不再相信比特币的「数字黄金」叙事。对比特币而言,或许是一个重要转折点。5月22日,亿万富翁投资者马克库班表示, 在对比特币作为抵御法币疲软和地缘政治不稳定对冲工具的作用失去信心后, 他已经卖掉大部分比特币持仓。净资产约为100亿…...

揭秘CuCl超低热导率:四声子散射与温度重正化的关键作用
1. 项目概述:为何要深挖CuCl的热导率?在材料科学和凝聚态物理的交叉领域,热输运性质的研究从来都不是一个孤立的课题。它直接关系到热电材料的转换效率、电子器件的散热能力,以及热障涂层的服役寿命。传统上,我们倾向于…...

18分钟攻陷GitHub!Nx Console投毒事件深度复盘:3800个核心仓库泄露的供应链安全警示
摘要:2026年5月20日,全球最大代码托管平台GitHub遭遇史上最严重的供应链攻击之一。黑客组织TeamPCP通过投毒VS Code扩展市场中的Nx Console v18.95.0版本,仅用18分钟、28次下载就成功渗透GitHub内部网络,窃取了包括Copilot、CodeQ…...
)
Unity动画状态机实战:用Animator Controller实现角色平滑切换攻击动作(附避坑指南)
Unity动画状态机实战:用Animator Controller实现角色平滑切换攻击动作(附避坑指南)在动作类游戏开发中,角色攻击动作的流畅切换是提升战斗体验的关键。许多开发者在使用Unity的Animator Controller时,常常遇到动作卡顿…...

VMware Workstation Pro 17上快速体验Rocky Linux 8.6:从镜像下载到命令行登录的5分钟极简流程
VMware Workstation Pro 17极速部署Rocky Linux 8.6实战指南 当技术爱好者们想要快速搭建一个Linux测试环境时,繁琐的安装流程往往会消耗大量时间。本文将展示如何在VMware Workstation Pro 17上,用最短时间完成Rocky Linux 8.6的部署,从零开…...