Android14 WMS启动流程
一 概述
本文Android14源代码可参考:Search
在 Android 系统中,从设计的角度来看,窗口管理系统是基于 C/S 模式的。整个窗口系统分为服务端和客户端两大部分,客户端负责请求创建窗口和使用窗口,服务端完成窗口的维护,窗口显示等。

WMS 在 Android 系统的地位,它作为中间层,连接了上层的 View 框架和下层的 SurfaceFingler。
SurfaceFingler在systrace的表现可以参考:Perfetto详细解析-CSDN博客
WMS 主要职责
窗口管理:负责启动、添加、删除窗口,管理窗口大小、层级,核心成员有:WindowContainer、RootWindowContainer、DisplayContent、TaskStack、Task、AppWindowToken、WindowState;
窗口动画:由其子系统 WindowAnimator 管理;
输入系统中转站:通过对窗口的触摸从而产生触摸事件,由 InputMethodService(IMS)对触摸事件进行处理,它会寻找一个最合适的窗口处理触摸反馈信息;
Surface 管理:为每个窗口分配一块 Surface,用于绘制要显示的内容。
二、WMS重要成员
WMS
继承于 IWindowManager.Stub,作为 Binder 服务端
mSessions
ArraySet 类型的变量,元素类型为 Session,保存着所有的 Session 对象,Session 继承于 IWindowSession.Stub,作为 Binder 服务端,它主要用于进程间通信,其他的应用程序进程想要和 WMS 进程进行通信就需要经过 Session,并且每个应用程序进程都会对应一个Session,WMS 保存这些 Session 用来记录所有向 WMS 提出窗口管理服务的客户端。
mPolicy
WindowManagerPolicy 类型的变量,是窗口管理策略的接口类,用来定义一个窗口策略所要遵循的通用规范,并提供了 WindowManager 所有的特定的 UI 行为。具体实现类为 PhoneWindowManager,这个实现类在 WMS 创建时被创建。WMP 允许定制窗口层级和特殊窗口类型以及关键的调度和布局。
DisplayContent 的成员变量 mTokenMap,保存所有的 WindowToken 对象,以 IBinder 为 key,可以是 IAppWindowToken 或者其他 Binder 的 Bp 端;另一端情况:ActivityRecord.Token extends IApplicationToken.Stub
mWindowMap
WindowHashMap 类型的变量,WindowHashMap 继承了 HashMap,它限制了 HashMap 的 key 值的类型为 IBinder,value 值的类型为 WindowState。保存 WMS 中所有的 WindowState 对象
mResizingWindows
ArrayList 类型的变量,元素类型为 WindowState。mResizingWindows 是用来存储正在调整大小的窗口的列表。
mAnimator
WindowAnimator 类型的变量,用于管理窗口的动画以及特效动画。
mH
H 类型的变量,系统的 Handler 类,用于将任务加入到主线程的消息队列中,这样代码逻辑就会在主线程中执行。
三、WMS 的启动流程
3.1 SystemServer.java
3.1.1 main(String[] args)
/*** The main entry point from zygote.*/
public static void main(String[] args) {new SystemServer().run();
}
main方法中只调用了SystemServer的run方法,如下所示。
3.1.2 run()
从下面的注释中可以看到,官方把系统服务分为了三种类型,分别是引导服务、核心服务和其他服务,其中其他服务是一些非紧要和一些不需要立即启动的服务。系统服务总共大约有80多个,我们主要来查看引导服务WMS是如何启动的。
private void run() {// Initialize native services.//1.加载了动态库libandroid_servers.soSystem.loadLibrary("android_servers");......// Create the system service manager.//2.创建SystemServiceManager,它会对系统的服务进行创建、启动和生命周期管理。mSystemServiceManager = new SystemServiceManager(mSystemContext);mSystemServiceManager.setStartInfo(mRuntimeRestart,mRuntimeStartElapsedTime, mRuntimeStartUptime);mDumper.addDumpable(mSystemServiceManager);...... // Start services.try {t.traceBegin("StartServices");//用SystemServiceManager启动了ActivityManagerService、PowerManagerService、PackageManagerService等服务。startBootstrapServices(t);//启动了BatteryService、UsageStatsService和WebViewUpdateService。startCoreServices(t);//启动了CameraService、WindowManagerService、VrManagerService等服务。这些服务的父类均为SystemService。startOtherServices(t);startApexServices(t);// Only update the timeout after starting all the services so that we use// the default timeout to start system server.updateWatchdogTimeout(t);} catch (Throwable ex) {Slog.e("System", "******************************************");Slog.e("System", "************ Failure starting system services", ex);throw ex;} finally {t.traceEnd(); // StartServices}...}3.1.3 startOtherServices(@NonNull TimingsTraceAndSlog t)
private void startOtherServices(@NonNull TimingsTraceAndSlog t) {t.traceBegin("startOtherServices");mSystemServiceManager.updateOtherServicesStartIndex();
......t.traceBegin("StartInputManagerService");// wms与 InputManagerService 息息相关,创建 InputManagerService 对象inputManager = new InputManagerService(context);t.traceEnd();
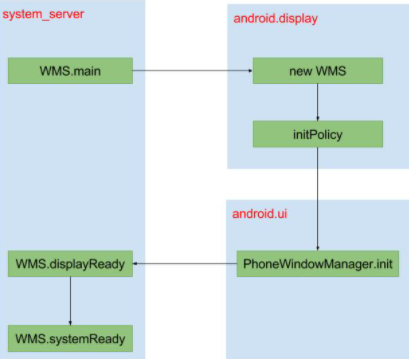
......t.traceBegin("StartWindowManagerService");// WMS needs sensor service readymSystemServiceManager.startBootPhase(t, SystemService.PHASE_WAIT_FOR_SENSOR_SERVICE);3.2. 创建 WindowManagerService 对象wm = WindowManagerService.main(context, inputManager, !mFirstBoot,new PhoneWindowManager(), mActivityManagerService.mActivityTaskManager);// 将WindowManagerService添加到服务中ServiceManager.addService(Context.WINDOW_SERVICE, wm, /* allowIsolated= */ false,DUMP_FLAG_PRIORITY_CRITICAL | DUMP_FLAG_PROTO);// 将InputManagerService 添加到服务中ServiceManager.addService(Context.INPUT_SERVICE, inputManager,/* allowIsolated= */ false, DUMP_FLAG_PRIORITY_CRITICAL);t.traceEnd();t.traceBegin("SetWindowManagerService");3.3. wms 与 ams 关联mActivityManagerService.setWindowManager(wm);t.traceEnd();t.traceBegin("WindowManagerServiceOnInitReady");// 3.4 初始化完成wm.onInitReady();t.traceEnd();t.traceBegin("StartInputManager");// 3.5 InputManagerService 设置回调,并启动 InputManagerService inputManager.setWindowManagerCallbacks(wm.getInputManagerCallback());inputManager.start();t.traceEnd();
......t.traceBegin("MakeDisplayReady");try {// 3.6 调用 displayReady 方法wm.displayReady();} catch (Throwable e) {reportWtf("making display ready", e);}t.traceEnd();t.traceBegin("MakeDisplayReady");try {wm.displayReady();} catch (Throwable e) {reportWtf("making display ready", e);}t.traceEnd();......try {//3.7 系统准备完毕,调用 systemReadywm.systemReady();} catch (Throwable e) {reportWtf("making Window Manager Service ready", e);}t.traceEnd();
......
}下面根据注释的1-6跟进源码查看
3.2 创建 WindowManagerService 对象
3.2.1 WindowManagerService.java & WindowManagerService main(...)
public static WindowManagerService main(final Context context, final InputManagerService im,final boolean showBootMsgs, WindowManagerPolicy policy,ActivityTaskManagerService atm) {return main(context, im, showBootMsgs, policy, atm, new DisplayWindowSettingsProvider(),SurfaceControl.Transaction::new, SurfaceControl.Builder::new);
}
//PhoneWindowManager,主要是负责窗口管理的各种策略。在 android.display 实例化 wms,所以wms 跑在android.display线程中// 一个Supplier可以通过lambda表达式、方法引用或默认构造函数来实例化。// Supplier在Java 8中被引入,属于java.util.function包// transactionFactory 为 SurfaceControl.Transaction::new,创建 Transaction 对象// 通过get 可以获取到对象 Transaction/*** Creates and returns an instance of the WindowManagerService. This call allows the caller* to override factories that can be used to stub native calls during test.*/
@VisibleForTesting
public static WindowManagerService main(final Context context, final InputManagerService im,final boolean showBootMsgs, WindowManagerPolicy policy, ActivityTaskManagerService atm,DisplayWindowSettingsProvider displayWindowSettingsProvider,Supplier<SurfaceControl.Transaction> transactionFactory,Function<SurfaceSession, SurfaceControl.Builder> surfaceControlFactory) {final WindowManagerService[] wms = new WindowManagerService[1];//3.2.2运行在"android.display"线程//3.2.4运行 runWithScissorsDisplayThread.getHandler().runWithScissors(() ->//执行WindowManagerService构造函数wms[0] = new WindowManagerService(context, im, showBootMsgs, policy, atm,displayWindowSettingsProvider, transactionFactory,surfaceControlFactory), 0);return wms[0];
}
3.2.2 DisplayThread.java & getHandler()
DisplayThread 给系统使用的共享单例前台线程类,线程名字为 android.display,专门提供给WindowManager, DisplayManager, InputManager来执行快速响应的实时操作。public final class DisplayThread extends ServiceThread {private static DisplayThread sInstance;private static Handler sHandler;private DisplayThread() {// DisplayThread runs important stuff, but these are not as important as things running in// AnimationThread. Thus, set the priority to one lower.// 线程名字为 "android.display",优先级为 -3super("android.display", Process.THREAD_PRIORITY_DISPLAY + 1, false /*allowIo*/);}private static void ensureThreadLocked() {if (sInstance == null) {sInstance = new DisplayThread();sInstance.start();sInstance.getLooper().setTraceTag(Trace.TRACE_TAG_SYSTEM_SERVER);// 调用makeSharedHandler,跟进代码sHandler = makeSharedHandler(sInstance.getLooper());}}public static DisplayThread get() {synchronized (DisplayThread.class) {ensureThreadLocked();return sInstance;}}
// 获取到handlerpublic static Handler getHandler() {synchronized (DisplayThread.class) {ensureThreadLocked();return sHandler;}}/*** Disposes current display thread if it's initialized. Should only be used in tests to set up a* new environment.*/@VisibleForTestingpublic static void dispose() {synchronized (DisplayThread.class) {if (sInstance == null) {return;}//handler 执行 runWithScissors 方法getHandler().runWithScissors(() -> sInstance.quit(), 0 /* timeout */);sInstance = null;}}
}
3.2.3 ServiceThread.java $ makeSharedHandler()
public class ServiceThread extends HandlerThread {private static final String TAG = "ServiceThread";private final boolean mAllowIo;public ServiceThread(String name, int priority, boolean allowIo) {super(name, priority);mAllowIo = allowIo;}@Overridepublic void run() {Process.setCanSelfBackground(false);if (!mAllowIo) {StrictMode.initThreadDefaults(null);}super.run();}//创建handler,looper 为 thread "android.display" 的looperprotected static Handler makeSharedHandler(Looper looper) {return new Handler(looper, /*callback=*/ null, /* async=*/ false, /* shared=*/ true);}
}
3.2.4 Handler.java & runWithScissors()
public final boolean runWithScissors(@NonNull Runnable r, long timeout) {if (r == null) {throw new IllegalArgumentException("runnable must not be null");}if (timeout < 0) {throw new IllegalArgumentException("timeout must be non-negative");}if (Looper.myLooper() == mLooper) {r.run();return true;}BlockingRunnable br = new BlockingRunnable(r);
// 返回BlockingRunnable的postAndWaitreturn br.postAndWait(this, timeout);
}private static final class BlockingRunnable implements Runnable {private final Runnable mTask;private boolean mDone;public BlockingRunnable(Runnable task) {mTask = task;}@Overridepublic void run() {try {mTask.run();} finally {synchronized (this) {mDone = true;// 执行完则唤醒系统主线程notifyAll();}}}public boolean postAndWait(Handler handler, long timeout) // 将其增加到消息队列中if (!handler.post(this)) {return false;}synchronized (this) {if (timeout > 0) {final long expirationTime = SystemClock.uptimeMillis() + timeout;while (!mDone) {long delay = expirationTime - SystemClock.uptimeMillis();if (delay <= 0) {return false; // timeout}try {wait(delay);} catch (InterruptedException ex) {}}} else {while (!mDone) {try {// 阻塞systemserver 主线程wait();} catch (InterruptedException ex) {}}}}return true;}}
}
3.2.5 WindowManagerService构造函数
private WindowManagerService(Context context, InputManagerService inputManager,boolean showBootMsgs, boolean onlyCore, WindowManagerPolicy policy,ActivityTaskManagerService atm, DisplayWindowSettingsProviderdisplayWindowSettingsProvider, Supplier<SurfaceControl.Transaction> transactionFactory,Supplier<Surface> surfaceFactory,Function<SurfaceSession, SurfaceControl.Builder> surfaceControlFactory) {installLock(this, INDEX_WINDOW);// 锁机制与 atm 一致mGlobalLock = atm.getGlobalLock();// 缓存 AtmSmAtmService = atm;mContext = context;mIsPc = mContext.getPackageManager().hasSystemFeature(FEATURE_PC);mAllowBootMessages = showBootMsgs;mOnlyCore = onlyCore;mLimitedAlphaCompositing = context.getResources().getBoolean(com.android.internal.R.bool.config_sf_limitedAlpha);mHasPermanentDpad = context.getResources().getBoolean(com.android.internal.R.bool.config_hasPermanentDpad);mInTouchMode = context.getResources().getBoolean(com.android.internal.R.bool.config_defaultInTouchMode);inputManager.setInTouchMode(mInTouchMode, myPid(), myUid(), /* hasPermission = */ true);mDrawLockTimeoutMillis = context.getResources().getInteger(com.android.internal.R.integer.config_drawLockTimeoutMillis);// 是否允许在低电量开启动画mAllowAnimationsInLowPowerMode = context.getResources().getBoolean(com.android.internal.R.bool.config_allowAnimationsInLowPowerMode);mMaxUiWidth = context.getResources().getInteger(com.android.internal.R.integer.config_maxUiWidth);mDisableTransitionAnimation = context.getResources().getBoolean(com.android.internal.R.bool.config_disableTransitionAnimation);mPerDisplayFocusEnabled = context.getResources().getBoolean(com.android.internal.R.bool.config_perDisplayFocusEnabled);mAssistantOnTopOfDream = context.getResources().getBoolean(com.android.internal.R.bool.config_assistantOnTopOfDream);mLetterboxConfiguration = new LetterboxConfiguration(// Using SysUI context to have access to Material colors extracted from Wallpaper.ActivityThread.currentActivityThread().getSystemUiContext());// Must be before createDisplayContentLocked.mInputManager = inputManager; mDisplayManagerInternal = LocalServices.getService(DisplayManagerInternal.class);mPossibleDisplayInfoMapper = new PossibleDisplayInfoMapper(mDisplayManagerInternal);mSurfaceControlFactory = surfaceControlFactory;mTransactionFactory = transactionFactory;mSurfaceFactory = surfaceFactory;// 获取 Transaction  对象mTransaction = mTransactionFactory.get();mPolicy = policy;// 创建 WindowAnimator 对象mAnimator = new WindowAnimator(this);// 创建 RootWindowContainer 对象mRoot = new RootWindowContainer(this);final ContentResolver resolver = context.getContentResolver();mUseBLAST = Settings.Global.getInt(resolver,Settings.Global.DEVELOPMENT_USE_BLAST_ADAPTER_VR, 1) == 1;mSyncEngine = new BLASTSyncEngine(this);mWindowPlacerLocked = new WindowSurfacePlacer(this);// 任务快照控制类mTaskSnapshotController = new TaskSnapshotController(this);mWindowTracing = WindowTracing.createDefaultAndStartLooper(this,Choreographer.getInstance());LocalServices.addService(WindowManagerPolicy.class, mPolicy);mDisplayManager = (DisplayManager)context.getSystemService(Context.DISPLAY_SERVICE);// mH 为  final H mH = new H();mKeyguardDisableHandler = KeyguardDisableHandler.create(mContext, mPolicy, mH);mPowerManager = (PowerManager)context.getSystemService(Context.POWER_SERVICE);mPowerManagerInternal = LocalServices.getService(PowerManagerInternal.class);// 注册低电量观察者if (mPowerManagerInternal != null) {mPowerManagerInternal.registerLowPowerModeObserver(new PowerManagerInternal.LowPowerModeListener() {@Overridepublic int getServiceType() {return ServiceType.ANIMATION;}@Overridepublic void onLowPowerModeChanged(PowerSaveState result) {synchronized (mGlobalLock) {final boolean enabled = result.batterySaverEnabled;if (mAnimationsDisabled != enabled && !mAllowAnimationsInLowPowerMode) {mAnimationsDisabled = enabled;dispatchNewAnimatorScaleLocked(null);}}}});mAnimationsDisabled = mPowerManagerInternal.getLowPowerState(ServiceType.ANIMATION).batterySaverEnabled;}mScreenFrozenLock = mPowerManager.newWakeLock(PowerManager.PARTIAL_WAKE_LOCK, "SCREEN_FROZEN");mScreenFrozenLock.setReferenceCounted(false);mDisplayNotificationController = new DisplayWindowListenerController(this);mTaskSystemBarsListenerController = new TaskSystemBarsListenerController();mActivityManager = ActivityManager.getService();mAmInternal = LocalServices.getService(ActivityManagerInternal.class);mAppOps = (AppOpsManager)context.getSystemService(Context.APP_OPS_SERVICE);AppOpsManager.OnOpChangedInternalListener opListener =new AppOpsManager.OnOpChangedInternalListener() {@Override public void onOpChanged(int op, String packageName) {updateAppOpsState();}};mAppOps.startWatchingMode(OP_SYSTEM_ALERT_WINDOW, null, opListener);mAppOps.startWatchingMode(AppOpsManager.OP_TOAST_WINDOW, null, opListener);mPmInternal = LocalServices.getService(PackageManagerInternal.class);mTestUtilityService = LocalServices.getService(TestUtilityService.class);final IntentFilter suspendPackagesFilter = new IntentFilter();suspendPackagesFilter.addAction(Intent.ACTION_PACKAGES_SUSPENDED);suspendPackagesFilter.addAction(Intent.ACTION_PACKAGES_UNSUSPENDED);context.registerReceiverAsUser(new BroadcastReceiver() {@Overridepublic void onReceive(Context context, Intent intent) {final String[] affectedPackages =intent.getStringArrayExtra(Intent.EXTRA_CHANGED_PACKAGE_LIST);final boolean suspended =Intent.ACTION_PACKAGES_SUSPENDED.equals(intent.getAction());updateHiddenWhileSuspendedState(new ArraySet<>(Arrays.asList(affectedPackages)),suspended);}}, UserHandle.ALL, suspendPackagesFilter, null, null);// Get persisted window scale settingmWindowAnimationScaleSetting = Settings.Global.getFloat(resolver,Settings.Global.WINDOW_ANIMATION_SCALE, mWindowAnimationScaleSetting);mTransitionAnimationScaleSetting = Settings.Global.getFloat(resolver,Settings.Global.TRANSITION_ANIMATION_SCALE,context.getResources().getFloat(R.dimen.config_appTransitionAnimationDurationScaleDefault));setAnimatorDurationScale(Settings.Global.getFloat(resolver,Settings.Global.ANIMATOR_DURATION_SCALE, mAnimatorDurationScaleSetting));mForceDesktopModeOnExternalDisplays = Settings.Global.getInt(resolver,DEVELOPMENT_FORCE_DESKTOP_MODE_ON_EXTERNAL_DISPLAYS, 0) != 0;final String displaySettingsPath = Settings.Global.getString(resolver,DEVELOPMENT_WM_DISPLAY_SETTINGS_PATH);mDisplayWindowSettingsProvider = displayWindowSettingsProvider;if (displaySettingsPath != null) {mDisplayWindowSettingsProvider.setBaseSettingsFilePath(displaySettingsPath);}mDisplayWindowSettings = new DisplayWindowSettings(this, mDisplayWindowSettingsProvider);IntentFilter filter = new IntentFilter();// Track changes to DevicePolicyManager state so we can enable/disable keyguard.filter.addAction(ACTION_DEVICE_POLICY_MANAGER_STATE_CHANGED);mContext.registerReceiverAsUser(mBroadcastReceiver, UserHandle.ALL, filter, null, null);mLatencyTracker = LatencyTracker.getInstance(context);mSettingsObserver = new SettingsObserver();mHoldingScreenWakeLock = mPowerManager.newWakeLock(PowerManager.SCREEN_BRIGHT_WAKE_LOCK | PowerManager.ON_AFTER_RELEASE, TAG_WM);mHoldingScreenWakeLock.setReferenceCounted(false);mSurfaceAnimationRunner = new SurfaceAnimationRunner(mTransactionFactory,mPowerManagerInternal);mAllowTheaterModeWakeFromLayout = context.getResources().getBoolean(com.android.internal.R.bool.config_allowTheaterModeWakeFromWindowLayout);mTaskPositioningController = new TaskPositioningController(this);mDragDropController = new DragDropController(this, mH.getLooper());mHighRefreshRateDenylist = HighRefreshRateDenylist.create(context.getResources());mConstants = new WindowManagerConstants(this, DeviceConfigInterface.REAL);mConstants.start(new HandlerExecutor(mH));LocalServices.addService(WindowManagerInternal.class, new LocalService());mEmbeddedWindowController = new EmbeddedWindowController(mAtmService);mDisplayAreaPolicyProvider = DisplayAreaPolicy.Provider.fromResources(mContext.getResources());mDisplayHashController = new DisplayHashController(mContext);setGlobalShadowSettings();mAnrController = new AnrController(this);mStartingSurfaceController = new StartingSurfaceController(this);// anr 控制类,无响应,无焦点等mBlurController = new BlurController(mContext, mPowerManager);mTaskFpsCallbackController = new TaskFpsCallbackController(mContext);mAccessibilityController = new AccessibilityController(this);
}
3.3 关联wms 与 ams
3.3.1 ActivityTaskManagerService.java & setWindowManager()
public void setWindowManager(WindowManagerService wm) {synchronized (mGlobalLock) {mWindowManager = wm;// 缓存 RootWindowContainermRootWindowContainer = wm.mRoot;mWindowOrganizerController.setWindowManager(wm);mTempConfig.setToDefaults();mTempConfig.setLocales(LocaleList.getDefault());mConfigurationSeq = mTempConfig.seq = 1;mRootWindowContainer.onConfigurationChanged(mTempConfig);mLockTaskController.setWindowManager(wm);mTaskSupervisor.setWindowManager(wm);// RootWindowContainer 设置 WindowManagermRootWindowContainer.setWindowManager(wm);if (mBackNavigationController != null) {mBackNavigationController.setTaskSnapshotController(wm.mTaskSnapshotController);}}
}
3.4 初始化完成 onInitReady
3.4.1 WindowManagerService.java & onInitReady
//3.4.1 初始化完成 onInitReady
public void onInitReady() {initPolicy();// Add ourself to the Watchdog monitors.Watchdog.getInstance().addMonitor(this);createWatermark();showEmulatorDisplayOverlayIfNeeded();
}private void initPolicy() {// 在ui 线程执行下列函数,"android.ui"UiThread.getHandler().runWithScissors(new Runnable() {@Overridepublic void run() {WindowManagerPolicyThread.set(Thread.currentThread(), Looper.myLooper());//3.4.2 初始化 PhoneWindowManagermPolicy.init(mContext, WindowManagerService.this);}}, 0);
}
3.4.2 PhoneWindowManager.java & init()
mHandler = new PolicyHandler();public void init(Context context, WindowManagerFuncs funcs) {init(new Injector(context, funcs));
}@VisibleForTesting
void init(Injector injector) {mContext = injector.getContext();mWindowManagerFuncs = injector.getWindowManagerFuncs();mWindowManagerInternal = LocalServices.getService(WindowManagerInternal.class);mActivityManagerInternal = LocalServices.getService(ActivityManagerInternal.class);mActivityTaskManagerInternal = LocalServices.getService(ActivityTaskManagerInternal.class);mInputManagerInternal = LocalServices.getService(InputManagerInternal.class);mDreamManagerInternal = LocalServices.getService(DreamManagerInternal.class);mPowerManagerInternal = LocalServices.getService(PowerManagerInternal.class);mAppOpsManager = mContext.getSystemService(AppOpsManager.class);mSensorPrivacyManager = mContext.getSystemService(SensorPrivacyManager.class);mDisplayManager = mContext.getSystemService(DisplayManager.class);mDisplayManagerInternal = LocalServices.getService(DisplayManagerInternal.class);mUserManagerInternal = LocalServices.getService(UserManagerInternal.class);mPackageManager = mContext.getPackageManager();mHasFeatureWatch = mPackageManager.hasSystemFeature(FEATURE_WATCH);mHasFeatureLeanback = mPackageManager.hasSystemFeature(FEATURE_LEANBACK);mHasFeatureAuto = mPackageManager.hasSystemFeature(FEATURE_AUTOMOTIVE);mHasFeatureHdmiCec = mPackageManager.hasSystemFeature(FEATURE_HDMI_CEC);mAccessibilityShortcutController = injector.getAccessibilityShortcutController(mContext, new Handler(), mCurrentUserId);mGlobalActionsFactory = injector.getGlobalActionsFactory();mLockPatternUtils = new LockPatternUtils(mContext);mLogger = new MetricsLogger();mScreenOffSleepTokenAcquirer = mActivityTaskManagerInternal.createSleepTokenAcquirer("ScreenOff");Resources res = mContext.getResources();mWakeOnDpadKeyPress =res.getBoolean(com.android.internal.R.bool.config_wakeOnDpadKeyPress);mWakeOnAssistKeyPress =res.getBoolean(com.android.internal.R.bool.config_wakeOnAssistKeyPress);mWakeOnBackKeyPress =res.getBoolean(com.android.internal.R.bool.config_wakeOnBackKeyPress);// Init display burn-in protectionboolean burnInProtectionEnabled = mContext.getResources().getBoolean(com.android.internal.R.bool.config_enableBurnInProtection);// Allow a system property to override this. Used by developer settings.boolean burnInProtectionDevMode =SystemProperties.getBoolean("persist.debug.force_burn_in", false);if (burnInProtectionEnabled || burnInProtectionDevMode) {final int minHorizontal;final int maxHorizontal;final int minVertical;final int maxVertical;final int maxRadius;if (burnInProtectionDevMode) {minHorizontal = -8;maxHorizontal = 8;minVertical = -8;maxVertical = -4;maxRadius = (isRoundWindow()) ? 6 : -1;} else {Resources resources = mContext.getResources();minHorizontal = resources.getInteger(com.android.internal.R.integer.config_burnInProtectionMinHorizontalOffset);maxHorizontal = resources.getInteger(com.android.internal.R.integer.config_burnInProtectionMaxHorizontalOffset);minVertical = resources.getInteger(com.android.internal.R.integer.config_burnInProtectionMinVerticalOffset);maxVertical = resources.getInteger(com.android.internal.R.integer.config_burnInProtectionMaxVerticalOffset);maxRadius = resources.getInteger(com.android.internal.R.integer.config_burnInProtectionMaxRadius);}mBurnInProtectionHelper = new BurnInProtectionHelper(mContext, minHorizontal, maxHorizontal, minVertical, maxVertical, maxRadius);}
....
// handler是跑在ui 线程mSideFpsEventHandler = new SideFpsEventHandler(mContext, mHandler, mPowerManager);
3.5 InputManagerService 设置回调,并启InputManagerService
3.5.1 InputManagerService.java & setWindowManagerCallbacks
public void setWindowManagerCallbacks(WindowManagerCallbacks callbacks) {// 保证只有一个 callbackif (mWindowManagerCallbacks != null) {unregisterLidSwitchCallbackInternal(mWindowManagerCallbacks);}mWindowManagerCallbacks = callbacks;registerLidSwitchCallbackInternal(mWindowManagerCallbacks);
}
3.5.2 InputManagerService.java & registerLidSwitchCallbackInternal()
void registerLidSwitchCallbackInternal(@NonNull LidSwitchCallback callback) {synchronized (mLidSwitchLock) {// 将 callback 保存到 mLidSwitchCallbacksmLidSwitchCallbacks.add(callback);// Skip triggering the initial callback if the system is not yet ready as the switch// state will be reported as KEY_STATE_UNKNOWN. The callback will be triggered in// systemRunning().if (mSystemReady) {boolean lidOpen = getSwitchState(-1 /* deviceId */, InputDevice.SOURCE_ANY, SW_LID)== KEY_STATE_UP;callback.notifyLidSwitchChanged(0 /* whenNanos */, lidOpen);}}
}
3.5.3 InputManagerService.java & start()
public void start() {Slog.i(TAG, "Starting input manager");mNative.start();// Add ourselves to the Watchdog monitors.Watchdog.getInstance().addMonitor(this);
}
3.6 调用 displayReady 方法
3.6.1 WindowManagerService.java & displayReady()
public void displayReady() {synchronized (mGlobalLock) {if (mMaxUiWidth > 0) {mRoot.forAllDisplays(displayContent -> displayContent.setMaxUiWidth(mMaxUiWidth));}applyForcedPropertiesForDefaultDisplay();mAnimator.ready();mDisplayReady = true;// Reconfigure all displays to make sure that forced properties and// DisplayWindowSettings are applied.mRoot.forAllDisplays(DisplayContent::reconfigureDisplayLocked);mIsTouchDevice = mContext.getPackageManager().hasSystemFeature(PackageManager.FEATURE_TOUCHSCREEN);mIsFakeTouchDevice = mContext.getPackageManager().hasSystemFeature(PackageManager.FEATURE_FAKETOUCH);}mAtmService.updateConfiguration(null /* request to compute config */);
}
3.7 系统准备完毕,调用 systemReady
public void systemReady() {mSystemReady = true;// 调用 PhoneWindowManager的systemReadymPolicy.systemReady();mRoot.forAllDisplayPolicies(DisplayPolicy::systemReady);// 快照控制类mSnapshotController.systemReady();mHasWideColorGamutSupport = queryWideColorGamutSupport();mHasHdrSupport = queryHdrSupport();// ui线程执行 loadSettingsUiThread.getHandler().post(mSettingsObserver::loadSettings);IVrManager vrManager = IVrManager.Stub.asInterface(ServiceManager.getService(Context.VR_SERVICE));if (vrManager != null) {try {final boolean vrModeEnabled = vrManager.getVrModeState();synchronized (mGlobalLock) {vrManager.registerListener(mVrStateCallbacks);if (vrModeEnabled) {mVrModeEnabled = vrModeEnabled;mVrStateCallbacks.onVrStateChanged(vrModeEnabled);}}} catch (RemoteException e) {// Ignore, we cannot do anything if we failed to register VR mode listener}}
}
整个启动过程有3个线程,systemserver主线程,”android.display”,”android.ui”,整个过程采用阻塞的方式(利用runWithScissors)执行,WMS.mH的Looper运行在”android.display”进程。
参考:
WMS启动流程分析 | Skytoby
WMS—启动过程 - Gityuan博客 | 袁辉辉的技术博客
Android渲染(一)_系统服务WMS启动过程(基于Android10) - 掘金
Android窗口管理2 WMS启动过程_postandwait-CSDN博客
【安卓12源码】WMS的作用及其启动流程_android wms_蜘蛛侠不会飞的博客-CSDN博客
相关文章:
Android14 WMS启动流程
一 概述 本文Android14源代码可参考:Search 在 Android 系统中,从设计的角度来看,窗口管理系统是基于 C/S 模式的。整个窗口系统分为服务端和客户端两大部分,客户端负责请求创建窗口和使用窗口,服务端完成窗口的维护…...
磁盘管理(初始化,引导块,坏块管理,固态硬盘)
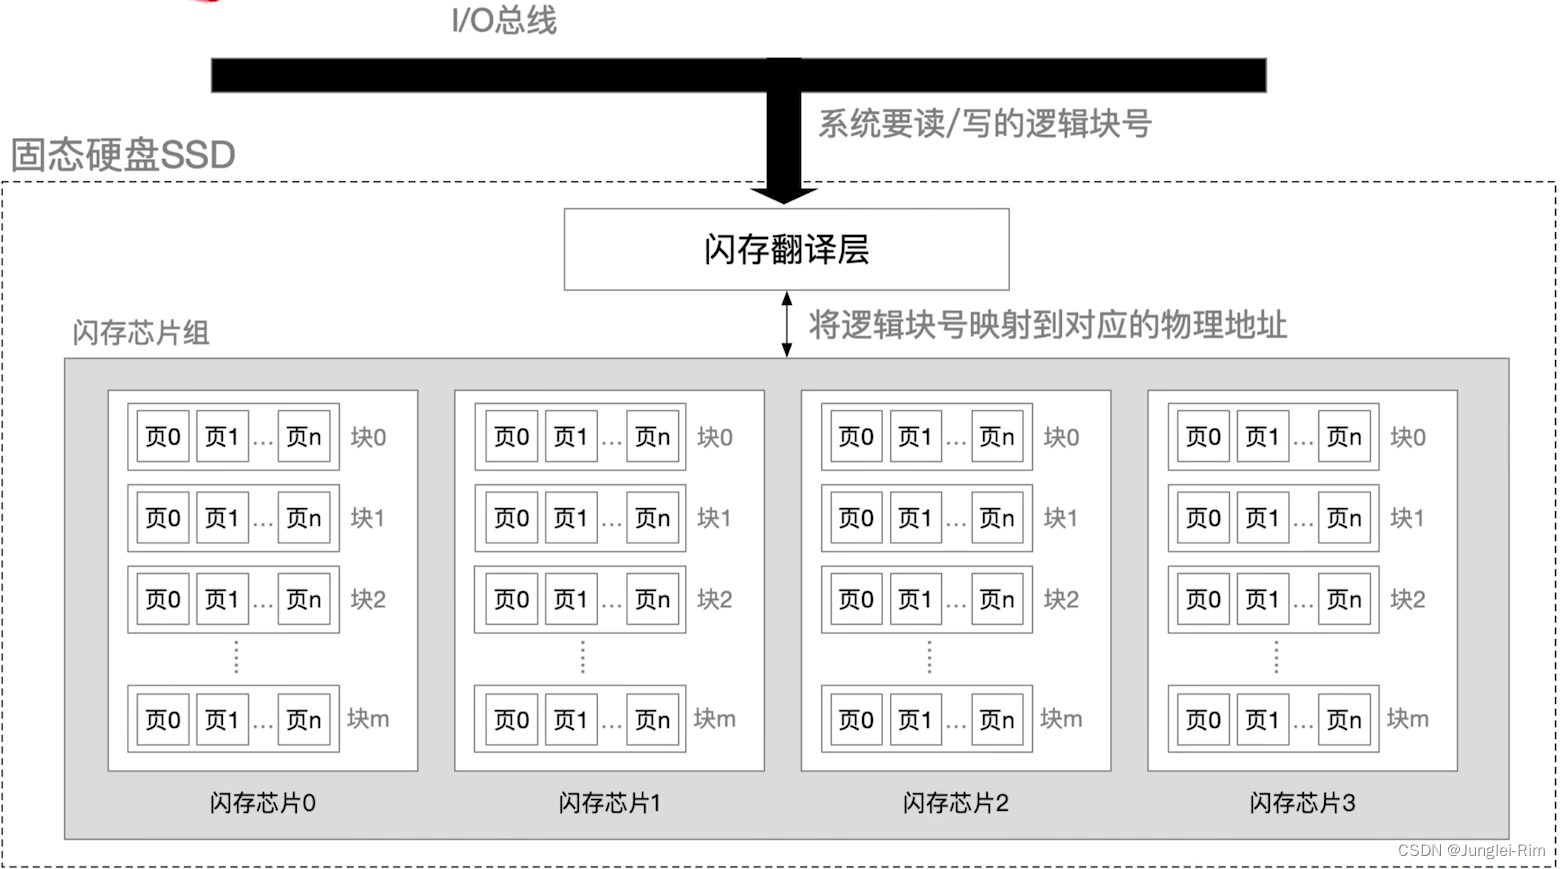
目录 1.磁盘初始化2.引导块3.坏块的管理1.坏块检查2.坏块链表3.扇区备用 4.固态硬盘(SSD)1.原理2.组成3.读写性能特性4.与机械硬盘相比5.磨损均衡技术 1.磁盘初始化 ①进行低级格式化(物理格式化),将磁盘的各个磁道划分…...

mysql冷拷贝大表
1、简述: mysql数据迁移有多种方式,最常见的就是先把数据库导出,然后导入新的数据库。拷贝数据目录data是另外一种方式。 尤其是当数据库启动不了,或者大型数据库迁移的时候,可以考虑这个方式。 2、场景:…...
苍穹外卖-01
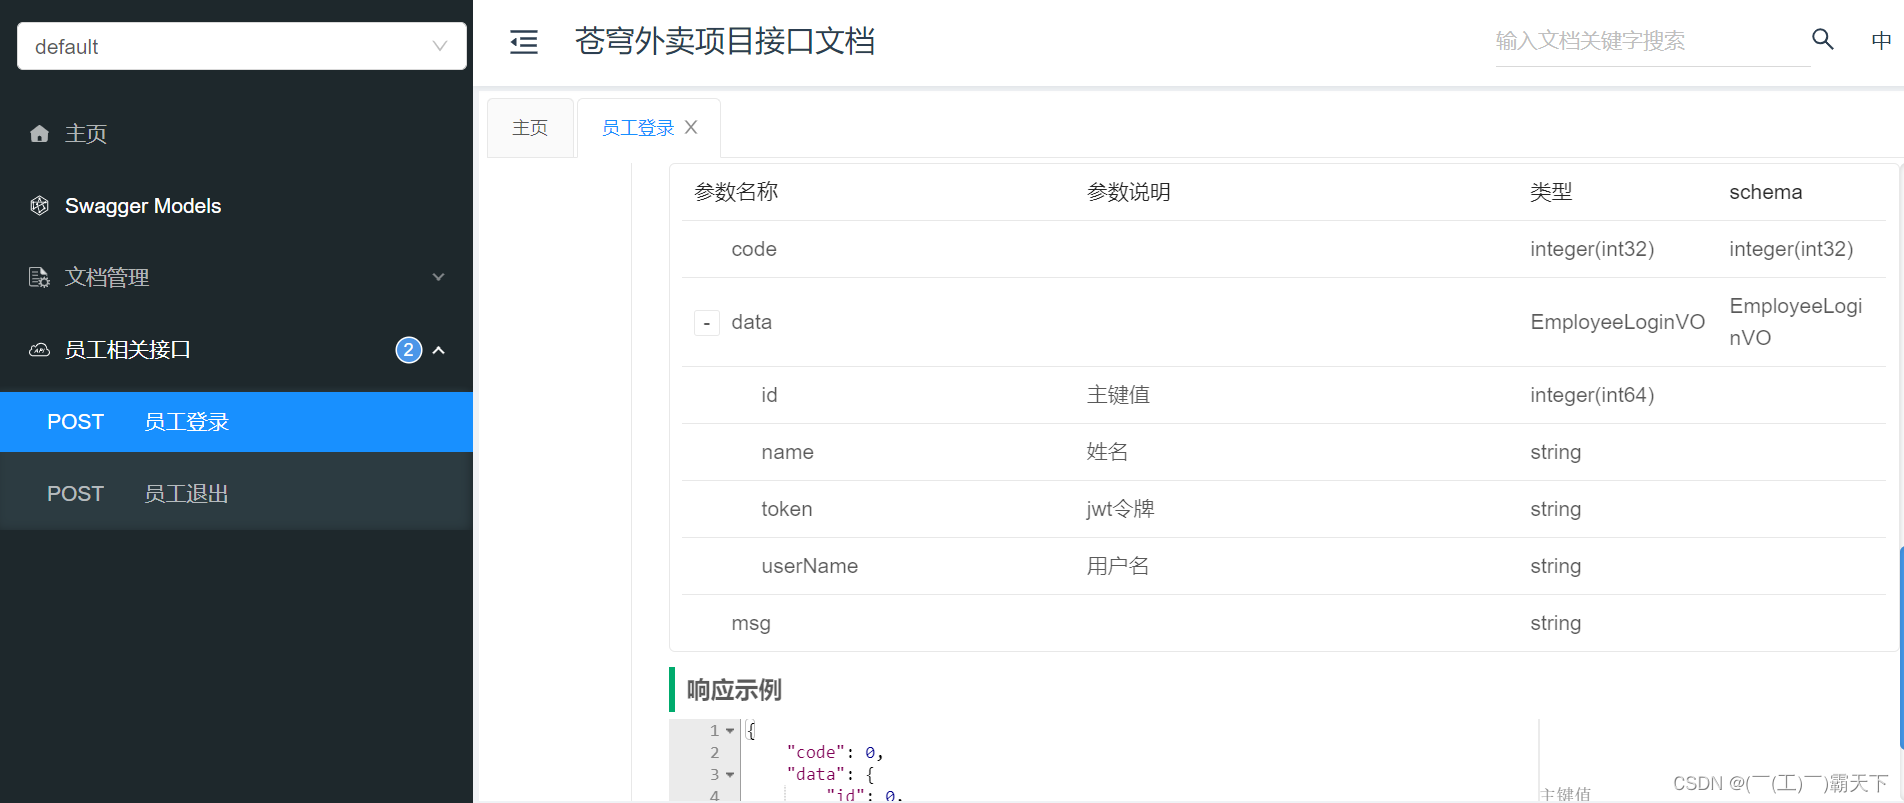
苍穹外卖-01 课程内容 软件开发整体介绍苍穹外卖项目介绍开发环境搭建导入接口文档Swagger 项目整体效果展示: 管理端-外卖商家使用 用户端-点餐用户使用 当我们完成该项目的学习,可以培养以下能力: 1. 软件开发整体介绍 作为一名…...

GAMP源码阅读(中)伪距单点定位 SPP
原始 Markdown文档、Visio流程图、XMind思维导图见:https://github.com/LiZhengXiao99/Navigation-Learning 文章目录 一、SPP 解算1、spp():单点定位主入口函数2、estpos()3、estpose_()4、valsol():GDOP和卡方检验结果有效性 二、卫星位置钟…...

Epinoia-有状态网络的意图验证模块,略读
Epinoia relies on a unified model for NFs by leveraging the causal precedence relationshipsthat exist between NF packet I/Os and states. 这句话的意思是:“Epinoia依靠一种统一的网络功能(NF)模型,通过利用存在于 NF 包…...

14.力扣c++刷题-->有效括号
题目:给定一个只包括 ‘(’,‘)’,‘{’,‘}’,‘[’,‘]’ 的字符串 s ,判断字符串是否有效。 有效字符串需满足: 左括号必须用相同类型的右括号闭合。 左括号必须以正确的顺序闭合…...
scrapy-redis分布式爬虫(分布式爬虫简述+分布式爬虫实战)
一、分布式爬虫简述 (一)分布式爬虫优势 1.充分利用多台机器的带宽速度 2.充分利用多台机器的ip地址 (二)Redis数据库 1.Redis是一个高性能的nosql数据库 2.Redis的所有操作都是原子性的 3.Redis的数据类型都是基于基本数据…...

单目深度估计之图像重构原理解析
一、参考资料 浅析自监督深度估计中的光度损失(Photometric Loss) 二、图像重构原理 设输入位姿估计网络的3帧连续单目序列为 < I t − 1 , I t , I t 1 > <I_{t-1},I_{t},I_{t1}> <It−1,It,It1>,其中 t t t 为时间索引,…...
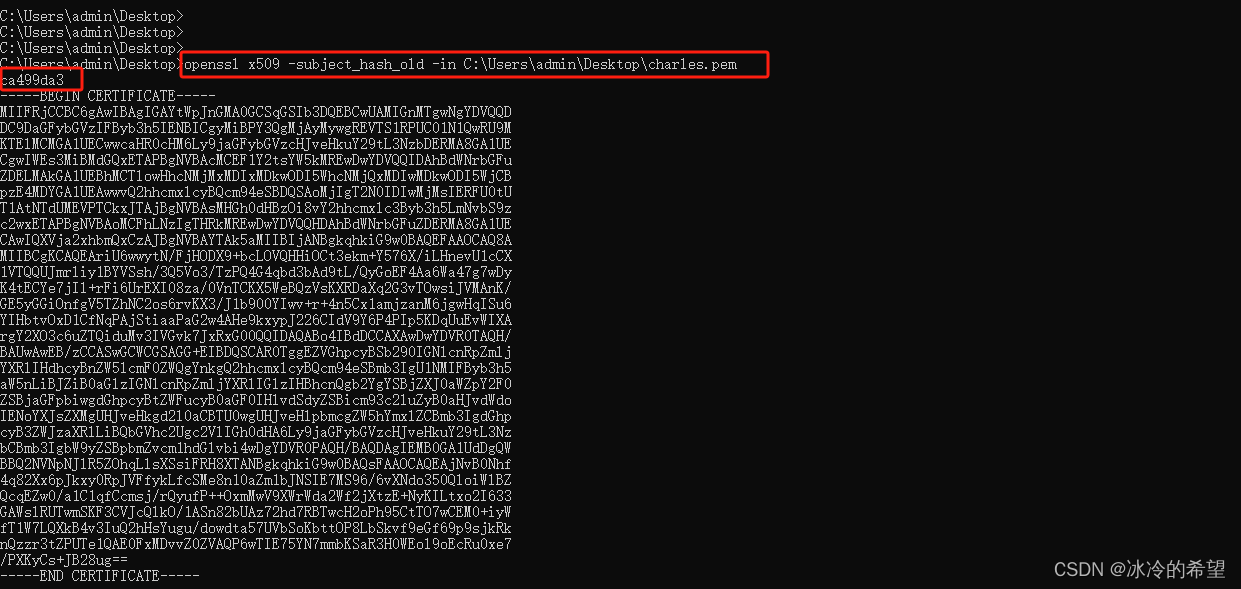
【爬虫】charles手机抓包环境设置(设置系统证书)
1.说明 想要对手机抓包,最关键的是需要设置好根证书,用户证书在安卓7.0之后就不受信任了,想要对手机app抓包,就需要把用户证书设置为系统证书(根证书) 注意,想要设置为根证书,你的…...

【flink sql table api】时间属性的指定与使用注意事项
文章目录 一. 时间属性介绍二. Table api指定时间属性三. 处理时间的指定1. 在创建表的 DDL 中定义2. 在 DataStream 到 Table 转换时定义3. 使用 TableSource 定义 四. 事件时间的指定1. 在 DDL 中定义2. 在 DataStream 到 Table 转换时定义3. 使用 TableSource 定义 五. 小结…...
评价模型:CRITIC客观赋权法
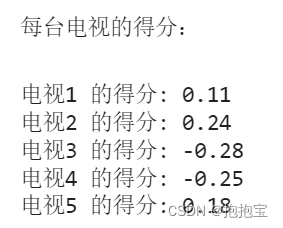
目录 1.算法原理介绍2.算法步骤2.1 数据标准化2.2 计算信息承载量2.3 计算权重和得分 3.案例分析 1.算法原理介绍 CRITIC方法是一种客观权重赋权法,其基本思路是确定指标的客观权数以两个基本概念为基础。一是对比强度,它表示同一指标各个评价方案取值差…...

两个Tomcat插件配置不同端口,session冲突,同时登录被挤下线问题的解决
如果是配置了两个Tomcat的插件,在同一ip有两个需要同时登录的项目,可以在其中一个web项目的web.xml文件里添加session命名的配置,如下: <!--配置不同的session,避免管理端和手机端两个同时登录被挤下线--><se…...

Mybatis中执行Sql的执行过程
MyBatis中执行SQL的过程可以分为以下几个步骤: 解析配置文件:在运行时,MyBatis会加载并解析配置文件(通常为mybatis-config.xml),获取数据库连接信息、映射文件等。 创建SqlSessionFactory:MyB…...

IEEE Standard for SystemVerilog—Chapter 25.7 Tasks and functions in interfaces
子例程(任务和函数)可以在接口中定义,也可以在连接的一个或多个模块中定义。这允许更抽象的建模级别。例如,“读”和“写”可以定义为任务,而不需要引用任何连线,主模块只能调用这些任务。在modport中&…...

一台服务器最大能支持多少条 TCP 连接
文章目录 1. 一台服务器最大能打开的文件数1.1 限制参数1.2 调整服务器能打开的最大文件数示例 2. 一台服务器最大能支持多少连接3. 一台客户端机器最多能发起多少条连接4. 其他5. 相关实际问题5.1 "too many open files" 报错是怎么回事,该如何解决5.2 一…...

Qt重定向QDebug,Qt/C++开源作品39-日志输出增强版V2022
Qt重定向QDebug,自定义一个简易的日志管理类 Chapter1 Qt重定向QDebug,自定义一个简易的日志管理类0.前言1.最简单的操作运行结果2.实现一个简易的日志管理类 Chapter2 Qt::Qt Log日志模块Qt Log日志模块官方解释官方Demo思路 Chapter3 QT日志模块的个性…...

linux入门---多线程的控制
目录标题 线程库pthread_create如何一次性创建多个线程线程的终止线程的等待线程取消分离线程如何看待其他语言支持的多线程线程id的本质线程的局部存储线程的封装 线程库 要想控制线程就得使用原生线程库也可以将其称为pthread库,这个库是遵守posix标准的…...
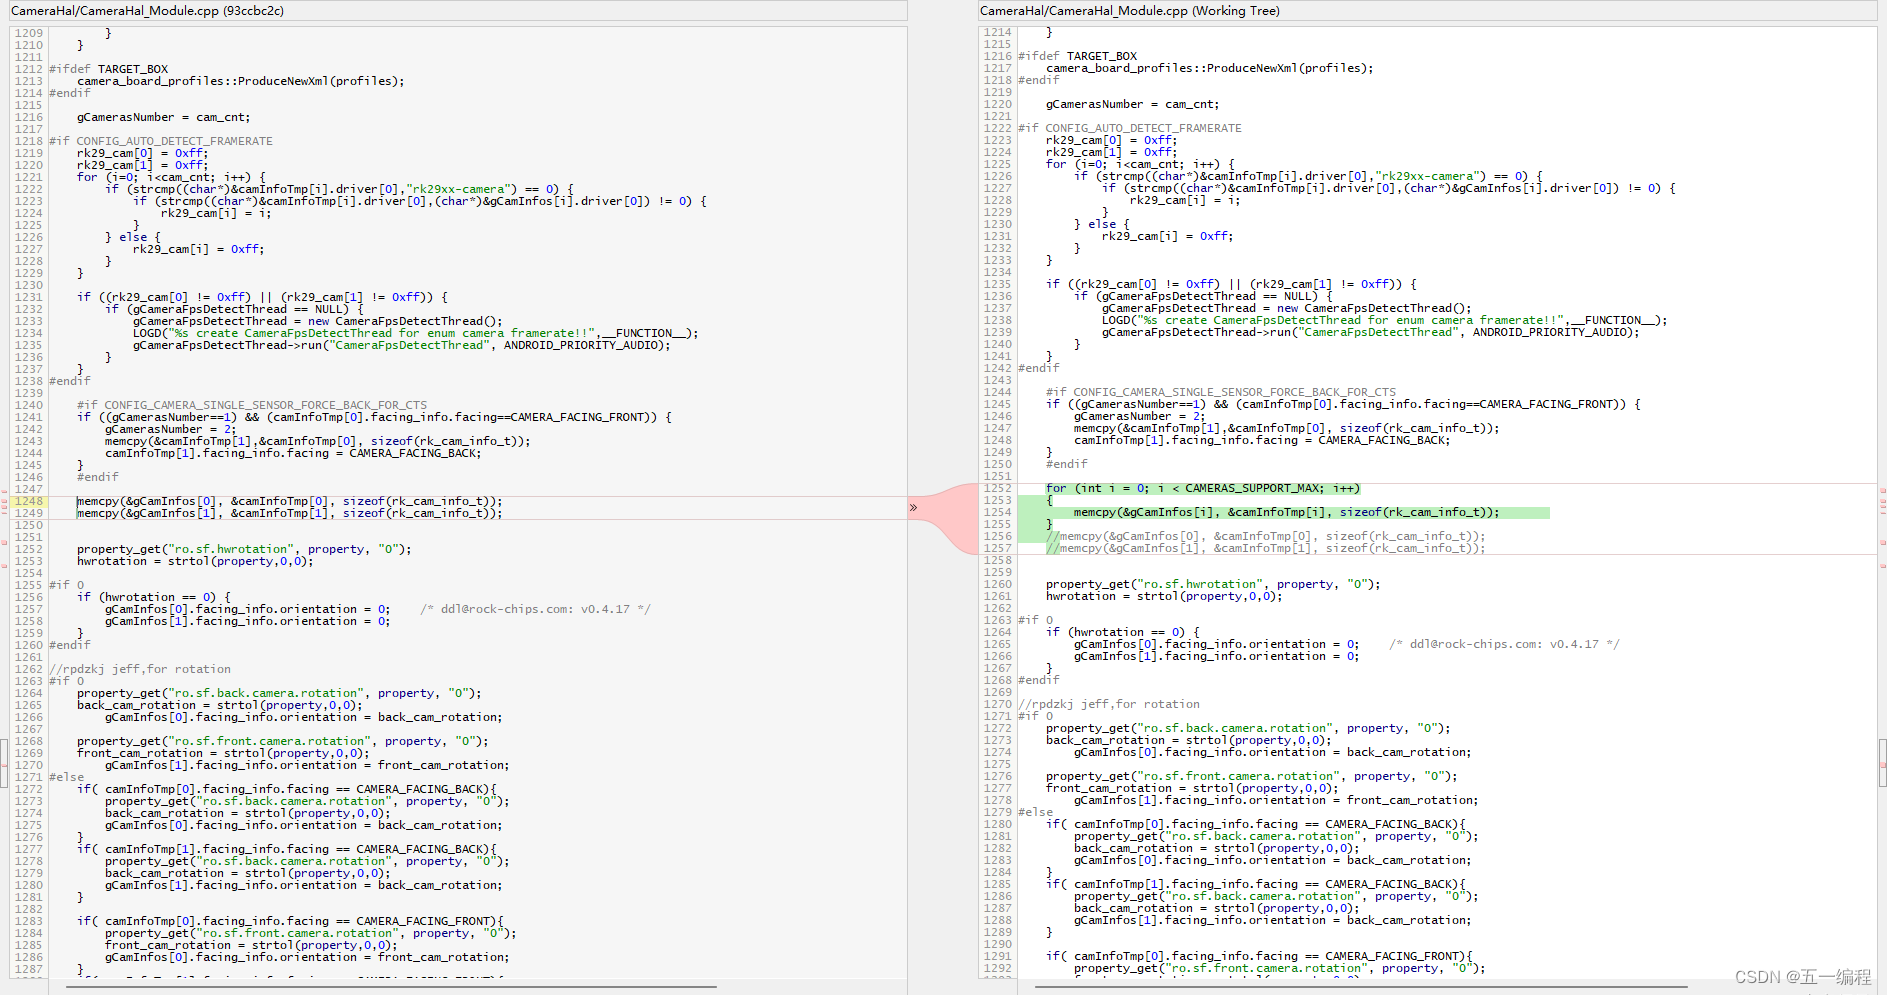
基于android的 rk3399 同时支持多个USB摄像头
基于android的 rk3399 同时支持多个USB摄像头 一、前文二、CameraHal_Module.h三、CameraHal_Module.cpp四、编译&烧录Image五、App验证 一、前文 Android系统默认支持2个摄像头,一个前置摄像头,一个后置摄像头 需要支持数量更多的摄像头࿰…...
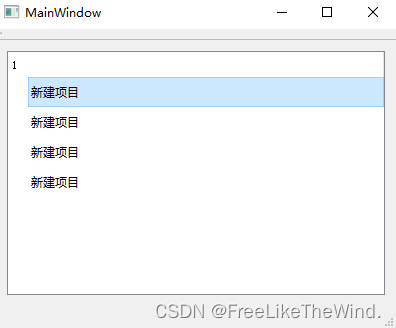
【Qt之控件QTreeView】设置单元格高度、设置图标尺寸
设置列宽 设置高度 自定义代理 继承QItemDelegate,实现sizeHint ()方法,设置自定义委托。 class itemDelegate : public QItemDelegate {Q_OBJECTpublic:explicit itemDelegate(QObject *parent 0) : QItemDelegate(parent){}~itemDelegate(){}virtua…...

像素风机甲对战小游戏HTML
先放效果图🎮 游戏玩法设计功能说明: 双人对战:两个玩家在同一键盘上对战 移动系统:左右移动 跳跃(带重力物理) 攻击系统: 近战攻击,有冷却时间和范围判定 防御系统:…...

Llama3-8B微调显存优化实战:在单张RTX 4090上如何用PEFT+TRL跑通SFT?
Llama3-8B微调显存优化实战:单卡RTX 4090的极限挑战 当Meta发布Llama3系列模型时,8B版本因其在消费级硬件上的潜在可行性迅速成为开发者社区的焦点。但将这样一个拥有80亿参数的模型塞进24GB显存的显卡,就像试图把一头大象装进冰箱——理论上…...
——为什么 DDR5 最怕地不好?回流路径,才是高速设计真正的灵魂)
硬件工程师,每天5分钟(5)——为什么 DDR5 最怕地不好?回流路径,才是高速设计真正的灵魂
讲透: 回流路径 为什么 Split Plane 最危险 为什么加地孔有时候能救命 为什么 GPS 会被 DDR 干扰 为什么 EMC 挂的根因常是地 🚗《硬件工程师,每天5分钟》第5篇 🔥《为什么 DDR5 最怕地不好?回流路径,才是高…...

Unity中DragonBones多动画性能优化:图集复用与骨骼模板化
1. 为什么DragonBones动画在Unity里总“卡得莫名其妙”?我第一次在Unity项目里接入DragonBones时,美术给的是一套角色的12个独立动画:idle、walk、run、jump、attack1、attack2、hurt、die、victory、taunt、cast、reload——每个都带完整骨骼…...

Godot RTS开发实战:从导航到建造的原子化实现
1. 为什么“从零开始玩转Godot RTS引擎”不是一句空话,而是真能落地的开发路径很多人看到“RTS”两个字母就下意识缩手——星际争霸、帝国时代、红色警戒这些名字背后是庞大的系统、复杂的寻路、海量单位同步、资源采集逻辑、建造队列、科技树、视野遮蔽……一连串术…...

APK Installer:重新定义Windows运行Android应用的突破性方案
APK Installer:重新定义Windows运行Android应用的突破性方案 【免费下载链接】APK-Installer An Android Application Installer for Windows 项目地址: https://gitcode.com/GitHub_Trending/ap/APK-Installer 在Windows系统上运行Android应用的传统方案往往…...

算法实例分析:使数组相等的最小开销
使数组相等的最小开销通过题意分析可知要让所有值相等,必然不需要超出数据的最大最小值,因此左右边界可以预先缩小范围。然后根据我们上面的分析不断缩小搜索边界范围。关于函数的计算,只要统计所有数据与的差值再乘上权重即可。最后注意&…...

claudecode用户如何通过taotoken解决封号与token不足的痛点
🚀 告别海外账号与网络限制!稳定直连全球优质大模型,限时半价接入中。 👉 点击领取海量免费额度 claudecode用户如何通过taotoken解决封号与token不足的痛点 1. 场景与核心挑战 对于深度使用 Claude Code 编程助手的开发者而言&…...

AI人工智能行业的发展:从机器学习到深度学习的演变历程
在数字化浪潮席卷全球的当下,人工智能(AI)已然成为推动各行业变革的核心力量。对于软件测试从业者而言,深入了解AI从机器学习到深度学习的演变历程,不仅能把握技术发展脉络,更能为测试工作的智能化转型提供…...

泥沙自动监测仪:从“估算”到“实测”,水保验收不再凭感觉
泥沙自动监测仪搭载一体化智能监测架构,聚焦水保监测核心指标,可全天候无人值守自动采集关键数据,精准监测径流量、实时径流含沙量、阶段性径流总量三大核心参数,全面覆盖水土保持监测刚需指标。区别于人工定时取样的片面性&#…...