centos9 stream 下 rabbitmq高可用集群搭建及使用
RabbitMQ是一种常用的消息队列系统,可以快速搭建一个高可用的集群环境,以提高系统的弹性和可靠性。下面是搭建RabbitMQ集群的步骤:
基于centos9 stream系统
1. 安装Erlang和RabbitMQ
首先需要在所有节点上安装Erlang和RabbitMQ。建议使用官方提供的安装包进行安装。
##直接从yum,repo源安装,建议一起装上librabbitmq*
yum install rabbitmq-server
#安装时会默认安装erlang相关依赖包。
#加入系统自动启动并立即运行rabbit
systemctl enable rabbitmq-server.service --now
2. 配置hosts文件
在所有节点上编辑hosts文件,将各节点的IP地址和主机名映射到一起。这样可以通过主机名进行通信,而不是依赖IP地址。
这个就不在讲了,直接编辑 /etc/hosts这个文件即可
个人主机内容参考如下:
127.0.0.1   localhost localhost.localdomain localhost4 localhost4.localdomain4
::1         localhost localhost.localdomain localhost6 localhost6.localdomain6110.110.10.5	host1
110.110.10.6	host2
110.110.10.7    host3
3. 配置rabbit集群
一般情况下一个节点的rabbit也差不多够用了,但为了稳定性使用高可用集群还是有必要的,配置集群可以直接编辑每个节点上的RabbitMQ配置文件,可以在/etc/rabbitmq/rabbitmq.conf中修改。常见的配置项:
# 节点名称
node_name = rabbit@node1
# 集群节点列表
cluster_nodes = {['rabbit@node1', 'rabbit@node2', 'rabbit@node3'], disc}
# Cookie值,用于节点间通信
erlang_cookie = abcde12345fghij
还有自定义rabbit的ip,各类服务端口,还有ssl等高级配置在这里不说了。
注意,这些配置项必须在所有节点上保持一致。
命令方式配置集群
默认情况下rabbit会直接获取hostname作为节点名,所以不用去配置文件中修改,这里主要讲使用命令直接配置和启动rabbit集群。
### 先配置管理节点,再将管理节点cookie复制到其他节点
for i in {host1,host2,host3};do ssh $i systemctl stop rabbitmq-server;done
for i in {host1,host2,host3};do scp /var/lib/rabbitmq/.erlang.cookie $i:/var/lib/rabbitmq/.erlang.cookie;done
for i in {host1,host2,host3};do ssh $i chown rabbitmq:rabbitmq /var/lib/rabbitmq/.erlang.cookie;done
for i in {host1,host2,host3};do ssh $i chmod 400 /var/lib/rabbitmq/.erlang.cookie;done
for i in {host1,host2,host3};do ssh $i systemctl start rabbitmq-server;done###节点加入集群,从拟定的主节点以外的其他节点操作,新加入节点操作也一样。;
rabbitmqctl stop_app
rabbitmqctl join_cluster --ram rabbit@host1
rabbitmqctl start_app# 查看rabbitmq集群服务状态,每加入一个节点都可以查看一下是否加入成功
rabbitmqctl cluster_status# 单个新节点加入集群操作,在新节点上操作,与上面多节点操作基本一致。
systemctl stop rabbitmq-server
scp host1:/var/lib/rabbitmq/.erlang.cookie /var/lib/rabbitmq/.erlang.cookie
chown rabbitmq:rabbitmq /var/lib/rabbitmq/.erlang.cookie
chmod 400 /var/lib/rabbitmq/.erlang.cookie
systemctl start rabbitmq-server
rabbitmqctl stop_app
rabbitmqctl join_cluster --ram rabbit@host1
rabbitmqctl start_app
读写测试
写入和读取测试:pythonimport pika
# 连接到 rabbitmq 服务器
connection = pika.BlockingConnection(pika.ConnectionParameters('localhost'))
channel = connection.channel()# 定义队列名称
queue_name = 'test_queue'# 向队列写入消息
channel.queue_declare(queue=queue_name)
channel.basic_publish(exchange='',routing_key=queue_name,body='Hello World!')
print(" [x] Sent 'Hello World!'")# 从队列中读取消息
method_frame, header_frame, body = channel.basic_get(queue=queue_name, auto_ack=True)
if method_frame:print(" [x] Received %r" % body)
else:print('No message returned')# 关闭连接
connection.close()# 在上述代码中,我们首先连接到了本地的 rabbitmq 服务器。然后定义了一个名为 test_queue 的队列,并向队列中写入了一条消息:Hello World!。接着,我们又从队列中读取了一条消息,并将其打印出来。
在Node.js中使用RabbitMQ
在Node.js中使用RabbitMQ需要先安装amqplib库,可以通过npm进行安装:
npm install amqplib##以下是使用RabbitMQ的基本步骤:
##建立与RabbitMQ服务器的连接
const amqp = require('amqplib');
amqp.connect('amqp://localhost').then(function(conn) {//执行后续操作
});###创建通道(channel)
conn.createChannel().then(function(ch) {//执行后续操作
});#发送消息
const queueName = "hello";
ch.assertQueue(queueName, { durable: false });
ch.sendToQueue(queueName, new Buffer('Hello World!'));# 接收消息
const queueName = "hello";
ch.assertQueue(queueName, { durable: false });
ch.consume(queueName, function(msg) {console.log("Received message: %s", msg.content.toString());
}, { noAck: true });#######完整示例代码:const amqp = require('amqplib');amqp.connect('amqp://localhost').then(function(conn) {conn.createChannel().then(function(ch) {const queueName = "hello";ch.assertQueue(queueName, { durable: false });ch.sendToQueue(queueName, new Buffer('Hello World!'));ch.assertQueue(queueName, { durable: false });ch.consume(queueName, function(msg) {console.log("Received message: %s", msg.content.toString());}, { noAck: true });});
}).catch(function(err) {console.log('Error:', err);
});
4. 常用管理命令
#添加新用户
sudo rabbitmqctl add_user username password#删除用户
sudo rabbitmqctl delete_user username#分配用户权限
sudo rabbitmqctl set_permissions -p / virtual-hostname 'username' '.*' '.*' '.*'#查看用户列表
sudo rabbitmqctl list_users#查看队列列表
sudo rabbitmqctl list_queues#查看交换机列表
sudo rabbitmqctl list_exchanges#查看绑定列表
sudo rabbitmqctl list_bindings#查看 vhost 列表
sudo rabbitmqctl list_vhosts#查看某个 vhost 的权限控制列表
sudo rabbitmqctl list_permissions -p virtual-hostname#查看 RabbitMQ 服务器信息
sudo rabbitmqctl status
5. 设置集群policy设置
##语句格式
rabbitmqctl set_policy [-p <vhost>] <name> <pattern> <definition>
rabbitmqctl clear_policy [-p <vhost>] <name>
rabbitmqctl list_policies [-p <vhost>]## [ host1 ] 设置 ha-mode 高可用模式
rabbitmqctl set_policy ha-all '^(?!amq\.).*' '{"ha-mode": "all"}';## 置一个队列的最大长度为1000条消息:
rabbitmqctl set_policy max-length-1000 "^my-queue$" '{"max-length":1000}' --apply-to queues
6. 启用web面板插件
# 启用web插件
rabbitmq-plugins enable rabbitmq_management##在本服务器或者同网段其他主机打开浏览器即可访问rabbitmq集群状态和管理页面
使用前面命令添加用户并设置为管理员即可登陆web界面。

7. rabbitmq配置文件参考
###一般情况下不用在这里修改配置文件,但自定义参数的时候还是很有用的。
cat /etc/rabbitmq/rabbitmq.conf
## This example configuration file demonstrates various settings
## available via rabbitmq.conf. It primarily focuses core broker settings
## but some tier 1 plugin settings are also covered.
##
## This file is AN EXAMPLE. It is NOT MEANT TO BE USED IN PRODUCTION. Instead of
## copying the entire (large!) file, create or generate a new rabbitmq.conf for the target system
## and populate it with the necessary settings.
##
## See https://rabbitmq.com/configure.html to learn about how to configure RabbitMQ,
## the ini-style format used by rabbitmq.conf, how it is different from `advanced.config`,
## how to verify effective configuration, and so on.
##
## See https://rabbitmq.com/documentation.html for the rest of RabbitMQ documentation.
##
## In case you have questions, please use RabbitMQ community Slack and the rabbitmq-users Google group
## instead of GitHub issues.# ======================================
# Core broker section
# ======================================####这下面的5672,5671如果已经被占用时或者为了安全考虑可修改为其他端口,在服务应用时也需要调整成新的端口
## Networking
## ====================
##
## Related doc guide: https://rabbitmq.com/networking.html.
##
## By default, RabbitMQ will listen on all interfaces, using
## the standard (reserved) AMQP 0-9-1 and 1.0 port.
##
# listeners.tcp.default = 5672## To listen on a specific interface, provide an IP address with port.
## For example, to listen only on localhost for both IPv4 and IPv6:
##
# IPv4
# listeners.tcp.local    = 127.0.0.1:5672
# IPv6
# listeners.tcp.local_v6 = ::1:5672## You can define multiple listeners using listener names
# listeners.tcp.other_port = 5673
# listeners.tcp.other_ip   = 10.10.10.10:5672## TLS listeners are configured in the same fashion as TCP listeners,
## including the option to control the choice of interface.
##
# listeners.ssl.default = 5671## It is possible to disable regular TCP (non-TLS) listeners. Clients
## not configured to use TLS and the correct TLS-enabled port won't be able
## to connect to this node.
# listeners.tcp = none## Number of Erlang processes that will accept connections for the TCP
## and TLS listeners.
##
# num_acceptors.tcp = 10
# num_acceptors.ssl = 10## Socket writer will force GC every so many bytes transferred.
## Default is 1 GiB (`1000000000`). Set to 'off' to disable.
##
# socket_writer.gc_threshold = 1000000000
#
## To disable:
# socket_writer.gc_threshold = off## Maximum amount of time allowed for the AMQP 0-9-1 and AMQP 1.0 handshake
## (performed after socket connection and TLS handshake) to complete, in milliseconds.
##
# handshake_timeout = 10000## Set to 'true' to perform reverse DNS lookups when accepting a
## connection. rabbitmqctl and management UI will then display hostnames
## instead of IP addresses. Default value is `false`.
##
# reverse_dns_lookups = false##
## Security, Access Control
## ==============
#### Related doc guide: https://rabbitmq.com/access-control.html.## The default "guest" user is only permitted to access the server
## via a loopback interface (e.g. localhost).
## {loopback_users, [<<"guest">>]},
##
# loopback_users.guest = true## Uncomment the following line if you want to allow access to the
## guest user from anywhere on the network.
# loopback_users.guest = false## TLS configuration.
##
## Related doc guide: https://rabbitmq.com/ssl.html.
##
# listeners.ssl.1                  = 5671
#
# ssl_options.verify               = verify_peer
# ssl_options.fail_if_no_peer_cert = false
# ssl_options.cacertfile           = /path/to/cacert.pem
# ssl_options.certfile             = /path/to/cert.pem
# ssl_options.keyfile              = /path/to/key.pem
#
# ssl_options.honor_cipher_order   = true
# ssl_options.honor_ecc_order      = true
#
## These are highly recommended for TLSv1.2 but cannot be used
## with TLSv1.3. If TLSv1.3 is enabled, these lines MUST be removed.
# ssl_options.client_renegotiation = false
# ssl_options.secure_renegotiate   = true
#
## Limits what TLS versions the server enables for client TLS
## connections. See https://www.rabbitmq.com/ssl.html#tls-versions for details.
##
## Cutting edge TLS version which requires recent client runtime
## versions and has no cipher suite in common with earlier TLS versions.
# ssl_options.versions.1 = tlsv1.3
## Enables TLSv1.2 for best compatibility
# ssl_options.versions.2 = tlsv1.2
## Older TLS versions have known vulnerabilities and are being phased out
## from wide use.## Limits what cipher suites the server will use for client TLS
## connections. Narrowing this down can prevent some clients
## from connecting.
## If TLSv1.3 is enabled and cipher suites are overridden, TLSv1.3-specific
## cipher suites must also be explicitly enabled.
## See https://www.rabbitmq.com/ssl.html#cipher-suites and https://wiki.openssl.org/index.php/TLS1.3#Ciphersuites
## for details.
#
## The example below uses TLSv1.3 cipher suites only
#
# ssl_options.ciphers.1  = TLS_AES_256_GCM_SHA384
# ssl_options.ciphers.2  = TLS_AES_128_GCM_SHA256
# ssl_options.ciphers.3  = TLS_CHACHA20_POLY1305_SHA256
# ssl_options.ciphers.4  = TLS_AES_128_CCM_SHA256
# ssl_options.ciphers.5  = TLS_AES_128_CCM_8_SHA256
#
## The example below uses TLSv1.2 cipher suites only
#
# ssl_options.ciphers.1  = ECDHE-ECDSA-AES256-GCM-SHA384
# ssl_options.ciphers.2  = ECDHE-RSA-AES256-GCM-SHA384
# ssl_options.ciphers.3  = ECDHE-ECDSA-AES256-SHA384
# ssl_options.ciphers.4  = ECDHE-RSA-AES256-SHA384
# ssl_options.ciphers.5  = ECDH-ECDSA-AES256-GCM-SHA384
# ssl_options.ciphers.6  = ECDH-RSA-AES256-GCM-SHA384
# ssl_options.ciphers.7  = ECDH-ECDSA-AES256-SHA384
# ssl_options.ciphers.8  = ECDH-RSA-AES256-SHA384
# ssl_options.ciphers.9  = DHE-RSA-AES256-GCM-SHA384
# ssl_options.ciphers.10 = DHE-DSS-AES256-GCM-SHA384
# ssl_options.ciphers.11 = DHE-RSA-AES256-SHA256
# ssl_options.ciphers.12 = DHE-DSS-AES256-SHA256
# ssl_options.ciphers.13 = ECDHE-ECDSA-AES128-GCM-SHA256
# ssl_options.ciphers.14 = ECDHE-RSA-AES128-GCM-SHA256
# ssl_options.ciphers.15 = ECDHE-ECDSA-AES128-SHA256
# ssl_options.ciphers.16 = ECDHE-RSA-AES128-SHA256
# ssl_options.ciphers.17 = ECDH-ECDSA-AES128-GCM-SHA256
# ssl_options.ciphers.18 = ECDH-RSA-AES128-GCM-SHA256
# ssl_options.ciphers.19 = ECDH-ECDSA-AES128-SHA256
# ssl_options.ciphers.20 = ECDH-RSA-AES128-SHA256
# ssl_options.ciphers.21 = DHE-RSA-AES128-GCM-SHA256
# ssl_options.ciphers.22 = DHE-DSS-AES128-GCM-SHA256
# ssl_options.ciphers.23 = DHE-RSA-AES128-SHA256
# ssl_options.ciphers.24 = DHE-DSS-AES128-SHA256
# ssl_options.ciphers.25 = ECDHE-ECDSA-AES256-SHA
# ssl_options.ciphers.26 = ECDHE-RSA-AES256-SHA
# ssl_options.ciphers.27 = DHE-RSA-AES256-SHA
# ssl_options.ciphers.28 = DHE-DSS-AES256-SHA
# ssl_options.ciphers.29 = ECDH-ECDSA-AES256-SHA
# ssl_options.ciphers.30 = ECDH-RSA-AES256-SHA
# ssl_options.ciphers.31 = ECDHE-ECDSA-AES128-SHA
# ssl_options.ciphers.32 = ECDHE-RSA-AES128-SHA
# ssl_options.ciphers.33 = DHE-RSA-AES128-SHA
# ssl_options.ciphers.34 = DHE-DSS-AES128-SHA
# ssl_options.ciphers.35 = ECDH-ECDSA-AES128-SHA
# ssl_options.ciphers.36 = ECDH-RSA-AES128-SHA# ssl_options.bypass_pem_cache = true## Select an authentication/authorisation backend to use.
##
## Alternative backends are provided by plugins, such as rabbitmq-auth-backend-ldap.
##
## NB: These settings require certain plugins to be enabled.
##
## Related doc guides:
##
##  * https://rabbitmq.com/plugins.html
##  * https://rabbitmq.com/access-control.html
### auth_backends.1   = rabbit_auth_backend_internal## uses separate backends for authentication and authorisation,
## see below.
# auth_backends.1.authn = rabbit_auth_backend_ldap
# auth_backends.1.authz = rabbit_auth_backend_internal## The rabbitmq_auth_backend_ldap plugin allows the broker to
## perform authentication and authorisation by deferring to an
## external LDAP server.
##
## Relevant doc guides:
##
## * https://rabbitmq.com/ldap.html
## * https://rabbitmq.com/access-control.html
##
## uses LDAP for both authentication and authorisation
# auth_backends.1 = rabbit_auth_backend_ldap## uses HTTP service for both authentication and
## authorisation
# auth_backends.1 = rabbit_auth_backend_http## uses two backends in a chain: HTTP first, then internal
# auth_backends.1   = rabbit_auth_backend_http
# auth_backends.2   = rabbit_auth_backend_internal## Authentication
## The built-in mechanisms are 'PLAIN',
## 'AMQPLAIN', and 'EXTERNAL' Additional mechanisms can be added via
## plugins.
##
## Related doc guide: https://rabbitmq.com/authentication.html.
##
# auth_mechanisms.1 = PLAIN
# auth_mechanisms.2 = AMQPLAIN## The rabbitmq-auth-mechanism-ssl plugin makes it possible to
## authenticate a user based on the client's x509 (TLS) certificate.
## Related doc guide: https://rabbitmq.com/authentication.html.
##
## To use auth-mechanism-ssl, the EXTERNAL mechanism should
## be enabled:
##
# auth_mechanisms.1 = PLAIN
# auth_mechanisms.2 = AMQPLAIN
# auth_mechanisms.3 = EXTERNAL## To force x509 certificate-based authentication on all clients,
## exclude all other mechanisms (note: this will disable password-based
## authentication even for the management UI!):
##
# auth_mechanisms.1 = EXTERNAL## This pertains to both the rabbitmq-auth-mechanism-ssl plugin and
## STOMP ssl_cert_login configurations. See the RabbitMQ STOMP plugin
## configuration section later in this file and the README in
## https://github.com/rabbitmq/rabbitmq-auth-mechanism-ssl for further
## details.
##
## To use the TLS cert's CN instead of its DN as the username
##
# ssl_cert_login_from   = common_name## TLS handshake timeout, in milliseconds.
##
# ssl_handshake_timeout = 5000## Cluster name
##
# cluster_name = dev3.eng.megacorp.local## Password hashing implementation. Will only affect newly
## created users. To recalculate hash for an existing user
## it's necessary to update her password.
##
## To use SHA-512, set to rabbit_password_hashing_sha512.
##
# password_hashing_module = rabbit_password_hashing_sha256## When importing definitions exported from versions earlier
## than 3.6.0, it is possible to go back to MD5 (only do this
## as a temporary measure!) by setting this to rabbit_password_hashing_md5.
##
# password_hashing_module = rabbit_password_hashing_md5##
## Default User / VHost
## ====================
#### On first start RabbitMQ will create a vhost and a user. These
## config items control what gets created.
## Relevant doc guide: https://rabbitmq.com/access-control.html
##
# default_vhost = /
# default_user = guest
# default_pass = guest# default_permissions.configure = .*
# default_permissions.read = .*
# default_permissions.write = .*## Tags for default user
##
## For more details about tags, see the documentation for the
## Management Plugin at https://rabbitmq.com/management.html.
##
# default_user_tags.administrator = true## Define other tags like this:
# default_user_tags.management = true
# default_user_tags.custom_tag = true##
## Additional network and protocol related configuration
## =====================================================
#### Set the server AMQP 0-9-1 heartbeat timeout in seconds.
## RabbitMQ nodes will send heartbeat frames at roughly
## the (timeout / 2) interval. Two missed heartbeats from
## a client will close its connection.
##
## Values lower than 6 seconds are very likely to produce
## false positives and are not recommended.
##
## Related doc guides:
##
## * https://rabbitmq.com/heartbeats.html
## * https://rabbitmq.com/networking.html
##
# heartbeat = 60## Set the max permissible size of an AMQP frame (in bytes).
##
# frame_max = 131072## Set the max frame size the server will accept before connection
## tuning occurs
##
# initial_frame_max = 4096## Set the max permissible number of channels per connection.
## 0 means "no limit".
##
# channel_max = 128## Customising TCP Listener (Socket) Configuration.
##
## Related doc guides:
##
## * https://rabbitmq.com/networking.html
## * https://www.erlang.org/doc/man/inet.html#setopts-2
### tcp_listen_options.backlog = 128
# tcp_listen_options.nodelay = true
# tcp_listen_options.exit_on_close = false
#
# tcp_listen_options.keepalive = true
# tcp_listen_options.send_timeout = 15000
#
# tcp_listen_options.buffer = 196608
# tcp_listen_options.sndbuf = 196608
# tcp_listen_options.recbuf = 196608##
## Resource Limits & Flow Control
## ==============================
##
## Related doc guide: https://rabbitmq.com/memory.html.## Memory-based Flow Control threshold.
##
# vm_memory_high_watermark.relative = 0.4## Alternatively, we can set a limit (in bytes) of RAM used by the node.
##
# vm_memory_high_watermark.absolute = 1073741824## Or you can set absolute value using memory units (with RabbitMQ 3.6.0+).
## Absolute watermark will be ignored if relative is defined!
##
# vm_memory_high_watermark.absolute = 2GB
##
## Supported unit symbols:
##
## k, kiB: kibibytes (2^10 - 1,024 bytes)
## M, MiB: mebibytes (2^20 - 1,048,576 bytes)
## G, GiB: gibibytes (2^30 - 1,073,741,824 bytes)
## kB: kilobytes (10^3 - 1,000 bytes)
## MB: megabytes (10^6 - 1,000,000 bytes)
## GB: gigabytes (10^9 - 1,000,000,000 bytes)## Fraction of the high watermark limit at which queues start to
## page message out to disc in order to free up memory.
## For example, when vm_memory_high_watermark is set to 0.4 and this value is set to 0.5,
## paging can begin as early as when 20% of total available RAM is used by the node.
##
## Values greater than 1.0 can be dangerous and should be used carefully.
##
## One alternative to this is to use durable queues and publish messages
## as persistent (delivery mode = 2). With this combination queues will
## move messages to disk much more rapidly.
##
## Another alternative is to configure queues to page all messages (both
## persistent and transient) to disk as quickly
## as possible, see https://rabbitmq.com/lazy-queues.html.
##
# vm_memory_high_watermark_paging_ratio = 0.5## Selects Erlang VM memory consumption calculation strategy. Can be `allocated`, `rss` or `legacy` (aliased as `erlang`),
## Introduced in 3.6.11. `rss` is the default as of 3.6.12.
## See https://github.com/rabbitmq/rabbitmq-server/issues/1223 and rabbitmq/rabbitmq-common#224 for background.
# vm_memory_calculation_strategy = rss## Interval (in milliseconds) at which we perform the check of the memory
## levels against the watermarks.
##
# memory_monitor_interval = 2500## The total memory available can be calculated from the OS resources
## - default option - or provided as a configuration parameter.
# total_memory_available_override_value = 2GB## Set disk free limit (in bytes). Once free disk space reaches this
## lower bound, a disk alarm will be set - see the documentation
## listed above for more details.
##
## Absolute watermark will be ignored if relative is defined!
# disk_free_limit.absolute = 50000## Or you can set it using memory units (same as in vm_memory_high_watermark)
## with RabbitMQ 3.6.0+.
# disk_free_limit.absolute = 500KB
# disk_free_limit.absolute = 50mb
# disk_free_limit.absolute = 5GB## Alternatively, we can set a limit relative to total available RAM.
##
## Values lower than 1.0 can be dangerous and should be used carefully.
# disk_free_limit.relative = 2.0##
## Clustering
## =====================
##
# cluster_partition_handling = ignore## Pauses all nodes on the minority side of a partition. The cluster
## MUST have an odd number of nodes (3, 5, etc)
# cluster_partition_handling = pause_minority## pause_if_all_down strategy require additional configuration
# cluster_partition_handling = pause_if_all_down## Recover strategy. Can be either 'autoheal' or 'ignore'
# cluster_partition_handling.pause_if_all_down.recover = ignore## Node names to check
# cluster_partition_handling.pause_if_all_down.nodes.1 = rabbit@localhost
# cluster_partition_handling.pause_if_all_down.nodes.2 = hare@localhost## Mirror sync batch size, in messages. Increasing this will speed
## up syncing but total batch size in bytes must not exceed 2 GiB.
## Available in RabbitMQ 3.6.0 or later.
##
# mirroring_sync_batch_size = 4096## Make clustering happen *automatically* at startup. Only applied
## to nodes that have just been reset or started for the first time.
##
## Relevant doc guide: https://rabbitmq.com//cluster-formation.html
#####这里设置集群,所有节点必须保持一致,当然也可以按照前面命令的方式进行设置
# cluster_formation.peer_discovery_backend     = rabbit_peer_discovery_classic_config
#
# cluster_formation.classic_config.nodes.1 = rabbit1@hostname
# cluster_formation.classic_config.nodes.2 = rabbit2@hostname
# cluster_formation.classic_config.nodes.3 = rabbit3@hostname
# cluster_formation.classic_config.nodes.4 = rabbit4@hostname## DNS-based peer discovery. This backend will list A records
## of the configured hostname and perform reverse lookups for
## the addresses returned.# cluster_formation.peer_discovery_backend = rabbit_peer_discovery_dns
# cluster_formation.dns.hostname = discovery.eng.example.local## This node's type can be configured. If you are not sure
## what node type to use, always use 'disc'.
# cluster_formation.node_type = disc## Interval (in milliseconds) at which we send keepalive messages
## to other cluster members. Note that this is not the same thing
## as net_ticktime; missed keepalive messages will not cause nodes
## to be considered down.
##
# cluster_keepalive_interval = 10000##
## Statistics Collection
## =====================
#### Statistics collection interval (in milliseconds). Increasing
## this will reduce the load on management database.
##
# collect_statistics_interval = 5000## Fine vs. coarse statistics
#
# This value is no longer meant to be configured directly.
#
# See https://www.rabbitmq.com/management.html#fine-stats.##
## Ra Settings
## =====================
##
# raft.segment_max_entries = 65536
# raft.wal_max_size_bytes = 1048576
# raft.wal_max_batch_size = 4096
# raft.snapshot_chunk_size = 1000000##
## Misc/Advanced Options
## =====================
##
## NB: Change these only if you understand what you are doing!
#### Timeout used when waiting for Mnesia tables in a cluster to
## become available.
##
# mnesia_table_loading_retry_timeout = 30000## Retries when waiting for Mnesia tables in the cluster startup. Note that
## this setting is not applied to Mnesia upgrades or node deletions.
##
# mnesia_table_loading_retry_limit = 10## Size in bytes below which to embed messages in the queue index.
## Related doc guide: https://rabbitmq.com/persistence-conf.html
##
# queue_index_embed_msgs_below = 4096## You can also set this size in memory units
##
# queue_index_embed_msgs_below = 4kb## Whether or not to enable background periodic forced GC runs for all
## Erlang processes on the node in "waiting" state.
##
## Disabling background GC may reduce latency for client operations,
## keeping it enabled may reduce median RAM usage by the binary heap
## (see https://www.erlang-solutions.com/blog/erlang-garbage-collector.html).
##
## Before trying this option, please take a look at the memory
## breakdown (https://www.rabbitmq.com/memory-use.html).
##
# background_gc_enabled = false## Target (desired) interval (in milliseconds) at which we run background GC.
## The actual interval will vary depending on how long it takes to execute
## the operation (can be higher than this interval). Values less than
## 30000 milliseconds are not recommended.
##
# background_gc_target_interval = 60000## Whether or not to enable proxy protocol support.
## Once enabled, clients cannot directly connect to the broker
## anymore. They must connect through a load balancer that sends the
## proxy protocol header to the broker at connection time.
## This setting applies only to AMQP clients, other protocols
## like MQTT or STOMP have their own setting to enable proxy protocol.
## See the plugins documentation for more information.
##
# proxy_protocol = false## Overriden product name and version.
## They are set to "RabbitMQ" and the release version by default.
# product.name = RabbitMQ
# product.version = 1.2.3## "Message of the day" file.
## Its content is used to expand the logged and printed banners.
## Default to /etc/rabbitmq/motd on Unix, %APPDATA%\RabbitMQ\motd.txt
## on Windows.
# motd_file = /etc/rabbitmq/motd## Consumer timeout
## If a message delivered to a consumer has not been acknowledge before this timer
## triggers the channel will be force closed by the broker. This ensure that
## faultly consumers that never ack will not hold on to messages indefinitely.
##
# consumer_timeout = 900000## ----------------------------------------------------------------------------
## Advanced Erlang Networking/Clustering Options.
##
## Related doc guide: https://rabbitmq.com/clustering.html
## ----------------------------------------------------------------------------# ======================================
# Kernel section
# ======================================## Timeout used to detect peer unavailability, including CLI tools.
## Related doc guide: https://www.rabbitmq.com/nettick.html.
##
# net_ticktime = 60## Inter-node communication port range.
## The parameters inet_dist_listen_min and inet_dist_listen_max
## can be configured in the classic config format only.
## Related doc guide: https://www.rabbitmq.com/networking.html#epmd-inet-dist-port-range.## ----------------------------------------------------------------------------
## RabbitMQ Management Plugin
##
## Related doc guide: https://rabbitmq.com/management.html.
## ----------------------------------------------------------------------------# =======================================
# Management section
# =======================================## Preload schema definitions from the following JSON file.
## Related doc guide: https://rabbitmq.com/management.html#load-definitions.
##
# management.load_definitions = /path/to/exported/definitions.json## Log all requests to the management HTTP API to a file.
##
# management.http_log_dir = /path/to/access.log##这里就是web插件的访问地址和端口设置了,变更后访问地址也要跟着变更才能访问到
## HTTP listener and embedded Web server settings.
# ## See https://rabbitmq.com/management.html for details.
#
# management.tcp.port = 15672
# management.tcp.ip   = 0.0.0.0
#
# management.tcp.shutdown_timeout   = 7000
# management.tcp.max_keepalive      = 120
# management.tcp.idle_timeout       = 120
# management.tcp.inactivity_timeout = 120
# management.tcp.request_timeout    = 120
# management.tcp.compress           = true##https配置,一般内网我们就不配置了,外网可以做url重写
## HTTPS listener settings.
## See https://rabbitmq.com/management.html and https://rabbitmq.com/ssl.html for details.
##
# management.ssl.port       = 15671
# management.ssl.cacertfile = /path/to/ca_certificate.pem
# management.ssl.certfile   = /path/to/server_certificate.pem
# management.ssl.keyfile    = /path/to/server_key.pem## More TLS options
# management.ssl.honor_cipher_order   = true
# management.ssl.honor_ecc_order      = true## These are highly recommended for TLSv1.2 but cannot be used
## with TLSv1.3. If TLSv1.3 is enabled, these lines MUST be removed.
# management.ssl.client_renegotiation = false
# management.ssl.secure_renegotiate   = true## Supported TLS versions
# management.ssl.versions.1 = tlsv1.2## Cipher suites the server is allowed to use
# management.ssl.ciphers.1 = ECDHE-ECDSA-AES256-GCM-SHA384
# management.ssl.ciphers.2 = ECDHE-RSA-AES256-GCM-SHA384
# management.ssl.ciphers.3 = ECDHE-ECDSA-AES256-SHA384
# management.ssl.ciphers.4 = ECDHE-RSA-AES256-SHA384
# management.ssl.ciphers.5 = ECDH-ECDSA-AES256-GCM-SHA384
# management.ssl.ciphers.6 = ECDH-RSA-AES256-GCM-SHA384
# management.ssl.ciphers.7 = ECDH-ECDSA-AES256-SHA384
# management.ssl.ciphers.8 = ECDH-RSA-AES256-SHA384
# management.ssl.ciphers.9 = DHE-RSA-AES256-GCM-SHA384## URL path prefix for HTTP API and management UI
# management.path_prefix = /a-prefix## One of 'basic', 'detailed' or 'none'. See
## https://rabbitmq.com/management.html#fine-stats for more details.
# management.rates_mode = basic## Configure how long aggregated data (such as message rates and queue
## lengths) is retained. Please read the plugin's documentation in
## https://rabbitmq.com/management.html#configuration for more
## details.
## Your can use 'minute', 'hour' and 'day' keys or integer key (in seconds)
# management.sample_retention_policies.global.minute    = 5
# management.sample_retention_policies.global.hour  = 60
# management.sample_retention_policies.global.day = 1200# management.sample_retention_policies.basic.minute   = 5
# management.sample_retention_policies.basic.hour = 60# management.sample_retention_policies.detailed.10 = 5## ----------------------------------------------------------------------------
## RabbitMQ Shovel Plugin
##
## Related doc guide: https://rabbitmq.com/shovel.html
## ----------------------------------------------------------------------------## See advanced.config.example for a Shovel plugin example## ----------------------------------------------------------------------------
## RabbitMQ STOMP Plugin
##
## Related doc guide: https://rabbitmq.com/stomp.html
## ----------------------------------------------------------------------------# =======================================
# STOMP section
# =======================================## See https://rabbitmq.com/stomp.html for details.## TCP listeners.
##
# stomp.listeners.tcp.1 = 127.0.0.1:61613
# stomp.listeners.tcp.2 = ::1:61613## TCP listener settings
##
# stomp.tcp_listen_options.backlog   = 2048
# stomp.tcp_listen_options.recbuf    = 131072
# stomp.tcp_listen_options.sndbuf    = 131072
#
# stomp.tcp_listen_options.keepalive = true
# stomp.tcp_listen_options.nodelay   = true
#
# stomp.tcp_listen_options.exit_on_close = true
# stomp.tcp_listen_options.send_timeout  = 120## Proxy protocol support
##
# stomp.proxy_protocol = false## TLS listeners
## See https://rabbitmq.com/stomp.html and https://rabbitmq.com/ssl.html for details.
# stomp.listeners.ssl.default = 61614
#
# ssl_options.cacertfile = path/to/cacert.pem
# ssl_options.certfile   = path/to/cert.pem
# ssl_options.keyfile    = path/to/key.pem
# ssl_options.verify     =  verify_peer
# ssl_options.fail_if_no_peer_cert = true## Number of Erlang processes that will accept connections for the TCP
## and TLS listeners.
##
# stomp.num_acceptors.tcp = 10
# stomp.num_acceptors.ssl = 1## Additional TLS options## Extract a name from the client's certificate when using TLS.
##
# stomp.ssl_cert_login = true## Set a default user name and password. This is used as the default login
## whenever a CONNECT frame omits the login and passcode headers.
##
## Please note that setting this will allow clients to connect without
## authenticating!
##
# stomp.default_user = guest
# stomp.default_pass = guest## If a default user is configured, or you have configured use TLS client
## certificate based authentication, you can choose to allow clients to
## omit the CONNECT frame entirely. If set to true, the client is
## automatically connected as the default user or user supplied in the
## TLS certificate whenever the first frame sent on a session is not a
## CONNECT frame.
##
# stomp.implicit_connect = true## Whether or not to enable proxy protocol support.
## Once enabled, clients cannot directly connect to the broker
## anymore. They must connect through a load balancer that sends the
## proxy protocol header to the broker at connection time.
## This setting applies only to STOMP clients, other protocols
## like MQTT or AMQP have their own setting to enable proxy protocol.
## See the plugins or broker documentation for more information.
##
# stomp.proxy_protocol = false## ----------------------------------------------------------------------------
## RabbitMQ MQTT Adapter
##
## See https://github.com/rabbitmq/rabbitmq-mqtt/blob/stable/README.md
## for details
## ----------------------------------------------------------------------------# =======================================
# MQTT section
# =======================================## TCP listener settings.
##
# mqtt.listeners.tcp.1 = 127.0.0.1:61613
# mqtt.listeners.tcp.2 = ::1:61613## TCP listener options (as per the broker configuration).
##
# mqtt.tcp_listen_options.backlog = 4096
# mqtt.tcp_listen_options.recbuf  = 131072
# mqtt.tcp_listen_options.sndbuf  = 131072
#
# mqtt.tcp_listen_options.keepalive = true
# mqtt.tcp_listen_options.nodelay   = true
#
# mqtt.tcp_listen_options.exit_on_close = true
# mqtt.tcp_listen_options.send_timeout  = 120## TLS listener settings
## ## See https://rabbitmq.com/mqtt.html and https://rabbitmq.com/ssl.html for details.
#
# mqtt.listeners.ssl.default = 8883
#
# ssl_options.cacertfile = /path/to/tls/ca_certificate_bundle.pem
# ssl_options.certfile   = /path/to/tls/server_certificate.pem
# ssl_options.keyfile    = /path/to/tls/server_key.pem
# ssl_options.verify     = verify_peer
# ssl_options.fail_if_no_peer_cert  = true
### Number of Erlang processes that will accept connections for the TCP
## and TLS listeners.
##
# mqtt.num_acceptors.tcp = 10
# mqtt.num_acceptors.ssl = 10## Whether or not to enable proxy protocol support.
## Once enabled, clients cannot directly connect to the broker
## anymore. They must connect through a load balancer that sends the
## proxy protocol header to the broker at connection time.
## This setting applies only to STOMP clients, other protocols
## like STOMP or AMQP have their own setting to enable proxy protocol.
## See the plugins or broker documentation for more information.
##
# mqtt.proxy_protocol = false## Set the default user name and password used for anonymous connections (when client
## provides no credentials). Anonymous connections are highly discouraged!
##
# mqtt.default_user = guest
# mqtt.default_pass = guest## Enable anonymous connections. If this is set to false, clients MUST provide
## credentials in order to connect. See also the mqtt.default_user/mqtt.default_pass
## keys. Anonymous connections are highly discouraged!
##
# mqtt.allow_anonymous = true## If you have multiple vhosts, specify the one to which the
## adapter connects.
##
# mqtt.vhost = /## Specify the exchange to which messages from MQTT clients are published.
##
# mqtt.exchange = amq.topic## Specify TTL (time to live) to control the lifetime of non-clean sessions.
##
# mqtt.subscription_ttl = 1800000## Set the prefetch count (governing the maximum number of unacknowledged
## messages that will be delivered).
##
# mqtt.prefetch = 10## ----------------------------------------------------------------------------
## RabbitMQ AMQP 1.0 Support
##
## See https://github.com/rabbitmq/rabbitmq-amqp1.0/blob/stable/README.md.
## ----------------------------------------------------------------------------# =======================================
# AMQP 1.0 section
# =======================================## Connections that are not authenticated with SASL will connect as this
## account. See the README for more information.
##
## Please note that setting this will allow clients to connect without
## authenticating!
##
# amqp1_0.default_user = guest## Enable protocol strict mode. See the README for more information.
##
# amqp1_0.protocol_strict_mode = false## Logging settings.
##
## See https://rabbitmq.com/logging.html for details.
#### Log directory, taken from the RABBITMQ_LOG_BASE env variable by default.
##
# log.dir = /var/log/rabbitmq## Logging to file. Can be false or a filename.
## Default:
# log.file = rabbit.log## To disable logging to a file
# log.file = false## Log level for file logging
##
# log.file.level = info## File rotation config. No rotation by default.
## DO NOT SET rotation date to ''. Leave the value unset if "" is the desired value
# log.file.rotation.date = $D0
# log.file.rotation.size = 0## Logging to console (can be true or false)
##
# log.console = false## Log level for console logging
##
# log.console.level = info## Logging to the amq.rabbitmq.log exchange (can be true or false)
##
# log.exchange = false## Log level to use when logging to the amq.rabbitmq.log exchange
##
# log.exchange.level = info## ----------------------------------------------------------------------------
## RabbitMQ LDAP Plugin
##
## Related doc guide: https://rabbitmq.com/ldap.html.
##
## ----------------------------------------------------------------------------# =======================================
# LDAP section
# =======================================##
## Connecting to the LDAP server(s)
## ================================
#### Specify servers to bind to. You *must* set this in order for the plugin
## to work properly.
##
# auth_ldap.servers.1 = your-server-name-goes-here## You can define multiple servers
# auth_ldap.servers.2 = your-other-server## Connect to the LDAP server using TLS
##
# auth_ldap.use_ssl = false## Specify the LDAP port to connect to
##
# auth_ldap.port = 389## LDAP connection timeout, in milliseconds or 'infinity'
##
# auth_ldap.timeout = infinity## Or number
# auth_ldap.timeout = 500## Enable logging of LDAP queries.
## One of
##   - false (no logging is performed)
##   - true (verbose logging of the logic used by the plugin)
##   - network (as true, but additionally logs LDAP network traffic)
##
## Defaults to false.
##
# auth_ldap.log = false## Also can be true or network
# auth_ldap.log = true
# auth_ldap.log = network##
## Authentication
## ==============
#### Pattern to convert the username given through AMQP to a DN before
## binding
##
# auth_ldap.user_dn_pattern = cn=${username},ou=People,dc=example,dc=com## Alternatively, you can convert a username to a Distinguished
## Name via an LDAP lookup after binding. See the documentation for
## full details.## When converting a username to a dn via a lookup, set these to
## the name of the attribute that represents the user name, and the
## base DN for the lookup query.
##
# auth_ldap.dn_lookup_attribute = userPrincipalName
# auth_ldap.dn_lookup_base      = DC=gopivotal,DC=com## Controls how to bind for authorisation queries and also to
## retrieve the details of users logging in without presenting a
## password (e.g., SASL EXTERNAL).
## One of
##  - as_user (to bind as the authenticated user - requires a password)
##  - anon    (to bind anonymously)
##  - {UserDN, Password} (to bind with a specified user name and password)
##
## Defaults to 'as_user'.
##
# auth_ldap.other_bind = as_user## Or can be more complex:
# auth_ldap.other_bind.user_dn  = User
# auth_ldap.other_bind.password = Password## If user_dn and password defined - other options is ignored.# -----------------------------
# Too complex section of LDAP
# -----------------------------##
## Authorisation
## =============
#### The LDAP plugin can perform a variety of queries against your
## LDAP server to determine questions of authorisation.
##
## Related doc guide: https://rabbitmq.com/ldap.html#authorisation.## Following configuration should be defined in advanced.config file
## DO NOT UNCOMMENT THESE LINES!## Set the query to use when determining vhost access
##
## {vhost_access_query, {in_group,
##                       "ou=${vhost}-users,ou=vhosts,dc=example,dc=com"}},## Set the query to use when determining resource (e.g., queue) access
##
## {resource_access_query, {constant, true}},## Set queries to determine which tags a user has
##
## {tag_queries, []}
#   ]},
# -----------------------------
相关文章:
centos9 stream 下 rabbitmq高可用集群搭建及使用
RabbitMQ是一种常用的消息队列系统,可以快速搭建一个高可用的集群环境,以提高系统的弹性和可靠性。下面是搭建RabbitMQ集群的步骤: 基于centos9 stream系统 1. 安装Erlang和RabbitMQ 首先需要在所有节点上安装Erlang和RabbitMQ。建议使用官…...

代码随想录算法训练营第10天|232. 用栈实现队列 225. 用队列实现栈
JAVA代码编写 232. 用栈实现队列 请你仅使用两个栈实现先入先出队列。队列应当支持一般队列支持的所有操作(push、pop、peek、empty): 实现 MyQueue 类: void push(int x) 将元素 x 推到队列的末尾int pop() 从队列的开头移除…...
线上Kafka集群如何调整消息存储时间
这里是weihubeats,觉得文章不错可以关注公众号小奏技术,文章首发。拒绝营销号,拒绝标题党 Kafka版本 kafka_2.13-3.5.0 背景 Kafka 默认消息存储时间为7天,实际线上的业务使用Kafka更多的是一些数据统计之类的业务,大多是朝生夕…...
[迁移学习]DA-DETR基于信息融合的自适应检测模型
原文标题为:DA-DETR: Domain Adaptive Detection Transformer with Information Fusion;发表于CVPR2023 一、概述 本文所描述的模型基于DETR,DETR网络是一种基于Transformer的目标检测网络,详细原理可以参见往期文章:…...
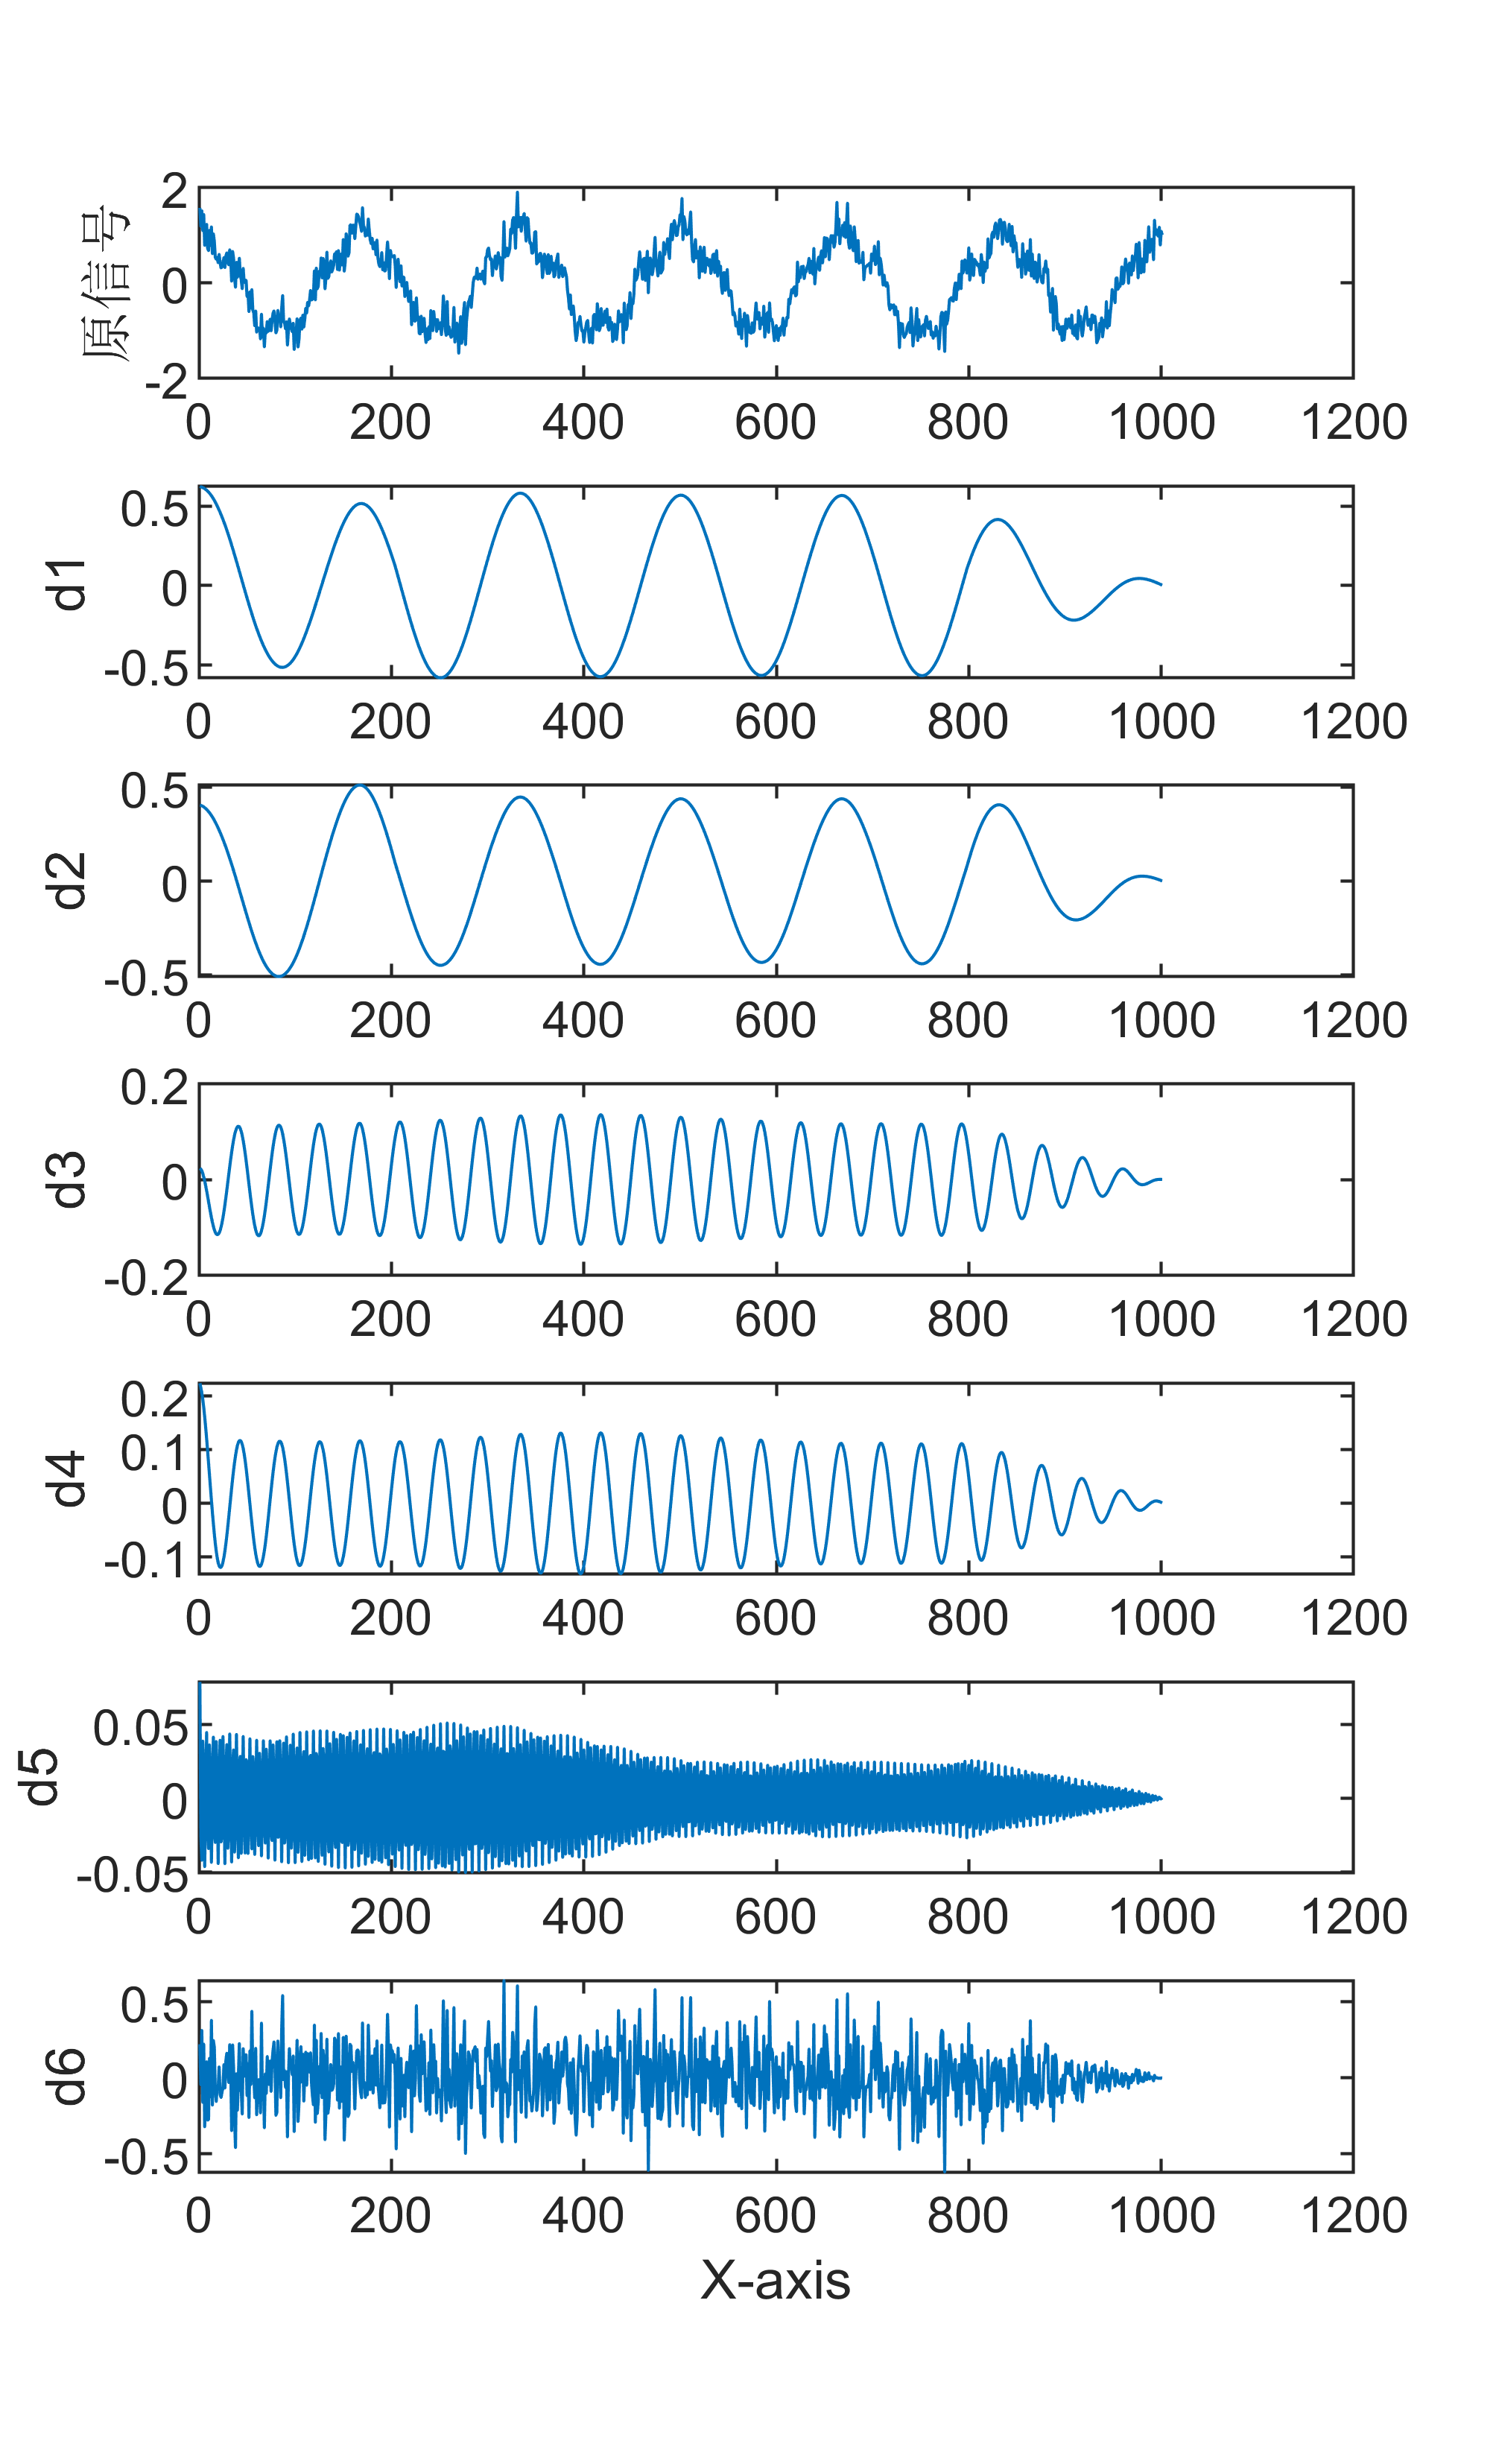
【MATLAB】全网唯一的13种信号分解+FFT傅里叶频谱变换联合算法全家桶
有意向获取代码,请转文末观看代码获取方式~ 大家吃一顿火锅的价格便可以拥有13种信号分解FFT傅里叶频谱变换联合算法,绝对不亏,知识付费是现今时代的趋势,而且都是我精心制作的教程,有问题可随时反馈~也可单独获取某一…...
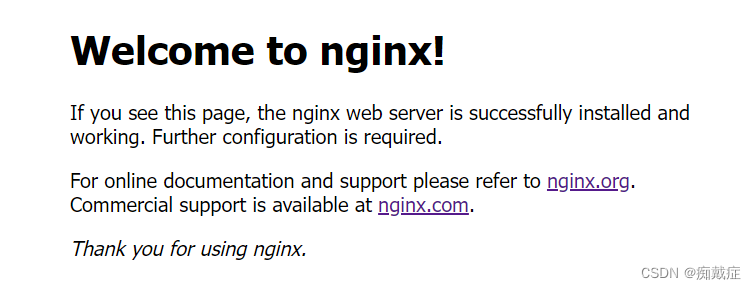
Nginx安装与配置
1.下载安装包 官网下载地址:nginx: download 可以先将安装包下载到本地再传到服务器,或者直接用wget命令将安装包下载到服务器,这里我们直接将安装包下载到服务器上。未安装wget命令的需要先安装wget,yum install -y wget [root…...

linux笔记总结-基本命令
参考: 1.Linux 和Windows比 比较 (了解) 1. 记住一句经典的话:在 Linux 世界里,一切皆文件 2. Linux目录结构 /lib • 系统开机所需要最基本的动态连接共享库,其作用类似于Windows里的DLL文件。几 乎所有…...

[PHP]禅道项目管理软件ZenTaoPMS源码包 v16.4
禅道项目管理软件ZenTaoPMS一键安装包是一款国产的开源项目管理软件。它集产品管理、项目管理、质量管理、文档管理、组织管理和事务管理于一体,是一款专业的研发项目管理软件,完整地覆盖了项目管理的核心流程。注重实效的管理思想,合理的软件…...

Required String parameter ‘name‘ is not present
[org.springframework.web.bind.MissingServletRequestParameterException: Required String parameter name is not present] 服务端有参数name,客户端没有传上来...
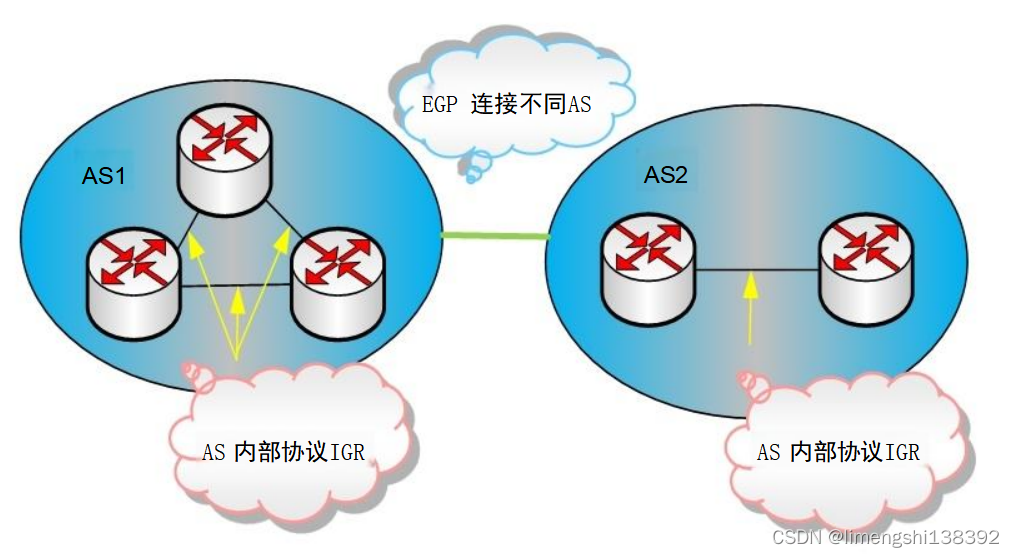
路由器基础(五): OSPF原理与配置
开放式最短路径优先 (Open Shortest Path First,OSPF) 是一个内部网关协议 (Interior Gateway Protocol,IGP),用于在单一自治系统(Autonomous System,AS) 内决策路由。OSPF 适合小型、中型、较大规模网络。OSPF 采用Dijkstra的最短路径优先算法 (Shortest Pat…...
Leetcode1128. 等价多米诺骨牌对的数量
Every day a Leetcode 题目来源:1128. 等价多米诺骨牌对的数量 解法1:暴力 代码: class Solution { public:int numEquivDominoPairs(vector<vector<int>> &dominoes){int n dominoes.size(), count 0;for (int i 0;…...

Dev-C调试的基本方法2-2
3.3 跳出函数 在图6所示的状态下,点击单步调试(F7)会继续调试下一行,而如果想结束在函数中的调试,则点击图4③所示的跳出函数,或CtrlF8按键跳出f()函数,程序将会停在图5所示的第11行处。 3.4 …...

企业之间的竞争,ISO三体系认证至关重要!
ISO三体系认证是指ISO 9001质量管理体系认证、ISO 14001环境管理体系认证、ISO 45001(OHSAS18001)职业健康安全管理体系认证。企业(组织)自愿申请、通过ISO三体系认证,并贯彻落实,确实能获益多多。 ISO 9001质量管理体系 我们经…...
node教程(四)Mongodb+mongoose
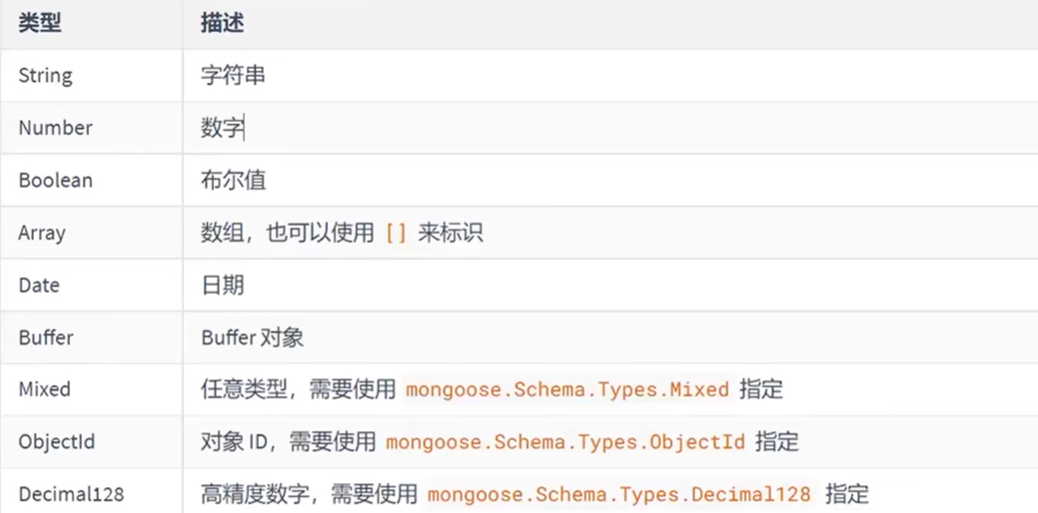
文章目录 一、mongodb1.简介1.1Mongodb是什么?1.2数据库是什么?1.3数据库的作用1.4数据库管理数据的特点 2.核心概念3.下载安装与启动4.命令行交互4.1数据库命令4.3文档命令 二、Mongoose1.介绍2.作用3.使用流程4.插入文档5.mongoose字段类型 一、mongod…...

作为一个初学者,该如何入门大模型?
在生成式 AI 盛行的当下,你是否被这种技术所折服,例如输入一段简简单单的文字,转眼之间,一幅精美的图片,又或者是文笔流畅的文字就展现在你的面前。 相信很多人有这种想法,认为生成式 AI 深不可测…...

编译支持GPU的opencv,并供python的import cv2调用
下载opencv和opencv_contrib,cmake过程中要下载的一些包可以手动下载配置,如果网络较好,也可以等待自动下载。主要记录的是cmake命令: cmake -D CMAKE_BUILD_TYPERELEASE \-D BUILD_opencv_python3YES \-D CMAKE_INSTALL_PREFIX/…...

Bug记录
那些年写过的很小的bug: Bug1: if args.model IRNN or irnn:# some code这实际上不会按你期望的方式工作。原因在于 ‘irnn’ 是一个非空的字符串,因此它在布尔上下文中被视为 True。所以条件总是为真,而不会考虑 args.model 的…...
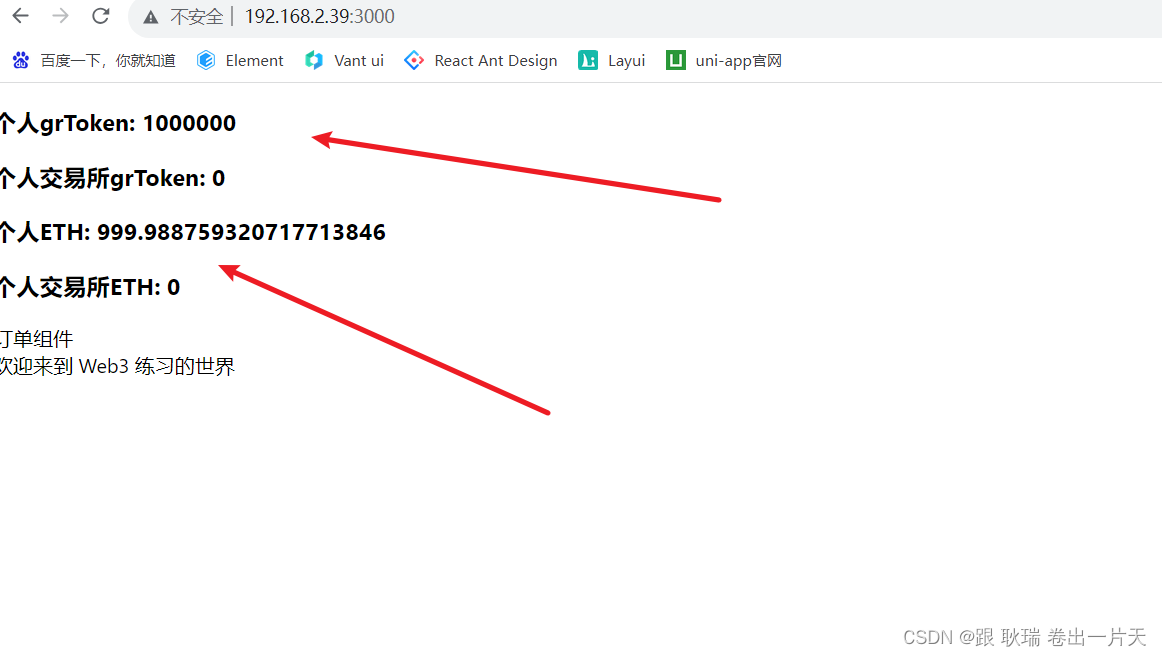
web3 React dapp中编写balance组件从redux取出并展示用户资产
好啊 上文WEB3 在 React搭建的Dapp中通过redux全局获取并存储用户ETH与自定义token与交易所存储数量中 我们拿到了用户的一个本身 和 交易所token数量 并放进了redux中做了一个全局管理 然后 我们继续 先 起来ganache的一个模拟环境 ganache -d然后 我们启动自己的项目 顺手发…...
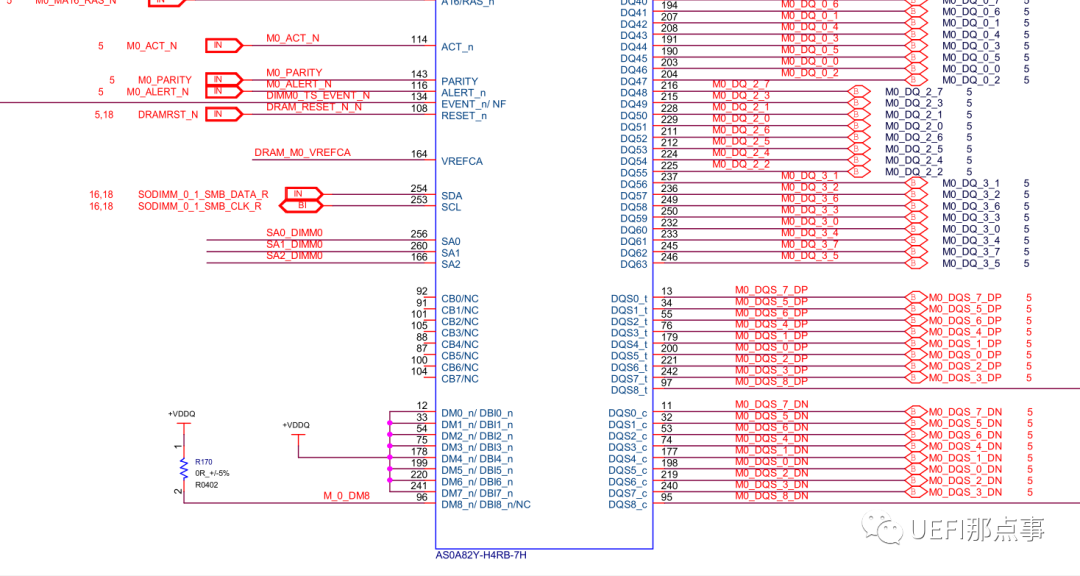
BIOS开发笔记 - DDR中的时序参数
通过前一篇文章学习,我们可以大致知道内存条(Module)的组成及SDRAM内部的结构,这一篇再介绍下SDRAM中常见的时序参数以及整个读写操作的流程。 一、外部信号 图1 DDR4的外部线路图 DDR是一种高带宽的传输接口,其外部信号较多,图1是一个DDR4的外部线路图,以下对图中跟通…...

语义分割 - 简介
语义分割是计算机视觉领域的一项重要任务,旨在将图像中的每个像素标记为对应的语义类别。与传统的图像分类任务不同,语义分割不仅要识别整个图像的类别,还需要对图像中的每个像素进行分类,从而实现对图像的像素级别理解。 语义分…...

【亲测免费】 PLC1200四路抢答器程序:打造高效公平的抢答体验
PLC1200四路抢答器程序:打造高效公平的抢答体验 【下载地址】PLC1200四路抢答器程序 本仓库提供了一个完整的S7-1200四路抢答器程序,可以直接下载并使用。该程序适用于需要进行四路抢答的场景,如竞赛、培训等。程序经过精心设计和测试&#x…...

终极Gerber文件查看器Gerbv:免费开源PCB设计验证的5大优势
终极Gerber文件查看器Gerbv:免费开源PCB设计验证的5大优势 【免费下载链接】gerbv Maintained fork of gerbv, carrying mostly bugfixes 项目地址: https://gitcode.com/gh_mirrors/ge/gerbv 还在为PCB设计文件的查看和验证而烦恼吗?Gerbv这款强…...

[实践|鸿蒙] 从HAP到APP:DevEco Studio编译构建全流程实战解析
1. 鸿蒙应用构建基础:理解HAP与APP的关系 第一次接触鸿蒙应用开发时,我被HAP和APP这两个概念搞得有点懵。经过几个项目的实战,终于搞明白了它们的关系。简单来说,HAP(Harmony Ability Package)就像乐高积木…...

嵌入式系统学习路径:从硬件基础到系统架构的认知跃迁
1. 从“螺丝钉”到“系统设计师”:嵌入式学习的认知跃迁大家好,我是老张,一个在嵌入式行业里摸爬滚打了十几年的老兵。今天我们不聊具体的代码,也不讲某个芯片的寄存器配置,我想和大家聊聊一个更根本的问题:…...
)
紧急通知:FAO 2024渔业AI伦理新规已生效!NotebookLM合规使用红线清单(含数据脱敏、模型可解释性、渔民知情权三重校验表)
更多请点击: https://intelliparadigm.com 第一章:FAO 2024渔业AI伦理新规核心要义与NotebookLM适配总览 联合国粮农组织(FAO)于2024年3月发布的《人工智能在渔业与水产养殖中的伦理应用指南》,首次将“可追溯性权”“…...

WinFlexBison:构建高性能Windows平台词法语法分析器的专业解决方案
WinFlexBison:构建高性能Windows平台词法语法分析器的专业解决方案 【免费下载链接】winflexbison Main winflexbision repository 项目地址: https://gitcode.com/gh_mirrors/wi/winflexbison 在Windows平台开发编译器、解释器或复杂配置文件解析器时&#…...

TalkingHeads开源项目:基于扩散模型的AI人脸说话视频生成技术详解
1. 项目概述:当AI学会“眉目传情” 最近在折腾一个挺有意思的开源项目,叫TalkingHeads。简单来说,它能让一张静态的人脸照片“活”过来,不仅能根据你输入的音频或文本生成口型同步的说话视频,还能让视频里的人做出各种…...

Shermie-proxy:基于Node.js的脚本化HTTP/HTTPS代理调试工具实战指南
1. 项目概述与核心价值最近在折腾一些本地开发环境下的网络请求调试和抓包,发现一个挺有意思的开源项目kxg3030/shermie-proxy。这本质上是一个基于 Node.js 实现的 HTTP/HTTPS 代理服务器,但它的定位非常清晰:专为开发者本地调试和网络请求分…...

简单易学:awesome-embedding-models 中负采样技术的完整实现指南
简单易学:awesome-embedding-models 中负采样技术的完整实现指南 【免费下载链接】awesome-embedding-models A curated list of awesome embedding models tutorials, projects and communities. 项目地址: https://gitcode.com/gh_mirrors/aw/awesome-embedding…...

API Key认证系统设计:企业级API开放平台实践
API Key认证系统设计:企业级API开放平台实践 摘要:当AI应用从内部工具转向对外开放时,如何确保接口安全、防止滥用并实现精细化权限控制?本文基于一个真实的跑步教练AI项目,详细解析如何构建一套生产级的API Key认证系…...