【组件自定义事件+全局事件总线+消息订阅与发布+TodoList案例——编辑+过度与动画】
组件自定义事件+全局事件总线+消息订阅与发布+TodoList案例——编辑+过度与动画
- 1 组件自定义事件
- 1.1 绑定
- 1.2 解绑
- 1.3 总结
- 1.4 TodoList案例——自定义事件
- 2 全局事件总线
- 2.1 理解
- 2.2 步骤
- 2.3 TodoList案例——事件总线
- 3 消息订阅与发布
- 3.1 理解
- 3.2 TodoList案例——消息的订阅与发布
- 4 TodoList案例——编辑
- 4.1 $nextTick
- 4.2 代码
- 5 过度与动画
- 5.1 理解
- 5.2 TodoList案例——动画
1 组件自定义事件
- 区别于JS中的内置事件(如:click、keyup等)用于html中的元素,自定义事件用于组件。
1.1 绑定
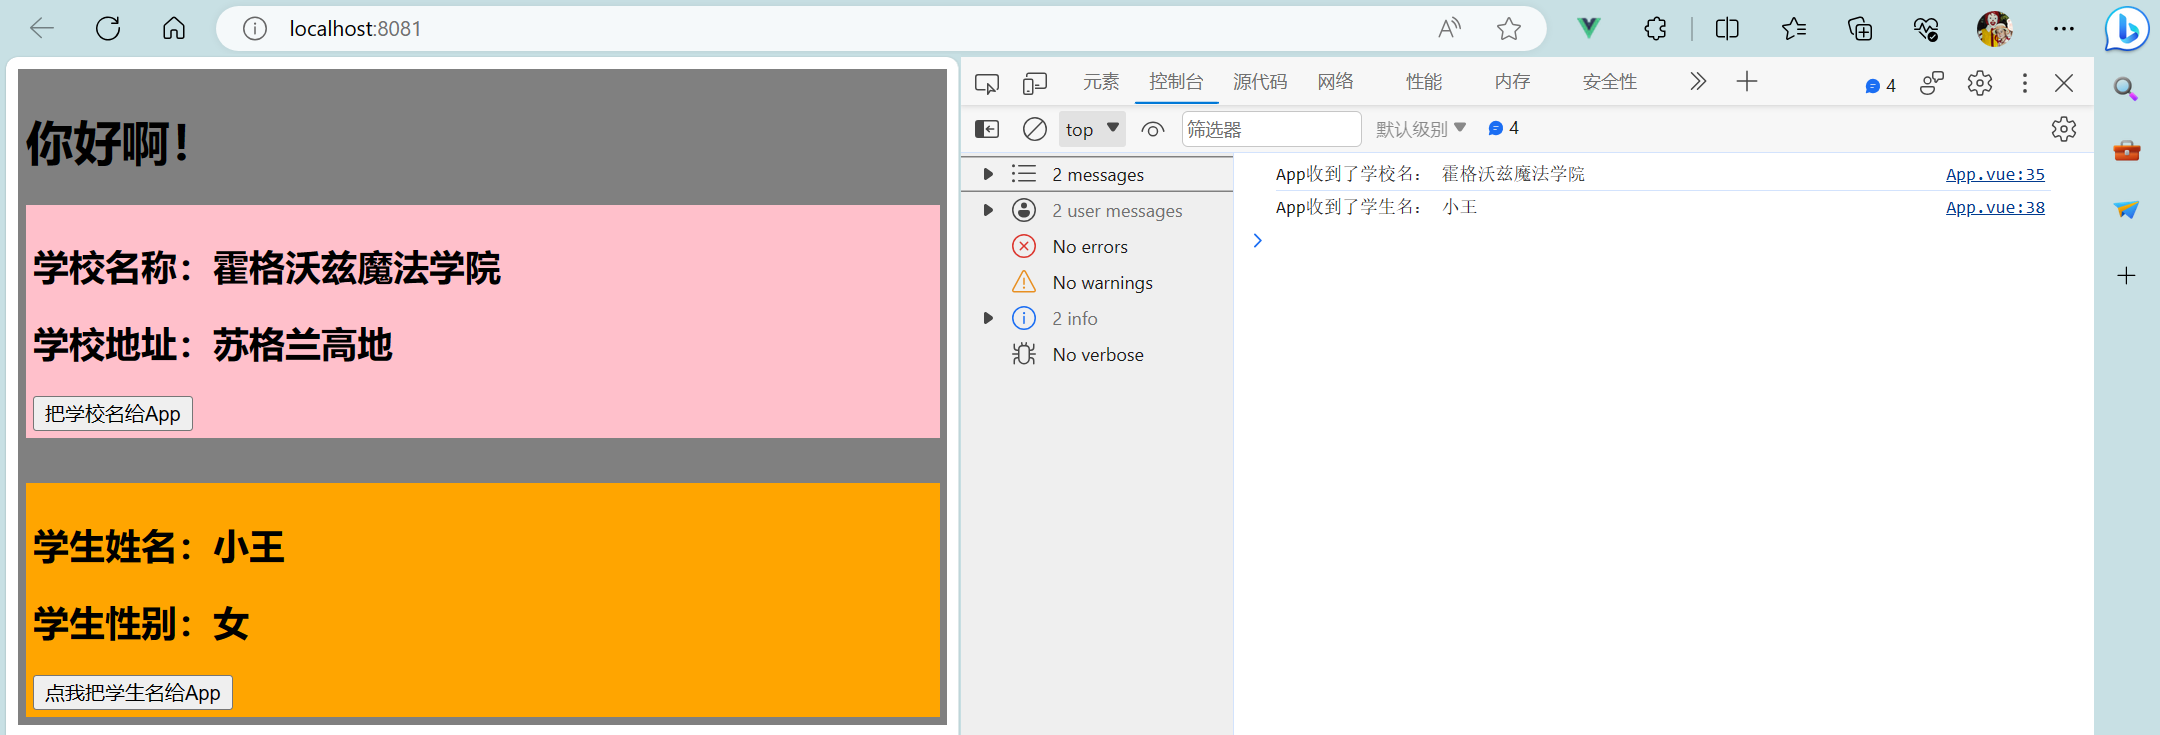
- App.vue:
<template><div class="app"><h1>{{msg}}</h1><!-- 通过父组件给子组件传递函数类型的props实现:子给父传递数据 --><School :getSchoolName="getSchoolName"/><!-- 通过父组件给子组件绑定一个自定义事件实现:子给父传递数据(第一种写法,使用@或v-on) --><Student v-on:atguigu="getStudentName"/> <!-- 由于v-on在Student组件标签上,所以是给Student组件的实例对象vc身上绑定了一个事件atguigu,如果有人触发了此事件,那么getStudentName函数将会被调用 --><!-- 若要让按钮只能触发一次 --><!-- <Student v-on:atguigu.once="getStudentName"/> --><!-- 通过父组件给子组件绑定一个自定义事件实现:子给父传递数据(第二种写法,使用ref) --><!-- <Student ref="student"/> --></div>
</template><script>// 引入Student组件import Student from './components/Student.vue' // 引入School组件import School from './components/School.vue'export default {name:'App',components:{School, Student},data() {return {msg:"你好啊!"}},methods: {getSchoolName(name) {console.log('App收到了学校名:',name);},getStudentName(name) {console.log('App收到了学生名:',name);}/* getStudentName(name,...params) {console.log('App收到了学生名:',name,params); // params收集剩余参数} */},// 用于第二种写法ref// mounted() {// 绑定自定义事件// this.$refs.student是Student组件的实例对象// this.$refs.student.$on('atguigu',this.getStudentName)// 绑定自定义事件且让他等三秒钟返回/* setTimeout(()=>{this.$refs.student.$on('atguigu',this.getStudentName)},3000) */// 绑定自定义事件且让按钮只能触发一次// this.$refs.student.$once('atguigu',this.getStudentName)// }}
</script><style scoped>.app {background-color: gray;padding: 5px;}
</style>
- School.vue:
<template><div class="school"><h2>学校名称:{{name}}</h2><h2>学校地址:{{address}}</h2><button @click="sendSchoolName">把学校名给App</button></div>
</template><script>export default {name:'School',props:['getSchoolName'],data() {return {name:'霍格沃兹魔法学院',address:'苏格兰高地'}},methods: {sendSchoolName() {this.getSchoolName(this.name)}}}
</script><style scoped>.school {background-color: pink;padding: 5px;}
</style>
- Student.vue:
<template><div class="student"><h2>学生姓名:{{name}}</h2><h2>学生性别:{{sex}}</h2><button @click="sendStudentName">点我把学生名给App</button></div>
</template><script>export default {name:'Student',data() {return {name:'小王',sex:'女'}},methods: {sendStudentName() {// 触发Student组件实例身上的atguigu事件this.$emit('atguigu',this.name)// this.$emit('atguigu',this.name,666,888,900)}}}
</script><style scoped>.student{background-color: orange;padding: 5px;margin-top: 30px;}
</style>
1.2 解绑
- App.vue:
<template><div class="app"><h1>{{msg}}</h1><!-- 通过父组件给子组件传递函数类型的props实现:子给父传递数据 --><School :getSchoolName="getSchoolName"/><!-- 通过父组件给子组件绑定一个自定义事件实现:子给父传递数据(第一种写法,使用@或v-on) --><!-- <Student v-on:atguigu="getStudentName"/> 由于v-on在Student组件标签上,所以是给Student组件的实例对象vc身上绑定了一个事件atguigu,如果有人触发了此事件,那么getStudentName函数将会被调用 --><Student v-on:atguigu="getStudentName" @demo="m1"/><!-- 若要让按钮只能触发一次 --><!-- <Student v-on:atguigu.once="getStudentName"/> --><!-- 通过父组件给子组件绑定一个自定义事件实现:子给父传递数据(第二种写法,使用ref) --><!-- <Student ref="student"/> --></div>
</template><script>// 引入Student组件import Student from './components/Student.vue' // 引入School组件import School from './components/School.vue'export default {name:'App',components:{School, Student},data() {return {msg:"你好啊!"}},methods: {getSchoolName(name) {console.log('App收到了学校名:',name);},getStudentName(name) {console.log('App收到了学生名:',name);},/* getStudentName(name,...params) {console.log('App收到了学生名:',name,params); // params收集剩余参数} */m1() {console.log("demo事件被触发了");}},// 用于第二种写法ref// mounted() {// 绑定自定义事件// this.$refs.student是Student组件的实例对象// this.$refs.student.$on('atguigu',this.getStudentName)// 绑定自定义事件且让他等三秒钟返回/* setTimeout(()=>{this.$refs.student.$on('atguigu',this.getStudentName)},3000) */// 绑定自定义事件且让按钮只能触发一次// this.$refs.student.$once('atguigu',this.getStudentName)// }}
</script><style scoped>.app {background-color: gray;padding: 5px;}
</style>
- Student.vue:
<template><div class="student"><h2>学生姓名:{{name}}</h2><h2>学生性别:{{sex}}</h2><button @click="sendStudentName">点我把学生名给App</button><button @click="unbind">解绑atguigu事件</button></div>
</template><script>export default {name:'Student',data() {return {name:'小王',sex:'女'}},methods: {sendStudentName() {// 触发Student组件实例身上的atguigu事件this.$emit('atguigu',this.name)// this.$emit('atguigu',this.name,666,888,900)// this.$emit('demo')},unbind() {this.$off('atguigu') // 只适用于解绑一个自定义事件// this.$off(['atguigu','demo']) // 解绑多个自定义事件// this.$off() // 解绑所有的自定义事件}}}
</script><style scoped>.student{background-color: orange;padding: 5px;margin-top: 30px;}
</style>
1.3 总结
- 一种组件间通信的方式,适用于:子组件 —> 父组件
- 使用场景:A是父组件,B是子组件,B想给A传数据,那么就要在A中给B绑定自定义事件(事件的回调在A中)。
- 绑定自定义事件:
1> 第一种方式,在父组件中:<Demo @atguigu="test"/>或<Demo v-on:atguigu="test"/>
2> 第二种方式,在父组件中:

3> 若想让自定义事件只能触发一次,可以使用once修饰符,或$once方法。 - 触发自定义事件:
this.$emit('atguigu',数据) - 解绑自定义事件:
1>this.$off('atguigu'):只适用于解绑一个自定义事件
2>this.$off(['atguigu','demo']):解绑多个自定义事件
3>this.$off():解绑所有的自定义事件 - 注意:通过
this.$refs.xxx.$on('atguigu',回调)绑定自定义事件时,回调要么配置在methods中,要么用箭头函数,否则this指向会出问题! - 组件上也可以绑定原生DOM事件,需要使用
native修饰符。 - App.vue:
<template><div class="app"><h1>{{msg}},学生姓名是:{{studentName}}</h1><!-- 通过父组件给子组件传递函数类型的props实现:子给父传递数据 --><School :getSchoolName="getSchoolName"/><!-- 通过父组件给子组件绑定一个自定义事件实现:子给父传递数据(第一种写法,使用@或v-on) --><!-- <Student v-on:atguigu="getStudentName"/> 由于v-on在Student组件标签上,所以是给Student组件的实例对象vc身上绑定了一个事件atguigu,如果有人触发了此事件,那么getStudentName函数将会被调用 --><Student v-on:atguigu="getStudentName" @demo="m1"/><!-- 若要让按钮只能触发一次 --><!-- <Student v-on:atguigu.once="getStudentName"/> --><!-- 通过父组件给子组件绑定一个自定义事件实现:子给父传递数据(第二种写法,使用ref) --><!-- <Student ref="student"/> --><!-- 组件上也可以绑定原生DOM事件 需要使用native修饰符 --><!-- <Student ref="student" @click.native="show"/> --></div>
</template><script>// 引入Student组件import Student from './components/Student.vue' // 引入School组件import School from './components/School.vue'export default {name:'App',components:{School, Student},data() {return {msg:"你好啊!",studentName:''}},methods: {getSchoolName(name) {console.log('App收到了学校名:',name);},// 要么配置在methods中getStudentName(name) {console.log('App收到了学生名:',name);this.studentName = name},/* getStudentName(name,...params) {console.log('App收到了学生名:',name,params); // params收集剩余参数} */m1() {console.log("demo事件被触发了");},/* show() {alert(123)} */},// 用于第二种写法ref// mounted() {// 绑定自定义事件// this.$refs.student是Student组件的实例对象// this.$refs.student.$on('atguigu',this.getStudentName)// 要么用箭头函数/* this.$refs.student.$on('atguigu',(name,...params)=>{console.log('App收到了学生名:',name,params);console.log(this)this.studentName = name}) */// 绑定自定义事件且让他等三秒钟返回/* setTimeout(()=>{this.$refs.student.$on('atguigu',this.getStudentName)},3000) */// 绑定自定义事件且让按钮只能触发一次// this.$refs.student.$once('atguigu',this.getStudentName)// }}
</script><style scoped>.app {background-color: gray;padding: 5px;}
</style>
1.4 TodoList案例——自定义事件
- App.vue:
<template><div id="root"><div class="todo-container"><div class="todo-wrap"><!-- <MyHeader :addTodo="addTodo"/> --><!-- 采用自定义事件方法改为: --><MyHeader @addTodo="addTodo"/><MyList :todos="todos" :checkTodo="checkTodo" :deleteTodo="deleteTodo"/> <!--传递数据--><!-- <MyFooter :todos="todos" :checkAllTodo="checkAllTodo" :clearAllTodo="clearAllTodo"/> --><!-- 采用自定义事件方法改为: --><MyFooter :todos="todos" @checkAllTodo="checkAllTodo" @clearAllTodo="clearAllTodo"/></div></div></div>
</template><script>import MyHeader from './components/MyHeader.vue'import MyList from './components/MyList.vue'import MyFooter from './components/MyFooter.vue'export default {name:'App',components:{ MyHeader,MyList,MyFooter},data() {return {todos:JSON.parse(localStorage.getItem('todos')) || []}},methods:{// 添加一个todoaddTodo(todoObj) {// console.log('我是App组件,我收到了数据:',x);this.todos.unshift(todoObj)},// 勾选or取消勾选一个todocheckTodo(id) {this.todos.forEach((todo)=>{if(todo.id === id) todo.done = !todo.done})},// 删除一个tododeleteTodo(id) {this.todos = this.todos.filter((todo)=>{return todo.id !== id})},// 全选or取消全选checkAllTodo(done) {this.todos.forEach((todo)=>{todo.done = done})},// 清除所有已经完成的todoclearAllTodo() {this.todos = this.todos.filter((todo)=>{return !todo.done})}},watch: {todos: {// 深度监视deep:true,handler(value) {localStorage.setItem('todos',JSON.stringify(value))}}}}
</script><style>/*base*/body {background: #fff;}.btn {display: inline-block;padding: 4px 12px;margin-bottom: 5px;margin-left: 285px;font-size: 14px;line-height: 20px;text-align: center;vertical-align: middle;cursor: pointer;box-shadow: inset 0 1px 0 rgba(255, 255, 255, 0.2), 0 1px 2px rgba(0, 0, 0, 0.05);border-radius: 4px;}.btn-danger {color: #fff;background-color: #da4f49;border: 1px solid #bd362f;}.btn-danger:hover {color: #fff;background-color: #bd362f;}.btn:focus {outline: none;}.todo-container {width: 600px;margin: 0 auto;}.todo-container .todo-wrap {padding: 10px;border: 1px solid #ddd;border-radius: 5px;}
</style>
- MyHeader.vue:
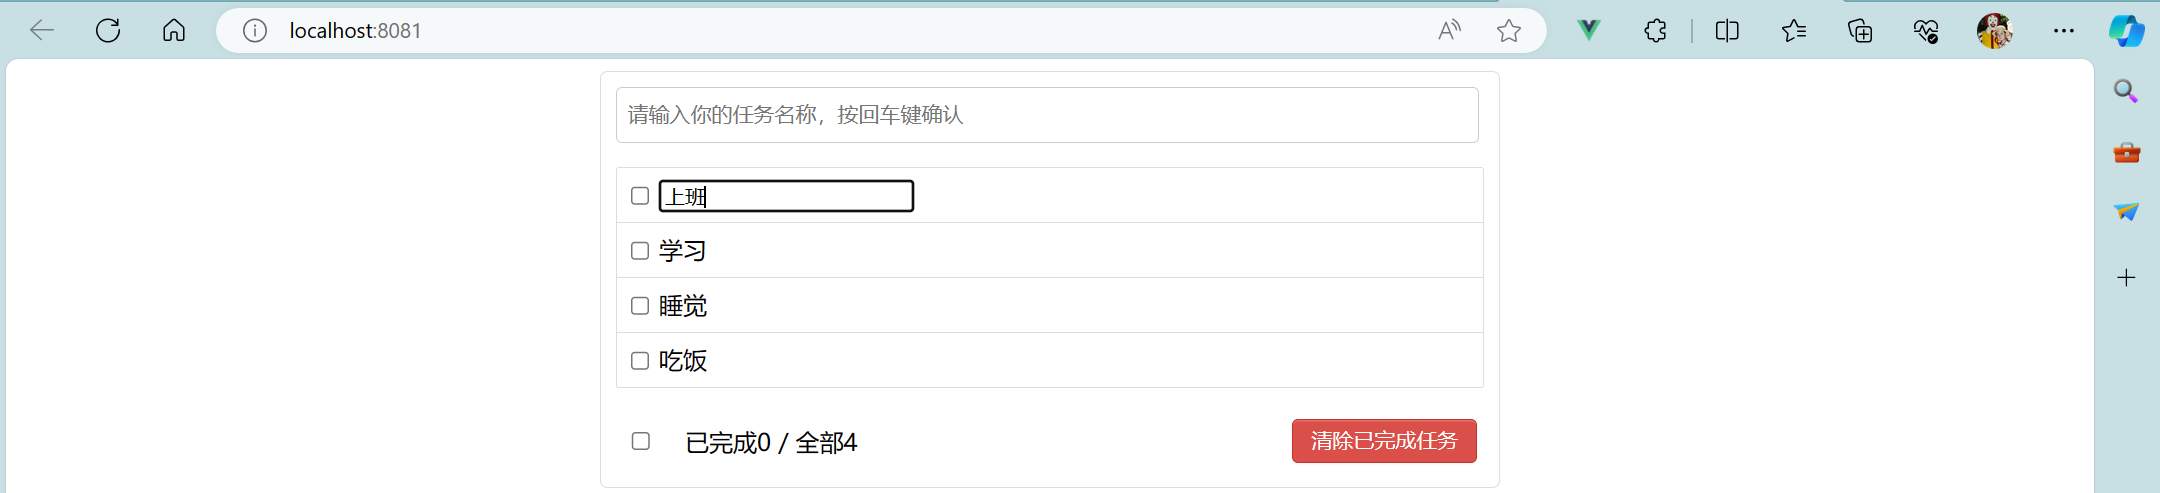
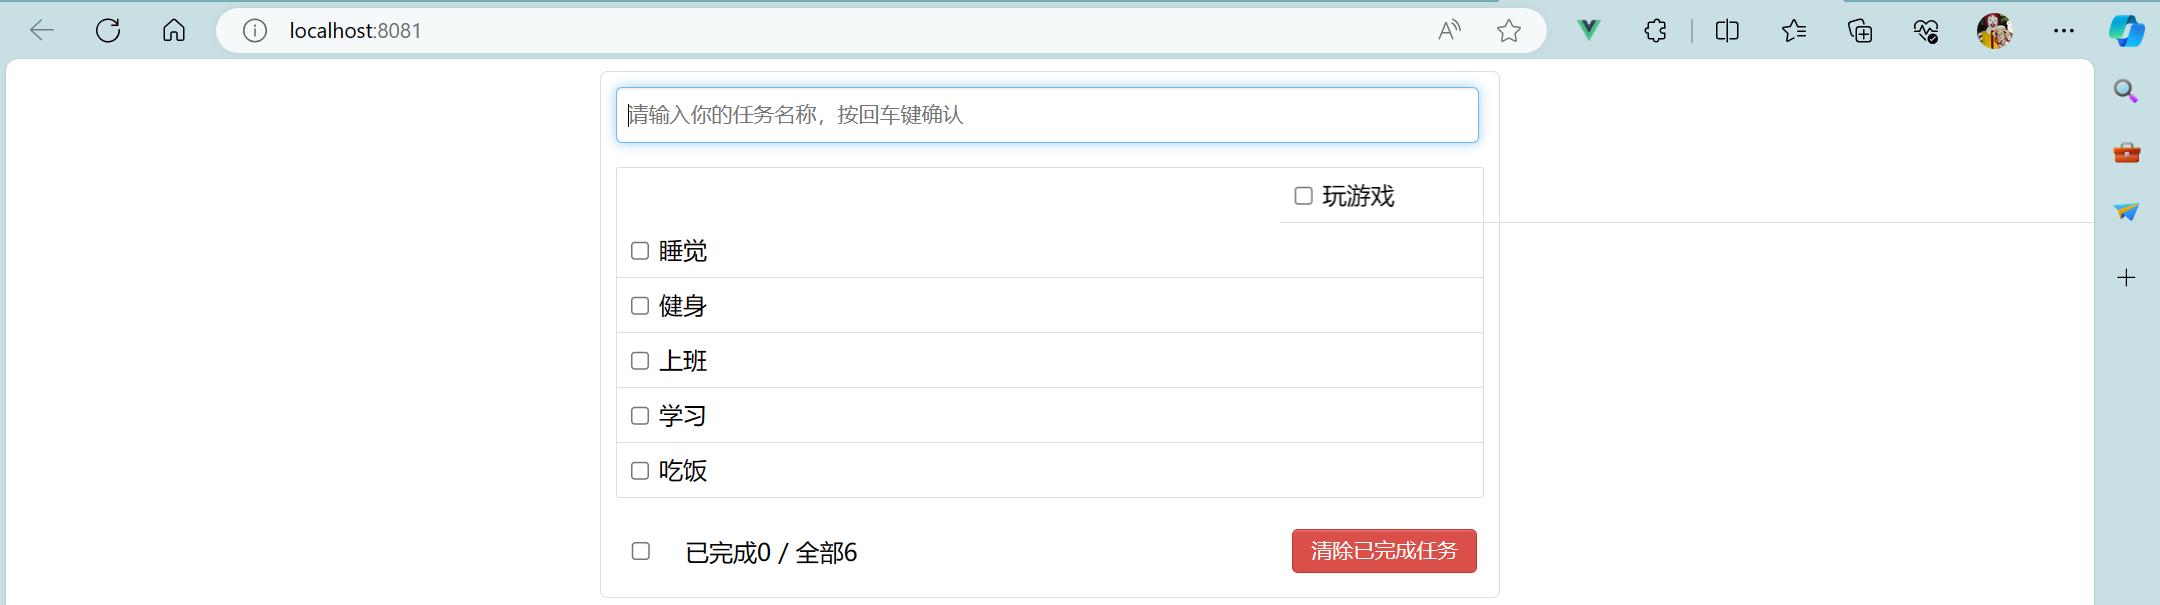
<template><div class="todo-header"><input type="text" placeholder="请输入你的任务名称,按回车键确认" v-model="title" @keyup.enter="add"/></div>
</template><script>import {nanoid} from 'nanoid'export default {name:'MyHeader',// 采用自定义事件方法改为:// props:['addTodo'],data() {return{title:''}},methods: {add() {// 校验数据if(!this.title.trim()) return alert('输入不能为空') // 如果输入为空 敲回车就没反应 trim()去掉前后空格// console.log(e.target.value);// 将用户的输入包装成为一个todo对象const todoObj = {id:nanoid(),title:this.title,done:false}// console.log(todoObj)// 通知App组件去添加一个todo对象// this.addTodo(todoObj)// 采用自定义事件方法改为:this.$emit('addTodo',todoObj)// 清空输入this.title = ''}}}
</script><style scoped>/*header*/.todo-header input {width: 560px;height: 28px;font-size: 14px;border: 1px solid #ccc;border-radius: 4px;padding: 4px 7px;}.todo-header input:focus {outline: none;border-color: rgba(82, 168, 236, 0.8);box-shadow: inset 0 1px 1px rgba(0, 0, 0, 0.075), 0 0 8px rgba(82, 168, 236, 0.6);}
</style>
- MyFooter.vue:
<template><div class="todo-footer" v-show="total"><label><!-- <input type="checkbox" :checked="doneTotal === total"/> --><!-- 写法一 --><!-- <input type="checkbox" :checked="isAll" @change="checkAll"/> --><!-- 写法二 --><input type="checkbox" v-model="isAll"/></label><span><!-- <span>已完成{{doneTotal}}</span> / 全部{{todos.length}} --><span>已完成{{doneTotal}}</span> / 全部{{total}}</span><button class="btn btn-danger" @click="clearAll">清除已完成任务</button></div>
</template><script>export default {name:'MyFooter',// props:['todos','checkAllTodo','clearAllTodo'],// 采用自定义事件方法改为:props:['todos'],computed:{total() {return this.todos.length},doneTotal() {/* const x =  this.todos.reduce((pre,current)=>{console.log('@',pre,current)return pre + (current.done ? 1 : 0)},0)console.log('###',x); */// 简写为:return this.todos.reduce((pre,todo)=> pre + (todo.done ? 1 : 0) ,0)},// 写法一/* isAll() {return this.doneTotal === this.total && this.total > 0}, */// 写法二isAll: {get(){return this.doneTotal === this.total && this.total > 0},set(value){// this.checkAllTodo(value)// 采用自定义事件方法改为:this.$emit('checkAllTodo',value)}}},methods: {/* checkAll(e) {// console.log(e.target.checked);this.checkAllTodo(e.target.checked)} */clearAll() {// this.clearAllTodo()// 采用自定义事件方法改为:this.$emit('clearAllTodo')}}}
</script><style scoped>/*footer*/.todo-footer {height: 40px;line-height: 40px;padding-left: 6px;margin-top: 5px;}.todo-footer label {display: inline-block;margin-right: 20px;cursor: pointer; /* 网页浏览时用户鼠标指针的样式或图形形状为一只手 */}
</style>
2 全局事件总线
2.1 理解
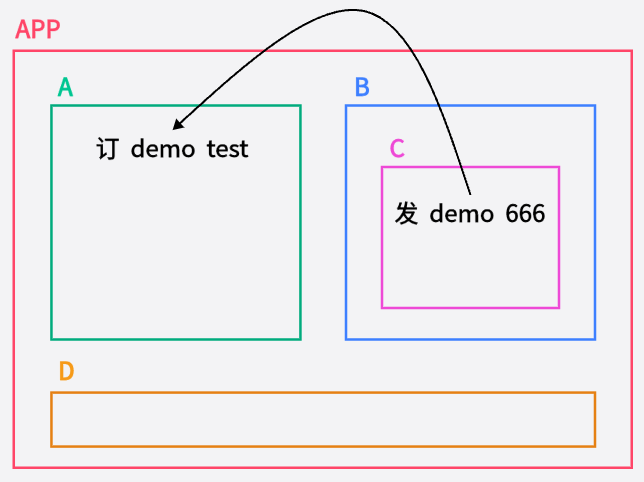
- 全局事件总线:一种组件间通信的方式,适用于任意组件间通信。
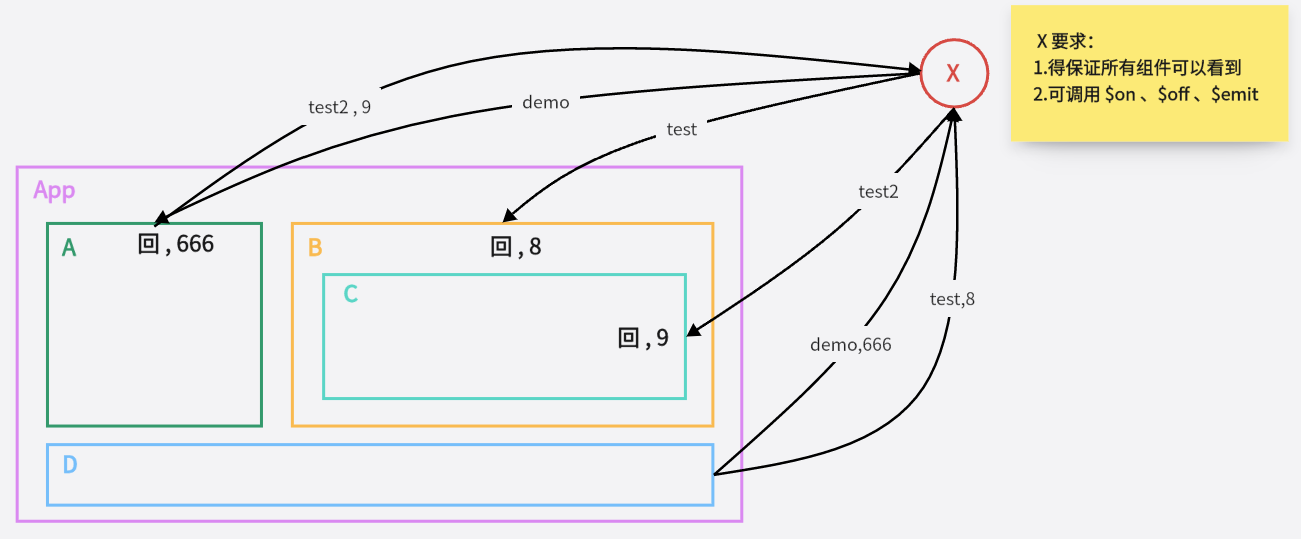
- Vue 原型对象上包含事件处理的方法:
1>$on(eventName, listener): 绑定自定义事件监听
2>$emit(eventName, data): 分发自定义事件
3>$off(eventName): 解绑自定义事件监听
4>$once(eventName, listener): 绑定事件监听, 但只能处理一次 - 所有组件实例对象的原型对象的原型对象就是 Vue 的原型对象。
1> 所有组件对象都能看到 Vue 原型对象上的属性和方法。
2>Vue.prototype.$bus = new Vue(), 所有的组件对象都能看到$bus这个属性对象。
2.2 步骤
- 安装全局事件总线:
- 使用事件总线:
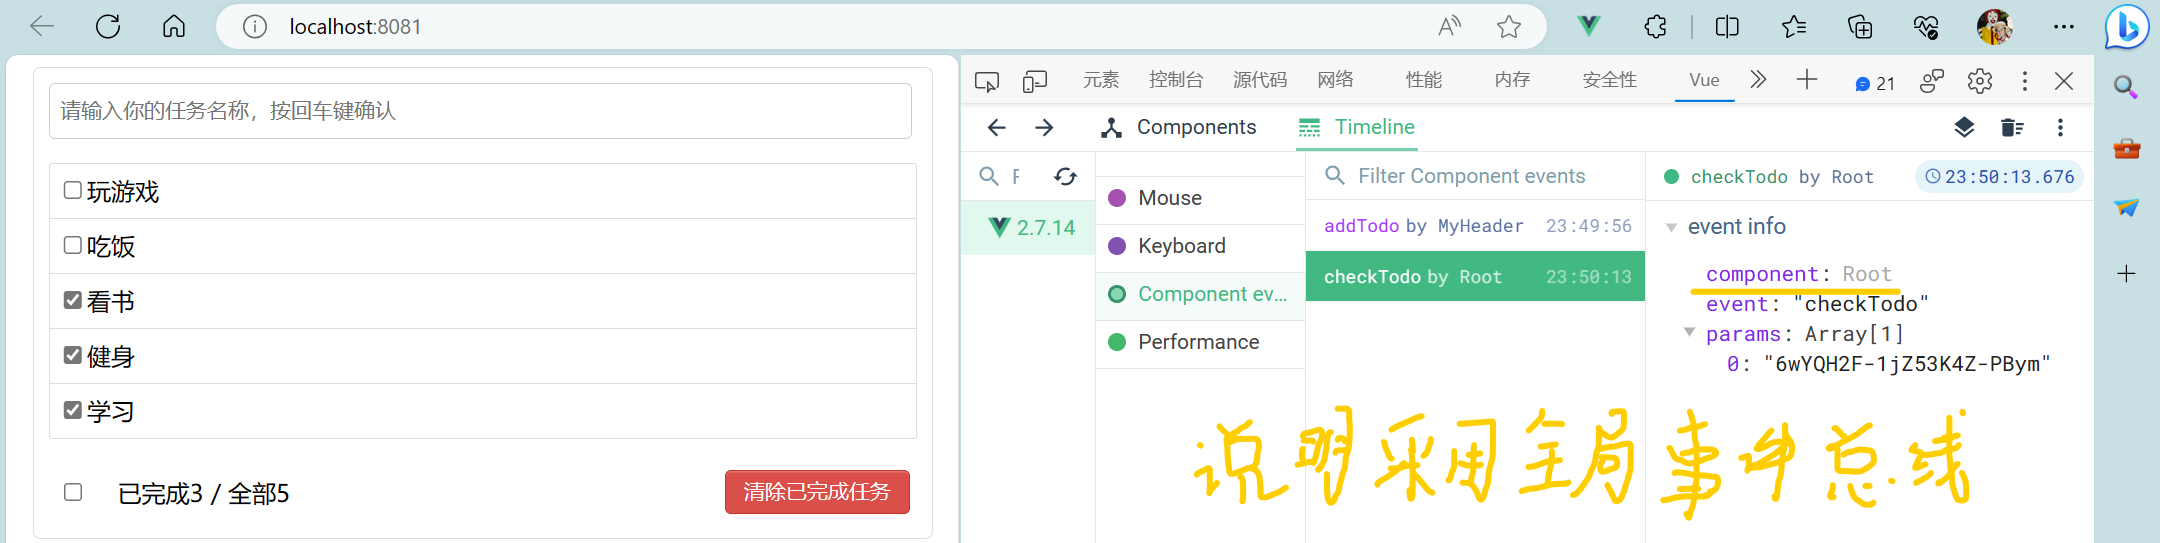
1> 接收数据:A组件想接收数据,则在A组件中给$bus绑定自定义事件,事件的回调留在A组件自身。
最好在beforeDestroy钩子中,用$off去解绑当前组件所用到的事件。
2> 提供数据:
2.3 TodoList案例——事件总线
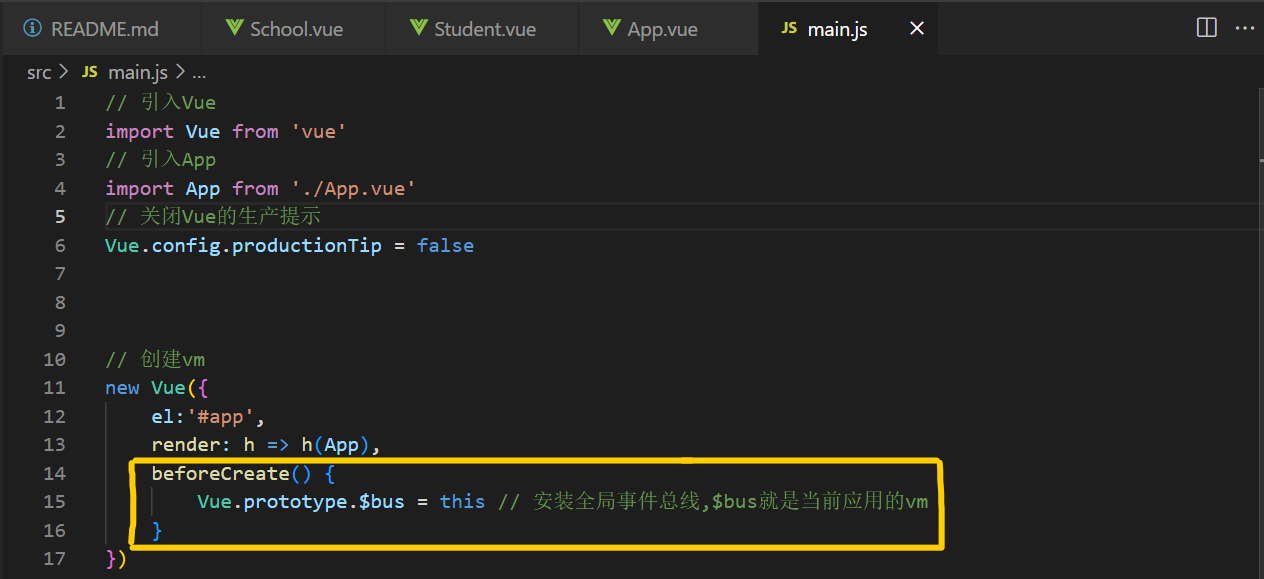
- main.js代码:
// 引入Vue
import Vue from 'vue'
// 引入App
import App from './App.vue'
// 关闭Vue的生产提示
Vue.config.productionTip = false// 创建vm
new Vue({el:'#app',render: h => h(App),beforeCreate(){Vue.prototype.$bus = this}
})
- App.vue代码:
<template><div id="root"><div class="todo-container"><div class="todo-wrap"><!-- <MyHeader :addTodo="addTodo"/> --><!-- 采用自定义事件方法改为: --><MyHeader @addTodo="addTodo"/><!-- <MyList :todos="todos" :checkTodo="checkTodo" :deleteTodo="deleteTodo"/> 传递数据--><!-- 采用全局事件总线方法改为: --><MyList :todos="todos"/><!-- <MyFooter :todos="todos" :checkAllTodo="checkAllTodo" :clearAllTodo="clearAllTodo"/> --><!-- 采用自定义事件方法改为: --><MyFooter :todos="todos" @checkAllTodo="checkAllTodo" @clearAllTodo="clearAllTodo"/></div></div></div>
</template><script>import MyHeader from './components/MyHeader.vue'import MyList from './components/MyList.vue'import MyFooter from './components/MyFooter.vue'export default {name:'App',components:{ MyHeader,MyList,MyFooter},data() {return {todos:JSON.parse(localStorage.getItem('todos')) || []}},methods:{// 添加一个todoaddTodo(todoObj) {// console.log('我是App组件,我收到了数据:',x);this.todos.unshift(todoObj)},// 勾选or取消勾选一个todocheckTodo(id) {this.todos.forEach((todo)=>{if(todo.id === id) todo.done = !todo.done})},// 删除一个tododeleteTodo(id) {this.todos = this.todos.filter((todo)=>{return todo.id !== id})},// 全选or取消全选checkAllTodo(done) {this.todos.forEach((todo)=>{todo.done = done})},// 清除所有已经完成的todoclearAllTodo() {this.todos = this.todos.filter((todo)=>{return !todo.done})}},watch: {todos: {// 深度监视deep:true,handler(value) {localStorage.setItem('todos',JSON.stringify(value))}}},// 采用全局事件总线方法此处添加:mounted(){this.$bus.$on('checkTodo',this.checkTodo)this.$bus.$on('deleteTodo',this.deleteTodo)},beforeDestroy() {this.$bus.$off('checkTodo')this.$bus.$off('deleteTodo')}}
</script><style>/*base*/body {background: #fff;}.btn {display: inline-block;padding: 4px 12px;margin-bottom: 5px;margin-left: 285px;font-size: 14px;line-height: 20px;text-align: center;vertical-align: middle;cursor: pointer;box-shadow: inset 0 1px 0 rgba(255, 255, 255, 0.2), 0 1px 2px rgba(0, 0, 0, 0.05);border-radius: 4px;}.btn-danger {color: #fff;background-color: #da4f49;border: 1px solid #bd362f;}.btn-danger:hover {color: #fff;background-color: #bd362f;}.btn:focus {outline: none;}.todo-container {width: 600px;margin: 0 auto;}.todo-container .todo-wrap {padding: 10px;border: 1px solid #ddd;border-radius: 5px;}
</style>
- MyList.vue代码:
<template><ul class="todo-main"><MyItem v-for="todoObj in todos" :key="todoObj.id" :todo="todoObj" /> <!--遍历数组并且传递数据--> <!--采用全局事件总线方法此处删除了 :checkTodo="checkTodo" 和 :deleteTodo="deleteTodo"--></ul>
</template><script>import MyItem from './MyItem.vue'export default {name:'MyList',components: {MyItem},// props:['todos','checkTodo','deleteTodo'] // 接收数据// 采用全局事件总线方法改为:props:['todos']}
</script><style scoped>/*main*/.todo-main {margin-left: 0px;border: 1px solid #ddd;border-radius: 2px;padding: 0px;}.todo-empty {height: 40px;line-height: 40px;border: 1px solid #ddd;border-radius: 2px;padding-left: 5px;margin-top: 10px;}
</style>
- MyItem代码:
<template><li><label><!-- 写法一 --><!-- <input type="checkbox" :checked="todo.done" @click="handleCheck(todo.id)"/>  :checked="true" 给input指定一个checked选项,如为true,拥有checked,如为false,则没有checked--><!-- 写法二 --><input type="checkbox" :checked="todo.done" @change="handleCheck(todo.id)"/><!-- 写法三 此写法直接合并后两项 不用App插件将数据传给MyList再传给MyItem 不推荐此写法 因为props是只读的 不建议修改--><!-- <input type="checkbox" v-model="todo.done"/> --><span>{{todo.title}}</span></label><button class="btn btn-danger" @click="handleDelete(todo.id)">删除</button></li>
</template><script>export default {name:'MyItem',// 声明接收todo对象// props:['todo','checkTodo','deleteTodo'],// 采用全局事件总线方法改为:props:['todo'],methods:{// 勾选or取消勾选handleCheck(id) {// console.log(id);// 通知App组件将对应的todo对象的done值取反// this.checkTodo(id)// 采用全局事件总线方法改为:this.$bus.$emit('checkTodo',id)},// 删除handleDelete(id) {// confirm根据用户的交互 确定布尔值为真还是假if(confirm('确定删除吗?')) {// console.log(id);// this.deleteTodo(id)// 采用全局事件总线方法改为:this.$bus.$emit('deleteTodo',id)}}}}
</script><style scoped>/*item*/li {list-style: none;height: 36px;line-height: 36px;padding: 0 5px;border-bottom: 1px solid #ddd;}li label {float: left;cursor: pointer;}li label li input {vertical-align: middle;margin-right: 6px;position: relative;top: -1px;}li button {float: right;display: none;margin-top: 3px;}li:before {content: initial;}li:last-child {border-bottom: none;}li:hover {background-color: #ddd;}li:hover button {display: block;}
</style>

3 消息订阅与发布
3.1 理解
- 这种方式的思想与全局事件总线很相似,它包含以下操作:
1> 订阅消息 --对应绑定事件监听
2> 发布消息 --对应分发事件
3> 取消消息订阅 --对应解绑事件监听 - 需要引入一个消息订阅与发布的第三方实现库: PubSubJS
- 报纸订阅与发布步骤:
1> 订阅报纸:家庭住址
2> 邮递员送报纸:报纸 - 消息订阅与发布步骤:
1> 订阅消息:消息名
2> 发布消息:消息内容
- 一种组件间通信的方式,适用于任意组件间通信。
- 使用步骤:
1> 安装pubsub:npm i pubsub-js
2> 引入:import pubsub from 'pubsub-js'
3> 接收数据(消息的订阅语法):A组件想接收数据,则在A组件中订阅消息,订阅的回调留在A组件自身。
4> 提供数据(消息的发布语法):pubsub.publish('xxx',数据)(第一个形参代表消息名,第二个形参代表传递的数据)
5> 最好在beforeDestroy钩子中,用Pubsub.unsubscribe(pid)去取消订阅。 - main.js代码:
// 引入Vue
import Vue from 'vue'
// 引入App
import App from './App.vue'
// 关闭Vue的生产提示
Vue.config.productionTip = false// 创建vm
new Vue({el:'#app',render: h => h(App),
})
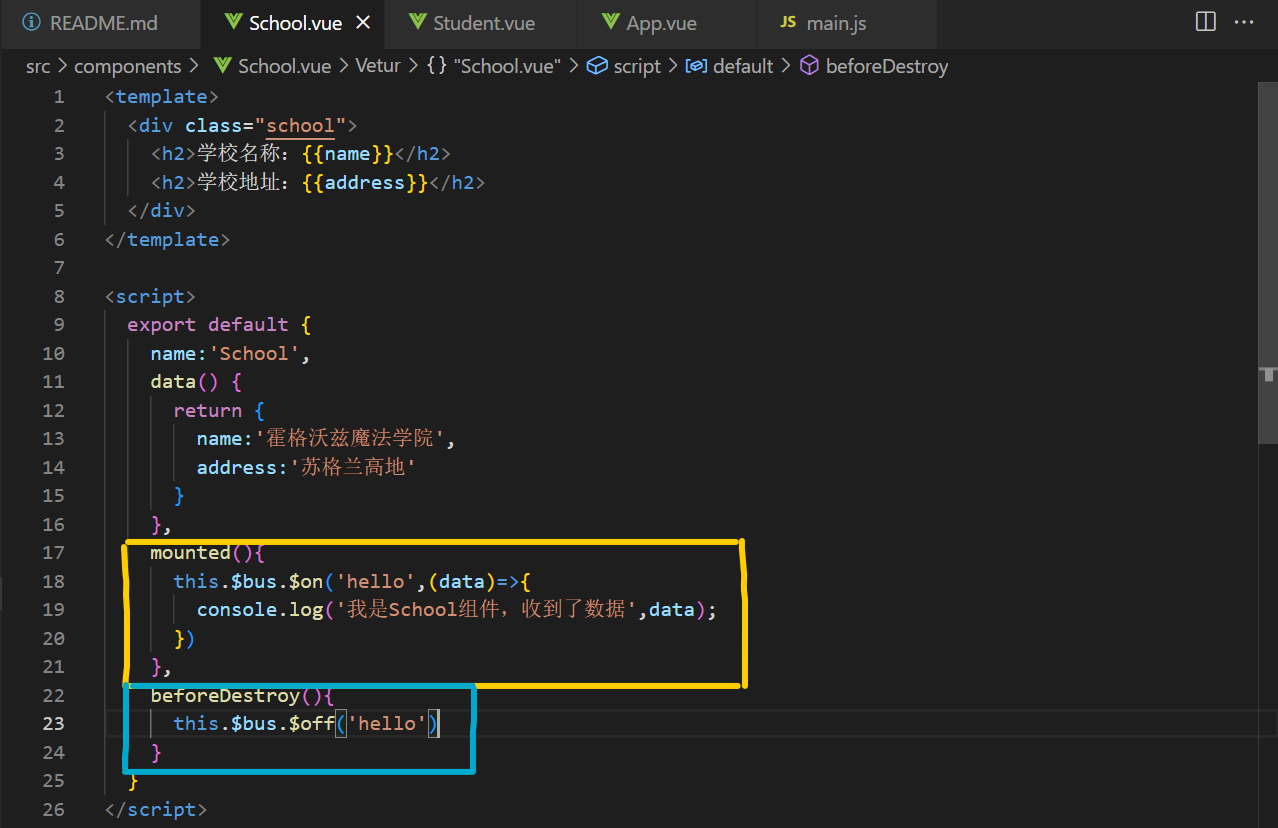
- School.vue代码:
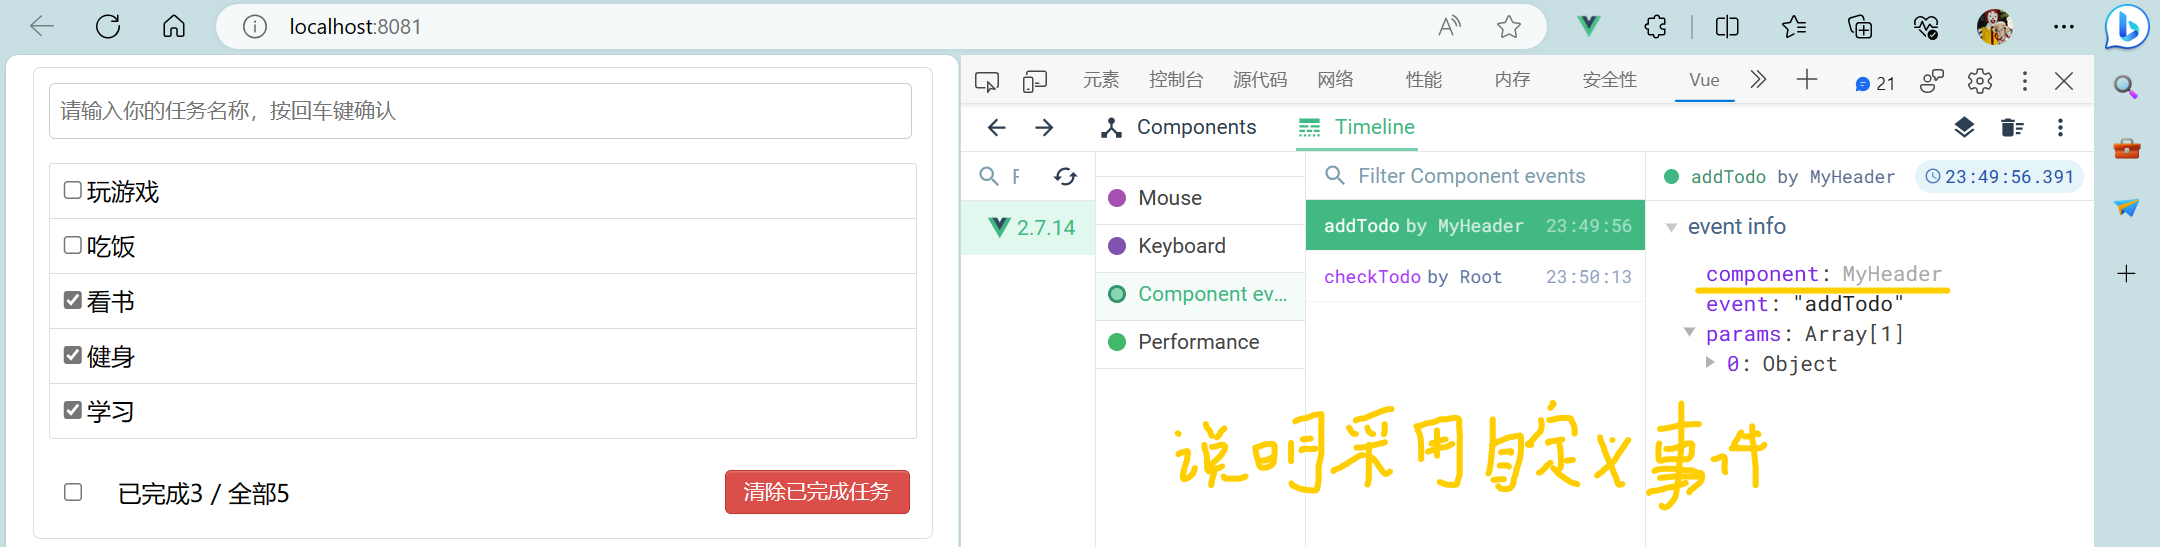
<template><div class="school"><h2>学校名称:{{name}}</h2><h2>学校地址:{{address}}</h2></div>
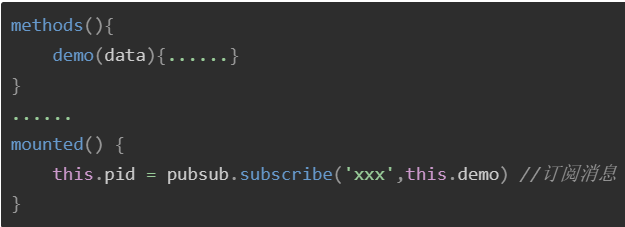
</template><script>import pubsub from 'pubsub-js'export default {name:'School',data() {return {name:'霍格沃兹魔法学院',address:'苏格兰高地'}},methods: {demo(msgName,data){console.log('有人发布了hello消息,hello消息的回调执行了',data)}},mounted(){this.pubId = pubsub.subscribe('hello',this.demo)},beforeDestroy(){pubsub.unsubscribe(this.pubId)}}
</script><style scoped>.school {background-color: pink;padding: 5px;}
</style>
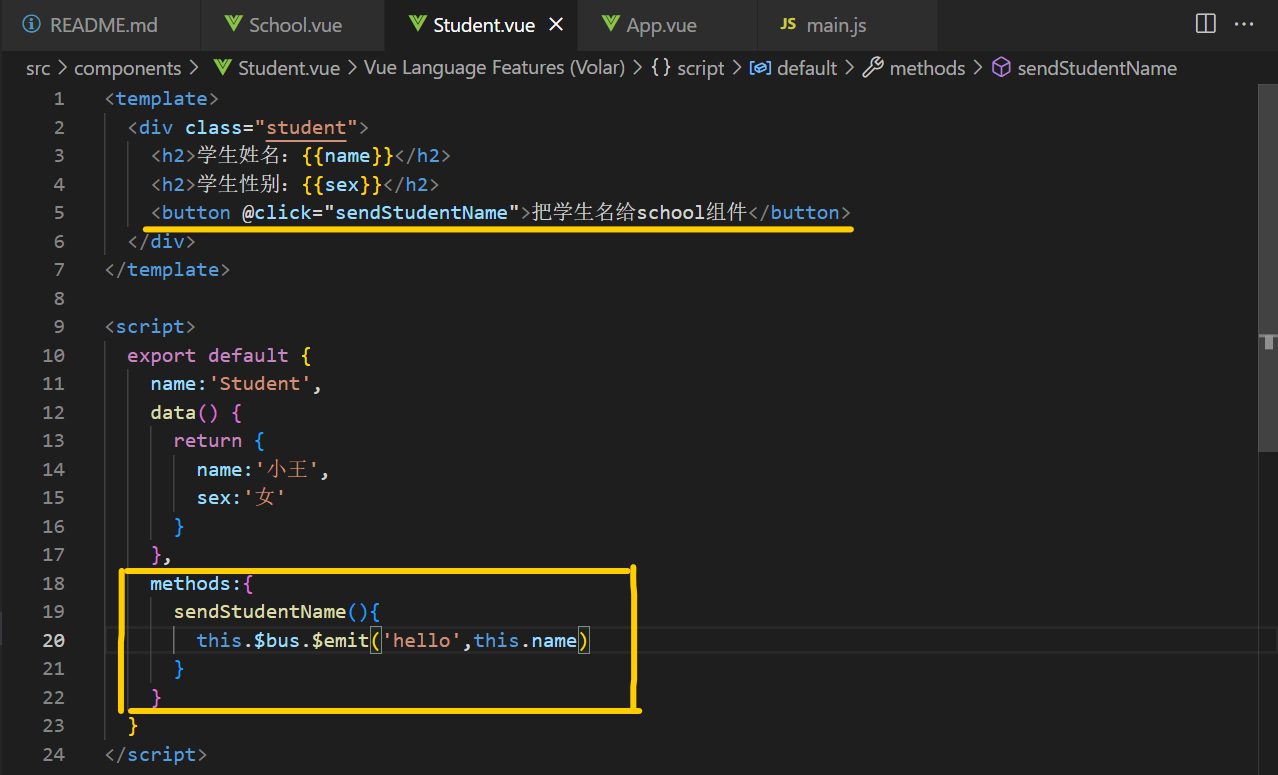
- Student.vue代码:
<template><div class="student"><h2>学生姓名:{{name}}</h2><h2>学生性别:{{sex}}</h2><button @click="sendStudentName">把学生名给school组件</button></div>
</template><script>import pubsub from 'pubsub-js'export default {name:'Student',data() {return {name:'小王',sex:'女'}},methods:{sendStudentName(){pubsub.publish('hello',666)}}}
</script><style scoped>.student{background-color: orange;padding: 5px;margin-top: 30px;}
</style>
3.2 TodoList案例——消息的订阅与发布
- App.vue代码:
<template><div id="root"><div class="todo-container"><div class="todo-wrap"><!-- <MyHeader :addTodo="addTodo"/> --><!-- 采用自定义事件方法改为: --><MyHeader @addTodo="addTodo"/><!-- <MyList :todos="todos" :checkTodo="checkTodo" :deleteTodo="deleteTodo"/> 传递数据--><!-- 采用全局事件总线方法改为: --><MyList :todos="todos"/><!-- <MyFooter :todos="todos" :checkAllTodo="checkAllTodo" :clearAllTodo="clearAllTodo"/> --><!-- 采用自定义事件方法改为: --><MyFooter :todos="todos" @checkAllTodo="checkAllTodo" @clearAllTodo="clearAllTodo"/></div></div></div>
</template><script>// 引入pubsub库import pubsub from 'pubsub-js'import MyHeader from './components/MyHeader.vue'import MyList from './components/MyList.vue'import MyFooter from './components/MyFooter.vue'export default {name:'App',components:{ MyHeader,MyList,MyFooter},data() {return {todos:JSON.parse(localStorage.getItem('todos')) || []}},methods:{// 添加一个todoaddTodo(todoObj) {// console.log('我是App组件,我收到了数据:',x);this.todos.unshift(todoObj)},// 勾选or取消勾选一个todocheckTodo(id) {this.todos.forEach((todo)=>{if(todo.id === id) todo.done = !todo.done})},// 删除一个todo// deleteTodo(msgName,id) {// 用下划线占个位deleteTodo(_,id) {this.todos = this.todos.filter((todo)=>{return todo.id !== id})},// 全选or取消全选checkAllTodo(done) {this.todos.forEach((todo)=>{todo.done = done})},// 清除所有已经完成的todoclearAllTodo() {this.todos = this.todos.filter((todo)=>{return !todo.done})}},watch: {todos: {// 深度监视deep:true,handler(value) {localStorage.setItem('todos',JSON.stringify(value))}}},// 采用全局事件总线方法此处添加:mounted(){this.$bus.$on('checkTodo',this.checkTodo)// this.$bus.$on('deleteTodo',this.deleteTodo) // 采用消息订阅与发布方法此处改为:this.pubId = pubsub.subscribe('deleteTodo',this.deleteTodo)},beforeDestroy() {this.$bus.$off('checkTodo')// this.$bus.$off('deleteTodo')// 采用消息订阅与发布方法此处改为:pubsub.unsubscribe(this.pubId)}}
</script><style>/*base*/body {background: #fff;}.btn {display: inline-block;padding: 4px 12px;margin-bottom: 5px;margin-left: 285px;font-size: 14px;line-height: 20px;text-align: center;vertical-align: middle;cursor: pointer;box-shadow: inset 0 1px 0 rgba(255, 255, 255, 0.2), 0 1px 2px rgba(0, 0, 0, 0.05);border-radius: 4px;}.btn-danger {color: #fff;background-color: #da4f49;border: 1px solid #bd362f;}.btn-danger:hover {color: #fff;background-color: #bd362f;}.btn:focus {outline: none;}.todo-container {width: 600px;margin: 0 auto;}.todo-container .todo-wrap {padding: 10px;border: 1px solid #ddd;border-radius: 5px;}
</style>
- MyItem.vue代码:
<template><li><label><!-- 写法一 --><!-- <input type="checkbox" :checked="todo.done" @click="handleCheck(todo.id)"/>  :checked="true" 给input指定一个checked选项,如为true,拥有checked,如为false,则没有checked--><!-- 写法二 --><input type="checkbox" :checked="todo.done" @change="handleCheck(todo.id)"/><!-- 写法三 此写法直接合并后两项 不用App插件将数据传给MyList再传给MyItem 不推荐此写法 因为props是只读的 不建议修改--><!-- <input type="checkbox" v-model="todo.done"/> --><span>{{todo.title}}</span></label><button class="btn btn-danger" @click="handleDelete(todo.id)">删除</button></li>
</template><script>import pubsub from 'pubsub-js'export default {name:'MyItem',// 声明接收todo对象// props:['todo','checkTodo','deleteTodo'],// 采用全局事件总线方法改为:props:['todo'],methods:{// 勾选or取消勾选handleCheck(id) {// console.log(id);// 通知App组件将对应的todo对象的done值取反// this.checkTodo(id)// 采用全局事件总线方法改为:this.$bus.$emit('checkTodo',id)}, // 删除handleDelete(id) {// confirm根据用户的交互 确定布尔值为真还是假if(confirm('确定删除吗?')) {// console.log(id);// this.deleteTodo(id)// 采用全局事件总线方法改为:// this.$bus.$emit('deleteTodo',id)// 采用消息订阅与发布方法此处改为:pubsub.publish('deleteTodo',id)}}}}
</script><style scoped>/*item*/li {list-style: none;height: 36px;line-height: 36px;padding: 0 5px;border-bottom: 1px solid #ddd;}li label {float: left;cursor: pointer;}li label li input {vertical-align: middle;margin-right: 6px;position: relative;top: -1px;}li button {float: right;display: none;margin-top: 3px;}li:before {content: initial;}li:last-child {border-bottom: none;}li:hover {background-color: #ddd;}li:hover button {display: block;}
</style>
4 TodoList案例——编辑
4.1 $nextTick
- 语法:
this.$nextTick(回调函数) - 作用:在下一次 DOM 更新结束后执行其指定的回调。
- 什么时候用:当改变数据后,要基于更新后的新DOM进行某些操作时,要在nextTick所指定的回调函数中执行。
4.2 代码
- MyItem.vue代码:
<template><li><label><!-- 写法一 --><!-- <input type="checkbox" :checked="todo.done" @click="handleCheck(todo.id)"/>  :checked="true" 给input指定一个checked选项,如为true,拥有checked,如为false,则没有checked--><!-- 写法二 --><input type="checkbox" :checked="todo.done" @change="handleCheck(todo.id)"/><!-- 写法三 此写法直接合并后两项 不用App插件将数据传给MyList再传给MyItem 不推荐此写法 因为props是只读的 不建议修改--><!-- <input type="checkbox" v-model="todo.done"/> --><span v-show="!todo.isEdit">{{todo.title}}</span><input type="text" v-show="todo.isEdit" :value="todo.title" @blur="handleBlur(todo,$event)" ref="inputTitle"></label><button class="btn btn-danger" @click="handleDelete(todo.id)">删除</button><button v-show="!todo.isEdit" class="btn btn-edit" @click="handleEdit(todo)">编辑</button></li>
</template><script>import pubsub from 'pubsub-js'export default {name:'MyItem',// 声明接收todo对象// props:['todo','checkTodo','deleteTodo'],// 采用全局事件总线方法改为:props:['todo'],methods:{// 勾选or取消勾选handleCheck(id) {// console.log(id);// 通知App组件将对应的todo对象的done值取反// this.checkTodo(id)// 采用全局事件总线方法改为:this.$bus.$emit('checkTodo',id)}, // 删除handleDelete(id) {// confirm根据用户的交互 确定布尔值为真还是假if(confirm('确定删除吗?')) {// console.log(id);// this.deleteTodo(id)// 采用全局事件总线方法改为:// this.$bus.$emit('deleteTodo',id)// 采用消息订阅与发布方法此处改为:pubsub.publish('deleteTodo',id)}},// 编辑handleEdit(todo) {// todo.isEdit = true // 此写法可以改值 但没有getter和setter// 利用列表渲染中的vue.set// this.$set(todo,'isEdit',true)// 第一次加上isEdit属性 后面无需再加 因此使用if语句// 如果todo身上有isEdit 直接改 如果todo身上没有isEdit 先添加此属性再赋值if('isEdit' in todo) {todo.isEdit = true} else {this.$set(todo,'isEdit',true)}this.$nextTick(function() {// nextTick指定的回调 会在dom节点更新完毕后执行this.$refs.inputTitle.focus() // 获取焦点}) },// 失去焦点回调(真正执行修改逻辑)handleBlur(todo,e){todo.isEdit = falseif(!e.target.value.trim()) return alert('输入不能为空!') // trim()函数用于删除字符串的头尾空白符this.$bus.$emit('updateTodo',todo.id,e.target.value)}}}
</script><style scoped>/*item*/li {list-style: none;height: 36px;line-height: 36px;padding: 0 5px;border-bottom: 1px solid #ddd;}li label {float: left;cursor: pointer;}li label input {vertical-align: middle;margin-right: 6px;position: relative;top: -1px;}li button {float: right;display: none; margin-top: 3px; margin-left: 5px;}li:before {content: initial;}li:last-child {border-bottom: none;}li:hover {background-color: #ddd;}li:hover button {display: block;}
</style>
- App.vue代码:
<template><div id="root"><div class="todo-container"><div class="todo-wrap"><!-- <MyHeader :addTodo="addTodo"/> --><!-- 采用自定义事件方法改为: --><MyHeader @addTodo="addTodo"/><!-- <MyList :todos="todos" :checkTodo="checkTodo" :deleteTodo="deleteTodo"/> 传递数据--><!-- 采用全局事件总线方法改为: --><MyList :todos="todos"/><!-- <MyFooter :todos="todos" :checkAllTodo="checkAllTodo" :clearAllTodo="clearAllTodo"/> --><!-- 采用自定义事件方法改为: --><MyFooter :todos="todos" @checkAllTodo="checkAllTodo" @clearAllTodo="clearAllTodo"/></div></div></div>
</template><script>// 引入pubsub库import pubsub from 'pubsub-js'import MyHeader from './components/MyHeader.vue'import MyList from './components/MyList.vue'import MyFooter from './components/MyFooter.vue'export default {name:'App',components:{ MyHeader,MyList,MyFooter},data() {return {todos:JSON.parse(localStorage.getItem('todos')) || []}},methods:{// 添加一个todoaddTodo(todoObj) {// console.log('我是App组件,我收到了数据:',x);this.todos.unshift(todoObj)},// 勾选or取消勾选一个todocheckTodo(id) {this.todos.forEach((todo)=>{if(todo.id === id) todo.done = !todo.done})},// 更新一个todoupdateTodo(id,title) {this.todos.forEach((todo)=>{if(todo.id === id) todo.title = title})},// 删除一个todo// deleteTodo(msgName,id) {// 用下划线占个位deleteTodo(_,id) {this.todos = this.todos.filter((todo)=>{return todo.id !== id})},// 全选or取消全选checkAllTodo(done) {this.todos.forEach((todo)=>{todo.done = done})},// 清除所有已经完成的todoclearAllTodo() {this.todos = this.todos.filter((todo)=>{return !todo.done})}},watch: {todos: {// 深度监视deep:true,handler(value) {localStorage.setItem('todos',JSON.stringify(value))}}},// 采用全局事件总线方法此处添加:mounted(){this.$bus.$on('checkTodo',this.checkTodo)this.$bus.$on('updateTodo',this.updateTodo)// this.$bus.$on('deleteTodo',this.deleteTodo) // 采用消息订阅与发布方法此处改为:this.pubId = pubsub.subscribe('deleteTodo',this.deleteTodo)},beforeDestroy() {this.$bus.$off('checkTodo')this.$bus.$off('updateTodo')// this.$bus.$off('deleteTodo')// 采用消息订阅与发布方法此处改为:pubsub.unsubscribe(this.pubId)}}
</script><style>/*base*/body {background: #fff;}.btn {display: inline-block;padding: 4px 12px;margin-bottom: 5px;margin-left: 285px;font-size: 14px;line-height: 20px;text-align: center;vertical-align: middle;cursor: pointer;box-shadow: inset 0 1px 0 rgba(255, 255, 255, 0.2), 0 1px 2px rgba(0, 0, 0, 0.05);border-radius: 4px;}.btn-danger {color: #fff;background-color: #da4f49;border: 1px solid #bd362f;}.btn-edit {color: #fff;background-color: skyblue;border: 1px solid rgb(23, 99, 129);}.btn-danger:hover {color: #fff;background-color: #bd362f;}.btn:focus {outline: none;}.todo-container {width: 600px;margin: 0 auto;}.todo-container .todo-wrap {padding: 10px;border: 1px solid #ddd;border-radius: 5px;}
</style>

5 过度与动画
5.1 理解
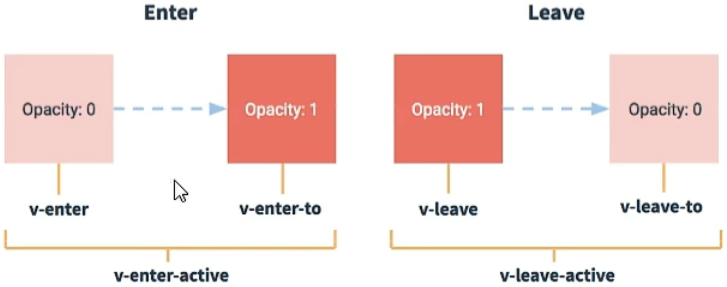
- 作用:在插入、更新或移除 DOM元素时,在合适的时候给元素添加样式类名。
- 图示:
- 写法:
1> 准备好样式:
元素进入的样式:
1. v-enter:进入的起点
2. v-enter-active:进入过程中
3. v-enter-to:进入的终点
元素离开的样式:
1. v-leave:离开的起点
2. v-leave-active:离开过程中
3. v-leave-to:离开的终点
2> 使用<transition>包裹要过度的元素,并配置name属性:

3> 备注:若有多个元素需要过度,则需要使用:<transition-group>,且每个元素都要指定key。 - 代码示例:
1> main.js代码:
// 引入Vue
import Vue from 'vue'
// 引入App
import App from './App.vue'
// 关闭Vue的生产提示
Vue.config.productionTip = false// 创建vm
new Vue({el:'#app',render: h => h(App)
})
2> App.vue代码:
<template><div><Test/><Test2/><Test3/></div>
</template><script>import Test from './components/Test.vue'import Test2 from './components/Test2.vue'import Test3 from './components/Test3.vue'export default {name:'App',components:{Test,Test2,Test3},}
</script>
3> Test.vue代码:
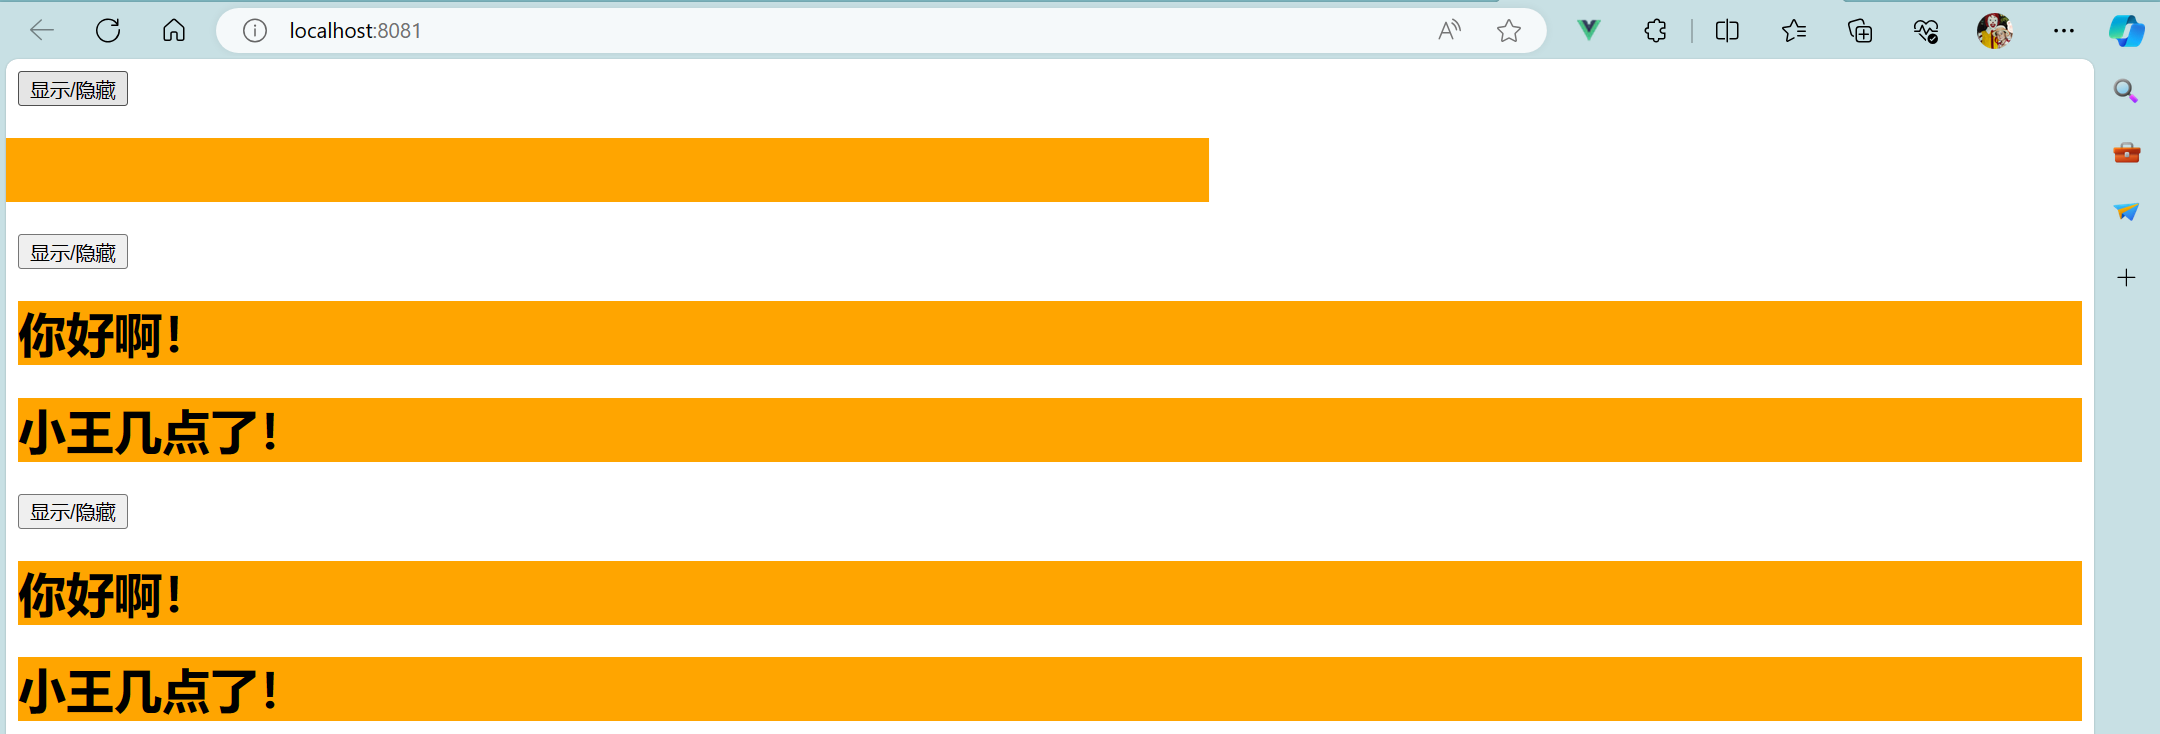
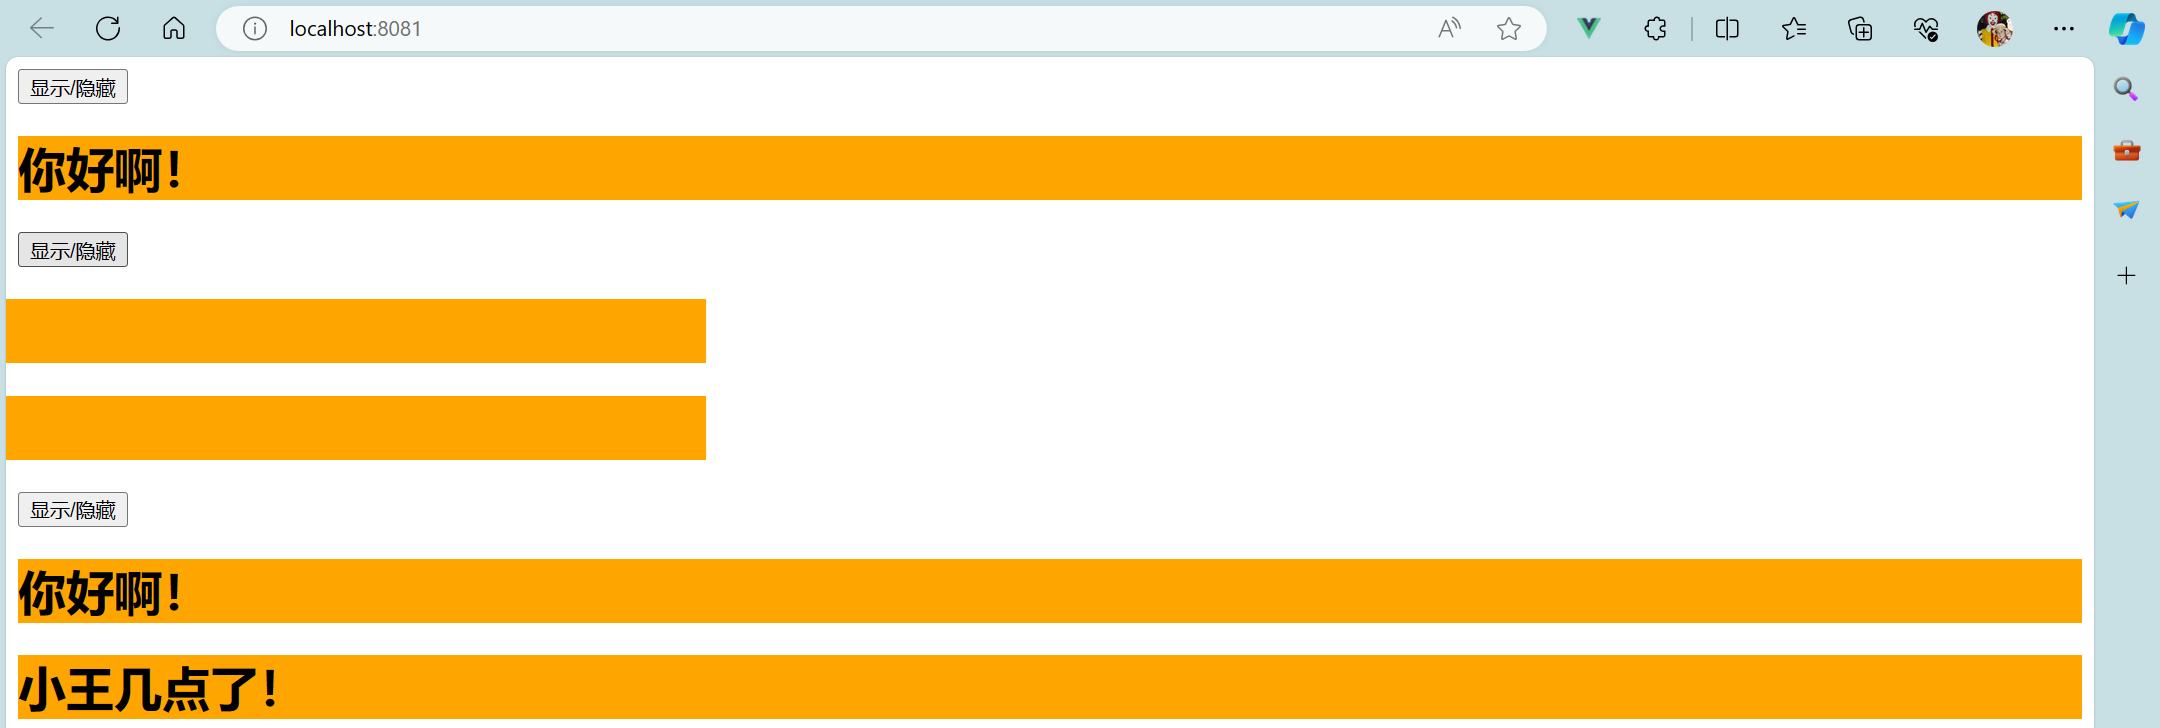
<template><div><button @click="isShow = !isShow">显示/隐藏</button><transition name="hello" :appear="true"> <!-- appear控制h1一上来就滑入 --><h1 v-show="isShow">你好啊!</h1></transition></div>
</template><script>export default {name:'Test',data() {return {isShow:true}}}
</script><style scoped>h1 {background-color: orange;}/* 动画样式 用动画写 *//* 来 */.hello-enter-active {animation: atguigu 1s linear; /* linear 匀速 */}/* 去 */.hello-leave-active {animation: atguigu 1s reverse; /* reverse 反转 */}@keyframes atguigu {from {transform: translateX(-100%);}to {transform: translateX(0);}}
</style>
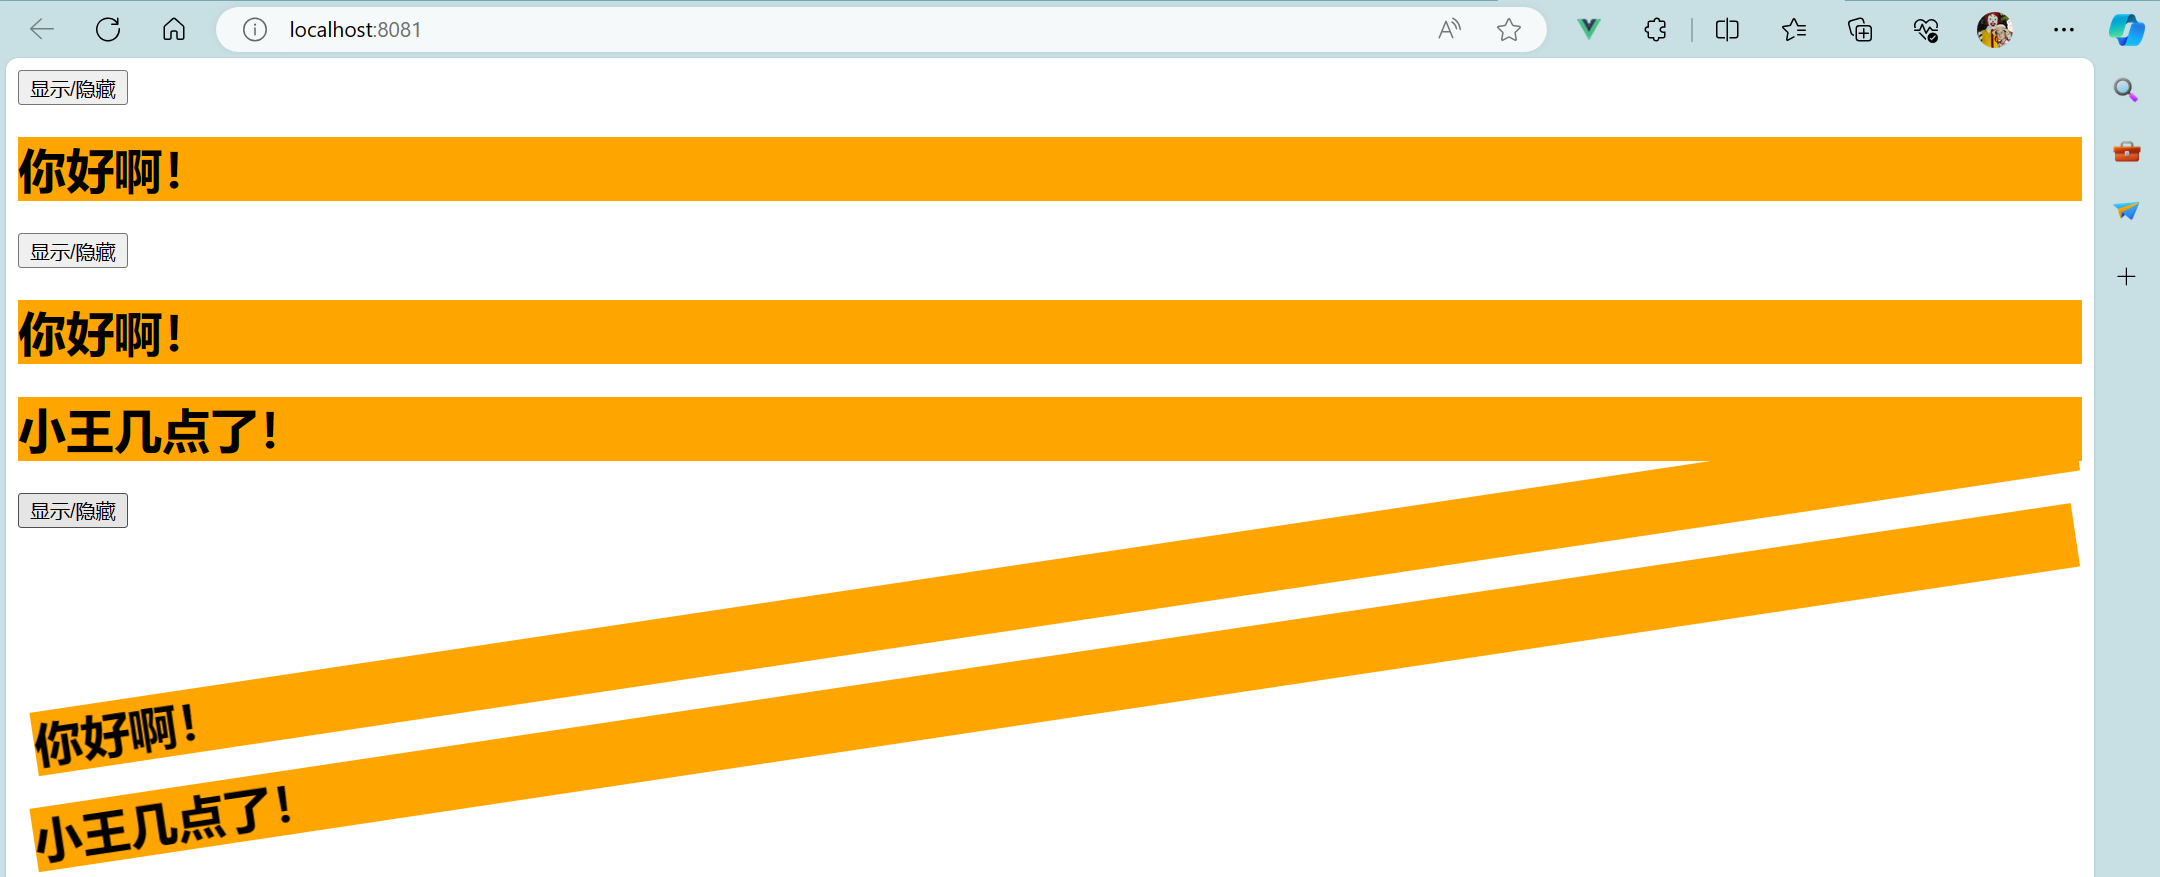
4> Test2.vue代码:
<template><div><button @click="isShow = !isShow">显示/隐藏</button><!-- 单个元素过度 --><!-- <transition name="hello" :appear="true"> --> <!-- appear控制h1一上来就滑入 --><!-- <h1 v-show="isShow">你好啊!</h1> --><!-- </transition> --><!-- 多个元素过度 --><transition-group name="hello" :appear="true"> <!-- appear控制h1一上来就滑入 --><h1 v-show="isShow" key="1">你好啊!</h1><h1 v-show="isShow" key="2">小王几点了!</h1></transition-group></div>
</template><script>export default {name:'Test',data() {return {isShow:true}}}
</script><style scoped>h1 {background-color: orange;/* transition: 1s linear;  放在下面*/}/* 动画样式 用过度写 *//* 来 *//* 进入的起点、离开的终点 */.hello-enter, .hello-leave-to {transform: translateX(-100%);}/* 进入过程中 */.hello-enter-active, .hello-leave-active {transition: 1s linear;}/* 进入的终点、离开的起点 */.hello-enter-to, .hello-leave {transform: translateX(0);}/* 去 *//* 离开的起点 *//* .hello-leave {transform: translateX(0);} *//* 离开的终点 *//* .hello-leave-to {transform: translateX(-100%);} */</style>
5> Test3.vue代码:
<template><div><button @click="isShow = !isShow">显示/隐藏</button><!-- 多个元素过度 --><transition-group:appear="true" name="animate__animated animate__bounce" enter-active-class="animate__swing"leave-active-class="animate__backOutUp"><h1 v-show="isShow" key="1">你好啊!</h1><h1 v-show="isShow" key="2">小王几点了!</h1></transition-group></div>
</template><script>// 引入第三方库import 'animate.css'export default {name:'Test',data() {return {isShow:true}}}
</script><style scoped>h1 {background-color: orange;}
</style>

5.2 TodoList案例——动画
- 方法一 修改MyItem.vue代码:
<template><transition name="todo" appear="true"><li><label><!-- 写法一 --><!-- <input type="checkbox" :checked="todo.done" @click="handleCheck(todo.id)"/>  :checked="true" 给input指定一个checked选项,如为true,拥有checked,如为false,则没有checked--><!-- 写法二 --><input type="checkbox" :checked="todo.done" @change="handleCheck(todo.id)"/><!-- 写法三 此写法直接合并后两项 不用App插件将数据传给MyList再传给MyItem 不推荐此写法 因为props是只读的 不建议修改--><!-- <input type="checkbox" v-model="todo.done"/> --><span v-show="!todo.isEdit">{{todo.title}}</span><input type="text" v-show="todo.isEdit" :value="todo.title" @blur="handleBlur(todo,$event)" ref="inputTitle"></label><button class="btn btn-danger" @click="handleDelete(todo.id)">删除</button><button v-show="!todo.isEdit" class="btn btn-edit" @click="handleEdit(todo)">编辑</button></li></transition>
</template><script>import pubsub from 'pubsub-js'export default {name:'MyItem',// 声明接收todo对象// props:['todo','checkTodo','deleteTodo'],// 采用全局事件总线方法改为:props:['todo'],methods:{// 勾选or取消勾选handleCheck(id) {// console.log(id);// 通知App组件将对应的todo对象的done值取反// this.checkTodo(id)// 采用全局事件总线方法改为:this.$bus.$emit('checkTodo',id)}, // 删除handleDelete(id) {// confirm根据用户的交互 确定布尔值为真还是假if(confirm('确定删除吗?')) {// console.log(id);// this.deleteTodo(id)// 采用全局事件总线方法改为:// this.$bus.$emit('deleteTodo',id)// 采用消息订阅与发布方法此处改为:pubsub.publish('deleteTodo',id)}},// 编辑handleEdit(todo) {// todo.isEdit = true // 此写法可以改值 但没有getter和setter// 利用列表渲染中的vue.set// this.$set(todo,'isEdit',true)// 第一次加上isEdit属性 后面无需再加 因此使用if语句// 如果todo身上有isEdit 直接改 如果todo身上没有isEdit 先添加此属性再赋值if('isEdit' in todo) {todo.isEdit = true} else {this.$set(todo,'isEdit',true)}this.$nextTick(function() {// nextTick指定的回调 会在dom节点更新完毕后执行this.$refs.inputTitle.focus() // 获取焦点}) },// 失去焦点回调(真正执行修改逻辑)handleBlur(todo,e){todo.isEdit = falseif(!e.target.value.trim()) return alert('输入不能为空!') // trim()函数用于删除字符串的头尾空白符this.$bus.$emit('updateTodo',todo.id,e.target.value)}}}
</script><style scoped>/*item*/li {list-style: none;height: 36px;line-height: 36px;padding: 0 5px;border-bottom: 1px solid #ddd;}li label {float: left;cursor: pointer;}li label input {vertical-align: middle;margin-right: 6px;position: relative;top: -1px;}li button {float: right;display: none; margin-top: 3px; margin-left: 5px;}li:before {content: initial;}li:last-child {border-bottom: none;}li:hover {background-color: #ddd;}li:hover button {display: block;}/* 添加动画效果 */.todo-enter-active {animation: atguigu 0.5s linear;}.todo-leave-active {animation: atguigu 0.5s linear reverse;}@keyframes atguigu {from {transform: translateX(100%);}to {transform: translateX(0);}}
</style>
- 方法二 修改MyList.vue代码:
<template><ul class="todo-main"><transition-group><MyItem v-for="todoObj in todos" :key="todoObj.id" :todo="todoObj" /></transition-group></ul>
</template><script>import MyItem from './MyItem.vue'export default {name:'MyList',components: {MyItem},// props:['todos','checkTodo','deleteTodo'] // 接收数据// 采用全局事件总线方法改为:props:['todos']}
</script><style scoped>/*main*/.todo-main {margin-left: 0px;border: 1px solid #ddd;border-radius: 2px;padding: 0px;}.todo-empty {height: 40px;line-height: 40px;border: 1px solid #ddd;border-radius: 2px;padding-left: 5px;margin-top: 10px;}/* 添加动画效果 */.todo-enter-active {animation: atguigu 0.5s linear;}.todo-leave-active {animation: atguigu 0.5s linear reverse;}@keyframes atguigu {from {transform: translateX(100%);}to {transform: translateX(0);}}
</style>
相关文章:
【组件自定义事件+全局事件总线+消息订阅与发布+TodoList案例——编辑+过度与动画】
组件自定义事件全局事件总线消息订阅与发布TodoList案例——编辑过度与动画 1 组件自定义事件1.1 绑定1.2 解绑1.3 总结1.4 TodoList案例——自定义事件 2 全局事件总线2.1 理解2.2 步骤2.3 TodoList案例——事件总线 3 消息订阅与发布3.1 理解3.2 TodoList案例——消息的订阅与…...
【带头学C++】----- 三、指针章 ---- 3.11 补充重要指针知识(二,拓展基础知识)
1.指针与函数 1.1指针变量作为函数的参数 如果想在函数内部修改外部变量的值,可以将外部变量的地址传递给函数。 在C/C中,函数的参数传递方式有值传递(传递变量的副本)和引用传递(传递变量的地址)。如果希…...
Jmeter分布式性能测试细节+常见问题解决,资深老鸟带你避坑...
目录:导读 前言一、Python编程入门到精通二、接口自动化项目实战三、Web自动化项目实战四、App自动化项目实战五、一线大厂简历六、测试开发DevOps体系七、常用自动化测试工具八、JMeter性能测试九、总结(尾部小惊喜) 前言 Jmeter分布式测试…...
动态表单获取某一项值
<template><div><el-form :model"form" :rules"rules" ref"form"><el-row v-for"(item,index) in form.list" :key"index"><el-col :span"6"><el-form-item label"用户名称…...

短路表达式
什么是短路表达式 作为"&&"和"||"操作符的操作数表达式,这些表达式在进行求值时,只要最终的结果已经可以确定是真或假,求值过程便告终止,这称之为短路求值。这是这两个操作符的一个重要属性。 而在j…...
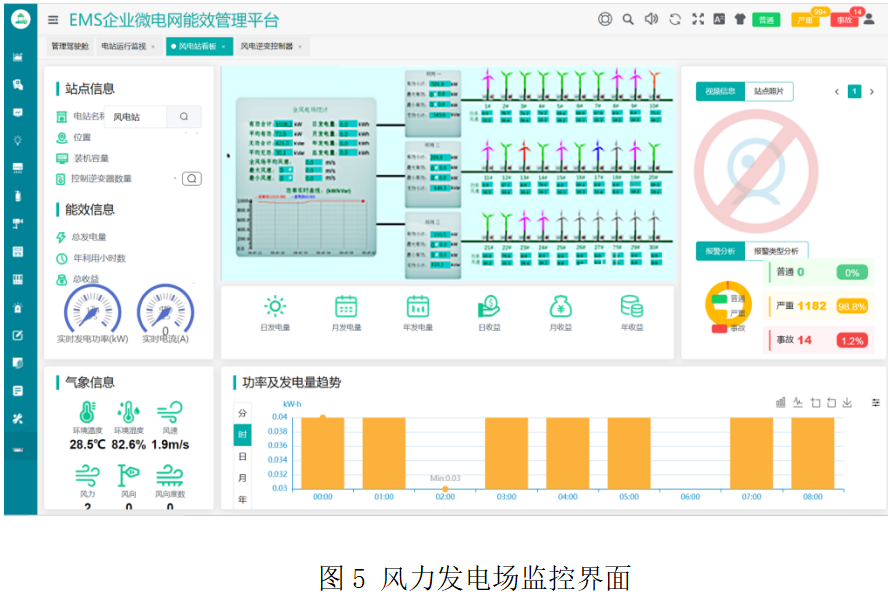
风力发电场集中监控系统解决方案
安科瑞 崔丽洁 作为清洁能源之一,风力发电场近几年装机容量快速增长。8月17日,国家能源局发布1-7月份全国电力工业统计数据。截至7月底,全国累计发电装机容量约27.4亿千瓦,同比增长11.5%。其中,太阳能发电装机容量约4.…...
SpringDataJpa(二)
三、Spring Data JPA概述 Spring Data JPA 是 Spring 基于 ORM 框架、JPA 规范的基础上封装的一套JPA应用框架,可使开发者用极简的代码即可实现对数据库的访问和操作。它提供了包括增删改查等在内的常用功能,且易于扩展!学习并使用 Spring D…...

软件测评中心▏软件功能测试和非功能测试的区别和联系简析
在软件开发的过程中,功能测试和非功能测试是两个重要的环节。功能测试是指对软件的各项功能进行验证和确认,关注软件是否按照需求规格说明书进行了实现,是否满足了用户的功能需求。而非功能测试是指对软件的性能、可靠性、安全性等方面进行测…...

打卡系统有什么用?如何通过日常管理系统提高企业员工的效率?
在当今快速发展的时代,职工的行动管理已成为机构单位工作中至关重要的一环。如何更好地了解和掌握职工的日程安排和行动轨迹,成为了一个值得探讨的问题。为了解决这一难题,“的修”打卡系统应运而生,它为我们提供了一个全面而高效…...
png怎么转jpg?这款图片转格式工具一学就会用
虽然png图片格式是一种无损压缩格式,但是png图片的内存大小也是比较大的,而且兼容性上也没有jpg图片好,许多平台推荐的也都是jpg格式,所以当我们需要把png转jpg格式的时候,就需要用到图片格式转换器,今天推…...
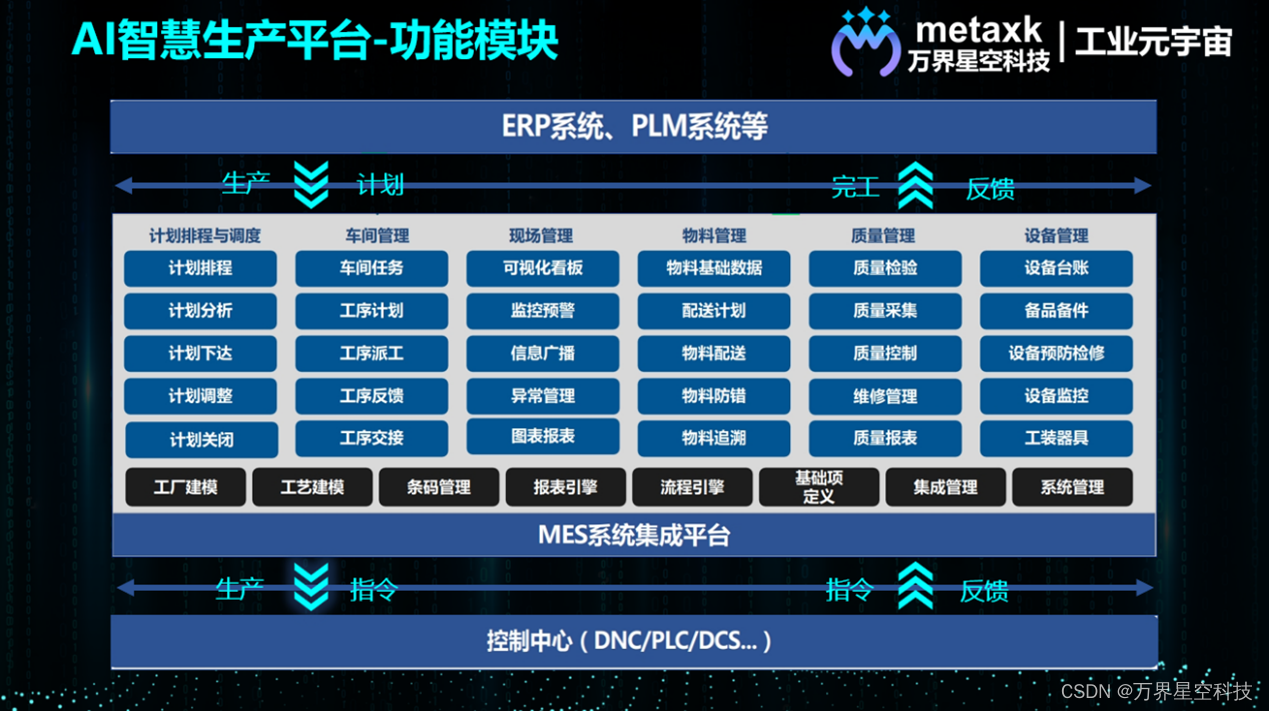
万界星空科技MES系统软件体系架构及应用
MES系统是数字化车间的核心。MES通过数字化生产过程控制,借助自动化和智能化技术手段,实现车间制造控制智能化、生产过程透明化、制造装备数控化和生产信息集成化。生产管理MES系统主要包括车间管理系统、质量管理系统、资源管理系统及数据采集和分析系统…...

uniapp h5实现Excel、Word、PDF文件在线预览,而不是跳转下载,也不需要下载
实现方案 word,微软 Office Web Viewer const url https://view.officeapps.live.com/op/view.aspx?src${encodeURIComponent(https://501351981.github.io/vue-office/examples/dist/static/test-files/test.docx)} window.open(url) //新建窗口打开链接预览 /…...
台式电脑一键重装Win10系统详细教程
很多用户都在使用台式Win10电脑办公,如果电脑出现系统问题无法解决了,这时候就可以考虑给电脑重装系统哦,下面小编给大家详细介绍关于台式电脑一键重装Win10系统的步骤方法,安装后电脑就能恢复正常,也不会影响到用户的…...

图像相机-相机属性SDK汇总设置
文章目录 彩色相机设置彩色分辨率设置(TY_ENUM_IMAGE_MODE)彩色模拟增益(TY_INT_ANALOG_GAIN)彩色曝光(TY_INT_EXPOSURE_TIME)彩色增益彩色畸变 深度相机设置深度分辨率(TY_ENUM_IMAGE_MODE&…...

使用ffmpeg调用电脑自带的摄像头和扬声器录制音视频
1、打开cmd,执行chcp 65001,修改cmd的编码格式为utf8,避免乱码 2、执行指令ffmpeg -list_devices true -f dshow -i dummy,查看当前window的音频和视频名称 3、打开windows系统的"打开声音设置"–“麦克风隐私设置”–"允许应用访问你…...
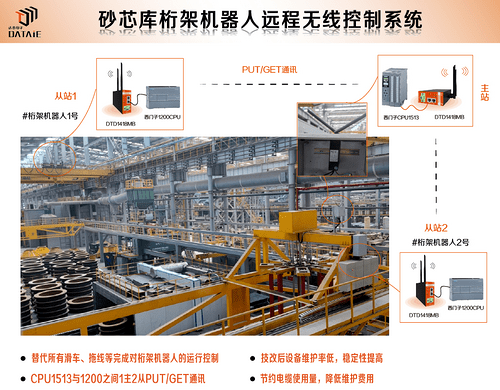
工业物联网模块应用之砂芯库桁架机器人远程无线控制
一、应用背景 在铸管车间无线技改项目中,客户需要构建智能化砂芯库,要求各库存的规格、数量、位置坐标等数据实时可显。此外,还需具备自动入库及出库功能,用于将出炉后的成摞砂芯及时码放至砂芯库的预设位置,当离心机…...

Ubuntu安装.Net SDK
参考微软文档:在 Linux 上安装 .NET选择自己对应系统版本的链接辅助即可。 我这里使用的是 Ubuntu 20.04,因为在这个版本.Net 在Ubuntu包源存储库中不可用,需要手动添加Microsoft包存储库。 使用 APT 进行安装可通过几个命令来完成。 安装 …...
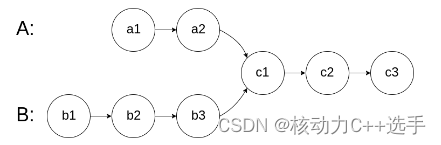
相交链表~
题目描述 给你两个单链表的头节点 headA和headB,请你找出并返回两个单链表相交的起始节点。如果两个链表不存在相交节点,返回 null。图示两个链表在节点 c1 开始相交: 题目数据保证整个链式结构中不存在环。注意,函数返回结果后&…...

跨境电商API接口如何通过API数据接口进行选品
一、了解API及其重要性 API,即应用程序接口,是一种提供给开发者使用的工具,使他们能够通过编程方式访问和操作另一个应用程序的功能。在跨境电商领域,API通常被用于连接电商平台、支付系统、物流服务等,以实现数据的共…...

代码切换NLP技术:挑战、演进与应用实践
1. 代码切换NLP的现状与挑战代码切换(Code-Switching, CSW)是多语言社会中的普遍现象,指说话者在同一对话中交替使用两种或多种语言。这种现象在社交媒体对话、日常交流等场景中尤为常见。例如,印度用户经常混合使用印地语和英语&…...

量子误差缓解中的线性回归与Lasso优化原理
1. 量子误差缓解中的线性回归与Lasso优化原理量子计算中的误差主要来源于量子比特与环境相互作用导致的退相干、门操作误差以及测量误差。量子误差缓解(Quantum Error Mitigation, QEM)技术通过后处理方式修正这些误差,而非量子纠错ÿ…...

考场信号屏蔽器分布式天馈系统手机信号屏蔽器
在当今信息时代,保障特定场所的信息安全至关重要。中科星月的分布式信号屏蔽器,凭借其卓越性能,成为众多场所的理想选择。多场景适用,解决信号屏蔽难题中科星月的分布式信号屏蔽器可屏蔽 2.3.4.5G 手机信号,适用于军营…...

OpCore Simplify:15分钟搞定黑苹果OpenCore配置的终极方案
OpCore Simplify:15分钟搞定黑苹果OpenCore配置的终极方案 【免费下载链接】OpCore-Simplify A tool designed to simplify the creation of OpenCore EFI 项目地址: https://gitcode.com/GitHub_Trending/op/OpCore-Simplify 还在为复杂的黑苹果配置而头疼吗…...

51note.cn撸猫记:程序员专属的免费效率工具平台
作为一名程序员,效率工具的选择至关重要。今天给大家介绍一个专为程序员设计的免费效率工具平台——51note.cn(撸猫记)。## 平台概述51note.cn是一个集笔记管理、任务提醒、日历规划和开发工具箱于一体的免费效率工具平台。平台采用本地处理机…...

如何加入DevDocs合作伙伴计划:打造技术文档生态系统的完整指南
如何加入DevDocs合作伙伴计划:打造技术文档生态系统的完整指南 【免费下载链接】devdocs API Documentation Browser 项目地址: https://gitcode.com/GitHub_Trending/de/devdocs DevDocs作为一款强大的API文档浏览器,致力于为开发者提供集中、高…...

深度滤波架构革新:全频段实时语音增强的系统设计与实现
深度滤波架构革新:全频段实时语音增强的系统设计与实现 【免费下载链接】DeepFilterNet Noise supression using deep filtering 项目地址: https://gitcode.com/GitHub_Trending/de/DeepFilterNet 在远程通信、语音交互和音频处理领域,背景噪声一…...

FanControl终极指南:5分钟掌握Windows风扇控制神器,告别噪音与高温烦恼
FanControl终极指南:5分钟掌握Windows风扇控制神器,告别噪音与高温烦恼 【免费下载链接】FanControl.Releases This is the release repository for Fan Control, a highly customizable fan controlling software for Windows. 项目地址: https://git…...

Depth-Anything-V2:开启单目深度估计新纪元
Depth-Anything-V2:开启单目深度估计新纪元 【免费下载链接】Depth-Anything-V2 [NeurIPS 2024] Depth Anything V2. A More Capable Foundation Model for Monocular Depth Estimation 项目地址: https://gitcode.com/gh_mirrors/de/Depth-Anything-V2 在计…...

Audiveris乐谱识别完全指南:三步将纸质乐谱变为数字音乐
Audiveris乐谱识别完全指南:三步将纸质乐谱变为数字音乐 【免费下载链接】audiveris Latest generation of Audiveris OMR engine 项目地址: https://gitcode.com/gh_mirrors/au/audiveris 你是否曾看着堆积如山的纸质乐谱发愁?想要将它们变成可编…...