SpringBoot自动配置的原理篇,剖析自动配置原理;实现自定义启动类!附有代码及截图详细讲解
SpringBoot 自动配置
Condition
Condition 是在Spring 4.0 增加的条件判断功能,通过这个可以功能可以实现选择性的创建 Bean 操作
思考:SpringBoot是如何知道要创建哪个Bean的?比如SpringBoot是如何知道要创建RedisTemplate的?
演示1:
<dependency><groupId>org.springframework.boot</groupId><artifactId>spring-boot-starter-data-redis</artifactId>
</dependency>
1. 没有添加坐标前,发现为空,报错ConfigurableApplicationContext context =SpringApplication.run(SpringbootCondition01Application.class, args);Object redisTemplate = context.getBean("redisTemplate");System.out.println(redisTemplate);
2. 有添加坐标前,发现有对象ConfigurableApplicationContext context =SpringApplication.run(SpringbootCondition01Application.class, args);Object redisTemplate = context.getBean("redisTemplate");System.out.println(redisTemplate);
疑问,他怎么知道的配置哪个类案例1:
案例1:
Spring的IOC容器中有一个User的Bean现要求:导入Jedis坐标后,加载该Bean,没导入,则不加载
代码实现:
-
POJO实体类:User
public class User { } -
现在对User的加载有条件,不能直接用@Component注入,需要写配置类通过@Bean的方式注入
@Configuration
public class UserConfig {@Bean@Conditional(value = ClassCondition.class)    // 注入条件public User user(){return  new User();}
}
@Conditional中的ClassCondition.class的matches方法,返回true执行以下代码,否则反之
-
创建ClassCondition类实现Condition接口,重写matches方法
public class ClassCondition implements Condition {@Overridepublic boolean matches(ConditionContext context, AnnotatedTypeMetadata metadata) {boolean falg = true;try {Class<?> cls = Class.forName("redis.clients.jedis.Jedis");} catch (ClassNotFoundException e) {falg=false;}return falg;} } -
启动类:
@SpringBootApplication public class SpringbootCondition01Application {public static void main(String[] args) {//启动SpringBoot的应用,返回Spring的IOC容器ConfigurableApplicationContext context = SpringApplication.run(SpringbootCondition01Application.class,args);//获取Bean,redisTemplate//情况1 没有添加坐标前,发现为空//情况2 有添加坐标前,发现有对象Object user = context.getBean("user");System.out.println(user);} } -
测试,通过pom文件中对Jedis坐标是否注释
-
Jedi坐标未注释,可以打印出User对象地址
-
Jedis坐标被注释掉,报错,不打印User对象地址
-
案例二:
在 Spring 的 IOC 容器中有一个 User 的 Bean,现要求:将类的判断定义为动态的。判断哪个字节码文件存在可以动态指定
实现步骤:
- 不使用@Conditional(ClassCondition.class)注解
- 自定义注解@ConditionOnClass,因为他和之前@Conditional注解功能一直,所以直接复制
- 编写ClassCondition中的matches方法
代码实现:
-
POJO实体类User和案例1相同
-
User的注入条件需要改变,使用@ConditionOnClass
@Configuration public class UserConfig {@Bean // @ConditionOnClass(value = "redis.clients.jedis.Jedis") 有jedis坐标注入User@ConditionOnClass(value = {"redis.clients.jedis.Jedis","com.alibaba.fastjson.JSON"}) //jedis和json都有才注入 public User user(){return new User();} } -
重写matches方法
public class ClassCondition implements Condition {@Overridepublic boolean matches(ConditionContext context, AnnotatedTypeMetadata metadata) {Map<String, Object> map = metadata.getAnnotationAttributes(ConditionOnClass.class.getName());System.out.println("map:"+map);String[] value = (String[]) map.get("value");boolean isok = true;try {for(String val : value){Class<?> cls = Class.forName(val);}}catch (ClassNotFoundException e){isok = false;}return isok;} } -
自定义注解
@Target({ElementType.TYPE,ElementType.METHOD})//可以修饰在类与方法上 @Retention(RetentionPolicy.RUNTIME)//注解生效节点runtime @Documented//生成文档 @Conditional(value = ClassCondition.class) public @interface ConditionOnClass {String[] value(); //设置此注解的属性redis.clients.jedis.Jedis } -
启动类
@SpringBootApplication public class SpringbootCondition02Application {public static void main(String[] args) {ConfigurableApplicationContext context = SpringApplication.run(SpringbootCondition02Application.class, args);Object user = context.getBean("user");System.out.println(user);} } -
测试:通过pom文件中的Jedis和JSON坐标测试
- Jedis和JSON坐标都有:打印User对象地址
- 只有一个坐标或者都没有:报错,不打印User对象地址
Condition总结
自定义条件:
- 定义条件类:自定义类实现Condition接口,重写 matches 方法,在 matches 方法中进行逻辑判断,返回boolean值 。matches 方法两个参数:
- context:上下文对象,可以获取属性值,获取类加载器,获取BeanFactory等。
- metadata:元数据对象,用于获取注解属性。
- 判断条件: 在初始化Bean时,使用 @Conditional(条件类.class)注解
SpringBoot提供的常用条件注解:
一下注解在springBoot-autoconfigure的condition包下
- ConditionalOnProperty:判断配置文件中是否有对应属性和值才初始化Bean
- ConditionalOnClass:判断环境中是否有对应字节码文件才初始化Bean
- ConditionalOnMissingBean:判断环境中没有对应Bean才初始化Bean
- ConditionalOnBean:判断环境中有对应Bean才初始化Bean
@Enable注解
SpringBoot中提供了很多Enable开头的注解,这些注解都是用于动态启用某些功能的。而其底层原理是使用@Import注 解导入一些配置类,实现Bean的动态加载
思考 SpringBoot 工程是否可以直接获取jar包中定义的Bean?
@Enable的底层核心:@Import
@Enable底层依赖于@Import注解导入一些类,使用@Import导入的类会被Spring加载到IOC容器中。而@Import提供4中用法:
- 导入Bean
- 导入配置类
- 导入 ImportSelector 实现类。一般用于加载配置文件中的类
- 导入 ImportBeanDefinitionRegistrar 实现类
导入Bean
代码实现:
需要用到多模块编程,项目结构如图:
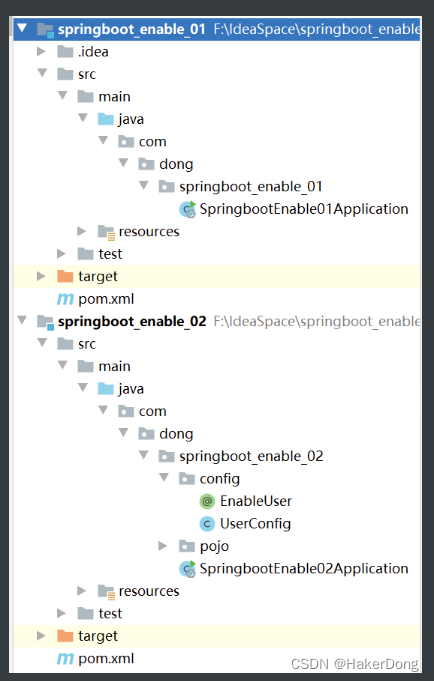
springboot_enable_02:
-
springboot项目,pom文件不需要格外到坐标
-
User
public class User { } -
UserConfig
@Configuration public class UserConfig {@Beanpublic User user(){return new User();} } -
EnableUser自定义注解
@Target(ElementType.TYPE) @Retention(RetentionPolicy.RUNTIME) @Documented @Import(UserConfig.class) public @interface EnableUser { } -
启动类
@SpringBootApplication
public class SpringbootEnable02Application {public static void main(String[] args) {ConfigurableApplicationContext context = SpringApplication.run(SpringbootEnable02Application.class, args);Object user = context.getBean("user");   // enable_02中肯定能取到UserSystem.out.println(user);}
}
springboot_enable_01:
-
pom文件导入springboot_enable_02的gav:
<dependency><groupId>org.springframework.boot</groupId><artifactId>spring-boot-starter-web</artifactId> </dependency><dependency><groupId>org.springframework.boot</groupId><artifactId>spring-boot-starter-test</artifactId><scope>test</scope> </dependency><!--模块2--> <dependency><groupId>com.dong</groupId><artifactId>springboot_enable_02</artifactId><version>0.0.1-SNAPSHOT</version> </dependency> -
测试:
//@Import(User.class)
//@Import(UserConfig.class)
//@EnableUser
@ComponentScan("com.dong.springboot_enable_02.config")
@SpringBootApplication
public class SpringbootEnable01Application {public static void main(String[] args) {ConfigurableApplicationContext context = SpringApplication.run(SpringbootEnable01Application.class, args);Object user = context.getBean(User.class);System.out.println(user);}
}
因为enable_01导如了enable_02的坐标,相当是把02的所有代码拷贝在与01的启动类同级目录下,如果包名和包的层级都相同,就可以直接装配User类,但是包的层级不同就必须加注解
-
@Import(User.class):对应第一个使用场景
导入02中的User类
-
@Import(UserConfig.class):对应第二个使用场景
加载02中的UserConfig配置类,加载配置类中所有的方法和类
-
@EnableUser:
自定义的注解,包装了一个@Import(User.class)
-
@ComponentScan(“com.dong.springboot_enable_02.config”):
扫描包,加载类和配置类
-
导入配置类
见上方示例的@Import(UserConfig.class),导入配置类加载配置类中所有的方法和类
导入ImportSelector 实现类
导入 ImportBeanDefinitionRegistrar 实现类
ImportSelector 和 ImportBeanDefinitionRegistrar 一起演示
代码实现:
项目结构
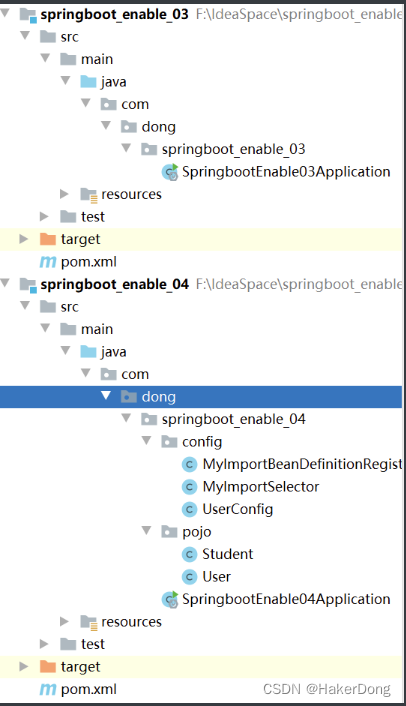
springboot_enable_04
-
springboot项目,pom文件不需要额外到坐标
-
POJO
实体类:User
public class User {
}
Student
public class Student { } -
UserConfig配置类
@Configuration public class UserConfig {@Beanpublic User user(){return new User();} } -
MyImportSelector
public class MyImportSelector implements ImportSelector {@Overridepublic String[] selectImports(AnnotationMetadata importingClassMetadata) {return new String[]{"com.dong.springboot_enable_04.pojo.User","com.dong.springboot_enable_04.pojo.Student"};} } -
MyImportBeanDefinitionRegistrar
public class MyImportBeanDefinitionRegistrar implements ImportBeanDefinitionRegistrar {@Overridepublic void registerBeanDefinitions(AnnotationMetadata importingClassMetadata, BeanDefinitionRegistry registry) {AbstractBeanDefinition beanDefinition = BeanDefinitionBuilder.rootBeanDefinition(User.class).getBeanDefinition();registry.registerBeanDefinition("user1",beanDefinition);}
}
springboot_enable_03
-
springboot_enable_03pom文件导入springboot_enable_04坐标
<dependencies><dependency><groupId>org.springframework.boot</groupId><artifactId>spring-boot-starter-web</artifactId></dependency><dependency><groupId>org.springframework.boot</groupId><artifactId>spring-boot-starter-test</artifactId><scope>test</scope></dependency><!--springboot_enable_04坐标--><dependency><groupId>com.dong</groupId><artifactId>springboot_enable_04</artifactId><version>0.0.1-SNAPSHOT</version></dependency> </dependencies> -
测试:启动类
@ComponentScan("com.dong.springboot_enable_04.config") @Import(User.class) @Import(UserConfig.class) @Import(MyImportSelector.class) @Import(MyImportBeanDefinitionRegistrar.class) @SpringBootApplication public class SpringbootEnable03Application {public static void main(String[] args) {ConfigurableApplicationContext context = SpringApplication.run(SpringbootEnable03Application.class, args);User user = context.getBean(User.class);System.out.println(user);Student student = context.getBean(Student.class);System.out.println(student);User user1 = (User) context.getBean("user1");System.out.println(user1);} }-
@Import(MyImportSelector.class):对应第三个使用场景
MyImportSelector实现了ImportSelector接口,重写了selectImports方法,在字符出数组中的完全相对路径即注入了容器,因为引入了enable_04,所以03中可以获取到User和Student
-
@Import(MyImportBeanDefinitionRegistrar.class):对应第四个使用场景
MyImportBeanDefinitionRegistrar实现了ImportBeanDefinitionRegistrar接口,registerBeanDefinitions方法,在此方法中就可以对Bean进行注册,如案例演示,04注入了一个User对象,id是user1,所以03中就可以获取到User这个对象,打印出地址
-
@EnableAutoConfiguration注解
-
主启动类
//@SpringBootApplication 来标注一个主程序类 //说明这是一个Spring Boot应用 @SpringBootApplication public class SpringbootApplication {public static void main(String[] args) {//以为是启动了一个方法,没想到启动了一个服务SpringApplication.run(SpringbootApplication.class, args);} } -
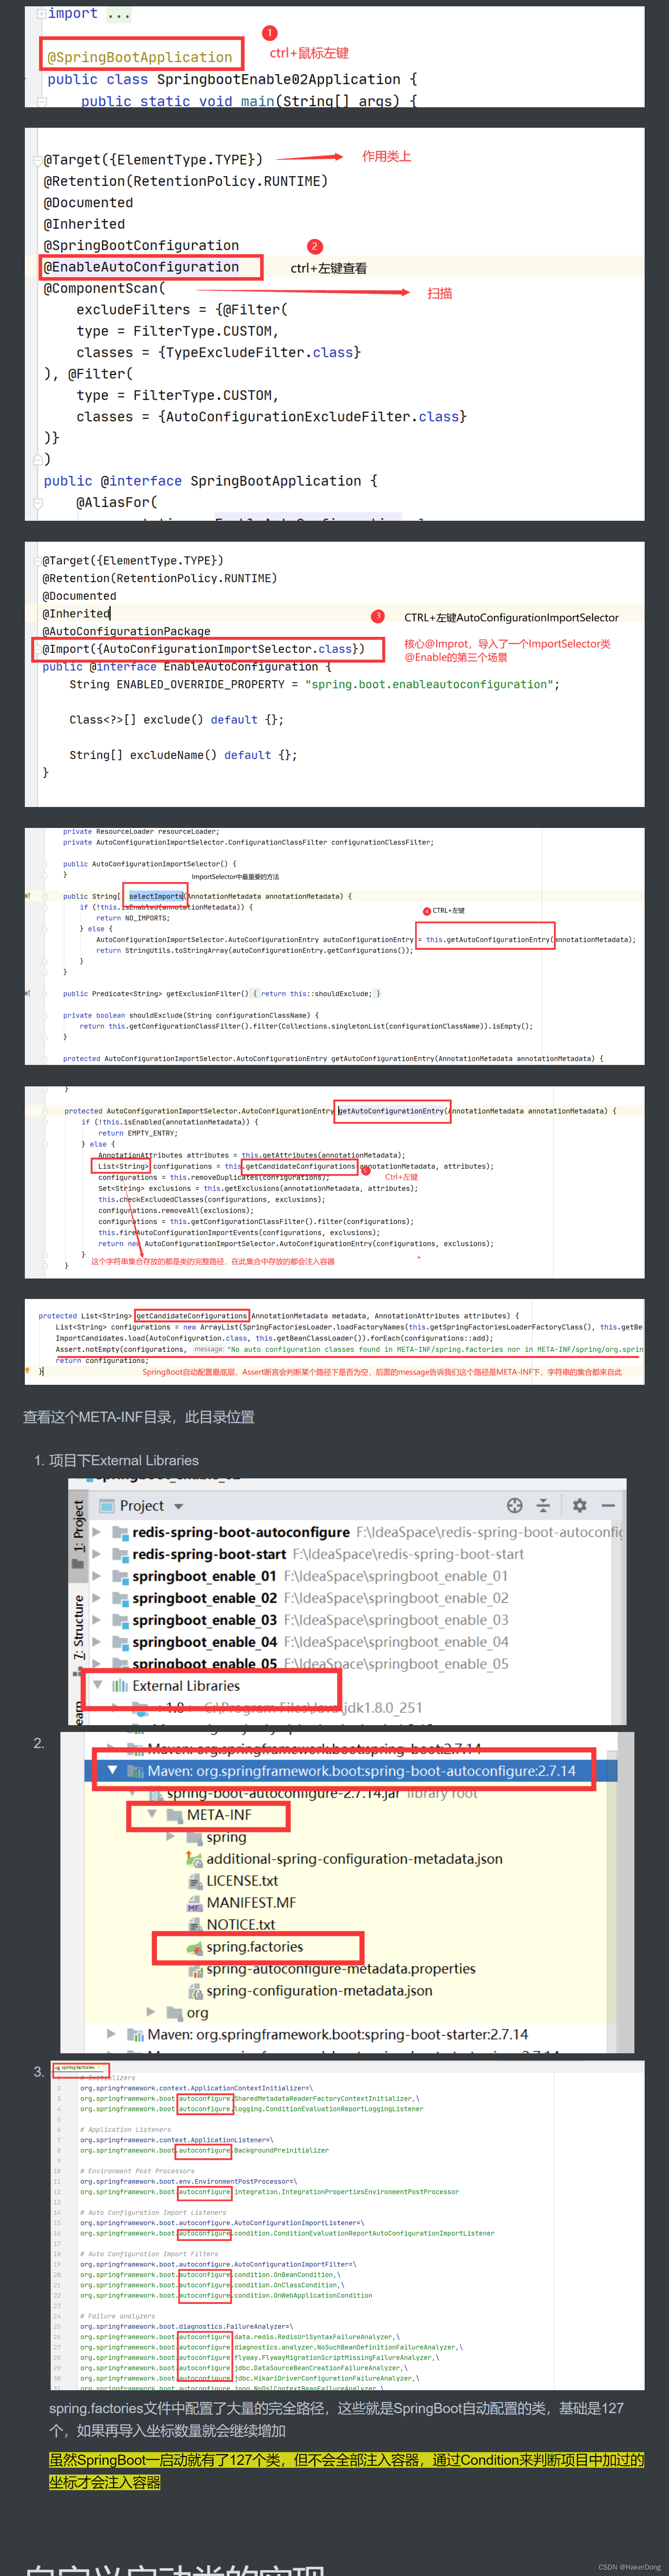
@SpringBootApplication注解内部
@SpringBootConfiguration @EnableAutoConfiguration @ComponentScan(excludeFilters = {@Filter(type = FilterType.CUSTOM,classes = {TypeExcludeFilter.class} ), @Filter(type = FilterType.CUSTOM,classes = {AutoConfigurationExcludeFilter.class} )} ) public @interface SpringBootApplication { // ...... }-
@ComponentScan
这个注解在Spring中很重要 ,它对应XML配置中的元素。
作用:自动扫描并加载符合条件的组件或者bean , 将这个bean定义加载到IOC容器中
-
@SpringBootConfiguration
作用:SpringBoot的配置类 ,标注在某个类上 , 表示这是一个SpringBoot的配置类;
//@SpringBootConfiguration注解内部
//这里的 @Configuration,说明这是一个配置类 ,配置类就是对应Spring的xml 配置文件;
@Configuration
public @interface SpringBootConfiguration {}
//里面的 @Component 这就说明,启动类本身也是Spring中的一个组件而已,负责启动应用
@Component
public @interface Configuration {}
-
-
AutoConfigurationPackage :自动配置包
//AutoConfigurationPackage的子注解 //Registrar.class 作用:将主启动类的所在包及包下面所有子包里面的所有组件扫描到Spring容器 @Import({Registrar.class}) public @interface AutoConfigurationPackage { } -
@EnableAutoConfiguration开启自动配置功能
以前我们需要自己配置的东西,而现在SpringBoot可以自动帮我们配置 ;@EnableAutoConfiguration告诉SpringBoot开启自动配置功能,这样自动配置才能生效;
@Import({AutoConfigurationImportSelector.class}):给容器导入组件 ;
AutoConfigurationImportSelector :自动配置导入选择器,给容器中导入一些组件
AutoConfigurationImportSelector.class↓selectImports方法↓
this.getAutoConfigurationEntry(annotationMetadata)方法↓
this.getCandidateConfigurations(annotationMetadata, attributes)方法↓
方法体:List<String> configurations =
SpringFactoriesLoader.loadFactoryNames(this.getSpringFactoriesLoaderFactoryClass
(), this.getBeanClassLoader());Assert.notEmpty(configurations, "No auto configuration classes found in META-INF/spring.factories. If you are using a custom packaging, make sure that file is correct.");
return configurations;↓
在所有包名叫做autoConfiguration的包下面都有META-INF/spring.factories文件
总结原理:
-
@EnableAutoConfiguration 注解内部使用 @Import(AutoConfigurationImportSelector.class)
来加载配置类。
-
配置文件位置:META-INF/spring.factories,该配置文件中定义了大量的配置类,当 SpringBoot
应用启动时,会自动加载这些配置类,初始化Bean
-
并不是所有的Bean都会被初始化,在配置类中使用Condition来加载满足条件的Bean
SpringBoot自动配置原理扒源代码图解
自定义启动类的实现
案例需求:
自定义redis-starter,要求当导入redis坐标时,SpringBoot自动创建Jedis的Bean
参考:
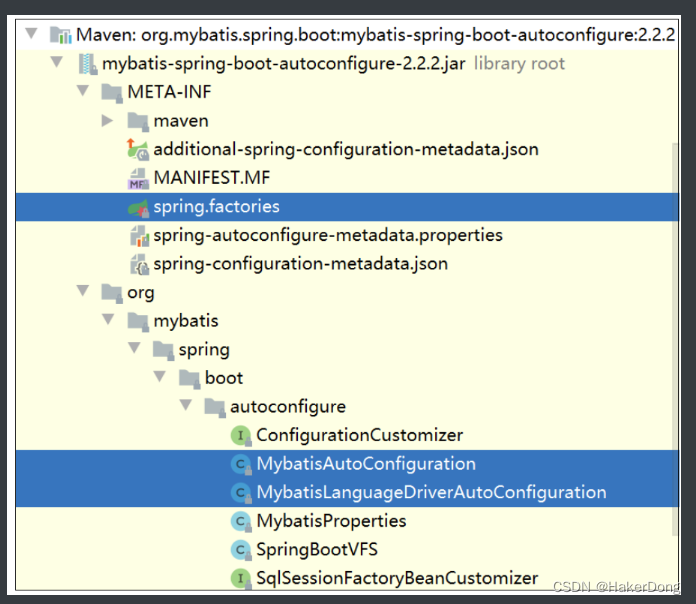
可以参考mybatis启动类的应用
实现步骤:
- 创建redis-spring-boot-autoconfigure模块
- 创建redis-spring-boot-starter模块,依赖redis-spring-boot-autoconfigure的模块
- 在redis-spring-boot-autoconfigure模块中初始化Jedis的Bean,并定义META-INF/spring.factories文件
- 在测试模块中引入自定义的redis-starter依赖,测试获取Jedis的Bean,操作redis
代码实现演示:
目录结构
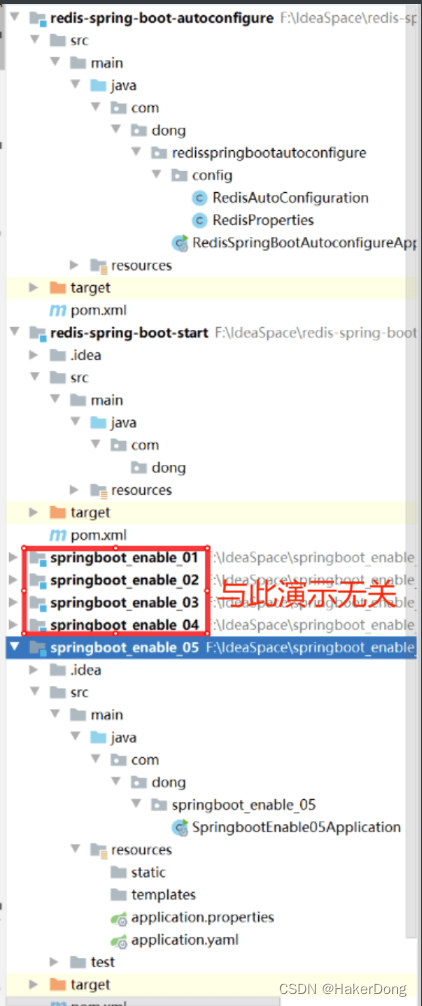
-
redis-spring-boot-autoconfigure模块
-
pom文件
<dependencies><dependency><groupId>redis.clients</groupId><artifactId>jedis</artifactId></dependency><dependency><groupId>org.springframework.boot</groupId><artifactId>spring-boot-starter</artifactId></dependency><!--spring-boot-starter-test注释掉了--> </deendencies> -
RedisAutoConfiguration配置类
@Configuration @EnableConfigurationProperties(RedisProperties.class) public class RedisAutoConfiguration {@Beanpublic Jedis jedis(RedisProperties redisProperties){return new Jedis(redisProperties.getHost(),redisProperties.getPort());} } -
动态获取主机号和端口号的类
@ConfigurationProperties(prefix = "spring.redis") //如果配置文件中有就读取配置文件中的spring.redis下面get、set方法就会对host和port达到动态效果,如果配置文件中没有spring.redis就默认localhost和6379 public class RedisProperties {private String host="localhost";private int port=6379;public String getHost() {return host;}public void setHost(String host) {this.host = host;}public int getPort() {return port;}public void setPort(int port) {this.port = port;} } -
在resources目录下创建META-INF文件夹,下创建spring.factories文件,写入键值
org.springframework.boot.autoconfigure.EnableAutoConfiguration=\com.dong.redisspringbootautoconfigure.config.RedisAutoConfiguration
-
-
redis-spring-boot-start模块
此模块只需要在pom文件中导入上个模块的gav,test文件夹和java下的目录都可以删除
<dependencies><dependency><groupId>org.springframework.boot</groupId><artifactId>spring-boot-starter</artifactId></dependency><!--引入自定义的redis-spring-boot-autoconfigure--><dependency><groupId>com.dong</groupId><artifactId>redis-spring-boot-autoconfigure</artifactId><version>0.0.1-SNAPSHOT</version></dependency> </dependencies> -
测试模块springboot_enable_05
-
pom文件导入redis-spring-boot-start模块gav
<dependencies><dependency><groupId>org.springframework.boot</groupId><artifactId>spring-boot-starter-web</artifactId></dependency><dependency><groupId>org.springframework.boot</groupId><artifactId>spring-boot-starter-test</artifactId><scope>test</scope></dependency><!--导入自定义启动类--><dependency><groupId>com.dong</groupId><artifactId>redis-spring-boot-start</artifactId><version>0.0.1-SNAPSHOT</version></dependency> </dependencies> -
yaml配置文件修改端口
spring:redis:port: 6060 -
测试:
@SpringBootApplication
public class SpringbootEnable05Application {public static void main(String[] args) {ConfigurableApplicationContext context = SpringApplication.run(SpringbootEnable05Application.class, args);Jedis bean = context.getBean(Jedis.class);System.out.println(bean);}
}
输出内容:BinaryJedis{Connection{DefaultJedisSocketFactory{localhost:6060}}}
说明走了我们自定义的启动器
-
相关文章:
SpringBoot自动配置的原理篇,剖析自动配置原理;实现自定义启动类!附有代码及截图详细讲解
SpringBoot 自动配置 Condition Condition 是在Spring 4.0 增加的条件判断功能,通过这个可以功能可以实现选择性的创建 Bean 操作 思考:SpringBoot是如何知道要创建哪个Bean的?比如SpringBoot是如何知道要创建RedisTemplate的?…...

苹果Ios系统app应用程序开发者如何获取IPA文件签名证书时需要注意什么?
今天呢想和大家介绍介绍苹果App开发者如何获取IPA文件签名证书的步骤和注意事项。对于苹果应用程序开发者而言,获取IPA文件签名证书是发布应用程序至App Store的重要步骤之一。签名证书能够确保应用程序的安全性和可信度,并使其能够在设备上正确运行。 …...

算法通关村第七关-黄金挑战二叉树迭代遍历
大家好我是苏麟 , 今天带来二叉树的迭代遍历 . 二叉树的迭代遍历 前序编列 描述 : 给你二叉树的根节点 root ,返回它节点值的 前序 遍历。 题目 : LeetCode 二叉树的前序遍历 : 144. 二叉树的前序遍历 分析 : 前序遍历是中左右,如果还有左子树就一…...
2023-11-Rust
学习方案:Rust程序设计指南 1、变量和可变性 声明变量:let 变量、const 常量 rust 默认变量一旦声明,就不可变(immutable)。当想改变 加 mut(mutable) 。 const 不允许用mut ,只能声明常量,…...

iOS代码混淆----自动
先大致解释一下“编译"、"反编译": 编译:就是把千千万万行字符串(也叫代码,或者源文件),变成010101010101(机器码,也叫目标代码) 编译过程:预处理-编译-汇编-链接 我的脚本运行在预处理阶段。 反编…...
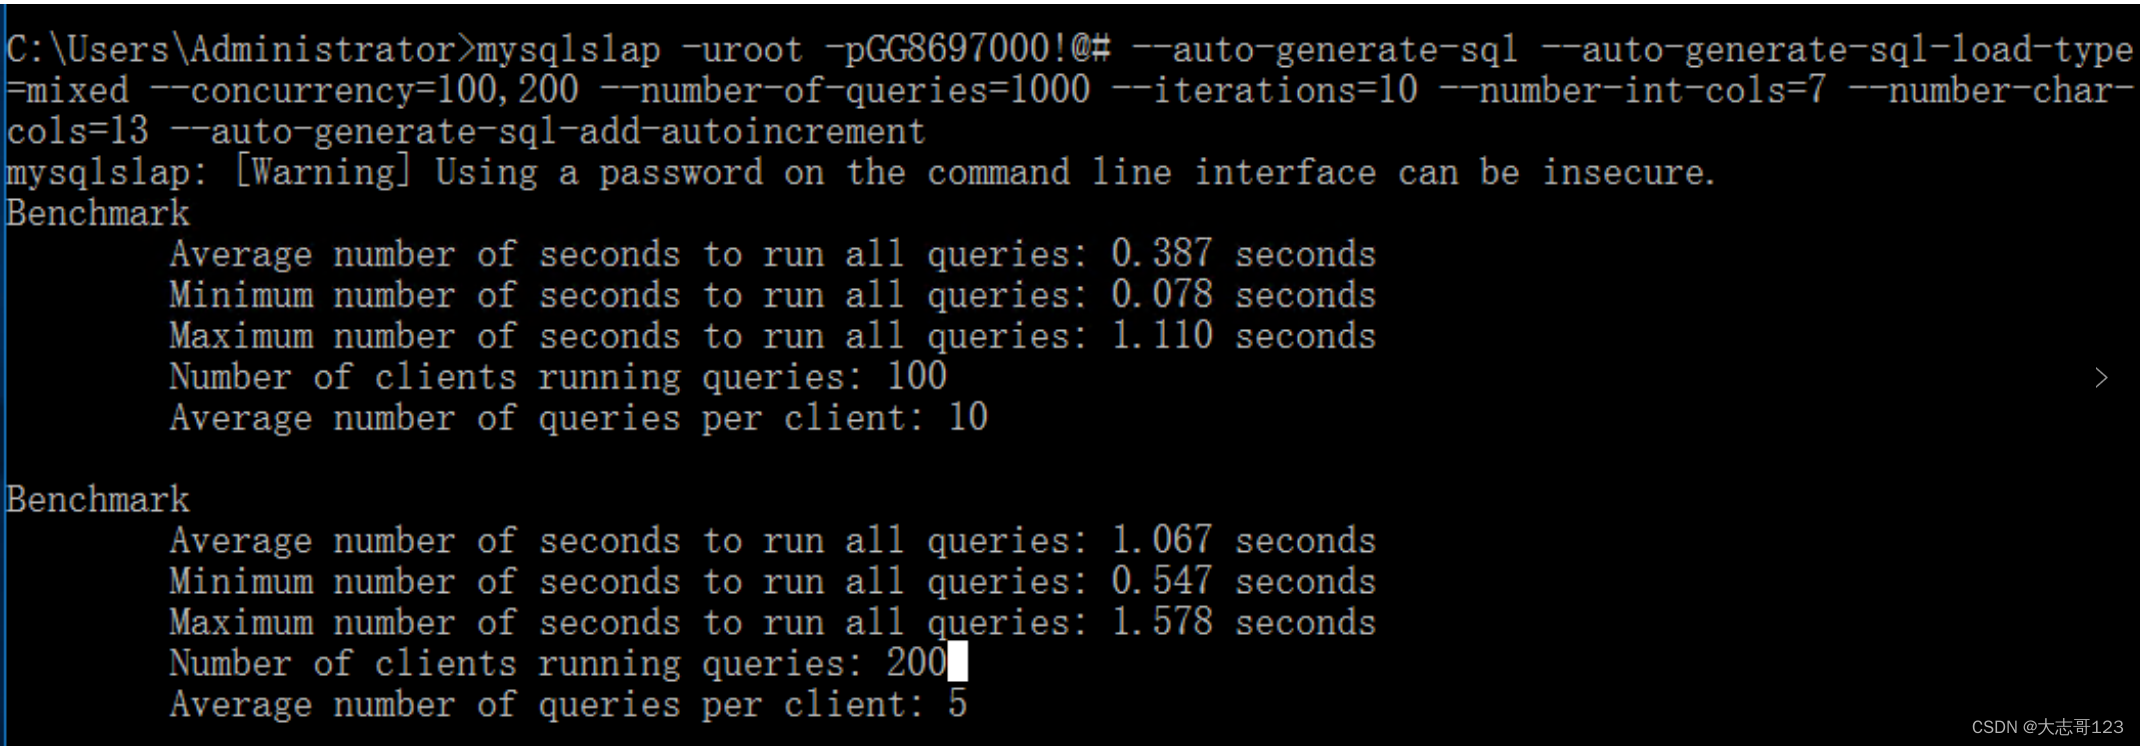
对Mysql和应用微服务做TPS压力测试
1.对Mysql 使用工具:mysqlslap工具 使用命令: mysqlslap -uroot pGG8697000!#--auto generate sql -auto generate sql-load typemixed-concurrency100,200 - number of queries1000-iterations10 - number-int-cols7 - number-charcols13auto genera…...
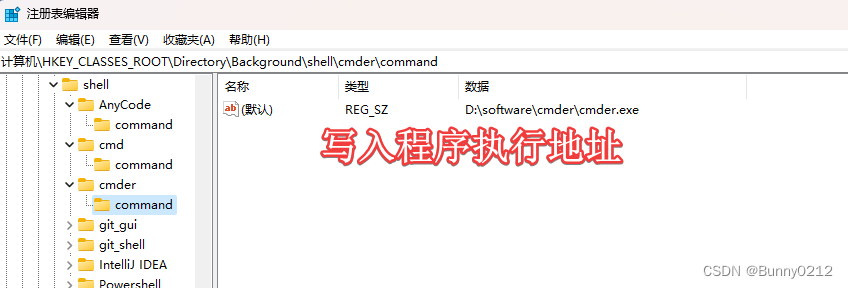
将程序添加至右键菜单
将程序添加至右键菜单 手动导入 如果要将cmder添加至右键菜单。可以通过编写reg注册表方式添加 也可以在路径HKEY_CLASSES_ROOT\Directory\Background\shell中右击添加 创建项commadn 编写reg注册表 [HKEY_CLASSES_ROOT\Directory\Background\shell\cmder]为注册表地址 Wi…...

三板斧的使用、全局配置文件、静态文件的配置、orm介绍
三板斧的使用 【1】HttpResponse 返回字符串类型 【2】render 返回html页面,并且在返回给浏览器之前还可以给html页面传值 【3】redirect 重定向页面 视图函数必须返回一个 HttpResponse 对象 def index(request):print(request)# return HttpResponse("r…...

【编程实践】黑框框里的打字小游戏,但是汇编语言
开始: 在学习王爽的《汇编语言》的过程中,我就真切地体会到编程实践对于理解的帮助。起初我没有安装书中的实验环境,看到100页左右就开始感觉无趣、吃力,看了后面忘前面,差点就要放弃这本书的学习。好在我后来还是装好…...
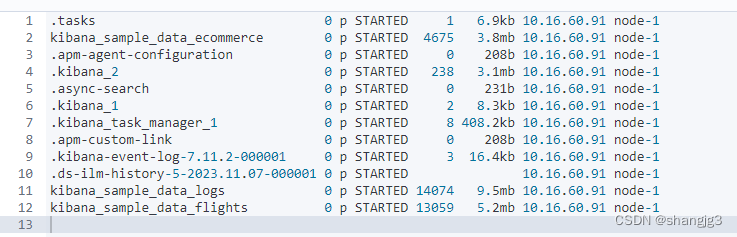
ElasticSearch的集群、节点、索引、分片和副本
Elasticsearch是面向文档型数据库,一条数据在这里就是一个文档。为了方便大家理解,我们将Elasticsearch里存储文档数据和关系型数据库MySQL存储数据的概念进行一个类比 ES里的Index可以看做一个库,而Types相当于表,Documents则相当…...

std::cout无法打印uint8_t类型的数据
std::cout在处理uint8_t变量类型的时候默认输出字符,刚好数字0-10对应的ascii字符都是不可打印的 解决: 使用static_cast std::cout << static_cast<int>(time) << std::endl;参考文章:https://blog.csdn.net/weixin_459…...
浅谈泛在电力物联网在智能配电系统应用
贾丽丽 安科瑞电气股份有限公司 上海嘉定 201801 摘要:在社会经济和科学技术不断发展中,配电网实现了角色转变,传统的单向供电服务形式已经被双向能流服务形式取代,社会多样化的用电需求也得以有效满足。随着物联网技术的发展&am…...

已解决:云原生领域的超时挂载Bug — Kubernetes深度剖析
🌷🍁 博主猫头虎(🐅🐾)带您 Go to New World✨🍁 🦄 博客首页——🐅🐾猫头虎的博客🎐 🐳 《面试题大全专栏》 🦕 文章图文…...

概念解析 | 高光谱图像:揭开自然世界的神秘面纱
注1:本文系“概念解析”系列之一,致力于简洁清晰地解释、辨析复杂而专业的概念。本次辨析的概念是:高光谱图像 高光谱图像:揭开自然世界的神秘面纱 Hyperspectral imaging - Wikipedia 背景介绍 我们生活的世界充满了丰富多彩的颜色。这些颜色来源于各种物体反射或吸收不同波长…...
Java类和对象(1)
🐵本篇文章将会开始对类和对象的第一部分讲解 一、简单描述类和对象 对象可以理解为一个实体,在现实生活中,比如在创建一个建筑之前,要先有一个蓝图,这个蓝图用来描述这个建筑的各种属性;此时蓝图就是类&a…...

百度上海智能研发中心一面
Prometheus告警机制原理 介绍hashmap和concurrentHashmap concurrentHashmap和hashmap如果线程1在遍历 另一个线程对这个map进行修改操作 会发生什么现象 对线程安全的理解 通过什么方法解决线程安全 除了上锁 CAS等还有其他手段 不用锁的话 (集合的类设计成一…...
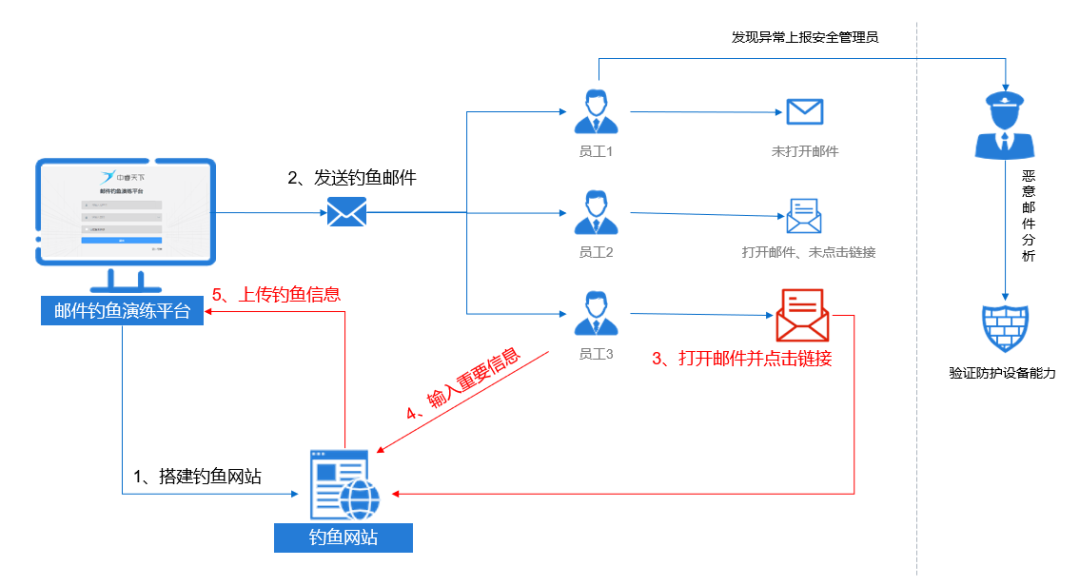
硝烟后的茶歇 | 中睿天下谈攻防演练之邮件攻击溯源实战分享
近日,由中国信息协会信息安全专业委员会、深圳市CIO协会、PCSA安全能力者联盟主办的《硝烟后的茶歇广东站》主题故事会在深圳成功召开。活动已连续举办四年四期,共性智慧逐步形成《年度红蓝攻防系列全景图》、《三化六防“挂图作战”》等共性研究重要成果…...

Leetcode Hot 100之四:283. 移动零+11. 盛最多水的容器
283.移动零 题目: 给定一个数组 nums,编写一个函数将所有 0 移动到数组的末尾,同时保持非零元素的相对顺序。 请注意 ,必须在不复制数组的情况下原地对数组进行操作。 示例 1: 输入: nums [0,1,0,3,12] 输出: [1,3,12,0,0] …...

景联文科技助力金融机构强化身份验证,提供高质量人像采集服务
随着社会的数字化和智能化进程的加速,人像采集在金融机构身份认证领域中发挥重要作用,为人们的生活带来更多便利和安全保障。 金融机构在身份验证上的痛点主要包括以下方面: 身份盗用和欺诈风险:传统身份验证方式可能存在漏洞&am…...
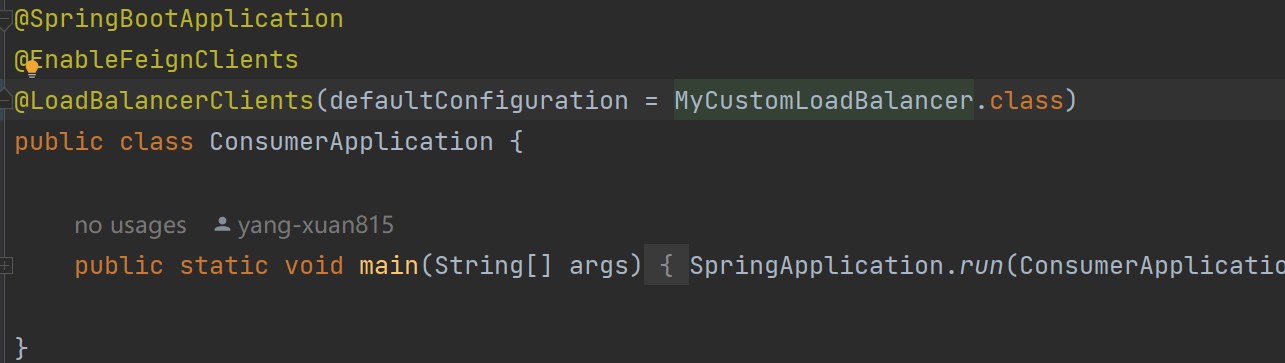
Spring Cloud LoadBalancer基础知识
LoadBalancer 概念常见的负载均衡策略使用随机选择的负载均衡策略创建随机选择负载均衡器配置 Nacos 权重负载均衡器创建 Nacos 负载均衡器配置 自定义负载均衡器(根据IP哈希策略选择)创建自定义负载均衡器封装自定义负载均衡器配置 缓存 概念 LoadBalancer(负载均衡器)是一种…...

从一根烧掉的射频功放管说起:聊聊阻抗不匹配的‘血泪史’与Smith圆图避坑指南
从一根烧掉的射频功放管说起:聊聊阻抗不匹配的‘血泪史’与Smith圆图避坑指南 那是一个周五的深夜,实验室里弥漫着焦糊味。当我盯着示波器上消失的信号波形,拆开散热器看到发黑的功放管时,才真正理解教科书上那句"阻抗匹配是…...

QtCreator+CMake+Ninja:跨平台C++开发环境高效搭建指南
1. 为什么选择QtCreatorCMakeNinja组合? 如果你正在开发跨平台的C应用程序,那么QtCreatorCMakeNinja这个组合绝对值得一试。作为一个长期使用这套工具链的开发者,我发现它完美解决了传统构建方式中的几个痛点:编译速度慢、配置复杂…...
)
408考研避坑指南:我踩过的那些“弯路”(教材、网课、题海战术)
408考研避坑指南:那些让我效率翻倍的实战经验 备考408计算机专业基础综合的同学们,一定都听过"教材为王"、"题海战术"、"名师必跟"这些老生常谈的建议。但作为一个从低效复习中挣扎出来的过来人,我想说&#x…...

Python 定时任务调度器实现
Python定时任务调度器实现指南 在现代软件开发中,定时任务调度是常见的需求,例如定时数据备份、日志清理、邮件发送等。Python凭借其丰富的库和简洁的语法,成为实现定时任务的理想选择。本文将介绍Python中几种常用的定时任务调度实现方式&a…...
的完整检测与响应流程)
别再只盯着攻击了:从防御者视角,用Kali和Metasploit复现永恒之蓝(MS17-010)的完整检测与响应流程
从防御者视角实战演练:基于Kali和Metasploit的MS17-010漏洞检测与响应全流程 当企业内网的安全警报突然响起,显示445端口存在异常活动时,作为安全团队成员的你会如何应对?传统漏洞复现教程往往只关注攻击过程,而本文将…...

Meta计划5月裁员约10%,约8000人受影响,此前AI领域投资巨大
Meta新一轮裁员:约8000人将告别据彭博社公布的Meta首席人力官珍妮尔盖尔(Janelle Gale)的备忘录显示,Meta计划在5月裁员约10%,这意味着约8000人将被裁。同时,盖尔还表示,Meta还将关闭约6000个招…...

数工-面试汇总
数据工程师面试四大块:Python 算法 SQL(重中之重) 大数据组件 (Hadoop/Spark/Hive) 数仓理论 八股阶段 1:基础恢复期(1~2 周・你现在立刻开始)Python复习:列表、字典、字符串、循环、函数刷题…...

Tensor Core加速信号处理的原理与实践
1. Tensor Core加速信号处理的原理与挑战 Tensor Core是NVIDIA从Volta架构开始引入的专用矩阵计算单元,其核心设计理念是通过混合精度计算实现高吞吐量矩阵运算。以RTX 4070 SUPER为例,其Tensor Core支持FP16输入/FP32累加的计算模式,单个流式…...

Bamtone班通:PCB为什么要做耐电流测试?
在电子产品设计与制造中,印刷电路板(PCB)作为电子元器件的支撑体和电气连接的载体,其可靠性直接决定着整个设备的性能与安全。耐电流测试正是确保PCB在高负载条件下稳定运行的关键。这项测试通过模拟实际工况中的电流负荷…...

Elasticsearch核心指南:全量数据类型详解与最优选型策略
Elasticsearch核心指南:全量数据类型详解与最优选型策略一、前言二、Elasticsearch 核心数据类型分类1. 字符串类型(最常用)2. 数值类型3. 日期类型4. 布尔类型5. 复杂类型6. 特殊类型三、ES 数据类型选型核心流程图四、核心数据类型详解使用…...