FFMPEG库实现mp4/flv文件(H264+AAC)的封装与分离
#include <stdio.h>#define __STDC_CONSTANT_MACROS#ifdef _WIN32//Windows
extern "C"
{
#include "libavformat/avformat.h"
};
#else//Linux...
#ifdef __cplusplus
extern "C"
{
#endif
#include <libavformat/avformat.h>
#ifdef __cplusplus
};
#endif
#endifint main(int argc, char* argv[]) {const AVOutputFormat* ofmt = NULL;//Input AVFormatContext and Output AVFormatContextAVFormatContext* ifmt_ctx_v = NULL, * ifmt_ctx_a = NULL, * ofmt_ctx = NULL;AVPacket pkt;int ret;unsigned int i;int videoindex_v = -1, videoindex_out = -1;int audioindex_a = -1, audioindex_out = -1;int frame_index = 0;int64_t cur_pts_v = 0, cur_pts_a = 0;int writing_v = 1, writing_a = 1;const char* in_filename_v = "test.h264";const char* in_filename_a = "audio_chn0.aac";const char* out_filename = "test.mp4";//Output file URLif ((ret = avformat_open_input(&ifmt_ctx_v, in_filename_v, 0, 0)) < 0) {printf("Could not open input file.");goto end;}if ((ret = avformat_find_stream_info(ifmt_ctx_v, 0)) < 0) {printf("Failed to retrieve input stream information");goto end;}if ((ret = avformat_open_input(&ifmt_ctx_a, in_filename_a, 0, 0)) < 0) {printf("Could not open input file.");goto end;}if ((ret = avformat_find_stream_info(ifmt_ctx_a, 0)) < 0) {printf("Failed to retrieve input stream information");goto end;}//Outputavformat_alloc_output_context2(&ofmt_ctx, NULL, NULL, out_filename);if (!ofmt_ctx) {printf("Could not create output context\n");ret = AVERROR_UNKNOWN;goto end;}ofmt = ofmt_ctx->oformat;for (i = 0; i < ifmt_ctx_v->nb_streams; i++) {//Create output AVStream according to input AVStreamif (ifmt_ctx_v->streams[i]->codecpar->codec_type == AVMEDIA_TYPE_VIDEO) {AVStream* out_stream = avformat_new_stream(ofmt_ctx, nullptr);videoindex_v = i;if (!out_stream) {printf("Failed allocating output stream\n");ret = AVERROR_UNKNOWN;goto end;}videoindex_out = out_stream->index;//Copy the settings of AVCodecContextif (avcodec_parameters_copy(out_stream->codecpar, ifmt_ctx_v->streams[i]->codecpar) < 0) {printf("Failed to copy context from input to output stream codec context\n");goto end;}break;}}for (i = 0; i < ifmt_ctx_a->nb_streams; i++) {//Create output AVStream according to input AVStreamif (ifmt_ctx_a->streams[i]->codecpar->codec_type == AVMEDIA_TYPE_AUDIO) {AVStream* out_stream = avformat_new_stream(ofmt_ctx, nullptr);audioindex_a = i;if (!out_stream) {printf("Failed allocating output stream\n");ret = AVERROR_UNKNOWN;goto end;}audioindex_out = out_stream->index;//Copy the settings of AVCodecContextif (avcodec_parameters_copy(out_stream->codecpar, ifmt_ctx_a->streams[i]->codecpar) < 0) {printf("Failed to copy context from input to output stream codec context\n");goto end;}out_stream->codecpar->codec_tag = 0;if (ofmt_ctx->oformat->flags & AVFMT_GLOBALHEADER)ofmt_ctx->flags |= AV_CODEC_FLAG_GLOBAL_HEADER;break;}}/* open the output file, if needed */if (!(ofmt->flags & AVFMT_NOFILE)) {if (avio_open(&ofmt_ctx->pb, out_filename, AVIO_FLAG_WRITE)) {fprintf(stderr, "Could not open '%s': %d\n", out_filename,ret);goto end;}}//Write file headerif (avformat_write_header(ofmt_ctx, NULL) < 0) {fprintf(stderr, "Error occurred when opening output file: %d\n",ret);goto end;}//写入数据while (writing_v || writing_a){AVFormatContext* ifmt_ctx;int stream_index = 0;AVStream* in_stream, * out_stream;int av_type = 0;if (writing_v &&(!writing_a || av_compare_ts(cur_pts_v, ifmt_ctx_v->streams[videoindex_v]->time_base,cur_pts_a, ifmt_ctx_a->streams[audioindex_a]->time_base) <= 0)){av_type = 0;ifmt_ctx = ifmt_ctx_v;stream_index = videoindex_out;if (av_read_frame(ifmt_ctx, &pkt) >= 0){do {in_stream = ifmt_ctx->streams[pkt.stream_index];out_stream = ofmt_ctx->streams[stream_index];if (pkt.stream_index == videoindex_v){//FIX:No PTS (Example: Raw H.264)//Simple Write PTSif (pkt.pts == AV_NOPTS_VALUE){//Write PTSAVRational time_base1 = in_stream->time_base;//Duration between 2 frames (us)int64_t calc_duration = (double)AV_TIME_BASE / av_q2d(in_stream->r_frame_rate);//Parameterspkt.pts = (double)(frame_index * calc_duration) / (double)(av_q2d(time_base1) * AV_TIME_BASE);pkt.dts = pkt.pts;pkt.duration = (double)calc_duration / (double)(av_q2d(time_base1) * AV_TIME_BASE);frame_index++;printf("frame_index:  %d\n", frame_index);}cur_pts_v = pkt.pts;break;}} while(av_read_frame(ifmt_ctx, &pkt) >= 0);}else{writing_v = 0;continue;}}else{av_type = 1;ifmt_ctx = ifmt_ctx_a;stream_index = audioindex_out;if (av_read_frame(ifmt_ctx, &pkt) >= 0){do {in_stream = ifmt_ctx->streams[pkt.stream_index];out_stream = ofmt_ctx->streams[stream_index];if (pkt.stream_index == audioindex_a){//FIX:No PTS//Simple Write PTSif (pkt.pts == AV_NOPTS_VALUE){//Write PTSAVRational time_base1 = in_stream->time_base;//Duration between 2 frames (us)int64_t calc_duration = (double)AV_TIME_BASE / av_q2d(in_stream->r_frame_rate);//Parameterspkt.pts = (double)(frame_index * calc_duration) /(double)(av_q2d(time_base1) * AV_TIME_BASE);pkt.dts = pkt.pts;pkt.duration = (double)calc_duration / (double)(av_q2d(time_base1) * AV_TIME_BASE);frame_index++;}cur_pts_a = pkt.pts;break;}} while (av_read_frame(ifmt_ctx, &pkt) >= 0);}else{writing_a = 0;continue;}}//Convert PTS/DTSpkt.pts = av_rescale_q_rnd(pkt.pts, in_stream->time_base, out_stream->time_base,(AVRounding)(AV_ROUND_NEAR_INF | AV_ROUND_PASS_MINMAX));pkt.dts = av_rescale_q_rnd(pkt.dts, in_stream->time_base, out_stream->time_base,(AVRounding)(AV_ROUND_NEAR_INF | AV_ROUND_PASS_MINMAX));pkt.duration = av_rescale_q(pkt.duration, in_stream->time_base, out_stream->time_base);pkt.pos = -1;pkt.stream_index = stream_index;printf("Write 1 Packet. type:%d, size:%d\tpts:%ld\n", av_type, pkt.size, pkt.pts);//Writeif (av_interleaved_write_frame(ofmt_ctx, &pkt) < 0) {printf("Error muxing packet\n");break;}av_packet_unref(&pkt);}printf("Write file trailer.\n");//Write file trailerav_write_trailer(ofmt_ctx);end:avformat_close_input(&ifmt_ctx_v);avformat_close_input(&ifmt_ctx_a);/* close output */if (ofmt_ctx && !(ofmt->flags & AVFMT_NOFILE))avio_close(ofmt_ctx->pb);avformat_free_context(ofmt_ctx);if (ret < 0 && ret != AVERROR_EOF) {printf("Error occurred.\n");return -1;}return 0;
}CROSS_COMPILE = aarch64-himix200-linux-CC = $(CROSS_COMPILE)g++
AR = $(CROSS_COMPILE)ar
STRIP = $(CROSS_COMPILE)stripCFLAGS = -Wall -O2 -I../../source/mp4Lib/include
LIBS += -L../../source/mp4Lib/lib -lpthread
LIBS += -lavformat -lavcodec -lavdevice -lavutil -lavfilter -lswscale -lswresample -lzSRCS = $(wildcard *.cpp)
OBJS = $(SRCS:%.cpp=%.o)
DEPS = $(SRCS:%.cpp=%.d)
TARGET = mp4muxerall:$(TARGET)-include $(DEPS)%.o:%.cpp$(CC) $(CFLAGS) -c -o $@ $<%.d:%.c@set -e; rm -f $@; \$(CC) -MM $(CFLAGS) $< > $@.$$$$; \sed 's,\($*\)\.o[ :]*,\1.o $@ : ,g' < $@.$$$$ > $@; \rm -f $@.$$$$$(TARGET):$(OBJS)$(CC) -o $@ $^ $(LIBS)$(STRIP) $@ .PHONY:cleanclean:rm -fr $(TARGET) $(OBJS) $(DEPS)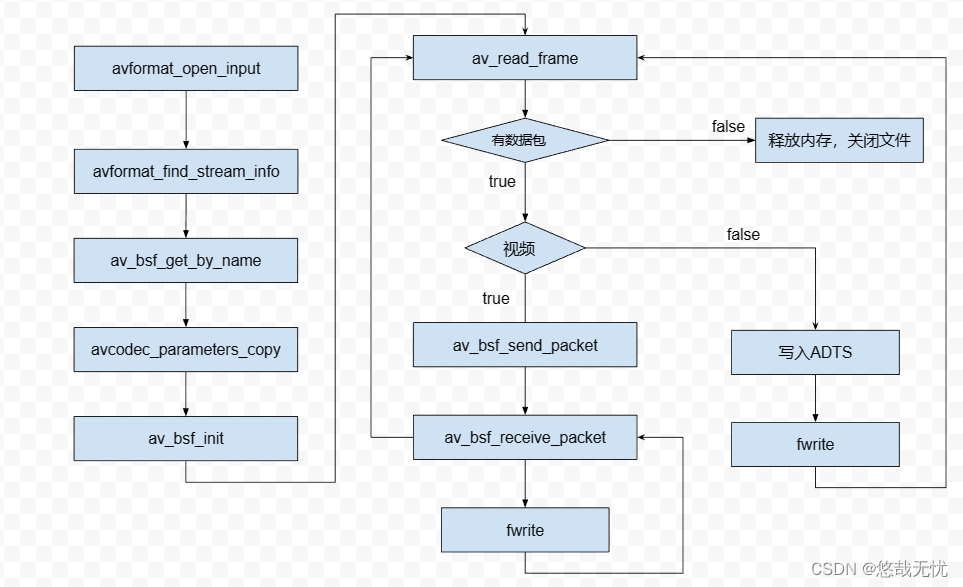
#include <stdio.h>
extern "C"
{
#include <libavformat/avformat.h>
}/* 打印编码器支持该采样率并查找指定采样率下标 */
static int find_sample_rate_index(const AVCodec* codec, int sample_rate)
{const int* p = codec->supported_samplerates;int sample_rate_index = -1; //支持的分辨率下标int count = 0;while (*p != 0) {// 0作为退出条件,比如libfdk-aacenc.c的aac_sample_ratesprintf("%s 支持采样率: %dhz  对应下标:%d\n", codec->name, *p, count);if (*p == sample_rate)sample_rate_index = count;p++;count++;}return sample_rate_index;
}/// <summary>
/// 给aac音频数据添加adts头
/// </summary>
/// <param name="header">adts数组</param>
/// <param name="sample_rate">采样率</param>
/// <param name="channals">通道数</param>
/// <param name="prfile">音频编码器配置文件(FF_PROFILE_AAC_LOW  定义在 avcodec.h)</param>
/// <param name="len">音频包长度</param>
void addHeader(char header[], int sample_rate, int channals, int prfile, int len)
{uint8_t sampleIndex = 0;    switch (sample_rate) {case 96000: sampleIndex = 0; break;case 88200: sampleIndex = 1; break;case 64000: sampleIndex = 2; break;case 48000: sampleIndex = 3; break;case 44100: sampleIndex = 4; break;case 32000: sampleIndex = 5; break;case 24000: sampleIndex = 6; break;case 22050: sampleIndex = 7; break;case 16000: sampleIndex = 8; break;case 12000: sampleIndex = 9; break;case 11025: sampleIndex = 10; break;case 8000: sampleIndex = 11; break;case 7350: sampleIndex = 12; break;default: sampleIndex = 4; break;}uint8_t audioType = 2;  //AAC LCuint8_t channelConfig = 2;      //双通道len += 7;//0,1是固定的header[0] = (uint8_t)0xff;         //syncword:0xfff                          高8bitsheader[1] = (uint8_t)0xf0;         //syncword:0xfff                          低4bitsheader[1] |= (0 << 3);    //MPEG Version:0 for MPEG-4,1 for MPEG-2  1bitheader[1] |= (0 << 1);    //Layer:0                                 2bits header[1] |= 1;           //protection absent:1                     1bit//根据aac类型,采样率,通道数来配置header[2] = (audioType - 1) << 6;            //profile:audio_object_type - 1                      2bitsheader[2] |= (sampleIndex & 0x0f) << 2; //sampling frequency index:sampling_frequency_index  4bits header[2] |= (0 << 1);                             //private bit:0                                      1bitheader[2] |= (channelConfig & 0x04) >> 2;           //channel configuration:channel_config               高1bit//根据通道数+数据长度来配置header[3] = (channelConfig & 0x03) << 6;     //channel configuration:channel_config      低2bitsheader[3] |= (0 << 5);                      //original:0                               1bitheader[3] |= (0 << 4);                      //home:0                                   1bitheader[3] |= (0 << 3);                      //copyright id bit:0                       1bit  header[3] |= (0 << 2);                      //copyright id start:0                     1bitheader[3] |= ((len & 0x1800) >> 11);           //frame length:value   高2bits//根据数据长度来配置header[4] = (uint8_t)((len & 0x7f8) >> 3);     //frame length:value    中间8bitsheader[5] = (uint8_t)((len & 0x7) << 5);       //frame length:value    低3bitsheader[5] |= (uint8_t)0x1f;                    //buffer fullness:0x7ff 高5bitsheader[6] = (uint8_t)0xfc;
}int main() {AVFormatContext* ifmt_ctx = NULL;AVPacket pkt;int ret;unsigned int i;int videoindex = -1, audioindex = -1;const char* in_filename = "test.mp4";const char* out_filename_v = "test1.h264";const char* out_filename_a = "test1.aac";if ((ret = avformat_open_input(&ifmt_ctx, in_filename, 0, 0)) < 0) {printf("Could not open input file.");return -1;}if ((ret = avformat_find_stream_info(ifmt_ctx, 0)) < 0) {printf("Failed to retrieve input stream information");return -1;}videoindex = -1;for (i = 0; i < ifmt_ctx->nb_streams; i++) { //nb_streams:视音频流的个数if (ifmt_ctx->streams[i]->codecpar->codec_type == AVMEDIA_TYPE_VIDEO)videoindex = i;else if (ifmt_ctx->streams[i]->codecpar->codec_type == AVMEDIA_TYPE_AUDIO)audioindex = i;}printf("\nInput Video===========================\n");av_dump_format(ifmt_ctx, 0, in_filename, 0);  // 打印信息printf("\n======================================\n");FILE* fp_audio = fopen(out_filename_a, "wb+");FILE* fp_video = fopen(out_filename_v, "wb+");AVBSFContext* bsf_ctx = NULL;const AVBitStreamFilter* pfilter = av_bsf_get_by_name("h264_mp4toannexb");if (pfilter == NULL) {printf("Get bsf failed!\n");}if ((ret = av_bsf_alloc(pfilter, &bsf_ctx)) != 0) {printf("Alloc bsf failed!\n");}ret = avcodec_parameters_copy(bsf_ctx->par_in, ifmt_ctx->streams[videoindex]->codecpar);if (ret < 0) {printf("Set Codec failed!\n");}ret = av_bsf_init(bsf_ctx);if (ret < 0) {printf("Init bsf failed!\n");}//这里遍历音频编码器打印支持的采样率,并找到当前音频采样率所在的下表,用于后面添加adts头//本程序并没有使用,只是测试,如果为了程序健壮性可以采用此方式const AVCodec* codec = nullptr;codec  = avcodec_find_encoder(ifmt_ctx->streams[audioindex]->codecpar->codec_id);int sample_rate_index = find_sample_rate_index(codec, ifmt_ctx->streams[audioindex]->codecpar->sample_rate);printf("分辨率数组下表:%d\n", sample_rate_index);while (av_read_frame(ifmt_ctx, &pkt) >= 0) {if (pkt.stream_index == videoindex) {av_bsf_send_packet(bsf_ctx, &pkt);while (true){ret = av_bsf_receive_packet(bsf_ctx, &pkt);if (ret == AVERROR(EAGAIN) || ret == AVERROR_EOF)break;else if (ret < 0) {printf("Receive Pkt failed!\n");break;}printf("Write Video Packet. size:%d\tpts:%ld\n", pkt.size, pkt.pts);fwrite(pkt.data, 1, pkt.size, fp_video);}}else if (pkt.stream_index == audioindex) {printf("Write Audio Packet. size:%d\tpts:%ld\n", pkt.size, pkt.pts);char adts[7] = { 0 };addHeader(adts, ifmt_ctx->streams[audioindex]->codecpar->sample_rate, ifmt_ctx->streams[audioindex]->codecpar->channels, ifmt_ctx->streams[audioindex]->codecpar->profile,pkt.size);fwrite(adts, 1, 7, fp_audio);fwrite(pkt.data, 1, pkt.size, fp_audio);}av_packet_unref(&pkt);}av_bsf_free(&bsf_ctx);fclose(fp_video);fclose(fp_audio);avformat_close_input(&ifmt_ctx);return 0;if (ifmt_ctx)avformat_close_input(&ifmt_ctx);if (fp_audio)fclose(fp_audio);if (fp_video)fclose(fp_video);if (bsf_ctx)av_bsf_free(&bsf_ctx);return -1;
}CROSS_COMPILE = aarch64-himix200-linux-CC = $(CROSS_COMPILE)g++
AR = $(CROSS_COMPILE)ar
STRIP = $(CROSS_COMPILE)stripCFLAGS = -Wall -O2 -I../../source/mp4Lib/include
LIBS += -L../../source/mp4Lib/lib -lpthread
LIBS += -lavformat -lavcodec -lavdevice -lavutil -lavfilter -lswscale -lswresample -lzSRCS = $(wildcard *.cpp)
OBJS = $(SRCS:%.cpp=%.o)
DEPS = $(SRCS:%.cpp=%.d)
TARGET = mp4demuxerall:$(TARGET)-include $(DEPS)%.o:%.cpp$(CC) $(CFLAGS) -c -o $@ $<%.d:%.c@set -e; rm -f $@; \$(CC) -MM $(CFLAGS) $< > $@.$$$$; \sed 's,\($*\)\.o[ :]*,\1.o $@ : ,g' < $@.$$$$ > $@; \rm -f $@.$$$$$(TARGET):$(OBJS)$(CC) -o $@ $^ $(LIBS)$(STRIP) $@ .PHONY:cleanclean:rm -fr $(TARGET) $(OBJS) $(DEPS)相关文章:
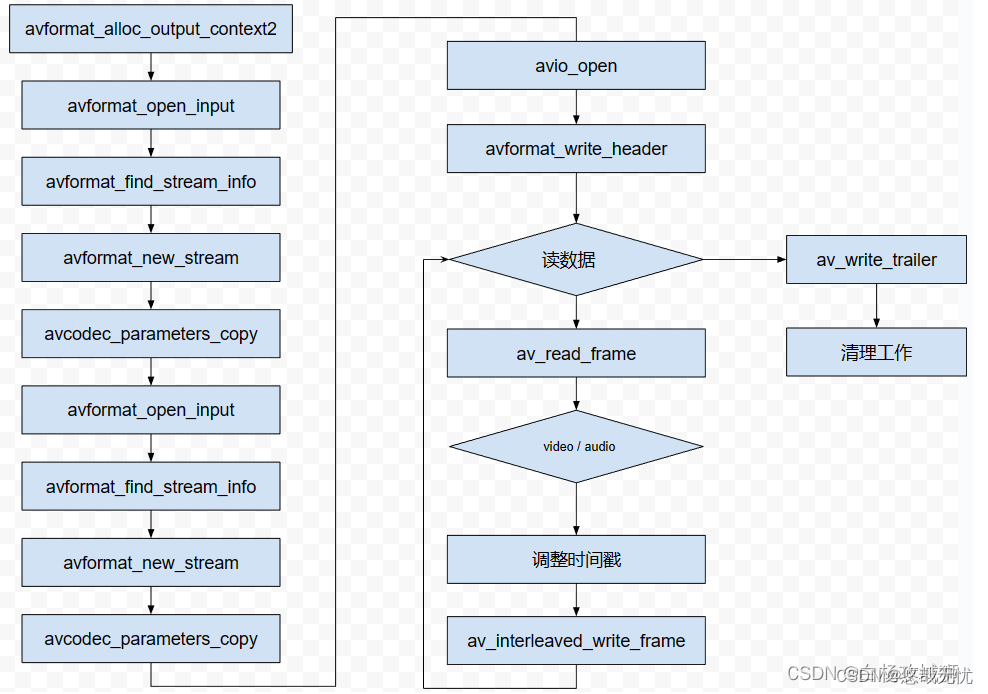
FFMPEG库实现mp4/flv文件(H264+AAC)的封装与分离
ffmepeg 4.4(亲测可用) 一、使用FFMPEG库封装264视频和acc音频数据到 mp4/flv 文件中 封装流程 1.使用avformat_open_input分别打开视频和音频文件,初始化其AVFormatContext,使用avformat_find_stream_info获取编码器基本信息 2.使…...
《红蓝攻防对抗实战》九.内网穿透之利用GRE协议进行隧道穿透
前文推荐: 《红蓝攻防对抗实战》一. 隧道穿透技术详解 《红蓝攻防对抗实战》二.内网探测协议出网之TCP/UDP协议探测出网 《红蓝攻防对抗实战》三.内网探测协议出网之HTTP/HTTPS协议探测出网 《红蓝攻防对抗实战》四.内网探测协议出网之ICMP协议探测出网 《红蓝…...

大数据毕业设计选题推荐-智慧消防大数据平台-Hadoop-Spark-Hive
✨作者主页:IT毕设梦工厂✨ 个人简介:曾从事计算机专业培训教学,擅长Java、Python、微信小程序、Golang、安卓Android等项目实战。接项目定制开发、代码讲解、答辩教学、文档编写、降重等。 ☑文末获取源码☑ 精彩专栏推荐⬇⬇⬇ Java项目 Py…...
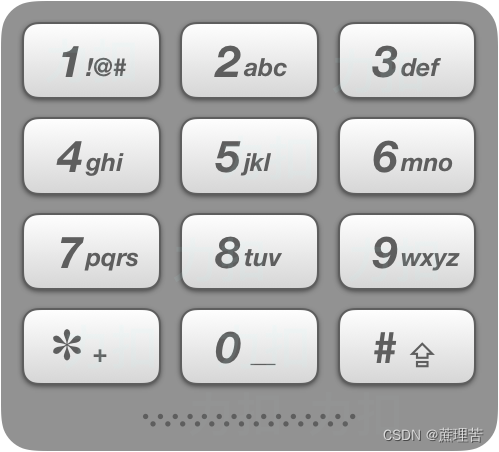
LeetCode 面试题 16.20. T9键盘
文章目录 一、题目二、C# 题解 一、题目 在老式手机上,用户通过数字键盘输入,手机将提供与这些数字相匹配的单词列表。每个数字映射到0至4个字母。给定一个数字序列,实现一个算法来返回匹配单词的列表。你会得到一张含有有效单词的列表。映射…...

systemctl enable docker.service报错“Failed to execute operation: Bad message“
将docker加入到开机自启,报错: 解决: 重新粘贴复制: [Unit] DescriptionDocker Application Container Engine Documentationhttps://docs.docker.com Afternetwork-online.target firewalld.service Wantsnetwork-online.target…...
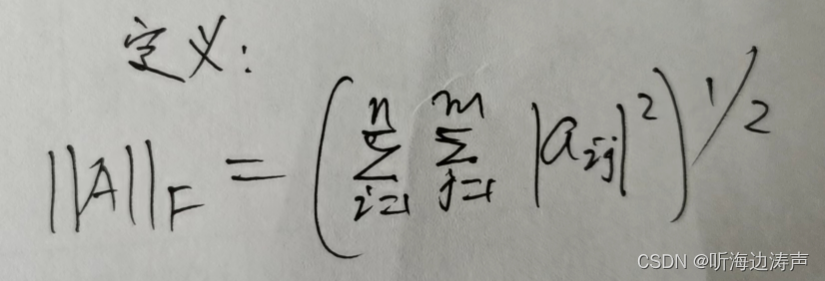
向量的范数、矩阵的范数
向量的范数 p-范数 常用的0-范数、1-范数、2-范数、无穷-范数其实都是p-范数的特殊情形。 0-范数 当p0时,表示0-范数。它比较特殊,本质是一种计数,表示向量中非0元素的个数。 1-范数(也称L1范数) 当p1时ÿ…...
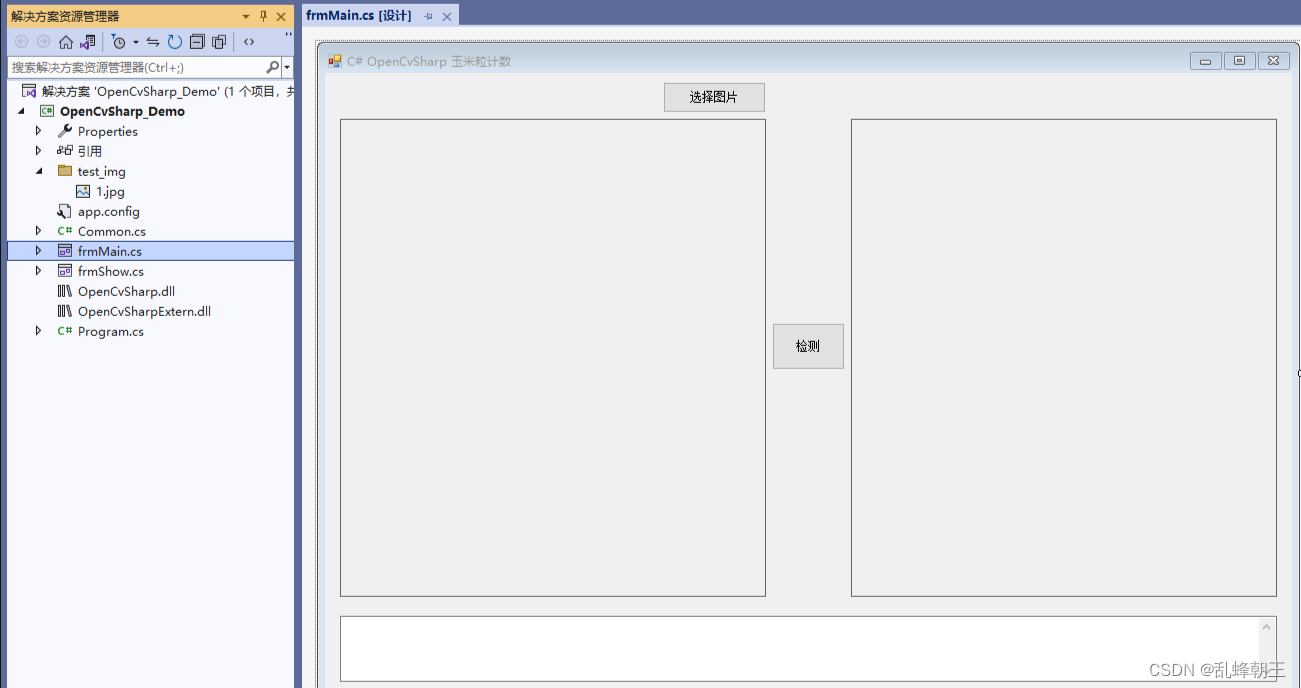
C# OpenCvSharp 玉米粒计数
效果 项目 代码 using OpenCvSharp; using System; using System.Drawing; using System.Text; using System.Windows.Forms;namespace OpenCvSharp_Demo {public partial class frmMain : Form{public frmMain(){InitializeComponent();}string fileFilter "*.*|*.bmp;…...
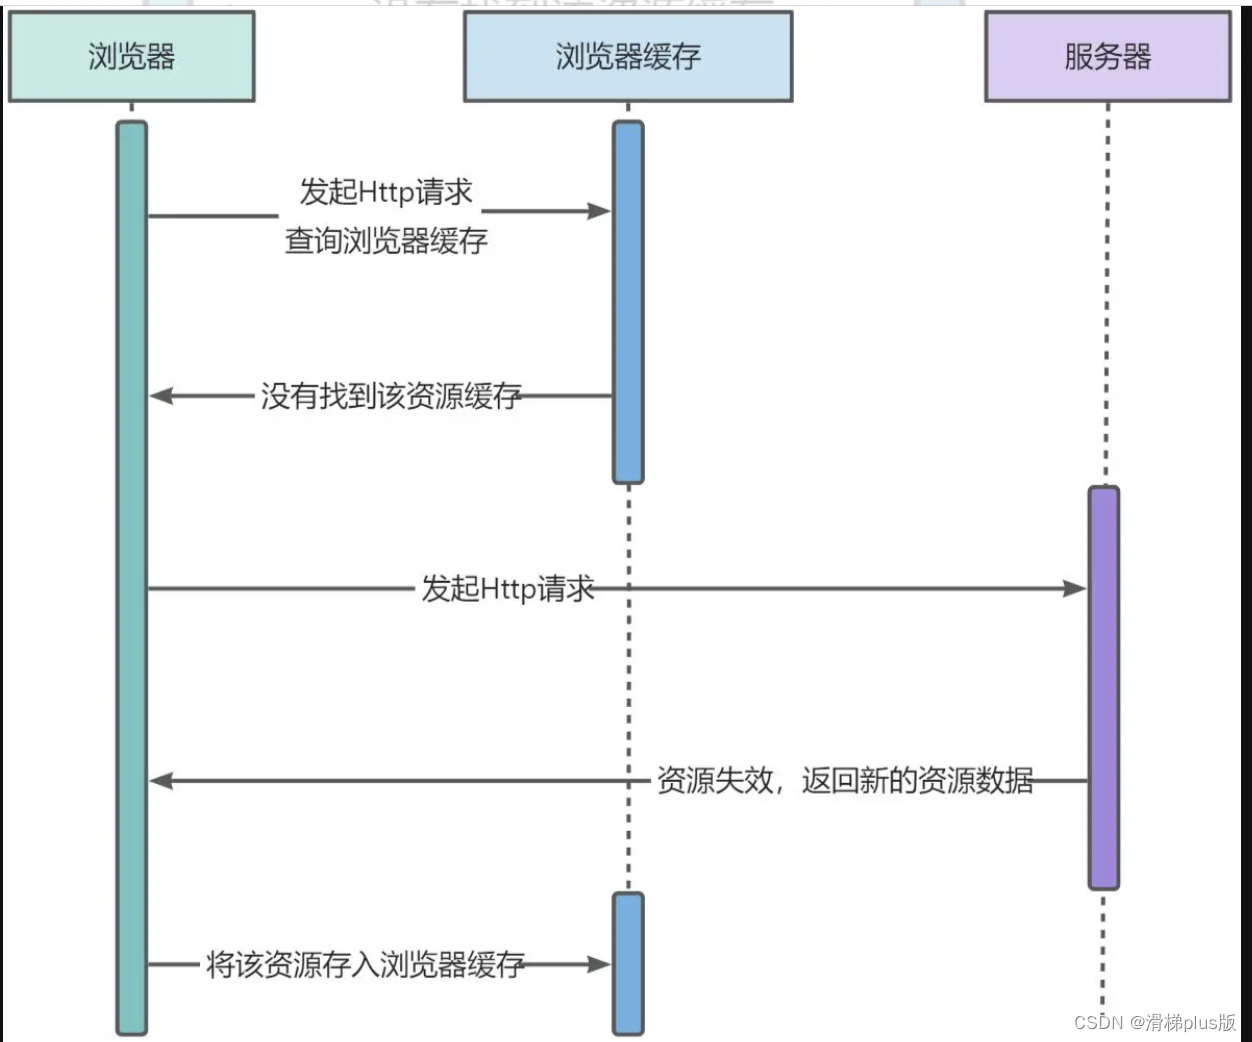
前端缓存机制——强缓存、弱缓存、启发式缓存
强缓存和弱缓存的主要区别是主要区别在于缓存头携带的信息不同。 强缓存: 浏览器发起请求,查询浏览器的本地缓存,如果找到资源,则直接在浏览器中使用该资源。若是未找到,或者资源已过期,则浏览器缓存返回未…...

对称密钥加密与非对称密钥加密:原理与应用
在信息安全领域,对称密钥加密和非对称密钥加密是两种重要的加密方法,它们各有特点,适用于不同的场景。本文将详细介绍这两种加密方法的原理,并通过实例说明其应用,同时阐述在报文传输过程中,何时使用对称密…...

商品小类管理实现B
<?xml version="1.0" encoding="UTF-8" ?> <!DOCTYPE mapperPUBLIC "-//mybatis.org//DTD Mapper 3.0//EN""http://mybatis.org/dtd/mybatis-3-mapper.dtd"> <mapper namespace="com.java1234.mapper.SmallType…...
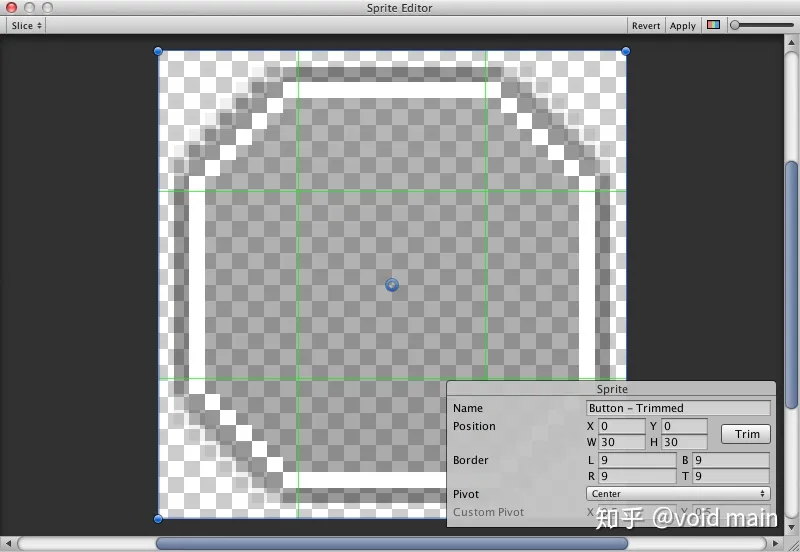
Unity--视觉组件(Raw Image,Mask)||Unity--视觉组件(Text,Image)
1.Raw Image 2.mask “”Raw Image:“” Texture:(纹理) 表示要显示的图像的纹理; Color:(颜色) 应用于图像的颜色; Material:(材质)…...

在Node.js中,什么是事件发射器(EventEmitter)?
聚沙成塔每天进步一点点 ⭐ 专栏简介 前端入门之旅:探索Web开发的奇妙世界 欢迎来到前端入门之旅!感兴趣的可以订阅本专栏哦!这个专栏是为那些对Web开发感兴趣、刚刚踏入前端领域的朋友们量身打造的。无论你是完全的新手还是有一些基础的开发…...
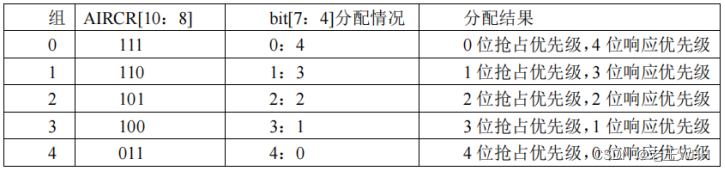
STM32——NVIC中断优先级管理分析
文章目录 前言一、中断如何响应?NVIC如何分配优先级?二、NVIC中断优先级管理详解三、问题汇总 前言 个人认为本篇文章是我作总结的最好的一篇,用自己的话总结出来清晰易懂,给小白看也能一眼明了,这就是写博客的意义吧…...

YOLOV5----修改损失函数-SimAM
主要修改yolo.py、yolov5s.yaml及添加SimAM.py 一、SimAM.py import torch import torch.nn as nnclass SimAM(torch.nn.Module):def __init__(self, e_lambda=1e-4):super...
)
MongoDB单实例安装(windows)
https://fastdl.mongodb.org/windows/mongodb-windows-x86_64-7.0.2.zip 安装过程很简单,将下载的文件解压到安装目录。 提前创建好数据文件目录: D:\data\4000 创建配置文件mongodb.conf,配置文件需要注意的是,mongodb在6.1之后就…...
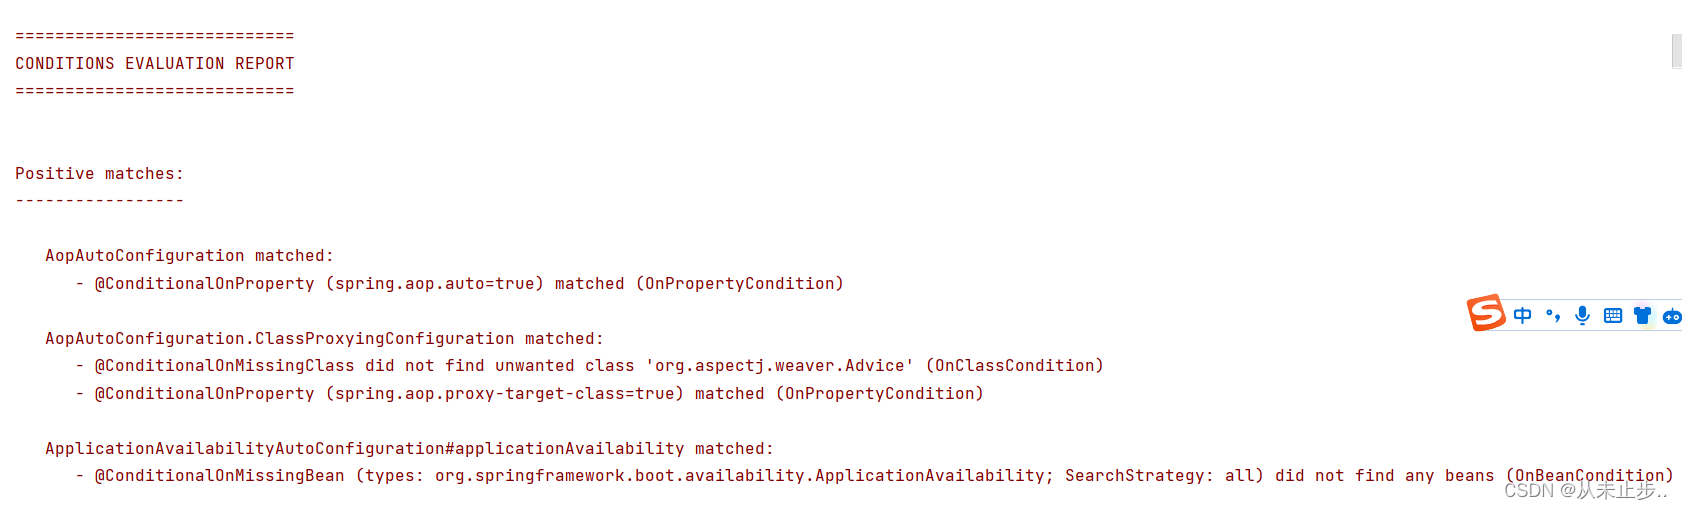
Caused by: org.springframework.beans.factory.NoSuchBeanDefinitionException:
错误描述如下所示: 我们将错误拉到最下面如下所示为导致异常的原因: Caused by: org.springframework.beans.factory.NoSuchBeanDefinitionException: No qualifying bean of type com.example.reviewmybatisplus.Service.UserService available: expec…...

安卓RadioButton设置图片大小
RadioButton都不陌生,一般我们都会设置图片在里面,这就涉及一个问题,图片的大小。如果图片过大,效果很不理想。搜了很多方法,都不理想。无奈只能自己研究了 代码如下: 1,一个简单的 RadioButt…...
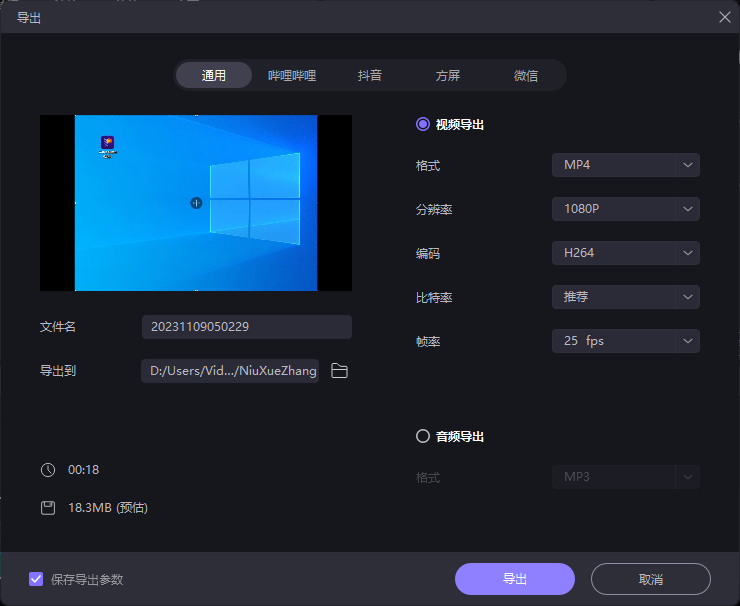
电脑怎么录制视频,录制的视频怎么剪辑?
在现今数字化的时代,视频成为了人们日常生活中不可或缺的一部分。因此,对于一些需要制作视频教程、录制游戏或者是进行视频演示的人来说,电脑录屏已经成为了一个必不可少的工具。那么,对于这些人来说,如何选择一个好用…...
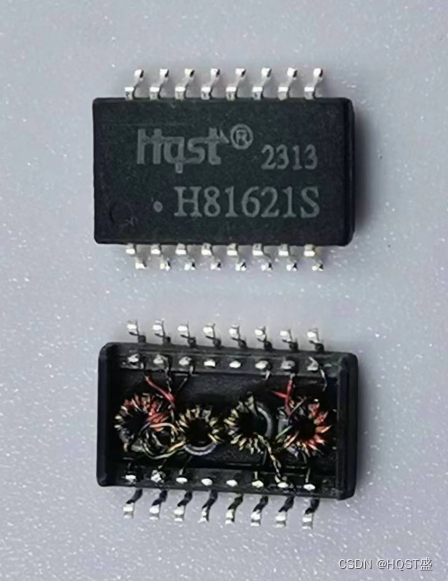
外接式网络隔离变压器/网络隔离滤波器/网口变压器/脉冲变压器/网络隔离变压器模块
Hqst华强盛(石门盈盛)电子导读:外接式网络隔离变压器/网络隔离滤波器/网口变压器/脉冲变压器/网络隔离变压器模块,后统称网络隔离变压器,它是一种安装在电路外部的隔离变压器,主要用于隔离网络中的干扰信号…...
AI:83-基于深度学习的手势识别与实时控制
🚀 本文选自专栏:人工智能领域200例教程专栏 从基础到实践,深入学习。无论你是初学者还是经验丰富的老手,对于本专栏案例和项目实践都有参考学习意义。 ✨✨✨ 每一个案例都附带有在本地跑过的代码,详细讲解供大家学习,希望可以帮到大家。欢迎订阅支持,正在不断更新中,…...

【NLP实战】基于NLTK词性标注的英语缩写消歧:以he‘s/she‘s为例
1. 为什么需要英语缩写消歧? 第一次处理英文文本数据时,我就被hes/shes这类缩写搞得晕头转向。明明都是s结尾,有时候表示"is",有时候又表示"has"。比如"Shes finished"和"Shes happy"&a…...

从云端到终端:深度解析语音唤醒KWS技术的演进与落地
1. 语音唤醒技术的前世今生 第一次在智能音箱上喊出"小爱同学"时,我盯着那个突然亮起的环形灯发呆——这玩意儿怎么知道我在叫它?后来才知道,这就是典型的KWS(Keyword Spotting)技术在发挥作用。简单来说&am…...

从零搭建Adams-Matlab机器人联合仿真环境:一份详尽的配置指南
1. 为什么需要Adams-Matlab联合仿真 作为一名在机器人领域摸爬滚打多年的工程师,我深刻理解动力学仿真和控制系统设计之间的鸿沟。Adams擅长多体动力学分析,能精确模拟机械系统的运动学和动力学特性;Matlab则是控制算法开发和验证的利器。但…...

AGI验证不是“加个测试集”那么简单:基于27个真实事故案例的12项反模式清单
第一章:AGI验证的本质挑战与范式跃迁 2026奇点智能技术大会(https://ml-summit.org) AGI验证远非传统软件测试或模型评估的简单延伸,其核心困境在于:验证对象本身缺乏稳定定义、可穷举行为边界与可判定终止条件。当系统具备跨域元认知、自主…...

告别虚拟机!在Ubuntu 20.04上原生安装MATLAB 2015b的保姆级避坑指南
告别虚拟机!在Ubuntu 20.04上原生安装MATLAB 2015b的保姆级避坑指南 科研工作者和工程师们常常面临一个两难选择:既需要Linux系统的高效稳定,又离不开MATLAB这类专业计算工具。传统解决方案往往依赖虚拟机或双系统,但性能损耗和操…...

在Windows 7 64位系统上从零部署YOLOv3 CPU推理环境:Cygwin配置与Darknet编译实战
1. 环境准备:Windows 7下的特殊挑战 在Windows 7 64位系统上部署YOLOv3的CPU版本,最大的挑战在于这个老旧的系统环境与现代深度学习框架之间的兼容性问题。我去年帮一个工厂的老设备做视觉检测升级时就遇到过类似场景,他们的质检电脑全是Win…...
)
Abaqus 2023实战:手把手教你搞定金属管无芯绕弯的完整仿真流程(附模型文件)
Abaqus 2023金属管无芯绕弯仿真全流程实战指南 金属管件弯曲成形是制造业中常见的加工工艺,从汽车排气管到家具金属框架都离不开这项技术。传统试错法不仅成本高昂,还难以预测成形缺陷。借助Abaqus Explicit模块,工程师可以在计算机中完整模…...

MelonLoader:让Unity游戏模组安装变得像吃西瓜一样简单 [特殊字符]
MelonLoader:让Unity游戏模组安装变得像吃西瓜一样简单 🍉 【免费下载链接】MelonLoader The Worlds First Universal Mod Loader for Unity Games compatible with both Il2Cpp and Mono 项目地址: https://gitcode.com/gh_mirrors/me/MelonLoader …...

为什么你的内容收集工作流正在消耗你的创造力?一个关于小红书素材采集的思维实验
为什么你的内容收集工作流正在消耗你的创造力?一个关于小红书素材采集的思维实验 【免费下载链接】XHS-Downloader 小红书(XiaoHongShu、RedNote)链接提取/作品采集工具:提取账号发布、收藏、点赞、专辑作品链接;提取搜…...

从R-CNN到YOLO:初代YOLO论文如何用‘一张图看一次’颠覆了实时目标检测?
从R-CNN到YOLO:实时目标检测的范式革命 在计算机视觉领域,目标检测技术经历了从传统方法到深度学习驱动的跨越式发展。2015年,Joseph Redmon等人提出的YOLO(You Only Look Once)算法彻底改变了这一领域的技术范式&…...