利用角色roles上线wordpress项目
角色订制:roles
① 简介
对于以上所有的方式有个弊端就是无法实现复用假设在同时部署Web、db、ha 时或不同服务器组合不同的应用就需要写多个yml文件。很难实现灵活的调用。 roles 用于层次性、结构化地组织playbook。roles 能够根据层次型结构自动装载变量文件、tasks以及handlers等。要使用roles只需要在playbook中使用include指令即可。简单来讲,roles就是通过分别将变量(vars)、文件(file)、任务(tasks)、模块(modules)及处理器(handlers)放置于单独的目录中,并可以便捷地include它们的一种机制。角色一般用于基于主机构建服务的场景中,但也可以是用于构建守护进程等场景中。
② 角色集合
角色集合:roles/ mysql/ httpd/ nginx/ files/:存储由copy或script等模块调用的文件; tasks/:此目录中至少应该有一个名为main.yml的文件,用于定义各task;其它的文件需要由main.yml进行“包含”调用; handlers/:此目录中至少应该有一个名为main.yml的文件,用于定义各handler;其它的文件需要由main.yml进行“包含”调用; vars/:此目录中至少应该有一个名为main.yml的文件,用于定义各variable;其它的文件需要由main.yml进行“包含”调用; templates/:存储由template模块调用的模板文本; meta/:此目录中至少应该有一个名为main.yml的文件,定义当前角色的特殊设定及其依赖关系;其它的文件需要由main.yml进行“包含”调用; default/:此目录中至少应该有一个名为main.yml的文件,用于设定默认变量;
实验:
192.168.231.210 安装ansible机器 管理机
192.168.231.214
192.168.231.215 被管理的俩台机器
在roles目录下生成对应的目录结构
[root@localhost ~]# mkdir roles
[root@localhost ~]# cd  roles[root@localhost roles]# ansible-galaxy init nginx
- Role nginx was created successfully
[root@localhost roles]# ansible-galaxy init mysql
- Role mysql was created successfully
[root@localhost roles]# ansible-galaxy init php
- Role php was created successfully[root@localhost roles]# tree
.
├── mysql
│   ├── defaults
│   │   └── main.yml
│   ├── files
│   ├── handlers
│   │   └── main.yml
│   ├── meta
│   │   └── main.yml
│   ├── README.md
│   ├── tasks
│   │   └── main.yml
│   ├── templates
│   ├── tests
│   │   ├── inventory
│   │   └── test.yml
│   └── vars
│       └── main.yml
├── nginx
│   ├── defaults
│   │   └── main.yml
│   ├── files
│   ├── handlers
│   │   └── main.yml
│   ├── meta
│   │   └── main.yml
│   ├── README.md
│   ├── tasks
│   │   └── main.yml
│   ├── templates
│   ├── tests
│   │   ├── inventory
│   │   └── test.yml
│   └── vars
│       └── main.yml
└── php├── defaults│   └── main.yml├── files├── handlers│   └── main.yml├── meta│   └── main.yml├── README.md├── tasks│   └── main.yml├── templates├── tests│   ├── inventory│   └── test.yml└── vars└── main.yml27 directories, 24 files
分别定义配置文件 ,nginx配置文件
[root@localhost roles]# vim nginx/tasks/main.yml
---
# tasks file for nginx- name: 下载yum源shell: curl -o /opt/yum-server.sh http://10.36.192.100/yum-server.sh- name: 安装yum源shell: sh /opt/yum-server.sh- name: 安装nginxyum: name=nginx state=present- name: nginx配置文件template: src=/root/nginx.conf dest=/etc/nginx/- name: 拷贝phpcopy: src=/root/roles/wp-config.php  dest=/usr/share/nginx/html/wordpress- name: 启动Nginxservice: name=nginx state=started enabled=true- name: 拷贝wordpress源代码unarchive: src=/root/wordpress-6.4.1-zh_CN.tar.gz dest=/usr/share/nginx/html
-
创建 /root/roles/wp-config.php文件写入一下内容
[root@localhost roles]# vim wp-config.php
<?php
/*** The base configuration for WordPress** The wp-config.php creation script uses this file during the installation.* You don't have to use the web site, you can copy this file to "wp-config.php"* and fill in the values.** This file contains the following configurations:** * Database settings* * Secret keys* * Database table prefix* * ABSPATH** @link https://wordpress.org/documentation/article/editing-wp-config-php/** @package WordPress*/// ** Database settings - You can get this info from your web host ** //
/** The name of the database for WordPress */
define( 'DB_NAME', 'wordpress' );/** Database username */
define( 'DB_USER', 'wordpress' );/** Database password */
define( 'DB_PASSWORD', 'Qianfeng@123' );/** Database hostname */
define( 'DB_HOST', '192.168.231.214' );/** Database charset to use in creating database tables. */
define( 'DB_CHARSET', 'utf8mb4' );/** The database collate type. Don't change this if in doubt. */
define( 'DB_COLLATE', '' );/**#@+* Authentication unique keys and salts.** Change these to different unique phrases! You can generate these using* the {@link https://api.wordpress.org/secret-key/1.1/salt/ WordPress.org secret-key service}.** You can change these at any point in time to invalidate all existing cookies.* This will force all users to have to log in again.** @since 2.6.0*/
define( 'AUTH_KEY', 'U^UE ~}t)n(9.~=_qMaI:,K`X;Iji<Bsuh[b%yL-VpltA#_zRAX<~kJ>`D;PB:g4' );
define( 'SECURE_AUTH_KEY', 'mZcTrBj{U/-M#+AX:U +&?.&sXlV~/Dlm:rO|=/XL66gI+pl#IcwWUe(<p6HzYs1' );
define( 'LOGGED_IN_KEY', 'D(a}-NENZ{u[& =;|fSIDZt]`z aVKYyt|wt$5[jC#<yvgaM9mvvZCn|W(Wo=8rY' );
define( 'NONCE_KEY', 'MRC+QQ+o6`uE?S^`A1cwBP1I2jC#S?%xoR9dQSSs1+S}n.F{Cf7l*%c:dUSbo' );
define( 'AUTH_SALT', 'Ai6`CEc,KaGUmk-/mLFEU $:b0#!Mjg6_qTB)+*tx=SRsuD6+;z[Ji6gL|@8.TRn' );
define( 'SECURE_AUTH_SALT', '`NL:<P=!HtaQ> q]*}_TB9LA!%Kmh7CjXeM-s-/;>U0o8huC7&KPq{i_wNX%3OI{' );
define( 'LOGGED_IN_SALT', 'q9p;a=$q|m}NI*z!?UKgMzs*xKsF)L.TPhnZ/|U[5bw+RzDv.|$W#vMzu<g5!xYb' );
define( 'NONCE_SALT', 'F+/f&;FTu yZ^(qtdT3 zY%s~FN6lS71iic:X1&q4f^pzi4w3e/$b %,tRt?),$4' );/**#@-*//*** WordPress database table prefix.** You can have multiple installations in one database if you give each* a unique prefix. Only numbers, letters, and underscores please!*/
$table_prefix = 'wp_';/*** For developers: WordPress debugging mode.** Change this to true to enable the display of notices during development.* It is strongly recommended that plugin and theme developers use WP_DEBUG* in their development environments.** For information on other constants that can be used for debugging,* visit the documentation.** @link https://wordpress.org/documentation/article/debugging-in-wordpress/*/
define( 'WP_DEBUG', false );/* Add any custom values between this line and the "stop editing" line. *//* That's all, stop editing! Happy publishing. *//** Absolute path to the WordPress directory. */
if ( ! defined( 'ABSPATH' ) ) {define( 'ABSPATH', __DIR__ . '/' );
}/** Sets up WordPress vars and included files. */
require_once ABSPATH . 'wp-settings.php';
修改变量文件
[root@localhost roles]# vim    nginx/vars/main.yml
---
# vars file for nginxnginx_user: rootnginx_port: 80
放置我们所需要的文件到指定目录
直接 cp /root/nginx.conf  /root/roles/nginx/templates/nginx.conf
也可以直接写
[root@localhost roles]# vim nginx/templates/nginx.conf
# For more information on configuration, see:
#   * Official English Documentation: http://nginx.org/en/docs/
#   * Official Russian Documentation: http://nginx.org/ru/docs/user {{ nginx_user }};
worker_processes auto;
error_log /var/log/nginx/error.log;
pid /run/nginx.pid;# Load dynamic modules. See /usr/share/doc/nginx/README.dynamic.
include /usr/share/nginx/modules/*.conf;events {worker_connections 1024;
}http {log_format  main  '$remote_addr - $remote_user [$time_local] "$request" ''$status $body_bytes_sent "$http_referer" ''"$http_user_agent" "$http_x_forwarded_for"';access_log  /var/log/nginx/access.log  main;sendfile            on;tcp_nopush          on;tcp_nodelay         on;keepalive_timeout   65;types_hash_max_size 4096;include             /etc/nginx/mime.types;default_type        application/octet-stream;# Load modular configuration files from the /etc/nginx/conf.d directory.# See http://nginx.org/en/docs/ngx_core_module.html#include# for more information.include /etc/nginx/conf.d/*.conf;server {listen       {{ nginx_port }};listen       [::]:80;server_name  _;root         /usr/share/nginx/html/wordpress;# Load configuration files for the default server block.include /etc/nginx/default.d/*.conf;location / {root /usr/share/nginx/html/wordpress;index index.php;}location ~ \.php$ {root          /usr/share/nginx/html/wordpress;  #指定网站目录fastcgi_pass   127.0.0.1:9000;    #指定访问地址fastcgi_index  index.php;		#指定默认文件fastcgi_param  SCRIPT_FILENAME  $document_root$fastcgi_script_name;include        fastcgi_params;  #包含nginx常量定义}  error_page 404 /404.html;location = /404.html {}error_page 500 502 503 504 /50x.html;location = /50x.html {}}# Settings for a TLS enabled server.
#
#    server {
#        listen       443 ssl http2;
#        listen       [::]:443 ssl http2;
#        server_name  _;
#        root         /usr/share/nginx/html;
#
#        ssl_certificate "/etc/pki/nginx/server.crt";
#        ssl_certificate_key "/etc/pki/nginx/private/server.key";
#        ssl_session_cache shared:SSL:1m;
#        ssl_session_timeout  10m;
#        ssl_ciphers HIGH:!aNULL:!MD5;
#        ssl_prefer_server_ciphers on;
#
#        # Load configuration files for the default server block.
#        include /etc/nginx/default.d/*.conf;
#
#        error_page 404 /404.html;
#            location = /40x.html {
#        }
#
#        error_page 500 502 503 504 /50x.html;
#            location = /50x.html {
#        }
#    }}
php配置文件
[root@localhost roles]# vim php/tasks/main.yml
---
# tasks file for php- name: 安装PHPyum: name=php80-php-xsl,php80-php,php80-php-cli,php80-php-devel,php80-php-gd,php80-php-pdo,php80-php-mysql,php80-php-fpm state=present- name: 启动PHPservice: name=php80-php-fpm state=started enabled=true
mysql配置文件
[root@localhost roles]# cat mysql/tasks/main.yml
---
# tasks file for mysql- name: 安装数据库yum: name=mariadb-server,mariadb state=present disablerepo=mysql-5.7-community- name: 启动数据库service: name=mariadb state=started enabled=true- name: 配置数据库shell: mysql -e "create database {{ db_name }}; grant all on wordpress.* to 'wordpress'@'%' identified by '{{ db_passwd }}'; flush privileges"
mysql变量文件
[root@localhost roles]# vim mysql/vars/main.yml
---
# vars file for mysql
db_passwd: 'Qianfeng@123'
db_name: 'wordpress'
定义剧本文件
接下来,我们就来定义剧本文件,由于大部分设置我们都单独配置在了roles里面,所以,接下来剧本就只需要写一点点内容即可:
[root@localhost roles]# vim roles.yml
---- hosts: webremote_user: rootroles:- nginx- php- mysql
启动服务
[root@localhost roles]# ansible-playbook roles.ymlPLAY [web] ********************************************************************************TASK [Gathering Facts] ********************************************************************
ok: [web1]
ok: [web2]TASK [nginx : 下载yum源] *********************************************************************
[WARNING]: Consider using the get_url or uri module rather than running 'curl'.  If you
need to use command because get_url or uri is insufficient you can add 'warn: false' to
this command task or set 'command_warnings=False' in ansible.cfg to get rid of this
message.
changed: [web1]
changed: [web2]TASK [nginx : 安装yum源] *********************************************************************
changed: [web1]
changed: [web2]TASK [安装nginx] ****************************************************************************
changed: [web1]
changed: [web2]TASK [nginx配置文件] **************************************************************************
changed: [web1]
changed: [web2]TASK [nginx : 启动Nginx] ********************************************************************
changed: [web2]
changed: [web1]TASK [nginx : 拷贝wordpress源代码] *************************************************************
changed: [web2]
changed: [web1]TASK [php : 安装PHP] ************************************************************************
changed: [web1]
changed: [web2]TASK [php : 启动PHP] ************************************************************************
changed: [web1]
changed: [web2]TASK [mysql : 安装数据库] **********************************************************************
changed: [web1]
changed: [web2]TASK [mysql : 启动数据库] **********************************************************************
changed: [web1]
changed: [web2]TASK [mysql : 配置数据库] **********************************************************************
changed: [web1]
changed: [web2]PLAY RECAP ********************************************************************************
web1                       : ok=12   changed=11   unreachable=0    failed=0    skipped=0    rescued=0    ignored=0
web2                       : ok=12   changed=11   unreachable=0    failed=0    skipped=0    rescued=0    ignored=0
查看所有服务的端口
[root@localhost roles]# ansible web -m shell -a 'ss -nplt'
web1 | CHANGED | rc=0 >>
State      Recv-Q Send-Q Local Address:Port               Peer Address:Port
LISTEN     0      128    127.0.0.1:9000                     *:*                   users:(("php-fpm",pid=2504,fd=9),("php-fpm",pid=2503,fd=9),("php-fpm",pid=2502,fd=9),("php-fpm",pid=2501,fd=9),("php-fpm",pid=2500,fd=9),("php-fpm",pid=2499,fd=7))
LISTEN     0      50           *:3306                     *:*                   users:(("mysqld",pid=2986,fd=14))
LISTEN     0      128          *:80                       *:*                   users:(("nginx",pid=2057,fd=6),("nginx",pid=2056,fd=6),("nginx",pid=2055,fd=6))
LISTEN     0      128          *:22                       *:*                   users:(("sshd",pid=922,fd=3))
LISTEN     0      100    127.0.0.1:25                       *:*                   users:(("master",pid=1115,fd=13))
LISTEN     0      128       [::]:80                    [::]:*                   users:(("nginx",pid=2057,fd=7),("nginx",pid=2056,fd=7),("nginx",pid=2055,fd=7))
LISTEN     0      128       [::]:22                    [::]:*                   users:(("sshd",pid=922,fd=4))
LISTEN     0      100      [::1]:25                    [::]:*                   users:(("master",pid=1115,fd=14))
web2 | CHANGED | rc=0 >>
State      Recv-Q Send-Q Local Address:Port               Peer Address:Port
LISTEN     0      128    127.0.0.1:9000                     *:*                   users:(("php-fpm",pid=2499,fd=9),("php-fpm",pid=2498,fd=9),("php-fpm",pid=2497,fd=9),("php-fpm",pid=2496,fd=9),("php-fpm",pid=2495,fd=9),("php-fpm",pid=2494,fd=7))
LISTEN     0      50           *:3306                     *:*                   users:(("mysqld",pid=2983,fd=14))
LISTEN     0      128          *:80                       *:*                   users:(("nginx",pid=2052,fd=6),("nginx",pid=2051,fd=6),("nginx",pid=2050,fd=6))
LISTEN     0      128          *:22                       *:*                   users:(("sshd",pid=920,fd=3))
LISTEN     0      100    127.0.0.1:25                       *:*                   users:(("master",pid=1115,fd=13))
LISTEN     0      128       [::]:80                    [::]:*                   users:(("nginx",pid=2052,fd=7),("nginx",pid=2051,fd=7),("nginx",pid=2050,fd=7))
LISTEN     0      128       [::]:22                    [::]:*                   users:(("sshd",pid=920,fd=4))
LISTEN     0      100      [::1]:25                    [::]:*                   users:(("master",pid=1115,fd=14))
进去浏览器查看


相关文章:
利用角色roles上线wordpress项目
角色订制:roles ① 简介 对于以上所有的方式有个弊端就是无法实现复用假设在同时部署Web、db、ha 时或不同服务器组合不同的应用就需要写多个yml文件。很难实现灵活的调用。 roles 用于层次性、结构化地组织playbook。roles 能够根据层次型结构自动装载变量文…...
4.0 Linux进程前导知识
个人主页:Lei宝啊 愿所有美好如期而遇 冯.诺依曼体系 CPU:运算器,控制器 输入设备:键盘,麦克风,摄像头,鼠标,网卡,磁盘等。 输出设备:显示器࿰…...

推荐一份适合所有人做的副业,尤其是程序员。
我建议每个人都去尝试一下网上接单,这是一个门槛低、类型多样的方式,尤其适合程序员! 在接单平台上,你可以看到各种类型的兼职。以freelancer为例,你可以在这里找到技术、设计、写作等类型的兼职,只要发挥…...
Linux中字符设备的打开、写入
一个内核模块应该由以下几部分组成。 第一部分,头文件部分。一般的内核模块,都需要 include 下面两个头文件: #include <linux/module.h> #include <linux/init.h> 第二部分,定义一些函数,用于处理内核…...

3d max软件中的缓存垃圾该如何清理?
使用3d max建模到渲染操作,来回对效果图调整的次数过多时,就会出现一下看不到的垃圾缓存,影响保存的速度,影响效率! 对于这类的3d垃圾清理的有什么高效方法呢? 3dmax垃圾清理的常规操作如下: 1、…...

11.13 牛客刷题8/10
11.13 信号完整性 指针地址 的加减,注意 最后转为16进制...

CI/CD简介
CI/CD简介 1、CI/CD流水线2、什么是CI/CD3、CI/CD的优点4、CI/CD的工作原理5、CI/CD流水线工具6、CI/CD的应用7、CI/CD的未来趋势 1、CI/CD流水线 从最初的瀑布模型,到后来的敏捷开发,再到今天的DevOps,这是现代开发人员构建出色产品的技术路…...

python opencv 读取文件夹下所有MP4文件并解析成jpg图像
你可以使用Python的OpenCV库来读取文件夹中的所有MP4文件,并将其解析为JPG图像。以下是一个示例代码,演示了如何实现这个功能,并设置解析间隔为3帧: import os import cv2def extract_frames(input_folder, output_folder, inter…...
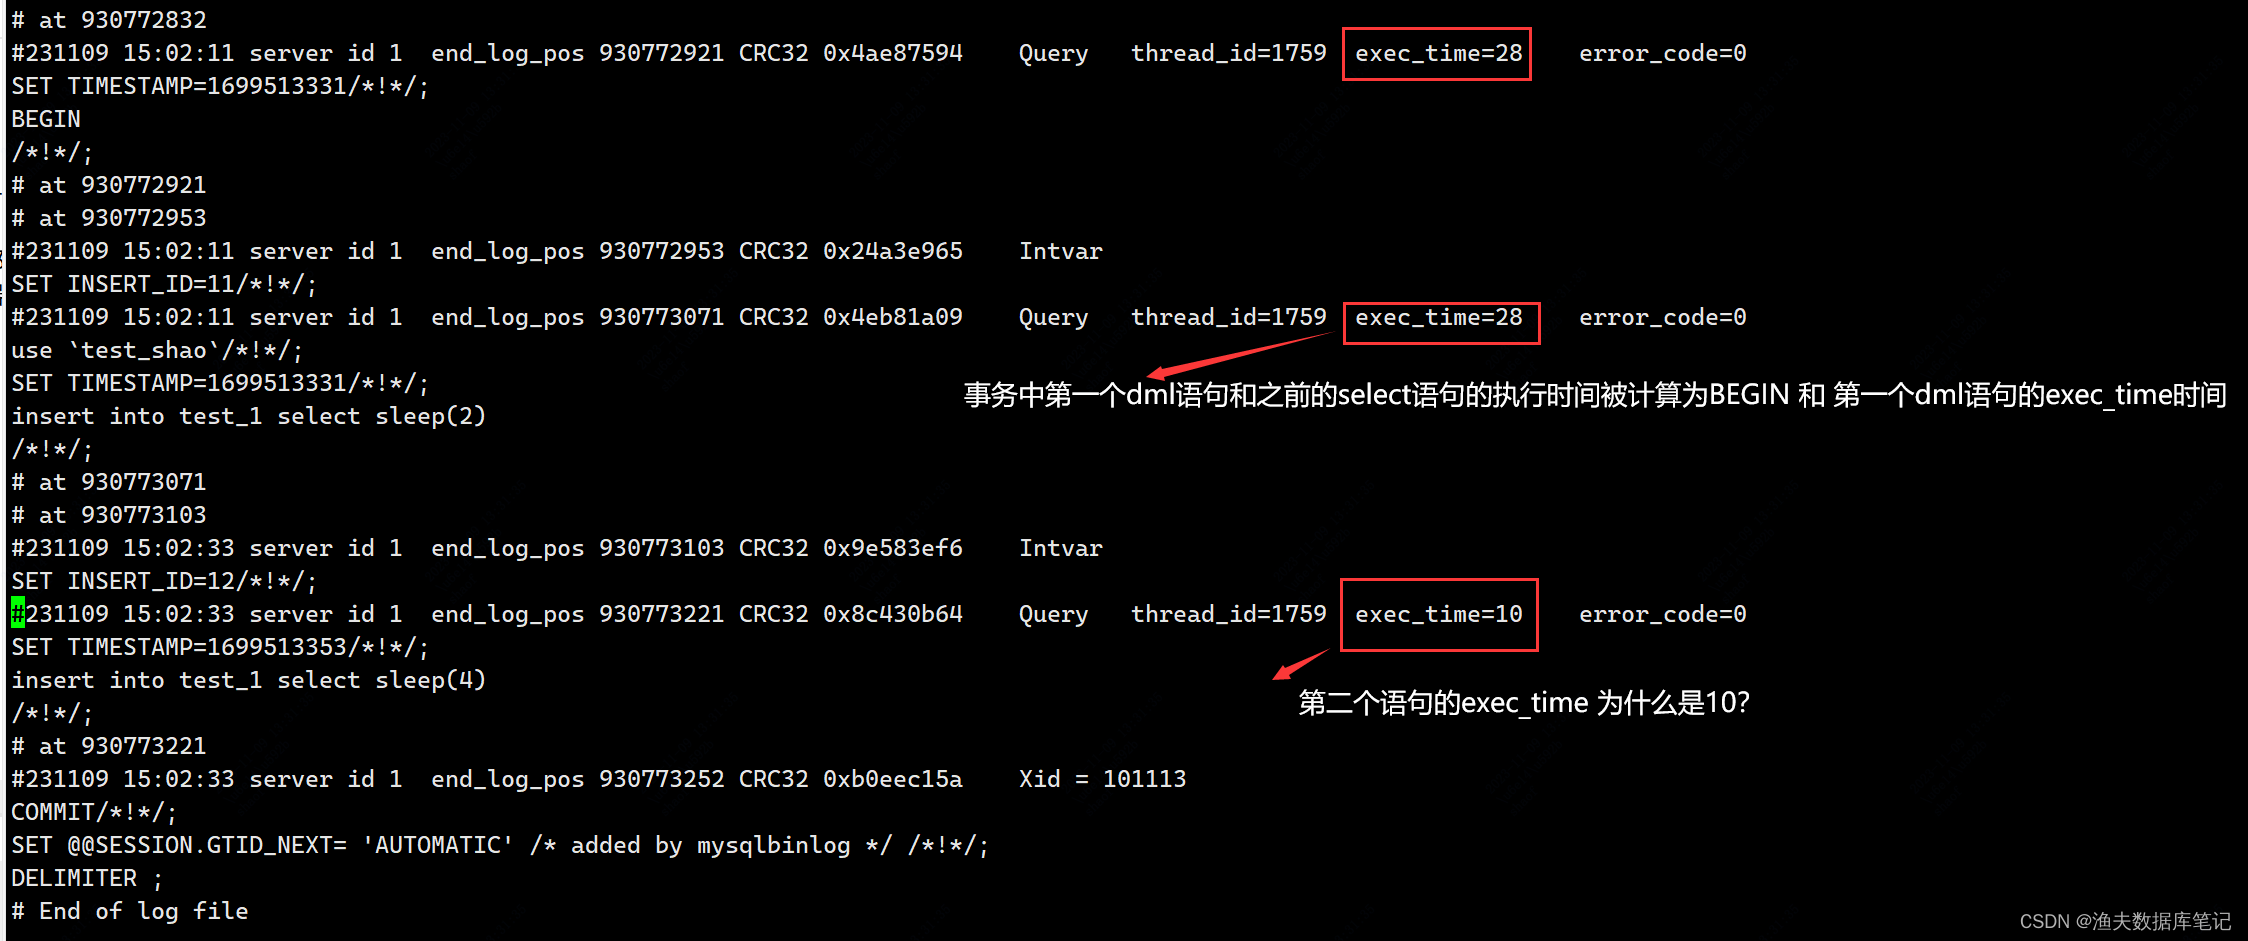
MySQL binlog 日志解析后的exec_time导致表示什么时间?
1. exec_time 到底表示什么时间? MySQL binlog日志解析后,我们能看到会有 exec_time ,从字面意思理解这个记录的是执行时间,那这个记录的到底是单条sql的执行时间?还是事务的执行时间?下面通过测试来解读一…...

【Linux】:git基本操作_添加文件_两种场景_查看.git文件 || git修改文件 || 版本回退
🎯添加⽂件–场景⼀ 🎯在包含.git的⽬录下新建⼀个ReadMe⽂件,我们可以使⽤ git add 命令可以将⽂件添加到暂存区: • 添加⼀个或多个⽂件到暂存区: git add [file1] [file2] … • 添加指定⽬录到暂存区,…...

Django 基于ORM的CURD、外键关联,请求的生命周期
文章目录 基于ORM进行的CURDORM外键关联Django请求的生命周期流程图 基于ORM进行的CURD 本质上就是通过面向对象的方式,对数据库的数据进行增、删、改、查。 这里将会将我们之前所有内容结合到一起,首先确保基于上序操作已经建立好了UserInfo表ÿ…...
集合贴4——QA机器人设计与优化
基础课21——知识库管理-CSDN博客文章浏览阅读342次,点赞6次,收藏2次。知识库中有什么信息内容,决定了智能客服机器人在回答时可以调用哪些信息内容,甚至可以更简单地理解为这是智能客服机器人的话术库。https://blog.csdn.net/22…...
【Verilog语法】
Verilog语法 1. Verilog语法1.1 拼接运算符1.2 运算符优先级1.3 注释1.4 关键字1.5 模块结构1.6 结构语句1.7 赋值语句1.8 条件语句1.9 状态机1.10 OSI七层模型 1. Verilog语法 1.1 拼接运算符 1.2 运算符优先级 1.3 注释 1.4 关键字 1.5 模块结构 1.6 结构语句 1.7 赋值语句 …...
阿里云通用算力型u1服务器和e实例有什么区别?选择攻略
阿里云服务器ECS经济型e实例和通用算力型u1实例有什么区别?如何选择?ECS经济型e实例是共享型云服务器,通用算力型u实例是企业级独享型云服务器,e实例性价比高,现在2核2G3M带宽一年99元,云服务器u1价格相对要…...
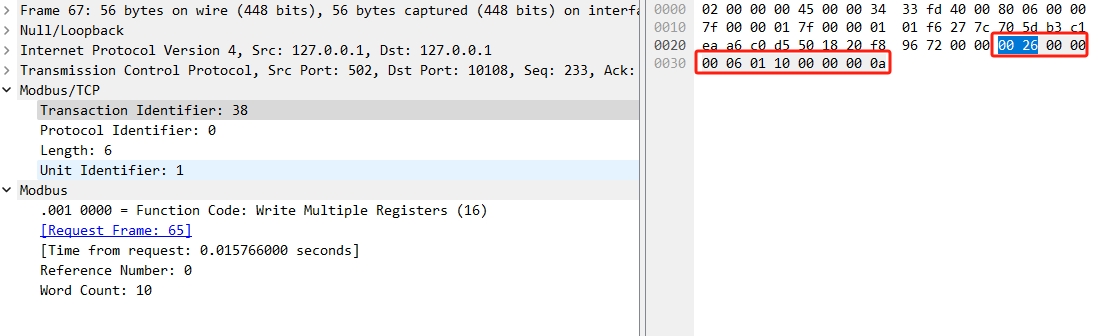
modbus-TCP协议详解
modbus-TCP协议详解 1996年施耐德公司推出基于以太网TCP/IP的modbus协议:modbus-TCP。 MODBUS-TCP使MODBUS-RTU协议运行于以太网,MODBUS-TCP使用TCP/IP以太网在站点间传送MODBUS报文,MODBUS-TCP结合了以太网物理网络和网络标准TCP/IP以及以…...
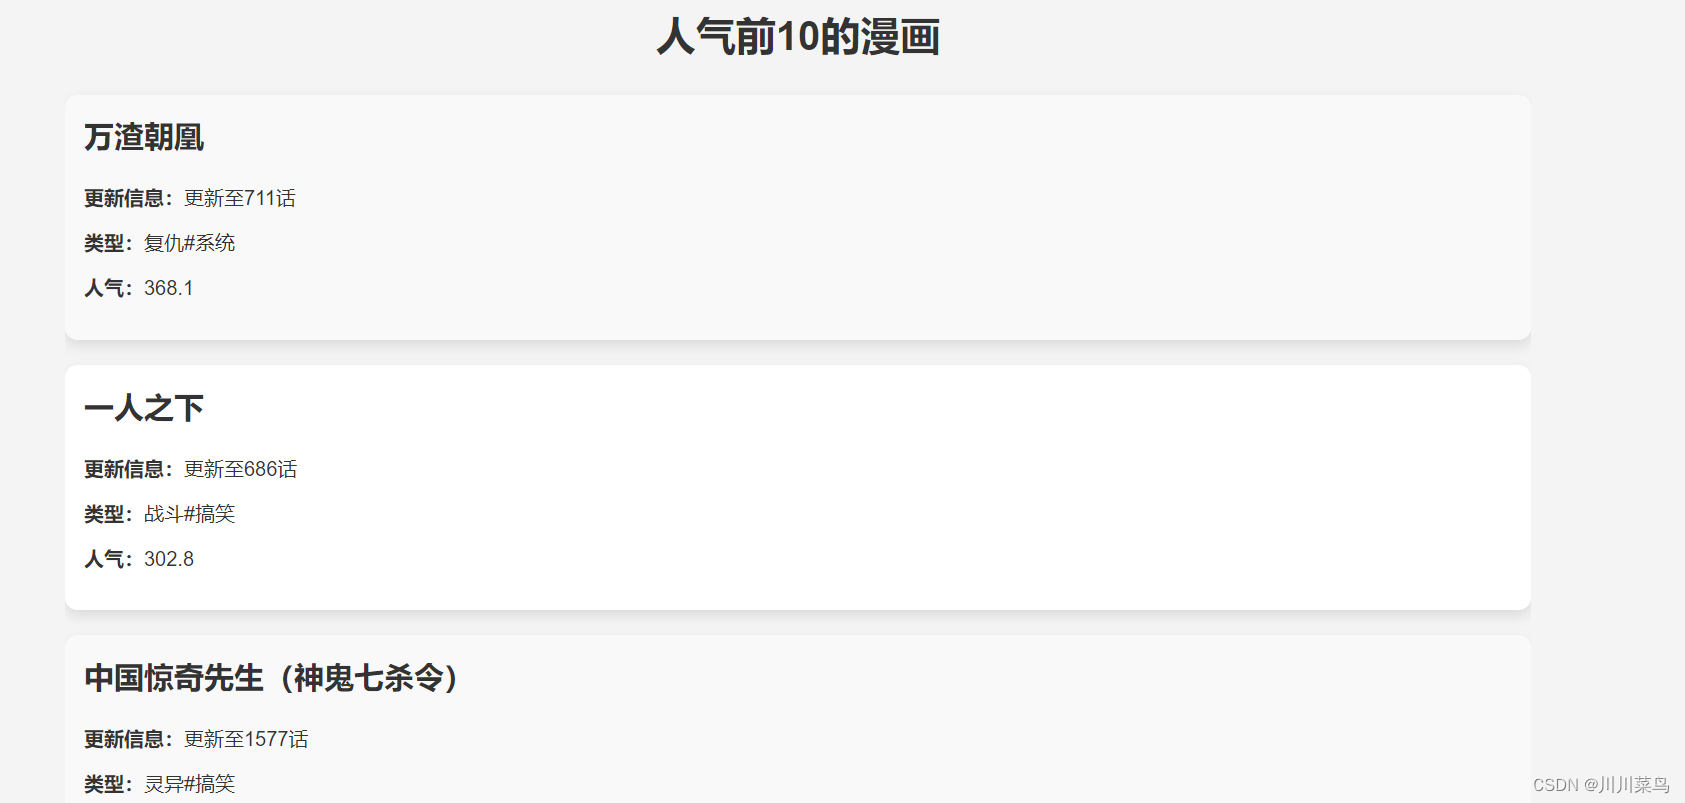
爬虫项目(12):正则、多线程抓取腾讯动漫,Flask展示数据
文章目录 书籍推荐正则抓取腾讯动漫数据Flask展示数据 书籍推荐 如果你对Python网络爬虫感兴趣,强烈推荐你阅读《Python网络爬虫入门到实战》。这本书详细介绍了Python网络爬虫的基础知识和高级技巧,是每位爬虫开发者的必读之作。详细介绍见ὄ…...

gedit编辑文件时常用快捷键
问题: 最近在修改文件时提到了gedit这个工具,与vi一样也是一个文件编辑器。但是在命令方面又有不同,在快捷键方面和Windows的使用习惯非常相似。 gedit举例: CTRL-Z:撤销CTRL-C:复制CTRL-V:粘贴CTRL-T:缩进CTRL-Q:退出CTRL-S:保…...

【C++干货铺】剖析string | 底层实现
个人主页点击直达:小白不是程序媛 C专栏:C干货铺 代码仓库:Gitee 目录 成员变量 成员函数 构造和拷贝构造 赋值重载 析构函数 operator[ ] size 迭代器 reserve(扩容函数) push_back(尾插函数)…...
nmap原理与使用
kali的命令行中可以直接使用 nmap 命令,打开一个「终端」,输入 nmap 后回车,可以看到 nmap 的版本,证明 nmap 可用。 一、端口扫描 扫描主机的「开放端口」,在nmap后面直接跟主机IP(默认扫描1000个端口&am…...

AI批量剪辑矩阵托管系统----源码技术开发
AI批量剪辑矩阵托管系统----源码技术开发 抖音账号矩阵系统是基于抖音开放平台研发的用于管理和运营多个抖音账号的平台。它可以帮助用户管理账号、发布内容、营销推广、分析数据等多项任务,从而提高账号的曝光度和影响力。 具体来说,抖音账号矩阵系统可…...

除了ulimit -c unlimited:深入理解Linux core dump机制与高级配置指南
深入Linux核心转储:从基础配置到生产环境实战指南当服务器上的关键应用突然崩溃时,系统管理员最需要的就是一份完整的"事故现场记录"。Linux的core dump机制正是为此而生,它能保存程序崩溃时的内存状态、寄存器值和调用堆栈&#x…...

PDF 可视化签名盖章页技术解析
本文是我在设备检测系统项目开发中,无设备检测的技术实现备忘录,记载实现过程。 本文以 PC 端页面 sign-pdf.vue 为主线,说明「无设备报检」在报告审批环节如何通过前后端协作,完成报告/记录 PDF 上的签名、印章、报告编号拖放定位,并在审批通过后由后端合并生成带签章的正…...

电容损坏深度诊断,从外观到 ESR精准区分容衰与漏电
在 PCB 故障中,电容损坏占比超 40%,是当之无愧的 “头号杀手”。很多工程师仅靠 “鼓包漏液” 判断电容好坏,殊不知80% 的电容损坏是隐性的—— 外观平整但容值衰减、ESR 升高、轻微漏电,导致供电不稳、系统重启、噪声增大&#x…...

艾尔登法环存档迁移终极指南:3分钟解决角色转移难题
艾尔登法环存档迁移终极指南:3分钟解决角色转移难题 【免费下载链接】EldenRingSaveCopier 项目地址: https://gitcode.com/gh_mirrors/el/EldenRingSaveCopier 还在为《艾尔登法环》存档版本不兼容而烦恼吗?EldenRingSaveCopier 是你的终极解决…...
)
GIS工程应用记录(AI辅助编程)
问题的问题:语境坍缩“从各个角度提出问题,AI做出对应积极答复和修改,结果没有什么变化。”这,就是元问题最核心的症状。你尝试了所有你已知的“高级”协作手段,但就像重拳打在棉花上,AI永远在积极回应&…...

DIY四路自动音频源切换器:从信号检测到继电器隔离的完整设计
1. 项目概述与核心需求解析作为一个喜欢在工作室里捣鼓各种音频设备的玩家,我经常遇到一个挺烦人的问题:我的功放只有一组输入,但我想接的设备却有好几个——台式电脑、平板、蓝牙接收模块,还有一台树莓派。每次想切换音源&#x…...

OmenSuperHub:基于WMI BIOS控制的高性能笔记本硬件管理方案
OmenSuperHub:基于WMI BIOS控制的高性能笔记本硬件管理方案 【免费下载链接】OmenSuperHub Control Omen laptop performance, fan speeds, and keyboard lighting, and unlock power limits. 项目地址: https://gitcode.com/gh_mirrors/om/OmenSuperHub 在惠…...
)
告别杂乱!用FileMenu Tools 8.4.2一键清理Windows 11右键菜单(附隐藏技巧)
Windows 11右键菜单精简指南:用FileMenu Tools打造高效工作流每次在文件上点击右键时,那个缓慢弹出的冗长菜单是否让你感到烦躁?随着安装的软件越来越多,Windows的右键菜单往往会变得臃肿不堪,严重影响工作效率。今天&…...

ubuntu环境下为python项目配置taotoken多模型api密钥与端点
🚀 告别海外账号与网络限制!稳定直连全球优质大模型,限时半价接入中。 👉 点击领取海量免费额度 Ubuntu环境下为Python项目配置Taotoken多模型API密钥与端点 1. 准备工作 在Ubuntu系统上为Python项目接入Taotoken,首…...

终极崩坏星穹铁道自动化指南:3分钟掌握解放双手的智能游戏伴侣
终极崩坏星穹铁道自动化指南:3分钟掌握解放双手的智能游戏伴侣 【免费下载链接】StarRailAssistant 崩坏:星穹铁道自动化 | 崩坏:星穹铁道自动锄大地 | 崩坏:星穹铁道锄大地 | 自动锄大地 | 基于模拟按键 项目地址: https://git…...