【工程部署】在RK3588上部署OCR(文字检测识别)(DBNet+CRNN)
硬件平台:
1、firefly安装Ubuntu系统的RK3588;
2、安装Windows系统的电脑一台,其上安装Ubuntu18.04系统虚拟机。
参考手册:《00-Rockchip_RKNPU_User_Guide_RKNN_API_V1.3.0_CN》
《RKNN Toolkit Lite2 用户使用指南》
1、文字检测
项目地址:
GitHub - WenmuZhou/PytorchOCR: 基于Pytorch的OCR工具库,支持常用的文字检测和识别算法
DBNet(Dynamic-Link Bi-directional Network)是一种用于文本检测的深度学习模型。该模型于2019年由Minghui Liao等人提出,并在文本检测领域取得了显著的成果。DBNet的设计目标是在保持高精度的同时,提高文本检测的效率。传统的文本检测模型通常使用单向的横向连接或纵向连接来处理文本实例。然而,这种单向连接可能导致信息的不完整传递或信息冗余,影响了检测性能和速度。
为了解决这些问题,DBNet引入了双向动态连接机制,允许横向和纵向两个方向上的信息流动。具体来说,DBNet由两个关键组成部分构成:
(1) Bi-directional FFM(Feature Fusion Module):这是DBNet的核心组件之一。它包括横向和纵向两个方向的子模块。在横向子模块中,DBNet通过可变形卷积(deformable convolution)从不同尺度的特征图中提取并融合文本实例的特征。而在纵向子模块中,DBNet使用自适应的特征选择机制,动态选择最具有代表性的特征。这些子模块的组合使得文本实例的特征能够全面而高效地进行建模。
(2) Aggregation Decoder:这是DBNet的另一个重要组件,用于从特征图中生成文本实例的边界框和对应的文本分数。该解码器结合了横向和纵向的特征,通过逐步聚合来预测文本的位置和形状。由于使用了双向动态连接,解码器能够更准确地还原文本实例的形态。
DBNet的训练过程包括前向传播和反向传播。在前向传播中,DBNet将图像输入网络,经过一系列卷积、特征融合和解码操作,得到文本检测的结果。然后,通过计算预测结果和真实标签之间的损失函数,使用反向传播算法来更新网络参数,从而不断优化模型的性能。
DBNet在文本检测任务中取得了非常好的效果。其双向动态连接机制允许更好地利用横向和纵向的信息,提高了文本检测的准确性和鲁棒性。此外,相比传统的文本检测模型,DBNet在保持高精度的情况下,大幅提升了检测速度,使得它在实际应用中更具可用性和实用性。因此,DBNet在文字检测、自动化办公、图像识别等领域都具有广泛的应用前景。论文地址:https://arxiv.org/abs/1911.08947
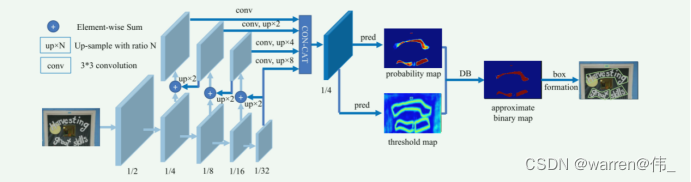 图1. DBNet网络结构
2、文字识别
项目地址:
GitHub - WenmuZhou/PytorchOCR: 基于Pytorch的OCR工具库,支持常用的文字检测和识别算法
CRNN(Convolutional Recurrent Neural Network)是一种深度学习模型,结合了卷积神经网络(CNN)和循环神经网络(RNN)的优势,广泛应用于图像文本识别(OCR)任务。CRNN模型于2015年由Baoguang Shi等人首次提出,并在OCR领域取得了显著的突破。
CRNN的设计思想是将卷积神经网络用于图像的特征提取,并利用循环神经网络来对序列建模,从而使得CRNN能够直接从图像级别到序列级别进行端到端的学习。
CRNN模型通常由以下几个部分组成:
(1) 卷积层(Convolutional Layers):CRNN利用多个卷积层来提取图像中的局部特征。这些卷积层可以学习不同层次的图像表示,从低级特征(如边缘和纹理)到高级特征(如形状和模式)。
(2) RNN层(Recurrent Layers):在卷积层后面,CRNN采用RNN层来处理序列数据。RNN能够捕捉序列的上下文信息,因此对于OCR任务而言,它可以有效地处理不同长度的文本序列。
(3) 转录层(Transcription Layer):在RNN层之后,CRNN使用转录层来将RNN输出映射到字符类别。这通常是一个全连接层,将RNN输出映射到预定义的字符集合,从而实现对文本的识别。
CRNN的训练过程包括两个主要步骤:前向传播和反向传播。在前向传播中,CRNN将图像输入模型,经过卷积和循环层,最终得到文本序列的预测。然后,通过计算预测结果和真实标签之间的损失函数,使用反向传播算法来更新网络参数,从而使得模型的预测结果逐渐接近真实标签。
CRNN在OCR领域的应用广泛,能够识别不同尺寸、字体、颜色和背景的文本。它在识别长文本序列方面表现优秀,并且由于端到端的设计,避免了传统OCR系统中复杂的流水线处理。因此,CRNN在很多实际场景中都取得了很好的效果,如车牌识别、文字检测和手写体识别等。
总结来说,CRNN是一种将CNN和RNN结合起来的深度学习模型,用于图像文本识别任务。其端到端的设计、优秀的序列建模能力和在OCR领域的广泛应用,使得CRNN成为了一种重要的OCR模型,为自动化文本处理和识别带来了巨大的便利。论文地址:https://arxiv.org/abs/1507.05717
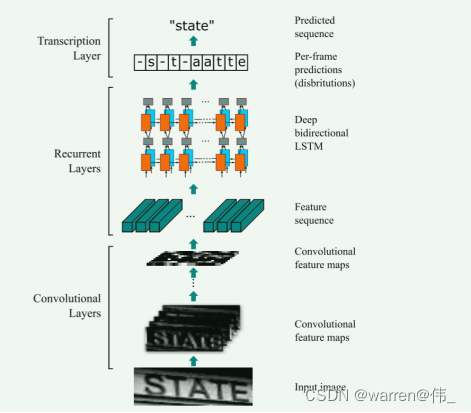
图2. CRNN结构
环境搭建
rknn-toolkit以及rknpu_sdk环境搭建
(手把手)rknn-toolkit以及rknpu_sdk环境搭建--以rk3588为例_warren@伟_的博客-CSDN博客
模型的导出与验证
文字检测
导出onnx模型
'''Author: warrenDate: 2023-06-07 14:52:27LastEditors: warrenLastEditTime: 2023-06-12 15:20:28FilePath: /warren/VanillaNet1/export_onnx.pyDescription: export onnx modelCopyright (c) 2023 by ${git_name_email}, All Rights Reserved.'''#!/usr/bin/env python3import torchfrom torchocr.networks import build_modelMODEL_PATH='./model/det_db_mbv3_new.pth'DEVICE='cuda:0' if torch.cuda.is_available() else 'cpu'print("-----------------------devices",DEVICE)class DetInfer:def __init__(self, model_path):ckpt = torch.load(model_path, map_location=DEVICE)cfg = ckpt['cfg']self.model = build_model(cfg['model'])state_dict = {}for k, v in ckpt['state_dict'].items():state_dict[k.replace('module.', '')] = vself.model.load_state_dict(state_dict)self.device = torch.device(DEVICE)self.model.to(self.device)self.model.eval()checkpoint = torch.load(MODEL_PATH, map_location=DEVICE)# Prepare input tensorinput = torch.randn(1, 3, 640, 640, requires_grad=False).float().to(torch.device(DEVICE))# Export the torch model as onnxprint("-------------------export")torch.onnx.export(self.model,input,'detect_model_small.onnx', # name of the exported onnx modelexport_params=True,opset_version=12,do_constant_folding=False)# Load the pretrained model and export it as onnxmodel = DetInfer(MODEL_PATH)验证
import numpy as npimport cv2import torchfrom torchvision import transforms# from label_convert import CTCLabelConverterimport cv2import numpy as npimport pyclipperfrom shapely.geometry import Polygon import onnxruntimeclass DBPostProcess():def __init__(self, thresh=0.3, box_thresh=0.7, max_candidates=1000, unclip_ratio=2):self.min_size = 3self.thresh = threshself.box_thresh = box_threshself.max_candidates = max_candidatesself.unclip_ratio = unclip_ratiodef __call__(self, pred, h_w_list, is_output_polygon=False):'''batch: (image, polygons, ignore_tagsh_w_list: 包含[h,w]的数组pred:binary: text region segmentation map, with shape (N, 1,H, W)'''pred = pred[:, 0, :, :]segmentation = self.binarize(pred)boxes_batch = []scores_batch = []for batch_index in range(pred.shape[0]):height, width = h_w_list[batch_index]boxes, scores = self.post_p(pred[batch_index], segmentation[batch_index], width, height,is_output_polygon=is_output_polygon)boxes_batch.append(boxes)scores_batch.append(scores)return boxes_batch, scores_batchdef binarize(self, pred):return pred > self.threshdef post_p(self, pred, bitmap, dest_width, dest_height, is_output_polygon=False):'''_bitmap: single map with shape (H, W),whose values are binarized as {0, 1}'''height, width = pred.shapeboxes = []new_scores = []# bitmap = bitmap.cpu().numpy()if cv2.__version__.startswith('3'):_, contours, _ = cv2.findContours((bitmap * 255).astype(np.uint8), cv2.RETR_LIST, cv2.CHAIN_APPROX_SIMPLE)if cv2.__version__.startswith('4'):contours, _ = cv2.findContours((bitmap * 255).astype(np.uint8), cv2.RETR_LIST, cv2.CHAIN_APPROX_SIMPLE)for contour in contours[:self.max_candidates]:epsilon = 0.005 * cv2.arcLength(contour, True)approx = cv2.approxPolyDP(contour, epsilon, True)points = approx.reshape((-1, 2))if points.shape[0] < 4:continuescore = self.box_score_fast(pred, contour.squeeze(1))if self.box_thresh > score:continueif points.shape[0] > 2:box = self.unclip(points, unclip_ratio=self.unclip_ratio)if len(box) > 1:continueelse:continuefour_point_box, sside = self.get_mini_boxes(box.reshape((-1, 1, 2)))if sside < self.min_size + 2:continueif not isinstance(dest_width, int):dest_width = dest_width.item()dest_height = dest_height.item()if not is_output_polygon:box = np.array(four_point_box)else:box = box.reshape(-1, 2)box[:, 0] = np.clip(np.round(box[:, 0] / width * dest_width), 0, dest_width)box[:, 1] = np.clip(np.round(box[:, 1] / height * dest_height), 0, dest_height)boxes.append(box)new_scores.append(score)return boxes, new_scoresdef unclip(self, box, unclip_ratio=1.5):poly = Polygon(box)distance = poly.area * unclip_ratio / poly.lengthoffset = pyclipper.PyclipperOffset()offset.AddPath(box, pyclipper.JT_ROUND, pyclipper.ET_CLOSEDPOLYGON)expanded = np.array(offset.Execute(distance))return expandeddef get_mini_boxes(self, contour):bounding_box = cv2.minAreaRect(contour)points = sorted(list(cv2.boxPoints(bounding_box)), key=lambda x: x[0])index_1, index_2, index_3, index_4 = 0, 1, 2, 3if points[1][1] > points[0][1]:index_1 = 0index_4 = 1else:index_1 = 1index_4 = 0if points[3][1] > points[2][1]:index_2 = 2index_3 = 3else:index_2 = 3index_3 = 2box = [points[index_1], points[index_2], points[index_3], points[index_4]]return box, min(bounding_box[1])def box_score_fast(self, bitmap, _box):# bitmap = bitmap.detach().cpu().numpy()h, w = bitmap.shape[:2]box = _box.copy()xmin = np.clip(np.floor(box[:, 0].min()).astype(np.int), 0, w - 1)xmax = np.clip(np.ceil(box[:, 0].max()).astype(np.int), 0, w - 1)ymin = np.clip(np.floor(box[:, 1].min()).astype(np.int), 0, h - 1)ymax = np.clip(np.ceil(box[:, 1].max()).astype(np.int), 0, h - 1)mask = np.zeros((ymax - ymin + 1, xmax - xmin + 1), dtype=np.uint8)box[:, 0] = box[:, 0] - xminbox[:, 1] = box[:, 1] - ymincv2.fillPoly(mask, box.reshape(1, -1, 2).astype(np.int32), 1)return cv2.mean(bitmap[ymin:ymax + 1, xmin:xmax + 1], mask)[0]def narrow_224_32(image, expected_size=(224,32)):ih, iw = image.shape[0:2]ew, eh = expected_size# scale = eh / ihscale = min((eh/ih),(ew/iw))# scale = eh / max(iw,ih)nh = int(ih * scale)nw = int(iw * scale)image = cv2.resize(image, (nw, nh), interpolation=cv2.INTER_CUBIC)top = 0bottom = eh - nhleft = 0right = ew - nwnew_img = cv2.copyMakeBorder(image, top, bottom, left, right, cv2.BORDER_CONSTANT, value=(114, 114, 114))return image,new_imgdef draw_bbox(img_path, result, color=(0, 0, 255), thickness=2):import cv2if isinstance(img_path, str):img_path = cv2.imread(img_path)# img_path = cv2.cvtColor(img_path, cv2.COLOR_BGR2RGB)img_path = img_path.copy()for point in result:point = point.astype(int)cv2.polylines(img_path, [point], True, color, thickness)return img_pathif __name__ == '__main__':onnx_model = onnxruntime.InferenceSession("detect_model_small.onnx")input_name = onnx_model.get_inputs()[0].name# Set inputsimg = cv2.imread('./pic/6.jpg')img0 , image= narrow_224_32(img,expected_size=(640,640))transform_totensor = transforms.ToTensor()tensor=transform_totensor(image)tensor_nor=transforms.Normalize(mean=[0.485, 0.456, 0.406], std=[0.229, 0.224, 0.225])tensor=tensor_nor(tensor)tensor = np.array(tensor,dtype=np.float32).reshape(1,3,640,640)post_proess = DBPostProcess()is_output_polygon = False#runoutputs = onnx_model.run(None, {input_name:tensor})#post processfeat_2 = torch.from_numpy(outputs[0])print(feat_2.size())box_list, score_list = post_proess(outputs[0], [image.shape[:2]], is_output_polygon=is_output_polygon)box_list, score_list = box_list[0], score_list[0]if len(box_list) > 0:idx = [x.sum() > 0 for x in box_list]box_list = [box_list[i] for i, v in enumerate(idx) if v]score_list = [score_list[i] for i, v in enumerate(idx) if v]else:box_list, score_list = [], []print("-----------------box list",box_list)img = draw_bbox(image, box_list)img = img[0:img0.shape[0],0:img0.shape[1]]print("============save pic")img1=np.array(img,dtype=np.uint8).reshape(640,640,3)cv2.imwrite("img.jpg",img1)cv2.waitKey()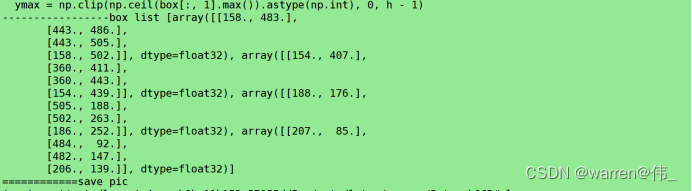

文字识别
onnx模型导出
#!/usr/bin/env python3import osimport sysimport pathlib# 将 torchocr路径加到python路径里__dir__ = pathlib.Path(os.path.abspath(__file__))import numpy as npsys.path.append(str(__dir__))sys.path.append(str(__dir__.parent.parent))import torchfrom torchocr.networks import build_modelMODEL_PATH='./model/ch_rec_moblie_crnn_mbv3.pth'DEVICE='cuda:0' if torch.cuda.is_available() else 'cpu'print("-----------------------devices",DEVICE)class RecInfer:def __init__(self, model_path, batch_size=1):ckpt = torch.load(model_path, map_location=DEVICE)cfg = ckpt['cfg']self.model = build_model(cfg['model'])state_dict = {}for k, v in ckpt['state_dict'].items():state_dict[k.replace('module.', '')] = vself.model.load_state_dict(state_dict)self.batch_size = batch_sizeself.device = torch.device(DEVICE)self.model.to(self.device)self.model.eval()# Prepare input tensorinput = torch.randn(1, 3, 32, 224, requires_grad=False).float().to(torch.device(DEVICE))# Export the torch model as onnxprint("-------------------export")torch.onnx.export(self.model,input,'rego_model_small.onnx',export_params=True,opset_version=12,do_constant_folding=False)# Load the pretrained model and export it as onnxmodel = RecInfer(MODEL_PATH)验证
import onnxruntimeimport numpy as npimport cv2import torchDEVICE='cuda:0' if torch.cuda.is_available() else 'cpu'IMG_WIDTH=448ONNX_MODEL='./onnx_model/repvgg_s.onnx'LABEL_FILE='/root/autodl-tmp/warren/PytorchOCR_OLD/torchocr/datasets/alphabets/dict_text.txt'#ONNX_MODEL='./onnx_model/rego_model_small.onnx'#LABEL_FILE='/root/autodl-tmp/warren/PytorchOCR_OLD/torchocr/datasets/alphabets/ppocr_keys_v1.txt'PIC='./pic/img.jpg'class CTCLabelConverter(object):""" Convert between text-label and text-index """def __init__(self, character):# character (str): set of the possible characters.dict_character = []with open(character, "rb") as fin:lines = fin.readlines()for line in lines:line = line.decode('utf-8').strip("\n").strip("\r\n")dict_character += list(line)self.dict = {}for i, char in enumerate(dict_character):# NOTE: 0 is reserved for 'blank' token required by CTCLossself.dict[char] = i + 1#TODO replace ‘ ’ with special symbolself.character = ['[blank]'] + dict_character+[' '] # dummy '[blank]' token for CTCLoss (index 0)def decode(self, preds, raw=False):""" convert text-index into text-label. """preds_idx = preds.argmax(axis=2)preds_prob = preds.max(axis=2)result_list = []for word, prob in zip(preds_idx, preds_prob):if raw:result_list.append((''.join([self.character[int(i)] for i in word]), prob))else:result = []conf = []for i, index in enumerate(word):if word[i] != 0 and (not (i > 0 and word[i - 1] == word[i])):result.append(self.character[int(index)])conf.append(prob[i])result_list.append((''.join(result), conf))return result_listdef decode(preds, raw=False):""" convert text-index into text-label. """dict_character = []dict = {}character=LABEL_FILEwith open(character, "rb") as fin:lines = fin.readlines()for line in lines:line = line.decode('utf-8').strip("\n").strip("\r\n")dict_character += list(line)for i, char in enumerate(dict_character):# NOTE: 0 is reserved for 'blank' token required by CTCLossdict[char] = i + 1#TODO replace ‘ ’ with special symbolcharacter = ['[blank]'] + dict_character+[' '] # dummy '[blank]' token for CTCLoss (index 0)preds_idx = preds.argmax(axis=2)preds_prob = preds.max(axis=2)result_list = []for word, prob in zip(preds_idx, preds_prob):if raw:result_list.append((''.join([character[int(i)] for i in word]), prob))else:result = []conf = []for i, index in enumerate(word):if word[i] != 0 and (not (i > 0 and word[i - 1] == word[i])):result.append(character[int(index)])conf.append(prob[i])result_list.append((''.join(result), conf))return result_listdef width_pad_img(_img, _target_width, _pad_value=0):_height, _width, _channels = _img.shapeto_return_img = np.ones([_height, _target_width, _channels], dtype=_img.dtype) * _pad_valueto_return_img[:_height, :_width, :] = _imgreturn to_return_imgdef resize_with_specific_height(_img):resize_ratio = 32 / _img.shape[0]return cv2.resize(_img, (0, 0), fx=resize_ratio, fy=resize_ratio, interpolation=cv2.INTER_LINEAR)def normalize_img(_img):return (_img.astype(np.float32) / 255 - 0.5) / 0.5if __name__ == '__main__':onnx_model = onnxruntime.InferenceSession(ONNX_MODEL)input_name = onnx_model.get_inputs()[0].name# Set inputsimgs = cv2.imread(PIC)if not isinstance(imgs,list):imgs = [imgs]imgs = [normalize_img(resize_with_specific_height(img)) for img in imgs]widths = np.array([img.shape[1] for img in imgs])idxs = np.argsort(widths)txts = []label_convert=CTCLabelConverter(LABEL_FILE)for idx in range(len(imgs)):batch_idxs = idxs[idx:min(len(imgs), idx+1)]batch_imgs = [width_pad_img(imgs[idx],IMG_WIDTH) for idx in batch_idxs]batch_imgs = np.stack(batch_imgs)print(batch_imgs.shape)tensor =batch_imgs.transpose([0,3, 1, 2]).astype(np.float32)out = onnx_model.run(None, {input_name:tensor})tensor_out = torch.tensor(out)tensor_out = torch.squeeze(tensor_out,dim=1)softmax_output = tensor_out.softmax(dim=2)print("---------------out shape is",softmax_output.shape)txts.extend([label_convert.decode(np.expand_dims(txt, 0)) for txt in softmax_output])idxs = np.argsort(idxs)out_txts = [txts[idx] for idx in idxs]import sysimport codecssys.stdout = codecs.getwriter("utf-8")(sys.stdout.detach())print(out_txts)![]()
至此 导出验证成功
rk3588板端部署
转化为rknn模型
from rknn.api import RKNNONNX_MODEL = 'xxx.onnx'
RKNN_MODEL = 'xxxx.rknn'
DATASET = './dataset.txt'if __name__ == '__main__':# Create RKNN objectrknn = RKNN(verbose=True)# pre-process configprint('--> Config model')ret=rknn.config(mean_values=[[0, 0, 0]], std_values=[[0, 0, 0]],target_platform='rk3588')  #wzwif ret != 0:print('config model failed!')exit(ret)print('done')# Load ONNX modelprint('--> Loading model')ret = rknn.load_onnx(model=ONNX_MODEL, outputs=['output', '345', '346'])  if ret != 0:print('Load model failed!')exit(ret)print('done')# Build modelprint('--> Building model')ret = rknn.build(do_quantization=True, dataset=DATASET)#ret = rknn.build(do_quantization=False)if ret != 0:print('Build model failed!')exit(ret)print('done')# Export RKNN modelprint('--> Export rknn model')ret = rknn.export_rknn(RKNN_MODEL)if ret != 0:print('Export rknn model failed!')exit(ret)print('done')#release rknnrknn.release()
使用pyqt进行开发
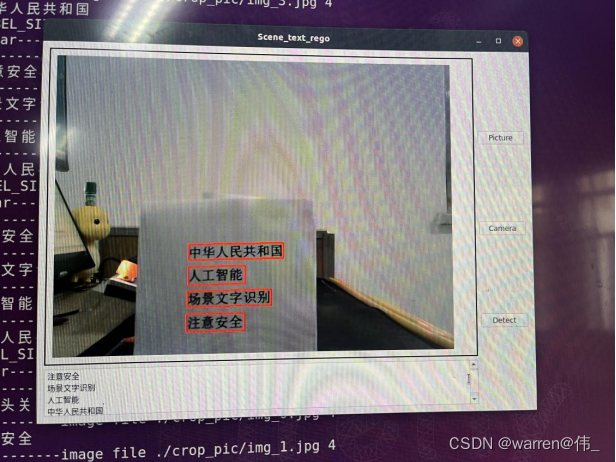
5.4 PyQt软件设计
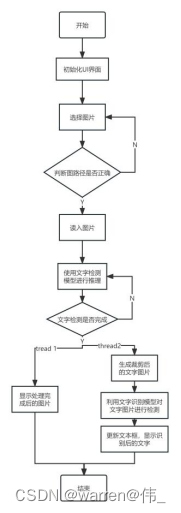
使用pyqt进行开发,ui界面如图所示

该界面包含了三个功能按钮,其中包裹一个选择静态图片,一个使用相机,一个检测按钮,TextEdit用于显示识别结果,label用于显示处理完成后的图片。
软件流程图如下:
总体目录参照

下面依次介绍图片检测的相关代码:
import platformimport sysimport cv2import numpy as npimport torchimport pyclipperfrom shapely.geometry import Polygonfrom torchvision import transformsimport timeimport osimport globimport threadingfrom PyQt5.QtGui import *from PyQt5.QtWidgets import *from PyQt5.QtCore import *import platformfrom rknnlite.api import RKNNLiteimport osos.environ.pop("QT_QPA_PLATFORM_PLUGIN_PATH")DETECT_MODEL = './model/model_small.rknn'REGO_MODEL='./model/repvgg_s.rknn'LABEL_FILE='./dict/dict_text.txt'LABEL_SIZE_PRIVIOUS=0LABEL_SIZE_LATTER=0# 文件夹路径folder_path = './crop_pic'# 使用 glob 来获取所有图片文件的路径image_files = glob.glob(os.path.join(folder_path, '*.png')) + glob.glob(os.path.join(folder_path, '*.jpg'))def resize_img_self(image,reszie_size=(0,0)):ih,iw=image.shape[0:2]ew,eh=reszie_sizescale=eh/ihwidth=int(iw*scale)height=int(ih*scale)if height!=eh:height=ehimage=cv2.resize(image,(width,height),interpolation=cv2.INTER_LINEAR)top = 0bottom = 0left = 0right = ew-widthnew_img = cv2.copyMakeBorder(image, top, bottom, left, right, cv2.BORDER_CONSTANT, value=(114, 114, 114))#print("new image shape",new_img.shape)return new_imgdef narrow_224_32(image, expected_size=(224,32)):ih, iw = image.shape[0:2]ew, eh = expected_size# scale = eh / ihscale = min((eh/ih),(ew/iw))# scale = eh / max(iw,ih)nh = int(ih * scale)nw = int(iw * scale)image = cv2.resize(image, (nw, nh), interpolation=cv2.INTER_CUBIC)top = 0bottom = eh - nhleft = 0right = ew - nwnew_img = cv2.copyMakeBorder(image, top, bottom, left, right, cv2.BORDER_CONSTANT, value=(114, 114, 114))return image,new_imgdef draw_bbox(img_path, result, color=(0, 0, 255), thickness=2):import cv2if isinstance(img_path, str):img_path = cv2.imread(img_path)# img_path = cv2.cvtColor(img_path, cv2.COLOR_BGR2RGB)img_path = img_path.copy()for point in result:point = point.astype(int)cv2.polylines(img_path, [point], True, color, thickness)return img_pathdef delay_milliseconds(milliseconds):seconds = milliseconds / 1000.0time.sleep(seconds)""" Convert between text-label and text-index """class CTCLabelConverter(object):def __init__(self, character):# character (str): set of the possible characters.dict_character = []with open(character, "rb") as fin:lines = fin.readlines()for line in lines:line = line.decode('utf-8').strip("\n").strip("\r\n")dict_character += list(line)self.dict = {}for i, char in enumerate(dict_character):# NOTE: 0 is reserved for 'blank' token required by CTCLossself.dict[char] = i + 1#TODO replace ‘ ’ with special symbolself.character = ['[blank]'] + dict_character+[' '] # dummy '[blank]' token for CTCLoss (index 0)def decode(self, preds, raw=False):""" convert text-index into text-label. """preds_idx = preds.argmax(axis=2)preds_prob = preds.max(axis=2)result_list = []for word, prob in zip(preds_idx, preds_prob):if raw:result_list.append((''.join([self.character[int(i)] for i in word]), prob))else:result = []conf = []for i, index in enumerate(word):if word[i] != 0 and (not (i > 0 and word[i - 1] == word[i])):result.append(self.character[int(index)])#conf.append(prob[i])#result_list.append((''.join(result), conf))result_list.append((''.join(result)))return result_listclass DBPostProcess():def __init__(self, thresh=0.3, box_thresh=0.7, max_candidates=1000, unclip_ratio=2):self.min_size = 3self.thresh = threshself.box_thresh = box_threshself.max_candidates = max_candidatesself.unclip_ratio = unclip_ratiodef __call__(self, pred, h_w_list, is_output_polygon=False):pred = pred[:, 0, :, :]segmentation = self.binarize(pred)boxes_batch = []scores_batch = []for batch_index in range(pred.shape[0]):height, width = h_w_list[batch_index]boxes, scores = self.post_p(pred[batch_index], segmentation[batch_index], width, height,is_output_polygon=is_output_polygon)boxes_batch.append(boxes)scores_batch.append(scores)return boxes_batch, scores_batchdef binarize(self, pred):return pred > self.threshdef post_p(self, pred, bitmap, dest_width, dest_height, is_output_polygon=False):'''_bitmap: single map with shape (H, W),whose values are binarized as {0, 1}'''height, width = pred.shapeboxes = []new_scores = []# bitmap = bitmap.cpu().numpy()if cv2.__version__.startswith('3'):_, contours, _ = cv2.findContours((bitmap * 255).astype(np.uint8), cv2.RETR_LIST, cv2.CHAIN_APPROX_SIMPLE)if cv2.__version__.startswith('4'):contours, _ = cv2.findContours((bitmap * 255).astype(np.uint8), cv2.RETR_LIST, cv2.CHAIN_APPROX_SIMPLE)for contour in contours[:self.max_candidates]:epsilon = 0.005 * cv2.arcLength(contour, True)approx = cv2.approxPolyDP(contour, epsilon, True)points = approx.reshape((-1, 2))if points.shape[0] < 4:continuescore = self.box_score_fast(pred, contour.squeeze(1))if self.box_thresh > score:continueif points.shape[0] > 2:box = self.unclip(points, unclip_ratio=self.unclip_ratio)if len(box) > 1:continueelse:continuefour_point_box, sside = self.get_mini_boxes(box.reshape((-1, 1, 2)))if sside < self.min_size + 2:continueif not isinstance(dest_width, int):dest_width = dest_width.item()dest_height = dest_height.item()if not is_output_polygon:box = np.array(four_point_box)else:box = box.reshape(-1, 2)box[:, 0] = np.clip(np.round(box[:, 0] / width * dest_width), 0, dest_width)box[:, 1] = np.clip(np.round(box[:, 1] / height * dest_height), 0, dest_height)boxes.append(box)new_scores.append(score)return boxes, new_scoresdef unclip(self, box, unclip_ratio=1.5):poly = Polygon(box)distance = poly.area * unclip_ratio / poly.lengthoffset = pyclipper.PyclipperOffset()offset.AddPath(box, pyclipper.JT_ROUND, pyclipper.ET_CLOSEDPOLYGON)expanded = np.array(offset.Execute(distance))return expandeddef get_mini_boxes(self, contour):bounding_box = cv2.minAreaRect(contour)points = sorted(list(cv2.boxPoints(bounding_box)), key=lambda x: x[0])index_1, index_2, index_3, index_4 = 0, 1, 2, 3if points[1][1] > points[0][1]:index_1 = 0index_4 = 1else:index_1 = 1index_4 = 0if points[3][1] > points[2][1]:index_2 = 2index_3 = 3else:index_2 = 3index_3 = 2box = [points[index_1], points[index_2], points[index_3], points[index_4]]return box, min(bounding_box[1])def box_score_fast(self, bitmap, _box):# bitmap = bitmap.detach().cpu().numpy()h, w = bitmap.shape[:2]box = _box.copy()xmin = np.clip(np.floor(box[:, 0].min()).astype(np.int), 0, w - 1)xmax = np.clip(np.ceil(box[:, 0].max()).astype(np.int), 0, w - 1)ymin = np.clip(np.floor(box[:, 1].min()).astype(np.int), 0, h - 1)ymax = np.clip(np.ceil(box[:, 1].max()).astype(np.int), 0, h - 1)mask = np.zeros((ymax - ymin + 1, xmax - xmin + 1), dtype=np.uint8)box[:, 0] = box[:, 0] - xminbox[:, 1] = box[:, 1] - ymincv2.fillPoly(mask, box.reshape(1, -1, 2).astype(np.int32), 1)return cv2.mean(bitmap[ymin:ymax + 1, xmin:xmax + 1], mask)[0]class Process_Class(QWidget):detect_end = pyqtSignal(str)clear_text = pyqtSignal()def __init__(self):super().__init__()self.image = Noneself.img=Noneself.camera_status=Falseself.result_string=Noneself.cap = cv2.VideoCapture()#detectrknn_model_detect = DETECT_MODELself.rknn_lite_detect = RKNNLite()self.rknn_lite_detect.load_rknn(rknn_model_detect)# load RKNN modelself.rknn_lite_detect.init_runtime(core_mask=RKNNLite.NPU_CORE_2)# init runtime environment#regorknn_model_rego = REGO_MODELself.rknn_lite_rego = RKNNLite()self.rknn_lite_rego.load_rknn(rknn_model_rego)# load RKNN modelself.rknn_lite_rego.init_runtime(core_mask=RKNNLite.NPU_CORE_0_1)# init runtime environmentself.detect_end.connect(self.update_text_box)self.clear_text.connect(self.clear_text_box)def cv2_to_qpixmap(self, cv_image):height, width, channel = cv_image.shapebytes_per_line = 3 * widthq_image = QImage(cv_image.data, width, height, bytes_per_line, QImage.Format_RGB888).rgbSwapped()return QPixmap.fromImage(q_image)def show_pic(self, cv_image):pixmap = self.cv2_to_qpixmap(cv_image)if MainWindow.pic_label is not None:MainWindow.pic_label.setPixmap(pixmap)QApplication.processEvents()else:print("wrong!!!!!!!")def camera_open(self):self.camera_status = not self.camera_statusprint("------------camera status is",self.camera_status)if self.camera_status:self.cap.open(12)if self.cap.isOpened():print("run camera")while(True):frame = self.cap.read()if not frame[0]:print("read frame failed!!!!")exit()self.image=frame[1]self.detect_pic()if not self.camera_status: breakelse:print("Cannot open camera")exit()else:self.release_camera()def release_camera(self):if self.cap.isOpened():self.cap.release()self.camera_status = Falseprint("摄像头关闭")def open_file(self):# 获取图像的路径img_path, _ = QFileDialog.getOpenFileName()if img_path != '':self.image = cv2.imread(img_path)self.show_pic(self.image)def crop_and_save_image(self,image, box_points):global LABEL_SIZE_PRIVIOUSglobal LABEL_SIZE_LATTERi=-1# 将box_points转换为NumPy数组,并取整数值box_points = np.array(box_points, dtype=np.int32)mask = np.zeros_like(image) # 创建与图像相同大小的全黑图像print("LABEL_SIZE_PRIVIOUS ",LABEL_SIZE_PRIVIOUS,"LABEL_SIZE_LATTER ",LABEL_SIZE_LATTER)if LABEL_SIZE_PRIVIOUS==LABEL_SIZE_LATTER:LABEL_SIZE_PRIVIOUS=len(box_points)for box_point in box_points:i=i+1cropped_image = image.copy()# 使用OpenCV的函数裁剪图像x, y, w, h = cv2.boundingRect(box_point)cropped_image = image[y:y+h, x:x+w]# 创建与图像大小相同的全黑掩码mask = np.zeros_like(cropped_image)# 在掩码上绘制多边形cv2.fillPoly(mask, [box_point - (x, y)], (255, 255, 255))# 使用 bitwise_and 进行图像裁剪masked_cropped_image = cv2.bitwise_and(cropped_image, mask) # 保存裁剪后的图像output_path = f"{'./crop_pic/'}img_{i}.jpg"cv2.imwrite(output_path, masked_cropped_image)else:#self.clear_text.emit()LABEL_SIZE_LATTER=LABEL_SIZE_PRIVIOUScurrent_directory = os.getcwd()+'/crop_pic' # Get the current directoryfor filename in os.listdir(current_directory):if filename.endswith(".jpg"):file_path = os.path.join(current_directory, filename)os.remove(file_path)print(f"Deleted: {file_path}")def detect_thread(self):#detect inferenceimg0 , image= narrow_224_32(self.image,expected_size=(640,640))outputs =self.rknn_lite_detect.inference(inputs=[image])post_proess = DBPostProcess()is_output_polygon = Falsebox_list, score_list = post_proess(outputs[0], [image.shape[:2]], is_output_polygon=is_output_polygon)box_list, score_list = box_list[0], score_list[0]if len(box_list) > 0:idx = [x.sum() > 0 for x in box_list]box_list = [box_list[i] for i, v in enumerate(idx) if v]score_list = [score_list[i] for i, v in enumerate(idx) if v]else:box_list, score_list = [], []self.image = draw_bbox(image, box_list)self.crop_and_save_image(image,box_list)self.image = self.image[0:img0.shape[0],0:img0.shape[1]]self.show_pic(self.image)def rego_thread(self):label_convert=CTCLabelConverter(LABEL_FILE)self.clear_text.emit()for image_file in image_files:if os.path.exists(image_file):print('-----------image file',image_file,len(image_files))self.img = cv2.imread(image_file)image = resize_img_self(self.img,reszie_size=(448,32))# Inferenceoutputs = self.rknn_lite_rego.inference(inputs=[image])#post processfeat_2 = torch.tensor(outputs[0],dtype=torch.float32)txt = label_convert.decode(feat_2.detach().numpy())self.result_string = ' '.join(txt)print(self.result_string)self.detect_end.emit(self.result_string)else:print("-----------no crop image!!!")def detect_pic(self):self.detect_thread()my_thread = threading.Thread(target=self.rego_thread)# 启动线程my_thread.start()# 等待线程结束my_thread.join()def update_text_box(self, text):# 在主线程中更新文本框的内容MainWindow.text_box.append(text)def clear_text_box(self):print("clear--------------------------------")# 在主线程中更新文本框的内容MainWindow.text_box.clear()class MainWindow(QMainWindow):#pic_label = Nonedef __init__(self):pic_label = Nonetext_box = Nonesuper().__init__()self.process_functions = Process_Class()self.window = QWidget()# 创建小部件self.pic_label = QLabel('Show Window!', parent=self.window)self.pic_label.setMinimumHeight(500) # 设置最小高度self.pic_label.setMaximumHeight(500) # 设置最大高度self.pic_button = QPushButton('Picture', parent=self.window)self.pic_button.clicked.connect(self.process_functions.open_file)self.camera_button = QPushButton('Camera', parent=self.window)self.camera_button.clicked.connect(self.process_functions.camera_open)self.detect_button = QPushButton('Detect', parent=self.window)self.detect_button.clicked.connect(self.process_functions.detect_pic)self.text_box = QTextEdit()# 创建垂直布局管理器并将小部件添加到布局中self.left_layout = QVBoxLayout()self.right_layout = QVBoxLayout()self.layout = QHBoxLayout()self.create_ui()self.window.closeEvent = self.closeEventdef create_ui(self):self.window.setWindowTitle('Scene_text_rego')self.window.setGeometry(0, 0, 800, 600) # 设置窗口位置和大小# 设置主窗口的布局self.pic_label.setStyleSheet('border: 2px solid black; padding: 10px;')self.left_layout.addWidget(self.pic_label)self.left_layout.addWidget(self.text_box)self.right_layout.addWidget(self.pic_button)self.right_layout.addWidget(self.camera_button)self.right_layout.addWidget(self.detect_button)self.layout.addLayout(self.left_layout)self.layout.addLayout(self.right_layout)self.window.setLayout(self.layout)self.window.show()def closeEvent(self, event):# 释放摄像头资源self.process_functions.release_camera()event.accept()def main():# 创建应用程序对象app = QApplication(sys.argv)win = MainWindow()MainWindow.pic_label = win.pic_label # 设置类变量pic_label为MainWindow对象的pic_labelMainWindow.text_box = win.text_box # 设置类变量pic_label为MainWindow对象的pic_label# 运行应用程序sys.exit(app.exec_())rknn_lite_detect.release()if __name__ == '__main__':main()运行结果
参考资料
博文:
【工程部署】手把手教你在RKNN上部署OCR服务(上)_rknn ocr_三叔家的猫的博客-CSDN博客
相关文章:
【工程部署】在RK3588上部署OCR(文字检测识别)(DBNet+CRNN)
硬件平台: 1、firefly安装Ubuntu系统的RK3588; 2、安装Windows系统的电脑一台,其上安装Ubuntu18.04系统虚拟机。 参考手册:《00-Rockchip_RKNPU_User_Guide_RKNN_API_V1.3.0_CN》 《RKNN Toolkit Lite2 用户使用指南》 1、文…...

Dockerfile运行容器不立即退出
1. 问题描述 运行容器结束,docker container立即退出。 2. 解决方案 在dockerfile中,添加如下命令, ENTRYPOINT ["tail", "-f", "/dev/null"]...
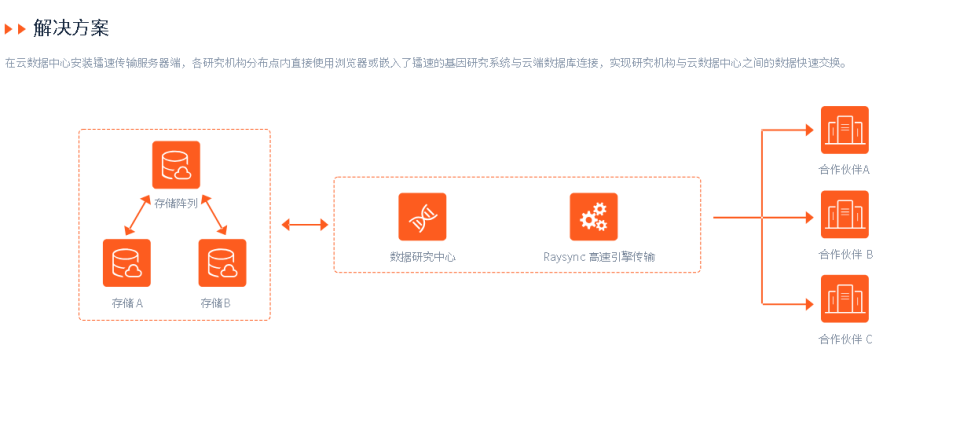
基因检测技术的发展与创新:安全文件数据传输的重要作用
基因是生命的密码,它决定了我们的身体特征、健康状况、疾病风险等。随着基因检测技术的高速发展,我们可以通过对基因进行测序、分析和解读,更深入地认识自己,预防和治疗各种遗传性疾病,甚至实现个性化医疗和精准健康管…...
Flink SQL自定义标量函数(Scalar Function)
使用场景: 标量函数即 UDF,⽤于进⼀条数据出⼀条数据的场景。 开发流程: 实现 org.apache.flink.table.functions.ScalarFunction 接⼝实现⼀个或者多个⾃定义的 eval 函数,名称必须叫做 eval,eval ⽅法签名必须是 p…...
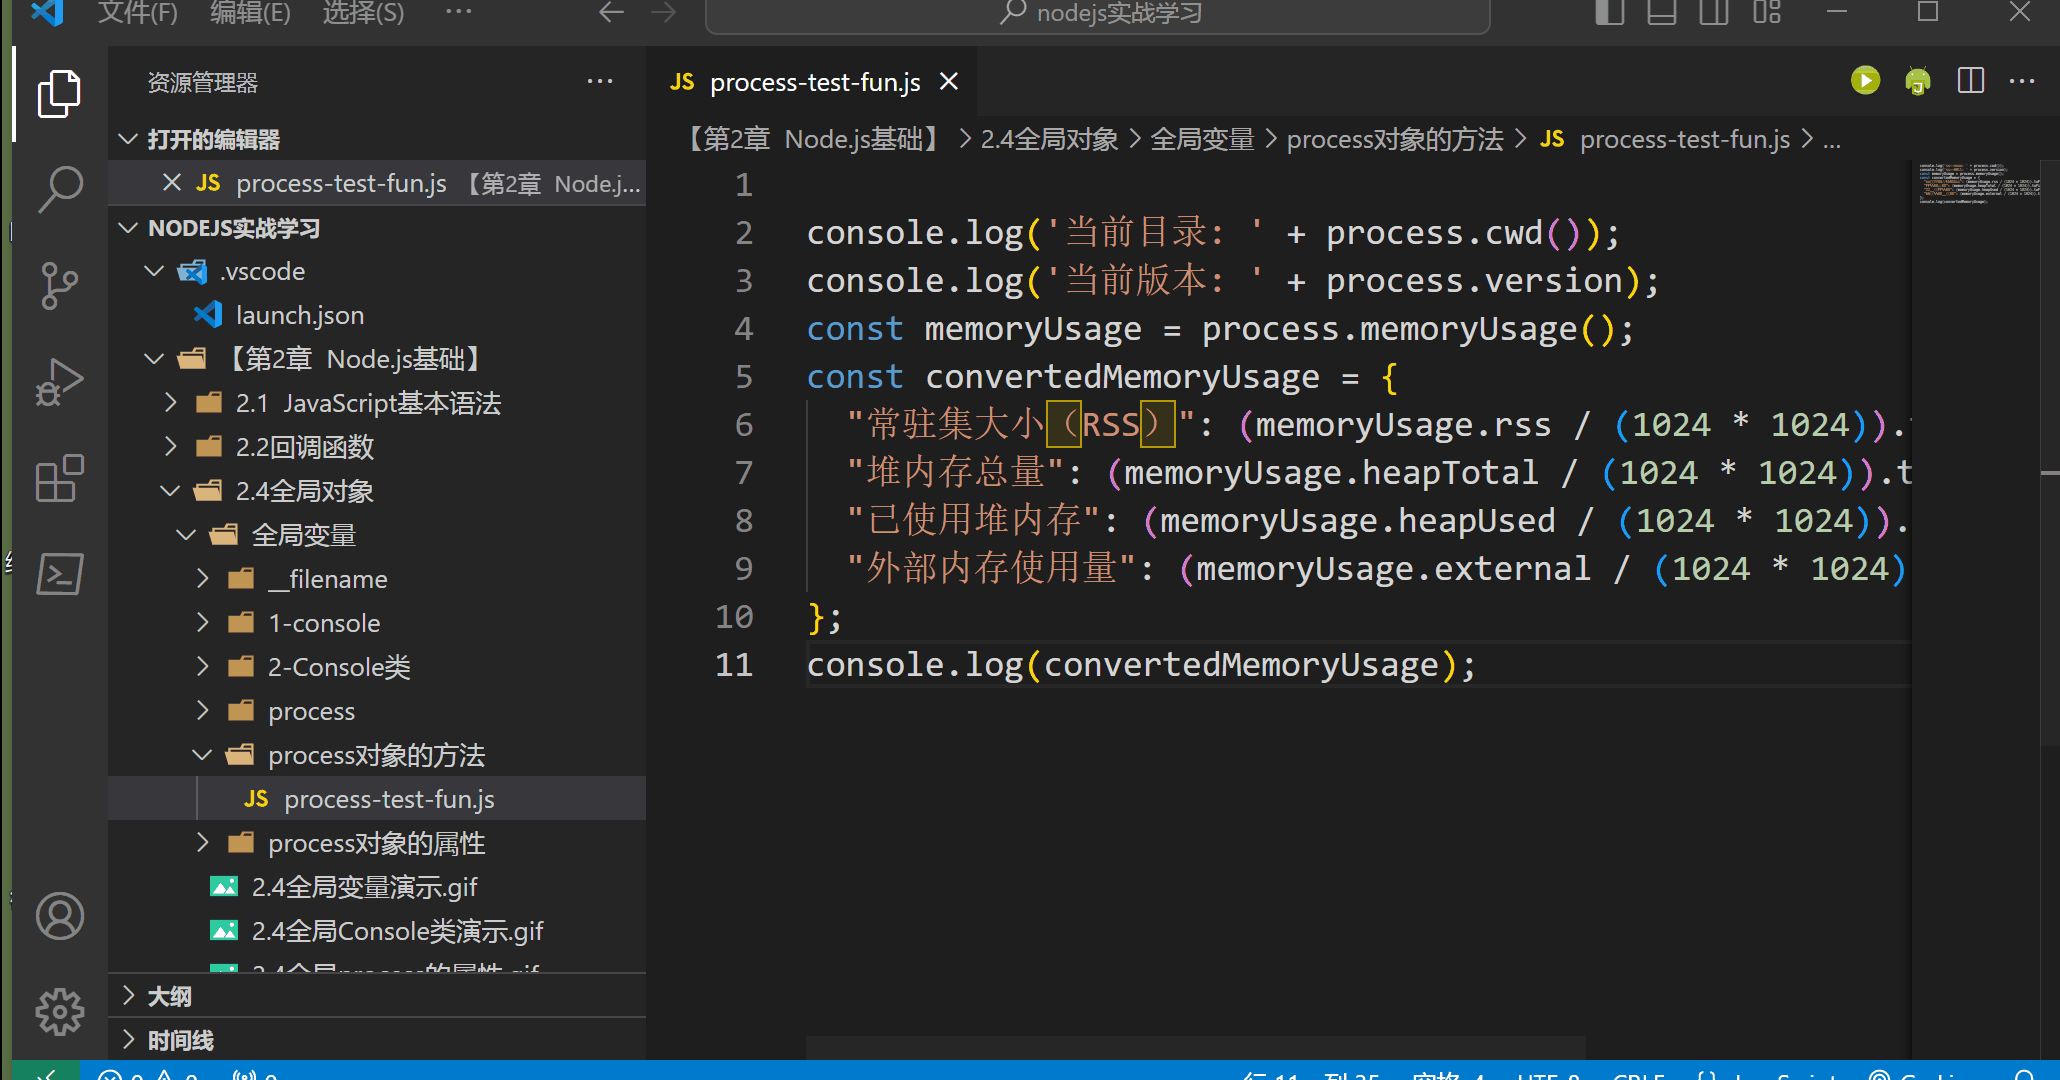
【第2章 Node.js基础】2.4 Node.js 全局对象(二) process 对象
process对象是一个全局对象,提供当前Node.js 进程信息并对其进行控制。通常用于编写本地命令行程序。 1.进程事件 process对象是EventEmitter类的实例,因此可以使用事件的方式来处理和监听process对象的各种事件。以下是一些常用的process对象事件&…...
觉非科技发布【轻地图高速NOA智驾方案】|地平线,觉非科技,MobileDrive超捷生态协作实现技术落地
11月10日,2023世界新汽车技术合作生态展期间,觉非科技正式发布了基于地平线征程系列以及MobileDrive超捷规控系统的【轻地图高速NOA智驾解决方案】。该方案首次实现了从芯片能力输出、到数据闭环建设、再到规控部署的产业生态链协作与打通,为…...
竞赛 车道线检测(自动驾驶 机器视觉)
0 前言 无人驾驶技术是机器学习为主的一门前沿领域,在无人驾驶领域中机器学习的各种算法随处可见,今天学长给大家介绍无人驾驶技术中的车道线检测。 1 车道线检测 在无人驾驶领域每一个任务都是相当复杂,看上去无从下手。那么面对这样极其…...

128. 最长连续序列
这道题最简单的想法就是排序计数,但是复杂度为O(nlogn),不符合题意 于是采用哈希表的方法 将所有数字存放在哈希表中,然后开始逐个寻找。 比如当前遍历到x,如果x-1也存在哈希表中,那就从x-1开始遍历最长连续序列&#…...

设计模式-设计原则
文章目录 设计模式-设计原则单一职责原则开闭原则里氏替换原则依赖倒转原则接口隔离原则合成复用原则迪米特法则 设计模式-设计原则 单一职责原则 单一职责原则:一个对象应该只包含单一的职责,并且该职责被完整地封装在一个类中。 有时候类的功能并不…...

MongoDB基础运维
mongodb的基础概念介绍 database #数据库 collection #集合,类似于mysql中的表 filed #类似于mysql中字段 document #每行的记录 连接客户端 mongo ip:port 例如mongo 127.0.0.1:27017 mongo客户端的命…...
侧击雷如何检测预防
侧击雷是一种雷击的形式,指的是雷电从建筑物的侧面打来的直接雷击。侧击雷对高层建筑物的防雷保护提出了更高的要求,因为一般的避雷带或避雷针不能完全保护住建筑物的侧面。侧击雷可能会对建筑物的结构、设备和人员造成严重的损害,甚至引发火…...
检索搜索信息能力
(一)搜索工具的选择 谷歌 > 微信搜一搜 > 抖音等短视频 > 百度 (二)搜索方式 一,搜索内容的分类 信息类学习类工具类 二,谷歌浏览器的搜索技巧 1、“搜索内容” 限定完整出现的词 如下图搜…...
设计大咖亲授:Figma中文环境设置全攻略!
作为UI设计师,你一定很熟悉Figma,Figma是一款专注于UI/UX设计的在线协作工具,使用非常高效方便,不需要下载和安装。它只需要通过浏览器编辑,在国外很受欢迎。但是Figma对于国内的小伙伴来说,使用Figma有一定…...
)
华为Hcia-数通学习(更改策略)
方法:书籍视频题目训练 书籍:华为HCNA网络技术学习指南。 视频:网络工程师学习路线_哔哩哔哩_bilibili 有过一点基础。考软考网络工程师的时候做了大量笔记,回去复习了一遍。现在准备找工作了,开始学习华为认证的网…...
数据校验:Spring Validation
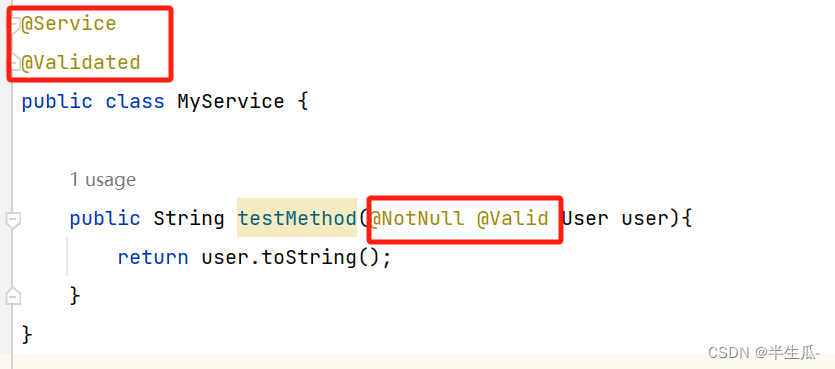
Spring Validation概述 在开发中,我们经常遇到参数校验的需求,比如用户注册的时候,要校验用户名不能为空、用户名长度不超过20个字符、手机号是合法的手机号格式等等。如果使用普通方式,我们会把校验的代码和真正的业务处理逻辑耦…...

CSS怎么选择除了第一个子元素外的其余同级子元素
使用 CSS 的:not()伪类选择器和:nth-child()伪类选择器 要通过CSS的代码选择某一个元素的除了第一个子元素外的其余的跟第一个子元素同级的子元素,可以结合使用CSS的:not()伪类选择器和:nth-child()伪类选择器进行选择。大致的语法如下: .parent > …...
Mac下eclipse配置JDK
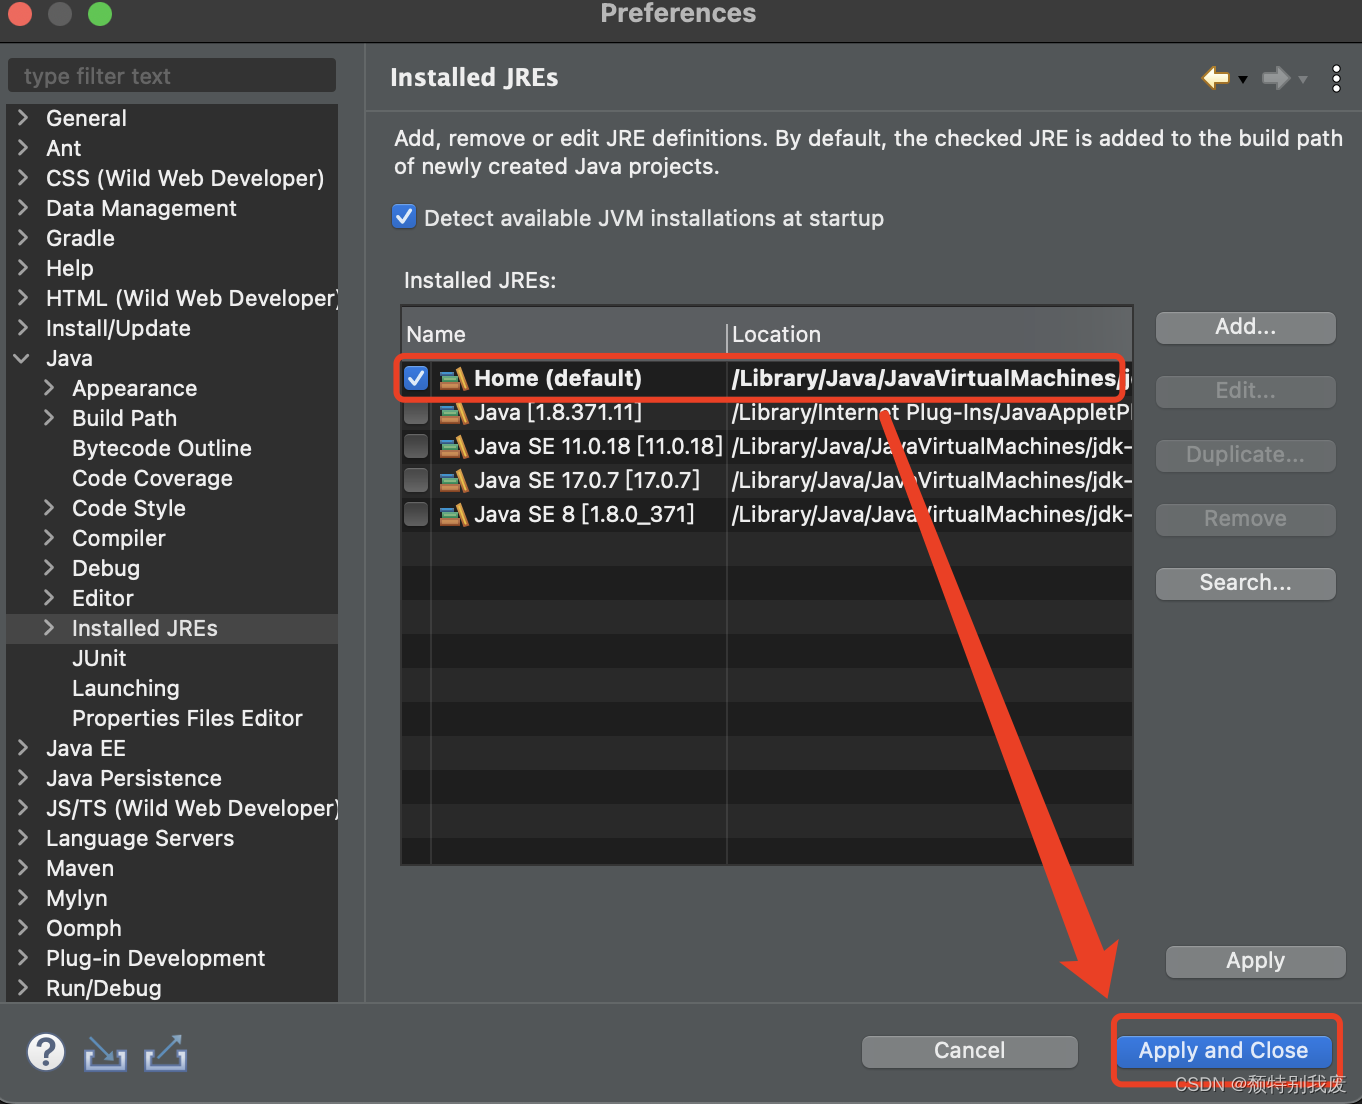
目录 一、配置JDK,需要电脑下载Java并且配置环境 (1)、左上角找到“Eclipse”-->“Preferences...” (2)、找到“Java”-->“Installde JREs”-->界面显示电脑所安安装的Java;若没有需要点击“Add”进行配置 ①、选择“Standard VM”--&g…...

基于springboot实现体育场馆运营平台项目【项目源码】
基于springboot实现体育场馆运营管理系统演示 系统开发平台 在该数码论坛系统中,Eclipse能给用户提供更多的方便,其特点一是方便学习,方便快捷;二是有非常大的信息储存量,主要功能是用在对数据库中查询和编程。其功能…...
优雅的Java编程:将接口对象作为方法参数
theme: smartblue 目录 概述 在Java编程中,方法的参数传递方式通常是通过基本类型、对象引用或者集合等方式。然而,一种更加优雅且灵活的设计模式是将接口对象作为方法的参数。这种方式为我们带来了许多好处,包括降低耦合性、实现多态性和可…...
一文简单聊聊protobuf
目录 基本介绍 原理 同类对比 为什么要使用protobuf? 基本介绍 protobuf的全称是Protocol Buffer,是Google提供的一种数据序列化协议。Protocol Buffers 是一种轻便高效的结构化数据存储格式,可以用于结构化数据序列化,很适合做数据存储…...

作业本耐用度差距巨大?深圳大明印刷厂拆解合规工艺,告别定制作业本掉页开裂通病
在校园日常教学中,很多学校都会遇到同一个难题:同一学期采购的作业本、定制作业本,品质差距悬殊,有的完好无损用到期末,有的短短几周就出现书脊开裂、页面脱落、边角破损、翻页卡顿等问题。不少人误以为是学生使用习惯…...

上线前最后一道防线,DeepSeek代码审查如何帮你拦截87%的CVE类缺陷?
更多请点击: https://intelliparadigm.com 第一章:上线前最后一道防线,DeepSeek代码审查如何帮你拦截87%的CVE类缺陷? 在软件交付生命周期末期,传统人工代码审计与通用SAST工具常因误报率高、上下文理解弱而漏检高危漏…...

解密高校教师必会的Gemini 3.1 Pro五大科研隐藏技能:从论文评估到创新点锁定
各位同仁好,我是七哥。一个在高校里从事人工智能相关领域研究,钻研用大模型AI实操的学术人。可以和七哥交流学术写作或Gemini、GPT、Claude等大模型学术实操相关问题,多多交流,相互成就,共同进步。 科研路上,有人发完顶刊顺利晋升,有人还在为创新点抓耳挠腮。 大多数教…...

账务台账数据
银行里说的 “账务台账数据”,本质就是按会计规则把每笔业务逐笔、分户、分科目记下来的完整明细流水 余额 辅助信息,核心是 “可逐笔追溯、可对账、可审计” 的一套明细数据。下面用通俗、具体的方式拆开说:一、银行 “账务台账” 到底是什…...

HarmonyOS 6学习:解决图片放大后无法移动至边缘的matrix4矩阵变换技巧
从"卡在中间"到"自由拖拽":一次完整的图片缩放平移边界问题攻关在HarmonyOS 6应用开发中,我最近遇到了一个看似简单却让人头疼的图片查看器问题:用户双指放大图片后,想要拖动查看边缘细节,却发现图…...

机器学习在犬类癌症筛查中的性能极限与挑战:基于血液数据的多癌种分析
1. 项目概述:当机器学习遇见犬类癌症筛查作为一名长期关注数据科学在生命科学领域应用的从业者,我常常被问及一个充满希望的问题:我们能否像分析人类健康数据一样,利用宠物的常规体检数据,通过机器学习提前发现癌症的蛛…...

终极解决方案:Windows Cleaner免费开源工具,3步彻底解决C盘爆红问题
终极解决方案:Windows Cleaner免费开源工具,3步彻底解决C盘爆红问题 【免费下载链接】WindowsCleaner Windows Cleaner——专治C盘爆红及各种不服! 项目地址: https://gitcode.com/gh_mirrors/wi/WindowsCleaner 你是否也经历过这样的…...

Armv9-A架构解析:SVE/SME与安全增强技术
1. Armv9-A架构演进与核心特性全景Armv9-A架构代表了Arm公司面向未来十年计算需求的设计哲学,其核心在于三个维度的突破:性能、安全与专用计算。作为长期从事Arm架构开发的工程师,我见证了从Armv7到Armv9的技术跃迁。与固定宽度向量指令的NEO…...

LSTM、GRU与注意力机制在股票预测中的性能对比与实战指南
1. 项目概述与核心价值在量化金融和算法交易这个行当里,预测股票价格走势一直是个充满诱惑又极具挑战的“圣杯”问题。传统的技术分析和基本面分析,虽然各有拥趸,但在面对市场的高噪声、非线性和突发性事件时,往往显得力不从心。我…...

基于概率随机森林的天文测光数据尘埃恒星自动分类实践
1. 项目概述:当机器学习遇见尘埃恒星处理海量天文数据,尤其是从像斯皮策空间望远镜(Spitzer)的SAGE巡天这类项目中获取的多波段测光数据,一直是个既让人兴奋又头疼的活儿。传统的光谱分类方法虽然精准,但面…...