mysql---MHA(高可用)
MHA概述
magterhight availabulity :基于主库的高可用环境下,主故障切换
基础要求:主从架构 (一主两从)
解决mysql的单点故障问题,一旦数据库崩溃,MHA会在0-30s内这东东完成故障切换。
复制方式:半同步复制
MHA原理
数据库不需要抢占,只需要主从同步即可,只要有一台数据库服务器写入,就会自动提交客户端。
master崩溃,slave 就会从主的二进制日志文件保存文件
slave识别最新的更新日志
差异部分同步到slave
其他的slave继续和新的master同步
MHA工作原理总结如下:
1、从宕机崩溃的master保存二进制日志事件(binlog events);
2、识别含有最新的更新 slave 日志
3、应用差异的中继日志(relay log)到其他的slave
4、应用从master保存的二进制日志事件
5、提升一个 salve 为新的master
6、使其他的slave连接行的master 进行复制。
MHA :为了解决的了是故障切换、数据尽可能的保存,以及所有节点日志的一致性
实验思路
1.MHA架构
1)数据库安装
2)一主两从
3)MHA搭建
2.故障模拟
1)主库失效
2)备选主库成为主库
3)原故障主库恢复重新加入到MHA成为从库
组件
node组件---》都需要部署在所有的服务器上。manager组件依赖于node组件,node组件监控mysql的状态。
node组件靠ssh来进行通信
实验操作
一、主从复制
组件MHA manager 节点服务器:CentOS7.6(64 位) manager/192.168.233.10 ,安装MHA node 和 manager 组件
Master 节点服务器:CentOS7.6(64 位) mysql1/192.168.233.21 ,安装mysql5.7、MHA node 组件
Slave1 节点服务器:CentOS7.6(64 位) mysql2/192.168.233.22 ,安装mysql5.7、MHA node 组件
Slave2 节点服务器:CentOS7.6(64 位) mysql3/192.168.233.23 ,安装mysql5.7、MHA node 组件systemctl stop firewalld
systemctl disable firewalld
setenforce 01.Master、Slave1、Slave2 节点上安装 mysql5.72.修改 Master、Slave1、Slave2 节点的主机名
hostnamectl set-hostname Master
hostnamectl set-hostname Slave1
hostnamectl set-hostname Slave23.修改 Master、Slave1、Slave2 节点的 Mysql主配置文件/etc/my.cnf
##Master 节点##
vim /etc/my.cnf
[mysqld]
server-id = 1
log_bin = master-bin
log-slave-updates = truelog_bin = master-bin:
用于记录主服务器上的更改操作的日志文件。
这个配置用于主服务器,将生成的二进制日志文件保存为"master-bin"(可以是其他自定义的名称)。log-slave-updates = true:
从服务器是否要记录它自己执行的更改操作到自己的二进制日志文件中。
设置为"true"表示从服务器会记录自己执行的更改操作,将其写入从服务器的二进制日志文件中。systemctl restart mysqld##Slave1 节点##
vim /etc/my.cnf
server-id = 2 						#三台服务器的 server-id 不能一样
log_bin = master-bin
relay-log = relay-log-bin
relay-log-index = slave-relay-bin.indexlog_bin = master-bin:
指定主服务器(master)的二进制日志文件名称,用于记录主服务器上的更改操作的日志文件。relay-log = relay-log-bin:
指定从服务器的中继日志文件名称,即用于记录主服务器的二进制日志在从服务器上执行的中继日志。
从服务器会读取主服务器的二进制日志并将其记录到中继日志中。这个配置用于从服务器。relay-log-index = slave-relay-bin.index:
指定从服务器的中继日志索引文件的名称,该索引文件用于跟踪中继日志文件的位置和顺序。
通过这个索引文件,从服务器知道哪个中继日志文件是下一个要读取和执行的。这个配置用于从服务器。systemctl restart mysqld###Slave2 节点##
vim /etc/my.cnf						#三台服务器的 server-id 不能一样
server-id = 3
relay-log = relay-log-bin
relay-log-index = slave-relay-bin.index#slave2不用设置master,指定主的备服务器为slave1即可。systemctl restart mysqld4.在 Master、Slave1、Slave2 节点上都创建两个软链接
ln -s /usr/local/mysql/bin/mysql /usr/sbin/
ln -s /usr/local/mysql/bin/mysqlbinlog /usr/sbin/5.配置 mysql 一主两从
(1)所有数据库节点进行 mysql 授权
mysql -u root -p123456#从数据库同步使用
grant replication slave on *.* to 'myslave'@'192.168.10.%' identified by '123456';	#manager 使用
grant all privileges on *.* to 'mha'@'192.168.10.%' identified by 'manager';		#防止从库通过主机名连接不上主库
grant all privileges on *.* to 'mha'@'master' identified by 'manager';
grant all privileges on *.* to 'mha'@'slave1' identified by 'manager';
grant all privileges on *.* to 'mha'@'slave2' identified by 'manager';
flush privileges;(2)在 Master 节点查看二进制文件和同步点
show master status;
+-------------------+----------+--------------+------------------+-------------------+
| File              | Position | Binlog_Do_DB | Binlog_Ignore_DB | Executed_Gtid_Set |
+-------------------+----------+--------------+------------------+-------------------+
| master-bin.000001 |    1747  |              |                  |                   |
+-------------------+----------+--------------+------------------+-------------------+(3)在 Slave1、Slave2 节点执行同步操作
change master to master_host='192.168.10.100',master_user='myslave',master_password='123456',master_log_file='master-bin.000004',master_log_pos=154; start slave;(4)在 Slave1、Slave2 节点查看数据同步结果
show slave status\G;//确保 IO 和 SQL 线程都是 Yes,代表同步正常。
Slave_IO_Running: Yes
Slave_SQL_Running: Yes(5)两个从库必须设置为只读模式:
set global read_only=1;(6)插入数据测试数据库同步
##在 Master 主库插入条数据,测试是否同步##
create database test_db;
二、安装MHA所有组件
6.安装 MHA 软件
(1)所有服务器上都安装 MHA 依赖的环境,首先安装 epel 源
yum install epel-release --nogpgcheck -yyum install -y perl-DBD-MySQL \
perl-Config-Tiny \
perl-Log-Dispatch \
perl-Parallel-ForkManager \
perl-ExtUtils-CBuilder \
perl-ExtUtils-MakeMaker \
perl-CPAN(2)安装 MHA 软件包,先在所有服务器上必须先安装 node 组件
对于每个操作系统版本不一样,这里 CentOS7.6选择 0.57 版本。
在所有服务器上必须先安装 node 组件,最后在 MHA-manager 节点上安装 manager 组件,因为 manager 依赖 node 组件。
cd /opt
tar zxvf mha4mysql-node-0.57.tar.gz
cd mha4mysql-node-0.57
perl Makefile.PL
make && make install(3)在 MHA manager 节点上安装 manager 组件
cd /opt
tar zxvf mha4mysql-manager-0.57.tar.gz
cd mha4mysql-manager-0.57
perl Makefile.PL
make && make install----------------------------------------------------------------------------------------------------------
#manager 组件安装后在/usr/local/bin 下面会生成几个工具,主要包括以下几个:
masterha_check_ssh 检查 MHA 的 SSH 配置状况
masterha_check_repl 检查 MySQL 复制状况
masterha_manger 启动 manager的脚本
masterha_check_status 检测当前 MHA 运行状态
masterha_master_monitor 检测 master 是否宕机
masterha_master_switch 控制故障转移(自动或者 手动)
masterha_conf_host 添加或删除配置的 server 信息
masterha_stop  关闭manager#node 组件安装后也会在/usr/local/bin 下面会生成几个脚本
(这些工具通常由 MHAManager 的脚本触发,无需人为操作)主要如下:save_binary_logs 保存和复制 master 的二进制日志apply_diff_relay_logs 识别差异的中继日志事件并将其差异的事件应用于其他的 slavefilter_mysqlbinlog 去除不必要的 ROLLBACK 事件(MHA 已不再使用这个工具)purge_relay_logs 清除中继日志(不会阻塞 SQL 线程)
----------------------------------------------------------------------------------------------------------7.在所有服务器上配置无密码认证
(1)在 manager 节点上配置到所有数据库节点的无密码认证
ssh-keygen -t rsa 				#一路按回车键
ssh-copy-id 192.168.10.102
ssh-copy-id 192.168.10.101
ssh-copy-id 192.168.10.100(2)在 master 上配置到数据库节点 slave1 和 slave2 的无密码认证
ssh-keygen -t rsa
ssh-copy-id 192.168.233.22
ssh-copy-id 192.168.233.23(3)在 slave1 上配置到数据库节点 master 和 slave2 的无密码认证
ssh-keygen -t rsa
ssh-copy-id 192.168.233.21
ssh-copy-id 192.168.233.23(4)在 slave2 上配置到数据库节点 master 和 slave1 的无密码认证
ssh-keygen -t rsa
ssh-copy-id 192.168.233.21
ssh-copy-id 192.168.233.228.在 manager 节点上配置 MHA
(1)在 manager 节点上复制相关脚本到/usr/local/bin 目录
cp -rp /opt/mha4mysql-manager-0.57/samples/scripts /usr/local/bin
//拷贝后会有四个执行文件
ll /usr/local/bin/scripts/
----------------------------------------------------------------------------------------------------------
master_ip_failover  		#自动切换时 VIP 管理的脚本
master_ip_online_change 	#在线切换时 vip 的管理
power_manager 				#故障发生后关闭主机的脚本
send_report 				#因故障切换后发送报警的脚本
----------------------------------------------------------------------------------------------------------(2)复制上述的自动切换时 VIP 管理的脚本到 /usr/local/bin 目录,
这里使用master_ip_failover脚本来管理 VIP 和故障切换cp /usr/local/bin/scripts/master_ip_failover /usr/local/bin(3)修改内容如下:(删除原有内容,直接复制并修改vip相关参数)
vim /usr/local/bin/master_ip_failover
#!/usr/bin/env perl
use strict;
use warnings FATAL => 'all';use Getopt::Long;my (
$command, $ssh_user, $orig_master_host, $orig_master_ip,
$orig_master_port, $new_master_host, $new_master_ip, $new_master_port
);
#############################添加内容部分#########################################
my $vip = '192.168.233.100';									#指定vip的地址
my $brdc = '192.168.233.255';								#指定vip的广播地址
my $ifdev = 'ens33';										#指定vip绑定的网卡
my $key = '1';												#指定vip绑定的虚拟网卡序列号
my $ssh_start_vip = "/sbin/ifconfig ens33:$key $vip";		#代表此变量值为ifconfig ens33:1 192.168.233.100
my $ssh_stop_vip = "/sbin/ifconfig ens33:$key down";		#代表此变量值为ifconfig ens33:1 192.168.233.100 down
my $exit_code = 0;											#指定退出状态码为0
#my $ssh_start_vip = "/usr/sbin/ip addr add $vip/24 brd $brdc dev $ifdev label $ifdev:$key;/usr/sbin/arping -q -A -c 1 -I $ifdev $vip;iptables -F;";
#my $ssh_stop_vip = "/usr/sbin/ip addr del $vip/24 dev $ifdev label $ifdev:$key";
##################################################################################
GetOptions(
'command=s' => \$command,
'ssh_user=s' => \$ssh_user,
'orig_master_host=s' => \$orig_master_host,
'orig_master_ip=s' => \$orig_master_ip,
'orig_master_port=i' => \$orig_master_port,
'new_master_host=s' => \$new_master_host,
'new_master_ip=s' => \$new_master_ip,
'new_master_port=i' => \$new_master_port,
);exit &main();sub main {print "\n\nIN SCRIPT TEST====$ssh_stop_vip==$ssh_start_vip===\n\n";if ( $command eq "stop" || $command eq "stopssh" ) {my $exit_code = 1;
eval {
print "Disabling the VIP on old master: $orig_master_host \n";
&stop_vip();
$exit_code = 0;
};
if ($@) {
warn "Got Error: $@\n";
exit $exit_code;
}
exit $exit_code;
}
elsif ( $command eq "start" ) {my $exit_code = 10;
eval {
print "Enabling the VIP - $vip on the new master - $new_master_host \n";
&start_vip();
$exit_code = 0;
};
if ($@) {
warn $@;
exit $exit_code;
}
exit $exit_code;
}
elsif ( $command eq "status" ) {
print "Checking the Status of the script.. OK \n";
exit 0;
}
else {
&usage();
exit 1;
}
}
sub start_vip() {
`ssh $ssh_user\@$new_master_host \" $ssh_start_vip \"`;
}
## A simple system call that disable the VIP on the old_master
sub stop_vip() {
`ssh $ssh_user\@$orig_master_host \" $ssh_stop_vip \"`;
}sub usage {
print
"Usage: master_ip_failover --command=start|stop|stopssh|status --orig_master_host=host --orig_master_ip=ip --orig_master_port=port --new_master_host=host --new_master_ip=ip --new_master_port=port\n";
}
----------------------------------------------------------------------------------------------------------------
#!/usr/bin/env perl
use strict;
use warnings FATAL => 'all';use Getopt::Long;
my (
$command, $ssh_user, $orig_master_host, $orig_master_ip,
$orig_master_port, $new_master_host, $new_master_ip, $new_master_port
);
my $vip = '192.168.10.99';
my $brdc = '192.168.10.255';
my $ifdev = 'ens33';
my $key = '1';
my $ssh_start_vip = "/sbin/ifconfig ens33:$key $vip";
my $ssh_stop_vip = "/sbin/ifconfig ens33:$key down";
my $exit_code = 0;
GetOptions(
'command=s' => \$command,
'ssh_user=s' => \$ssh_user,
'orig_master_host=s' => \$orig_master_host,
'orig_master_ip=s' => \$orig_master_ip,
'orig_master_port=i' => \$orig_master_port,
'new_master_host=s' => \$new_master_host,
'new_master_ip=s' => \$new_master_ip,
'new_master_port=i' => \$new_master_port,
);exit &main();sub main {
print "\n\nIN SCRIPT TEST====$ssh_stop_vip==$ssh_start_vip===\n\n";
if ( $command eq "stop" || $command eq "stopssh" ) {
my $exit_code = 1;
eval {
print "Disabling the VIP on old master: $orig_master_host \n";
&stop_vip();
$exit_code = 0;
};
if ($@) {
warn "Got Error: $@\n";
exit $exit_code;
}
exit $exit_code;
}
elsif ( $command eq "start" ) {
my $exit_code = 10;
eval {
print "Enabling the VIP - $vip on the new master - $new_master_host \n";
&start_vip();
$exit_code = 0;
};
if ($@) {
warn $@;
exit $exit_code;
}
exit $exit_code;
}
elsif ( $command eq "status" ) {
print "Checking the Status of the script.. OK \n";
exit 0;
}
else {
&usage();
exit 1;
}
}
sub start_vip() {
`ssh $ssh_user\@$new_master_host \" $ssh_start_vip \"`;
}
### A simple system call that disable the VIP on the old_master
sub stop_vip() {
`ssh $ssh_user\@$orig_master_host \" $ssh_stop_vip \"`;
}sub usage {
print
"Usage: master_ip_failover --command=start|stop|stopssh|status --orig_master_host=host --orig_master_ip=ip --orig_master_port=port --new_master_host=host --new_master_ip=ip --new_master_port=port\n";
}管理 MySQL 主从复制设置中的虚拟 IP 故障切换而设计的,可能用于主服务器需要切换到另一台服务器的情景。
它使用 SSH 在远程服务器上执行命令来控制虚拟 IP 地址
----------------------------------------------------------------------------------------------------------------(4)创建 MHA 软件目录并拷贝配置文件,这里使用app1.cnf配置文件来管理 mysql 节点服务器
mkdir /etc/masterha
cp /opt/mha4mysql-manager-0.57/samples/conf/app1.cnf /etc/masterhavim /etc/masterha/app1.cnf						#删除原有内容,直接复制并修改节点服务器的IP地址
[server default]
manager_log=/var/log/masterha/app1/manager.log
manager_workdir=/var/log/masterha/app1
master_binlog_dir=/usr/local/mysql/data
master_ip_failover_script=/usr/local/bin/master_ip_failover
master_ip_online_change_script=/usr/local/bin/master_ip_online_change
password=manager
ping_interval=1
remote_workdir=/tmp
repl_password=123456
repl_user=myslave
secondary_check_script=/usr/local/bin/masterha_secondary_check -s 192.168.10.101 -s 192.168.10.100
#从对主监听
shutdown_script=""
ssh_user=root
user=mha[server1]
hostname=192.168.10.102
#主服务器
port=3306[server2]
candidate_master=1
check_repl_delay=0
hostname=192.168.10.101
#备用主服务器
port=3306[server3]
hostname=192.168.10.100
#从服务器2
port=3306----------------------------------------------------------------------------------------------------------
[server default]
manager_log=/var/log/masterha/app1/manager.log      #manager日志
manager_workdir=/var/log/masterha/app1            #manager工作目录
master_binlog_dir=/usr/local/mysql/data/         #master保存binlog的位置,这里的路径要与master里配置的binlog的路径一致,以便MHA能找到
master_ip_failover_script=/usr/local/bin/master_ip_failover  #设置自动failover时候的切换脚本,也就是上面的那个脚本
master_ip_online_change_script=/usr/local/bin/master_ip_online_change  #设置手动切换时候的切换脚本
password=manager			#设置mysql中root用户的密码,这个密码是前文中创建监控用户的那个密码
ping_interval=1				#设置监控主库,发送ping包的时间间隔,默认是3秒,尝试三次没有回应的时候自动进行failover
remote_workdir=/tmp			#设置远端mysql在发生切换时binlog的保存位置
repl_password=123		    #设置复制用户的密码
repl_user=myslave			#设置复制用户的用户
report_script=/usr/local/send_report     #设置发生切换后发送的报警的脚本
secondary_check_script=/usr/local/bin/masterha_secondary_check -s 192.168.233.22 -s 192.168.233.23	#指定检查的从服务器IP地址
shutdown_script=""			#设置故障发生后关闭故障主机脚本(该脚本的主要作用是关闭主机防止发生脑裂,这里没有使用)
ssh_user=root				#设置ssh的登录用户名
user=mha					#设置监控用户root[server1]
hostname=192.168.233.21
port=3306[server2]
hostname=192.168.233.22
port=3306
candidate_master=1
#设置为候选master,设置该参数以后,发生主从切换以后将会将此从库提升为主库,
即使这个从库不是集群中最新的slavecheck_repl_delay=0
#默认情况下如果一个slave落后master 超过100M的relay logs的话,MHA将不会选择该slave作为一个新的master,
因为对于这个slave的恢复需要花费很长时间;通过设置check_repl_delay=0,
MHA触发切换在选择一个新的master的时候将会忽略复制延时,这个参数对于设置了candidate_master=1的主机非常有用,
因为这个候选主在切换的过程中一定是新的master[server3]
hostname=192.168.233.23
port=3306
三、测试是否成功
9.第一次配置需要在 Master 节点上手动开启虚拟IP
/sbin/ifconfig ens33:1 192.168.10.110/2410.在 manager 节点上测试 ssh 无密码认证,如果正常最后会输出 successfully,如下所示。
masterha_check_ssh -conf=/etc/masterha/app1.cnfTue Nov 26 23:09:45 2020 - [warning] Global configuration file /etc/masterha_default.cnf not found. Skipping.
Tue Nov 26 23:09:45 2020 - [info] Reading application default configuration from /etc/masterha/app1.cnf..
Tue Nov 26 23:09:45 2020 - [info] Reading server configuration from /etc/masterha/app1.cnf..
Tue Nov 26 23:09:45 2020 - [info] Starting SSH connection tests..
Tue Nov 26 23:09:46 2020 - [debug]
Tue Nov 26 23:09:45 2020 - [debug]  Connecting via SSH from root@192.168.80.11(192.168.80.11:22) to root@192.168.80.12(192.168.80.12:22)..
Tue Nov 26 23:09:46 2020 - [debug]   ok.
Tue Nov 26 23:09:47 2020 - [debug]
Tue Nov 26 23:09:46 2020 - [debug]  Connecting via SSH from root@192.168.80.12(192.168.80.12:22) to root@192.168.80.11(192.168.80.11:22)..
Tue Nov 26 23:09:47 2020 - [debug]   ok.
Tue Nov 26 23:09:47 2020 - [info] All SSH connection tests passed successfully.11.在 manager 节点上测试 mysql 主从连接情况,最后出现 MySQL Replication Health is OK 字样说明正常。如下所示。
masterha_check_repl -conf=/etc/masterha/app1.cnfTue Nov 26 23:10:29 2020 - [info] Slaves settings check done.
Tue Nov 26 23:10:29 2020 - [info]
192.168.80.11(192.168.80.11:3306) (current master)+--192.168.80.12(192.168.80.12:3306)Tue Nov 26 23:10:29 2020 - [info] Checking replication health on 192.168.80.12..
Tue Nov 26 23:10:29 2020 - [info]  ok.
Tue Nov 26 23:10:29 2020 - [info] Checking master_ip_failover_script status:
Tue Nov 26 23:10:29 2020 - [info]   /usr/local/bin/master_ip_failover --command=status --ssh_user=root --orig_master_host=192.168.80.11 --orig_master_ip=192.168.80.11 --orig_master_port=3306 IN SCRIPT TEST====/sbin/ifconfig ens33:1 down==/sbin/ifconfig ens33:1 192.168.80.200===Checking the Status of the script.. OK
Tue Nov 26 23:10:29 2020 - [info]  OK.
Tue Nov 26 23:10:29 2020 - [warning] shutdown_script is not defined.
Tue Nov 26 23:10:29 2020 - [info] Got exit code 0 (Not master dead).MySQL Replication Health is OK.12.在 manager 节点上启动 MHA
nohup masterha_manager --conf=/etc/masterha/app1.cnf --remove_dead_master_conf --ignore_last_failover < /dev/null > /var/log/masterha/app1/manager.log 2>&1 &
四、故障模拟
1、systemctl stop mysqld此时vip转移到新主
2、停止新主的mysql服务
修改后的:
systemctl stop mysqldvim /etc/my.cnf
----------------------
server-id = 2
log_bin = master-bin
log-slave-updates = true
----------------------
systemctl start mysqld.service原主
vim /etc/my.cnf
----------------------
server-id = 1
log_bin = master-bin
relay-log = relay-log-bin
relay-log-index = slave-relay-bin.index
----------------------
systemctl start mysqld.service3、在 manager 节点上修改配置文件app1.cnf
(再把这个记录添加进去,因为它检测掉失效时候会自动消失)
vim /etc/masterha/app1.cnf
修改
旧主的server
secondary_check_script=/usr/local/bin/masterha_secondary_check -s 192.168.10.101 -s 192.168.10.102		监控主的设备[server1]
hostname=192.168.10.100
port=3306[server2]
hostname=192.168.10.102
port=3306
candidate_master=1
check_repl_delay=0[server3]
hostname=192.168.10.101
port=3306nohup masterha_manager --conf=/etc/masterha/app1.cnf --remove_dead_master_conf --ignore_last_failover < /dev/null > /var/log/masterha/app1/manager.log 2>&1 &新主和就主进入数据库
stop slave;
在旧主--------------------------------------------
change master to master_host='192.168.10.100',master_user='myslave',master_password='123456',master_log_file='master-bin.000004',master_log_pos=154;reset slave;start slave;show slave status\G; 	查看二进制文件和同步点
//确保 IO 和 SQL 线程都是 Yes,代表同步正常
Slave_IO_Running: Yes
Slave_SQL_Running: Yes	---------------------------------------------------
验证
在新主终端创建新数据库,查看是否同步到旧主的库
相关文章:
)
mysql---MHA(高可用)
MHA概述 magterhight availabulity :基于主库的高可用环境下,主故障切换基础要求:主从架构 (一主两从)解决mysql的单点故障问题,一旦数据库崩溃,MHA会在0-30s内这东东完成故障切换。复制方式:半…...

人工智能基础_机器学习032_多项式回归升维_原理理解---人工智能工作笔记0072
现在开始我们来看多项式回归,首先理解多维 原来我们学习的使用线性回归,其实就是一条直线对吧,那个是一维的,我们之前学的全部都是一维的对吧,是一维的,然后是多远的,因为有多个x1,x2,x3,x4... 但是比如我们有一个数据集,是上面这种,的如果用一条直线很难拟合,那么 这个时候,…...

C#截取范围
string[] strs new string[]{"1e2qe","23123e21","3ewqewq","4fewfew","5fsdfds"};var list strs[1..2];Range p 0..3;var list strs[Range];...
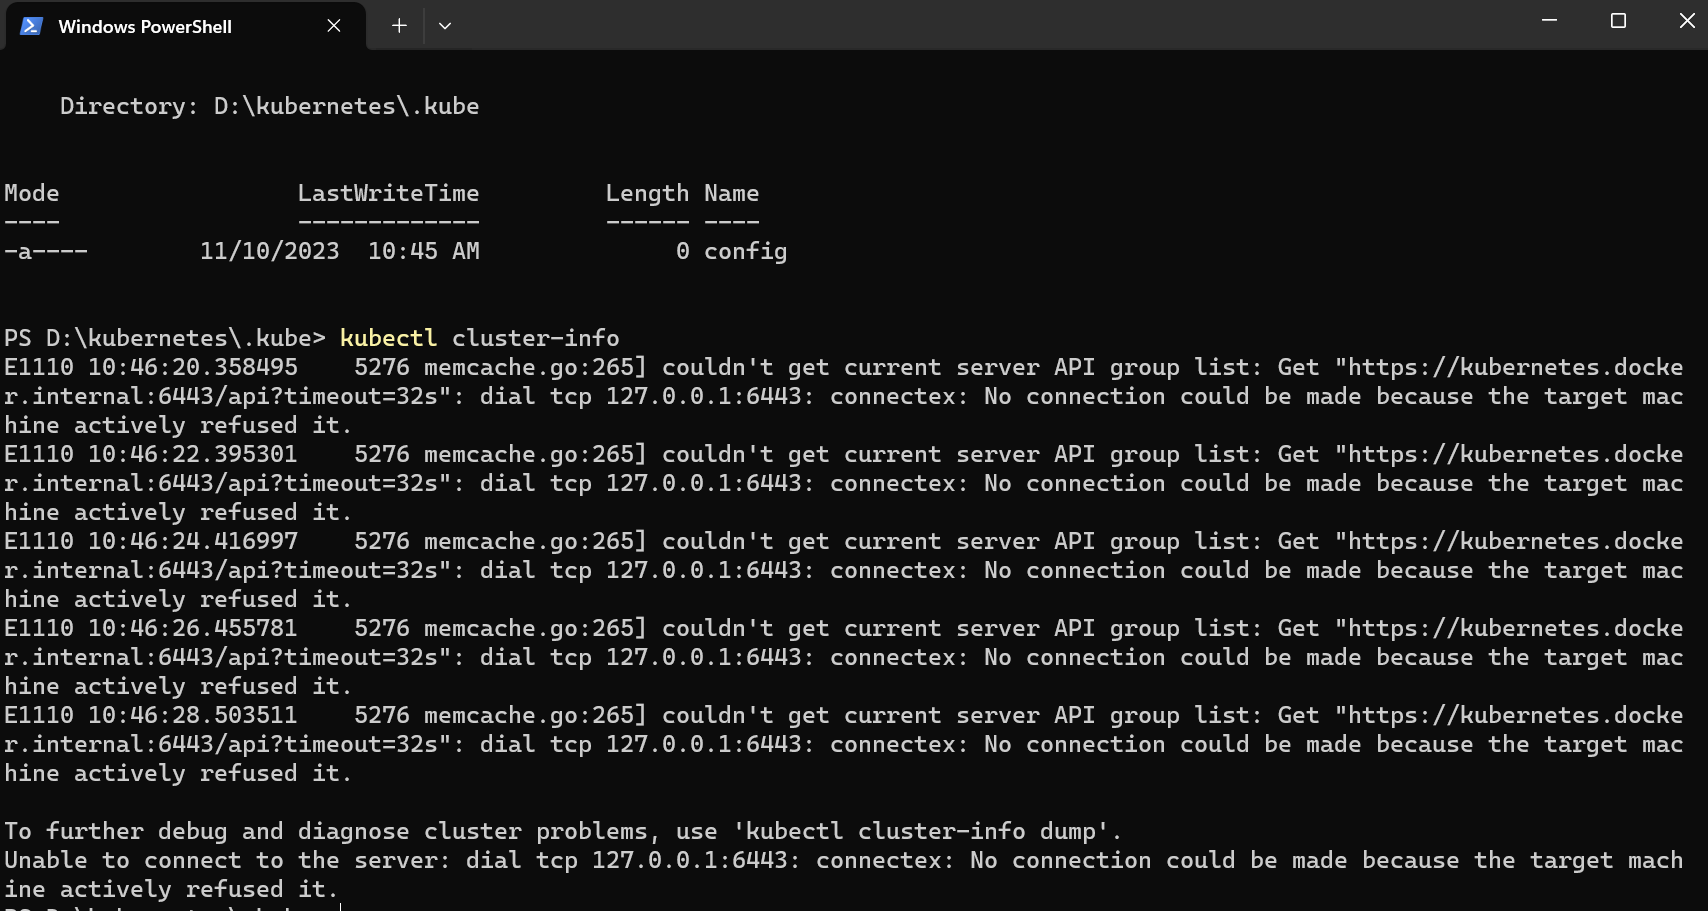
用 winget 在 Windows 上安装 kubectl
目录 kubectl 是什么? 安装 kubectl 以管理员身份打开 PowerShell 使用 winget 安装 kubectl 测试一下,确保安装的是最新版本 导航到你的 home 目录: 验证 kubectl 配置 kubectl 是什么? kubectl 是 Kubernetes 的命令行工…...
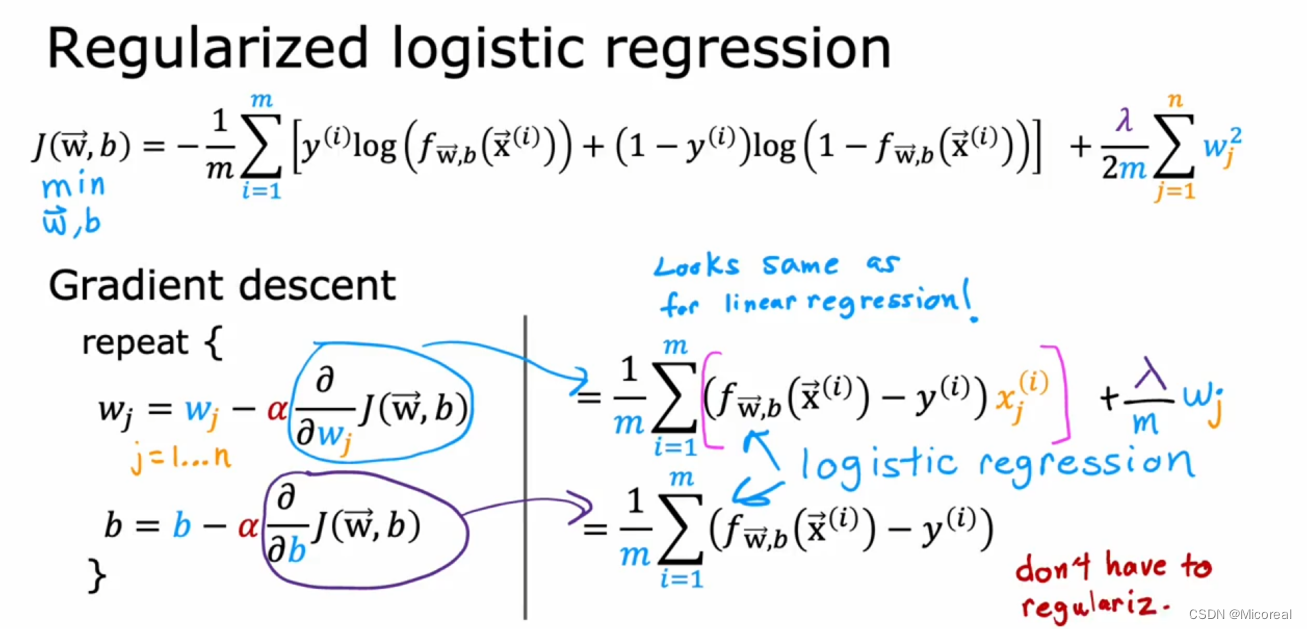
1 Supervised Machine Learning Regression and Classification
文章目录 Week1OverViewSupervised LearningUnsupervised LearningLinear Regression ModelCost functionGradient Descent Week2Muliple FeatureVectorizationGradient Descent for Multiple RegressionFeature ScalingGradient DescentFeature EngineeringPolynomial Regress…...

Antv/G2 折线图 DataSet 数据展开成指定格式
DataSet 文档 G2 3.2 DataSet 文档 Demo: <!DOCTYPE html> <html lang"en"> <head><meta charset"UTF-8" /><meta name"viewport" content"widthdevice-width, initial-scale1.0" /><m…...
物理问题中常见的分析问题----什么样的函数性质较好
物理问题中常见的积分符号位置交换问题 重极限与累次极限 高数下的定义 累次极限:求极限时需要遵循一定的顺序重极限:任意方向趋于的极限 两者之间的关系: 两者没啥关系存在累次极限存在而不相等的函数...... 求和符号与积分符号互换--逐项积…...

8 Go的函数
概述 在上一节的内容中,我们介绍了Go的指针,包括:使用指针、空指针、指针数组、指向指针的指针等。在本节中,我们将介绍Go的函数。函数允许开发者将相关的代码组织在一起,并将其命名,以便在其他地方进行调用…...

算法笔记-第九章-二叉树的遍历(待整理)
算法笔记-第九章-二叉树的遍历 二叉树的先序遍历二叉树的中序遍历二叉树的先序遍历 //二叉树的先序遍历 #include <cstdio> #include <vector> using namespace std;const int MAXN = 50;struct Node //用结构体表示左子树和右子树的数据 {int l, r; } nodes[MAXN]…...
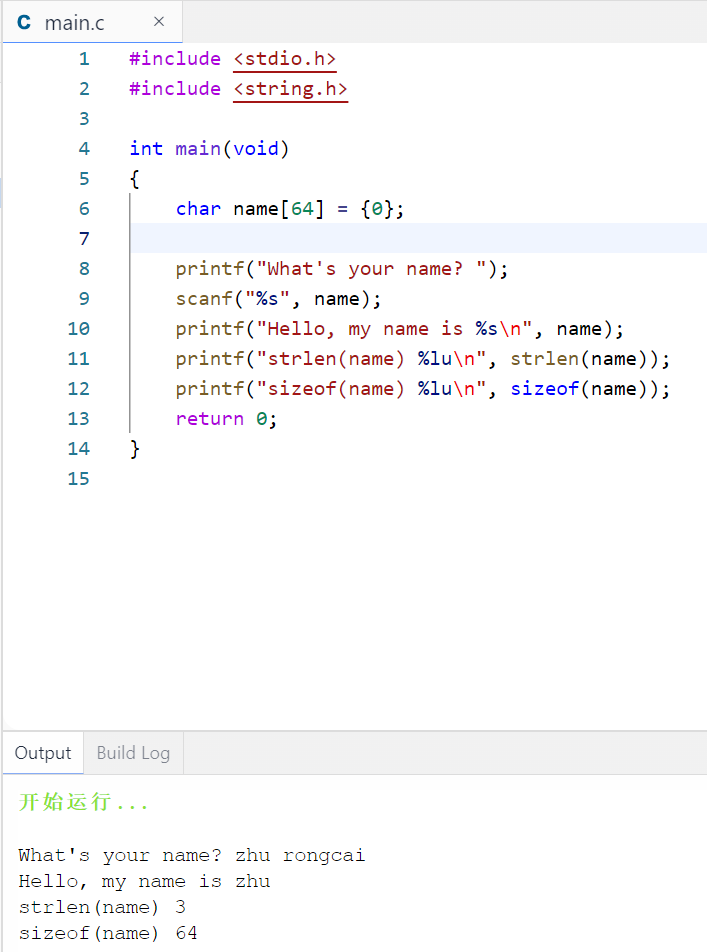
C语言从入门到精通之【字符串】
C语言没有专门用于储存字符串的变量类型,字符串都被储存在char类型的数组中。数组由连续的存储单元组成,字符串中的字符被储存在相邻的存储单元中,每个单元储存一个字符,每个字符占1个字节。 数组末尾位置的字符\0。这是空字符&am…...
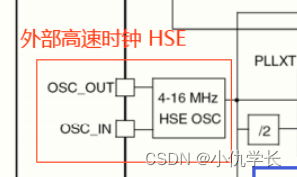
超详细!必看!!STM32--时钟树原理
一、什么是时钟? 时钟是单片机的脉搏,是系统工作的同步节拍。单片机上至CPU,下至总线外设,它们工作时序的配合,都需要一个同步的时钟信号来统一指挥。时钟信号是周期性的脉冲信号。 二、什么是时钟树? S…...

用 Golang 采集 Nginx 接口流量大小
简介 在开发和运维中,我们经常需要监控和分析服务器的接口流量大小,特别是对于部署了 Nginx 的服务器。本文将介绍如何使用 Golang 采集 Nginx 接口流量大小,并展示如何将这些数据进行实时监控和分析。 步骤一:准备工作 在开始…...
)
Linux java jar启停脚本(合并版)
#包文件路径及名称(目录按照各自配置) APP_NAME=/opt/whkc/gs/app-java.jar#查询进程,并杀掉当前jar/java程序 pid=`ps -ef|grep app-java.jar | grep -v grep | awk {print $2}` kill...

计算机毕业设计选题推荐-公共浴池微信小程序/安卓APP-项目实战
✨作者主页:IT毕设梦工厂✨ 个人简介:曾从事计算机专业培训教学,擅长Java、Python、微信小程序、Golang、安卓Android等项目实战。接项目定制开发、代码讲解、答辩教学、文档编写、降重等。 ☑文末获取源码☑ 精彩专栏推荐⬇⬇⬇ Java项目 Py…...

sqli-labs关卡13(基于post提交的单引号加括号的报错盲注)通关思路
文章目录 前言一、回顾第十二关知识点二、靶场第十三关通关思路1、判断注入点2、爆显位3、爆数据库名4、爆数据库表5、爆数据库列6、爆数据库关键信息 总结 前言 此文章只用于学习和反思巩固sql注入知识,禁止用于做非法攻击。注意靶场是可以练习的平台,…...

SparkAi创作系统ChatGPT网站源码+详细搭建部署教程+AI绘画系统+支持GPT4.0+Midjourney绘画
一、AI创作系统 SparkAi创作系统是基于OpenAI很火的ChatGPT进行开发的Ai智能问答系统和Midjourney绘画系统,支持OpenAI-GPT全模型国内AI全模型。本期针对源码系统整体测试下来非常完美,可以说SparkAi是目前国内一款的ChatGPT对接OpenAI软件系统。那么如…...

shiro默认session设置永不超时
Shiro默认情况下session是有超时时间的,而不是永不超时。默认的超时时间是30分钟,可以通过修改Shiro的配置文件来更改超时时间。如果想要让session永不超时,可以将超时时间设置为一个很大的值,例如Integer.MAX_VALUE。 以下是修改…...

前端食堂技术周刊第 104 期:Angular v17、GPTs、Vue vapor mode、Svelte Flow、Bundler 的设计取舍
美味值:🌟🌟🌟🌟🌟 口味:金奖乳鸽 食堂技术周刊仓库地址:https://github.com/Geekhyt/weekly 大家好,我是童欧巴。欢迎来到前端食堂技术周刊,我们先来看下…...
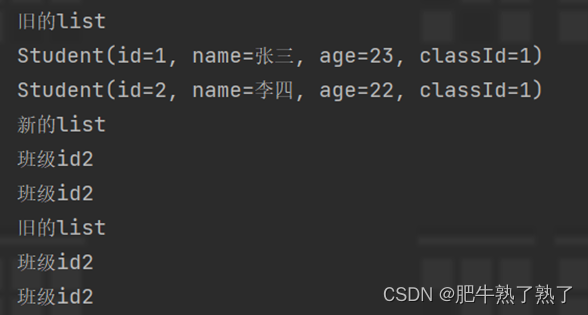
list复制出新的list后修改元素,也更改了旧的list?
例子 addAll() Testpublic void CopyListTest(){Student student Student.builder().id(1).name("张三").age(23).classId(1).build();Student student2 Student.builder().id(2).name("李四").age(22).classId(1).build();List<Student> student…...

Qt绘制各种图形
重载绘图事件: protected:void paintEvent(QPaintEvent *event) Q_DECL_OVERRIDE;void Widget::paintEvent(QPaintEvent *event) { 进行绘图操作 } 绘图前操作: //基本绘图QPainter painter(this);//创建QPainter对象painter.setRenderHint(QPa…...

从入门到上岗,Java+AI 复合型人才养成攻略
当下编程行业格局正在悄然改变,纯 Java 后端岗位内卷日趋严重,薪资增长逐步放缓;纯粹的 AI 算法岗门槛居高不下,对学历、数理功底要求严苛,普通开发者很难入局。 而Java+AI 复合型开发顺势成为行业刚需岗位,既依托成熟的 Java 体系承接业务开发,又能融入人工智能技术实…...

极致精简,功能强大的PDF编辑工具
这是一款功能全面的PDF编辑工具 你只需要导入一份PDF格式文件 就可以快速的对它进行插入 批注编辑保护转换等各种操作 而且无需登录 也可以直接使用 在插入选项中可以进行插入文字图片 页面页眉页脚页码文档背景水印视频音频等 在批注选项中可以管理批注隐藏批注 高亮显示 文本…...

Onekey终极指南:如何5分钟快速获取Steam游戏清单的免费神器
Onekey终极指南:如何5分钟快速获取Steam游戏清单的免费神器 【免费下载链接】Onekey Onekey Steam Depot Manifest Downloader 项目地址: https://gitcode.com/gh_mirrors/one/Onekey 还在为复杂的Steam游戏清单下载而头疼吗?想要备份游戏资源却不…...

机器学习与SHAP在教育公平研究中的应用:精准定位学业困境根源
1. 项目概述:当机器学习遇见教育公平,我们如何精准定位学业困境的根源?在拉丁美洲的教育研究领域,一个长期困扰政策制定者和研究者的核心问题是:究竟是什么因素,在复杂的社会经济背景下,系统性地…...

TV Bro电视浏览器:为智能电视打造的最佳遥控器上网解决方案
TV Bro电视浏览器:为智能电视打造的最佳遥控器上网解决方案 【免费下载链接】tv-bro Simple web browser for android optimized to use with TV remote 项目地址: https://gitcode.com/gh_mirrors/tv/tv-bro 还在为智能电视上网操作不便而烦恼吗?…...

Taotoken的审计日志功能为企业API安全与合规管理提供支持
🚀 告别海外账号与网络限制!稳定直连全球优质大模型,限时半价接入中。 👉 点击领取海量免费额度 Taotoken的审计日志功能为企业API安全与合规管理提供支持 当企业决定将大模型能力集成到内部业务流程中时,IT管理员和安…...

Lovable电商网站搭建,为什么92%的初创团队在第3周就遭遇性能雪崩?
更多请点击: https://codechina.net 第一章:Lovable电商网站搭建 Lovable 是一个面向中小商户的轻量级电商解决方案,采用现代 Web 技术栈构建,强调可扩展性、用户体验与快速部署。其核心基于 Vue 3(Composition API&a…...

原来专业的赛事专用匹克球厂家有这么多门道?
引言在匹克球运动蓬勃发展的当下,专业赛事专用匹克球的选择至关重要。很多人可能不知道,看似普通的赛事专用匹克球背后,其实隐藏着诸多门道。接下来,我们就一起深入探究专业赛事专用匹克球厂家的秘密。核心技术与材料的门道专业赛…...

OpenCore Legacy Patcher完整指南:如何让老旧Mac重获新生运行最新macOS
OpenCore Legacy Patcher完整指南:如何让老旧Mac重获新生运行最新macOS 【免费下载链接】OpenCore-Legacy-Patcher Experience macOS just like before 项目地址: https://gitcode.com/GitHub_Trending/op/OpenCore-Legacy-Patcher 想让你的老旧Mac设备重获新…...

Godot4地图分层绘制实战:从图层混乱到专业场景管理的避坑指南
Godot4地图分层绘制实战:从图层混乱到专业场景管理的避坑指南当你第一次在Godot4中完成一个复杂场景的TileMap绘制时,那种成就感无与伦比。但随着场景复杂度提升,你是否遇到过这些头疼问题:角色明明站在树后却被树叶遮挡ÿ…...