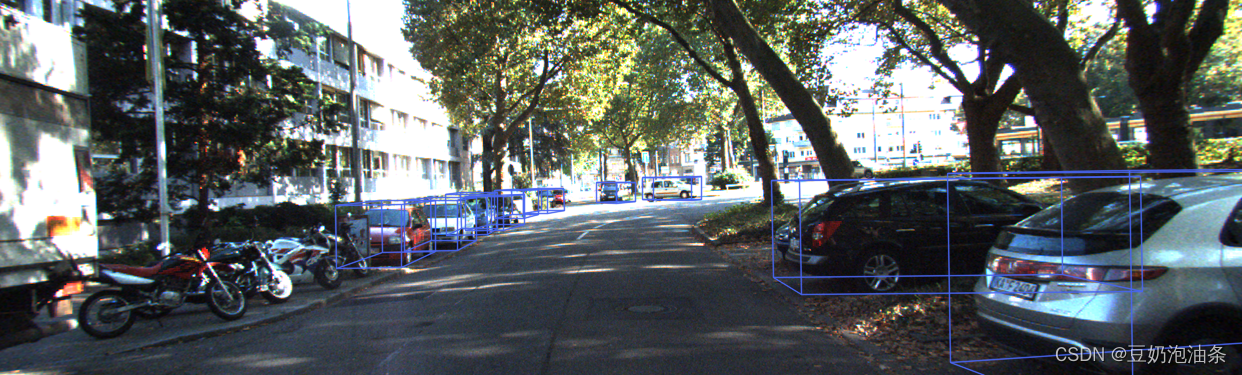
新版mmdetection3d将3D bbox绘制到图像
环境信息
使用 python mmdet3d/utils/collect_env.py收集环境信息
sys.platform: linux
Python: 3.7.12 | packaged by conda-forge | (default, Oct 26 2021, 06:08:21) [GCC 9.4.0]
CUDA available: True
numpy_random_seed: 2147483648
GPU 0,1: NVIDIA GeForce RTX 3090
CUDA_HOME: /usr/local/cuda
NVCC: Cuda compilation tools, release 11.3, V11.3.109
GCC: gcc (Ubuntu 7.5.0-6ubuntu2) 7.5.0
PyTorch: 1.8.1+cu111
PyTorch compiling details: PyTorch built with:- GCC 7.3- C++ Version: 201402- Intel(R) Math Kernel Library Version 2020.0.0 Product Build 20191122 for Intel(R) 64 architecture applications- Intel(R) MKL-DNN v1.7.0 (Git Hash 7aed236906b1f7a05c0917e5257a1af05e9ff683)- OpenMP 201511 (a.k.a. OpenMP 4.5)- NNPACK is enabled- CPU capability usage: AVX2- CUDA Runtime 11.1- NVCC architecture flags: -gencode;arch=compute_37,code=sm_37;-gencode;arch=compute_50,code=sm_50;-gencode;arch=compute_60,code=sm_60;-gencode;arch=compute_70,code=sm_70;-gencode;arch=compute_75,code=sm_75;-gencode;arch=compute_80,code=sm_80;-gencode;arch=compute_86,code=sm_86- CuDNN 8.0.5- Magma 2.5.2- Build settings: BLAS_INFO=mkl, BUILD_TYPE=Release, CUDA_VERSION=11.1, CUDNN_VERSION=8.0.5, CXX_COMPILER=/opt/rh/devtoolset-7/root/usr/bin/c++, CXX_FLAGS= -Wno-deprecated -fvisibility-inlines-hidden -DUSE_PTHREADPOOL -fopenmp -DNDEBUG -DUSE_KINETO -DUSE_FBGEMM -DUSE_QNNPACK -DUSE_PYTORCH_QNNPACK -DUSE_XNNPACK -O2 -fPIC -Wno-narrowing -Wall -Wextra -Werror=return-type -Wno-missing-field-initializers -Wno-type-limits -Wno-array-bounds -Wno-unknown-pragmas -Wno-sign-compare -Wno-unused-parameter -Wno-unused-variable -Wno-unused-function -Wno-unused-result -Wno-unused-local-typedefs -Wno-strict-overflow -Wno-strict-aliasing -Wno-error=deprecated-declarations -Wno-stringop-overflow -Wno-psabi -Wno-error=pedantic -Wno-error=redundant-decls -Wno-error=old-style-cast -fdiagnostics-color=always -faligned-new -Wno-unused-but-set-variable -Wno-maybe-uninitialized -fno-math-errno -fno-trapping-math -Werror=format -Wno-stringop-overflow, LAPACK_INFO=mkl, PERF_WITH_AVX=1, PERF_WITH_AVX2=1, PERF_WITH_AVX512=1, TORCH_VERSION=1.8.1, USE_CUDA=ON, USE_CUDNN=ON, USE_EXCEPTION_PTR=1, USE_GFLAGS=OFF, USE_GLOG=OFF, USE_MKL=ON, USE_MKLDNN=ON, USE_MPI=OFF, USE_NCCL=ON, USE_NNPACK=ON, USE_OPENMP=ON, TorchVision: 0.9.1+cu111
OpenCV: 4.6.0
MMEngine: 0.9.1
MMDetection: 3.2.0
MMDetection3D: 1.3.0+9d3e162
spconv2.0: True
以前写过mmdetection3d中的可视化,但mmdetection3d更新后代码已经不适用了,正好我把我的工作全转移到新版mmdetection3d上来了,因此重新写了一下推理结果可视化。整体思路还是构建模型、构建数据、推理、绘制,下面分步讲解
1、构建模型
我用jupyter实现,首先需要确保jupyter的工作路径在mmdetection3d的工作路径下,不然会存在找不到mmdet3d的问题
import sys
import os
import torch
import cv2
import numpy as np# 添加工作路径,不然找不到mmdet3d
os.chdir('/home/wistful/work/open_mmlab_mmdetection3d')
sys.path.append('/home/wistful/work/open_mmlab_mmdetection3d')# load config
config_file = 'configs/point_cls_voxel/pointpillars_hv_secfpn_8x2-160e_kitti-3d-3class.py'
checkpoint_file = '/home/wistful/work/open_mmlab_mmdetection3d/work_dirs/pointpillars_hv_secfpn_8x2-160e_kitti-3d-3class/epoch_80.pth'# 构建模型
from mmdet3d.apis import init_model, inference_detector
device = 'cuda:0'
model = init_model(config_file, checkpoint=checkpoint_file, device=device)
至此模型已经构建,下一步是构建数据,送入模型以获取推理结果
2、构建数据
新版mmdet3d的模型输入分为两个部分batch_inputs_dict, batch_data_samples。batch_inputs_dict包含了模型推理所需的数据(点云、图像),batch_data_samples包含了训练时需要的bbox等信息。因此,需要构建batch_inputs_dict,我写了一个简单的函数,可以调用
build_dataloader.py文件:
from mmdet3d.registry import DATASETS
from tools.misc.browse_dataset import build_data_cfg
from mmengine.registry import init_default_scopedef load_datasets(config_file, aug=False, set='train'):"""Args:config_file: 配置文件路径aug:是否数据增强(待测试)set:要读取的数据集,'train','test','val'Returns:"""cfg = build_data_cfg(config_file, aug=aug, cfg_options=None)init_default_scope(cfg.get('default_scope', 'mmdet3d'))# 选择需要读取的数据集if set == 'train':dataloader = cfg.train_dataloader.datasetelif set == 'val':dataloader = cfg.val_dataloader.datasetelif set == 'test':dataloader = cfg.test_dataloader.datasetreturn DATASETS.build(dataloader)def build_batch_dict(datasets, batch_size, device, images=False):"""Args:device: 指定设备datasets: 传入数据集batch_size: 批次大小images: 加入图像Returns:"""# TODO: 编写加入图像的代码points = []images = []batch_data_samples = []for i in range(batch_size):# 确保在同一个device上points.append(datasets[i]['inputs']['points'].to(device))data_samples = datasets[i]['data_samples']# if data_samples.gt_instances_3dif len(data_samples.gt_instances_3d.keys()) != 0:data_samples.gt_instances_3d.bboxes_3d = data_samples.gt_instances_3d.bboxes_3d.to(device)data_samples.gt_instances_3d.labels_3d = data_samples.gt_instances_3d.labels_3d.to(device)batch_inputs_dict = dict()batch_inputs_dict['points'] = points# batch_data_samples = data_samplesreturn batch_inputs_dict, batch_data_samplesdef cyclic_load_data_item(datasets, index, device, images=False):"""Args:device: 指定设备datasets: 传入数据集index: 索引images: 加入图像Returns:单条数据,适用于循环遍历整个数据集"""# TODO: 编写加入图像的代码points = []images = []points.append(datasets[index]['inputs']['points'].to(device))batch_inputs_dict = dict()batch_inputs_dict['points'] = pointsdata_samples = datasets[index]['data_samples']if len(data_samples.gt_instances_3d.keys()) !=0:data_samples.gt_instances_3d.bboxes_3d = data_samples.gt_instances_3d.bboxes_3d.to(device)data_samples.gt_instances_3d.labels_3d = data_samples.gt_instances_3d.labels_3d.to(device)batch_data_samples = [data_samples]return batch_inputs_dict, batch_data_samples
下面利用这个函数,实现构建数据集
# 构建数据集
from custom_API.build_dataloader import load_datasets # 我放在了custom_API路径下,如何导入取决于读者如何存放set = 'test'# set字段表示构建的数据集
datasets = load_datasets(dataset_config, aug=False, set=set) # aug字段表示不使用数据增强
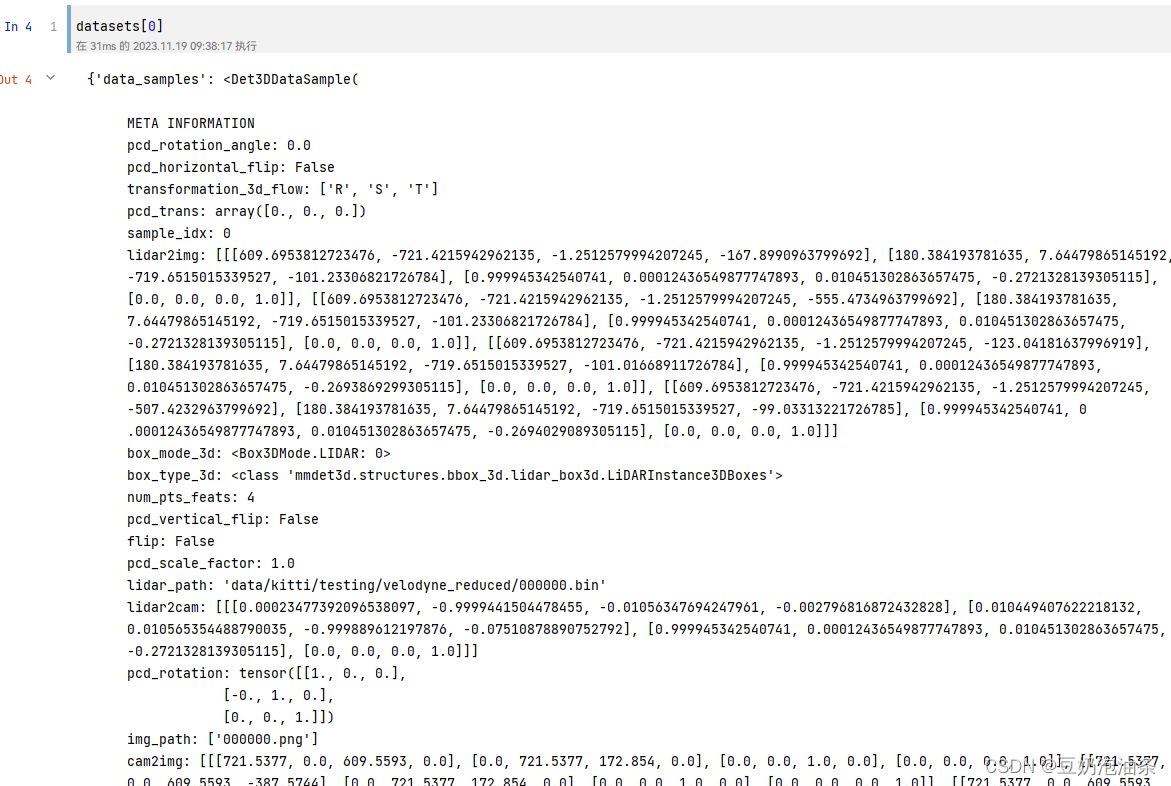
至此,datasets为一个列表,长度就是数据集的总样本数。eg:datasets[0]里面就包含了第1个样本的全部信息,下面可以看一下输出
3、推理与绘制
我们已经得到了整个数据集,那么我们就可以使用数据集中的任意一条数据进行推理,根据这个思路,我们也能很方便的推理完整个数据集。绘制部分的代码我使用的是旧版mmdetection3d中的代码,下面是代码:
# draw_box.py
import osfrom custom_API.draw_utils import draw_lidar_bbox3d_on_img, draw_depth_bbox3d_on_img, draw_camera_bbox3d_on_img
import mmcv
from os import path as osp
import numpy as npdef show_multi_modality_result(img,gt_bboxes,pred_bboxes,batch_data_samples,out_dir,filename,type='train',box_mode='lidar',img_metas=None,show=False,gt_bbox_color=(61, 102, 255),pred_bbox_color=(241, 101, 72)):"""Convert multi-modality detection results into 2D results.将3D边框投影到2D图像平面并且可视化Project the predicted 3D bbox to 2D image plane and visualize them.Args:img (np.ndarray): The numpy array of image in cv2 fashion.gt_bboxes (:obj:`BaseInstance3DBoxes`): Ground truth boxes.pred_bboxes (:obj:`BaseInstance3DBoxes`): Predicted boxes.proj_mat (numpy.array, shape=[4, 4]): The projection matrix # 投影矩阵according to the camera intrinsic parameters.out_dir (str): Path of output directory.filename (str): Filename of the current frame.box_mode (str, optional): Coordinate system the boxes are in.Should be one of 'depth', 'lidar' and 'camera'.Defaults to 'lidar'.img_metas (dict, optional): Used in projecting depth bbox.Defaults to None.show (bool, optional): Visualize the results online. Defaults to False.颜色为B G R,不是RGB!!!gt_bbox_color (str or tuple(int), optional): Color of bbox lines.The tuple of color should be in BGR order. Default: (255, 102, 61).pred_bbox_color (str or tuple(int), optional): Color of bbox lines.The tuple of color should be in BGR order. Default: (72, 101, 241)."""# 根据传入3D框所处的坐标系调用对应的投影方法,获取投影框if box_mode == 'depth':draw_bbox = draw_depth_bbox3d_on_imgelif box_mode == 'lidar':draw_bbox = draw_lidar_bbox3d_on_imgelif box_mode == 'camera':draw_bbox = draw_camera_bbox3d_on_imgelse:raise NotImplementedError(f'unsupported box mode {box_mode}')# 在out_dir下创建每个文件名字的文件夹# result_path = osp.join(out_dir, filename)# mmcv.mkdir_or_exist(result_path)out_dir = out_dir + type + '/'# 判断目录是否存在if not os.path.exists(out_dir):os.makedirs(out_dir)else:pass# os.makedirs(out_dir)# mmcv.mkdir_or_exist(result_path)# if score_thr > 0:#     inds = pred_scores > score_thr#     pred_bboxes = pred_bboxes[inds]# 获取投影矩阵proj_mat = batch_data_samples[0].lidar2imgproj_mat = proj_mat[0]proj_mat = np.array(proj_mat)if show:show_img = img.copy()if gt_bboxes is not None:show_img = draw_bbox(gt_bboxes, show_img, proj_mat, img_metas, color=gt_bbox_color)if pred_bboxes is not None:show_img = draw_bbox(pred_bboxes,show_img,proj_mat,img_metas,color=pred_bbox_color)mmcv.imshow(show_img, win_name='project_bbox3d_img', wait_time=0)if img is not None:# print('写入原图像')mmcv.imwrite(img, osp.join(out_dir, f'{filename}.png'))if gt_bboxes is not None:# 写入地面真相gt_img = draw_bbox(gt_bboxes, img, proj_mat, img_metas, color=gt_bbox_color)mmcv.imwrite(gt_img, osp.join(out_dir, f'{filename}_gt.png'))if pred_bboxes is not None:pred_img = draw_bbox(pred_bboxes, img, proj_mat, img_metas, color=pred_bbox_color)mmcv.imwrite(pred_img, osp.join(out_dir, f'{filename}_pred.png'))if pred_bboxes is not None and gt_bboxes is not None:# print('draw_gt_bbox')gt_img = draw_bbox(gt_bboxes, img, proj_mat, img_metas, color=gt_bbox_color)gt_and_pred_img = draw_bbox(pred_bboxes, gt_img, proj_mat, img_metas, color=pred_bbox_color)mmcv.imwrite(gt_and_pred_img, osp.join(out_dir, f'{filename}_pred_gt.png'))# draw_utils.py
# Copyright (c) OpenMMLab. All rights reserved.
import copyimport cv2
import numpy as np
import torch
from matplotlib import pyplot as pltdef project_pts_on_img(points,raw_img,lidar2img_rt,max_distance=70,thickness=-1):"""Project the 3D points cloud on 2D image.Args:points (numpy.array): 3D points cloud (x, y, z) to visualize.raw_img (numpy.array): The numpy array of image.lidar2img_rt (numpy.array, shape=[4, 4]): The projection matrixaccording to the camera intrinsic parameters.max_distance (float, optional): the max distance of the points cloud.Default: 70.thickness (int, optional): The thickness of 2D points. Default: -1."""img = raw_img.copy()num_points = points.shape[0]pts_4d = np.concatenate([points[:, :3], np.ones((num_points, 1))], axis=-1)pts_2d = pts_4d @ lidar2img_rt.T# cam_points is Tensor of Nx4 whose last column is 1# transform camera coordinate to image coordinatepts_2d[:, 2] = np.clip(pts_2d[:, 2], a_min=1e-5, a_max=99999)pts_2d[:, 0] /= pts_2d[:, 2]pts_2d[:, 1] /= pts_2d[:, 2]fov_inds = ((pts_2d[:, 0] < img.shape[1])& (pts_2d[:, 0] >= 0)& (pts_2d[:, 1] < img.shape[0])& (pts_2d[:, 1] >= 0))imgfov_pts_2d = pts_2d[fov_inds, :3]  # u, v, dcmap = plt.cm.get_cmap('hsv', 256)cmap = np.array([cmap(i) for i in range(256)])[:, :3] * 255for i in range(imgfov_pts_2d.shape[0]):depth = imgfov_pts_2d[i, 2]color = cmap[np.clip(int(max_distance * 10 / depth), 0, 255), :]cv2.circle(img,center=(int(np.round(imgfov_pts_2d[i, 0])),int(np.round(imgfov_pts_2d[i, 1]))),radius=1,color=tuple(color),thickness=thickness,)cv2.imshow('project_pts_img', img.astype(np.uint8))cv2.waitKey(0)def plot_rect3d_on_img(img,num_rects,rect_corners,color=(0, 255, 0),thickness=1):"""Plot the boundary lines of 3D rectangular on 2D images.Args:img (numpy.array): The numpy array of image.num_rects (int): Number of 3D rectangulars.rect_corners (numpy.array): Coordinates of the corners of 3Drectangulars. Should be in the shape of [num_rect, 8, 2].color (tuple[int], optional): The color to draw bboxes.Default: (0, 255, 0).thickness (int, optional): The thickness of bboxes. Default: 1."""line_indices = ((0, 1), (0, 3), (0, 4), (1, 2), (1, 5), (3, 2), (3, 7),(4, 5), (4, 7), (2, 6), (5, 6), (6, 7))# thickness = 0.5# print('rect_corners type:', rect_corners.dtype)# print('img type',type(img))for i in range(num_rects):corners = rect_corners[i].astype(np.int64)# print("opencv corners type:", corners.dtype)for start, end in line_indices:# cv2.line(img, (corners[start, 0], corners[start, 1]),#          (corners[end, 0], corners[end, 1]), color, thickness,#          cv2.LINE_AA)# print("change:", type(int(corners[start, 0])))cv2.line(img,tuple(corners[start]),tuple(corners[end]),color,thickness,cv2.LINE_AA)# cv2.line(img,#          (int(corners[start, 0]), int(corners[start, 1])),#          (int(corners[end, 0]), int(corners[end, 1])),#          color,#          thickness,#          cv2.LINE_AA)# return img.astype(np.uint8)return imgdef draw_lidar_bbox3d_on_img(bboxes3d,raw_img,lidar2img_rt,img_metas,color=(0, 255, 0),thickness=1):"""Project the 3D bbox on 2D plane and draw on input image.Args:bboxes3d (:obj:`LiDARInstance3DBoxes`):3d bbox in lidar coordinate system to visualize.raw_img (numpy.array): The numpy array of image.lidar2img_rt (numpy.array, shape=[4, 4]): The projection matrixaccording to the camera intrinsic parameters.img_metas (dict): Useless here.color (tuple[int], optional): The color to draw bboxes.Default: (0, 255, 0).thickness (int, optional): The thickness of bboxes. Default: 1."""img = raw_img.copy()corners_3d = bboxes3d.corners.cpu().numpy()num_bbox = corners_3d.shape[0]pts_4d = np.concatenate([corners_3d.reshape(-1, 3),np.ones((num_bbox * 8, 1))], axis=-1)lidar2img_rt = copy.deepcopy(lidar2img_rt).reshape(4, 4)if isinstance(lidar2img_rt, torch.Tensor):lidar2img_rt = lidar2img_rt.cpu().numpy()pts_2d = pts_4d @ lidar2img_rt.Tpts_2d[:, 2] = np.clip(pts_2d[:, 2], a_min=1e-5, a_max=1e5)pts_2d[:, 0] /= pts_2d[:, 2]pts_2d[:, 1] /= pts_2d[:, 2]imgfov_pts_2d = pts_2d[..., :2].reshape(num_bbox, 8, 2)return plot_rect3d_on_img(img, num_bbox, imgfov_pts_2d, color, thickness)# TODO: remove third parameter in all functions here in favour of img_metas
def draw_depth_bbox3d_on_img(bboxes3d,raw_img,calibs,img_metas,color=(0, 255, 0),thickness=1):"""Project the 3D bbox on 2D plane and draw on input image.Args:bboxes3d (:obj:`DepthInstance3DBoxes`, shape=[M, 7]):3d bbox in depth coordinate system to visualize.raw_img (numpy.array): The numpy array of image.calibs (dict): Camera calibration information, Rt and K.img_metas (dict): Used in coordinates transformation.color (tuple[int], optional): The color to draw bboxes.Default: (0, 255, 0).thickness (int, optional): The thickness of bboxes. Default: 1."""from mmdet3d.structures import points_cam2imgfrom mmdet3d.models import apply_3d_transformationimg = raw_img.copy()img_metas = copy.deepcopy(img_metas)corners_3d = bboxes3d.cornersnum_bbox = corners_3d.shape[0]points_3d = corners_3d.reshape(-1, 3)# first reverse the data transformationsxyz_depth = apply_3d_transformation(points_3d, 'DEPTH', img_metas, reverse=True)# project to 2d to get image coords (uv)uv_origin = points_cam2img(xyz_depth,xyz_depth.new_tensor(img_metas['depth2img']))uv_origin = (uv_origin - 1).round()imgfov_pts_2d = uv_origin[..., :2].reshape(num_bbox, 8, 2).numpy()return plot_rect3d_on_img(img, num_bbox, imgfov_pts_2d, color, thickness)def draw_camera_bbox3d_on_img(bboxes3d,raw_img,cam2img,img_metas,color=(0, 255, 0),thickness=1):"""Project the 3D bbox on 2D plane and draw on input image.Args:bboxes3d (:obj:`CameraInstance3DBoxes`, shape=[M, 7]):3d bbox in camera coordinate system to visualize.raw_img (numpy.array): The numpy array of image.cam2img (dict): Camera intrinsic matrix,denoted as `K` in depth bbox coordinate system.img_metas (dict): Useless here.color (tuple[int], optional): The color to draw bboxes.Default: (0, 255, 0).thickness (int, optional): The thickness of bboxes. Default: 1."""from mmdet3d.structures import points_cam2imgimg = raw_img.copy()cam2img = copy.deepcopy(cam2img)corners_3d = bboxes3d.cornersnum_bbox = corners_3d.shape[0]points_3d = corners_3d.reshape(-1, 3)if not isinstance(cam2img, torch.Tensor):cam2img = torch.from_numpy(np.array(cam2img))assert (cam2img.shape == torch.Size([3, 3])or cam2img.shape == torch.Size([4, 4]))cam2img = cam2img.float().cpu()# project to 2d to get image coords (uv)uv_origin = points_cam2img(points_3d, cam2img)uv_origin = (uv_origin - 1).round()imgfov_pts_2d = uv_origin[..., :2].reshape(num_bbox, 8, 2).numpy()return plot_rect3d_on_img(img, num_bbox, imgfov_pts_2d, color, thickness)
下面是推理和绘制的完整代码,必要的注释已经给出。
from custom_API.draw_box import show_multi_modality_result #如何导入取决于读者如何存放
print(f'datasets length:{len(datasets)}')
data_root = 'data/kitti/' # 数据集根路径
save_root = '/home/wistful/work/open_mmlab_mmdetection3d/visual_dir/predict_imgs/' # 保存可视化结果的根路径data_num = 100  # 最大不能超过数据集长度
# 判断一开始是读取的哪个数据集
if set == 'train' or set == 'val':new_set = 'training'
else:new_set = 'testing'
# 推理整个数据集的前data_num条数据
for i in tqdm(range(data_num), desc='process situation'):# cyclic_load_data_item代码位于第2步batch_inputs_dict, batch_data_samples = cyclic_load_data_item(datasets, index=i, device=device)  # 读取一条数据,并构建批次points = batch_inputs_dict['points'][0]  # 获取点云,因为是单条数据,所以直接取0# 获取检测结果result, data = inference_detector(model, points.cpu())bboxes_3d = result.pred_instances_3d.bboxes_3dlabels_3d = result.pred_instances_3d.labels_3dscores_3d = result.pred_instances_3d.scores_3d# 设置阈值thr = 0.4score = (scores_3d > thr)bboxes_3d = bboxes_3d[score] # 根据阈值筛选# 读取原始图像img_file_path = data_root + new_set + '/image_2/' + batch_data_samples[0].img_path[0]image = cv2.imread(img_file_path)img_name = batch_data_samples[0].img_path[0].split('.')[0] # 取一下文件名# 保存多模态结果(调用的旧版mmdet代码接口)show_multi_modality_result(img=image,box_mode='lidar',gt_bboxes=None,pred_bboxes=bboxes_3d,batch_data_samples=batch_data_samples,out_dir=save_root,filename=img_name,type=set,show=False)# result = model(batch_inputs_dict, batch_data_samples) # model的输入与具体模型有关
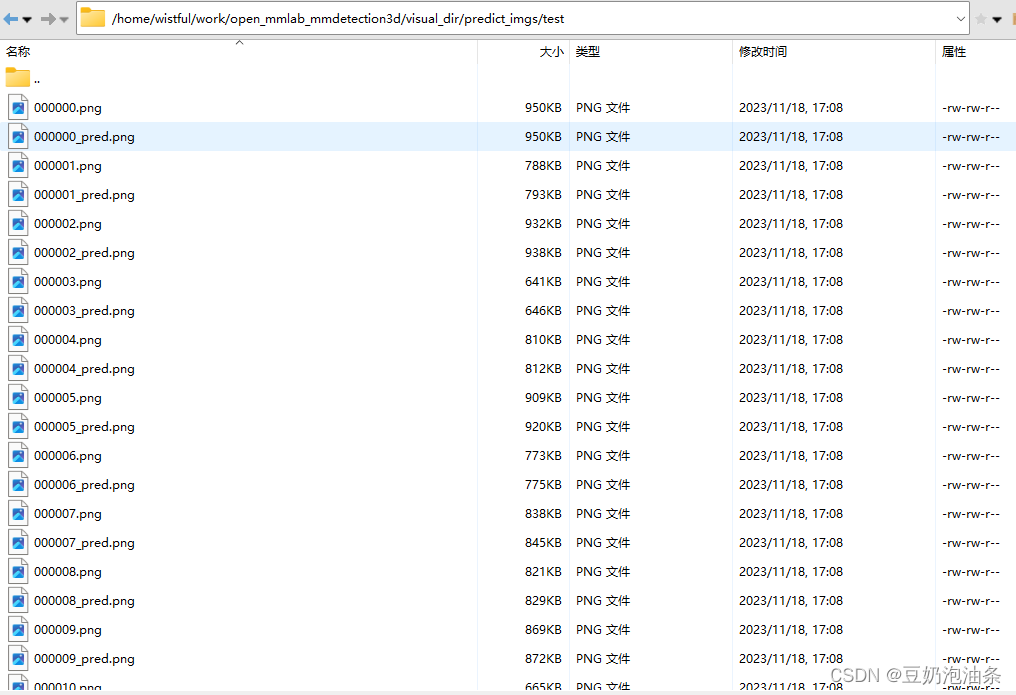
运行上述代码后,会在设置的save_root下生成可视化图片
相关文章:
新版mmdetection3d将3D bbox绘制到图像
环境信息 使用 python mmdet3d/utils/collect_env.py收集环境信息 sys.platform: linux Python: 3.7.12 | packaged by conda-forge | (default, Oct 26 2021, 06:08:21) [GCC 9.4.0] CUDA available: True numpy_random_seed: 2147483648 GPU 0,1: NVIDIA GeForce RTX 3090 …...
合伙人注册即得/创业平台扶持!
问心一语持续体验中~ 与公司签订线下(线上)纸质合伙人代理合同,具备法律效力。 一级直推、非一级直推注册即得奖励。(消耗完毕被邀请用户赠送的AI免费使用条数) 即:邀请1人注册即得并消耗!只需注册无需充值ÿ…...

02_使用API_String
StringBuilder StringBuilder 代表可变字符串对象,相对于是一个容器,它里面装的字符串是可以改变的,就是用来操作字符串的好处:StringBuilder 比 String 更适合做字符串的修改操作,效率会更高,代码也会更简…...
Spring IOC/DI和MVC及若依对应介绍
文章目录 一、Spring IOC、DI注解1.介绍2.使用 二、Spring MVC注解1.介绍2.使用 一、Spring IOC、DI注解 1.介绍 什么是Spring IOC/DI? IOC(Inversion of Control:控制反转)是面向对象编程中的一种设计原则。其中最常见的方式叫做依赖注入(…...

python的多层嵌套循环时,break可以退出多层循环吗?
在Python中,break 语句只能退出当前所在的循环,无法直接退出多层嵌套的循环。但是,你可以通过使用一个标志变量或者通过使用异常来模拟退出多层循环的效果。 使用标志变量: flag False for i in range(5):for j in range(5):if…...
链表OJ--上
文章目录 前言一、反转链表二、移除链表元素三、链表中倒数第K个结点四、相交链表五、链表的中间结点 前言 一、反转链表 力扣206:反转链表- - -点击此处传送 思路图: 方法一:改变指向 方法二: 代码: //方法一 /…...
内衣洗衣机哪些品牌质量好实惠?小型洗衣机全自动
现在洗内衣内裤也是一件较麻烦的事情了,在清洗过程中还要用热水杀菌,还要确保洗衣液是否有冲洗干净,还要防止细菌的滋生等等,所以入手一款小型的烘洗全套的内衣洗衣机是非常有必要的,专门的内衣洗衣机可以最大程度减少…...

推荐一款适合做智慧旅游的前端模板
目录 前言 一、功能介绍 二、前端技术介绍 三、功能及界面设计介绍 1、数据概览 2、车辆监控 3、地图界面 4、其它功能 四、扩展说明 总结 前言 智慧旅游是一种全新的旅游业务模式,它充分利用先进的信息技术,提升旅游体验,优化旅游管…...
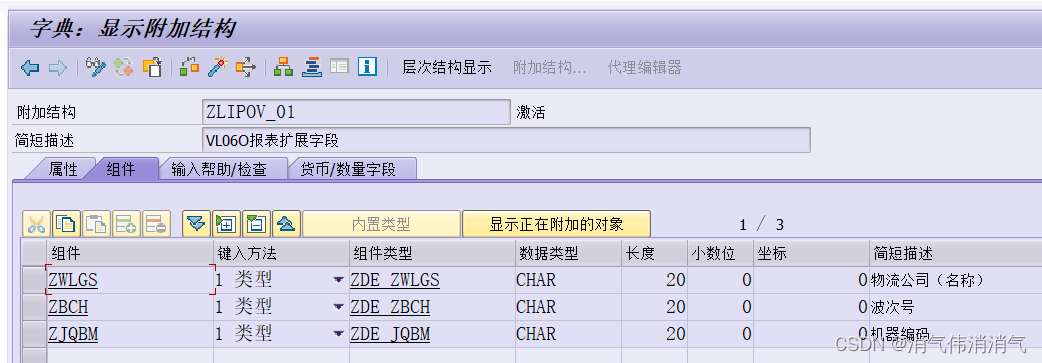
VL06O报表添加增强字段
业务描述 用户需要在VL06O事务代码下进行批量交货过账,现有的筛选条件不太适用当前公司的业务,需要在报表中新增三个交货单增强字段,方便其筛选(选择屏幕没有加,用户在报表里用标准按钮功能自己筛选) 效果…...

SpringBoot Admin
前言 Spring Boot Admin 是一个管理和监控 Spring Boot 应用程序的开源项目,它提供了一个简洁的 Web 界面来监控 Spring Boot 应用程序的状态和各种运行时指标。Spring Boot Admin 可以帮助开发者快速了解应用程序的状态,并快速定位错误或性能问题。下面…...
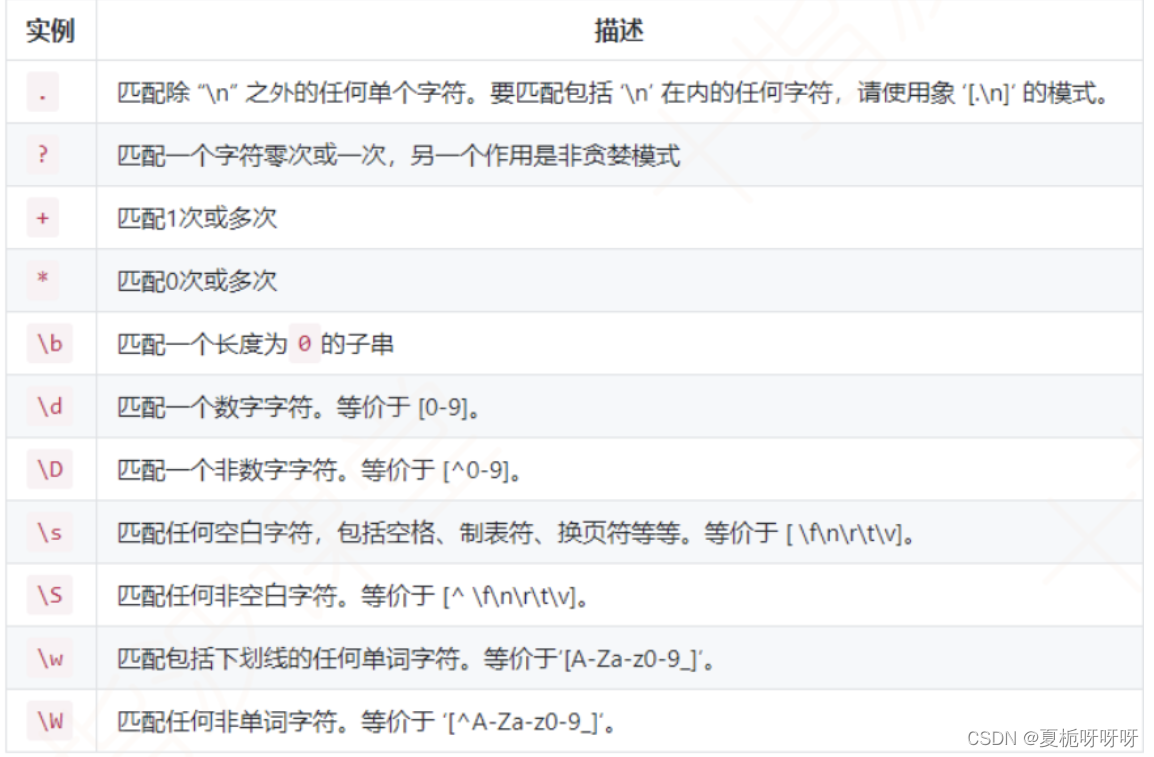
Java基础-----正则表达式
文章目录 1.简介2.目的3.学习网站4.常用匹配字符5.String类中用到正则表达式的方法 1.简介 又叫做规则表达式。是一种文本模式,包括普通字符和特殊字符(元字符)。正则使用单个字符来描述、匹配一系列某个句法规则的字符串,通常用…...
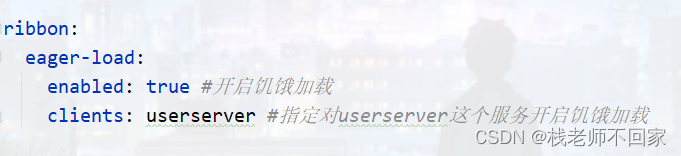
基于 Eureka 的 Ribbon 负载均衡实现原理【SpringCloud 源码分析】
目录 一、前言 二、源码分析 三、负载均衡策略 一、前言 如下图,我们在 orderserver 中通过 restTemplate 向 usersever 发起 http 请求,在服务拉取的时候,主机名 localhost 是用服务名 userserver 代替的,那么该 url 是一个可…...

如何用CHAT解释文章含义?
问CHAT:解释“ 本身乐善好施,令名远近共钦,待等二十左右,定有高亲可攀;而且四德俱备,帮夫之缘亦有。主持家事不紊,上下亦无闲言。但四十交进,家内谨防口舌,须安家堂&…...
创作4周年
🙌秋名山码民的主页 😂oi退役选手,Java、大数据、单片机、IoT均有所涉猎,热爱技术,技术无罪 🎉欢迎关注🔎点赞👍收藏⭐️留言📝 获取源码,添加WX 目录 前言机…...

《opencv实用探索·一》QT+opencv实现图片拼接和Mat转QImage
本文利用opencv实现了几个好用的功能,包含两个文件,如下: 源码放在文章末尾 imageProcessing类包含三个功能: 1、图像拼接 cv::Mat imageMosaic(cv::Mat mat1, cv::Mat mat2, MosaicMode mosaicMode);mat1和mat2为两个待拼接的…...
Apahce虚拟主机配置演示
在企业的真实环境中,一台WEB服务器发布单个网站会非常浪费资源,所以一台WEB服务器一般都会发布多个网站,少则3-5个,多个10-20个网站。在一台服务器上发布多网站,也称之为部署多个虚拟主机。 WEB虚拟机主机配置方法主要…...

加班做报表被嘲低效!快用大数据分析工具
做数据分析报表很耗时间,因为不仅要解决多业务系统数据质量标准不一问题,还需要进行大量的公式计算、报表设计与制作。但那是以前,在大数据分析工具强势崛起的当下,这些工作都能交给大数据分析工具来做了。以前是花90%的时间做报表…...
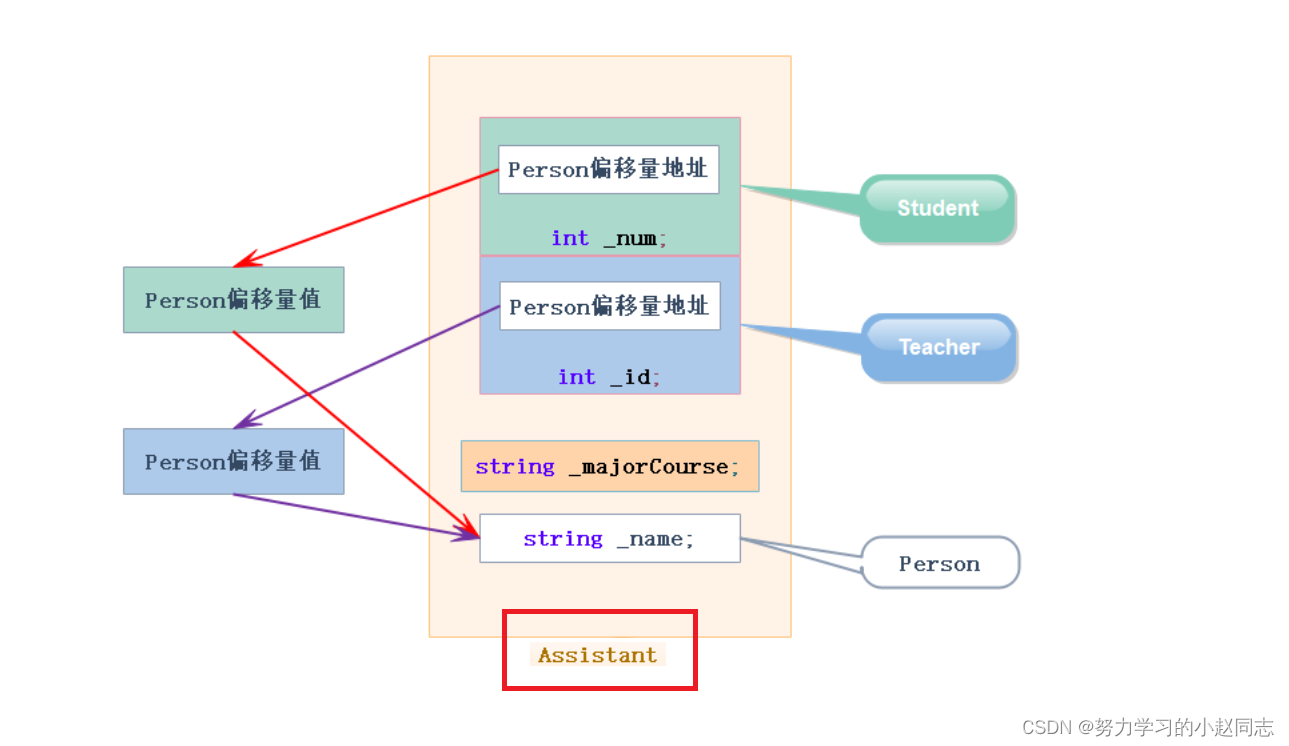
详解——菱形继承及菱形虚拟继承
目录 一,菱形继承 1.1单继承 1.2多继承 1.3菱形继承 1.4菱形继承的问题 1.5虚拟继承解决数据冗余和二义性的原理 二.继承的总结和反思 一,菱形继承 C三大特性——继承-CSDN博客 1.1单继承 单继承:一个子类只有一个直接父类时称这个继…...
路由的控制与转发原理
场景1:路由器收到数据包后,会根据数据包的目标IP地址,计算出目标网段,再确定终端设备的具体位置。这个过程中,还需要计算出接口,或数据包下一跳的地址。最终会生成一条路由,即路径,存…...
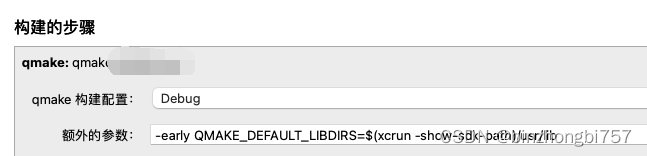
ios qt开发要点
目前关于ios qt的开发资料比较少,这里整理了几个比较重要的开发要点,基于MacOS14 Xcode15 Qt5.15 cmake iphone真机。 cmake报错,报错信息如下 CMake Error at /Users/user/Qt/5.15.5/ios/lib/cmake/Qt5Core/Qt5CoreConfig.cmake:91 (m…...

YOLOv8模型魔改实战:用C2f_SE模块替换C2f,我的目标检测精度提升了多少?
YOLOv8模型魔改实战:用C2f_SE模块替换C2f,我的目标检测精度提升了多少? 在目标检测领域,YOLOv8凭借其出色的速度和精度平衡,已经成为工业界和学术界的热门选择。但作为一名追求极致性能的开发者,我们总忍不…...

RAG从能跑到好用:收藏这份程序员必备大模型落地指南
本文分享了RAG系统从Demo阶段到生产环境落地过程中的关键难点与解决方案。核心内容包括:提升知识库质量的数据准备技巧、优化检索召回的模型选型与混合检索策略、精准Query理解的意图识别方法,以及强化生成阶段的Prompt约束与置信度评估。文章强调RAG系统…...

Houdini SOP模块实战:从Font节点到PolyExtrude,手把手教你做3D卡通字效
Houdini SOP模块实战:从Font节点到PolyExtrude打造3D卡通字效全流程 在影视特效和游戏开发领域,3D文字效果始终是视觉设计的重要组成部分。Houdini作为业界领先的 procedural 3D软件,其SOP(Surface Operators)模块提供…...

海思Hi1105V500无线模块实测:如何用它DIY一个10公里图传?
海思Hi1105V500无线模块实战:打造10公里超远距图传系统 手里这块Hi1105V500模块已经吃灰三个月了——直到上周末在郊外测试无人机时,突然意识到市售图传设备在复杂地形下的传输距离简直是个笑话。这让我重新翻出了这个支持Wi-Fi 6的四合一通信模块&#…...

Koin 开发者炸了!7 条规则根治运行时错误,自动扫描太香了
编译零警告,测试全绿,上线直接炸。 用过 Koin 的人或多或少都经历过这种场景——NoBeanDefFoundException 在某个不起眼的页面突然蹦出来,而你根本不知道是哪个依赖没注册。 这不是 Bug,是 Koin 的"特性"。它的运行时解…...

托盘式货架助力宁波电子制造企业仓储升级,浙江双彬打造定制化存储解决方案
作为长三角电子制造产业集聚地,宁波余姚电子工业园区内企业近年来持续扩产增效,仓储环节的空间利用率、作业效率成为制约企业发展的关键瓶颈。近日,浙江双彬自动化科技有限公司为园区内一家电子元器件制造企业打造的托盘式货架项目顺利落地&a…...
)
微信小游戏实现汉字找茬找梗游戏(完整源码+详细教程)
先看效果:找茬找汉字闯关王 点击或则搜索即可。 一、项目介绍 汉字找茬、汉字找梗是当下热门的休闲益智类小游戏,依靠文字纠错、趣味识梗、诗词改错玩法,操作简单、趣味性强,十分适合作为微信小程序入门练手项目。 本文基于原…...

5分钟掌握网盘直链下载助手:八大网盘满速下载终极指南
5分钟掌握网盘直链下载助手:八大网盘满速下载终极指南 【免费下载链接】Online-disk-direct-link-download-assistant 一个基于 JavaScript 的网盘文件下载地址获取工具。基于【网盘直链下载助手】修改 ,支持 百度网盘 / 阿里云盘 / 中国移动云盘 / 天翼…...

告别手动描边!用X-AnyLabeling和SAM模型,10分钟搞定YOLOv8-seg数据集标注
10倍效率革命:X-AnyLabelingSAMYOLOv8-seg智能标注全流程实战 标注效率是计算机视觉项目的第一道门槛。当面对500张工业零件图像需要标注时,传统手动描边可能需要消耗一个工程师整整三天的工作量——而现在,这个时间可以被压缩到3小时以内。这…...

深入探讨C++标准库容器构造函数与方法设计
在C++编程中,标准模板库(STL)提供了许多容器,如vector,这些容器的设计不仅考虑了功能性,还要确保其接口设计符合C++语言的特性和最佳实践。今天我们将深入探讨vector的构造函数和resize方法的设计哲学及其背后的理由。 构造函数的设计 vector的构造函数有两种形式: v…...