LCM-LoRA模型推理简明教程
潜在一致性模型 (LCM) 通常可以通过 2-4 个步骤生成高质量图像,从而可以在几乎实时的设置中使用扩散模型。
来自官方网站:
LCM 只需 4,000 个训练步骤(约 32 个 A100 GPU 小时)即可从任何预训练的稳定扩散 (SD) 中提取出来,只需 2~4 个步骤甚至一步即可生成高质量的 768 x 768 分辨率图像,从而显着加速文本转换 -图像生成。 我们使用 LCM 在短短 4,000 次训练迭代中提取了 Dreamshaper-V7 版本的 SD。
有关 LCM 的更多技术概述,请参阅论文。
然而,每个模型需要单独蒸馏以进行潜在一致性蒸馏。 LCM-LoRA 的核心思想是只训练几个适配器层,在本例中适配器是 LoRA。 这样,我们就不必训练完整的模型并保持可训练参数的数量可控。 然后,生成的 LoRA 可以应用于模型的任何微调版本,而无需单独蒸馏它们。 此外,LoRA 还可应用于图像到图像、ControlNet/T2I-Adapter、修复、AnimateDiff 等。LCM-LoRA 还可以与其他 LoRA 结合,只需很少的步骤 (4-8) 即可生成样式图像。

NSDT在线工具推荐: Three.js AI纹理开发包 - YOLO合成数据生成器 - GLTF/GLB在线编辑 - 3D模型格式在线转换 - 可编程3D场景编辑器
LCM-LoRA 可用于 stable-diffusion-v1-5、stable-diffusion-xl-base-1.0 和 SSD-1B 模型。 所有的检查点都可以在这个集合中找到。
有关LCM-LoRA的更多详细信息,请参阅技术报告。
本指南展示了如何使用 LCM-LoRA 进行推理:
- 文本到图像
- 图像到图像
- 与风格化的 LoRA 相结合
- ControlNet/T2I 适配器
- 图像修复
- 动画差异
在阅读本指南之前,我们将先了解一下使用 LCM-LoRA 执行推理的一般工作流程。 LCM-LoRA 与其他稳定扩散 LoRA 类似,因此它们可以与任何支持 LoRA 的 DiffusionPipeline 一起使用。
- 加载任务特定的管道和模型。
- 将调度程序设置为 LCMScheduler。
- 加载模型的 LCM-LoRA 权重。
- 减少 [1.0, 2.0] 之间的guiding_scale,并在 [4, 8] 之间设置 num_inference_steps。
- 使用常用参数对管道进行推理。
让我们看看如何使用 LCM-LoRA 对不同的任务进行推理。
首先,确保已安装 peft,以获得更好的 LoRA 支持。
pip install -U peft1、文本转图像
我们将使用 StableDiffusionXLPipeline 和调度程序:LCMScheduler,然后加载 LCM-LoRA。 该管道与 LCM-LoRA 和调度程序一起,可实现快速推理工作流程,克服扩散模型的缓慢迭代特性。
import torch
from diffusers import DiffusionPipeline, LCMSchedulerpipe = DiffusionPipeline.from_pretrained("stabilityai/stable-diffusion-xl-base-1.0",variant="fp16",torch_dtype=torch.float16
).to("cuda")# set scheduler
pipe.scheduler = LCMScheduler.from_config(pipe.scheduler.config)# load LCM-LoRA
pipe.load_lora_weights("latent-consistency/lcm-lora-sdxl")prompt = "Self-portrait oil painting, a beautiful cyborg with golden hair, 8k"generator = torch.manual_seed(42)
image = pipe(prompt=prompt, num_inference_steps=4, generator=generator, guidance_scale=1.0
).images[0]
结果如下:
请注意,我们仅使用 4 个步骤进行生成,这比标准 SDXL 通常使用的步骤要少得多。
你可能已经注意到,我们设置guidance_scale=1.0,这会禁用classifer-free-guidance。 这是因为 LCM-LoRA 是在指导下进行训练的,因此在这种情况下批量大小不必加倍。 这会导致更快的推理时间,但缺点是负面提示对去噪过程没有任何影响。
还可以使用 LCM-LoRA 的指导,但由于训练的性质,模型对guiding_scale 值非常敏感,高值可能会导致生成的图像中出现伪影。 在我们的实验中,我们发现最佳值在 [1.0, 2.0] 范围内。
2、使用微调模型进行推理
如上所述,LCM-LoRA 可以应用于模型的任何微调版本,而无需单独提取它们。 让我们看看如何使用微调模型进行推理。 在此示例中,我们将使用 animagine-xl 模型,它是用于生成动画的 SDXL 模型的微调版本。
from diffusers import DiffusionPipeline, LCMSchedulerpipe = DiffusionPipeline.from_pretrained("Linaqruf/animagine-xl",variant="fp16",torch_dtype=torch.float16
).to("cuda")# set scheduler
pipe.scheduler = LCMScheduler.from_config(pipe.scheduler.config)# load LCM-LoRA
pipe.load_lora_weights("latent-consistency/lcm-lora-sdxl")prompt = "face focus, cute, masterpiece, best quality, 1girl, green hair, sweater, looking at viewer, upper body, beanie, outdoors, night, turtleneck"generator = torch.manual_seed(0)
image = pipe(prompt=prompt, num_inference_steps=4, generator=generator, guidance_scale=1.0
).images[0]
结果如下:

3、图像到图像
LCM-LoRA 也可以应用于图像到图像的任务。 让我们看看如何使用 LCM 执行图像到图像的生成。 在本例中,我们将使用 dreamshaper-7 模型和 LCM-LoRA 来实现 stable-diffusion-v1-5 。
import torch
from diffusers import AutoPipelineForImage2Image, LCMScheduler
from diffusers.utils import make_image_grid, load_imagepipe = AutoPipelineForImage2Image.from_pretrained("Lykon/dreamshaper-7",torch_dtype=torch.float16,variant="fp16",
).to("cuda")# set scheduler
pipe.scheduler = LCMScheduler.from_config(pipe.scheduler.config)# load LCM-LoRA
pipe.load_lora_weights("latent-consistency/lcm-lora-sdv1-5")# prepare image
url = "https://huggingface.co/datasets/huggingface/documentation-images/resolve/main/diffusers/img2img-init.png"
init_image = load_image(url)
prompt = "Astronauts in a jungle, cold color palette, muted colors, detailed, 8k"# pass prompt and image to pipeline
generator = torch.manual_seed(0)
image = pipe(prompt,image=init_image,num_inference_steps=4,guidance_scale=1,strength=0.6,generator=generator
).images[0]
make_image_grid([init_image, image], rows=1, cols=2)
结果如下:

你可以根据提示和提供的图像获得不同的结果。 为了获得最佳结果,我们建议尝试 num_inference_steps、strength 和guiding_scale 参数的不同值并选择最佳值。
4、与风格化的 LoRA 结合
LCM-LoRA 可以与其他 LoRA 结合使用,只需很少的步骤即可生成样式图像 (4-8)。 在下面的示例中,我们将使用 LCM-LoRA 和剪纸 LoRA。 要了解有关如何组合 LoRA 的更多信息,请参阅这个指南。
import torch
from diffusers import DiffusionPipeline, LCMSchedulerpipe = DiffusionPipeline.from_pretrained("stabilityai/stable-diffusion-xl-base-1.0",variant="fp16",torch_dtype=torch.float16
).to("cuda")# set scheduler
pipe.scheduler = LCMScheduler.from_config(pipe.scheduler.config)# load LoRAs
pipe.load_lora_weights("latent-consistency/lcm-lora-sdxl", adapter_name="lcm")
pipe.load_lora_weights("TheLastBen/Papercut_SDXL", weight_name="papercut.safetensors", adapter_name="papercut")# Combine LoRAs
pipe.set_adapters(["lcm", "papercut"], adapter_weights=[1.0, 0.8])prompt = "papercut, a cute fox"
generator = torch.manual_seed(0)
image = pipe(prompt, num_inference_steps=4, guidance_scale=1, generator=generator).images[0]
image
结果如下:

5、ControlNet/T2I 适配器
让我们看看如何使用 ControlNet/T2I-Adapter 和 LCM-LoRA 进行推理。
在本例中,我们将使用 SD-v1-5 模型和 SD-v1-5 的 LCM-LoRA 以及 canny ControlNet。
import torch
import cv2
import numpy as np
from PIL import Imagefrom diffusers import StableDiffusionControlNetPipeline, ControlNetModel, LCMScheduler
from diffusers.utils import load_imageimage = load_image("https://hf.co/datasets/huggingface/documentation-images/resolve/main/diffusers/input_image_vermeer.png"
).resize((512, 512))image = np.array(image)low_threshold = 100
high_threshold = 200image = cv2.Canny(image, low_threshold, high_threshold)
image = image[:, :, None]
image = np.concatenate([image, image, image], axis=2)
canny_image = Image.fromarray(image)controlnet = ControlNetModel.from_pretrained("lllyasviel/sd-controlnet-canny", torch_dtype=torch.float16)
pipe = StableDiffusionControlNetPipeline.from_pretrained("runwayml/stable-diffusion-v1-5",controlnet=controlnet,torch_dtype=torch.float16,safety_checker=None,variant="fp16"
).to("cuda")# set scheduler
pipe.scheduler = LCMScheduler.from_config(pipe.scheduler.config)# load LCM-LoRA
pipe.load_lora_weights("latent-consistency/lcm-lora-sdv1-5")generator = torch.manual_seed(0)
image = pipe("the mona lisa",image=canny_image,num_inference_steps=4,guidance_scale=1.5,controlnet_conditioning_scale=0.8,cross_attention_kwargs={"scale": 1},generator=generator,
).images[0]
make_image_grid([canny_image, image], rows=1, cols=2)
结果如下:
本示例中的推理参数可能不适用于所有示例,因此我们建议你尝试“num_inference_steps”、“guidance_scale”、“controlnet_conditioning_scale”和“cross_attention_kwargs”参数的不同值,并选择最佳的值。
下面的示例展示了如何将 LCM-LoRA 与 Canny T2I 适配器和 SDXL 结合使用。
import torch
import cv2
import numpy as np
from PIL import Imagefrom diffusers import StableDiffusionXLAdapterPipeline, T2IAdapter, LCMScheduler
from diffusers.utils import load_image, make_image_grid# Prepare image
# Detect the canny map in low resolution to avoid high-frequency details
image = load_image("https://huggingface.co/Adapter/t2iadapter/resolve/main/figs_SDXLV1.0/org_canny.jpg"
).resize((384, 384))image = np.array(image)low_threshold = 100
high_threshold = 200image = cv2.Canny(image, low_threshold, high_threshold)
image = image[:, :, None]
image = np.concatenate([image, image, image], axis=2)
canny_image = Image.fromarray(image).resize((1024, 1024))# load adapter
adapter = T2IAdapter.from_pretrained("TencentARC/t2i-adapter-canny-sdxl-1.0", torch_dtype=torch.float16, varient="fp16").to("cuda")pipe = StableDiffusionXLAdapterPipeline.from_pretrained("stabilityai/stable-diffusion-xl-base-1.0", adapter=adapter,torch_dtype=torch.float16,variant="fp16",
).to("cuda")# set scheduler
pipe.scheduler = LCMScheduler.from_config(pipe.scheduler.config)# load LCM-LoRA
pipe.load_lora_weights("latent-consistency/lcm-lora-sdxl")prompt = "Mystical fairy in real, magic, 4k picture, high quality"
negative_prompt = "extra digit, fewer digits, cropped, worst quality, low quality, glitch, deformed, mutated, ugly, disfigured"generator = torch.manual_seed(0)
image = pipe(prompt=prompt,negative_prompt=negative_prompt,image=canny_image,num_inference_steps=4,guidance_scale=1.5, adapter_conditioning_scale=0.8, adapter_conditioning_factor=1,generator=generator,
).images[0]
make_image_grid([canny_image, image], rows=1, cols=2)
结果如下:

6、图像修复
LCM-LoRA 也可用于修复。
import torch
from diffusers import AutoPipelineForInpainting, LCMScheduler
from diffusers.utils import load_image, make_image_gridpipe = AutoPipelineForInpainting.from_pretrained("runwayml/stable-diffusion-inpainting",torch_dtype=torch.float16,variant="fp16",
).to("cuda")# set scheduler
pipe.scheduler = LCMScheduler.from_config(pipe.scheduler.config)# load LCM-LoRA
pipe.load_lora_weights("latent-consistency/lcm-lora-sdv1-5")# load base and mask image
init_image = load_image("https://huggingface.co/datasets/huggingface/documentation-images/resolve/main/diffusers/inpaint.png")
mask_image = load_image("https://huggingface.co/datasets/huggingface/documentation-images/resolve/main/diffusers/inpaint_mask.png")# generator = torch.Generator("cuda").manual_seed(92)
prompt = "concept art digital painting of an elven castle, inspired by lord of the rings, highly detailed, 8k"
generator = torch.manual_seed(0)
image = pipe(prompt=prompt,image=init_image,mask_image=mask_image,generator=generator,num_inference_steps=4,guidance_scale=4,
).images[0]
make_image_grid([init_image, mask_image, image], rows=1, cols=3)
结果如下:

7、动画差异
AnimateDiff 允许你使用稳定扩散模型对图像进行动画处理。 为了获得好的结果,我们需要生成多个帧(16-24),而使用标准 SD 模型执行此操作可能会非常慢。 LCM-LoRA 可用于显着加快该过程,因为你只需为每一帧执行 4-8 个步骤。 让我们看看如何使用 LCM-LoRA 和 AnimateDiff 执行动画。
import torch
from diffusers import MotionAdapter, AnimateDiffPipeline, DDIMScheduler, LCMScheduler
from diffusers.utils import export_to_gifadapter = MotionAdapter.from_pretrained("diffusers/animatediff-motion-adapter-v1-5")
pipe = AnimateDiffPipeline.from_pretrained("frankjoshua/toonyou_beta6",motion_adapter=adapter,
).to("cuda")# set scheduler
pipe.scheduler = LCMScheduler.from_config(pipe.scheduler.config)# load LCM-LoRA
pipe.load_lora_weights("latent-consistency/lcm-lora-sdv1-5", adapter_name="lcm")
pipe.load_lora_weights("guoyww/animatediff-motion-lora-zoom-in", weight_name="diffusion_pytorch_model.safetensors", adapter_name="motion-lora")pipe.set_adapters(["lcm", "motion-lora"], adapter_weights=[0.55, 1.2])prompt = "best quality, masterpiece, 1girl, looking at viewer, blurry background, upper body, contemporary, dress"
generator = torch.manual_seed(0)
frames = pipe(prompt=prompt,num_inference_steps=5,guidance_scale=1.25,cross_attention_kwargs={"scale": 1},num_frames=24,generator=generator
).frames[0]
export_to_gif(frames, "animation.gif")
结果如下:

原文链接:LCM-LoRA推理简明教程 - BimAnt
相关文章:
LCM-LoRA模型推理简明教程
潜在一致性模型 (LCM) 通常可以通过 2-4 个步骤生成高质量图像,从而可以在几乎实时的设置中使用扩散模型。 来自官方网站: LCM 只需 4,000 个训练步骤(约 32 个 A100 GPU 小时)即可从任何预训练的稳定扩散 (SD) 中提取出来&#…...

设计模式-开篇
什么是设计模式 设计模式是一种被反复使用、多数人知晓的、经过分类编目的代码设计经验的总结。使用设计模式是为了可重用代码、让代码更容易被他人理解、提高代码的可靠性。设计模式不是可直接转化为代码的完成解决方案,而是描述了如何解决一个问题的经过…...
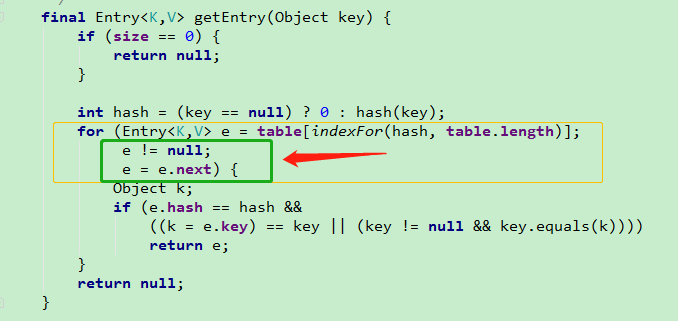
HashMap的实现原;HashMap的工作原理;HashMap存储结构; HashMap 构造函数
文章目录 说一下HashMap的实现原理(非常重要)①HashMap的工作原理HashMap存储结构常用的变量HashMap 构造函数tableSizeFor() put()方法详解hash()计算原理resize() 扩容机制get()方法为什么HashMap链表会形成死循环 HashMap是我们在工作中使用到存储数据特别频繁的数据结构&am…...

JavaScript 原型,原型链的特点
JavaScript 的原型(Prototype)和原型链(Prototype chain)是 JavaScript 面向对象编程中的重要概念。 原型(Prototype) 在 JavaScript 中,每个对象都有一个原型对象,而这个原型对象…...

越南服务器租用:企业在越南办工厂的趋势与当地(ERP/OA等)系统部署的重要性
近年来,越南逐渐成为全球企业布局的热门目的地之一。许多企业纷纷选择在越南设立工厂,以利用其低廉的劳动力成本和优越的地理位置。随着企业在越南的扩张,对于当地部署ERP系统或OA系统等的需求也日益增长。在这种情况下,租用越南服…...

Qt QString与QChar总结
(一) QString 1 QString的简介 QString 是Qt 中的一个类,用于存储字符串,QString 没有父类。QString 存储的是一串字符,每个字符是一个 QChar 类型的数据。QChar 使用的是 UTF-16 编码,一个字符包含 2字节数据。 对于超过 6553…...

Leetcode算法系列| 1. 两数之和(四种解法)
目录 1.题目2.题解解法一:暴力枚举解法二:哈希表解法解法三:双指针(有序状态)解法四:二分查找(有序状态) 1.题目 给定一个整数数组 nums 和一个整数目标值 target,请你在该数组中找出 和为目标值 target 的那 两个 整数…...

汇编-pop出栈指令
32位汇编 执行动作分为两步: 第一步:读出数据 第二步:改变栈地址 如果操作数是16位, 则ESP加2; 如果操作数是32位, 则ESP加4 espesp2 或 espesp4 格式:...
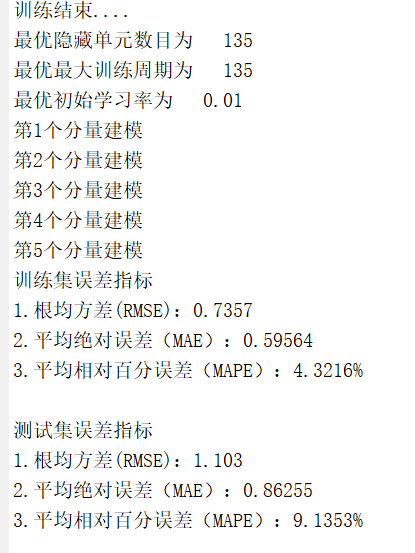
【代码】基于VMD(变分模态分解)-SSA(麻雀搜索算法优化)-LSTM的光伏功率预测模型(完美复现)matlab代码
程序名称:基于VMD(变分模态分解)-SSA(麻雀搜索算法优化)-LSTM的光伏功率预测模型 实现平台:matlab 代码简介:提出了变分模态分解(VMD)和麻雀搜索算法(SSA)与长短期记忆神经网络 (LSTM)相耦合,…...
【UnLua】在 Lua 中定义 UE 反射类型
【UnLua】在 Lua 中定义 UE 反射类型 用法 启动编辑器时遍历 Defines 目录下 lua 脚本来加载 UE 反射类型(开个临时的 Lua VM 即可)直接像 -- define a uenum in lua UEnum.EEnumGuestSomethingElse {Value1 1;Value2 2; }-- use it like a native …...
react的开发中关于图片的知识
React是一个流行的JavaScript库,用于构建用户界面。在React开发中,图片是一个非常重要的元素,可以用于美化界面和展示内容。本篇博客将详细讲解React中关于图片的知识。 1. React中使用图片 在React中使用图片非常简单,只需要使…...

AcWing 188:武士风度的牛 ← BFS
【题目来源】https://www.acwing.com/problem/content/190/ 【题目描述】 农民 John 有很多牛,他想交易其中一头被 Don 称为 The Knight 的牛。 这头牛有一个独一无二的超能力,在农场里像 Knight 一样地跳(就是我们熟悉的象棋中马的走法&…...
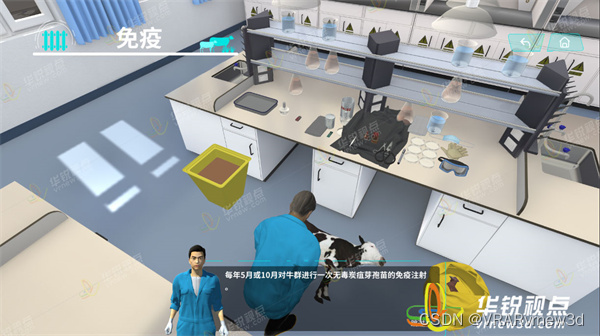
马养殖场建设VR模拟实训教学平台具有灵活性和复用性
为保障养殖场生物安全,避免疫病传播,学生出入养殖场受时间和地域的限制, 生产实习多以参观为主,通过畜牧企业技术人员的讲解,学生被动了解生产过程。为了解决畜牧养殖实训难的问题,借助VR技术开展畜牧养殖虚…...
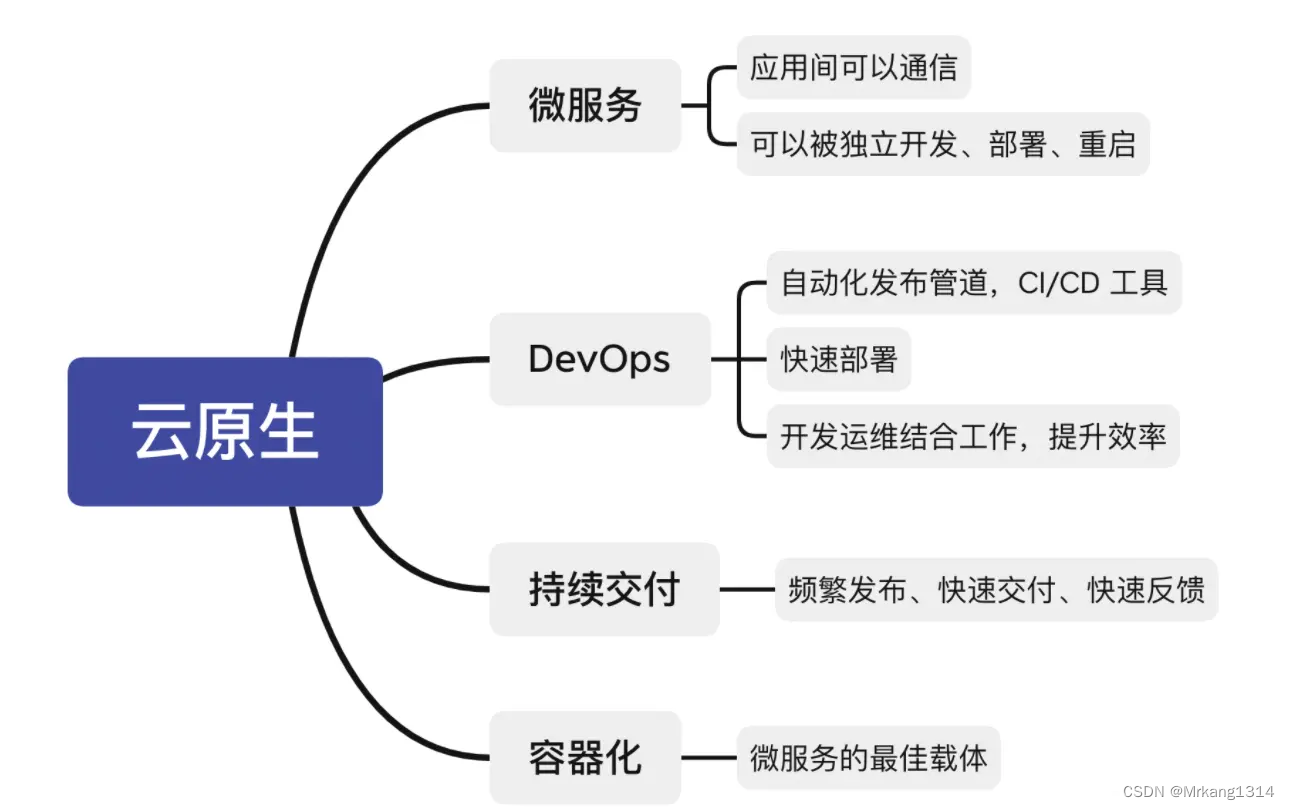
云原生技术演进之路-(云技术如何一步步演进的,云原生解决了什么问题?)
云技术如何一步步演进的? 云原生解决了什么问题? 物理设备 电脑刚被发明的时候,还没有网络,每个电脑(PC),就是一个单机。 这台单机,包括CPU、内存、硬盘、显卡等硬件。用户在单机…...
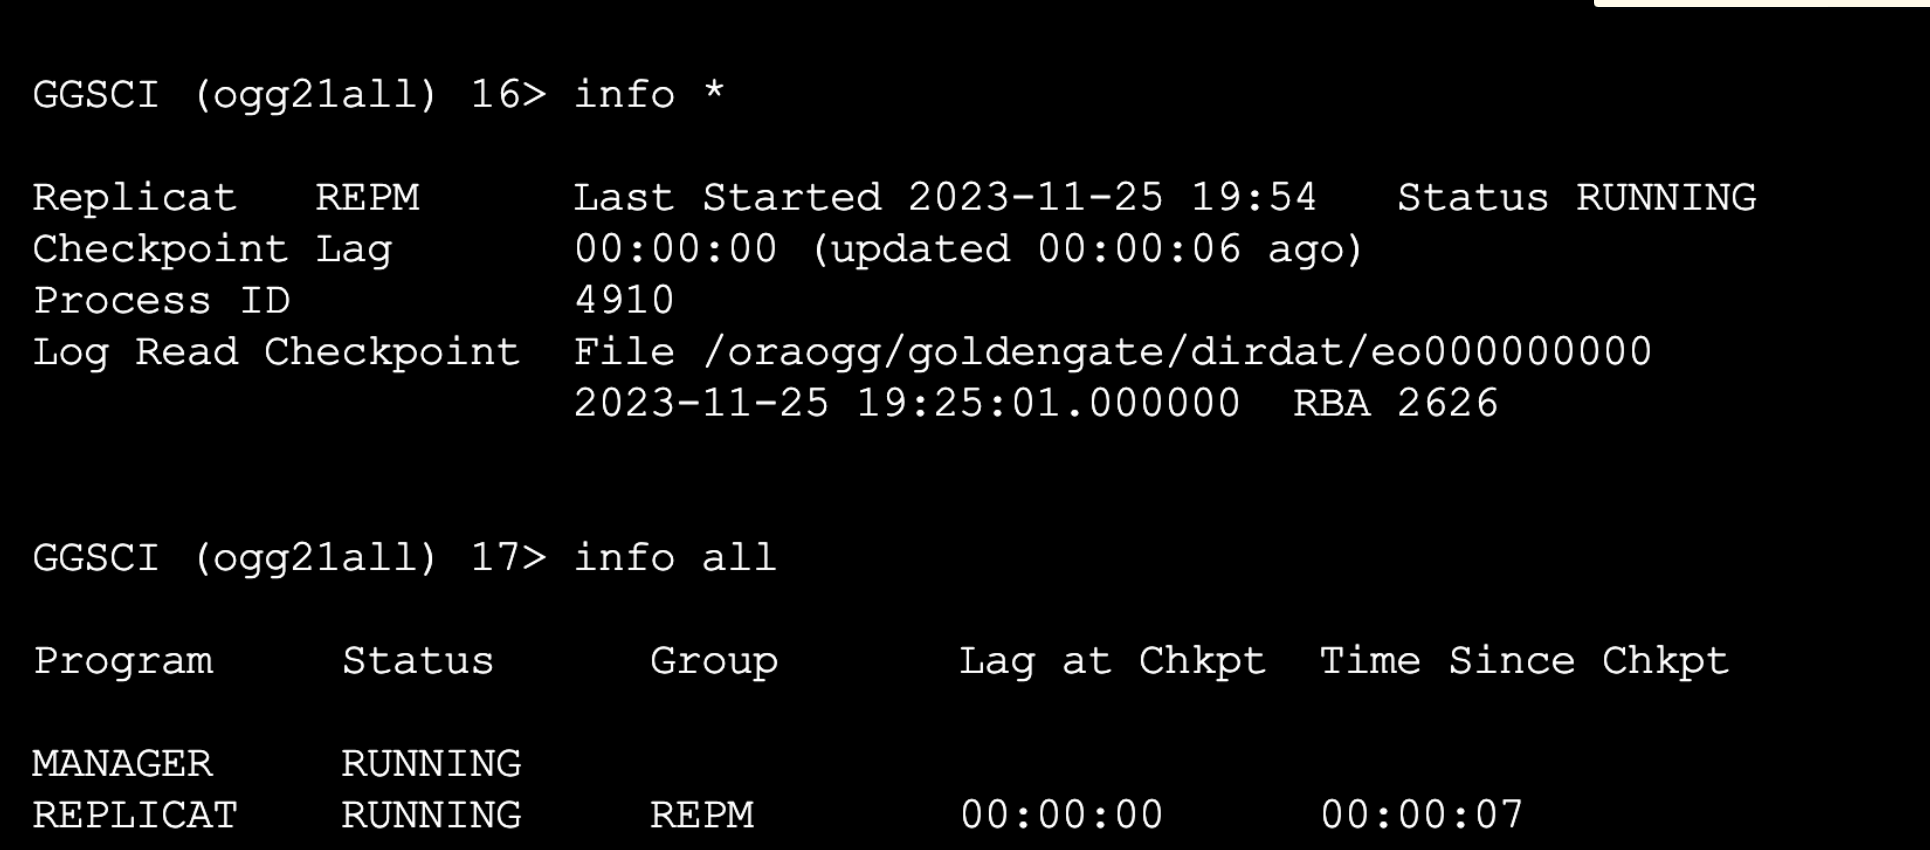
基于OGG实现Oracle实时同步MySQL
📢📢📢📣📣📣 哈喽!大家好,我是【IT邦德】,江湖人称jeames007,10余年DBA及大数据工作经验 一位上进心十足的【大数据领域博主】!😜&am…...
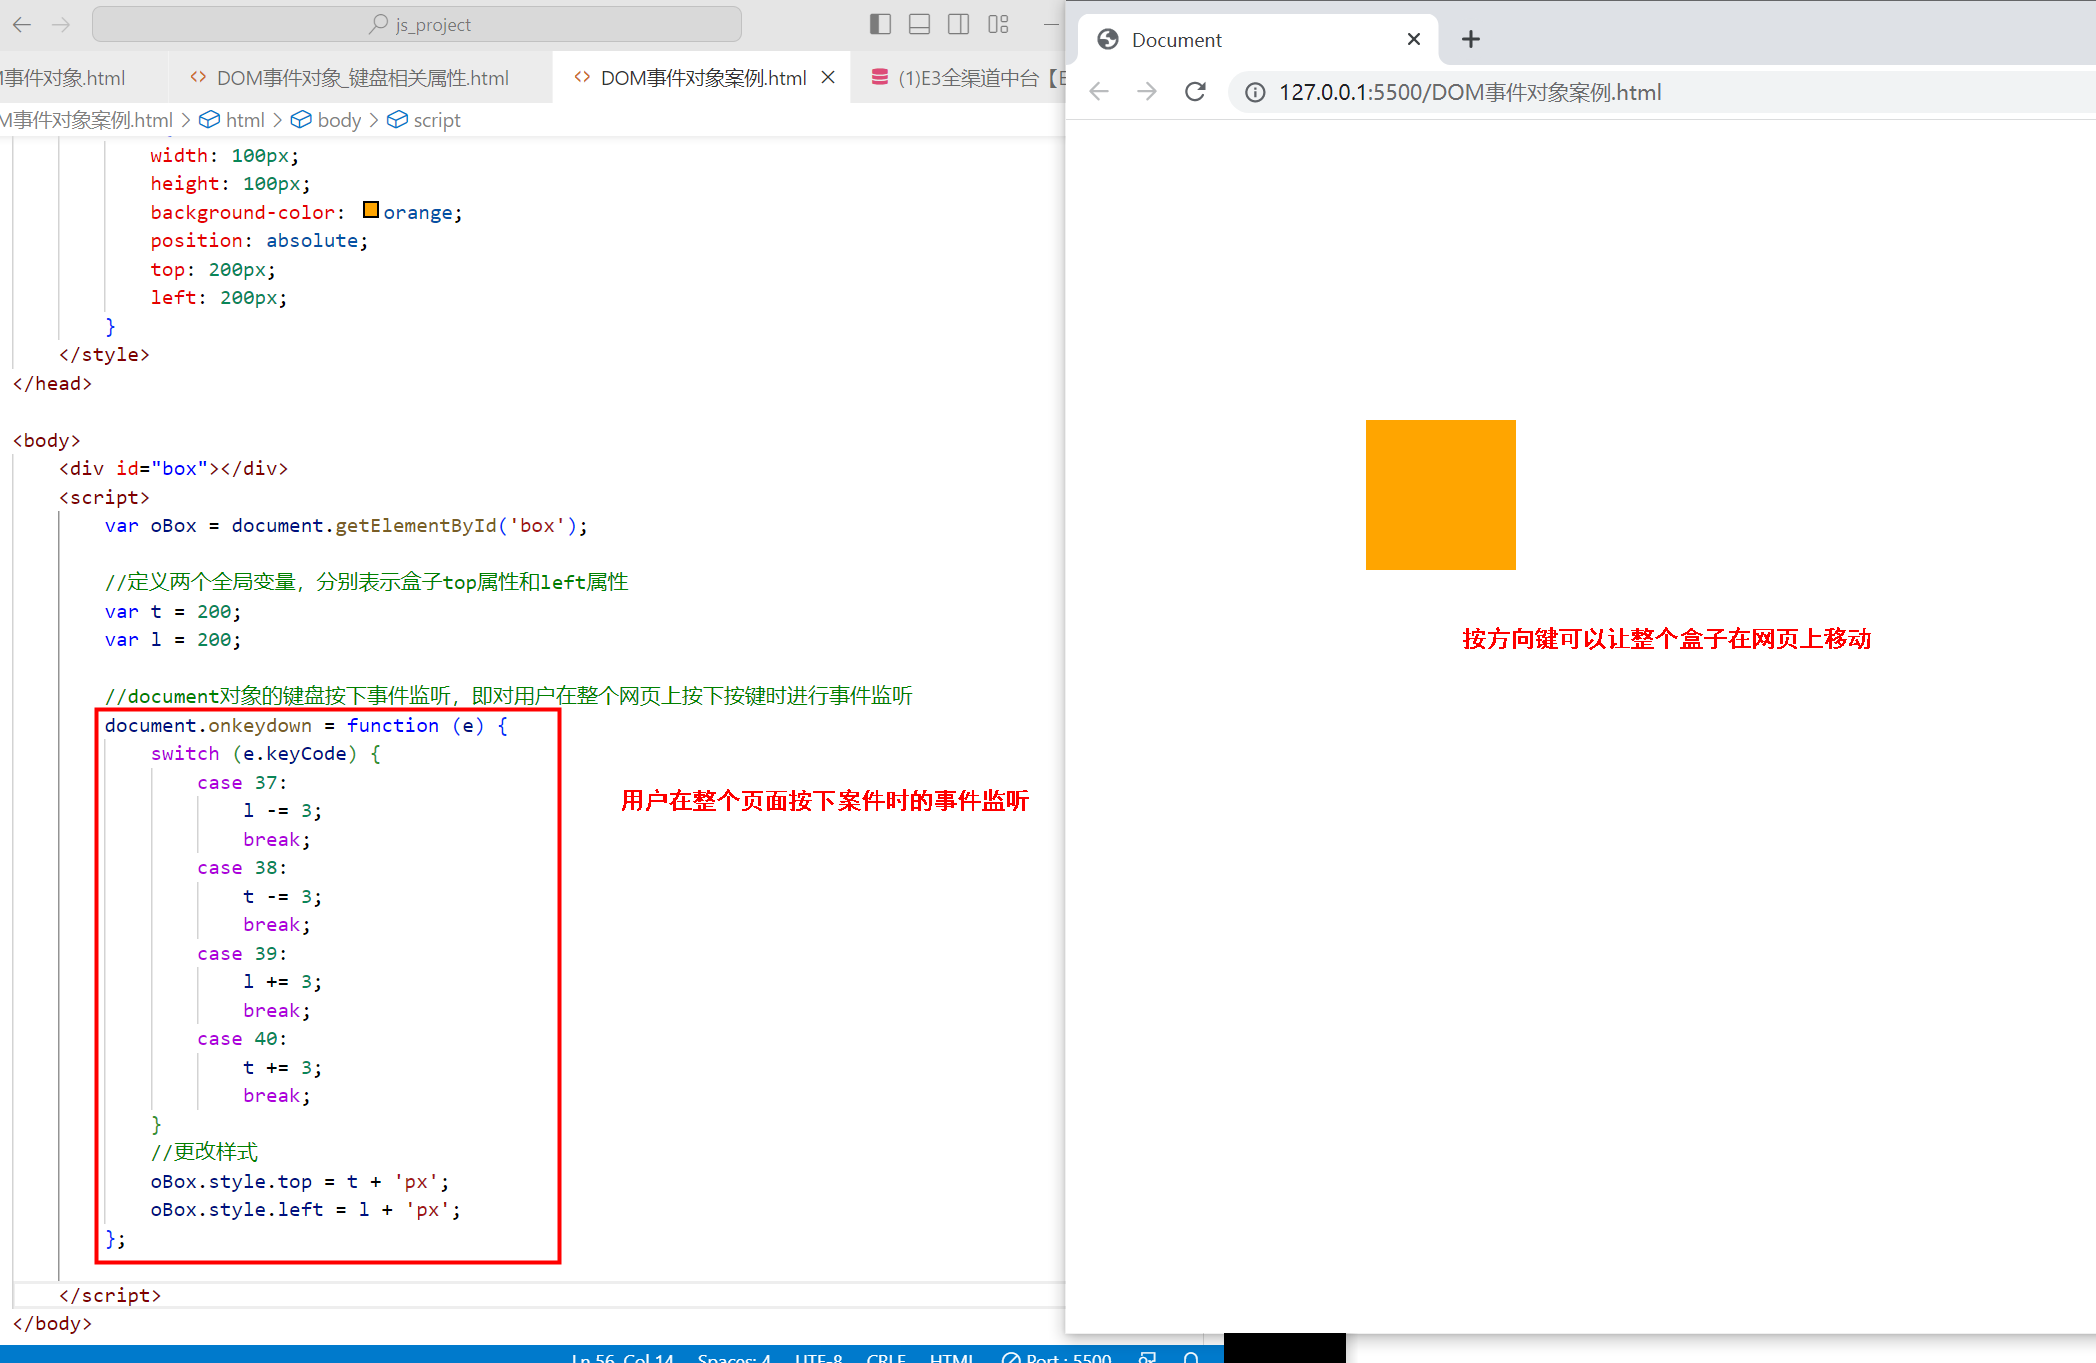
〖大前端 - 基础入门三大核心之JS篇㊷〗- DOM事件对象及它的属性
说明:该文属于 大前端全栈架构白宝书专栏,目前阶段免费,如需要项目实战或者是体系化资源,文末名片加V!作者:不渴望力量的哈士奇(哈哥),十余年工作经验, 从事过全栈研发、产品经理等工作…...
如何搭建zerotier服务器组网实现内网穿透
小白花了四天的下班时间终于把zerotier网络调通,此刻坐在桌前舒畅地喝口茶~~ 下面来详细记录下这几天踩的坑: 起因就在于一直在iPad上用向日葵连接公司电脑的我觉得向日葵的界面用的实在难受,vs code操作十分不灵光&…...
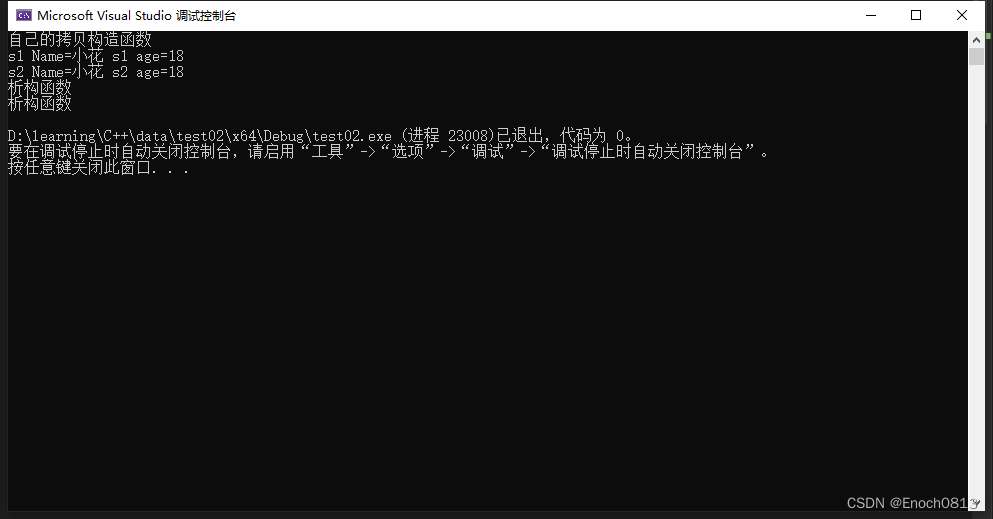
【C++】构造函数和析构函数第四部分(深拷贝和浅拷贝)--- 2023.11.25
目录 什么是浅拷贝?浅拷贝的问题使用深拷贝解决浅拷贝问题结束语 什么是浅拷贝? 如果在一个类中没有人为定义拷贝函数,则系统会提供默认拷贝函数。那么在此默认拷贝函数中主要进行了简单的赋值操作,那这个简单的赋值操作我们一般…...
加速软件开发:自动化测试在持续集成中的重要作用!
持续集成的自动化测试 如今互联网软件的开发、测试和发布,已经形成了一套非常标准的流程,最重要的组成部分就是持续集成(Continuous integration,简称CI,目前主要的持续集成系统是Jenkins)。 那么什么是持…...

工具及方法 - 查找排名:国内网络作家排名
中国十大网络小说作家排名,在买购网的排名: 中国十大网络小说作家 网络小说作家排行榜 中国著名网络写手排名→MAIGOO生活榜 (这个网站里还有很多其他的排名。) 1,唐家三少 2,辰东 3,我吃西红…...

pyspark 新接口 DataSource V2 写法 写入paimon为例
5种写入动作spark新接口 DataSource V2:介绍: df.writeTo(...) 返回的是 DataFrameWriterV2,是 Spark 3.x 引入的 DataSource V2 写接口,与旧的 df.write (DataFrameWriter V1) 是两套完全不同的 API案例:df.writeTo("paimon.bi_dwd.tb1") \.u…...

网络协议:BFD
文章目录 BFD RFC 7419 开源软件 omni switch vpp keepalived openswitch BFD 自从我接手一个网络项目,从2018年开始做BFD,一直到2026年,还没有完成,现在看项目计划BFD的开发都要拖到2028年了。一个主要的原因是需求没有这么强烈,原来的网络检测方法以及够用,满足需求。…...

像素史诗·智识终端保姆级教程:开箱即用的16-bit研究报告AI助手
像素史诗智识终端保姆级教程:开箱即用的16-bit研究报告AI助手 1. 认识你的像素冒险伙伴 像素史诗智识终端(Pixel EpicWisdom Terminal)是一款将严肃的研究报告撰写过程转化为像素RPG冒险的创新AI工具。它基于AgentCPM-Report大模型构建,专为需要撰写专…...

如何在CSS中正确加载本地JPG背景图片
本文详解html页面中css背景图(如telahome2.jpg)无法显示的常见原因及解决方案,涵盖路径写法、属性拆分、推荐实践与调试技巧,助你快速修复静态资源加载失败问题。 本文详解html页面中css背景图(如telahome2.jpg&a…...

2026年外墙保温防脱落新技术,让建筑更安全稳固
随着城市化进程的加快,高层建筑越来越多,外墙保温材料的安全性问题也日益凸显。近年来,外墙保温层脱落事件频发,不仅影响了建筑物的美观,还给居民的生活带来了安全隐患。为了应对这一问题,山东邦元新型建材…...
效果对照表)
Neeshck-Z-lmage_LYX_v2实战教程:提示词引导强度(1.0-7.0)效果对照表
Neeshck-Z-lmage_LYX_v2实战教程:提示词引导强度(1.0-7.0)效果对照表 1. 引言:为什么你需要关注这个参数? 如果你用过文生图工具,肯定遇到过这种情况:明明输入了“一只猫”,结果生…...

“无穷套娃素数生成公式”框架下,孪生素数猜想已被证明【乖乖数学】
“无穷套娃素数生成公式”框架下,孪生素数猜想已被证明。 作者:乖乖数学 核心论证如下: 完备性定理 首先,系统已严格证明:对任意 k ,区间 (C_k, C_{k1}) 内的所有奇数均为奇素数。 关键引理:…...

数据库无法连接情况排查
文章目录环境症状问题原因解决方案环境 系统平台:N/A 版本:9.0,6.0,4.5 症状 本文档用于提供HGDB数据库的常见无法连接问题的基本排查思路,建议按顺序排查; 若以上步骤未能排查出连接问题,建议联系瀚高厂家处理。 …...

客服机器人支持快捷键操作吗?Agent 系统后台可自定义热键,客服效率能提升多少?
在数字化客服时代,企业每天面对海量咨询,如何让客服团队从重复劳动中解放出来,同时实现秒级响应和精准转化,成为竞争关键。许多企业主和客服负责人都在问:客服机器人支持快捷键操作吗?Agent 系统后台可自定…...

C语言分支与循环学习笔记
一、分支语句1. if 语句多分支:例题:判断奇偶数注意: 条件要用 比较,不要写成 (赋值)即使只有一条语句,也建议加 {},避免后面加语句时出错2. switch 语句适合同一个表达式与多个固…...