Android、ESP32、ESP8266的mqtt通信
Android
activity_main
<?xml version="1.0" encoding="utf-8"?>
<LinearLayout xmlns:android="http://schemas.android.com/apk/res/android"xmlns:app="http://schemas.android.com/apk/res-auto"xmlns:tools="http://schemas.android.com/tools"android:layout_width="match_parent"android:layout_height="match_parent"tools:context=".MainActivity"android:orientation="vertical"><TextViewandroid:id="@+id/recvTxt"android:layout_width="match_parent"android:layout_height="600dp"android:text=""app:layout_constraintBottom_toBottomOf="parent"app:layout_constraintEnd_toEndOf="parent"app:layout_constraintStart_toStartOf="parent"app:layout_constraintTop_toTopOf="parent" /><Buttonandroid:id="@+id/onBtn"android:layout_width="match_parent"android:layout_height="wrap_content"android:text="开灯" /><Buttonandroid:id="@+id/offBtn"android:layout_width="match_parent"android:layout_height="wrap_content"android:text="关灯" /></LinearLayout>
AndroidManifest
<uses-permission android:name="android.permission.INTERNET"/>
<uses-permission android:name="android.permission.ACCESS_NETWORK_STATE"/>
MainActivity
package com.example.myapplication;
/*
* https://repo.eclipse.org/content/repositories/paho-releases/org/eclipse/paho/
* https://repo.eclipse.org/content/repositories/paho-releases/org/eclipse/paho/org.eclipse.paho.client.mqttv3/1.2.5/
* 下载org.eclipse.paho.client.mqttv3-1.2.5.jar文件
* 将下载的jar包复制至项目libs目录下,并右击mqtt jar包 ADD As Libray.. ,将mqtt jar包导入库文件中。
* */
import androidx.annotation.NonNull;
import androidx.appcompat.app.AppCompatActivity;import android.os.Bundle;
import android.os.Handler;
import android.os.Message;
import android.view.View;
import android.widget.Button;
import android.widget.TextView;
import android.widget.Toast;import org.eclipse.paho.client.mqttv3.IMqttDeliveryToken;
import org.eclipse.paho.client.mqttv3.MqttCallback;
import org.eclipse.paho.client.mqttv3.MqttClient;
import org.eclipse.paho.client.mqttv3.MqttConnectOptions;
import org.eclipse.paho.client.mqttv3.MqttException;
import org.eclipse.paho.client.mqttv3.MqttMessage;
import org.eclipse.paho.client.mqttv3.persist.MemoryPersistence;public class MainActivity extends AppCompatActivity {private String host = "tcp://broker.emqx.io:1883";private String userName = "dsx_phone";private String passWord = "dsx_phone_pwd";private String mqtt_id ="dsx_phone_001";private MqttClient client;private String subTopic = "dsx_phone"; //订阅的主题  接收内容private String sendTopic = "dsx_esp8266";//发送的主题private MqttConnectOptions options;private TextView recvTxt;private Button onBtn,offBtn;MyHandler myHandler;@Overrideprotected void onCreate(Bundle savedInstanceState) {super.onCreate(savedInstanceState);setContentView(R.layout.activity_main);recvTxt = findViewById(R.id.recvTxt);onBtn = findViewById(R.id.onBtn);offBtn = findViewById(R.id.offBtn);myHandler = new MyHandler();connectServer();onBtn.setOnClickListener(new View.OnClickListener() {@Overridepublic void onClick(View view) {publishMsg(sendTopic,"on");}});offBtn.setOnClickListener(new View.OnClickListener() {@Overridepublic void onClick(View view) {publishMsg(sendTopic,"off");}});}private void connectServer(){try {client = new MqttClient(host, mqtt_id, new MemoryPersistence());options = new MqttConnectOptions();options.setCleanSession(true);options.setUserName(userName);options.setPassword(passWord.toCharArray());options.setConnectionTimeout(10);options.setKeepAliveInterval(20);client.setCallback(new MqttCallback() {@Overridepublic void connectionLost(Throwable throwable) {//重新连接}@Overridepublic void messageArrived(String s, MqttMessage mqttMessage) throws Exception {//收到消息Message msg = new Message();msg.what = 2;msg.obj = s + "------" + mqttMessage.toString();myHandler.sendMessage(msg);}@Overridepublic void deliveryComplete(IMqttDeliveryToken iMqttDeliveryToken) {//发送完成后执行到这里Message msg = new Message();msg.what = 4;msg.obj = "Publish OK".toString();myHandler.sendMessage(msg);}});new Thread(new Runnable() {@Overridepublic void run() {try {if(!(client.isConnected())){client.connect(options);Message msg = new Message();msg.what = 1;msg.obj = "Connect Server Success".toString();myHandler.sendMessage(msg);publishMsg(sendTopic,"我是来自手机端的消息!");}}catch (Exception e){e.printStackTrace();Message msg = new Message();msg.what = 3;msg.obj = "Connect Server Fail".toString();myHandler.sendMessage(msg);}}}).start();} catch (MqttException e) {e.printStackTrace();throw new RuntimeException(e);}}private void publishMsg(String send_topic,String msg){if(client == null || !(client.isConnected())){return;}MqttMessage mqtt_msg = new MqttMessage();mqtt_msg.setPayload(msg.getBytes());try {client.publish(send_topic,mqtt_msg);} catch (MqttException e) {e.printStackTrace();throw new RuntimeException(e);}}class MyHandler extends Handler{@Overridepublic void handleMessage(@NonNull Message msg) {super.handleMessage(msg);switch (msg.what){case 1:recvTxt.setText(msg.obj.toString());Toast.makeText(MainActivity.this,msg.obj.toString(),Toast.LENGTH_LONG).show();try {client.subscribe(subTopic);} catch (MqttException e) {e.printStackTrace();throw new RuntimeException(e);}break;case 2:recvTxt.setText(msg.obj.toString());Toast.makeText(MainActivity.this,"Recv Data",Toast.LENGTH_LONG).show();break;case 3:recvTxt.setText(msg.obj.toString());Toast.makeText(MainActivity.this,msg.obj.toString(),Toast.LENGTH_LONG).show();break;case 4:recvTxt.setText(msg.obj.toString());Toast.makeText(MainActivity.this,msg.obj.toString(),Toast.LENGTH_LONG).show();break;case 5:Toast.makeText(MainActivity.this,"5",Toast.LENGTH_LONG).show();break;default:Toast.makeText(MainActivity.this,"default",Toast.LENGTH_LONG).show();break;}}}
}
ESP32
/*
//wifi连接
#include <WiFi.h>
const char* id="TP-LINK_8F3882";   //定义两个字符串指针常量
const char* psw="123456789";
void setup() {Serial.begin(115200);WiFi.begin(id,psw);while(WiFi.status() != WL_CONNECTED){			//未连接上delay(500);Serial.println("wifi connecting...");}Serial.println("wifi connect ok!");				//连接上
}
void loop(){							//空循环}*/
/*Broker:
broker.emqx.io
TCP 端口:
1883
WebSocket 端口:
8083
SSL/TLS 端口:
8883
WebSocket Secure 端口:
8084
QUIC 端口:
14567
CA 证书文件:
broker.emqx.io-ca.crt
*/#include <WiFi.h>
#include <PubSubClient.h>// const char* ssid     = "Netcore_dsx";
// const char* password = "dsx54254";const char* ssid="TP-LINK_8F3882";   //定义两个字符串指针常量
const char* password="123456789";//led
#define JDQ 2const char* MQTT_SERVER  = "broker.emqx.io";
const int   MQTT_PORT    = 1883;
const char* MQTT_USRNAME = "admin";
const char* MQTT_PASSWD  = "adminadmin";
const char* TOPIC = "dsx_esp8266";     //订阅的主题  接收这个主题的消息
const char* CLIENT_ID    = "dsx_esp32_01";  //当前设备的clientid标志WiFiClient espClient;
PubSubClient  client(espClient);String send_msg="I am esp32";
String send_topic = "dsx_phone";   //往这个主题发送消息
void setup()
{Serial.begin(115200);delay(5000);Serial.println();Serial.println();Serial.print("Connecting to ");Serial.println(ssid);WiFi.begin(ssid, password);while (WiFi.status() != WL_CONNECTED) {delay(2500);Serial.print(".");}Serial.println("");Serial.println("WiFi connected");Serial.print("IP address: ");Serial.println(WiFi.localIP());pinMode(JDQ, OUTPUT);client.setServer(MQTT_SERVER, MQTT_PORT); //设定MQTT服务器与使用的端口,1883是默认的MQTT端口client.setCallback(callback);        //设定回调方式,当ESP8266收到订阅消息时会调用此方法
}void reconnect() {while (!client.connected()) {Serial.println("Attempting MQTT connection...");if (client.connect(CLIENT_ID,MQTT_USRNAME,MQTT_PASSWD)) {Serial.println("Mqtt server connected success");// 连接成功时订阅主题client.subscribe(TOPIC);Serial.println("Topic  dsx_esp32  subscribe success");pubmsg(send_topic,send_msg);} else {Serial.print("failed, rc=");Serial.print(client.state());Serial.println(" try again in 5 seconds");delay(5000);}}
}void callback(char* topic, byte* payload, unsigned int length) {Serial.print("Message arrived in topic: ");Serial.println(topic);Serial.print("Message: ");String message;for (int i = 0; i < length; i++) {message += (char) payload[i];  // Convert *byte to string}Serial.print(message);if (message == "on") {digitalWrite(JDQ, HIGH);  // Turn on the LEDpubmsg(send_topic, "LED ON");}if (message == "off") {digitalWrite(JDQ, LOW); // Turn off the LEDpubmsg(send_topic, "LED OFF");}Serial.println();Serial.println("-----------------------");
}// topicString   参数类似  "device/date"
// messageString 参数类似  String realmsg="";void pubmsg( const String &topicString, const  String &messageString){char publishTopic[topicString.length() + 1];  strcpy(publishTopic, topicString.c_str());char publishMsg[messageString.length() + 1];   strcpy(publishMsg, messageString.c_str());// 实现ESP8266向主题发布信息if(client.publish(publishTopic, publishMsg)){Serial.print("Publish Topic:");Serial.println(publishTopic);Serial.print("Publish message:");Serial.println(publishMsg);   Serial.println("Send Success"); } else {Serial.println("Message Publish Failed."); }
}void loop()
{if (!client.connected()) {reconnect();}client.loop();
}
ESP8266
#include <ESP8266WiFi.h>
#include <PubSubClient.h>// 开发板上LED GPIO2 对应 D4  可以使用D4  也可以使用2    低电平点亮
#define LED 2// WiFi
const char *ssid = "Netcore_dsx"; // Enter your WiFi name
const char *password = "dsx54254";  // Enter WiFi password// MQTT Broker
const char *mqtt_broker = "broker.emqx.io";
const char *topic = "dsx_esp8266";
const char *mqtt_username = "emqx_dsx_esp8266";
const char *mqtt_password = "public_dsx_esp8266";
const int mqtt_port = 1883;
const char *send_topic = "dsx_phone";
bool ledState = false;WiFiClient espClient;
PubSubClient client(espClient);void setup() {// Set software serial baud to 115200;Serial.begin(115200);delay(1000); // Delay for stability// Connecting to a WiFi networkWiFi.begin(ssid, password);while (WiFi.status() != WL_CONNECTED) {delay(500);Serial.println("Connecting to WiFi...");}Serial.println("Connected to the WiFi network");// Setting LED pin as outputpinMode(LED, OUTPUT);digitalWrite(LED, HIGH);  // Turn off the LED initially// Connecting to an MQTT brokerclient.setServer(mqtt_broker, mqtt_port);client.setCallback(callback);while (!client.connected()) {String client_id = "esp8266-client-";client_id += String(WiFi.macAddress());Serial.printf("The client %s connects to the public MQTT broker\n", client_id.c_str());if (client.connect(client_id.c_str(), mqtt_username, mqtt_password)) {Serial.println("Public EMQX MQTT broker connected");} else {Serial.print("Failed with state ");Serial.print(client.state());delay(2000);}}// Publish and subscribeclient.publish(send_topic, "hello phone");client.subscribe(topic);
}void callback(char *topic, byte *payload, unsigned int length) {Serial.print("Message arrived in topic: ");Serial.println(topic);Serial.print("Message: ");String message;for (int i = 0; i < length; i++) {message += (char) payload[i];  // Convert *byte to string}Serial.print(message);if (message == "on" && !ledState) {digitalWrite(LED, LOW);  // Turn on the LEDledState = true;client.publish(send_topic, "LED ON");}if (message == "off" && ledState) {digitalWrite(LED, HIGH); // Turn off the LEDledState = false;client.publish(send_topic, "LED OFF");}Serial.println();Serial.println("-----------------------");
}void loop() {client.loop();delay(100); // Delay for a short period in each loop iteration
}
相关文章:

Android、ESP32、ESP8266的mqtt通信
Android activity_main <?xml version"1.0" encoding"utf-8"?> <LinearLayout xmlns:android"http://schemas.android.com/apk/res/android"xmlns:app"http://schemas.android.com/apk/res-auto"xmlns:tools"http:/…...

Hive安装与配置
你需要掌握: 1.Hive的基本安装; 2.Mysql的安装与设置; 3.Hive 的配置。 注意:Hive的安装与配置建立在Hadoop已安装配置好的情况下。 hadopp安装与配置 Hive 的基本安装 从 官网 下载Hive二进制包,下载好放在/op…...

vuejs: 解决浏览器切换页面后setInterval计时器停止执行的问题
setInterval定时器是基于当前页面的,如果切换到其他页面,定时器会被暂停。这是浏览器的一种优化措施,以减少不必要的性能消耗。 如果需要在切换页面后继续执行定时器,可以使用Web Worker,它是在后台运行的程序…...

基于Web邮箱的邮件系统
题目: 基于web的邮件收发系统设计与实现 摘 要 计算机的应用已经越来越广泛,它从产生到完善已经差不多有50年左右的历史,更新换代速度非常快,在人们生活、工作中都发挥了不可替代的作用,几乎所有行业都离不开它,已经成…...
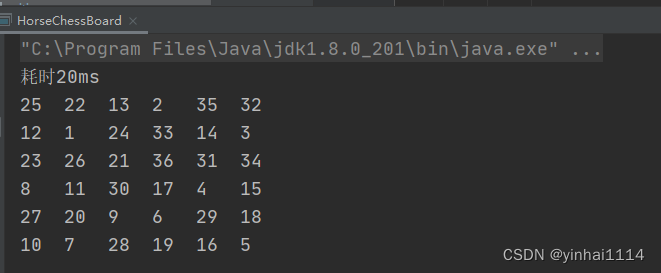
【Java学习笔记】75 - 算法优化入门 - 马踏棋盘问题
一、意义 1.算法是程序的灵魂,为什么有些程序可以在海量数据计算时,依然保持高速计算? 2.拿老韩实际工作经历来说,在Unix下开发服务器程序,功能是要支持上千万人同时在线,在上线前, 做内测,一…...
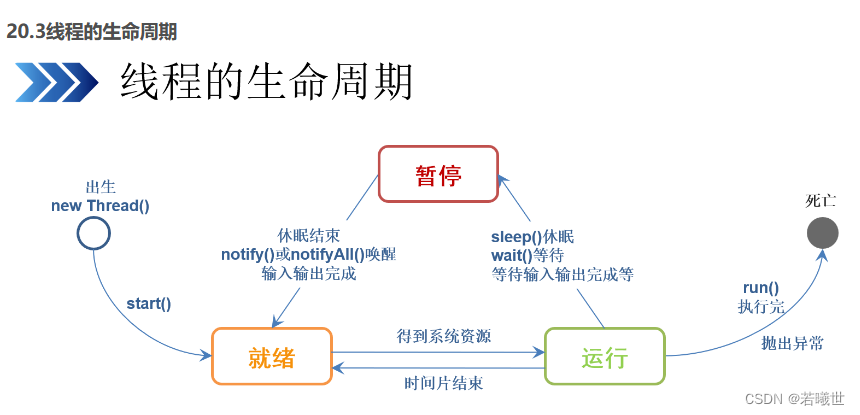
第二十章 多线程
20.2创建线程 20.2.1继承Thread类 Thread类是Java.lang包中的一个类,从这个类中实例化的对象代表线程,程序员启动一个新线程需要建议Thread实例。 public class ThreadTest extedns Thread{} run方法格式: public void run(){} 20.1让线程循…...

vue2使用npm依赖包导出xlsx文件
1.下载依赖npm i xlsx 2.在根目录utils新建mergeXlxs.js /****/ import { utils, writeFile } from "xlsx";export default function mergeHeader(headers, data, datamerges, defaultTitle) {const ws utils.book_new();utils.sheet_add_aoa(ws, headers);//这里…...
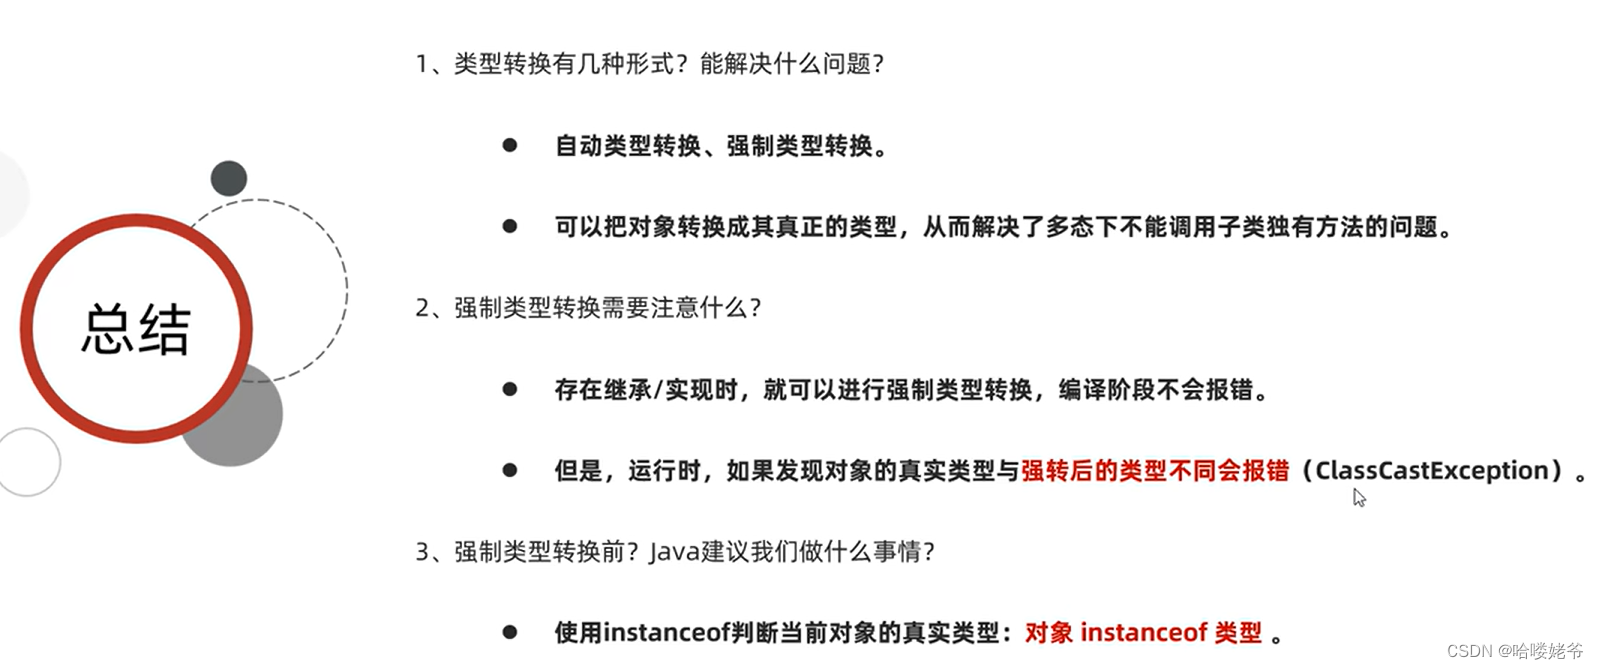
java--多态
1.什么是多态 多态是在继承/实现的情况下的一种现象,表现为:对象多态、行为多态。 2.多态的具体代码体现 编译看左边,运行看右边 3.多态的前提 有继承/实现关系;存在父类引用子类对象;存在方法重写 4.多态的一个注…...
保存至csv中)
知识图谱06——将pdf中的表格(文字形式)保存至csv中
使用ubuntu22.04,anaconda 由于装环境装了一阵子,不确定装了哪些包了 可能的环境安装 conda install -c conda-forge pymupdf conda install -c conda-forge camelot-py conda install pandas #或者 pip install PyMuPDF pip install camelot-py[all] …...

一文教你使用Swagger---适合新手小白(结合实战)
1.什么是Swagger Swagger----在线自动生成接口文档,是一个规范和完整的框架,用于生成、描述、调用和可视化RESTful风格的Web服务,可用于接口的文档在线自动生成以及功能测试。 2.Swagger与OpenAPI OpenAPI规范OpenAPI Specification以前叫…...

VC++调试QT源码
环境:vs2017 qt 5.14.2 1:首先我们需要选择我们的源码路径 右键解决方案-》属性-》通用属性-》调试源文件-》在窗口内添加QT下载时的源码**.src文件夹**,这里最好把源码 D:\software\QT\path\5.14.2\Src 源文件里面的Src文件做一个备份出来…...

058-第三代软件开发-文件Model
第三代软件开发-文件Model 文章目录 第三代软件开发-文件Model项目介绍文件Model 关键字: Qt、 Qml、 关键字3、 关键字4、 关键字5 项目介绍 欢迎来到我们的 QML & C 项目!这个项目结合了 QML(Qt Meta-Object Language)…...
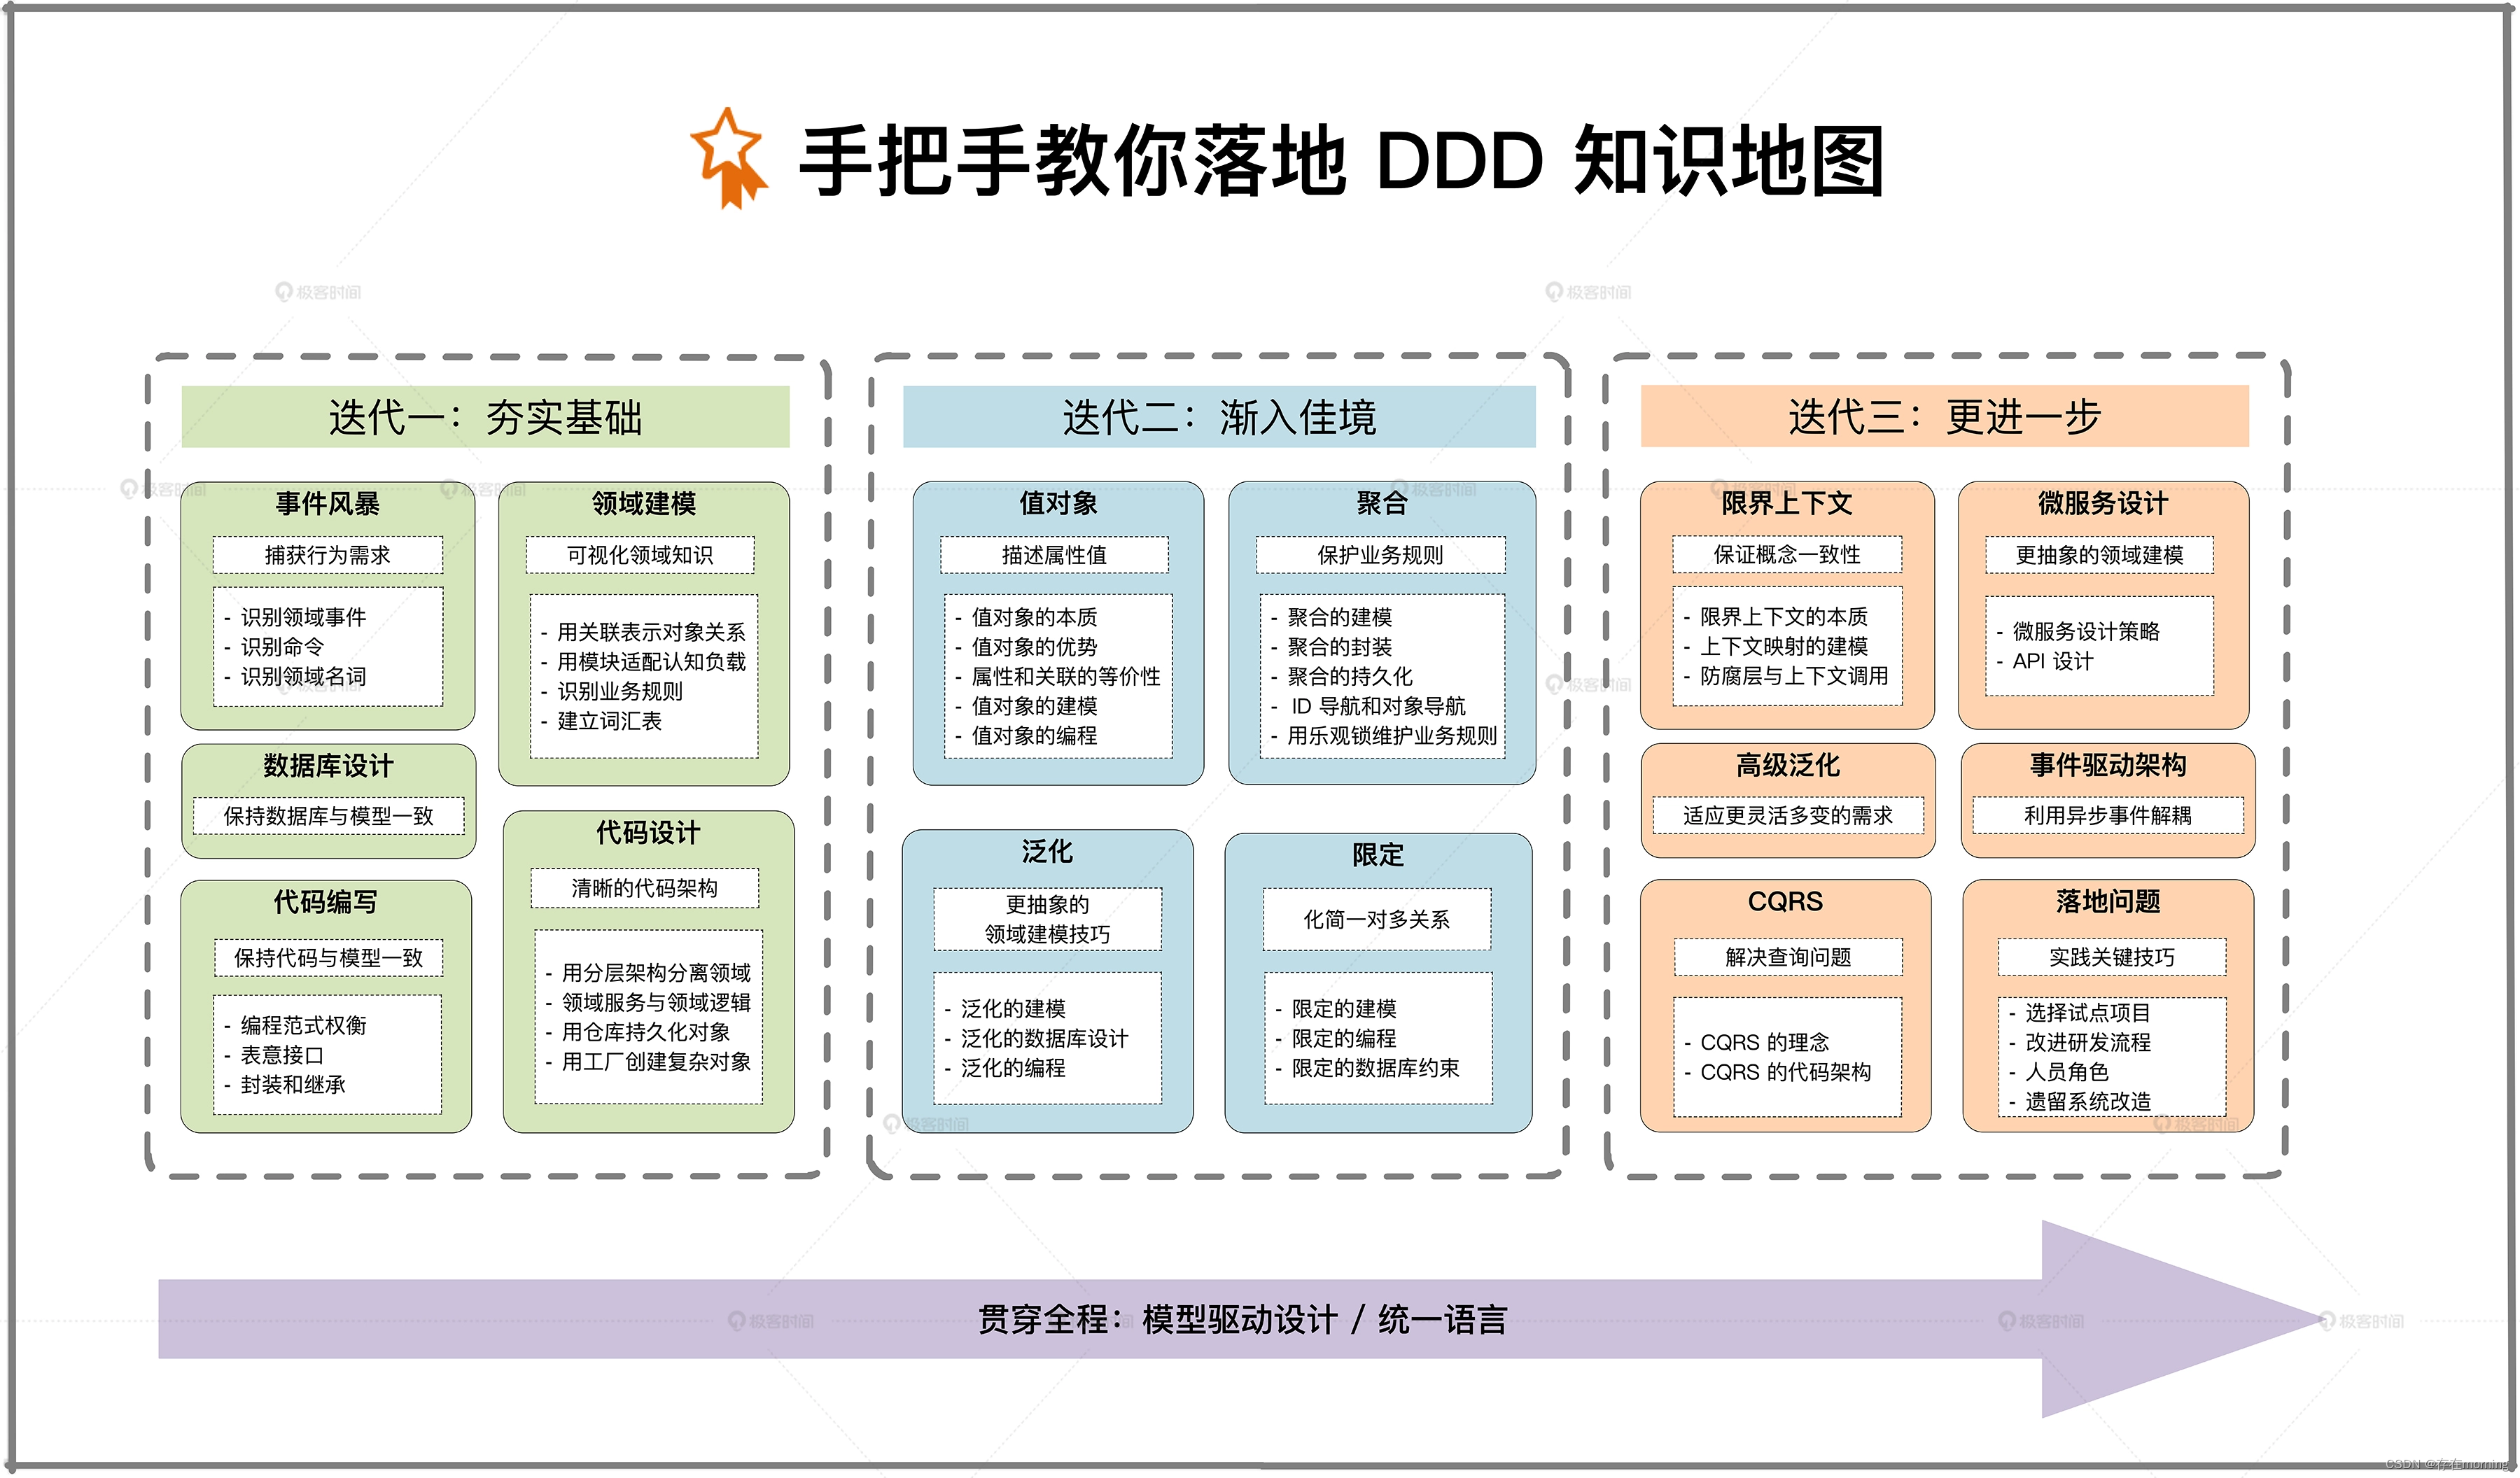
【领域驱动设计 学习目标及大纲】从CRUD到架构设计
从2018年至今,已工作了5年有余,回望这5年的工作历程,虽然一直在学习、一直在积累,但其实都在术的层面上停留,也就是具体的技术点。这5年多的时间里其实也不是没有窥道的想法: 一次是2018年刚工作的时候&am…...

asla四大开源组件应用示例(alsa-lib、alsa-utils、alsa-tools、alsa-plugins)
文章目录 alsa设备文件/dev/snd//sys/class/sound/proc/asoundalsa-lib示例1alsa-utilsalsa-toolsalsa-plugins参考alsa设备文件 /dev/snd/ alsa设备文件目录位于,/dev/snd,如下所示 root@xboard:~#ls /dev/snd -l total 0 drwxr-xr-x 2 root root 60 Nov 6 2023 …...

文档理解的新时代:LayOutLM模型的全方位解读
一、引言 在现代文档处理和信息提取领域,机器学习模型的作用日益凸显。特别是在自然语言处理(NLP)技术快速发展的背景下,如何让机器更加精准地理解和处理复杂文档成为了一个挑战。文档不仅包含文本信息,还包括布局、图…...

【二叉树】Leetcode 637. 二叉树的层平均值
637.二叉树的层平均值 解题思路 根据层序遍历的模板进行修改;主要的不同是,不需要输出每一层所有节点值,只需要输出平均值,只需要定义一个double双精度浮点数储存每一层数的总和,输出时将总和除以层节点总数即为层平均…...

设计模式-15-Jdk源码中的设计模式
之前我们学习了一些设计模式,今天我们剖析Java JDK 源码中用到的几种常见的设计模式。 1-jdk之工厂模式 在前面讲到工厂模式的时候,大部分工厂类都是以Factory作为后缀来命名,并且工厂类主要负责创建对象这样一件事情。但在实际的项目开发中…...
Vue框架学习笔记——事件scroll和wheel的区别
文章目录 前文提要滚动条滚动事件 scroll鼠标滚动事件 wheel二者不同点 前文提要 本人仅做个人学习记录,如有错误,请多包涵 滚动条滚动事件 scroll scroll事件绑定html页面中的指定滚动条,无论你拖拽滚动条,选中滚动条之后按键盘…...
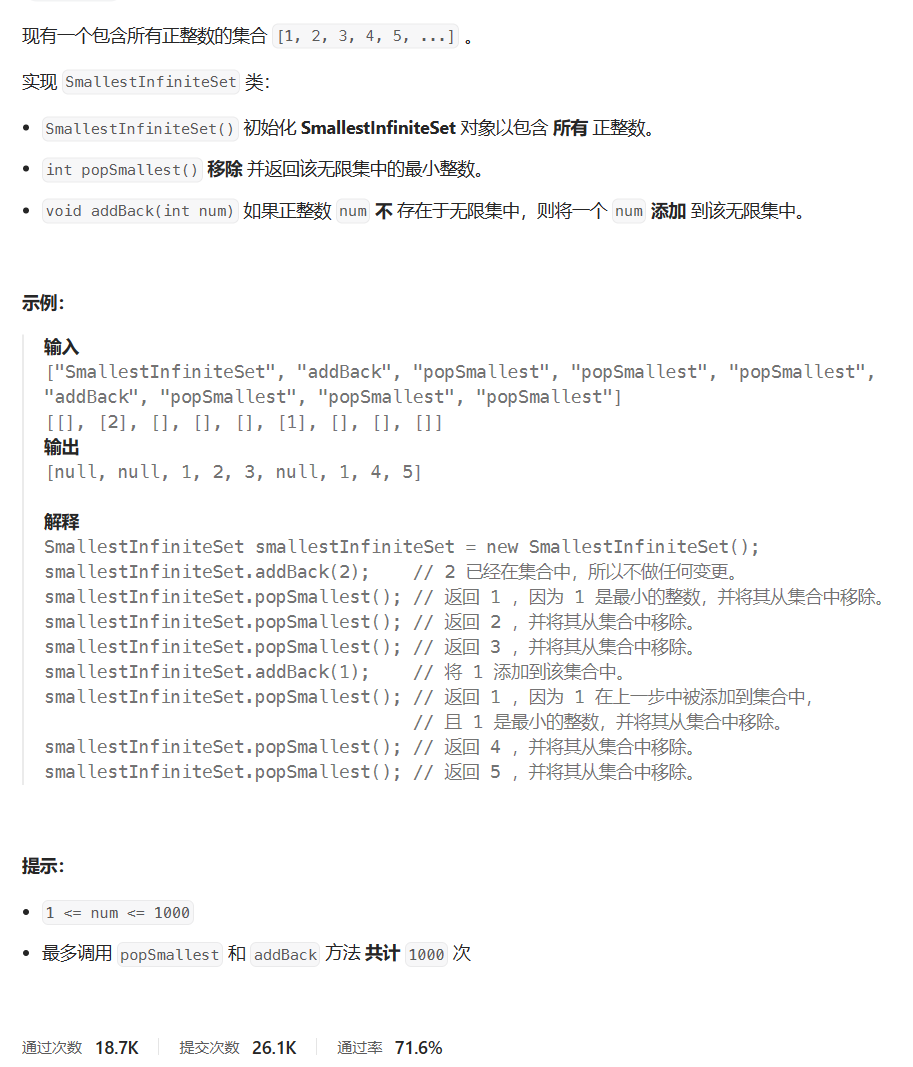
【LeetCode】每日一题 2023_11_29 无限集中的最小数字(哈希/堆)
文章目录 刷题前唠嗑题目:无限集中的最小数字题目描述代码与解题思路偷看大佬题解 结语 刷题前唠嗑 LeetCode?启动!!! 今天的题目也比较的简单,因为数据量不大,所以什么做法都能过的去 题目&a…...

C/C++ 常用的四种查找算法
在计算机科学中,搜索算法是一种用于在数据集合中查找特定元素的算法。C语言作为一种强大的编程语言,提供了多种搜索算法的实现方式。本文将介绍C语言中的四种常见搜索算法其中包括(线性查找,二分法查找,树结构查找&…...

Rockwell Studio5000 IO模块
一.型号命名规则: I:Input 输入模块 IA/IB/IC/IG/IH/IM/IN/IV O: Output 输出模块 A: AC 交流 B: DC 直流 I:Isolated 电气隔离,抗干扰强 D:Diagnostic 诊断功能,支持断线/故障诊断 F:High Speed 高速输…...

安卓Qwen Chat 国际版 无限AI生图 图生视频
最新 2.0.0 国际版限制更少应用名称:Qwen Chat 应用版本:2.0.0 应用大小:25 MB 适用平台:Android 使用说明: 软件介绍 Qwen Chat是一款强大的多功能AI助手应用,旨在提高您的工作效率和学习体验。&am…...

Windows 11热键冲突别抓狂!用OpenArk一键揪出‘元凶’并释放你的Ctrl+C
Windows 11热键冲突终极排查指南:用OpenArk精准定位并解决问题每次按下CtrlC却毫无反应,或者发现AltTab突然失效时,那种挫败感简直让人抓狂。作为每天要与数十个软件打交道的设计师,我深刻理解热键冲突对工作效率的致命影响。本文…...

Android性能优化深度解析:从理论到实践
在Android开发领域,性能优化是确保应用流畅运行和用户体验的关键。作为一名安卓开发工程师,掌握性能优化技术不仅能提升应用质量,还能在面试和实际工作中脱颖而出。本文将以性能优化为核心领域,深入探讨其理论、工具和实践方法,并提供代码示例和常见面试问题及答案。文章内…...

Claude Code 接入 DeepSeek
安装 Claude Code DeepSeek 文档: 使用如下命令安装 Claude Code: npm install -g anthropic-ai/claude-code安装完成后,可以输入下面的命令检查是否安装成功。 claude --version购买 DeepSeek API 创建 Api Key 点击如下链接创建 DeepSeek API Ke…...

美国RTP全系列材料:全面解析高性能导电塑料产品服务
宏裕塑胶代理美国RTP全系列材料,专注于为制造业企业提供高性价比、稳定可控的工程塑料原料供应及全流程技术支持,凭借源头直采优势与专业技术服务,助力客户降低采购成本、提升生产效率,适用于塑胶制品厂、精密注塑厂、汽车零部件厂…...

前端可访问性:表单验证的无障碍实现指南
前端可访问性:表单验证的无障碍实现指南 前言 各位前端小伙伴,今天咱们来聊聊表单验证的无障碍问题。想象一下: 用户填写表单时出错了视力正常的用户看到红色错误提示但屏幕阅读器用户可能完全不知道发生了什么键盘用户也可能错过错误信息 这…...

DeepSeek-R1模型压缩到<380MB还能保持98.7%对话准确率?——边缘设备量化微调四步法首次公开
更多请点击: https://intelliparadigm.com 第一章:DeepSeek边缘设备部署 DeepSeek系列大模型在边缘侧的轻量化部署,正成为工业质检、智能安防与车载语音等低延迟场景的关键技术路径。其核心挑战在于平衡模型精度、推理吞吐与硬件资源约束——…...

QrazyBox终极指南:专业二维码修复工具拯救你的损坏二维码
QrazyBox终极指南:专业二维码修复工具拯救你的损坏二维码 【免费下载链接】qrazybox QR Code Analysis and Recovery Toolkit 项目地址: https://gitcode.com/gh_mirrors/qr/qrazybox 你是否曾因打印模糊、水渍污染或屏幕划痕导致的重要二维码无法扫描而焦急…...

JMeter并发与持续性压测:从瞬时吞吐到系统韧性的工程实践
1. 为什么“并发持续”不是简单叠加,而是压测成败的分水岭 很多人第一次做接口性能测试时,会下意识把JMeter当成“高级curl”——写个HTTP请求,加个线程组,跑50个用户,看响应时间飘不飘。结果报告一出来,平…...