Kaggle-水果图像分类银奖项目 pytorch Densenet GoogleNet ResNet101 VGG19
一些原理文章
卷积神经网络基础(卷积,池化,激活,全连接) - 知乎
PyTorch 入门与实践(六)卷积神经网络进阶(DenseNet)_pytorch conv1x1_Skr.B的博客-CSDN博客
GoogLeNet网络结构的实现和详解_Dragon_0010的博客-CSDN博客
一文读懂LeNet、AlexNet、VGG、GoogleNet、ResNet到底是什么? - 知乎
使用PyTorch搭建ResNet101、ResNet152网络_torch resnet101-CSDN博客
深度学习之VGG19模型简介-CSDN博客
Georgiisirotenko的银奖原始代码
PyTorch|Fruits|TransferLearing+Ensemble|Test99.18% | Kaggle
调用模型
torchvision.models.densenet121、torchvision.models.googlenet、torchvision.models.resnet101、torchvision.models.vgg19_bn

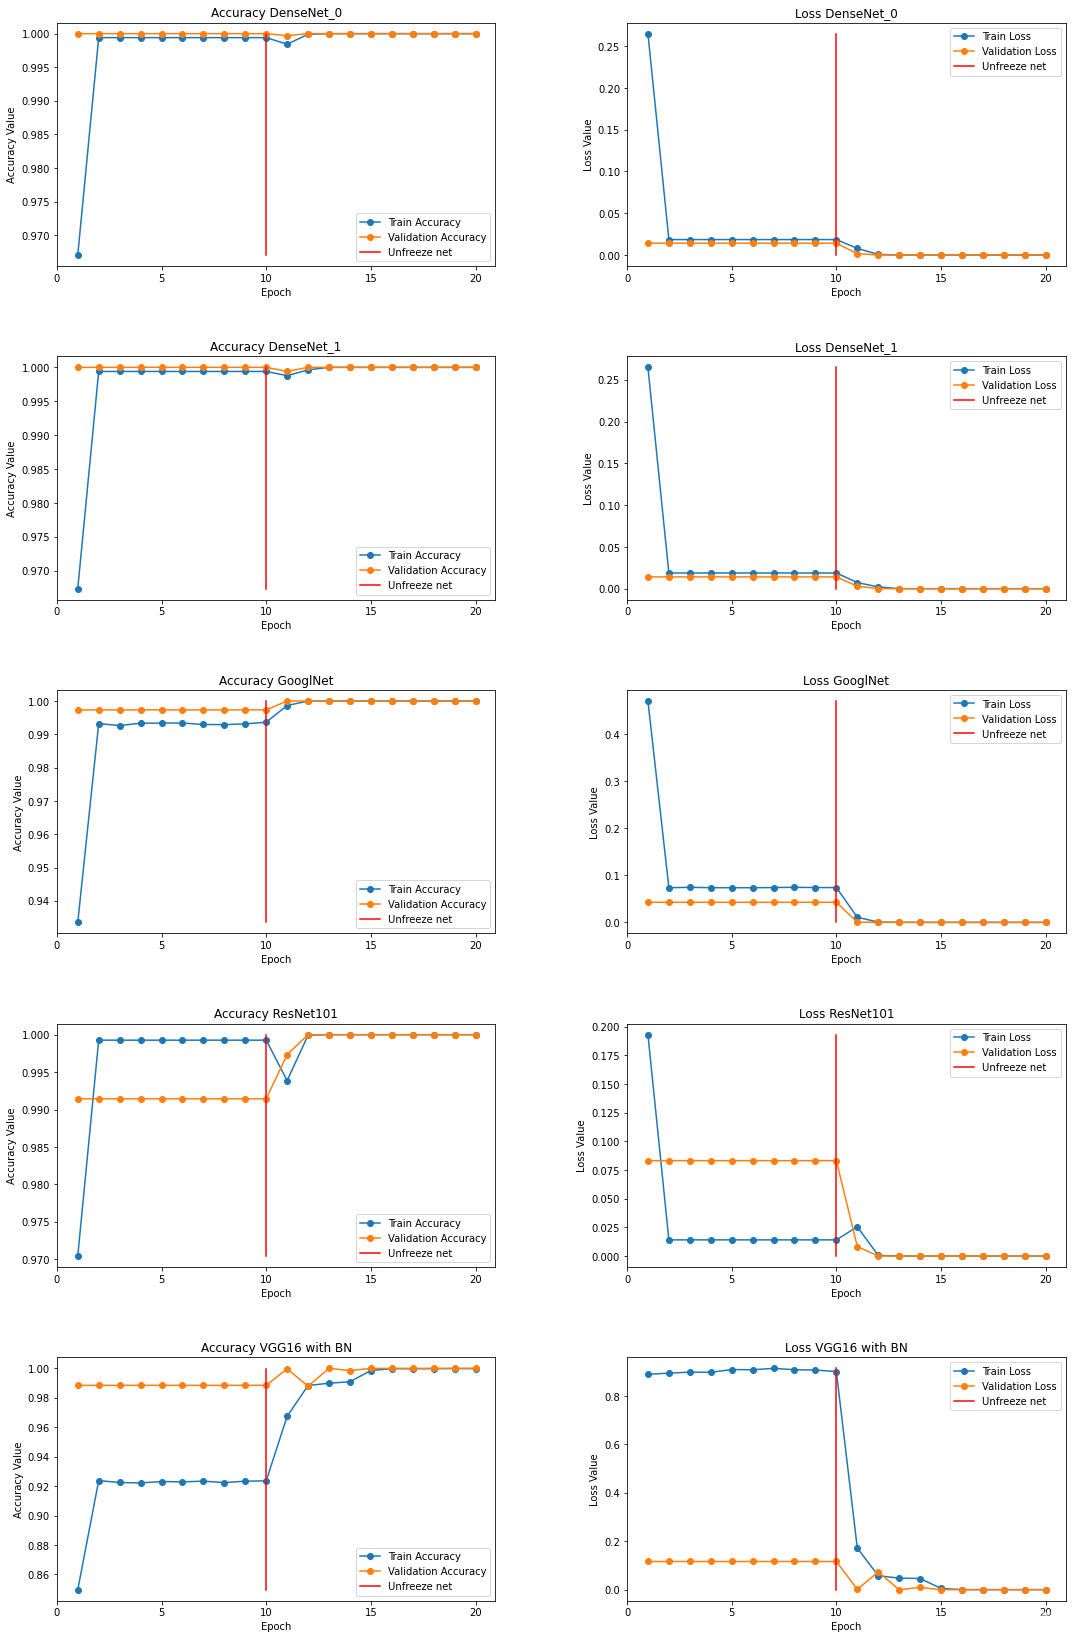
结果图
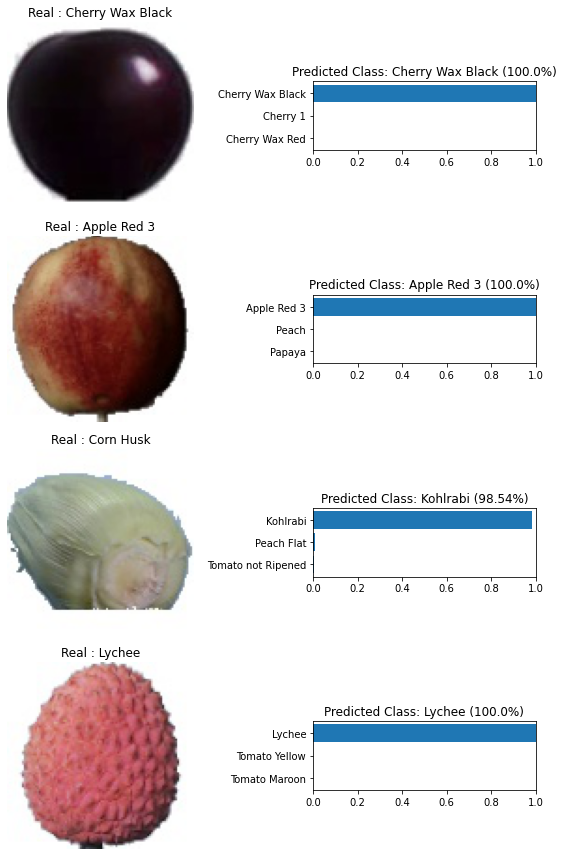
预测概率
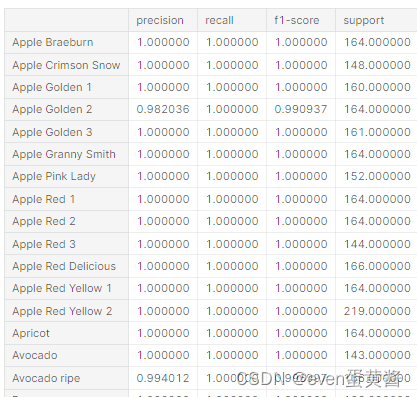
部分打分
本地可运行代码
#https://www.kaggle.com/code/georgiisirotenko/pytorch-fruits-transferlearing-ensemble-test99-18
#!/usr/bin/env python
# coding: utf-8# # **0. Importing Libraries**# In[2]:
%pip install mlxtend
%pip install opencv-python -i https://pypi.tuna.tsinghua.edu.cn/simple
#可能需要重启kernel
# In[3]:
import numpy as np
import pandas as pd
import os
import random
from operator import itemgetter
import cv2
import copy
import timeimport matplotlib.pyplot as plt
import matplotlib.image as mpimg
from matplotlib.image import imread
import seaborn as snsimport torch
import torchvision
from torchvision.datasets import ImageFolderfrom torchvision.utils import make_grid
import torchvision.transforms as transform
from torch.utils.data import Dataset, DataLoader, ConcatDataset
from sklearn.model_selection import train_test_split
import torch.nn as nn
import torchvision.models as models
from torchvision.utils import make_grid
import torch.nn.functional as Ffrom mlxtend.plotting import plot_confusion_matrix
from sklearn.metrics import confusion_matrix, classification_reportimport warnings
warnings.filterwarnings('ignore')device = torch.device('cuda:0' if torch.cuda.is_available() else 'cpu')# # **1. Data loading and preparation¶**
# **Paths**# In[4]:example_train_path = './datadev/train/'
path = './datadev/'# **Show example from data and size**# In[5]:img = mpimg.imread(example_train_path + "0/60695900831062008.jpg")
print("Shape:", img.shape)
plt.imshow(img);# **Sometimes the data is normalized in advance, but as you can see in the graph, this is not the case, so the data will have to be normalized**# In[6]:def plotHist(img):plt.figure(figsize=(10,5))plt.subplot(1,2,1)plt.imshow(img, cmap='gray')plt.axis('off')histo = plt.subplot(1,2,2)histo.set_ylabel('Count')histo.set_xlabel('Pixel Intensity')plt.hist(img.flatten(), bins=10, lw=0, color='r', alpha=0.5)plotHist(img)# **Normalize and load the data**# In[7]:transformer = transform.Compose([transform.ToTensor(),transform.Normalize([0.6840562224388123, 0.5786514282226562, 0.5037682056427002],[0.3034113645553589, 0.35993242263793945, 0.39139702916145325])])# In[8]:bs = 50training = ImageFolder(path+'/train', transform=transformer)trainset, valset = train_test_split(training, test_size=0.05, shuffle=True, random_state=9)loaders = {'train':DataLoader(trainset, batch_size=bs, num_workers=4, pin_memory=False), #, num_workers=4, pin_memory=False'val': DataLoader(valset, batch_size=bs, num_workers=4, pin_memory=False)}dataset_sizes = {'train':len(trainset), 'val':len(valset)}# **Let's check the average and standard deviation of the images for each channel. As we can observe, the standard deviation is near one, and the mean is near zero, which is what we need**# In[9]:channels = 3for channel in range(channels):for x in ['train', 'val']:#number of pixels in the dataset = number of all pixels in one object * number of all objects in the datasetnum_pxl = dataset_sizes[x]*100*100#we go through the butches and sum up the pixels of the objects, #which then divide the sum by the number of all pixels to calculate the averagetotal_sum = 0for batch in loaders[x]:layer = list(map(itemgetter(channel), batch[0]))layer = torch.stack(layer, dim=0)total_sum += layer.sum()mean = total_sum / num_pxl#we calculate the standard deviation using the formula that I indicated abovesum_sqrt = 0for batch in loaders[x]: layer = list(map(itemgetter(channel), batch[0]))sum_sqrt += ((torch.stack(layer, dim=0) - mean).pow(2)).sum()std = torch.sqrt(sum_sqrt / num_pxl)print(f'|channel:{channel+1}| {x} - mean: {mean}, std: {std}')# In[10]:x, y = next(iter(loaders['train']))
x.mean(),  x.std()# In[11]:x, y = next(iter(loaders['train']))
img_norm = x[0].permute(1,2,0).numpy()
plotHist(img_norm)# **So we can see the number of classes, there are really a lot of them**# In[12]:len(training.classes)# **Since information is always better perceived visually, I will make a graph with the distribution of classes**# In[13]:dic = {}for classes in training.classes:for filename in os.listdir(path+'/train/'+classes):dic[classes] = [len([os.path.join(path+'/train/'+classes, filename) for filename in os.listdir(path+'/train/'+classes)])]train_samplesize = pd.DataFrame.from_dict(dic)# In[14]:train_samplesize# In[15]:figure_size = plt.rcParams["figure.figsize"]
figure_size[0] = 40
figure_size[1] = 20
plt.rcParams["figure.figsize"] = figure_sizesns.barplot(data=train_samplesize)index = np.arange(len(training.classes))plt.xlabel('Fruits', fontsize=25)
plt.ylabel('Count of Fruits', fontsize=25)
plt.xticks(index, training.classes, fontsize=15, rotation=90)
plt.title('Training Set Distrubution', fontsize=35)
plt.show()# **Let's look at the data itself, which we will need to work with**# In[16]:# Function for plotting samples
def plot_samples(samples):  fig, ax = plt.subplots(nrows=5, ncols=5, figsize=(15,12))i = 0for row in range(5):for col in range(5):img = mpimg.imread(samples[i][0][0])ax[row][col].imshow(img)ax[row][col].axis('off')ax[row][col].set_title(samples[i][1], fontsize=15)i+=1rand_samples = []
for _ in range(25): classes = random.choice(training.classes)rand_samples.append([random.sample([os.path.join(path+'/train/'+classes, filename) for filename in os.listdir(path+'/train/'+classes)], 1), classes])
rand_samples[0]
plot_samples(rand_samples)
plt.suptitle('Training Set Samples', fontsize=30)
plt.show()# # **3. Training**
# **I will use an ensemble of pre-trained models, the idea is this: I first train only the classifier on 10 epochs, then unfreeze the network and train all together for another 10 epochs**# **Let's write the accuracy function so that we don't have to write it several times**# In[17]:def accuracy(outputs, labels):_, preds = torch.max(outputs, dim=1) return torch.tensor(torch.sum(preds == labels).item() / len(preds)), preds# **Learning history for further visualization**# In[18]:#save the losses for further visualization
losses = {'train':[], 'val':[]}
accuracies = {'train':[], 'val':[]}# Train function structure:
#
# 1. **Classifier Training**
# 2. **Network-wide Training**# In[19]:def train(seed, epochs, model):print('Creating a model {}...'.format(seed))model.to(device)  criterion = nn.CrossEntropyLoss()if seed==2 or seed==3:optimizer = torch.optim.Adam(model.fc.parameters(), lr=0.001, betas=(0.9, 0.999), eps=1e-08, weight_decay=0)else:optimizer = torch.optim.Adam(model.classifier.parameters(), lr=0.001, betas=(0.9, 0.999), eps=1e-08, weight_decay=0)scheduler = torch.optim.lr_scheduler.ReduceLROnPlateau(optimizer, mode='max', factor=0.1, patience=3, verbose=True)scheduler = torch.optim.lr_scheduler.StepLR(optimizer, 4, gamma=0.1)since = time.time()best_model = copy.deepcopy(model.state_dict())best_acc = 0.0for epoch in range(epochs):for phase in ['train', 'val']:if phase == 'train':model.train()else:model.eval()running_loss = 0.0running_corrects = 0.0for inputs, labels in loaders[phase]:inputs, labels = inputs.to(device), labels.to(device)optimizer.zero_grad()with torch.set_grad_enabled(phase=='train'):outp = model(inputs)_, pred = torch.max(outp, 1)loss = criterion(outp, labels)if phase == 'train':loss.backward()optimizer.step()running_loss += loss.item()*inputs.size(0)running_corrects += torch.sum(pred == labels.data)if phase == 'train':acc = 100. * running_corrects.double() / dataset_sizes[phase]scheduler.step(acc)epoch_loss = running_loss / dataset_sizes[phase]epoch_acc = running_corrects.double()/dataset_sizes[phase]losses[phase].append(epoch_loss)accuracies[phase].append(epoch_acc)if phase == 'train':print('Epoch: {}/{}'.format(epoch+1, epochs))print('{} - loss:{}, accuracy{}'.format(phase, epoch_loss, epoch_acc))if phase == 'val':print('Time: {}m {}s'.format((time.time()- since)//60, (time.time()- since)%60))print('=='*31)if phase == 'val' and epoch_acc > best_acc:best_acc = epoch_accbest_model = copy.deepcopy(model.state_dict())#scheduler.step() time_elapsed = time.time() - sinceprint('CLASSIFIER TRAINING TIME {}m {}s'.format(time_elapsed//60, time_elapsed%60))print('=='*31)model.load_state_dict(best_model)for param in model.parameters():param.requires_grad=Trueoptimizer = torch.optim.Adam(model.parameters(), lr=0.0001, betas=(0.9, 0.999), eps=1e-08, weight_decay=0)  scheduler = torch.optim.lr_scheduler.ReduceLROnPlateau(optimizer, factor=0.1, patience=2, verbose=True)#scheduler = torch.optim.lr_scheduler.StepLR(optimizer, 4, gamma=0.1)for epoch in range(epochs):for phase in ['train', 'val']:if phase == 'train':model.train()else:model.eval()running_loss = 0.0running_corrects = 0.0for inputs, labels in loaders[phase]:inputs, labels = inputs.to(device), labels.to(device)optimizer.zero_grad()with torch.set_grad_enabled(phase=='train'):outp = model(inputs)_, pred = torch.max(outp, 1)loss = criterion(outp, labels)if phase == 'train':loss.backward()optimizer.step()running_loss += loss.item()*inputs.size(0)running_corrects += torch.sum(pred == labels.data)if phase == 'train':acc = 100. * running_corrects.double() / dataset_sizes[phase]scheduler.step(acc)epoch_loss = running_loss / dataset_sizes[phase]epoch_acc = running_corrects.double()/dataset_sizes[phase]losses[phase].append(epoch_loss)accuracies[phase].append(epoch_acc)if phase == 'train':print('Epoch: {}/{}'.format(epoch+1, epochs))print('{} - loss:{}, accuracy{}'.format(phase, epoch_loss, epoch_acc))if phase == 'val':print('Time: {}m {}s'.format((time.time()- since)//60, (time.time()- since)%60))print('=='*31)    if phase == 'val' and epoch_acc > best_acc:best_acc = epoch_accbest_model = copy.deepcopy(model.state_dict())#scheduler.step() time_elapsed = time.time() - sinceprint('ALL NET TRAINING TIME {}m {}s'.format(time_elapsed//60, time_elapsed%60))print('=='*31)model.load_state_dict(best_model)return model# **Uploading models**# In[20]:
densenet121_0 = torchvision.models.densenet121(pretrained=True)
for param in densenet121_0.parameters():param.requires_grad=False
densenet121_0.classifier = nn.Linear(in_features=densenet121_0.classifier.in_features, out_features=len(training.classes), bias=True)# In[21]:
densenet121_1 = torchvision.models.densenet121(pretrained=True)
for param in densenet121_1.parameters():param.requires_grad=False
densenet121_1.classifier = nn.Linear(in_features=densenet121_1.classifier.in_features, out_features=len(training.classes), bias=True)# In[22]:
googlenet = torchvision.models.googlenet(pretrained=True)
for param in googlenet.parameters():param.grad_requires = False
googlenet.fc = nn.Linear(in_features=googlenet.fc.in_features, out_features=len(training.classes), bias=True)# In[23]:
resnet101 = torchvision.models.resnet101(pretrained=True)
for param in resnet101.parameters():param.grad_requires = False
resnet101.fc = nn.Linear(in_features=resnet101.fc.in_features, out_features=len(training.classes), bias=True)# In[24]:
vgg19_bn = torchvision.models.vgg19_bn(pretrained=True)
for param in vgg19_bn.parameters():param.grad_requires = False
vgg19_bn.classifier[6] = nn.Linear(4096, len(training.classes), bias=True)# In[25]:
# torch.save(densenet121_0.state_dict(), 'densenet121_0.pth')
# torch.save(densenet121_1.state_dict(), 'densenet121_1.pth')
# torch.save(googlenet.state_dict(), 'googlenet.pth')
# torch.save(resnet101.state_dict(), 'resnet101.pth')
# torch.save(vgg19_bn.state_dict(), 'vgg19_bn.pth')# In[26]:
# **Launching training**
num_models = 5
epochs = 10
models = [densenet121_0, densenet121_1, googlenet, resnet101, vgg19_bn]
for seed in range(num_models):train(seed=seed, epochs=epochs, model=models[seed])
# In[38]:
# # **4. Test**
# **Visualization of training. As we can see, after defrosting, the indicators have improved**
fig, ax = plt.subplots(5, 2, figsize=(15, 15))
modelname = ['DenseNet_0', 'DenseNet_1', 'GooglNet', 'ResNet101', 'VGG19 with BN']
epochs=10
i=0
for row in range(5):trainaccarr=[]valaccarr=[]trainlosarr=[]vallosarr=[]for k in range(20):trainaccarr.append(accuracies['train'][i+k].item())valaccarr.append(accuracies['val'][i+k].item())trainlosarr.append(losses['train'][i+k])vallosarr.append(losses['val'][i+k])epoch_list = list(range(1,epochs*2+1))ax[row][0].plot(epoch_list, trainaccarr, '-o', label='Train Accuracy')ax[row][0].plot(epoch_list, valaccarr, '-o', label='Validation Accuracy')ax[row][0].plot([epochs for x in range(20)],  np.linspace(min(trainaccarr), max(trainaccarr), 20), color='r', label='Unfreeze net')ax[row][0].set_xticks(np.arange(0, epochs*2+1, 5))ax[row][0].set_ylabel('Accuracy Value')ax[row][0].set_xlabel('Epoch')ax[row][0].set_title('Accuracy {}'.format(modelname[row]))ax[row][0].legend(loc="best")ax[row][1].plot(epoch_list, trainlosarr, '-o', label='Train Loss')ax[row][1].plot(epoch_list, vallosarr, '-o',label='Validation Loss')ax[row][1].plot([epochs for x in range(20)], np.linspace(min(trainlosarr), max(trainlosarr), 20), color='r', label='Unfreeze net')ax[row][1].set_xticks(np.arange(0, epochs*2+1, 5))ax[row][1].set_ylabel('Loss Value')ax[row][1].set_xlabel('Epoch')ax[row][1].set_title('Loss {}'.format(modelname[row]))ax[row][1].legend(loc="best")fig.tight_layout()fig.subplots_adjust(top=1.5, wspace=0.3)i+=20# **Let's write a model class that contains 5 already trained models**# In[39]:class Ensemble(nn.Module):def __init__(self, device):super(Ensemble,self).__init__()# you should use nn.ModuleList. Optimizer doesn't detect python list as parametersself.models = nn.ModuleList(models)def forward(self, x):# it is super simple. just forward num_ models and concat it.output = torch.zeros([x.size(0), len(training.classes)]).to(device)for model in self.models:output += model(x)return output# In[40]:model =  Ensemble(device)# **Let's write some functions that will help us make predictions and load the test data**# In[41]:def validation_step(batch):images,labels = batchimages,labels = images.to(device),labels.to(device)out = model(images)                                      loss = F.cross_entropy(out, labels)                    acc,preds = accuracy(out, labels)                       return {'val_loss': loss.detach(), 'val_acc':acc.detach(), 'preds':preds.detach(), 'labels':labels.detach()}# In[42]:def test_prediction(outputs):batch_losses = [x['val_loss'] for x in outputs]epoch_loss = torch.stack(batch_losses).mean()           batch_accs = [x['val_acc'] for x in outputs]epoch_acc = torch.stack(batch_accs).mean()             # combine predictionsbatch_preds = [pred for x in outputs for pred in x['preds'].tolist()] # combine labelsbatch_labels = [lab for x in outputs for lab in x['labels'].tolist()]  return {'test_loss': epoch_loss.item(), 'test_acc': epoch_acc.item(),'test_preds': batch_preds, 'test_labels': batch_labels}# In[43]:@torch.no_grad()
def test_predict(model, test_loader):model.eval()# perform testing for each batchoutputs = [validation_step(batch) for batch in test_loader] results = test_prediction(outputs)                          print('test_loss: {:.4f}, test_acc: {:.4f}'.format(results['test_loss'], results['test_acc']))return results['test_preds'], results['test_labels']# In[44]:testset = ImageFolder(path+'/test', transform=transformer)# In[45]:test_dl = DataLoader(testset, batch_size=256)
model.to(device)
preds,labels = test_predict(model, test_dl)# # **4. Metrics**# **To visualize the data qualitatively, we need to normalize it back, that is, to return the pixel brightness distribution to its original state. This is what the function below does**# In[46]:def norm_out(img):img = img.permute(1,2,0)mean = torch.FloatTensor([0.6840562224388123, 0.5786514282226562, 0.5037682056427002])std = torch.FloatTensor([0.3034113645553589, 0.35993242263793945, 0.39139702916145325])img = img*std + meanreturn np.clip(img,0,1)# **Let's see how confident the network is in its predictions, as you can see, the network has trained well and gives confident predictions**# In[47]:fig, ax = plt.subplots(figsize=(8,12), ncols=2, nrows=4)for row in range(4):i = np.random.randint(0, high=len(testset))img,label = testset[i]m = nn.Softmax(dim=1)percent = m(model(img.to(device).unsqueeze(0)))predmax3percent = torch.sort(percent[0])[0][-3:]predmax3inds = torch.sort(percent[0])[1][-3:]classes = np.array([training.classes[predmax3inds[-3]], training.classes[predmax3inds[-2]],training.classes[predmax3inds[-1]]])class_name = training.classesax[row][0].imshow(norm_out(img))ax[row][0].set_title('Real : {}'.format(class_name[label]))ax[row][0].axis('off')ax[row][1].barh(classes, predmax3percent.detach().cpu().numpy())ax[row][1].set_aspect(0.1)ax[row][1].set_yticks(classes)ax[row][1].set_title('Predicted Class: {} ({}%)'.format(training.classes[predmax3inds[-1]], round((predmax3percent[-1]*100).item(), 2)))ax[row][1].set_xlim(0, 1.)plt.tight_layout()# **Here you can see the main metrics for each individual class**# In[48]:report = classification_report(labels, preds,output_dict=True,target_names=training.classes)
report_df = pd.DataFrame(report).transpose()# In[49]:pd.set_option("display.max_rows", None)
report_df.head(134)# ***I am always happy to receive any feedback. What do you think can be changed and what can be removed?***
相关文章:

Kaggle-水果图像分类银奖项目 pytorch Densenet GoogleNet ResNet101 VGG19
一些原理文章 卷积神经网络基础(卷积,池化,激活,全连接) - 知乎 PyTorch 入门与实践(六)卷积神经网络进阶(DenseNet)_pytorch conv1x1_Skr.B的博客-CSDN博客GoogLeNet网…...
TPLink-Wr702N 通过OpenWrt系统打造打印服务器实现无线打印
最近淘到了一个TPLink-Wr702N路由器,而且里面已经刷机为OpenWrt系统了,刚好家里有一台老的USB打印机,就想这通过路由器将打印机改为无线打印机,一番折腾后,居然成功了,这里记录下实现过程,为后面…...

[UGUI]实现从一个道具栏拖拽一个UI道具到另一个道具栏
在Unity游戏开发中,实现UI道具的拖拽功能是一项常见的需求。本文将详细介绍如何使用Unity的UGUI系统和事件系统,实现从一个道具栏拖拽一个UI道具到另一个道具栏的功能。 一、准备工作 首先,你需要在Unity中创建两个道具栏和一些UI道具。道具…...

微服务--08--Seata XA模式 AT模式
提示:文章写完后,目录可以自动生成,如何生成可参考右边的帮助文档 文章目录 分布式事务Seata 1.XA模式1.1.两阶段提交1.2.Seata的XA模型1.3.优缺点 AT模式2.1.Seata的AT模型2.2.流程梳理2.3.AT与XA的区别 分布式事务 > 事务–01—CAP理论…...

Doris 数据导入一:Broker Load 方式
1.Doris导入数据的方式总结 导入(Load)功能就是将用户的原始数据导入到 Doris 中。导入成功后,用户即可通过 Mysql 客户端查询数据。为适配不同的数据导入需求,Doris 系统提供了6种不同的导入方式。每种导入方式支持不同的数据源,存在不同的使用方式(异步,同步)。 所有…...

docker踩坑记录:docker容器创建doris容器间无法通讯问题
背景: 开发大数据平台,使用doris作为数据仓储,使用docker做集群部署,先进行开发环境搭建,环境为BE1;FE1,原来使用官方例子,但是官方例子是创建了一个bridge使用172.20.80.0/24通讯,…...

springboot+java校园自助洗衣机预约系统的分析与设计ssm+jsp
洗衣服是每个人都必须做的事情,而洗衣机更成为了人们常见的电器,但是单个洗衣机价格不菲,如果每人都买,就会造成资源的冗余。所有就出现了公用设备,随着时代的发展,很多公用都开始向着无人看守的自助模式经…...

TCP简介及特性
1. TCP协议简介 TCP是Transmission Control Protocol的简称,中文名是传输控制协议。它是一种面向连接的、可靠的、基于IP的传输层协议。两个TCP应用之间在传输数据的之前必须建立一个TCP连接,TCP采用数据流的形式在网络中传输数据。TCP为了保证报文传输的…...

ElasticSearch 排障常用方法
文章目录 1,集群状态,节点在线情况,集群参数配置2,查看异常索引、分片,分析异常原因,手动分配分片 1,集群状态,节点在线情况,集群参数配置 GET _cluster/health?pretty…...
】136 - QNX 如何抓取系统 log 方法 之 网络部分日志抓取方法)
【SA8295P 源码分析 (四)】136 - QNX 如何抓取系统 log 方法 之 网络部分日志抓取方法
【SA8295P 源码分析】136 - QNX 如何抓取系统 log 方法 之 网络部分日志抓取方法 一、slog2info二、获取当前系统网络信息三、tracelogger四、qscan.sh : 用于收集 qnx 文件系统 权限、checksums 等信息系列文章汇总见:《【SA8295P 源码分析 (四)】网络模块 文章链接汇总 - 持…...
算法)
传统算法:使用Pygame实现SVM(支持向量机)算法
使用 Pygame 演示了支持向量机(SVM)在二维数据上的分类过程。以下是代码的主要步骤和原理解释: 1、初始化和基本设置 Pygame 初始化: 通过 pygame.init() 初始化 Pygame。 定义颜色和屏幕大小: 定义了一些颜色常量(WHITE, BLACK, RED, BLUE)和屏幕的宽度和高度。 创建…...

cookie wzws_sess** 逆向
声明 本文章中所有内容仅供学习交流,抓包内容、敏感网址、数据接口均已做脱敏处理,严禁用于商业用途和非法用途,否则由此产生的一切后果均与作者无关,若有侵权,请联系我立即删除! 网站: aHR0…...
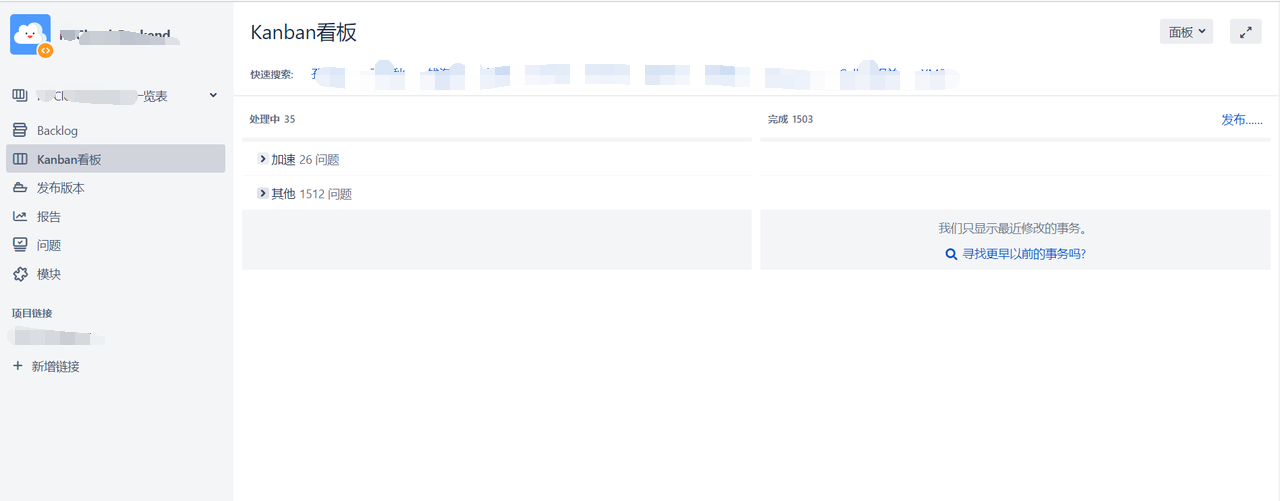
JIRA 基本使用
该页面可以: 查看个人基本信息以及归属的邮件组修改常用参数配置查看指给自己的 Open 问题查看自己最近的活动记录等 权限管理 Project 权限管理 JIRA 项目有三种通用权限方案: 公开权限方案(默认禁止使用此方案):…...
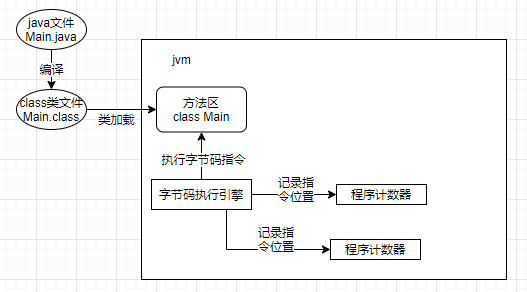
什么是JVM的内存模型?详细阐述Java中局部变量、常量、类名等信息在JVM中的存储位置
导航: 【Java笔记踩坑汇总】Java基础JavaWebSSMSpringBootSpringCloud瑞吉外卖/黑马旅游/谷粒商城/学成在线设计模式面试题汇总性能调优/架构设计源码-CSDN博客 目录 一、JVM基本介绍 二、JVM内存模型 2.0 概述 2.1 类加载子系统 2.2 运行时数据区 2.2.0 基本…...
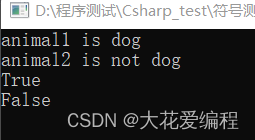
c#学习相关系列之as和is的相关用法
一、子类和父类的关系 public class Program{static void Main(string[] args){Animal animal new Dog();// Dog dog (Dog)new Animal(); 编译成功,运行报错Dog dog (Dog)animal;Dog dog new Dog();Animal animal dog; //等价于Animal animal new Dog();}}pub…...
excel合并单元格教程
在表格里,总是会遇到一级表格、二级表格的区别,这时候一级表格会需要合并成一个大格子,那么excel如何合并单元格呢,其实使用快捷键或者功能键就可以了。 excel如何合并单元格: 1、首先我们用鼠标选中所有要合并的单元…...
img[src=““] img无路径情况下,页面出现边框
在开发过程中遇到一个问题就是当img标签的src为空时,会出现边框,影响美观 其实我们可以直接加上这个就可以解决了 img[src""],img:not([src]){opacity:0; }...
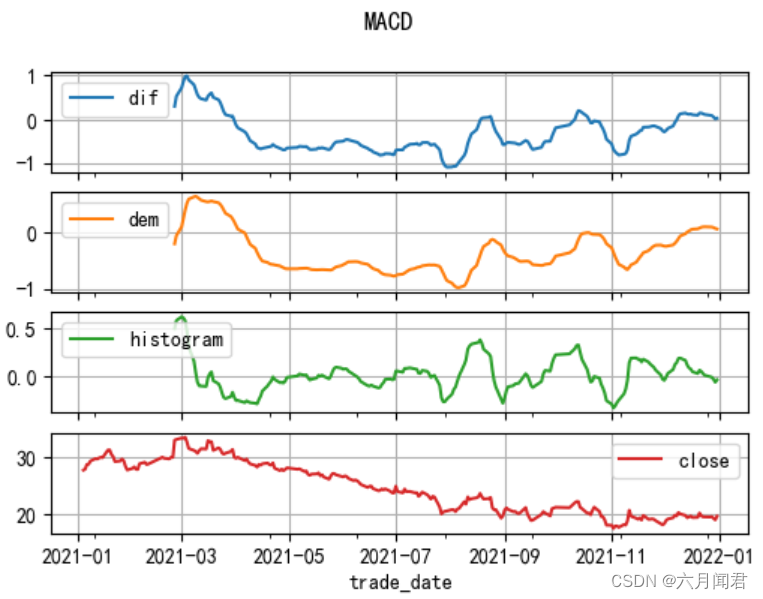
TA-Lib学习研究笔记(八)——Momentum Indicators 上
TA-Lib学习研究笔记(八)——Momentum Indicators 上 Momentum Indicators 动量指标,是最重要的股票分析指标,能够通过数据量化分析价格、成交量,预测股票走势和强度,大部分指标都在股票软件中提供。 1. A…...
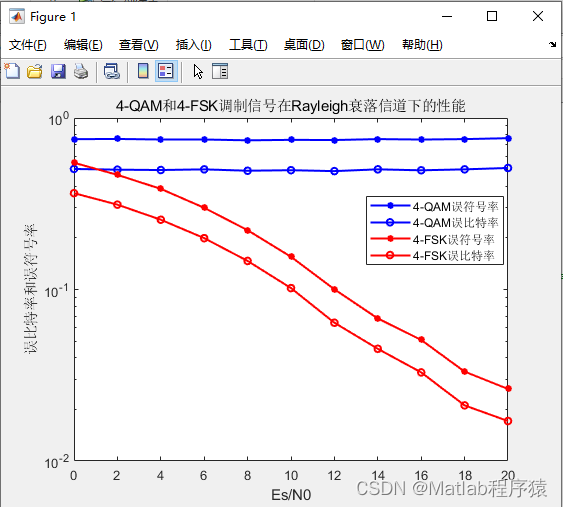
【MATLAB源码-第91期】基于matlab的4QAM和4FSK在瑞利(rayleigh)信道下误码率对比仿真。
操作环境: MATLAB 2022a 1、算法描述 正交幅度调制(QAM,Quadrature Amplitude Modulation)是一种在两个正交载波上进行幅度调制的调制方式。这两个载波通常是相位差为90度(π/2)的正弦波,因此…...

pywin32后台键鼠
1 后台键鼠操作 组合键不生效,并且按键按下会触发两次,不知道为什么?有大佬知道了,请指教一下! import time import win32api import win32con import win32guiclass VirtualKeyboard:def __init__(self, hwnd):self…...
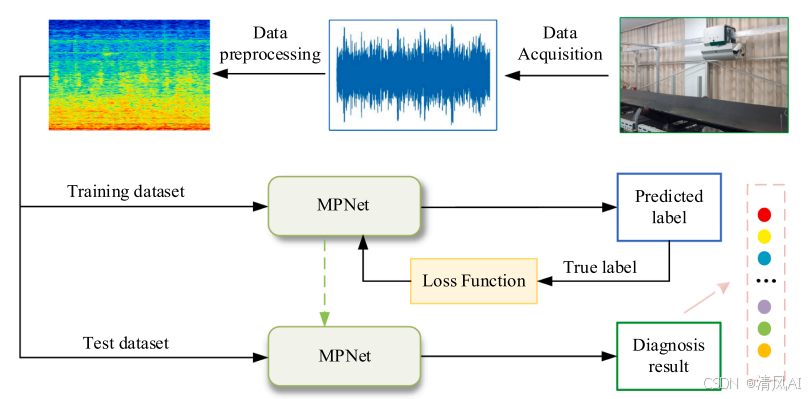
MPNet:旋转机械轻量化故障诊断模型详解python代码复现
目录 一、问题背景与挑战 二、MPNet核心架构 2.1 多分支特征融合模块(MBFM) 2.2 残差注意力金字塔模块(RAPM) 2.2.1 空间金字塔注意力(SPA) 2.2.2 金字塔残差块(PRBlock) 2.3 分类器设计 三、关键技术突破 3.1 多尺度特征融合 3.2 轻量化设计策略 3.3 抗噪声…...

conda相比python好处
Conda 作为 Python 的环境和包管理工具,相比原生 Python 生态(如 pip 虚拟环境)有许多独特优势,尤其在多项目管理、依赖处理和跨平台兼容性等方面表现更优。以下是 Conda 的核心好处: 一、一站式环境管理:…...
通过Wrangler CLI在worker中创建数据库和表
官方使用文档:Getting started Cloudflare D1 docs 创建数据库 在命令行中执行完成之后,会在本地和远程创建数据库: npx wranglerlatest d1 create prod-d1-tutorial 在cf中就可以看到数据库: 现在,您的Cloudfla…...
渗透实战PortSwigger靶场-XSS Lab 14:大多数标签和属性被阻止
<script>标签被拦截 我们需要把全部可用的 tag 和 event 进行暴力破解 XSS cheat sheet: https://portswigger.net/web-security/cross-site-scripting/cheat-sheet 通过爆破发现body可以用 再把全部 events 放进去爆破 这些 event 全部可用 <body onres…...

2024年赣州旅游投资集团社会招聘笔试真
2024年赣州旅游投资集团社会招聘笔试真 题 ( 满 分 1 0 0 分 时 间 1 2 0 分 钟 ) 一、单选题(每题只有一个正确答案,答错、不答或多答均不得分) 1.纪要的特点不包括()。 A.概括重点 B.指导传达 C. 客观纪实 D.有言必录 【答案】: D 2.1864年,()预言了电磁波的存在,并指出…...

STM32标准库-DMA直接存储器存取
文章目录 一、DMA1.1简介1.2存储器映像1.3DMA框图1.4DMA基本结构1.5DMA请求1.6数据宽度与对齐1.7数据转运DMA1.8ADC扫描模式DMA 二、数据转运DMA2.1接线图2.2代码2.3相关API 一、DMA 1.1简介 DMA(Direct Memory Access)直接存储器存取 DMA可以提供外设…...

【ROS】Nav2源码之nav2_behavior_tree-行为树节点列表
1、行为树节点分类 在 Nav2(Navigation2)的行为树框架中,行为树节点插件按照功能分为 Action(动作节点)、Condition(条件节点)、Control(控制节点) 和 Decorator(装饰节点) 四类。 1.1 动作节点 Action 执行具体的机器人操作或任务,直接与硬件、传感器或外部系统…...
)
python爬虫:Newspaper3k 的详细使用(好用的新闻网站文章抓取和解析的Python库)
更多内容请见: 爬虫和逆向教程-专栏介绍和目录 文章目录 一、Newspaper3k 概述1.1 Newspaper3k 介绍1.2 主要功能1.3 典型应用场景1.4 安装二、基本用法2.2 提取单篇文章的内容2.2 处理多篇文档三、高级选项3.1 自定义配置3.2 分析文章情感四、实战案例4.1 构建新闻摘要聚合器…...
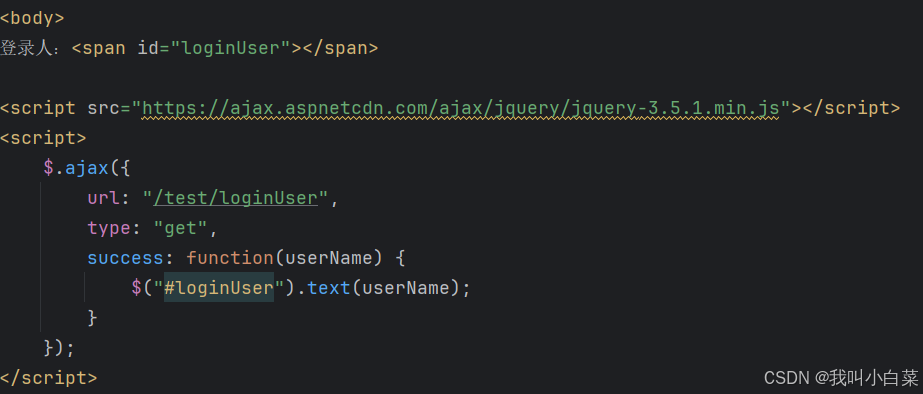
【Java_EE】Spring MVC
目录 Spring Web MVC 编辑注解 RestController RequestMapping RequestParam RequestParam RequestBody PathVariable RequestPart 参数传递 注意事项 编辑参数重命名 RequestParam 编辑编辑传递集合 RequestParam 传递JSON数据 编辑RequestBody …...
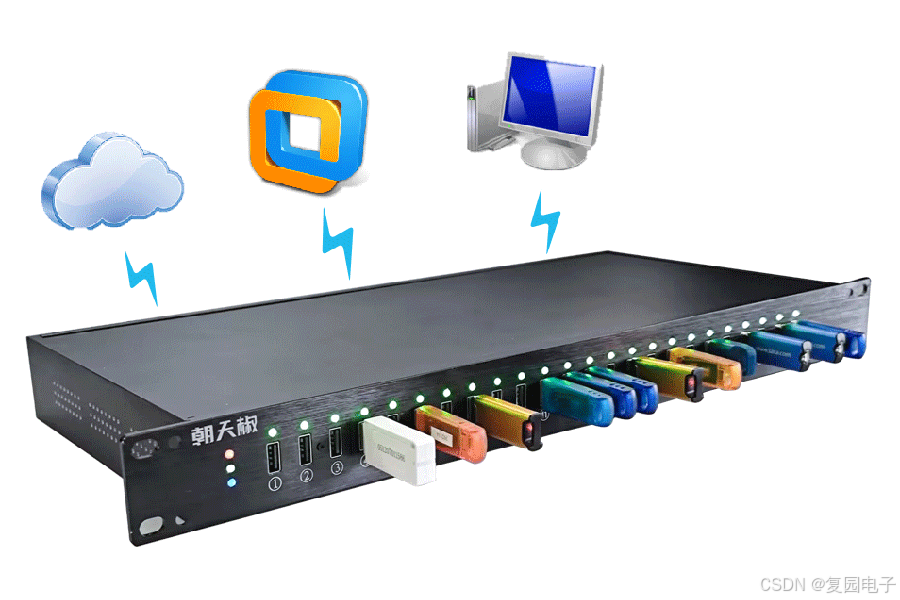
USB Over IP专用硬件的5个特点
USB over IP技术通过将USB协议数据封装在标准TCP/IP网络数据包中,从根本上改变了USB连接。这允许客户端通过局域网或广域网远程访问和控制物理连接到服务器的USB设备(如专用硬件设备),从而消除了直接物理连接的需要。USB over IP的…...
