Unity Image - 镜像
1、为什么要使用镜像
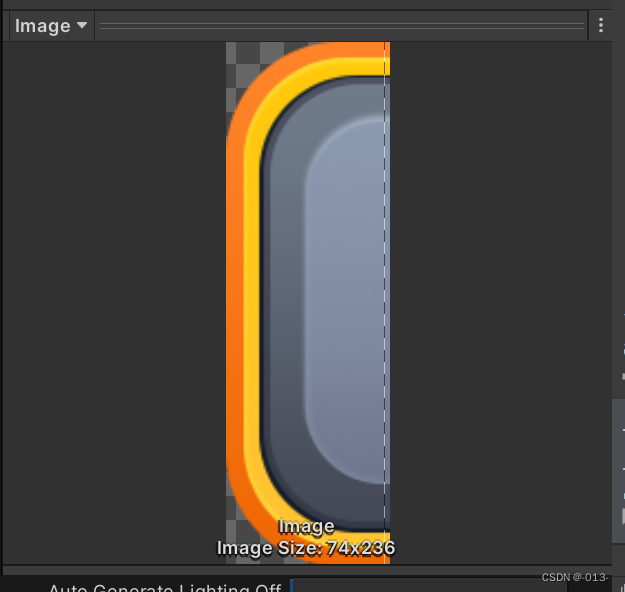
在游戏开发过程中,我们经常会为了节省 美术图片资源大小,美术会将两边相同的图片进行切一半来处理。如下所示一个按钮 需要 400 * 236,然而美术只需要切一张 74*236的大小就可以了。这样一来图集就可以容纳更多的图片。内存占用也更少。

2.实现方案
- 拷贝一张图片,然后把 scale改成-1,这种方法比较笨,需要多加一张图片,操作起来也很不方便。没啥好讲的。
- 拷贝原有的图片顶点,进行对称处理。如下图所示。

3.在哪里拿到mesh顶点?修改顶点?
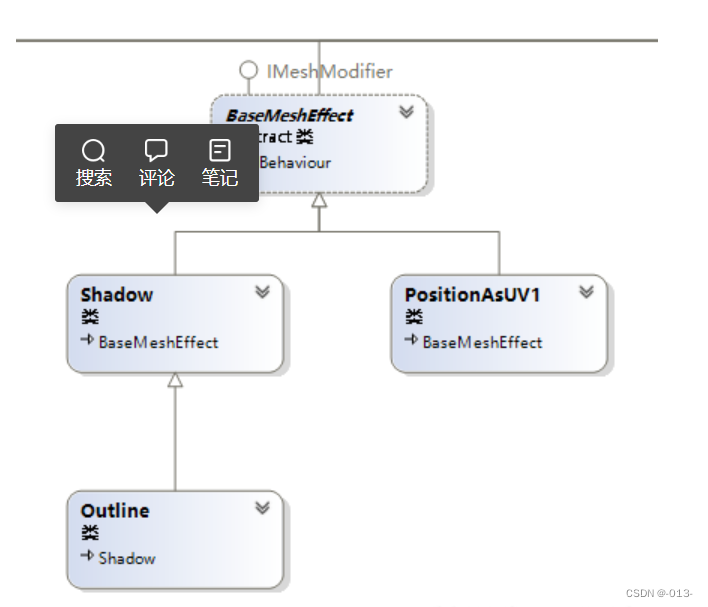
BaseMeshEffect :是用于实现网格效果的抽象类实现IMeshModifier接口,是Shadow、Outline等效果的基类。
从Unity uGUI原理解析-Graphic可以知道,Graphic 在执行 DoMeshGeneration 时会获取到当前GameObject上的所有实现 IMeshModifier 的组件。 并且会调用 ModifyMesh 方法来修改当前Graphic 的Mesh数据。BaseMeshEffect 的类结构图如下:
我们编写一个MirrorImage来继承BaseMeshEffect,拿到 VertexHelper,获取网格的顶点流数据,然后进行下面的镜像,映射操作:
using System.Collections.Generic;
using Sirenix.OdinInspector;
using UnityEngine;
using UnityEngine.UI;public enum MirrorType
{Horizontal,Vertical,HorizontalAndVertical
}[RequireComponent(typeof(Image))]
public class MirrorImage : BaseMeshEffect
{public MirrorType mirrorType = MirrorType.Horizontal;public Dictionary<Image.Type, IMirror> MirrorDic = new Dictionary<Image.Type, IMirror>(){{Image.Type.Simple, new SimpleMirror()},{Image.Type.Sliced, new SlicedMirror()},{Image.Type.Tiled, new TiledMirror()},{Image.Type.Filled, new FilledMirror()},};public Image image => graphic as Image;public override void ModifyMesh(VertexHelper vh){if (!IsActive()) return;Image.Type imageType = (graphic as Image).type;List<UIVertex> vertices = new List<UIVertex>();vh.GetUIVertexStream(vertices);vh.Clear();MirrorDic[imageType].Draw(image, vertices, mirrorType);vh.AddUIVertexTriangleStream(vertices);}[Button("Set Native Size")]public void SetNativeSize(){if (image.sprite != null){float w = image.sprite.rect.width / image.pixelsPerUnit;float h = image.sprite.rect.height / image.pixelsPerUnit;image.rectTransform.anchorMax = image.rectTransform.anchorMin;float x = mirrorType == MirrorType.Horizontal || mirrorType == MirrorType.HorizontalAndVertical ? 2 : 1;float y = mirrorType == MirrorType.Vertical || mirrorType == MirrorType.HorizontalAndVertical ? 2 : 1;image.rectTransform.sizeDelta = new Vector2(w * x, h * y);image.SetAllDirty();}}
}
当然除了继承BaseMeshEffect,当然还可以直接继承Image,重写OnPopulateMesh。
4.如何实现顶点的镜像?
很简单 假设中心的是 center( 0,0),需要水平镜像的点 A(-1,0) 镜像后的点就是 B(-1,0)需要满足 A 到Center的距离 == B到center的距离:
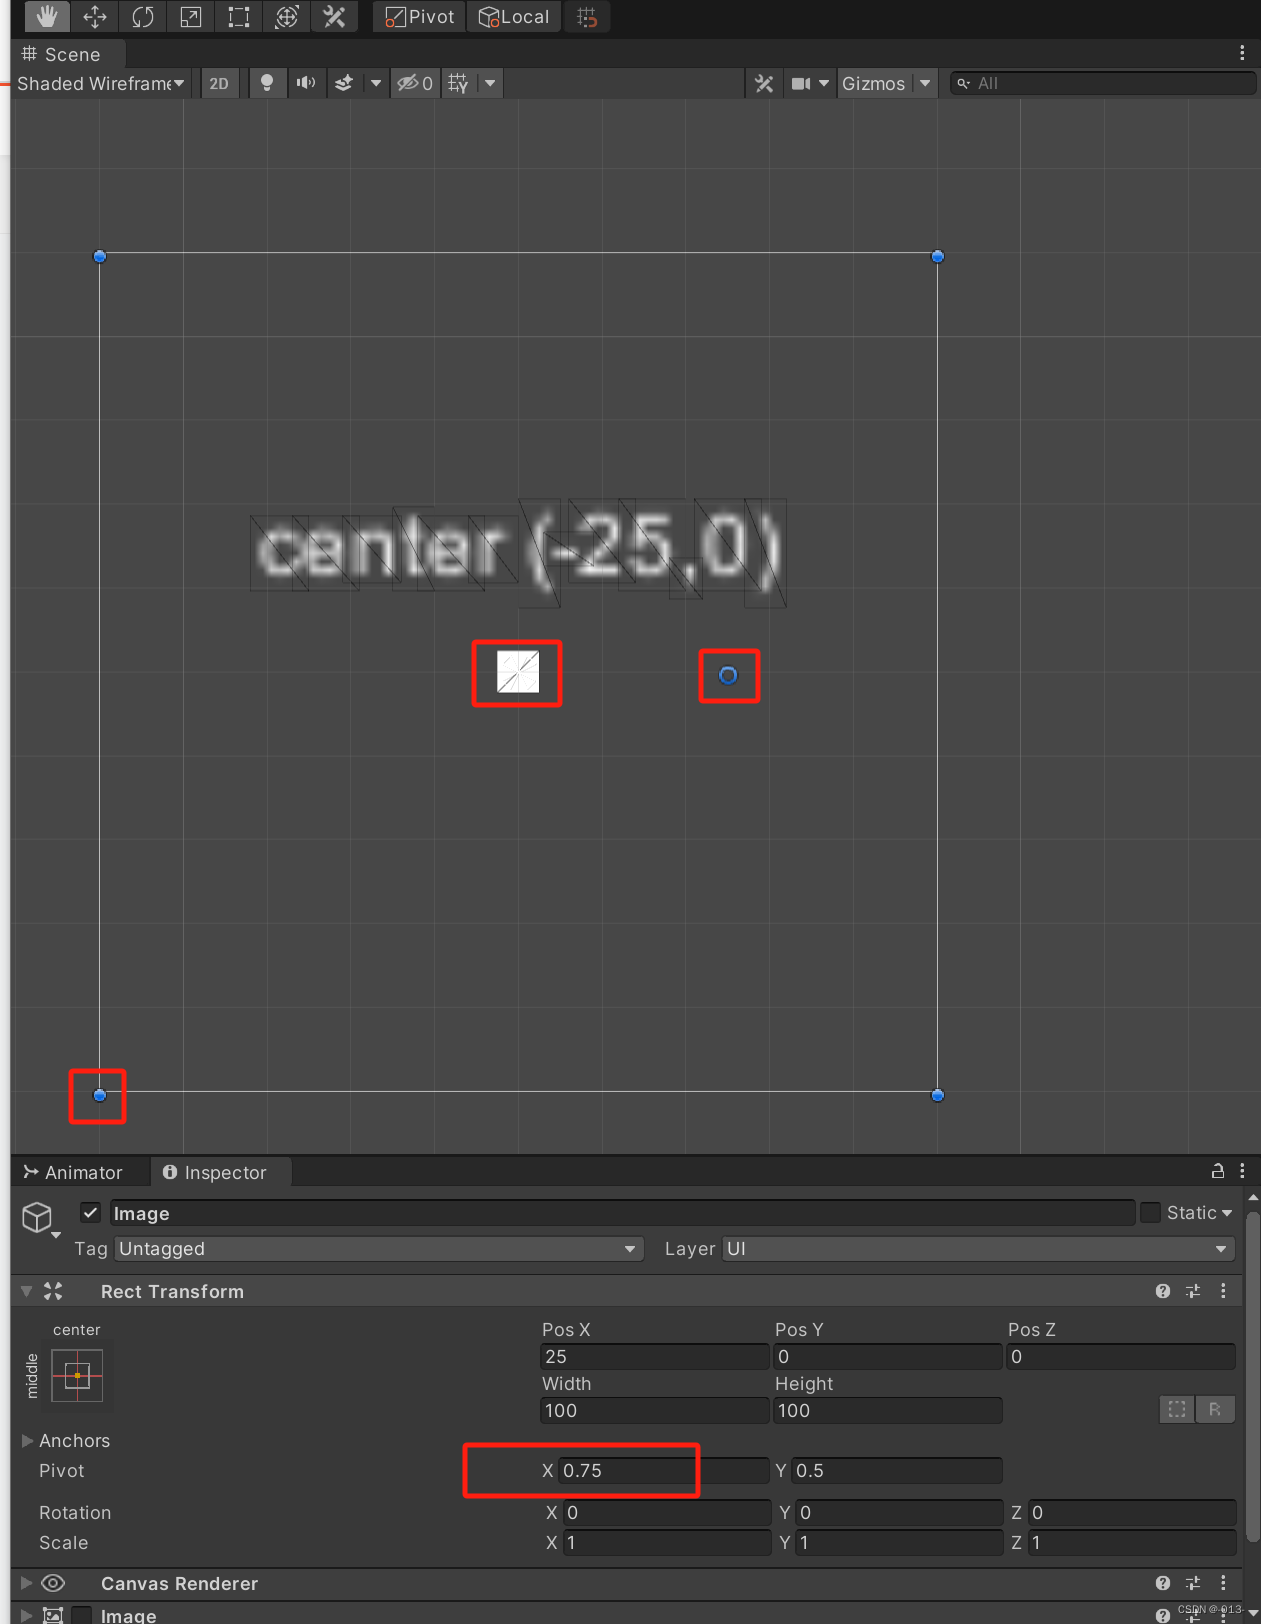
所以我们先求出镜像的中心点 center的位置 ,因为矩形有自己的中心点位置,我们需要求出镜像的中心点位置在改矩形下的坐标,这么说可能有点绕看下图:
矩形的宽w:100,h:100,矩形自身的中心点(蓝色的圈) 这边为称为O点,在Unity中是以 Rect中的 x,y代表的是坐下角的点 既 (-75,-50),
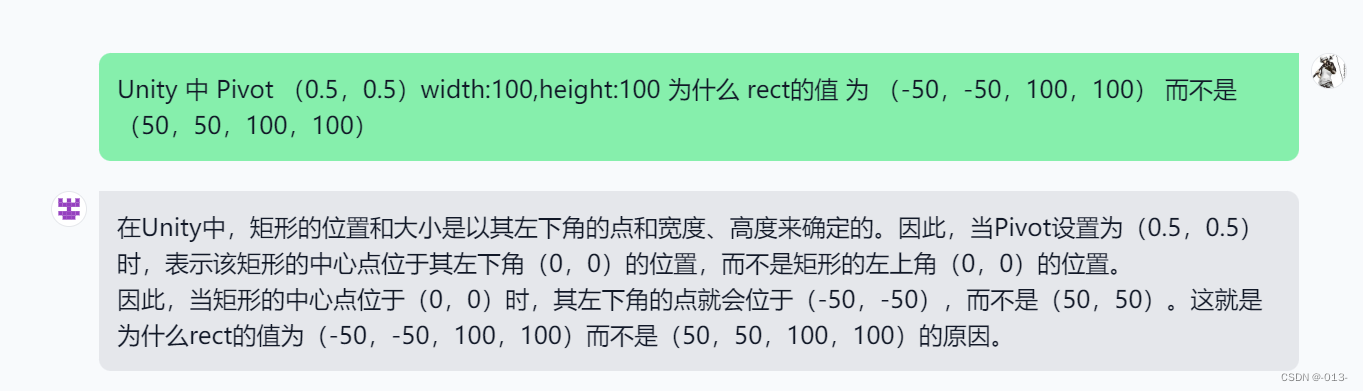
对于Rect(x,y) 不理解的话可以看下GPT的回答,可能比我讲的清楚:
那么镜像真正的中心点坐标
- center.x = rect.x + rect.width;
- center.y = rect.y + rect.height;
那么要镜像的点 A 镜像后为B ,需要求出A到center的长度大小然后取反 + 矩形中心点与镜像中心点的偏移
B.x = -(A.x - center.x) + (rect.x+rect.width/2)
B.y = -(A.y - center.y) + (rect.x+rect.width/2)
逻辑分析完了,直接看代码吧:
using System.Collections.Generic;
using UnityEngine;public static class MirrorUtlis
{public static void Mirror(Rect rect,List<UIVertex> uiVertices,MirrorType type){int count = uiVertices.Count;switch (type){case MirrorType.Horizontal:Mirror(rect, uiVertices, type, count);break;case MirrorType.Vertical:Mirror(rect, uiVertices, type, count);break;case MirrorType.HorizontalAndVertical:Mirror(rect, uiVertices, MirrorType.Horizontal, count);Mirror(rect, uiVertices, MirrorType.Vertical, 2 * count);break;}RemoveVertices(uiVertices);}private static void Mirror(Rect rect, List<UIVertex> uiVertices, MirrorType type, int count){for (int i = 0; i < count; i++){UIVertex vertex = uiVertices[i];switch (type){case MirrorType.Horizontal:vertex = HorizontalMirror(rect, vertex);break;case MirrorType.Vertical:vertex = VerticalMirror(rect, vertex);break;case MirrorType.HorizontalAndVertical:vertex = HorizontalMirror(rect, vertex);vertex = VerticalMirror(rect, vertex);break;}uiVertices.Add(vertex);}}private static UIVertex HorizontalMirror(Rect rect, UIVertex vertex){float center = rect.width / 2 + rect.x;vertex.position.x = -(vertex.position.x - center) + rect.x + rect.width/2;return vertex;}private static UIVertex VerticalMirror(Rect rect, UIVertex vertex){float center = rect.height / 2 + rect.y;vertex.position.y = -(vertex.position.y - center) + rect.y + rect.height/2;return vertex;}// 移除构不成三角形的顶点private static void RemoveVertices(List<UIVertex> uiVertices){int end = uiVertices.Count;for (int i = 2; i < end; i += 3){UIVertex v1 = uiVertices[i];UIVertex v2 = uiVertices[i - 1];UIVertex v3 = uiVertices[i - 2];if (v1.position == v2.position ||v1.position == v3.position ||v2.position == v3.position){// 移动到尾部ChaneVertices(uiVertices, i - 1, end - 3);ChaneVertices(uiVertices, i - 2, end - 2);ChaneVertices(uiVertices, i, end - 1);end -= 3;}}if(end < uiVertices.Count)uiVertices.RemoveRange(end,uiVertices.Count - end);}private static void ChaneVertices(List<UIVertex> uiVertices,int a,int b){(uiVertices[a], uiVertices[b]) = (uiVertices[b], uiVertices[a]);}
}
在顶点镜像前我们需要对顶点进行顶点映射,什么时时映射?
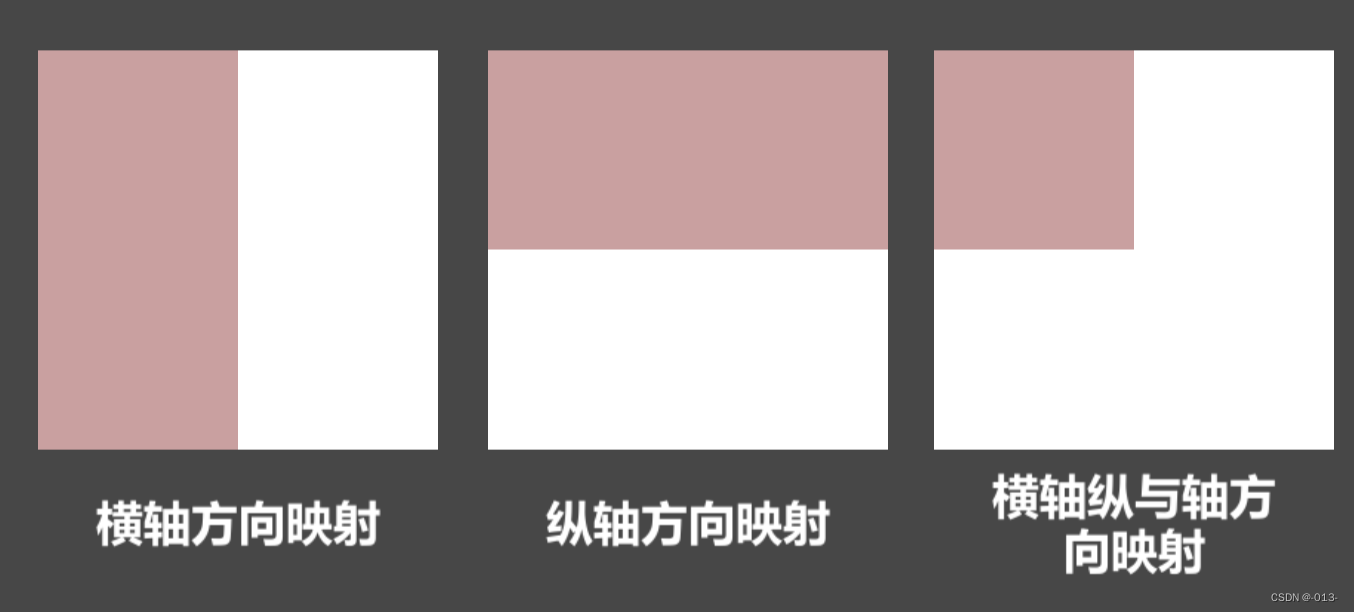
如上图所示,原来图片是白色区域大小,顶点为白色图片的四个顶点,因为要做对称,所以需要留出一半的位置来增加映射后的顶点。
在不同模式下的顶点映射需要做不同处理,在Unity中有一下几种模式:
- Simple: 如上面的图所示,对顶点的位置 除以 2 即可比较简单
- Sliced:九宫格模式下因为要保留九宫格的顶点位置,不能让九宫格保留的位置发生形变,就不能直接除以2来处理,需要做平移处理。具体实现下面在讲
- Filed:平铺模式下是不需要在镜像网格顶点的,因为平铺下的图片顶点是已经增加好的了,我们只需要对UV做镜像就可以了
- Filled:暂时未实现该模式下的,以后有时间在研究。
由于有多种模式的处理我们将实现接口化,方便我们的管理:定义一个IMirror接口:
using System.Collections.Generic;
using UnityEngine;
using UnityEngine.UI;public interface IMirror
{void Draw(Image image,List<UIVertex> uiVertices,MirrorType type);
}
Simpe下的顶点映射:
public class SimpleMirror : IMirror
{public void Draw(Image image,List<UIVertex> uiVertices,MirrorType type){ChangeVertices(image.rectTransform.rect,uiVertices,type);MirrorUtlis.Mirror(image.rectTransform.rect,uiVertices,type);}// 改变原有的顶点位置 (做一半映射) 如果是 Horizontal:左半部分 Vertical:上半部分 HorizontalAndVertical:左上四分之一private void ChangeVertices(Rect rect,List<UIVertex> uiVertices,MirrorType type){for (int i = 0; i < uiVertices.Count; i++){UIVertex vertex = uiVertices[i];switch (type){case MirrorType.Horizontal:vertex = HorizontalVertex(rect, vertex);break;case MirrorType.Vertical:vertex = VerticalVertex(rect, vertex);break;case MirrorType.HorizontalAndVertical:vertex = HorizontalVertex(rect, vertex);vertex = VerticalVertex(rect, vertex);break;}uiVertices[i] = vertex;}}// 水平映射private UIVertex HorizontalVertex(Rect rect,UIVertex vertex){vertex.position.x = (vertex.position.x + rect.x) / 2;// - rect.width / 2;return vertex;}// 垂直映射private UIVertex VerticalVertex(Rect rect,UIVertex vertex){vertex.position.y = (rect.y + vertex.position.y) / 2 + rect.height / 2;return vertex;}
}
Sliced下的顶点映射:
我们可以看到如下映射的主要方法:
// 水平映射
private UIVertex HorizontalVertex(Rect rect,UIVertex vertex)
{if (vertex.position.x == s_VertScratch[0].x || vertex.position.x == s_VertScratch[1].x) return vertex;vertex.position.x -= rect.width / 2;return vertex;
}
时机上非常简单,就是直接对 x 做矩形宽度/2 的平移,比较难的是我们需要知道什么顶点需要做平移?
这个需要看一下Image的源码是如何实现顶点的处理:
/// <summary>/// Generate vertices for a 9-sliced Image./// </summary>private void GenerateSlicedSprite(VertexHelper toFill){if (!hasBorder){GenerateSimpleSprite(toFill, false);return;}Vector4 outer, inner, padding, border;if (activeSprite != null){outer = Sprites.DataUtility.GetOuterUV(activeSprite);inner = Sprites.DataUtility.GetInnerUV(activeSprite);padding = Sprites.DataUtility.GetPadding(activeSprite);border = activeSprite.border;}else{outer = Vector4.zero;inner = Vector4.zero;padding = Vector4.zero;border = Vector4.zero;}Rect rect = GetPixelAdjustedRect();Vector4 adjustedBorders = GetAdjustedBorders(border / multipliedPixelsPerUnit, rect);padding = padding / multipliedPixelsPerUnit;s_VertScratch[0] = new Vector2(padding.x, padding.y);s_VertScratch[3] = new Vector2(rect.width - padding.z, rect.height - padding.w);s_VertScratch[1].x = adjustedBorders.x;s_VertScratch[1].y = adjustedBorders.y;s_VertScratch[2].x = rect.width - adjustedBorders.z;s_VertScratch[2].y = rect.height - adjustedBorders.w;for (int i = 0; i < 4; ++i){s_VertScratch[i].x += rect.x;s_VertScratch[i].y += rect.y;}............}这段源码不全我截取了,计算图片的位置信息,然后把4个顶点位置信息按顺序写进s_VertScratch数组中。这四个位置分别对应一下位置:

即九宫格裁剪后映射到Image顶点上的四个位置,所以当我们向做水平映射的时候只需要平移和 3和4 x轴相等的顶点,与1和2 x轴相等的顶点保留原来的位置。如下图可以很直观的看出来
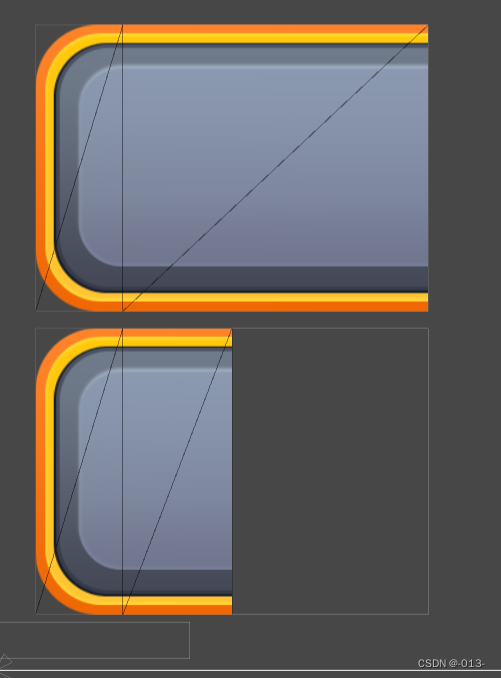
至于怎么算出这四个九宫格映射的顶点就直接拷贝Image源码的实现就好了。
贴一下完整代码:
using System.Collections.Generic;
using UnityEngine;
using UnityEngine.UI;public class SlicedMirror : IMirror
{private Image image;// 九宫格的四个分界点private Vector2[] s_VertScratch = new Vector2[4];public void Draw(Image image,List<UIVertex> uiVertices,MirrorType type){this.image = image;SetVertScratch();ChangeVertices(image.rectTransform.rect,uiVertices,type);MirrorUtlis.Mirror(image.rectTransform.rect,uiVertices,type);}private void ChangeVertices(Rect rect,List<UIVertex> uiVertices,MirrorType type){for (int i = 0; i < uiVertices.Count; i++){UIVertex vertex = uiVertices[i];switch (type){case MirrorType.Horizontal:vertex = HorizontalVertex(rect, vertex);break;case MirrorType.Vertical:vertex = VerticalVertex(rect, vertex);break;case MirrorType.HorizontalAndVertical:vertex = HorizontalVertex(rect, vertex);vertex = VerticalVertex(rect, vertex);break;}uiVertices[i] = vertex;}}// 水平映射private UIVertex HorizontalVertex(Rect rect,UIVertex vertex){if (vertex.position.x == s_VertScratch[0].x || vertex.position.x == s_VertScratch[1].x) return vertex;vertex.position.x -= rect.width / 2;return vertex;}// 垂直映射private UIVertex VerticalVertex(Rect rect,UIVertex vertex){if (vertex.position.y == s_VertScratch[2].y || vertex.position.y == s_VertScratch[3].y) return vertex;vertex.position.y += rect.height / 2;return vertex;}private void SetVertScratch(){Sprite activeSprite = image.sprite;Vector4 padding, border;if (activeSprite != null){padding = UnityEngine.Sprites.DataUtility.GetPadding(activeSprite);border = activeSprite.border;}else{padding = Vector4.zero;border = Vector4.zero;}Rect rect = image.GetPixelAdjustedRect();var multipliedPixelsPerUnit = image.pixelsPerUnit * image.pixelsPerUnitMultiplier;Vector4 adjustedBorders = GetAdjustedBorders(border / multipliedPixelsPerUnit, rect);padding /= multipliedPixelsPerUnit;s_VertScratch[0] = new Vector2(padding.x, padding.y);s_VertScratch[3] = new Vector2(rect.width - padding.z, rect.height - padding.w);s_VertScratch[1].x = adjustedBorders.x;s_VertScratch[1].y = adjustedBorders.y;s_VertScratch[2].x = rect.width - adjustedBorders.z;s_VertScratch[2].y = rect.height - adjustedBorders.w;for (int i = 0; i < 4; ++i){s_VertScratch[i].x += rect.x;s_VertScratch[i].y += rect.y;}}private Vector4 GetAdjustedBorders(Vector4 border, Rect adjustedRect){Rect originalRect = image.rectTransform.rect;for (int axis = 0; axis <= 1; axis++){float borderScaleRatio;if (originalRect.size[axis] != 0){borderScaleRatio = adjustedRect.size[axis] / originalRect.size[axis];border[axis] *= borderScaleRatio;border[axis + 2] *= borderScaleRatio;}float combinedBorders = border[axis] + border[axis + 2];if (adjustedRect.size[axis] < combinedBorders && combinedBorders != 0){borderScaleRatio = adjustedRect.size[axis] / combinedBorders;border[axis] *= borderScaleRatio;border[axis + 2] *= borderScaleRatio;}}return border;}
}
Tiled:模式下的映射
在平铺模式下顶点都是完整的,不需要做镜像处理,只需要修改没一块对应的UV对称即可,我们固定开始位置为1,不做翻转,那么
2位置所构成的顶点UV.y:就需要做对称处理
4位置所构成的顶点UV.x:就需要做对称处理
3位置所构成的顶点UV.x和y :都需要做对称处理
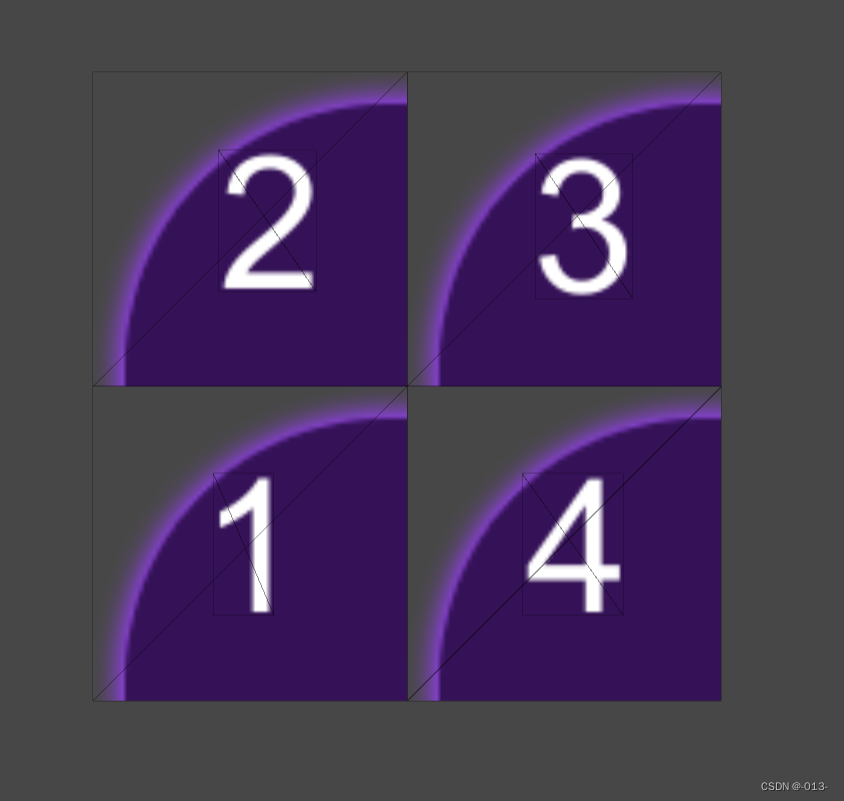
如何判断某几个顶点的UV需要做对称?
我们知道一个三角面由三个顶点构成,那么我么只需要找出三个顶点的中心位置,假设sprite的宽高都为w = 100,h = 100,构成的三角形区域的中心点分别为
1位置 =>(50,50),
2位置 => (50,150),
3位置 => (150,150),
4位置 => (150,50),
我们对中心的的
1 => x / W = 0.5
2 => x / W = 1.5
。。
我们对结果 %2 那么 结果为 1 的就需要翻转了;
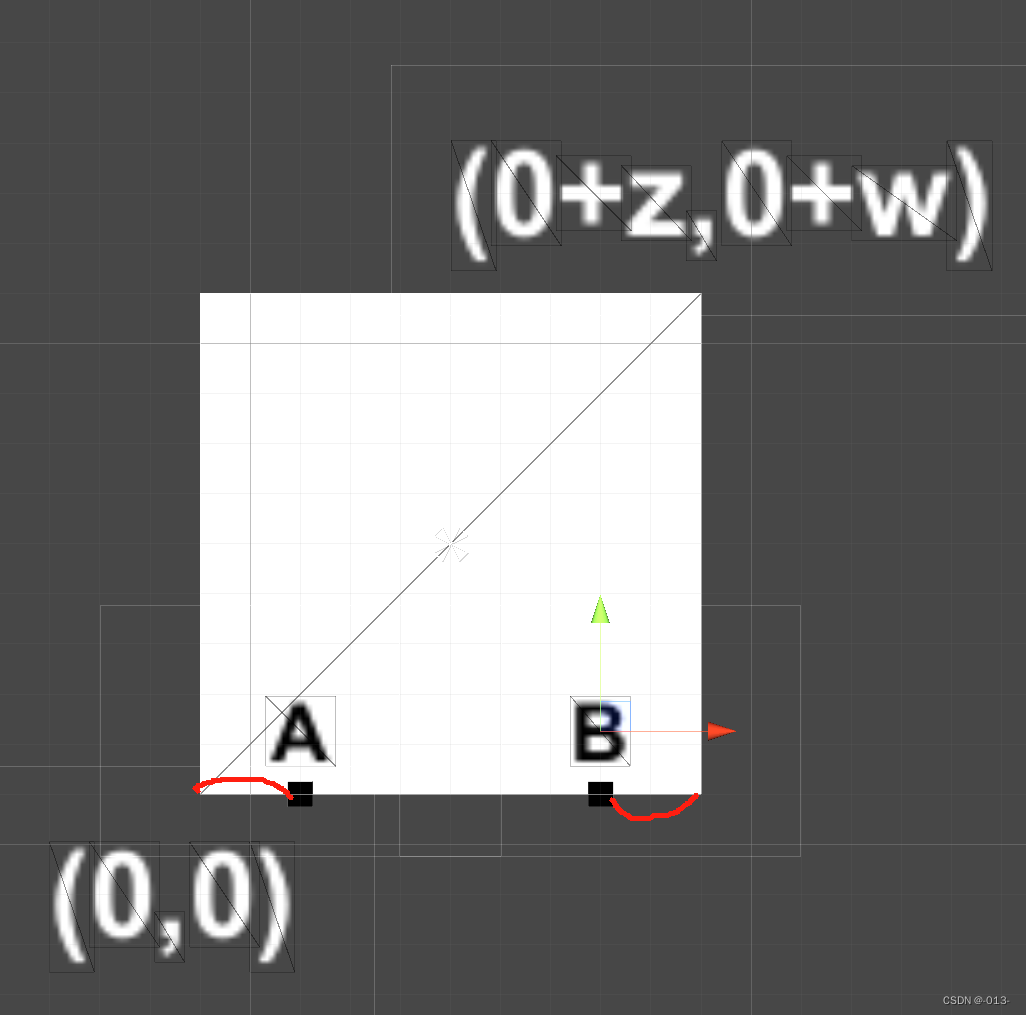
uv怎么翻转
outerUv = UnityEngine.Sprites.DataUtility.GetOuterUV(image.sprite);outerUV中的 x,y就代表右下角的点,z就代表宽,w:代表高,假设A镜像UV后的点为B,那么就满足:
A 到 (0,0)的距离 == B到(0+z)的距离,所以
镜像后的 A.x = outer.z -( A.x - outerUv.x )
贴一下完整代码
using System.Collections.Generic;
using UnityEngine;
using UnityEngine.UI;public class TiledMirror : IMirror
{private Vector4 outerUv;public void Draw(Image image,List<UIVertex> uiVertices,MirrorType type){outerUv = UnityEngine.Sprites.DataUtility.GetOuterUV(image.sprite);ChangeUv(uiVertices,type);}// uv翻转private void ChangeUv(List<UIVertex> uiVertices,MirrorType type){Vector3 cellMinP = uiVertices[0].position;Vector3 cellMaxP = uiVertices[2].position;float w = cellMaxP.x - cellMinP.x;float h = cellMaxP.y - cellMinP.y;for (int i = 0; i < uiVertices.Count; i+= 3){UIVertex v1 = uiVertices[i];UIVertex v2 = uiVertices[i+1];UIVertex v3 = uiVertices[i+2];float centerX = GetCenter(v1, v2, v3, true) - cellMaxP.x;float centerY = GetCenter(v1, v2, v3, false) - cellMaxP.y;bool changeX = Mathf.Ceil(centerX / w) % 2 != 0;bool changeY = Mathf.Ceil(centerY / h) % 2 != 0;if (changeX && (type == MirrorType.Horizontal || type == MirrorType.HorizontalAndVertical)){v1 = HorizontalUv(v1);v2 = HorizontalUv(v2);v3 = HorizontalUv(v3);}if (changeY && (type == MirrorType.Vertical || type == MirrorType.HorizontalAndVertical)){v1 = VerticalUv(v1);v2 = VerticalUv(v2);v3 = VerticalUv(v3);}uiVertices[i] = v1;uiVertices[i + 1] = v2;uiVertices[i + 2] = v3;}}// 获取三个顶点的中心位置private float GetCenter(UIVertex v1,UIVertex v2,UIVertex v3,bool isX){float min = Mathf.Min(Mathf.Min(isX ? v1.position.x : v1.position.y,isX ? v2.position.x : v2.position.y),Mathf.Min(isX ? v1.position.x : v1.position.y,isX ? v3.position.x : v3.position.y));float max = Mathf.Max(Mathf.Max(isX ? v1.position.x : v1.position.y,isX ? v2.position.x : v2.position.y),Mathf.Max(isX ? v1.position.x : v1.position.y,isX ? v3.position.x : v3.position.y));return (min + max) / 2;}private UIVertex HorizontalUv(UIVertex vertex){vertex.uv0.x = outerUv.x + outerUv.z - vertex.uv0.x;return vertex;}private UIVertex VerticalUv(UIVertex vertex){vertex.uv0.y = outerUv.y + outerUv.w - vertex.uv0.y;return vertex;}}
总结:
实现过程中,思路理清之后实现基本上是不难,但是需要去理解Unity Image的实现,针对绘制不同模式的生成网格顶点的实现,知道图篇是怎么绘制上去的,三个顶点构成一个面,Rect中的(x,y,z,w)分别代表什么。然后就是计算计算。
相关文章:
Unity Image - 镜像
1、为什么要使用镜像 在游戏开发过程中,我们经常会为了节省 美术图片资源大小,美术会将两边相同的图片进行切一半来处理。如下所示一个按钮 需要 400 * 236,然而美术只需要切一张 74*236的大小就可以了。这样一来图集就可以容纳更多的图片。…...

深入Spring Security魔幻山谷-获取认证机制核心原理讲解(新版)
文/朱季谦 这是一个古老的传说。 在神秘的Web系统世界里,有一座名为Spring Security的山谷,它高耸入云,蔓延千里,鸟飞不过,兽攀不了。这座山谷只有一条逼仄的道路可通。然而,若要通过这条道路前往另一头的…...

【知网稳定检索】第九届社会科学与经济发展国际学术会议 (ICSSED 2024)
第九届社会科学与经济发展国际学术会议 (ICSSED 2024) 2024 9th International Conference on Social Sciences and Economic Development 第九届社会科学与经济发展国际学术会议(ICSSED 2024)定于2024年3月22-24日在中国北京隆重举行。会议主要围绕社会科学与经济发展等研究…...

使用Spark写入数据到数据库表
项目场景: 使用Spark写入数据到数据库表 问题描述 Column "20231201" not found in schema Some(StructType(StructField(sdate,IntegerType,false),StructField(date_time,StringType,true),StructField(num,LongType,false),StructField(table_code,S…...

Codebeamer—软件全生命周期管理轻量级平台
产品概述 Codebeamer涵盖了软件研发的生命周期,在一个整合的平台内支持需求管理、测试管理、软件开发过程管理以及项目管理等,同时具有IToperations&DevOps相关的内容,并支持变体管理的功能。对于使用集成的应用程序生命周期管理…...

Yocto - bb脚本中使用的SRC_URI、SRCREV和S
我们遇到的各种自己不了解的技术或产品时,都需要阅读用户手册。用户手册里的内容很多时,除了由目录组织文档结构外,通常还有有一个词汇表,一般作为附录放在文档最后。 通过这个按照字母排序的词汇表,可以在对整个文档还…...
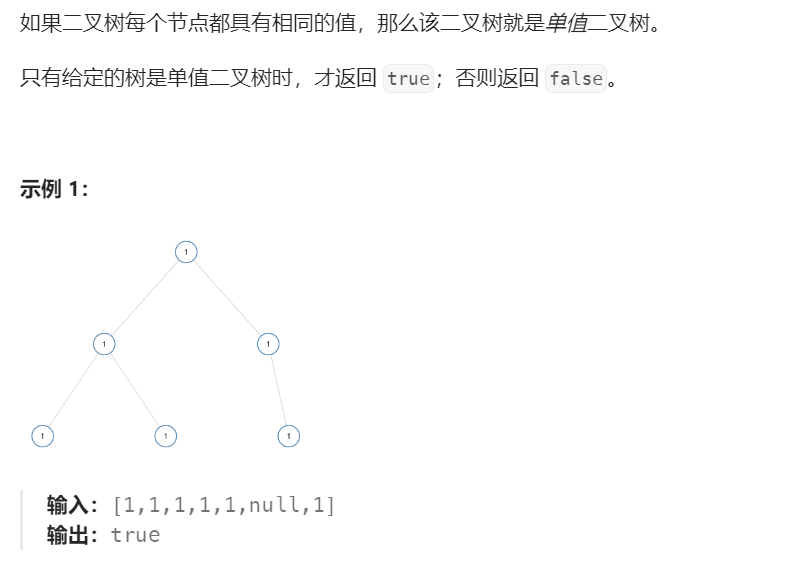
LeetCode | 965. 单值二叉树
LeetCode | 965. 单值二叉树 OJ链接 首先判断树为不为空,为空直接true然后判断左子树的val,和根的val相不相同再判断右子树的val,和根的val相不相同最后递归左子树和右子树 bool isUnivalTree(struct TreeNode* root) {if(root NULL)retur…...
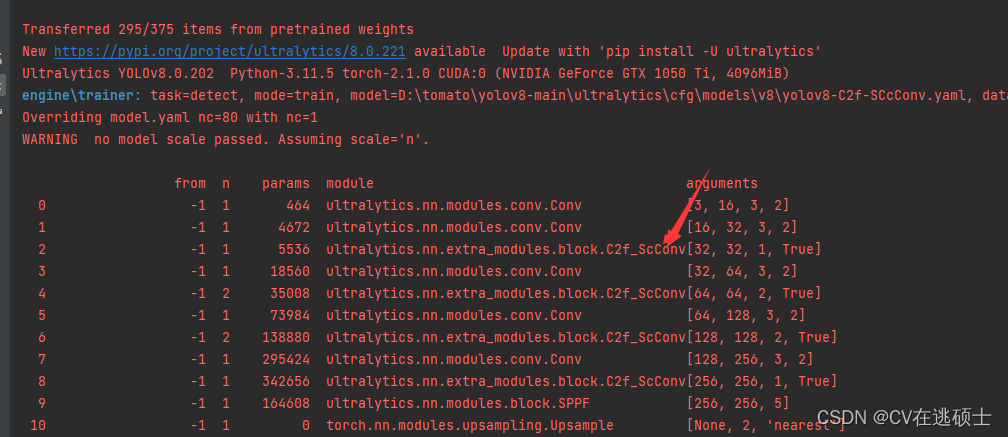
YOLOv8创新魔改教程(一)如何进行模块创新
YOLOv8创新魔改教程(一)如何进行模块创新 YOLOv8创新魔改教程 本人研一,最近好多朋友问我要如何修改模型创新模块,就想着不如直接开个专栏歇一歇文章,也算是对自己学习的总结,本专栏以YOLOv8为例…...

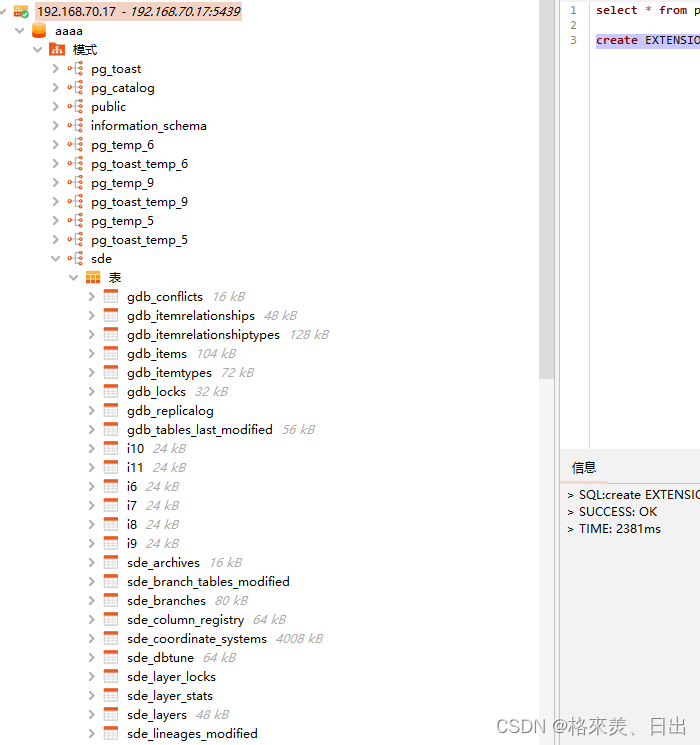
postgresql-shared_buffers参数详解
shared_buffers 是 PostgreSQL 中一个非常关键的参数,用于配置服务器使用的共享内存缓冲区的大小。这些缓冲区用于存储数据页,以便数据库可以更快地访问磁盘上的数据。 这个参数在 PostgreSQL 的性能方面有着重要的影响。增加 shared_buffers 可以提高数…...
windows10 Arcgis pro3.0-3.1
我先安装的arcgis pro3.0,然后下载的3.1。 3.0里面有pro、help、sdk、还有一些补丁包根据个人情况安装。 3.1里面也是这些。 下载 正版试用最新的 ArcGIS Pro 21 天教程,仅需五步!-地理信息云 (giscloud.com.cn) 1、安装windowsdesktop-…...

Apache Airflow (十四) :Airflow分布式集群搭建及测试
🏡 个人主页:IT贫道_大数据OLAP体系技术栈,Apache Doris,Clickhouse 技术-CSDN博客 🚩 私聊博主:加入大数据技术讨论群聊,获取更多大数据资料。 🔔 博主个人B栈地址:豹哥教你大数据的个人空间-豹…...
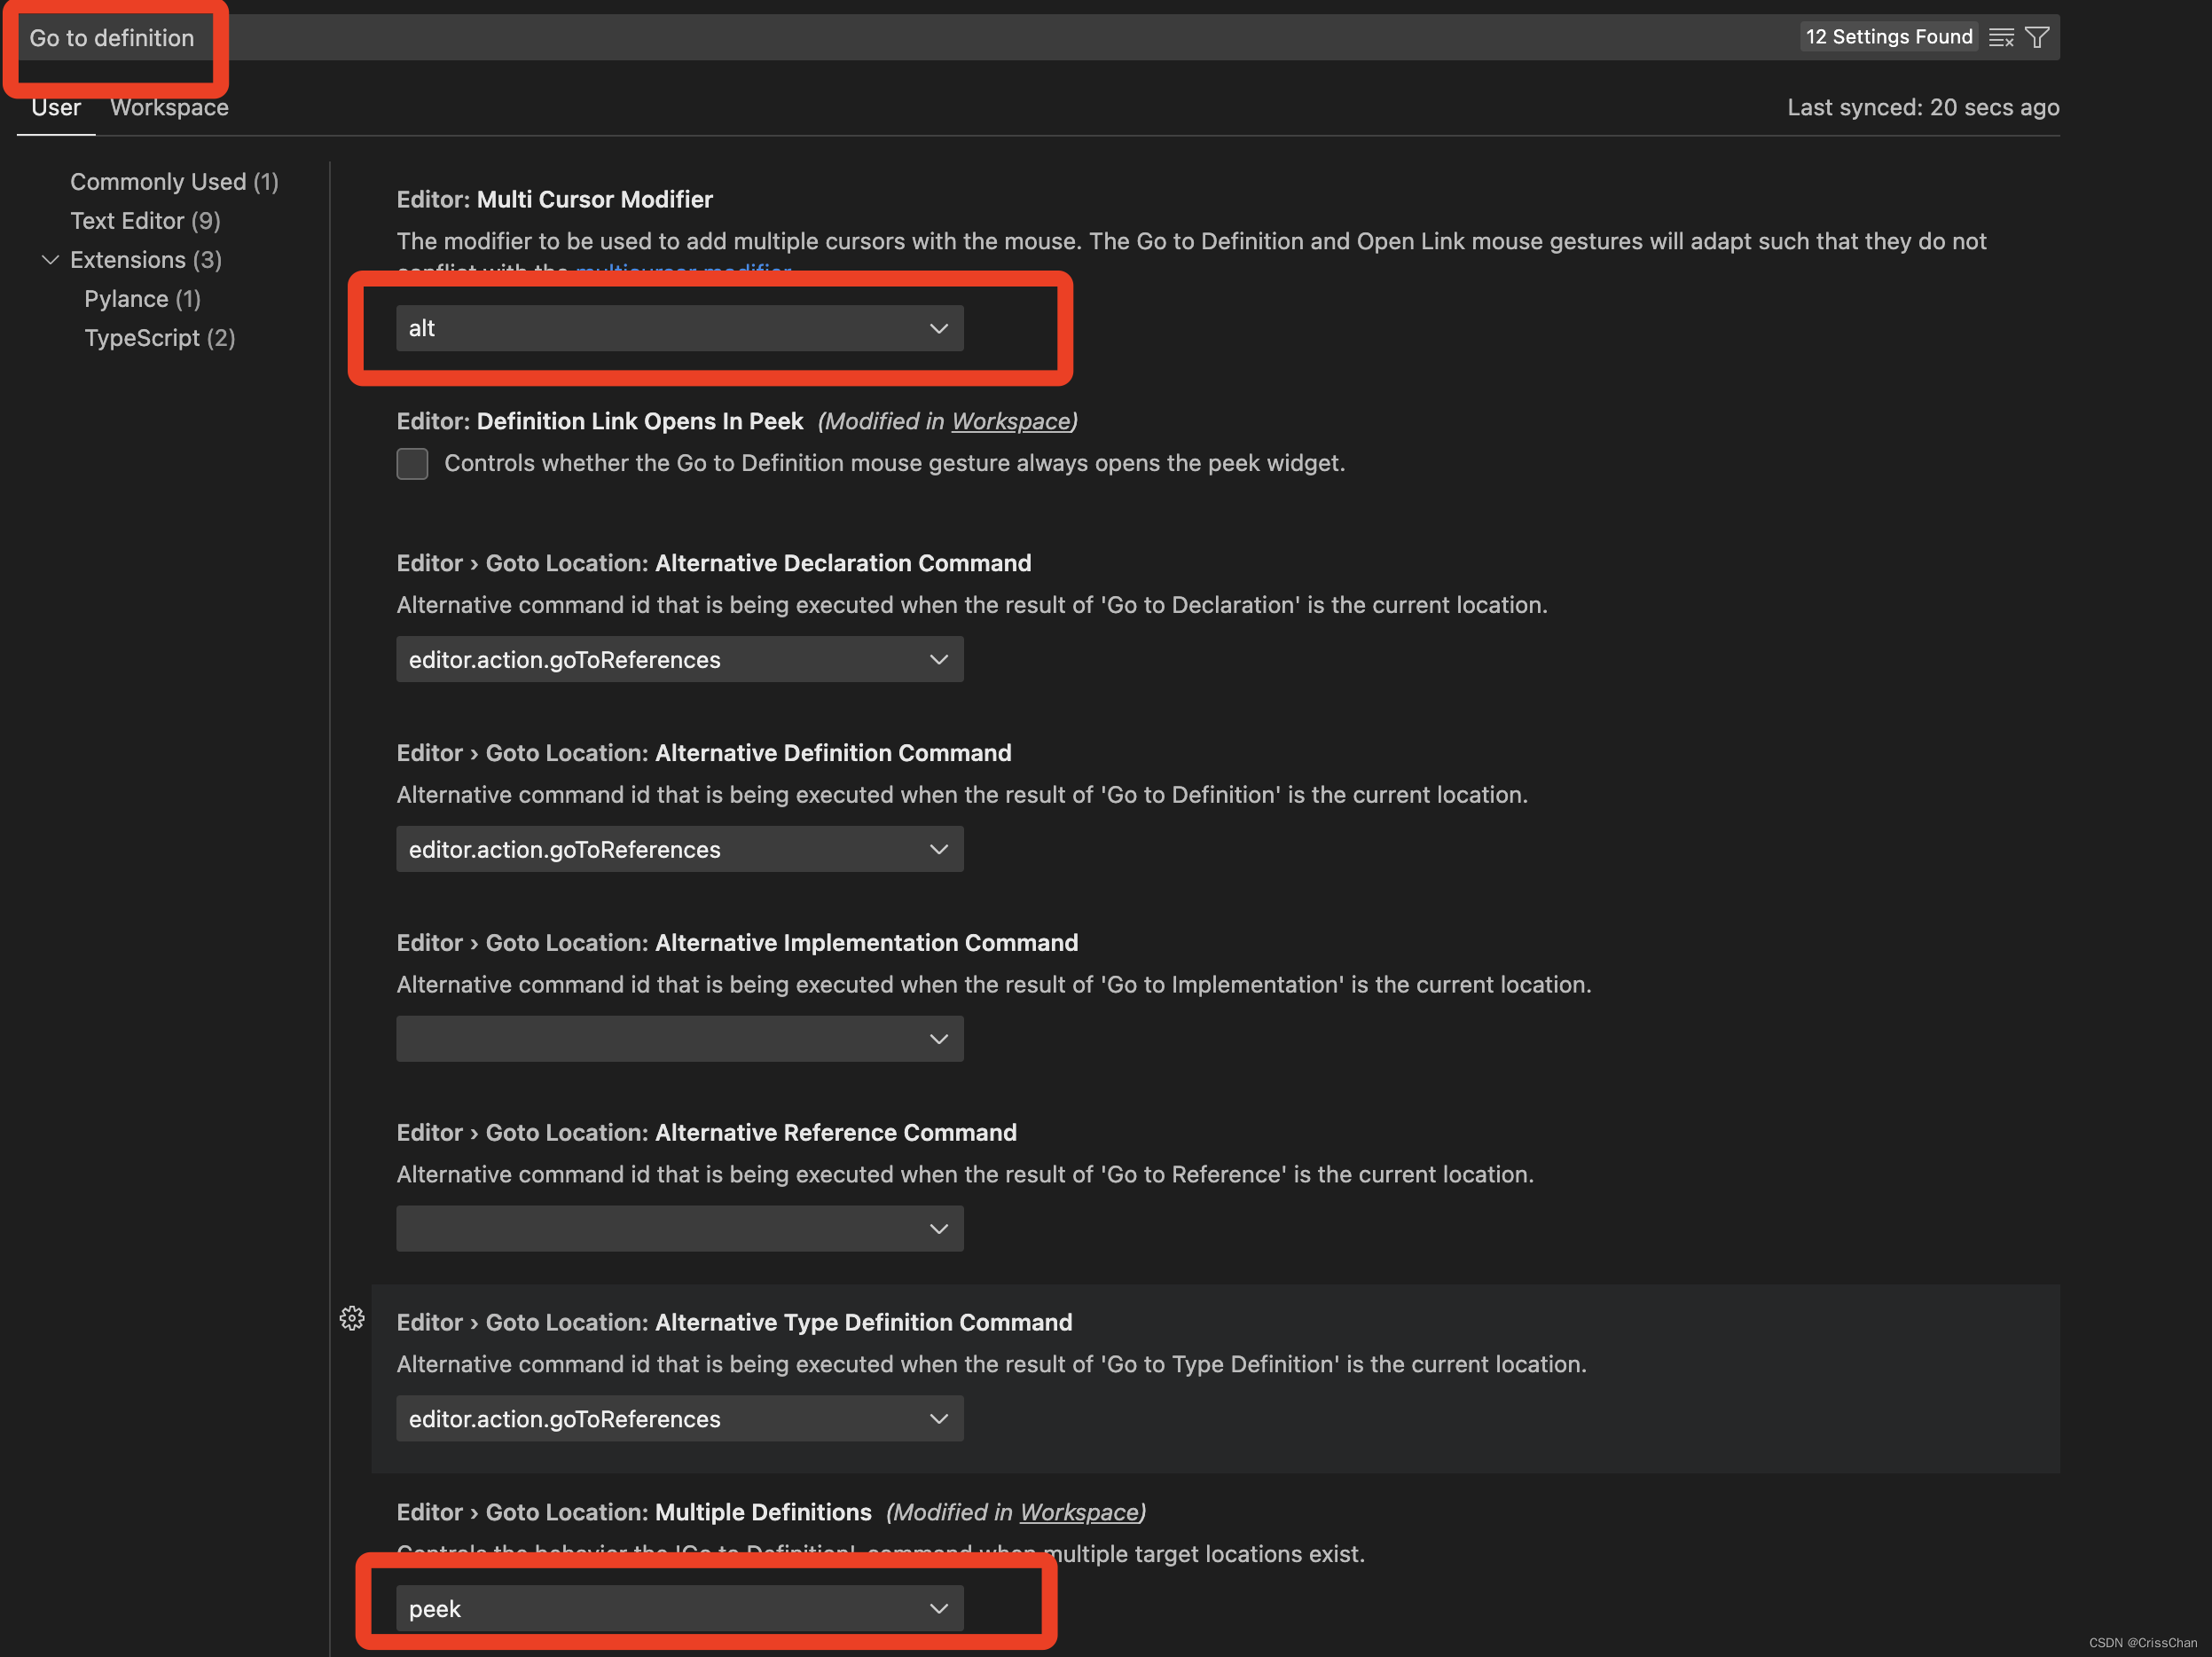
解决VSCode按住Ctrl(or Command) 点击鼠标左键不跳转的问题(不能Go to Definition)
问题出现 往往在升级了VSCode以后,就会出现按住Ctrl(or Command) 点击鼠标左键不跳转的问题,这个问题很常见。 解决办法 1 进入VScode的首选项,选择设置 2 输入Go to definition,找到如下两个设置&#…...

使用DrlParser 检测drl文件是否有错误
为避免运行时候错误,drools 7 可以使用DrlParser预先检测 drl文件是否正常。 parser 过程通常不会返回异常ruleDescr parser.parse(resource); 为空代表有异常 具体测试代码如下: public class DrlParserTest {public static void main(String[] arg…...

ArcGIS中基于人口数据计算人口密度的方法
文章目录 一、密度分析原理二、点密度分析三、线密度分析四、核密度分析一、密度分析原理 密度分析是指根据输入的要素数据集计算整个区域的数据聚集状况,从而产生一个联系的密度表面。通过密度计算,将每个采样点的值散步到整个研究区域,并获得输出栅格中每个像元的密度值。…...

在CentOS 8.2中安装Percona Xtrabackup 8.0.x备份MySql
添加Percona软件库: yum install https://repo.percona.com/yum/percona-release-latest.noarch.rpm 安装Percona Xtrabackup 8.0.x: yum install percona-xtrabackup-80 确认安装完成后,您可以使用以下命令验证Percona Xtrabackup的安装…...

javascript中的正则表达式的相关知识积累
01-javascript中的正则表达式用符号/作为正则表达式的开始符和结束符 javascript中的正则表达式用符号/作为正则表达式的开始符和结束符。 即javascript的正则表达式如下所示: /正则表达式/02-^:匹配字符串的开始 ^: 该符号表示匹配字符串的开始。这个…...
51k+ Star!动画图解、一键运行的数据结构与算法教程!
大家好,我是 Java陈序员。 我们都知道,《数据结构与算法》 —— 是程序员的必修课。 无论是使用什么编程语音,亦或者是前后端开发,都需要修好《数据结构与算法》这门课! 在各个互联网大产的面试中,对数据…...
)
4.7 矩阵的转置运算(C语言实现)
【题目描述】用键盘从终端输入一个3行4列的矩阵,编写一个函数对该矩阵进行转置操作。 【题目分析】矩阵的转置运算是线性代数中的一个基本运算。显然,一个m行n列的矩阵经过转置运算后就变成了一个n行m列的矩阵。这个问题的解决关键是要解决两个问题&…...

快速掌握Pyqt5的9种显示控件
Pyqt5相关文章: 快速掌握Pyqt5的三种主窗口 快速掌握Pyqt5的2种弹簧 快速掌握Pyqt5的5种布局 快速弄懂Pyqt5的5种项目视图(Item View) 快速弄懂Pyqt5的4种项目部件(Item Widget) 快速掌握Pyqt5的6种按钮 快速掌握Pyqt5的10种容器&…...

【WP】Geek Challenge 2023 web 部分wp
EzHttp http协议基础题 unsign 简单反序列化题 n00b_Upload 很简单的文件上传,上传1.php,抓包,发现php内容被过滤了,改为<? eval($_POST[‘a’]);?>,上传成功,命令执行读取就好了 easy_php …...
打包成安卓/鸿蒙APP)
保姆级教程:将训练好的YOLOv5s模型(PyTorch 1.7)打包成安卓/鸿蒙APP
从YOLOv5模型到移动端应用:全流程实战指南 1. 环境准备与模型导出 在开始将YOLOv5模型部署到移动端之前,确保你的开发环境已经准备就绪。对于PyTorch 1.7用户,需要特别注意版本兼容性问题。以下是推荐的环境配置: 操作系统&#x…...

GD32F427以太网通信避坑指南:LAN8720的REF_CLK模式选择与SMI管理接口配置
GD32F427以太网通信避坑指南:LAN8720的REF_CLK模式选择与SMI管理接口配置 在嵌入式系统开发中,以太网通信的稳定性往往决定着整个产品的可靠性。GD32F427作为国产MCU的优秀代表,其内置的ENET控制器配合LAN8720 PHY芯片能够实现高效的网络通信…...

2026年第二次答辩前论文降AI攻略:二次答辩AIGC超标4.8元彻底解决完整处理方案
2026年第二次答辩前论文降AI攻略:二次答辩AIGC超标4.8元彻底解决完整处理方案 关于第二次答辩论文降AI,我总结了一个最重要的教训:别只降标红段落,要全文处理。 之前逐段降,整体检测还是超标。换成全文上传ÿ…...

解决Redroid安卓12串流黑屏:修改SurfaceFlinger绕过Secure Flag的实战记录
解决Redroid安卓12串流黑屏:修改SurfaceFlinger绕过Secure Flag的实战记录 在RK3588开发板上运行Redroid容器时,许多开发者会遇到一个棘手问题:使用scrcpy等工具串流显示某些应用界面时,屏幕突然变黑。这并非硬件故障,…...

ElevenLabs瑞典文语音生成延迟超800ms?独家逆向分析其WebRTC音频缓冲机制,给出3行代码级低延迟注入方案
更多请点击: https://codechina.net 第一章:ElevenLabs瑞典文语音生成延迟超800ms?独家逆向分析其WebRTC音频缓冲机制,给出3行代码级低延迟注入方案 ElevenLabs 在瑞典语(sv-SE)TTS 服务中默认启用高保真音…...

RustRedOps COM组件操作指南:从IActiveScript到IShellDispatch的完整示例
RustRedOps COM组件操作指南:从IActiveScript到IShellDispatch的完整示例 【免费下载链接】RustRedOps RustRedOps is a repository for advanced Red Team techniques focused on Rust 项目地址: https://gitcode.com/gh_mirrors/ru/RustRedOps RustRedOps是…...

slambook-en学习路线图:从初学者到专家的10个关键步骤
slambook-en学习路线图:从初学者到专家的10个关键步骤 【免费下载链接】slambook-en The English version of 14 lectures on visual SLAM. 项目地址: https://gitcode.com/gh_mirrors/sl/slambook-en 想要掌握视觉SLAM技术但不知从何开始?&#…...

大学英语四级试卷历年真题及答案PDF电子版百度网盘
大学英语四级备考必备历年真题合集(2015年6月-2025年12月),高清 PDF 电子版含完整试卷与详细答案解析,以及配套听力音频,题型齐全答案详实,可下载打印刷题,吃透真题考点,高效冲刺顺利…...

如何快速掌握LuaJIT字节码还原:面向开发者的完整指南
如何快速掌握LuaJIT字节码还原:面向开发者的完整指南 【免费下载链接】luajit-decompiler https://gitlab.com/znixian/luajit-decompiler 项目地址: https://gitcode.com/gh_mirrors/lu/luajit-decompiler LuaJIT反编译器(LuaJIT Raw-Bytecode D…...
)
【限时解密】Midjourney野兽派风格“原始态”生成协议:仅用/raw + 2个隐藏参数,绕过所有风格平滑化过滤(实测成功率提升67%)
更多请点击: https://codechina.net 第一章:Midjourney野兽派风格的美学本质与系统性失衡 野兽派(Fauvism)在视觉艺术中以高饱和色彩、粗犷笔触与主观情感压倒写实逻辑著称;当这一美学被Midjourney等扩散模型“转译”…...