Django 简单图书管理系统
一、图书需求
1. 书籍book_index.html中有超链接:查看所有的书籍列表book_list.html页面
2. 书籍book_list.html中显示所有的书名,有超链接:查看本书籍详情book_detail.html(通过书籍ID)页面
3. 书籍book_detail.html中书的作者和出版社,有超链接:作者详情author_detail.html(通过书籍ID)和出版社详情publisher_detail.html(通过书籍ID)页面
4. 书籍book_list.html中添加图书超链接,book_add.html
5. 书籍book_list.html中修改图书超链接,book_edit.html
6. 书籍book_list.html中删除图书超链接,book_delete.html
二、实现步骤
1、创建每个模块的模型models.py
2、创建每个模块的html页面
3、创建每个模块的视图函数views.py
4、编写每个模块的子路由urls.py
5、运行测试每个模块访问http://127.0.0.1:8000/book/detail/1http://127.0.0.1:8000/book/list/http://127.0.0.1:8000/book/index/.....
注意:分模块操作
三、数据表关系
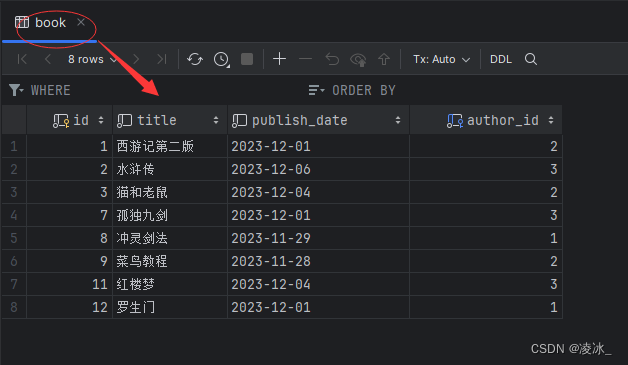
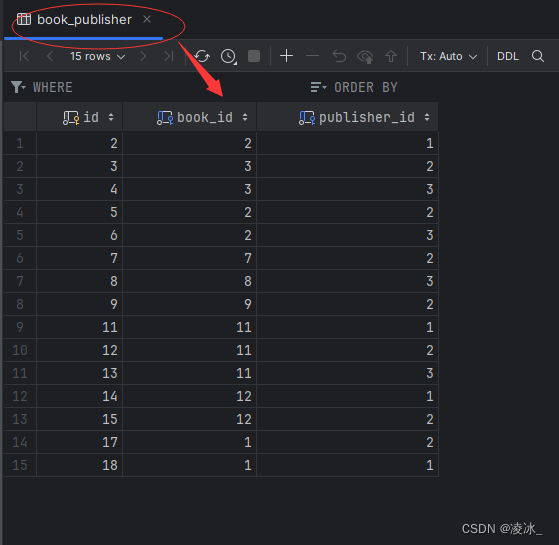
书籍表 Book:title 、 pub_date 、 publisher(多对多) 、 author(外键,多对一)
出版社表 Publisher:name 、address、city 、state_province、 country、website
作者表 Author:first_name、 last_name、 email、 gender
注意:自动生成中间表 book_publisher
四、创建bookitem项目

在控制台执行子应用: python manage.py startapp book
五、编码显示
(1)模型层models.py
from django.db import models# Create your models here.
#作者数据模型
class Author(models.Model):first_name=models.CharField(max_length=30)last_name=models.CharField(max_length=30)email=models.EmailField()# gender=models.BooleanField(default=True)gender_choices=((0,'女'),(1,'男'),(2,'保密'),)gender=models.SmallIntegerField(choices=gender_choices)class Meta:db_table='author'verbose_name='作者'verbose_name_plural=verbose_namedef __str__(self):return self.first_name+self.last_name
from django.db import models# Create your models here.
#出版社数据模块
class Publisher(models.Model):name=models.CharField(max_length=30)address=models.CharField(max_length=100)city=models.CharField(max_length=30)state_province=models.CharField(max_length=30)country=models.CharField(max_length=30)website=models.URLField()class Meta:db_table = 'publisher'verbose_name = '出版社'verbose_name_plural = verbose_namedef __str__(self):return self.namefrom django.db import models
from author.models import Author #导入数据模型
from publisher.models import Publisher# Create your models here.
# 书籍数据模型
class Book(models.Model):title=models.CharField(max_length=100,verbose_name='书名')publish_date=models.DateField(verbose_name='出版时间')#FK关联#fk:book:Author作者数据模型=N:1(多对一)author=models.ForeignKey(Author,on_delete=models.PROTECT,verbose_name='作者')#多对多 book:Publisher 出版社数据模型(多对多)publisher=models.ManyToManyField(Publisher,verbose_name='出版社')class Meta:db_table = 'book'verbose_name = '书籍'verbose_name_plural = verbose_namedef __str__(self):return self.title数据迁移,生成相关表
在终端依次执行命令
python manage.py makemigrationspython manage.py migrate
手动添加相关数据


(2)视图层views.py
from django.shortcuts import render
from author.models import *# Create your views here.
#作者详情
def author_detail(request,aid):'''通过aid获取作者详情信息:param request::param aid::return:'''author=Author.objects.get(pk=aid)return  render(request,'author/author_detail.html',{'author':author})
from django.shortcuts import render
from publisher.models import *
# Create your views here.
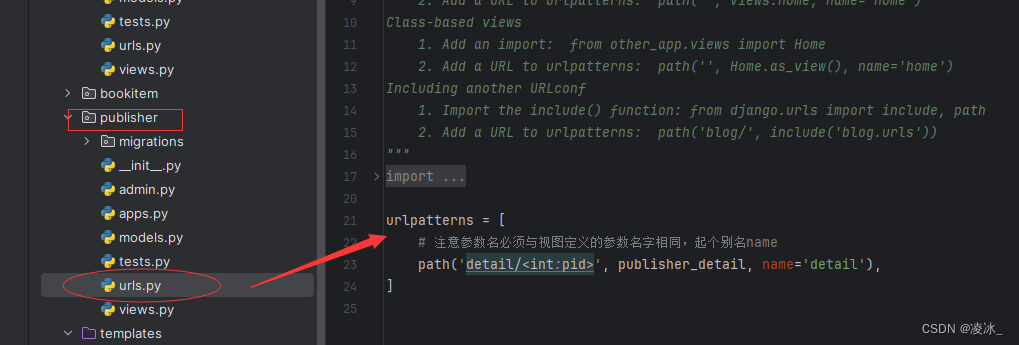
#出版社详情
def publisher_detail(request,pid):publisher=Publisher.objects.get(pk=pid)return render(request,'publisher/publisher_detail.html',{"publisher":publisher})from django.shortcuts import render, redirect
from book.models import *
from author.models import *
from publisher.models import *# Create your views here.
# 书籍首页
def book_index(request):return render(request, 'book/book_index.html')# return render(request, 'book/book_home.html')# 书籍列表
def book_list(request):'''获取所有的书籍:param request::return:'''books = Book.objects.all()return render(request, 'book/book_list.html', {'books': books})# 书籍详情
def book_detail(request, bid):'''获取bid对应的书籍:param request::param bid::return:'''book = Book.objects.get(pk=bid)return render(request, 'book/book_detail.html', {'book': book})# 书籍添加
def book_add(request):if request.method == 'POST':# 获取书名,出版时间,作者,出版社列表title = request.POST.get('title')publish_date = request.POST.get('publish_date')author_id = request.POST.get('author')#*列表:getlistpublisher_list = request.POST.getlist('publisher')# 操作数据库存储数据book_obj = Book.objects.create(title=title, publish_date=publish_date, author_id=author_id)# 书籍与出版社的关系表book_obj.publisher.add(*publisher_list)# 跳转到书籍的展示页面# 直接跳转对应的列表数据,使用别名name=listreturn redirect('../list')# 获取当前系统所有的出版社和作者信息publishers = Publisher.objects.all()# print(publishers)authors = Author.objects.all()# print(authors)#返回添加页面return render(request, 'book/book_add.html', locals())# 书籍编辑
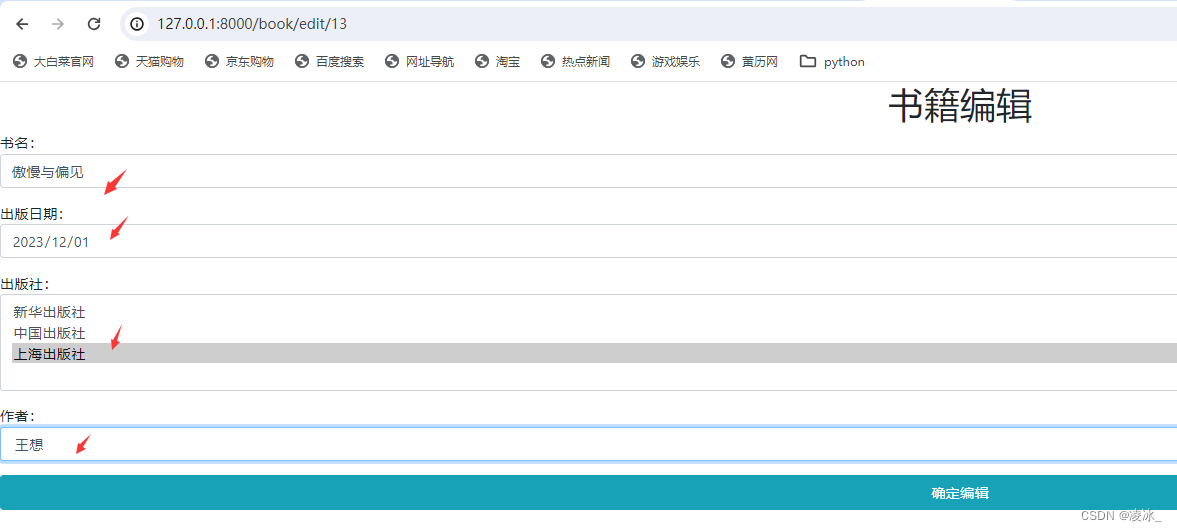
def book_edit(request, bid):'''获取bid对应的书籍:param request::param bid::return:'''if request.method == 'POST':# 获取书名,出版时间,作者,出版社列表title = request.POST.get('title')publish_date = request.POST.get('publish_date')author_id = request.POST.get('author')# *列表:getlistpublisher_list = request.POST.getlist('publisher')# 操作数据库修改数据Book.objects.filter(pk=bid).update(title=title,publish_date=publish_date,author_id=author_id)# 修改第三张表book_obj=Book.objects.filter(pk=bid).first()# 修改出版社列表book_obj.publisher.set(publisher_list)# 跳转到书籍的展示页面# 直接跳转对应的列表数据,使用别名name=listreturn redirect('../list')# 获取当前用户想要编辑的书籍对象,展示给用户看edit_obj = Book.objects.filter(pk=bid).first()# 获取当前系统所有的出版社和作者信息publishers = Publisher.objects.all()# print(publishers)authors = Author.objects.all()# print(authors)return render(request, 'book/book_edit.html', locals())# 书籍删除
def book_delete(request, bid):#删除书籍Book.objects.filter(pk=bid).delete()# 跳转到书籍的展示页面# 直接跳转对应的列表数据,使用别名name=listreturn redirect('../list')(3)路由层urls.py

from django.contrib import admin
from django.urls import path
from book.views import *  #导入视图urlpatterns = [path('index/', book_index, name='index'),path('list/', book_list, name='list'),# 注意参数名必须与视图定义的参数名字相同,起个别名namepath('detail/<int:bid>', book_detail, name='detail'),#添加书籍path('add/', book_add, name='add'),# 注意参数名必须与视图定义的参数名字相同,起个别名name#修改书籍path('edit/<int:bid>', book_edit, name='edit'),# 删除书籍path('delete/<int:bid>', book_delete, name='delete'),
]

from django.contrib import admin
from django.urls import path, includeurlpatterns = [#path('author/', include(('author.urls','author'),namespace='author')), #子路由authorpath('book/', include(('book.urls','book'),namespace='book')), #子路由bookpath('publisher/', include(('publisher.urls','publisher'),namespace='publisher')), #子路由publisherpath('admin/', admin.site.urls), #后台管理路由
]
(4)模板页面html
(1) 首页页面
<!DOCTYPE html>
<html lang="en">
<head><meta charset="UTF-8"><title>Title</title>
</head>
<body><h1>书籍首页</h1><hr/>{# book命名空间 ,list是别名 #}<a href="{% url 'book:list' %}">查看所有的书籍</a>
</body>
</html>
(2) 图书展示页面
<!DOCTYPE html>
<html lang="en">
<head><meta charset="UTF-8"><title>Title</title>{# css #}{% block extcss %}<!-- 新 Bootstrap4 核心 CSS 文件 --><link rel="stylesheet" href="https://cdn.staticfile.org/twitter-bootstrap/4.3.1/css/bootstrap.min.css">{% endblock %}{% block extJs %}<!-- jQuery文件。务必在bootstrap.min.js 之前引入 --><script src="https://cdn.staticfile.org/jquery/3.2.1/jquery.min.js"></script><!-- bootstrap.bundle.min.js 用于弹窗、提示、下拉菜单,包含了 popper.min.js --><script src="https://cdn.staticfile.org/popper.js/1.15.0/umd/popper.min.js"></script><!-- 最新的 Bootstrap4 核心 JavaScript 文件 --><script src="https://cdn.staticfile.org/twitter-bootstrap/4.3.1/js/bootstrap.min.js"></script>{% endblock %}
</head>
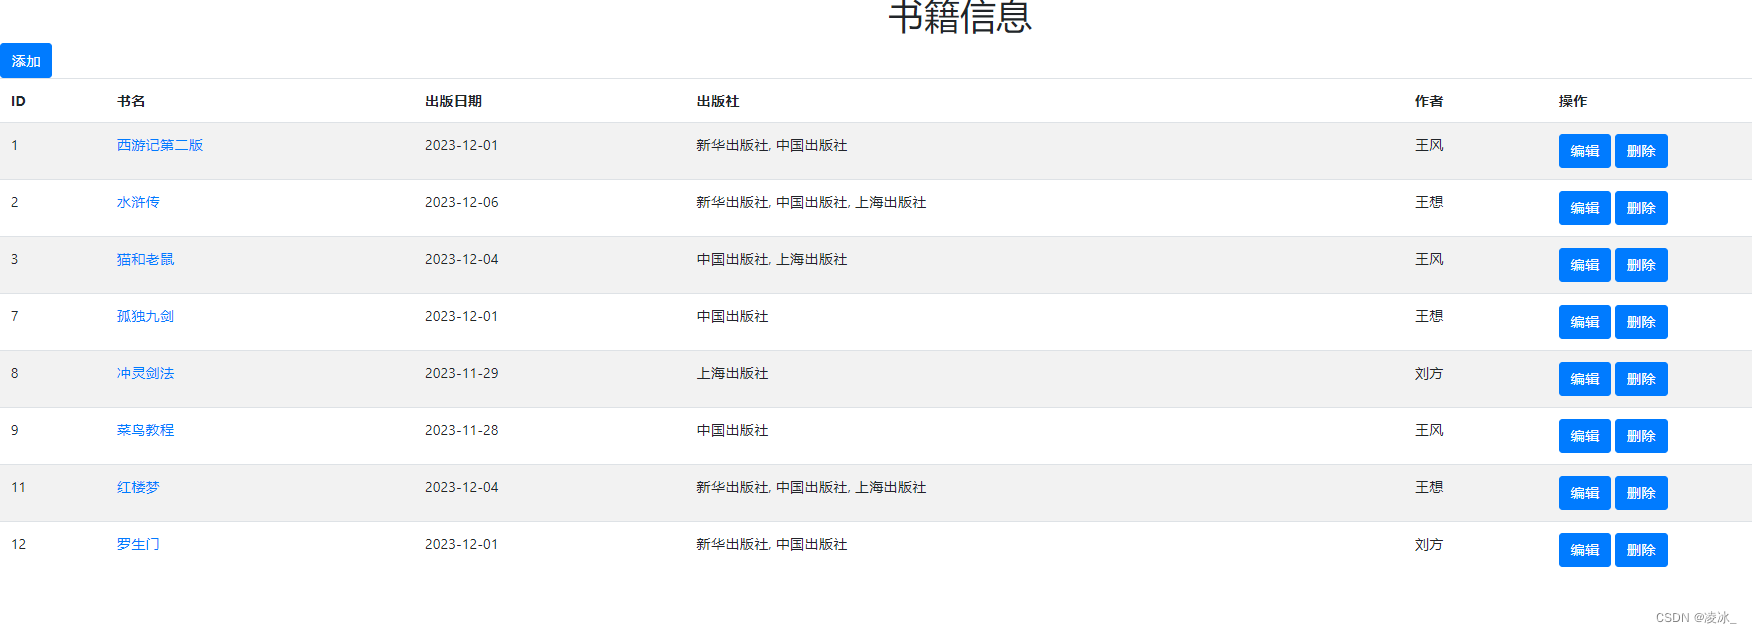
<body><h1 class="text-center">书籍信息</h1><a href="{% url 'book:add' %}" class="btn btn-primary btn-xs">添加</a><br><table class="table table-hover table-striped"><thead><tr><th>ID</th><th>书名</th><th>出版日期</th><th>出版社</th><th>作者</th><th>操作</th></tr></thead><tbody>{% for book in books %}<tr><td>{{ book.pk }}</td><td><a href="{% url 'book:detail' book.id %}">{{ book.title }}</a></td>{#格式化日期#}<td>{{ book.publish_date|date:'Y-m-d' }}</td><td>{% for publish in book.publisher.all %}{# 判断是最后一个不加,#}{% if forloop.last %}{{publish.name }}{# 判断是其他加,#}{% else %}{{publish.name }},{% endif %}{% endfor %}</td><td> {{book.author.first_name }}{{book.author.last_name }}</td><td><a href="{% url 'book:edit' book.pk %}" class="btn btn-primary btn-xs">编辑</a><a href="{% url 'book:delete' book.pk %}" class="btn btn-primary btn-xs">删除</a></td></tr>{% endfor %}</tbody></table>
</body>
(3) 图书添加页面
<!DOCTYPE html>
<html lang="en">
<head><meta charset="UTF-8"><title>Title</title>{# css #}{% block extcss %}<!-- 新 Bootstrap4 核心 CSS 文件 --><link rel="stylesheet" href="https://cdn.staticfile.org/twitter-bootstrap/4.3.1/css/bootstrap.min.css">{% endblock %}
</head>
<body><h1 class="text-center">书籍添加</h1><hr/><form action="" method="post">{# 确认html中的form添加模板标签,否则发生异常#}{% csrf_token %}<p>书名:<input type="text" name="title" class="form-control"></p><p>出版日期:<input type="date" name="publish_date" class="form-control"></p><p>出版社:<select name="publisher" id=""  multiple class="form-control">{% for publish_obj in publishers %}<option value="{{ publish_obj.pk }}">{{ publish_obj.name }}</option>{% endfor %}</select></p><p>作者:<select name="author" id=""  class="form-control">{% for author_obj in authors %}<option value="{{ author_obj.pk }}">{{ author_obj.first_name }}{{ author_obj.last_name }}</option>{% endfor %}</select></p><input type="submit" value="新增" class="btn btn-primary btn-block"></form></body>
</html>
(4) 图书修改页面
<!DOCTYPE html>
<html lang="en">
<head><meta charset="UTF-8"><title>Title</title>{# css #}{% block extcss %}<!-- 新 Bootstrap4 核心 CSS 文件 --><link rel="stylesheet" href="https://cdn.staticfile.org/twitter-bootstrap/4.3.1/css/bootstrap.min.css">{% endblock %}
</head>
<body>
<h1 class="text-center">书籍编辑</h1>
<form action="" method="post">{# 确认html中的form添加模板标签,否则发生异常#}{% csrf_token %}<p>书名:<input type="text" name="title" class="form-control" value="{{ edit_obj.title }}"></p><p>出版日期:<input type="date" name="publish_date" class="form-control"value="{{ edit_obj.publish_date|date:'Y-m-d' }}"></p><p>出版社:<select name="publisher" id="" multiple class="form-control">{% for publish_obj in publishers %}{# 针对当前书籍对象的出版社应该默认选中 #}{% if publish_obj in edit_obj.publisher.all %}<option value="{{ publish_obj.pk }}" selected>{{ publish_obj.name }}</option>{% else %}<option value="{{ publish_obj.pk }}">{{ publish_obj.name }}</option>{% endif %}{% endfor %}</select></p><p>作者:<select name="author" id=""  class="form-control">{% for author_obj in authors%}{% if author_obj == edit_obj.author %}<option value="{{ author_obj.pk }}" selected>{{ author_obj.first_name }}{{ author_obj.last_name }}</option>{% else %}<option value="{{ author_obj.pk }}">{{ author_obj.first_name }}{{ author_obj.last_name }}</option>{% endif %}{% endfor %}</select></p><input type="submit" value="确定编辑" class="btn btn-info btn-block">
</form></body>
</html>
(5) 图书详情页面
<!DOCTYPE html>
<html lang="en">
<head><meta charset="UTF-8"><title>Title</title>
</head>
<body><h1>书籍详情页</h1><hr/><div><p>名称:{{ book.title }}</p><p>出版时间:{{ book.publish_date }}</p><p>作者:<a href="{% url 'author:detail' book.author.id %}">{{ book.author.first_name }}{{ book.author.last_name }}</a></p><p>出版社:{% for publisher in book.publisher.all %}<a href="{% url 'publisher:detail' publisher.id  %}">{{ publisher.name}}</a>{# 每个出版社之间加分割|#}{%  if not forloop.last %}|{% endif %}{% endfor %}</p></div></body>
</html>
(6) 作者详情页面
<!DOCTYPE html>
<html lang="en">
<head><meta charset="UTF-8"><title>Title</title>
</head>
<body><h1>作者详情页</h1><hr/><div><p>名字:{{ author.last_name }}{{ author.last_name }}</p><p>性别:{{author.gender }}</p><p>邮箱:{{author.email }}</p></div>
</body>
</html>
(7) 出版社详情页面
<!DOCTYPE html>
<html lang="en">
<head><meta charset="UTF-8"><title>Title</title>
</head>
<body><h1>出版社详情页</h1><hr/><div><p>名字:{{ publisher.name }}</p><p>地址:{{publisher.address }}</p><p>城市:{{publisher.city }}</p><p>省份:{{publisher.state_province }}</p><p>国家:{{publisher.country }}</p><p>网址:{{publisher.website }}</p></div>
</body>
</html>
四、效果
图书信息

图书详情

作者详情

出版社详情

图书添加
单击添加按钮

返回列表显示

图书修改
单击编辑跳转

修改数据
修改后数据显示

图书删除
单击删除按钮
注意:删除书籍信息,相关的中间表的也删除数据。
相关文章:
Django 简单图书管理系统
一、图书需求 1. 书籍book_index.html中有超链接:查看所有的书籍列表book_list.html页面 2. 书籍book_list.html中显示所有的书名,有超链接:查看本书籍详情book_detail.html(通过书籍ID)页面 3. 书籍book_detail.html中书的作者和出版社&…...

C++内存管理和模板初阶
C/C内存分布 请看代码: int globalVar 1; static int staticGlobalVar 1; void Test() {static int staticVar 1;int localVar 1;int num1[10] { 1, 2, 3, 4 };char char2[] "abcd";const char* pChar3 "abcd";int* ptr1 (int*)mallo…...
分布式对象远程通信)
QtRO(Qt Remote Objects)分布式对象远程通信
一、什么是QtRO Qt Remote Objects(QRO)是Qt提供的一种用于实现远程对象通信的机制。 QtRO支持两种类型的通信:RPC(远程过程调用)和LPC(本地进程通信)。 RPC(远程过程调用…...
【K8s】1# 使用kuboard-spray安装K8s集群
文章目录 搭建k8s集群1.推荐配置1.1.服务器配置1.2.软件版本 2.使用Kuboard-Spray安装k8s集群2.1.配置要求2.2.操作系统兼容性2.3.安装 Kuboard-Spray2.4.加载离线资源包2.5.规划并安装集群2.6.安装成功2.7.访问集群 3.涉及的命令3.1.linux 4.问题汇总Q1:启动离线集…...

leetCode算法—12. 整数转罗马数字
12. 整数转罗马数字 难度:中等 ** 罗马数字包含以下七种字符: I, V, X, L,C,D 和 M。 字符 数值 I 1 V 5 X 10 L 50 C 100 D 500 M 1000 例如, 罗马数字 2 写做 II ,即…...
使用OpenCV4实现工业缺陷检测的六种方法
目录 1 机器视觉2 缺陷检测3 工业上常见缺陷检测方法 1 机器视觉 机器视觉是使用各种工业相机,结合传感器跟电气信号实现替代传统人工,完成对象识别、计数、测量、缺陷检测、引导定位与抓取等任务。其中工业品的缺陷检测极大的依赖人工完成,…...

Excel 获取当前行的行数
ROW() 获取当前行 ROW()1 获取当前行然后支持二次开发...

R语言【stringr】——str_detect 检测是否存在字符串的匹配项
Package stringr version 1.5.1 str_detect(string, pattern, negate FALSE) 参数【string】:输入向量。既可以是字符向量,也可以是强制作为一个字符向量。 参数【pattern】:要寻找的模式。默认解释为正则表达式,如 vignette(&…...
【SpringMVC】SpringMVC的请求与响应
文章目录 0. Tomcat环境的配置1. PostMan工具介绍创建WorkSpace建立新的请求 2. 请求映射路径案例结构与代码案例结构案例代码 案例存在问题解决方案方法方法升级版——配置请求路径前缀注解总结 3. Get请求与Post请求案例结构与案例代码案例结构案例代码 Get请求Post请求接收中…...
Spring Boot3通过GraalVM生成exe执行文件
一、安装GraalVM 1、官网:https://www.graalvm.org/downloads/ 2、配置环境变量 2.1、环境变量必须使用JAVA_HOME,否则会出现问题 2.2、在系统变量配置Path,%JAVA_HOME%\bin,注意必须放在顶部第一位 2.3、配置jdk的环境变量,在P…...

【Amazon 实验②】使用缓存策略及源请求策略,用于控制边缘缓存的行为及回源行为
文章目录 1. 了解缓存策略和源请求策略1.1 使用缓存键和缓存策略 实验:使用CloudFront缓存策略和缓存键控制缓存行为 接上一篇文章【Amazon 实验①】使用 Amazon CloudFront加速Web内容分发,我们现在了解和配置如何使用缓存策略及源请求策略,…...

达梦数据对比工具的部署与使用
1、拷贝达梦软件bin目录到Oracle服务器(root用户) 压缩Linux rh6 x86版本的达梦数据库bin目录,例如压缩文件为dmbin.tar.gz,将文件拷贝到Oracle服务器指定目录并解压(如:/home/oracle/dmbin)&a…...

TLC2543(12位A/D转换器)实现将输入的模拟电压显示到数码管上
代码: #include <reg51.h> #define uchar unsigned char #define uint unsigned int// 数码管0-9 unsigned char seg[] {0x3F, 0x06, 0x5B, 0x4F, 0x66, 0x6D, 0x7D, 0x07, 0x7F, 0x6F}; sbit SDO P1^0; sbit SDI P1^1; sbit CS P1^2; sbit CLK P1^3; s…...

npm的使用技巧
以下是一些NPM(Node Package Manager)的使用技巧: 1. **获取帮助**: - 使用 npm help 或者 npm <command> --help 可以获取关于特定命令的帮助信息。 2. **命令自动完成**: - 在 Bash、Zsh 等 shell 中&…...

MySQL 5.6的新特性
MySQL 5.6是一个主要的版本发布,它在性能、可伸缩性、可靠性和可用性方面引入了多项重要改进和新特性。它在2013年发布,相比于它的前身MySQL 5.5,MySQL 5.6带来了以下关键升级: 优化的InnoDB存储引擎:MySQL 5.6中的Inn…...

大模型重构云计算:AI原生或将改变格局
摘要:随着AI技术的快速发展,大模型正逐渐改变云计算的格局。本文将深入探讨大模型如何重构云计算,并分析其对云计算的影响。 一、开篇引言 近年来,人工智能技术的飞速发展,特别是大模型的崛起,正在对云计算…...

一文讲清什么是TypeScript装饰器以及如何使用TypeScript装饰器
TypeScript 装饰器是什么? 装饰器(Decorator)是TypeScript提供的一个高级语法,它类似于一种特殊类型的声明,可以附加到类声明,方法,访问符,属性或参数上。装饰器主要以函数的形式出…...
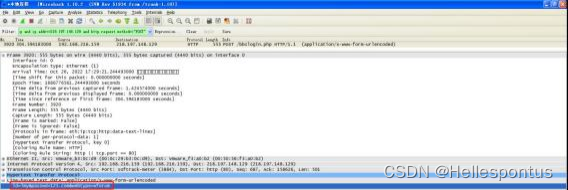
恶意软件样本行为分析——Process Monitor和Wireshark
1.1 实验名称 恶意软件样本行为分析 1.2 实验目的 1) 熟悉 Process Monitor 的使用 2) 熟悉抓包工具 Wireshark 的使用 3) VMware 的熟悉和使用 4) 灰鸽子木马的行为分析 1.3 实验步骤及内容 第一阶段:熟悉 Process Monitor 的使用 利用 Process …...
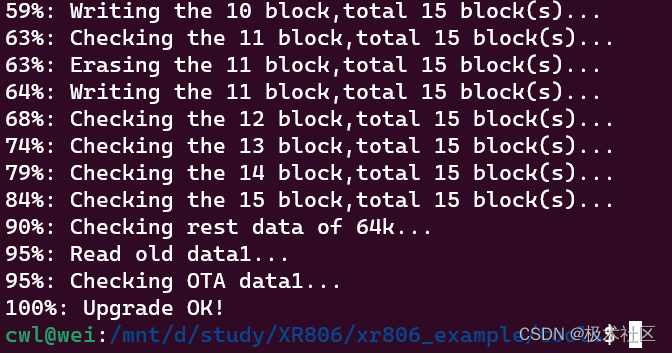
【XR806开发板试用】通过http请求从心知天气网获取天气预报信息
1. 开发环境搭建 本次评测开发环境搭建在windows11的WSL2的Ubuntu20.04中,关于windows安装WSL2可以参考文章: Windows下安装Linux(Ubuntu20.04)子系统(WSL) (1) 在WSL的Ubuntu20.04下安装必要的工具的. 安装git: sudo apt-get install git …...

NPM介绍与使用
什么是NPM? NPM(Node Package Manager)是一个强大的包管理工具,专门用于Node.js应用程序的依赖管理。它允许开发者轻松地分享、安装、更新和管理项目中使用的库、工具和框架。 NPM的安装 在使用NPM之前,请确保你的机…...

【零基础部署】Ollama 部署 Qwen2.5 保姆级教程
你是否想在本地运行大语言模型,但又被复杂的环境配置劝退?Ollama 是一款轻量级的本地大模型运行工具,只需一行命令即可部署。Qwen2.5 是阿里巴巴通义千问团队推出的强大开源模型,支持多种规格。本教程将手把手带你通过 Ollama 在 Ubuntu 上部署 Qwen2.5,从安装到 API 调用…...

从串行到以太网:SEMI E37 HSMS协议如何重塑半导体设备通信
1. 半导体设备通信的进化史:从串口到以太网 十年前我第一次接触半导体设备通信时,车间里密密麻麻的串口线让我印象深刻。每条产线上十几台设备,每台设备背后都拖着几根九针串口线,像蜘蛛网一样缠绕在一起。当时最头疼的就是排查通…...

2026最权威的五大AI辅助写作网站横评
Ai论文网站排名(开题报告、文献综述、降aigc率、降重综合对比) TOP1. 千笔AI TOP2. aipasspaper TOP3. 清北论文 TOP4. 豆包 TOP5. kimi TOP6. deepseek 人工智能领域学术输出里关键核心的载体当属 AI 毕业论文,其重要性明显易于理解。…...

云端AI控制机械臂:从视觉感知到运动规划的全栈实践
1. 项目概述:从“Clawd-Control”看AI驱动的机械臂控制新范式最近在GitHub上看到一个挺有意思的项目,叫“Temaki-AI/clawd-control”。光看名字,你可能会有点摸不着头脑——“Clawd”是什么?是“Claw”(爪子࿰…...

告别手动匹配:利用Allegro插件高效构建DDRx多负载等长约束
1. 多负载DDRx等长约束的痛点解析 每次面对4颗以上DDR芯片的PCB设计,工程师们最头疼的就是同步总线的等长约束设置。我做过一个8层板项目,上面挂了6颗DDR4颗粒,光是数据线就有72根,更不用说地址控制线了。手动设置等长组的时候&am…...

Android WMS实战:一个取巧的closeSystemDialogs,解决透明Activity横屏导致桌面布局错乱
Android WMS实战:巧用closeSystemDialogs解决透明Activity横屏导致的桌面布局错乱 在Android系统开发中,窗口管理服务(WindowManagerService,简称WMS)一直是开发者需要深入理解的核心模块。今天我们要探讨的是一个非常…...

Visual C++运行库全家桶:终极解决方案让你告别“DLL丢失“烦恼
Visual C运行库全家桶:终极解决方案让你告别"DLL丢失"烦恼 【免费下载链接】vcredist AIO Repack for latest Microsoft Visual C Redistributable Runtimes 项目地址: https://gitcode.com/gh_mirrors/vc/vcredist 你是否曾经遇到过这样的情况&am…...

不止同步:用群晖Docker+阿里云盘WebDAV,打造你的低成本异地备份方案
低成本数据容灾方案:群晖NAS与阿里云盘的深度整合实践 在数字化时代,数据安全已成为个人和小型工作室不可忽视的核心需求。传统备份方案往往面临成本高昂或操作复杂的困境——企业级云存储服务年费动辄上千元,而额外购置硬盘不仅需要前期投入…...

UVA10464 Big Big Real Numbers 题解
UVA10464 Big Big Real Numbers 题目描述 Link: https://uva.onlinejudge.org/index.php?optioncom_onlinejudge&Itemid8&category16&pageshow_problem&problem1405 PDF 输入格式 输出格式 输入输出样例 #1 输入 #1 8 1111.332 1123.1112 .223 9.8963 0.…...

RT-Thread Smart下基于74LV595的KSZ8081网卡复位与驱动移植实战
1. 硬件连接与复位逻辑解析 第一次拿到i.MX6ULL开发板时,我发现KSZ8081网卡的复位引脚竟然接在了74LV595芯片上,这和常见的直接连接GPIO的设计完全不同。这种设计虽然节省了GPIO资源,但给驱动开发带来了新挑战。 74LV595是典型的串行输入并行…...